Funkempfänger radio receiver récepteur radio - bei Berner Torantriebe
Funkempfänger radio receiver récepteur radio - bei Berner Torantriebe Funkempfänger radio receiver récepteur radio - bei Berner Torantriebe
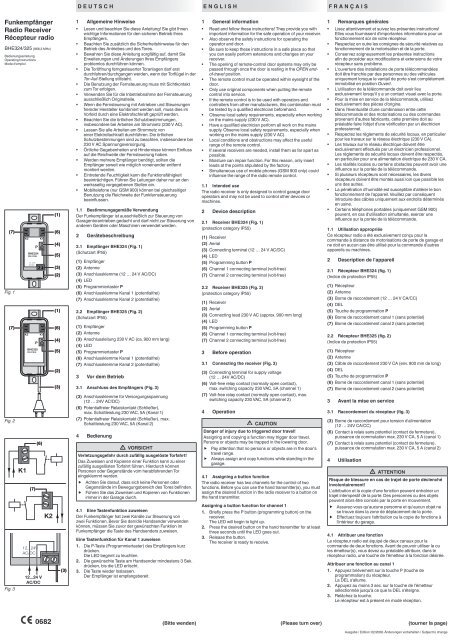
Funkempfänger radio receiver récepteur radio BHE324/325 (868,3 MHz) Bedienungsanleitung Operating Instructions Mode d‘emploi (7) Fig. 1 (7) Fig. 2 Fig. 3 K1 K2 K1 K2 12...24V AC/DC P BHE324 868,3 MHz BHE325 868,3 MHz (7) P 12...24V AC/DC K1 (6) 12...24 V AC/DC K2 0682 (1) (6) (4) (5) (3) (2) (1) (6) (4) (5) (2) (3) (3) 1 Allgemeine Hinweise • Lesen und beachten Sie diese Anleitung! Sie gibt Ihnen wichtige Informationen für den sicheren Betrieb Ihres Empfängers. • Beachten Sie zusätzlich die Sicherheitshinweise für den Betrieb des Antriebes und des Tores. • Bewahren Sie diese Anleitung sorgfältig auf, damit Sie Erweiterungen und Änderungen Ihres Empfängers problemlos durchführen können. • Die Toröffnung ferngesteuerter Toranlagen darf erst durchfahren/durchgangen werden, wenn der Torflügel in der Tor-Auf-Stellung stillsteht. • Die Benutzung der Fernsteuerung muss mit Sichtkontakt zum Tor erfolgen. • Verwenden Sie für die Inbetriebnahme der Fernsteuerung ausschließlich Originalteile. • Wenn die Fernsteuerung mit Antrieben und Steuerungen fremder Hersteller kombiniert werden soll, muss dies im Vorfeld durch eine Elektrofachkraft geprüft werden. • Beachten Sie die örtlichen Schutzbestimmungen, insbesondere bei Arbeiten am Stromnetz (230 V AC). • Lassen Sie alle Arbeiten am Stromnetz von einer Elektrofachkraft durchführen. Die örtlichen Schutzbestimmungen sind zu beachten, insbesondere bei 230 V AC Spannungsversorgung. • Örtliche Gegebenheiten und Hindernisse können Einfluss auf die Reichweite der Fernsteuerung haben. • Werden mehrere Empfänger benötigt, sollten die Empfänger soweit wie möglich voneinander entfernt montiert werden. • Eintretende Feuchtigkeit kann die Funktionsfähigkeit beeinträchtigen. Führen Sie Leitungen daher nur an den werksseitig vorgegebenen Stellen ein. • Mobiltelefone (nur GSM 900) können bei gleichzeitiger Benutzung die Reichweite der Funkfernsteuerung beeinflussen. 1.1 Bestimmungsgemäße Verwendung Der Funkempfänger ist ausschließlich zur Steuerung von Garagentorantrieben gedacht und darf nicht zur Steuerung von anderen Geräten oder Maschinen verwendet werden. 2 Gerätebeschreibung 2.1 Empfänger BHE324 (Fig. 1) (Schutzart IP55) (1) Empfänger (2) Antenne (3) Anschlussklemme (12 … 24 V AC/DC) (4) LED (5) Programmiertaster P (6) Anschlussklemme Kanal 1 (potentialfrei) (7) Anschlussklemme Kanal 2 (potentialfrei) 2.2 Empfänger BHE325 (Fig. 2) (Schutzart IP55) (1) Empfänger (2) Antenne (3) Anschlussleitung 230 V AC (ca. 900 mm lang) (4) LED (5) Programmiertaster P (6) Anschlussklemme Kanal 1 (potentialfrei) (7) Anschlussklemme Kanal 2 (potentialfrei) 3 Vor dem Betrieb 3.1 Anschluss des Empfängers (Fig. 3) (3) Anschlussklemme für Versorgungsspannung (12 … 24V AC/DC) (6) Potentialfreier Relaiskontakt (Schließer), max. Schaltleistung 230 VAC, 5A (Kanal 1) (7) Potentialfreier Relaiskontakt (Schließer), max. Schaltleistung 230 VAC, 5A (Kanal 2) 4 DEutscH Bedienung VorsicHt Verletzungsgefahr durch zufällig ausgelöste torfahrt! Das Zuweisen und Kopieren einer Funktion kann zu einer zufällig ausgelösten Torfahrt führen. Hierdurch können Personen oder Gegenstände vom herabfahrenden Tor eingeklemmt werden. f f Achten Sie darauf, dass sich keine Personen oder Gegenstände im Bewegungsbereich des Tores befinden. Führen Sie das Zuweisen und Kopieren von Funktionen immer in der Garage durch. 4.1 Eine tastenfunktion zuweisen Der Funkempfänger hat zwei Kanäle zur Steuerung von zwei Funktionen. Bevor Sie den/die Handsender verwenden können, müssen Sie zuvor der gewünschten Funktion im Funkempfänger die Taste des Handsenders zuweisen. Eine tastenfunktion für Kanal 1 zuweisen 1. Die P-Taste (Programmiertaster) des Empfängers kurz drücken. Die LED beginnt zu leuchten. 2. Die gewünschte Taste am Handsender mindestens 3 Sek. drücken, bis die LED erlischt. 3. Die Taste wieder loslassen. Der Empfänger ist empfangsbereit. (Bitte wenden) 1 General information • Read and follow these instructions! They provide you with important information for the safe operation of your receiver. • Also observe the safety instructions for operating the operator and door. • Be sure to keep these instructions in a safe place so that you can easily perform extensions and changes on your receiver. • The opening of remote-control door systems may only be passed through once the door is resting in the OPEN endof-travel position. • The remote control must be operated within eyesight of the door. • Only use original components when putting the remote control into service. • If the remote control is to be used with operators and controllers from other manufacturers, this combination must be tested by a qualified electrician beforehand. • Observe local safety requirements, especially when working on the mains supply (230 V AC). • Have a qualified electrician perform all work on the mains supply. Observe local safety requirements, especially when working on the mains supply (230 V AC). • Local conditions and obstructions may affect the useful range of the remote control. • If several receivers are needed, install them as far apart as possible. • Moisture can impair function. For this reason, only insert leads at the points stipulated by the factory. • Simultaneous use of mobile phones (GSM 900 only) could influence the range of the radio remote control. 1.1 intended use The radio receiver is only designed to control garage door operators and may not be used to control other devices or machines. 2 Device description 2.1 receiver BHE324 (Fig. 1) (protection category IP55) (1) Receiver (2) Aerial (3) Connecting terminal (12 … 24 V AC/DC) (4) LED (5) Programming button P (6) Channel 1 connecting terminal (volt-free) (7) Channel 2 connecting terminal (volt-free) 2.2 receiver BHE325 (Fig. 2) (protection category IP55) (1) Receiver (2) Aerial (3) Connecting lead 230 V AC (approx. 900 mm long) (4) LED (5) Programming button P (6) Channel 1 connecting terminal (volt-free) (7) Channel 2 connecting terminal (volt-free) 3 3.1 Before operation connecting the receiver (Fig. 3) (3) Connecting terminal for supply voltage (12 … 24V AC/DC) (6) Volt-free relay contact (normally open contact), max. switching capacity 230 VAC, 5A (channel 1) (7) Volt-free relay contact (normally open contact), max. switching capacity 230 VAC, 5A (channel 2) 4 EnGLisH FrAnÇAis operation cAution Danger of injury due to triggered door travel! Assigning and copying a function may trigger door travel. Persons or objects may be trapped in the lowering door. f f Pay attention that no persons or objects are in the door's travel range. Always assign and copy functions while standing in the garage. 4.1 Assigning a button function The radio receiver has two channels for the control of two functions. Before you can use the hand transmitter(s), you must assign the desired function in the radio receiver to a button on the hand transmitter. Assigning a button function for channel 1 1. Briefly press the P button (programming button) on the receiver. The LED will begin to light up. 2. Press the desired button on the hand transmitter for at least three seconds until the LED goes out. 3. Release the button. The receiver is ready to receive. (Please turn over) 1 • • • • • • • • • • • • • remarques générales Lisez attentivement et suivez les présentes instructions! Elles vous fournissent d'importantes informations pour un fonctionnement sûr de votre récepteur. Respectez en outre les consignes de sécurité relatives au fonctionnement de la motorisation et de la porte. Conservez soigneusement les présentes instructions afin de procéder aux modifications et extensions de votre récepteur sans problème. L'ouverture des installations de porte télécommandées doit être franchie par des personnes ou des véhicules uniquement lorsque le vantail de porte s'est complètement immobilisé en position Ouvert. L'utilisation de la télécommande doit avoir lieu exclusivement lorsqu'il y a un contact visuel avec la porte. Pour la mise en service de la télécommande, utilisez exclusivement des pièces d'origine. Dans l'éventualité d'une combinaison entre cette télécommande et des motorisations ou des commandes provenant d'autres fabricants, cette première doit au préalable faire l'objet d'une vérification par un électricien professionnel. Respectez les règlements de sécurité locaux, en particulier pour les travaux sur le réseau électrique (230 V CA). Les travaux sur le réseau électrique doivent être exclusivement effectués par un électricien professionnel. Les règlements de sécurité locaux doivent être respectés, en particulier pour une alimentation électrique de 230 V CA. Les réalités locales ou certains obstacles peuvent avoir une influence sur la portée de la télécommande. Si plusieurs récepteurs sont nécessaires, les divers récepteurs doivent être montés aussi loin que possible les uns des autres. La pénétration d'humidité est susceptible d'altérer le bon fonctionnement de l'appareil. Veuillez par conséquent introduire des câbles uniquement aux endroits déterminés en usine. Certains téléphones portables (uniquement GSM 900) peuvent, en cas d'utilisation simultanée, exercer une influence sur la portée de la télécommande. 1.1 utilisation appropriée Ce récepteur radio a été exclusivement conçu pour la commande à distance de motorisations de porte de garage et ne doit en aucun cas être utilisé pour la commande d’autres appareils ou machines. 2 Description de l'appareil 2.1 Récepteur BHE324 (fig. 1) (Indice de protection IP55) (1) Récepteur (2) Antenne (3) Borne de raccordement (12 … 24 V CA/CC) (4) DEL (5) Touche de programmation P (6) Borne de raccordement canal 1 (sans potentiel) (7) Borne de raccordement canal 2 (sans potentiel) 2.2 Récepteur BHE325 (fig. 2) (Indice de protection IP55) (1) Récepteur (2) Antenne (3) Câble de raccordement 230 V CA (env. 900 mm de long) (4) DEL (5) Touche de programmation P (6) Borne de raccordement canal 1 (sans potentiel) (7) Borne de raccordement canal 2 (sans potentiel) 3 3.1 Avant la mise en service Raccordement du récepteur (fig. 3) (3) Borne de raccordement pour tension d'alimentation (12 … 24V CA/CC) (6) Contact à relais sans potentiel (contact de fermeture), puissance de commutation max. 230 V CA, 5 A (canal 1) (7) Contact à relais sans potentiel (contact de fermeture), puissance de commutation max. 230 V CA, 5 A (canal 2) 4 utilisation AttEntion risque de blessure en cas de trajet de porte déclenché involontairement! L'attribution et la copie d'une fonction peuvent entraîner un trajet intempestif de la porte. Des personnes ou des objets peuvent alors être coincés par la porte en mouvement. f f Assurez-vous qu'aucune personne et qu'aucun objet ne se trouve dans la zone de déplacement de la porte. Effectuez toujours l'attribution ou la copie de fonctions à l'intérieur du garage. 4.1 Attribuer une fonction Le récepteur radio est équipé de deux canaux pour la commande de deux fonctions. Avant de pouvoir utiliser le ou les émetteur(s), vous devez au préalable attribuer, dans le récepteur radio, une touche de l'émetteur à la fonction désirée. Attribuer une fonction au canal 1 1. Appuyez brièvement sur la touche P (touche de programmation) du récepteur. La DEL s'allume. 2. Appuyez au moins 3 sec. sur la touche de l'émetteur sélectionnée jusqu'à ce que la DEL s'éteigne. 3. Relâchez la touche. Le récepteur est à présent en mode réception. (tourner la page) Ausgabe / Edition: 02/2008. Änderungen vorbehalten / Subject to change
- Page 2 and 3: 0682 Eine tastenfunktion für Kanal
- Page 4: 0682 Een toetsfunctie voor kanaal 2
<strong>Funkempfänger</strong><br />
<strong>radio</strong> <strong>receiver</strong><br />
<strong>récepteur</strong> <strong>radio</strong><br />
BHE324/325 (868,3 MHz)<br />
Bedienungsanleitung<br />
Operating Instructions<br />
Mode d‘emploi<br />
(7)<br />
Fig. 1<br />
(7)<br />
Fig. 2<br />
Fig. 3<br />
K1<br />
K2 K1<br />
K2<br />
12...24V<br />
AC/DC<br />
P<br />
BHE324<br />
868,3 MHz<br />
BHE325<br />
868,3 MHz<br />
(7)<br />
P<br />
12...24V<br />
AC/DC<br />
K1<br />
(6)<br />
12...24 V<br />
AC/DC<br />
K2<br />
0682<br />
(1)<br />
(6)<br />
(4)<br />
(5)<br />
(3)<br />
(2)<br />
(1)<br />
(6)<br />
(4)<br />
(5)<br />
(2)<br />
(3)<br />
(3)<br />
1<br />
Allgemeine Hinweise<br />
• Lesen und beachten Sie diese Anleitung! Sie gibt Ihnen<br />
wichtige Informationen für den sicheren Betrieb Ihres<br />
Empfängers.<br />
• Beachten Sie zusätzlich die Sicherheitshinweise für den<br />
Betrieb des Antriebes und des Tores.<br />
• Bewahren Sie diese Anleitung sorgfältig auf, damit Sie<br />
Erweiterungen und Änderungen Ihres Empfängers<br />
problemlos durchführen können.<br />
• Die Toröffnung<br />
ferngesteuerter Toranlagen darf erst<br />
durchfahren/durchgangen werden, wenn der Torflügel in der<br />
Tor-Auf-Stellung stillsteht.<br />
• Die Benutzung der Fernsteuerung muss mit Sichtkontakt<br />
zum Tor erfolgen.<br />
• Verwenden Sie für<br />
die Inbetriebnahme der Fernsteuerung<br />
ausschließlich Originalteile.<br />
• Wenn die Fernsteuerung mit Antrieben und Steuerungen<br />
fremder Hersteller kombiniert werden soll, muss dies im<br />
Vorfeld durch eine Elektrofachkraft geprüft werden.<br />
• Beachten Sie die örtlichen Schutzbestimmungen,<br />
insbesondere <strong>bei</strong> Ar<strong>bei</strong>ten am Stromnetz (230 V AC).<br />
• Lassen Sie alle Ar<strong>bei</strong>ten am Stromnetz von<br />
einer Elektrofachkraft durchführen. Die örtlichen<br />
Schutzbestimmungen sind zu beachten, insbesondere <strong>bei</strong><br />
230 V AC Spannungsversorgung.<br />
• Örtliche Gegebenheiten und Hindernisse können Einfluss<br />
auf die Reichweite der Fernsteuerung haben.<br />
• Werden mehrere Empfänger benötigt, sollten die<br />
Empfänger soweit wie möglich voneinander entfernt<br />
montiert werden.<br />
• Eintretende Feuchtigkeit kann die Funktionsfähigkeit<br />
beeinträchtigen. Führen Sie Leitungen daher nur an den<br />
werksseitig vorgegebenen Stellen ein.<br />
• Mobiltelefone (nur GSM 900) können <strong>bei</strong> gleichzeitiger<br />
Benutzung die Reichweite der Funkfernsteuerung<br />
beeinflussen.<br />
1.1 Bestimmungsgemäße Verwendung<br />
Der <strong>Funkempfänger</strong> ist ausschließlich zur Steuerung von<br />
Garagentorantrieben gedacht und darf nicht zur Steuerung von<br />
anderen Geräten oder Maschinen verwendet werden.<br />
2<br />
Gerätebeschreibung<br />
2.1 Empfänger BHE324 (Fig. 1)<br />
(Schutzart IP55)<br />
(1) Empfänger<br />
(2) Antenne<br />
(3) Anschlussklemme (12 … 24 V AC/DC)<br />
(4) LED<br />
(5) Programmiertaster P<br />
(6) Anschlussklemme Kanal 1 (potentialfrei)<br />
(7) Anschlussklemme Kanal 2 (potentialfrei)<br />
2.2 Empfänger BHE325 (Fig. 2)<br />
(Schutzart IP55)<br />
(1) Empfänger<br />
(2) Antenne<br />
(3) Anschlussleitung 230 V AC (ca. 900 mm lang)<br />
(4) LED<br />
(5) Programmiertaster P<br />
(6) Anschlussklemme Kanal 1 (potentialfrei)<br />
(7) Anschlussklemme Kanal 2 (potentialfrei)<br />
3<br />
Vor dem Betrieb<br />
3.1 Anschluss des Empfängers (Fig. 3)<br />
(3) Anschlussklemme für Versorgungsspannung<br />
(12 … 24V AC/DC)<br />
(6) Potentialfreier Relaiskontakt (Schließer),<br />
max. Schaltleistung 230 VAC, 5A (Kanal 1)<br />
(7) Potentialfreier Relaiskontakt (Schließer), max.<br />
Schaltleistung 230 VAC, 5A (Kanal 2)<br />
4<br />
DEutscH<br />
Bedienung<br />
VorsicHt<br />
Verletzungsgefahr durch zufällig ausgelöste torfahrt!<br />
Das Zuweisen und Kopieren einer Funktion kann zu einer<br />
zufällig ausgelösten Torfahrt führen. Hierdurch können<br />
Personen oder Gegenstände vom herabfahrenden Tor<br />
eingeklemmt werden.<br />
f<br />
f<br />
Achten Sie darauf, dass sich keine Personen oder<br />
Gegenstände im Bewegungsbereich des Tores befinden.<br />
Führen Sie das Zuweisen und Kopieren von Funktionen<br />
immer in der Garage durch.<br />
4.1 Eine tastenfunktion zuweisen<br />
Der <strong>Funkempfänger</strong> hat zwei Kanäle zur Steuerung von<br />
zwei Funktionen. Bevor Sie den/die Handsender verwenden<br />
können, müssen Sie zuvor der gewünschten Funktion im<br />
<strong>Funkempfänger</strong> die Taste des Handsenders zuweisen.<br />
Eine tastenfunktion für Kanal 1 zuweisen<br />
1. Die P-Taste (Programmiertaster) des Empfängers kurz<br />
drücken.<br />
Die LED beginnt zu leuchten.<br />
2. Die gewünschte Taste am Handsender mindestens 3 Sek.<br />
drücken, bis die LED erlischt.<br />
3. Die Taste wieder loslassen.<br />
Der Empfänger ist empfangsbereit.<br />
(Bitte wenden)<br />
1<br />
General information<br />
• Read and follow these instructions! They provide you with<br />
important information for the safe operation of your <strong>receiver</strong>.<br />
• Also observe the safety instructions for operating the<br />
operator and door.<br />
• Be sure to keep these instructions in a safe place so that<br />
you can easily perform extensions and changes on your<br />
<strong>receiver</strong>.<br />
• The opening of remote-control door systems may only be<br />
passed through once the door is resting in the OPEN endof-travel<br />
position.<br />
• The remote control must be operated within eyesight of the<br />
door.<br />
• Only use original components when putting the remote<br />
control into service.<br />
• If the remote control is to be used with operators and<br />
controllers from other manufacturers, this combination must<br />
be tested by a qualified electrician beforehand.<br />
• Observe local safety requirements, especially when working<br />
on the mains supply (230 V AC).<br />
• Have a qualified electrician perform all work on the mains<br />
supply. Observe local safety requirements, especially when<br />
working on the mains supply (230 V AC).<br />
• Local conditions and obstructions may affect the useful<br />
range of the remote control.<br />
• If several <strong>receiver</strong>s are needed, install them as far apart as<br />
possible.<br />
• Moisture can impair function. For this reason, only insert<br />
leads at the points stipulated by the factory.<br />
• Simultaneous use of mobile phones (GSM 900 only) could<br />
influence the range of the <strong>radio</strong> remote control.<br />
1.1 intended use<br />
The <strong>radio</strong> <strong>receiver</strong> is only designed to control garage door<br />
operators and may not be used to control other devices or<br />
machines.<br />
2<br />
Device description<br />
2.1 <strong>receiver</strong> BHE324 (Fig. 1)<br />
(protection category IP55)<br />
(1) Receiver<br />
(2) Aerial<br />
(3) Connecting terminal (12 … 24 V AC/DC)<br />
(4) LED<br />
(5) Programming button P<br />
(6) Channel 1 connecting terminal (volt-free)<br />
(7) Channel 2 connecting terminal (volt-free)<br />
2.2 <strong>receiver</strong> BHE325 (Fig. 2)<br />
(protection category IP55)<br />
(1) Receiver<br />
(2) Aerial<br />
(3) Connecting lead 230 V AC (approx. 900 mm long)<br />
(4) LED<br />
(5) Programming button P<br />
(6) Channel 1 connecting terminal (volt-free)<br />
(7) Channel 2 connecting terminal (volt-free)<br />
3<br />
3.1<br />
Before operation<br />
connecting the <strong>receiver</strong> (Fig. 3)<br />
(3) Connecting terminal for supply voltage<br />
(12 … 24V AC/DC)<br />
(6) Volt-free relay contact (normally open contact),<br />
max. switching capacity 230 VAC, 5A (channel 1)<br />
(7) Volt-free relay contact (normally open contact), max.<br />
switching capacity 230 VAC, 5A (channel 2)<br />
4<br />
EnGLisH FrAnÇAis<br />
operation<br />
cAution<br />
Danger of injury due to triggered door travel!<br />
Assigning and copying a function may trigger door travel.<br />
Persons or objects may be trapped in the lowering door.<br />
f<br />
f<br />
Pay attention that no persons or objects are in the door's<br />
travel range.<br />
Always assign and copy functions while standing in the<br />
garage.<br />
4.1 Assigning a button function<br />
The <strong>radio</strong> <strong>receiver</strong> has two channels for the control of two<br />
functions. Before you can use the hand transmitter(s), you must<br />
assign the desired function in the <strong>radio</strong> <strong>receiver</strong> to a button on<br />
the hand transmitter.<br />
Assigning a button function for channel 1<br />
1. Briefly press the P button (programming button) on the<br />
<strong>receiver</strong>.<br />
The LED will begin to light up.<br />
2. Press the desired button on the hand transmitter for at least<br />
three seconds until the LED goes out.<br />
3. Release the button.<br />
The <strong>receiver</strong> is ready to receive.<br />
(Please turn over)<br />
1<br />
•<br />
•<br />
•<br />
•<br />
•<br />
•<br />
•<br />
•<br />
•<br />
•<br />
•<br />
•<br />
•<br />
remarques générales<br />
Lisez attentivement et suivez les présentes instructions!<br />
Elles vous fournissent d'importantes informations pour un<br />
fonctionnement sûr de votre <strong>récepteur</strong>.<br />
Respectez en outre les consignes de sécurité relatives au<br />
fonctionnement de la motorisation et de la porte.<br />
Conservez soigneusement les présentes instructions<br />
afin de procéder aux modifications et extensions de votre<br />
<strong>récepteur</strong> sans problème.<br />
L'ouverture des installations de porte télécommandées<br />
doit être franchie par des personnes ou des véhicules<br />
uniquement lorsque le vantail de porte s'est complètement<br />
immobilisé en position Ouvert.<br />
L'utilisation de la télécommande doit avoir lieu<br />
exclusivement lorsqu'il y a un contact visuel avec la porte.<br />
Pour la mise en service de la télécommande, utilisez<br />
exclusivement des pièces d'origine.<br />
Dans l'éventualité d'une combinaison entre cette<br />
télécommande et des motorisations ou des commandes<br />
provenant d'autres fabricants, cette première doit au<br />
préalable faire l'objet d'une vérification par un électricien<br />
professionnel.<br />
Respectez les règlements de sécurité locaux, en particulier<br />
pour les travaux sur le réseau électrique (230 V CA).<br />
Les travaux sur le réseau électrique doivent être<br />
exclusivement effectués par un électricien professionnel.<br />
Les règlements de sécurité locaux doivent être respectés,<br />
en particulier pour une alimentation électrique de 230 V CA.<br />
Les réalités locales ou certains obstacles peuvent avoir une<br />
influence sur la portée de la télécommande.<br />
Si plusieurs <strong>récepteur</strong>s sont nécessaires, les divers<br />
<strong>récepteur</strong>s doivent être montés aussi loin que possible les<br />
uns des autres.<br />
La pénétration d'humidité est susceptible d'altérer le bon<br />
fonctionnement de l'appareil. Veuillez par conséquent<br />
introduire des câbles uniquement aux endroits déterminés<br />
en usine.<br />
Certains téléphones portables (uniquement GSM 900)<br />
peuvent, en cas d'utilisation simultanée, exercer une<br />
influence sur la portée de la télécommande.<br />
1.1 utilisation appropriée<br />
Ce <strong>récepteur</strong> <strong>radio</strong> a été exclusivement conçu pour la<br />
commande à distance de motorisations de porte de garage et<br />
ne doit en aucun cas être utilisé pour la commande d’autres<br />
appareils ou machines.<br />
2<br />
Description de l'appareil<br />
2.1 Récepteur BHE324 (fig. 1)<br />
(Indice de protection IP55)<br />
(1) Récepteur<br />
(2) Antenne<br />
(3) Borne de raccordement (12 … 24 V CA/CC)<br />
(4) DEL<br />
(5) Touche de programmation P<br />
(6) Borne de raccordement canal 1 (sans potentiel)<br />
(7) Borne de raccordement canal 2 (sans potentiel)<br />
2.2 Récepteur BHE325 (fig. 2)<br />
(Indice de protection IP55)<br />
(1) Récepteur<br />
(2) Antenne<br />
(3) Câble de raccordement 230 V CA (env. 900 mm de long)<br />
(4) DEL<br />
(5) Touche de programmation P<br />
(6) Borne de raccordement canal 1 (sans potentiel)<br />
(7) Borne de raccordement canal 2 (sans potentiel)<br />
3<br />
3.1<br />
Avant la mise en service<br />
Raccordement du <strong>récepteur</strong> (fig. 3)<br />
(3) Borne de raccordement pour tension d'alimentation<br />
(12 … 24V CA/CC)<br />
(6) Contact à relais sans potentiel (contact de fermeture),<br />
puissance de commutation max. 230 V CA, 5 A (canal 1)<br />
(7) Contact à relais sans potentiel (contact de fermeture),<br />
puissance de commutation max. 230 V CA, 5 A (canal 2)<br />
4<br />
utilisation<br />
AttEntion<br />
risque de blessure en cas de trajet de porte déclenché<br />
involontairement!<br />
L'attribution et la copie d'une fonction peuvent entraîner un<br />
trajet intempestif de la porte. Des personnes ou des objets<br />
peuvent alors être coincés par la porte en mouvement.<br />
f<br />
f<br />
Assurez-vous qu'aucune personne et qu'aucun objet ne<br />
se trouve dans la zone de déplacement de la porte.<br />
Effectuez toujours l'attribution ou la copie de fonctions à<br />
l'intérieur du garage.<br />
4.1 Attribuer une fonction<br />
Le <strong>récepteur</strong> <strong>radio</strong> est équipé de deux canaux pour la<br />
commande de deux fonctions. Avant de pouvoir utiliser le ou<br />
les émetteur(s), vous devez au préalable attribuer, dans le<br />
<strong>récepteur</strong> <strong>radio</strong>, une touche de l'émetteur à la fonction désirée.<br />
Attribuer une fonction au canal 1<br />
1. Appuyez brièvement sur la touche P (touche de<br />
programmation) du <strong>récepteur</strong>.<br />
La DEL s'allume.<br />
2. Appuyez au moins 3 sec. sur la touche de l'émetteur<br />
sélectionnée jusqu'à ce que la DEL s'éteigne.<br />
3. Relâchez la touche.<br />
Le <strong>récepteur</strong> est à présent en mode réception.<br />
(tourner la page)<br />
Ausgabe / Edition: 02/2008. Änderungen vorbehalten / Subject to change
0682<br />
Eine tastenfunktion für Kanal 2 zuweisen<br />
1. Die P-Taste (Programmiertaster) des Empfängers kurz<br />
drücken.<br />
Die LED beginnt zu leuchten.<br />
2. Die P-Taste nochmals drücken.<br />
Die LED erlischt kurz und leuchtet anschließend wieder.<br />
3. Die gewünschte Taste am Handsender mindestens 3 Sek.<br />
drücken, bis die LED erlischt.<br />
Die blaue LED blinkt.<br />
4. Die Taste wieder loslassen und den Blinkvorgang abwarten.<br />
Nach dem Blinkvorgang ist der Empfänger empfangsbereit.<br />
Programmierung überprüfen<br />
f Drücken Sie die programmierte Taste des Senders.<br />
Der Befehl wird ausgelöst.<br />
Hinweis:<br />
Der Abstand zwischen Sender und Empfänger muss<br />
mindestens 1 m betragen.<br />
Sollte der Handsender nicht funktionieren, versuchen Sie<br />
erneut, dem Kanal eine Tastenfunktion zuzuweisen.<br />
4.3<br />
Den Auslieferungszustand wieder herstellen<br />
1. Die P-Taste des Empfängers drücken und für ca. 10 Sek.<br />
gedrückt halten.<br />
Die LED blinkt.<br />
2. Das Ende des Blinkvorgangs abwarten und dann die Taste<br />
loslassen.<br />
Hinweis:<br />
Das Löschen einzelner Handsender ist nicht möglich.<br />
5<br />
•<br />
DEutscH<br />
technische Daten und Zusatzinformationen<br />
Zulässige Umgebungstemperatur –20˚C bis +60˚C<br />
Max. Speicherplätze je Kanal 50 Handsendercodes<br />
Werden mehr als 50 Handsendercodes eingelernt, werden<br />
die zuerst programmierten Codes gelöscht.<br />
6 EG-Konformitätserklärung<br />
Der Empfänger BHE324 bzw. BHE325 entspricht aufgrund<br />
seiner Konzipierung und Bauart in der von uns in Verkehr<br />
gebrachten Ausführung den einschlägigen grundlegenden<br />
Anforderungen der R&TTE-Richtlinie 1995/5/EG, Artikel 3.<br />
Angewandte Normen: EN 301 489, EN 300 220.<br />
Rottenburg, den 29.2.2008 Hersteller:<br />
<strong>Berner</strong> <strong>Torantriebe</strong> KG,<br />
Graf-Bentzel-Straße 68,<br />
D-72108 Rottenburg<br />
Jürgen Ruppel, Geschäftsführer<br />
Assigning a button function for channel 2<br />
1. Briefly press the P button (programming button) on the<br />
<strong>receiver</strong>.<br />
The LED will begin to light up.<br />
2. Press the P button again.<br />
The LED will go out and then light up again.<br />
3. Press the desired button on the hand transmitter for at least<br />
three seconds until the LED goes out.<br />
The blue LED will flash.<br />
4. Release the button and wait for the flashing procedure.<br />
5. The <strong>receiver</strong> is ready to receive after the flashing procedure.<br />
checking programming<br />
f Press the programmed button on the transmitter.<br />
The command will be given.<br />
note:<br />
There must be a distance of at least 1 m between the<br />
transmitter and the <strong>receiver</strong>.<br />
If the hand transmitter does not work, try to assign a button<br />
function to the channel again.<br />
4.2 Den Programmiervorgang abbrechen<br />
4.2 cancelling the programming procedure<br />
•<br />
•<br />
Wenn 60 Sek. nach dem Drücken der P-Taste keine<br />
Programmierung erfolgt, erlischt die LED des Empfängers.<br />
Wenn die P-Taste 3-mal hintereinander betätigt wird, erlischt<br />
die LED des Empfängers und der Programmiervorgang wird<br />
abgebrochen.<br />
•<br />
•<br />
If no programming is performed within 60 seconds after the<br />
P button is pressed, the <strong>receiver</strong>'s LED will go out.<br />
If you press the P button three times in a row, the <strong>receiver</strong>'s<br />
LED will go out and the programming procedure will be<br />
cancelled.<br />
4.3<br />
restoring the delivery condition<br />
1. Press the P button on the <strong>receiver</strong> for approx. 10 seconds.<br />
The LED will flash.<br />
2. Wait until the flashing stops, and release the button.<br />
All taught-in hand transmitters are now deleted.<br />
note:<br />
It is not possible to delete individual hand transmitters.<br />
5<br />
•<br />
6<br />
EnGLisH FrAnÇAis<br />
technical data and additional information<br />
Permissible ambient temperature –20˚C - +60˚C<br />
Max. memory locations per channel 50 hand transmitter<br />
codes<br />
If more than 50 hand transmitter codes have been taught,<br />
the codes that were programmed first will be deleted.<br />
Ec Declaration of conformity<br />
Due to the conception and design of the versions marketed<br />
by us, the <strong>receiver</strong>s BHE324 and BHE325 conform to the<br />
respective essential requirements of the R&TTE directive<br />
1995/5/EG, article 3.<br />
Applied standards: EN 301 489, EN 300 220.<br />
Rottenburg, 29/02/2008 Manufacturer:<br />
<strong>Berner</strong> <strong>Torantriebe</strong> KG,<br />
Graf-Bentzel-Straße 68,<br />
D-72108 Rottenburg<br />
Jürgen Ruppel, Managing<br />
Director<br />
Attribuer une fonction au canal 2<br />
1. Appuyez brièvement sur la touche P (touche de<br />
programmation) du <strong>récepteur</strong>.<br />
La DEL s'allume.<br />
2. Appuyez à nouveau sur la touche P.<br />
La DEL s'éteint brièvement, puis s'allume à nouveau.<br />
3. Appuyez au moins 3 sec. sur la touche de l'émetteur<br />
sélectionnée jusqu'à ce que la DEL s'éteigne.<br />
La DEL bleue clignote.<br />
4. Relâchez à nouveau la touche et attendez que l'appareil<br />
clignote.<br />
5. Une fois le processus de clignotement achevé, le <strong>récepteur</strong><br />
se trouve en mode de réception.<br />
Vérifier la programmation<br />
f Appuyez sur la touche de l'émetteur programmée.<br />
La commande est déclenchée.<br />
remarque:<br />
Lors de l‘attribution d‘une fonction, la distance entre l‘émetteur<br />
et le <strong>récepteur</strong> doit être d‘au moins 1 mètre.<br />
Si l‘émetteur ne fonctionne pas, essayez d‘attribuer à nouveau<br />
une fonction au canal.<br />
4.2<br />
•<br />
•<br />
4.3<br />
interruption de la procédure de programmation<br />
Si aucune programmation n'est effectuée dans les 60 sec.<br />
suivant la pression sur la touche P, la DEL du <strong>récepteur</strong><br />
s'éteint.<br />
Si la touche P est actionnée 3 fois de suite, la DEL du<br />
<strong>récepteur</strong> s'éteint et la procédure de programmation est<br />
interrompue.<br />
rétablir l’état à la livraison<br />
1. Appuyez de façon ininterrompue environ10 sec. sur la<br />
touche P du <strong>récepteur</strong>.<br />
La DEL clignote.<br />
2. Attendez que l'appareil clignote et relâchez à nouveau a<br />
Attendez la fin du processus de clignotement puis relâchez<br />
la touche.<br />
remarque:<br />
Il est impossible de réinitialiser des émetteurs séparément.<br />
5<br />
•<br />
Données techniques et informations<br />
complémentaires<br />
Température ambiante autorisée DE -20˚C à +60˚C<br />
Emplacement mémoire max. par<br />
canal<br />
6<br />
50 codes d'émetteur<br />
Si plus de 50 codes d'émetteur sont enseignés, le code<br />
ayant été programmé le premier est supprimé.<br />
Déclaration de conformité cE<br />
Sur le plan de la conception, de la construction et de l'exécution<br />
que nous commercialisons, les émetteurs BHS324 et BHS325<br />
satisfont aux exigences fondamentales correspondant à l'Art. 3<br />
de la directive R&TTE 1995/5/CE.<br />
Normes apparentées et connexes: EN 301 489, EN 300 220.<br />
Rottenburg, le 29.2.2008 Fabricant:<br />
<strong>Berner</strong> <strong>Torantriebe</strong> KG,<br />
Graf-Bentzel-Straße 68,<br />
D-72108 Rottenburg<br />
Jürgen Ruppel, Directeur<br />
Ausgabe / Edition: 04/2008. Änderungen vorbehalten / Subject to change
Radio-ontvanger<br />
Receptor de <strong>radio</strong><br />
Radioricevitore<br />
BHE324/325 (868,3 MHz)<br />
Gebruiksaanwijzing<br />
Instrucciones de servicio<br />
Istruzioni d‘uso<br />
(7)<br />
Fig. 1<br />
(7)<br />
Fig. 2<br />
Fig. 3<br />
K1<br />
K2 K1<br />
K2<br />
12...24V<br />
AC/DC<br />
P<br />
BHE324<br />
868,3 MHz<br />
BHE325<br />
868,3 MHz<br />
(7)<br />
P<br />
12...24V<br />
AC/DC<br />
K1<br />
(6)<br />
12...24 V<br />
AC/DC<br />
K2<br />
0682<br />
(1)<br />
(6)<br />
(4)<br />
(5)<br />
(3)<br />
(2)<br />
(1)<br />
(6)<br />
(4)<br />
(5)<br />
(2)<br />
(3)<br />
(3)<br />
1<br />
•<br />
•<br />
•<br />
•<br />
•<br />
•<br />
•<br />
•<br />
•<br />
•<br />
•<br />
•<br />
•<br />
Algemene opmerkingen<br />
Deze handleiding lezen en in acht nemen! Zij geeft u<br />
belangrijke informatie voor de veilige werking van uw<br />
ontvanger.<br />
Gelieve ook de veiligheidsverwijzingen in acht te nemen<br />
voor de werking van de aandrijving en de garagedeur.<br />
Bewaar deze handleiding zorgvuldig, opdat u probleemloos<br />
uitbreidingen en wijzigingen van uw ontvanger kan<br />
doorvoeren.<br />
Men mag pas door de deuropening van afstandsbestuurde<br />
deurinstallaties rijden/gaan, als het deurblad in de positie<br />
Open stilstaat.<br />
De afstandsbesturing mag alleen gebruikt worden wanneer<br />
men de garagedeur kan zien.<br />
Gebruik voor de inbedrijfname van de afstandsbesturing<br />
uitsluitend originele onderdelen.<br />
Als de afstandsbesturing moet worden gecombineerd met<br />
aandrijvingen en besturingen van vreemd fabrikaat, moet<br />
dat vooraf door een elektricien gecontroleerd worden.<br />
Houd rekening met de plaatselijke veiligheidsvoorschriften,<br />
in het bijzonder bij werkzaamheden aan het stroomnet<br />
(230 V AC).<br />
Laat alle werkzaamheden aan het stroomnet uitvoeren door<br />
een elektricien. De plaatselijke veiligheidsvoorschriften<br />
moeten in acht genomen worden, in het bijzonder bij 230 V<br />
AC spanningsvoorziening.<br />
De lokale omstandigheden en hindernissen kunnen het<br />
zendbereik van de afstandsbesturing beïnvloeden.<br />
Als meerdere ontvangers gebruikt worden moeten deze zo<br />
ver mogelijk van elkaar gemonteerd worden.<br />
Binnentredend vocht kan de goede werking schaden. Sluit<br />
daarom enkel leidingen aan op de plaatsen, aangegeven<br />
door de fabriek.<br />
Gsm-toestellen (alleen gsm 900) kunnen bij gelijktijdig<br />
gebruik het zendbereik van de afstandsbesturing<br />
beïnvloeden.<br />
1.1 Gebruik voor de beoogde bestemming<br />
De <strong>radio</strong>-ontvanger is uitsluitend bedoeld voor de besturing van<br />
garagedeuraandrijvingen. Hij mag niet gebruikt worden voor de<br />
besturing van andere toestellen of machines.<br />
2<br />
Beschrijving van het toestel<br />
2.1 Ontvanger BHE324 (fig. 1)<br />
(beveiligingstype IP55)<br />
(1) Ontvanger<br />
(2) Antenne<br />
(3) Aansluitingsklem (12 … 24 V AC/DC)<br />
(4) led<br />
(5) Programmeertoets P<br />
(6) Aansluitklem kanaal 1 (potentiaalvrij)<br />
(7) Aansluitklem kanaal 2 (potentiaalvrij)<br />
2.2 Ontvanger BHE325 (fig. 2)<br />
(beveiligingstype IP55)<br />
(1) Ontvanger<br />
(2) Antenne<br />
(3) Aansluitingskabel 230 V AC (ca. 900 mm lang)<br />
(4) led<br />
(5) Programmeertoets P<br />
(6) Aansluitklem kanaal 1 (potentiaalvrij)<br />
(7) Aansluitklem kanaal 2 (potentiaalvrij)<br />
3<br />
3.1<br />
Vóór het gebruik<br />
Aansluiting van de ontvanger (fig. 3)<br />
(3) Aansluitklem voor toevoerspanning<br />
(12 … 24V AC/DC)<br />
(6) Potentiaalvrij relaiscontact (sluiter),<br />
max. schakelvermogen 230 VAC, 5A (kanaal 1)<br />
(7) Potentiaalvrij relaiscontact (sluiter), max. schakelvermogen<br />
230 VAC, 5A (kanaal 2)<br />
4<br />
nEDERlAnDS<br />
Bediening<br />
VooRzichtiG<br />
Gevaar voor letsels door toevallig geactiveerde<br />
deurbeweging!<br />
Het toewijzen en kopiëren van een functie kan een toevallig<br />
geactiveerde deurbeweging veroorzaken. Hierdoor kunnen<br />
personen of voorwerpen onder de neerkomende deur<br />
geklemd worden.<br />
f<br />
f<br />
Let erop dat er zich geen personen of voorwerpen binnen<br />
de bewegingsradius van de garagedeur bevinden.<br />
Het toewijzen en kopiëren van functies steeds in de<br />
garage uitvoeren.<br />
4.1 Een toetsfunctie toewijzen<br />
De <strong>radio</strong>-ontvanger heeft twee kanalen voor de besturing van<br />
twee functies. Voor u de handzender(s) kunt gebruiken, moet u<br />
eerst de toets van de handzender toewijzen aan de gewenste<br />
functie van de ontvanger.<br />
Een toetsfunctie voor kanaal 1 toewijzen<br />
1. De P-toets (programmeertoets) van de ontvanger kort<br />
indrukken.<br />
De led begint op te lichten.<br />
2. De gewenste toets van de handzender minstens 3 sec.<br />
indrukken, tot de led uitdooft.<br />
3. De toets weer loslaten.<br />
De onvanger is klaar voor ontvangst.<br />
(Omdraaien a.u.b.)<br />
1<br />
•<br />
•<br />
•<br />
•<br />
•<br />
•<br />
•<br />
•<br />
•<br />
•<br />
•<br />
•<br />
•<br />
indicaciones generales<br />
Lea y tenga en cuenta estas instrucciones. Le proprocionan<br />
información importante acerca del manejo seguro de su<br />
receptor.<br />
Tenga en cuenta asimismo las indicaciones de seguridad<br />
para el funcionamiento del automatismo y de la puerta.<br />
Conserve estas instrucciones cuidadosamente, para<br />
que pueda realizar ampliaciones y modificaciones en su<br />
receptor sin problemas.<br />
No debe pasarse por la apertura de las instalaciones de<br />
puerta controladas a distancia hasta que la hoja de la<br />
puerta se detenga en la posición PUERTA ABIERTA.<br />
Solamente debe usarse el mando a distancia si la puerta<br />
está al alcance de la vista.<br />
Utilice piezas originales para la puesta en marcha del<br />
mando a distancia.<br />
Si se pretende combinar el mando a distancia con<br />
automatismos y cuadros de maniobra de otros fabricantes,<br />
deberá comprobarse previamente por un electricista.<br />
Tenga en cuenta las disposiciones de seguridad locales,<br />
sobre todo al realizar trabajos en la red (230 V AC).<br />
Encargue todos los trabajos en la red de corriente a un<br />
electricista. Deben tenerse en cuenta las disposiciones de<br />
seguridad locales, sobre todo en caso de una alimentación<br />
de corriente de 230 V AC.<br />
Las condiciones locales y los obstáculos pueden influir<br />
sobre el alcance del mando a distancia.<br />
Si se requieren varios receptores, éstos deben instalarse a<br />
la mayor distancia posible el uno del otro.<br />
La entrada de humedad puede afectar el funcionamiento.<br />
Por este motivo solamente tienda los cables en los lugares<br />
fijados de fábrica.<br />
Si se usan simultáneamente teléfonos móviles (sólo<br />
GSM 900), éstos pueden afectar el alcance del mando a<br />
distancia por <strong>radio</strong>.<br />
1.1 Uso apropiado<br />
El receptor por <strong>radio</strong> está destinado exclusivamente al manejo<br />
de automatismos de puertas de garaje y no debe emplearse<br />
para el manejo de otros dispositivos o máquinas.<br />
2<br />
Descripción del aparato<br />
2.1 Receptor BHE324 (fig. 1)<br />
(Índice de protección IP55)<br />
(1) Receptor<br />
(2) Antena<br />
(3) Borne de conexión (12 … 24 V AC/DC)<br />
(4) LED<br />
(5) Pulsador de programación P<br />
(6) Borne de conexión para canal 1 (libre de potencial)<br />
(7) Borne de conexión para canal 2 (libre de potencial)<br />
2.2 Receptor BHE325 (fig. 2)<br />
(Índice de protección IP55)<br />
(1) Receptor<br />
(2) Antena<br />
(3) Cable de alimentación 230 V AC (aprox. 900 mm de largo)<br />
(4) LED<br />
(5) Pulsador de programación P<br />
(6) Borne de conexión para canal 1 (libre de potencial)<br />
(7) Borne de conexión para canal 2 (libre de potencial)<br />
3<br />
3.1<br />
Antes de la puesta en marcha<br />
Conexión del receptor (fig. 3)<br />
(3) Borne de conexión para corriente de alimentación<br />
(12 … 24V AC/DC)<br />
(6) Contacto de relé libre de potencial (cierre),<br />
rendimiento de conmutación máx. 230 VAC, 5A (canal 1)<br />
(7) Contacto de relé libre de potencial (cierre), rendimiento de<br />
conmutación máx. 230°VAC, 5A (canal 2)<br />
4<br />
ESPAÑol itAliAno<br />
Manejo<br />
PREcAUción<br />
¡Peligro de accidente por recorrido de puerta activado<br />
accidentalmente!<br />
Al asignar y copiar funciones puede provocarse un recorrido<br />
accidnetal de la puerta. Esto puede ocasionar que queden<br />
aprisionadas personas u objetos por la puerta en movimiento.<br />
f<br />
f<br />
Preste atención a que no se encuentren personas u<br />
objetos en la zona de movimiento de la puerta.<br />
Realice la asignación y copia de funciones siempre en el<br />
garaje.<br />
4.1 Asignar una función a un pulsador<br />
El recpeptor de <strong>radio</strong> tiene dos canales para el control de dos<br />
funciones. Antes de poder utilizar el o los emisores manuales,<br />
deberá asignar previamente un pulsador del emisor manual a<br />
cada función deseada del receptor de <strong>radio</strong>.<br />
Asignar una función a un pulsador para el canal 1<br />
1. Presionar brevemente el pulsador P (pulsador de<br />
programación) del receptor.<br />
El LED se ilumina.<br />
2. Presionar el pulsador deseado del emisor manual durante<br />
mín. 3 s, hasta que se apague el LED.<br />
3. Volver a soltar el pulsador.<br />
El receptor está listo para emitir.<br />
(Continuación al dorso)<br />
1<br />
•<br />
•<br />
•<br />
•<br />
•<br />
•<br />
•<br />
•<br />
•<br />
•<br />
•<br />
•<br />
•<br />
Avvertenze generali<br />
Leggere attentamente le seguenti istruzioni! Le forniranno le<br />
informazioni importanti per un uso sicuro del Suo ricevitore.<br />
Osservare inoltre le avvertenze di sicurezza relative al<br />
funzionamento della motorizzazione e del portone.<br />
Conservare queste istruzioni con cura per poter effettuare<br />
ampliamenti e modifiche al Suo ricevitore senza problemi.<br />
Attraversare il foro muratura dei sistemi di chiusura con<br />
comando a distanza solo se il battente della porta si trova<br />
nella posizione di apertura.<br />
Usare il telecomando solo se il portone è in vista!<br />
Per la messa in funzione del telecomando utilizzare<br />
esclusivamente pezzi originali.<br />
Se il telecomando deve essere combinato con<br />
motorizzazioni e comandi commerciali, far eseguire una<br />
verifica preventiva da un elettricista.<br />
Osservare le norme di sicurezza locali, in particolare in caso<br />
di lavori alla rete elettrica (230 V AC).<br />
Far eseguire tutti i lavori alla rete elettrica da un elettricista.<br />
Osservare le norme di sicurezza locali, specialmente con<br />
un'alimentazione di tensione di 230 V AC.<br />
Le caratteristiche e gli ostacoli architettonici sul posto<br />
possono eventualmente influire sulla portata del<br />
telecomando.<br />
Se sono necessari più ricevitori, questi devono essere<br />
installati quanto più distanti possibile l'uno dall'altro.<br />
L'infiltrazione di umidità può pregiudicare la funzionalità<br />
del ricevitore. Inserire pertanto i cavi solamente nei punti<br />
previsti da impostazione di fabbrica.<br />
I telefoni cellulari (solo GSM 900) possono influire sulla<br />
portata del ricevitore in caso di uso contemporaneo.<br />
1.1 Uso a norma<br />
Il <strong>radio</strong>ricevitore è concepito esclusivamente per il comando<br />
di motorizzazioni per portoni da garage e non deve essere<br />
utilizzato per il comando di altri apparecchi o macchine.<br />
2<br />
Descrizione apparecchio<br />
2.1 Ricevitore BHE 324 (Fig. 1)<br />
(Tipo di protezione IP55)<br />
(1) Ricevitore<br />
(2) Antenna<br />
(3) Morsetto (12 … 24 V AC/DC)<br />
(4) LED<br />
(5) Tasto di programmazione P<br />
(6) Morsetto canale 1 (a potenziale zero)<br />
(7) Morsetto canale 2 (a potenziale zero)<br />
2.2 Ricevitore BHE 325 (Fig. 2)<br />
(Tipo di protezione IP55)<br />
(1) Ricevitore<br />
(2) Antenna<br />
(3) Cavo di collegamento 230 V AC (circa 900 mm di<br />
lunghezza)<br />
(4) LED<br />
(5) Tasto di programmazione P<br />
(6) Morsetto canale 1 (a potenziale zero)<br />
(7) Morsetto canale 2 (a potenziale zero)<br />
3<br />
3.1<br />
Prima dell'uso<br />
Collegamento del ricevitore (Fig. 3)<br />
(3) Morsetto per tensione di alimentazione<br />
(12 … 24 V AC/DC)<br />
(6) Contatto a relè a potenziale zero (contatto di chiusura),<br />
Potenza di commutazione max. 230 V AC, 5A (canale 1)<br />
(7) Contatto a relè a potenziale zero (contatto di chiusura),<br />
potenza di commutazione max. 230 V AC, 5A (canale 2)<br />
4<br />
Funzionamento<br />
cAUtElA<br />
Rischio di lesioni causate dalla messa in moto<br />
accidentale del portone!<br />
L'assegnazione e la copia di una funzione può provocare la<br />
messa in moto accidentale del portone e persone o oggetti<br />
possono rimanere incastrati nel portone in fase di chiusura.<br />
f<br />
f<br />
Fare attenzione che persone o oggetti non si trovino nella<br />
zona di manovra del portone.<br />
Eseguire l'assegnazione e la copia delle funzioni sempre<br />
all'interno del garage.<br />
4.1 Assegnazione di una funzione<br />
Il <strong>radio</strong>ricevitore ha due canali per il comando di due funzioni.<br />
Prima di poter utilizzare il telecomando assegnare nel<br />
<strong>radio</strong>ricevitore il tasto del telecomando alla funzione desiderata.<br />
Assegnazione di una funzione per il canale 1<br />
1. Premere brevemente il tasto P (tasto di programmazione)<br />
del ricevitore.<br />
Il LED si illumina.<br />
2. Premere il tasto desiderato sul telecomando per almeno<br />
3 sec., finché il LED non si spenge.<br />
3. Rilasciare il tasto.<br />
Il ricevitore è pronto alla ricezione.<br />
(Continua)<br />
Ausgabe / Edition: 02/2008. Änderungen vorbehalten / Subject to change
0682<br />
Een toetsfunctie voor kanaal 2 toewijzen<br />
1. De P-toets (programmeertoets) van de ontvanger kort<br />
indrukken.<br />
De led begint op te lichten.<br />
2. De P-toets nogmaals indrukken.<br />
De led dooft even en licht daarna weer op<br />
3. De gewenste toets van de handzender op. 3 sec. indrukken,<br />
tot de LED uitdooft.<br />
De blauwe led knippert.<br />
4. De toets weer loslaten en het knipperproces afwachten.<br />
5. Na het knipperproces is de ontvanger klaar voor ontvangst.<br />
Programmering controleren<br />
f Druk op de geprogrammeerde toets van de zender.<br />
Het bevel wordt geactiveerd.<br />
opmerking:<br />
De afstand tussen de zender en de ontvanger moet bij het<br />
De afstand tussen zender en ontvanger moet minstens 1 m<br />
bedragen.<br />
Mocht de zender niet werken moet u opnieuw proberen een<br />
toetsfunctie aan het kanaal toe te wijzen.<br />
4.2<br />
•<br />
•<br />
4.3<br />
De programmeringsprocedure afbreken<br />
Als er tijdens de 60 sec. na het drukken op de P-toets geen<br />
programmering meer volgt, dooft de led van de ontvanger.<br />
Als de P-toets 3 maal na elkaar bediend wordt, dooft de led<br />
van de ontvanger en wordt de programmeringsprocedure<br />
afgebroken.<br />
De afleveringstoestand opnieuw herstellen<br />
1. Op de P-toets van de ontvanger drukken en deze<br />
gedurende ca. 10 sec. ingedrukt houden.<br />
De led knippert.<br />
Het einde van het knipperproces afwachten en dan de toets<br />
loslaten.<br />
Alle toegewezen handzenders zijn nu gewist.<br />
opmerking:<br />
Het wissen van afzonderlijke handzenders is niet mogelijk.<br />
5<br />
•<br />
technische gegevens en bijkomende<br />
informatie<br />
Toelaatbare omgevingstemperatuur -20˚C tot +60˚C<br />
Max. aantal geheugenplaatsen per<br />
kanaal<br />
6<br />
nEDERlAnDS<br />
50 handzendercodes<br />
Als er meer dan 50 handzendercodes aangeleerd worden,<br />
worden de eerst geprogrammeerde codes gewist.<br />
EG-verklaring van overeenstemming<br />
De ontvanger BHE324 respectievelijk BHE325 beantwoordt,<br />
op basis van zijn concept en zijn bouwwijze, in de door ons<br />
in omloop gebrachte uitvoering, aan de desbetreffende<br />
fundamentele vereisten van de R&TTE-richtlijn 1995/5/EG,<br />
artikel 3.<br />
Toegepaste normen: EN 301 489, EN 300 220.<br />
Rottenburg, 29.2.2008 Fabrikant:<br />
<strong>Berner</strong> <strong>Torantriebe</strong> KG,<br />
Graf-Bentzel-Straße 68,<br />
D-72108 Rottenburg<br />
Jürgen Ruppel, Directeur<br />
Asignar una función a un pulsador para el canal 2<br />
1. Presionar brevemente el pulsador P (pulsador de<br />
programación) del receptor.<br />
El LED se ilumina.<br />
2. Volver a presionar el pulsador P.<br />
El LED se apaga brevemente y, a continuación, vuelve a<br />
brillar<br />
3. Presionar el pulsador deseado del emisor manual durante<br />
mín. 3 s, hasta que se apague el LED.<br />
El LED azul parpadea.<br />
4. Vover a soltar el pulsador y esperar a que concluya el<br />
parpadeo.<br />
5. Después del parpadeo, el receptor está listo para recibir.<br />
comprobar la programación<br />
f Presione el pulsador programado del emisor.<br />
La orden se emite.<br />
indicación:<br />
La distancia entre el emisor y el receptor debe ser por lo menos<br />
1 m.<br />
Si el emisor manual no funcionara, intente asignar nuevamente<br />
una función al canal.<br />
4.2<br />
•<br />
•<br />
4.3<br />
interrumpir la programación<br />
Si en el plazo de 60 s desde haber presionado el pulsador<br />
P no se realiza la programación, el LED del receptor se<br />
apaga.<br />
Si se acciona 3 veces consecutivas el pulsador P, se apaga<br />
el LED del receptor y se interrumpe la programación.<br />
Reajustar al estado de suministro<br />
1. Presionar el pulsador P del receptor y mantenerlo<br />
presionado durante aprox. 10 s.<br />
El LED parpadea.<br />
2. Esperar a que concluya el parpadeo y volver a soltar el<br />
Esperar a que concluya el parpadeo y, a continuación,<br />
soltar el pulsador.<br />
Todos los emisores manuales memorizados se han<br />
borrado..<br />
indicación:<br />
No es posible borrar emisores manuales individuales.<br />
5<br />
•<br />
Datos técnicos e información adicional<br />
Temperatura ambiente permitida -20˚C a +60˚C<br />
Número máx. de espacios de<br />
memoría por canal<br />
6<br />
ESPAÑol itAliAno<br />
50 códigos de emisor<br />
manual<br />
Si se memorizan más de 50 códigos de emisores<br />
manuales, se borran los códigos programados en primera<br />
instancia.<br />
Declaración cE de conformidad<br />
El receptor BHE324 y/o BHE325 corresponden según su<br />
concepto y tipo de construcción en la versión comercializada<br />
por nosotros, a las exigencias básicas pertinentes a la directiva<br />
R&TTE 1995/5/CE, artículo 3.<br />
Normas aplicadas: EN 301 489, EN 300 220.<br />
Rottenburg, 29.2.2008 Fabricante:<br />
<strong>Berner</strong> <strong>Torantriebe</strong> KG,<br />
Graf-Bentzel-Straße 68,<br />
D-72108 Rottenburg<br />
Jürgen Ruppel, Gerente<br />
Assegnazione di una funzione per il canale 2<br />
1. Premere brevemente il tasto P (tasto di programmazione)<br />
del ricevitore.<br />
Il LED si illumina.<br />
2. Premere nuovamente il tasto P.<br />
Il LED si spegne brevemente e si riaccende.<br />
3. Premere il tasto desiderato sul telecomando per almeno<br />
3 sec., finché il LED non si spenge.<br />
Il LED lampeggia di blu.<br />
4. Rilasciare il tasto ed attendere che il LED finisca di<br />
lampeggiare.<br />
5. Dopo il lampeggio il ricevitore è pronto alla ricezione.<br />
Verifica della programmazione<br />
f Premere il tasto programmato del trasmettitore.<br />
Il comando viene inviato.<br />
nota:<br />
La distanza fra il trasmettitore e il ricevitore deve essere di<br />
almeno 1 m.<br />
Se il telecomando non funziona, ripetere nuovamente<br />
l‘assegnazione di una funzione tasto al canale.<br />
4.2<br />
•<br />
•<br />
4.3<br />
interruzione del processo di programmazione<br />
Se nei 60 sec. dopo aver premuto il tasto P non viene<br />
eseguita nessuna programmazione, il LED del ricevitore si<br />
spegne.<br />
Azionando il tasto P per 3 volte consecutive, il LED del<br />
ricevitore si spegne ed il processo di programmazione viene<br />
interrotto.<br />
Ripristina dello stato alla consegna<br />
1. Premere il tasto P del ricevitore e tenerlo premuto per circa<br />
10 sec.<br />
Il LED lampeggia.<br />
2. Attendere che il LED non lampeggi più e rilasciare il tasto.<br />
Adesso tutti i telecomandi appresi sono stati cancellati.<br />
nota:<br />
Non è possibile cancellare i singoli telecomandi.<br />
5<br />
•<br />
Dati tecnici e informazioni supplementari<br />
Temperatura ambiente consentita Da -20 ˚C a 60 ˚C<br />
Locazioni in memoria max. per<br />
canale<br />
6<br />
50 codici telecomando<br />
Se vengono appresi più di 50 codici telecomando, i codici<br />
programmati in precedenza vengono cancellati.<br />
Dichiarazione cE di conformità<br />
Il ricevitore BHE324 oppure BHE325, nella struttura, nel tipo<br />
e nella versione da noi messa in circolazione è conforme ai<br />
requisiti fondamentali prescritti nella direttiva R&TTE 1995/5/<br />
CE, articolo 3.<br />
Standard usati: EN 301 489, EN 300 220.<br />
Rottenburg, 29/02/2008 Produttore:<br />
<strong>Berner</strong> <strong>Torantriebe</strong> KG,<br />
Graf-Bentzel-Straße 68,<br />
D-72108 Rottenburg<br />
Jürgen Ruppel, Direzione<br />
Ausgabe / Edition: 04/2008. Änderungen vorbehalten / Subject to change


