MODEL 166XL - Av.loyola.com
MODEL 166XL - Av.loyola.com
MODEL 166XL - Av.loyola.com

You also want an ePaper? Increase the reach of your titles
YUMPU automatically turns print PDFs into web optimized ePapers that Google loves.
<strong>MODEL</strong> <strong>166XL</strong><br />
COMPRESSOR<br />
GATE<br />
A Harman International Company<br />
®
SAFETY INSTRUCTIONS<br />
NOTICE FOR CUSTOMERS IF YOUR UNIT IS EQUIPPED WITH A POWER<br />
CORD.<br />
WARNING: THIS APPLIANCE MUST BE EARTHED.<br />
The cores in the mains lead are coloured in accordance with the following code:<br />
GREEN and YELLOW - Earth BLUE - Neutral BROWN - Live<br />
As colours of the cores in the mains lead of this appliance may not correspond<br />
with the coloured markings identifying the terminals in your plug, proceed as follows:<br />
• The core which is coloured green and yellow must be connected to the<br />
terminal in the plug marked with the letter E, or with the earth symbol, or<br />
coloured green, or green and yellow.<br />
• The core which is coloured blue must be connected to the terminal<br />
marked N or coloured black.<br />
• The core which is coloured brown must be connected to the terminal<br />
marked L or coloured red.<br />
This equipment may require the use of a different line cord, attachment plug, or<br />
both, depending on the available power source at installation. If the attachment<br />
plug needs to be changed, refer servicing to qualified service personnel who<br />
should refer to the table below. The green/yellow wire shall be connected directly<br />
to the unit's chassis.<br />
CONDUCTOR<br />
L<br />
N<br />
E<br />
LIVE<br />
NEUTRAL<br />
EARTH GND<br />
CAUTION<br />
RISK OF ELECTRIC SHOCK<br />
DO NOT OPEN<br />
ATTENTION: RISQUE DE CHOC ELECTRIQUE - NE PAS OUVRIR<br />
WARNING: TO REDUCE THE RISK OF FIRE OR ELECTRIC<br />
SHOCK DO NOT EXPOSE THIS EQUIPMENT TO RAIN OR MOISTURE<br />
The symbols shown above are internationally accepted symbols that warn of<br />
potential hazards with electrical products. The lightning flash with arrowpoint in<br />
an equilateral triangle means that there are dangerous voltages present within<br />
the unit. The exclamation point in an equilateral triangle indicates that it is necessary<br />
for the user to refer to the owner’s manual.<br />
These symbols warn that there are no user serviceable parts inside the unit. Do<br />
not open the unit. Do not attempt to service the unit yourself. Refer all servicing<br />
to qualified personnel. Opening the chassis for any reason will void the manufacturer’s<br />
warranty. Do not get the unit wet. If liquid is spilled on the unit, shut it<br />
off immediately and take it to a dealer for service. Disconnect the unit during<br />
storms to prevent damage.<br />
U.K. MAINS PLUG WARNING<br />
A moulded mains plug that has been cut off from the cord is unsafe. Discard the<br />
mains plug at a suitable disposal facility. NEVER UNDER ANY CIRCUM-<br />
STANCES SHOULD YOU INSERT A DAMAGED OR CUT MAINS PLUG INTO<br />
A 13 AMP POWER SOCKET. Do not use the mains plug without the fuse cover<br />
in place. Replacement fuse covers can be obtained from your local retailer.<br />
Replacement fuses are 13 amps and MUST be ASTA approved to BS1362.<br />
WIRE COLOR<br />
Normal Alt<br />
BROWN<br />
BLUE<br />
GREEN/YEL<br />
BLACK<br />
WHITE<br />
GREEN<br />
WARNING: If the ground is defeated, certain fault conditions in the unit or in the<br />
system to which it is connected can result in full line voltage between chassis<br />
and earth ground. Severe injury or death can then result if the chassis and earth<br />
ground are touched simultaneously.<br />
WARNING<br />
FOR YOUR PROTECTION, READ THESE INSTRUCTIONS:<br />
WATER AND MOISTURE: Appliance should not be used near water (e.g. near a bathtub,<br />
washbowl, kitchen sink, laundry tub, in a wet basement, or near a swimming pool,<br />
etc). Care should be taken so that objects do not fall and liquids are not spilled into the<br />
enclosure through openings.<br />
POWER SOURCES: The appliance should be connected to a power supply only of the<br />
type described in the operating instructions or as marked on the appliance.<br />
GROUNDING OR POLARIZATION: Precautions should be taken so that the grounding<br />
or polarization means of an appliance is not defeated.<br />
POWER CORD PROTECTION: Power supply cords should be routed so that they are<br />
not likely to be walked on or pinched by items placed upon or against them, paying particular<br />
attention to cords at plugs, convenience receptacles, and the point where they<br />
exit from the appliance.<br />
SERVICING: To reduce the risk of fire or electric shock, the user should not attempt to<br />
service the appliance beyond that described in the operating instructions. All other servicing<br />
should be referred to qualified service personnel.<br />
FOR UNITS EQUIPPED WITH EXTERNALLY ACCESSIBLE FUSE RECEPTACLE:<br />
Replace fuse with same type and rating only.<br />
MULTIPLE-INPUT VOLTAGE: This equipment may require the use of a different line<br />
cord, attachment plug, or both, depending on the available power source at installation.<br />
Connect this equipment only to the power source indicated on the equipment rear<br />
panel. To reduce the risk of fire or electric shock, refer servicing to qualified service<br />
personnel or equivalent.<br />
ELECTROMAGNETIC COMPATIBILITY<br />
This unit conforms to the Product Specifications noted on the Declaration of<br />
Conformity. Operation is subject to the following two conditions:<br />
• this device may not cause harmful interference, and<br />
• this device must accept any interference received, including interference<br />
that may cause undesired operation.<br />
Operation of this unit within significant electromagnetic fields should be avoided.<br />
• use only shielded interconnecting cables.<br />
DECLARATION OF CONFORMITY<br />
Manufacturer’s Name: dbx Professional Products<br />
Manufacturer’s Address: 8760 S. Sandy Parkway<br />
Sandy, Utah 84070, USA<br />
declares that the product:<br />
dbx <strong>166XL</strong><br />
conforms to the following Product Specifications:<br />
Safety: EN 60065 (1993)<br />
IEC65 (1985) with Amendments 1, 2, 3<br />
EMC: EN 55013 (1990)<br />
EN 55020 (1991)<br />
Supplementary Information:<br />
The product herewith <strong>com</strong>plies with the requirements of the Low Voltage<br />
Directive 73/23/EEC and the EMC Directive 89/336/EEC as amended by<br />
Directive 93/68/EEC.<br />
dbx Professional Products<br />
Vice-President of Engineering<br />
8760 S. Sandy Parkway<br />
Sandy, Utah 84070, USA<br />
6/23/03<br />
European Contact: Your Local dbx Sales and Service Office<br />
or International Sales Office
MANUAL CONTENTS<br />
English<br />
INTRODUCTION . . . . . . . . . . . . . . . . . . . . . . . . . . . . . . . . . . . . . . . . . . . . . . . . . . . . . . 2<br />
INSPECTION . . . . . . . . . . . . . . . . . . . . . . . . . . . . . . . . . . . . . . . . . . . . . . . . . . . . . . . . . 2<br />
OPERATING CONTROLS . . . . . . . . . . . . . . . . . . . . . . . . . . . . . . . . . . . . . . . . . . . . . . . . 2<br />
OPERATING NOTES . . . . . . . . . . . . . . . . . . . . . . . . . . . . . . . . . . . . . . . . . . . . . . . . . . . 6<br />
CONNECTING THE <strong>166XL</strong> TO YOUR SYSTEM . . . . . . . . . . . . . . . . . . . . . . . . . . . . . . . . 10<br />
INSTALLATION CONSIDERATIONS . . . . . . . . . . . . . . . . . . . . . . . . . . . . . . . . . . . . . . . . . 12<br />
TECHNICAL SUPPORT / FACTORY SERVICE . . . . . . . . . . . . . . . . . . . . . . . . . . . . . . . . . . 12<br />
Français<br />
INTRODUCTION . . . . . . . . . . . . . . . . . . . . . . . . . . . . . . . . . . . . . . . . . . . . . . . . . . . . . . 13<br />
VÉRIFICATION . . . . . . . . . . . . . . . . . . . . . . . . . . . . . . . . . . . . . . . . . . . . . . . . . . . . . . . 14<br />
COMMANDES . . . . . . . . . . . . . . . . . . . . . . . . . . . . . . . . . . . . . . . . . . . . . . . . . . . . . . . 14<br />
NOTES D'UTILISATION . . . . . . . . . . . . . . . . . . . . . . . . . . . . . . . . . . . . . . . . . . . . . . . . 18<br />
RACCORDEMENT DU <strong>166XL</strong> AU SYSTEME DE SONORISATION . . . . . . . . . . . . . . . . . . . 22<br />
NOTES SUR L'INSTALLATION . . . . . . . . . . . . . . . . . . . . . . . . . . . . . . . . . . . . . . . . . . . . 24<br />
ASSISTANCE TECHNIQUE ET SERVICE USINE . . . . . . . . . . . . . . . . . . . . . . . . . . . . . . . . 25<br />
Deutsch<br />
EINLEITUNG . . . . . . . . . . . . . . . . . . . . . . . . . . . . . . . . . . . . . . . . . . . . . . . . . . . . . . . . 26<br />
KONTROLLE . . . . . . . . . . . . . . . . . . . . . . . . . . . . . . . . . . . . . . . . . . . . . . . . . . . . . . . . 26<br />
BEDIENUNGSELEMENTE . . . . . . . . . . . . . . . . . . . . . . . . . . . . . . . . . . . . . . . . . . . . . . . . 27<br />
BEDIENUNGSHINWEISE . . . . . . . . . . . . . . . . . . . . . . . . . . . . . . . . . . . . . . . . . . . . . . . . 30<br />
ANSCHLIEßEN DES DBX <strong>166XL</strong> AN IHRE ANLAGE . . . . . . . . . . . . . . . . . . . . . . . . . . . . 35<br />
ANSCHLUßHINWEISE . . . . . . . . . . . . . . . . . . . . . . . . . . . . . . . . . . . . . . . . . . . . . . . . . . 37<br />
SERVICE UND KUNDENDIENST . . . . . . . . . . . . . . . . . . . . . . . . . . . . . . . . . . . . . . . . . . . 38<br />
Español<br />
dbx <strong>166XL</strong> COMPRESSOR / GATE<br />
INTRODUCCION . . . . . . . . . . . . . . . . . . . . . . . . . . . . . . . . . . . . . . . . . . . . . . . . . . . . . . 39<br />
INSPECCION . . . . . . . . . . . . . . . . . . . . . . . . . . . . . . . . . . . . . . . . . . . . . . . . . . . . . . . . . 39<br />
CONTROLES OPERATIVOS . . . . . . . . . . . . . . . . . . . . . . . . . . . . . . . . . . . . . . . . . . . . . . 40<br />
NOTAS PARA EL OPERADOR . . . . . . . . . . . . . . . . . . . . . . . . . . . . . . . . . . . . . . . . . . . . 44<br />
CONEXION DEL <strong>166XL</strong> AL SISTEMA DE SONIDO . . . . . . . . . . . . . . . . . . . . . . . . . . . . . 49<br />
CONSIDERACIONES PARA LA INSTALACION . . . . . . . . . . . . . . . . . . . . . . . . . . . . . . . . . 51<br />
ASISTENCIA TÉCNICA / SERVICIO DE FABRICA . . . . . . . . . . . . . . . . . . . . . . . . . . . . . . . 52<br />
Specifications . . . . . . . . . . . . . . . . . . . . . . . . . . . . . . . . . . . . . . . . . . . . . . . . . . . . . . . 54<br />
1
INTRODUCTION<br />
Congratulations on choosing the dbx <strong>166XL</strong> Compressor / Gate. The <strong>166XL</strong> provides two channels of noise gating,<br />
OverEasy® or classic hard knee <strong>com</strong>pression and PeakStop® limiting to give <strong>com</strong>plete control of signal dynamics to studios,<br />
sound reinforcement <strong>com</strong>panies, musicians, or anyone who needs quality processing quickly and easily. We re<strong>com</strong>mend<br />
that you take a moment and read through the manual as it provides information that will assist you in using your unit<br />
to its fullest potential. Features Include:<br />
• Stereo or Dual Mono operation of gating, <strong>com</strong>pression and peak limiting.<br />
• OverEasy®/Hard Knee Selection - allows selection between our famous OverEasy <strong>com</strong>pression curve and the classic<br />
“Hard Knee” curve popularized by the original dbx 160, 161 and 162.<br />
• Expander/Gate Circuit - with variable release time and +15dBu maximum threshold.<br />
• Selectable Low Frequency Shelf (via Contour button) in the Sidechain Path - re<strong>com</strong>mended when <strong>com</strong>pressing mixed<br />
program material to prevent low frequency energy from “punching holes” in the sound.<br />
• PeakStop® Limiting - provides control of maximum peak levels at the output of the <strong>166XL</strong> regardless of any other<br />
control. PeakStop <strong>com</strong>es after the <strong>com</strong>pression, gating and other circuitry including the output gain, so it sets an<br />
absolute limit for peak excursions before they reach the output.<br />
• True RMS Level Detection - senses the power in the program in a musical manner, much as human hearing does, giving<br />
results superior to peak or average detection.<br />
• Hardwire System Bypass Buttons on both channels - allow the audio to pass even if the unit is unplugged, and are<br />
also useful for <strong>com</strong>paring the processed and unprocessed signals.<br />
• 10-Segment LED Display for GAIN REDUCTION (up to 30dB).<br />
• Electronically Balanced XLR and 1/4” TRS Input and Output Jacks<br />
• Separate Sidechain Inserts - enables an outboard processor or signal to control <strong>com</strong>pression or gating.<br />
• DC-Controlled Parameters - the signal does not pass thru any of the parameter controls. Instead a DC voltage controls<br />
all functions; this eliminates any possibility of potentiometer noise developing over time.<br />
INSPECTION<br />
Verify that the <strong>166XL</strong> package contains the following:<br />
• <strong>166XL</strong> Unit<br />
• AC Power Cord<br />
• Operation Manual<br />
• Registration Card<br />
OPERATING CONTROLS<br />
Front Panel<br />
EXPANDER/GATE Section<br />
Expander/Gate THRESHOLD Control and LEDs (BELOW/ABOVE):<br />
Adjusting this control sets the level at which the gate will open and allow the signal at the input to pass through to the<br />
output. Turning the knob fully counterclockwise (to OFF) allows the gate to pass signals unattenuated, effectively bypassing<br />
the gate. Turning the knob fully clockwise causes the gate to attenuate input signals below +15dBu.<br />
The two Expander/Gate LEDs indicate the relationship of the input signal level to the threshold setting. The red LED<br />
lights when the signal is BELOW threshold, the green LED lights when the signal is ABOVE threshold.<br />
Note: The <strong>166XL</strong>’s expander/gate attack rate (which controls how fast the signal is restored after being attenuated) is internally set to be very fast - fast<br />
enough to allow all of the transient at the beginning of a note, vocal or spoken word to <strong>com</strong>e through.<br />
2<br />
dbx <strong>166XL</strong> COMPRESSOR / GATE<br />
®<br />
PROFESSIONAL PRODUCTS
dbx <strong>166XL</strong> COMPRESSOR / GATE<br />
Note: The <strong>166XL</strong>’s expansion ratio is internally fixed, at approximately 10:1. This ratio helps to eliminate the artifacts normally associated with <strong>com</strong>mon<br />
switch gates. Attenuation is >50dB.<br />
SIDECHAIN (SC) ENABLE Switch and LED:<br />
This switch enables the 1/4” TRS connector of the sidechain, allowing external processing of the detector signal. It<br />
has no effect if there is nothing plugged into the sidechain loop; however the switch will still light indicating the<br />
sidechain is enabled.<br />
Expander/Gate RELEASE Control:<br />
This control determines the rate at which the gate closes once the signal at the INPUT or SIDECHAIN INSERT falls<br />
below the threshold. SLOW settings are useful for gating out noise present behind vocals and acoustic instruments.<br />
FAST settings are useful for tightening up the sound of percussion (e.g., kick or snare drum) and drying up leakage from<br />
other instruments into percussion tracks.<br />
Note: The gate release rate is “accelerating” in that the dB/Sec rate continually increases as the gate closes.<br />
CONTOUR Button and LED:<br />
Depress this button to make the <strong>166XL</strong>’s detection circuitry less sensitive to low frequency energy, preventing this<br />
energy from “punching holes” in the sound, especially with mixed program. With the CONTOUR button Out, the<br />
<strong>166XL</strong>’s detector is frequency-independent. The CONTOUR LED turns On when the CONTOUR button is depressed.<br />
COMPRESSOR Section<br />
GAIN REDUCTION Meter:<br />
This meter displays how much the signal is being attenuated by the <strong>com</strong>pressor and the gate.<br />
Compressor THRESHOLD LEDs:<br />
These three LEDs indicate the relationship of the input signal level to the threshold of <strong>com</strong>pression. The green<br />
BELOW LED is On when the signal is below threshold and the red ABOVE LED is On when the signal is above<br />
threshold. When the <strong>166XL</strong> is switched to OverEasy mode, the yellow LED is On when the signal is in the OverEasy<br />
region (See Figure 2).<br />
Note: Even though no input signal is being applied, it is normal for the LEDs to flicker when the power is applied or removed.<br />
Compressor THRESHOLD Control:<br />
Adjust this knob to set the threshold of <strong>com</strong>pression from -40dBu (7.8mVrms) to +20dBu (7.8Vrms). Setting the<br />
Compressor THRESHOLD control to +20dB will prevent all but the highest level peaks from being <strong>com</strong>pressed.<br />
(Setting the Compressor RATIO to 1:1 will turn the Compressor off, regardless of the setting of the Compressor<br />
THRESHOLD control.)<br />
In Hard Knee mode (OVEREASY button out), the THRESHOLD sets a reference level above which input signals<br />
will be processed by the <strong>166XL</strong>’s gain change circuitry in the manner defined by the setting of the RATIO control.<br />
Input signals which fall below this level will pass through the <strong>166XL</strong> unprocessed (except for fixed gain changes directed<br />
by the OUTPUT GAIN control). See Figure 1.<br />
In OverEasy mode (OVEREASY button depressed), signals begin to gradually activate the <strong>166XL</strong>’s gain change circuitry<br />
as they approach the THRESHOLD reference level and they do not get fully processed in the manner defined by<br />
the RATIO control until they have passed somewhat above the THRESHOLD reference level. In OverEasy mode there<br />
is no distinct point at which processing begins, and the THRESHOLD setting corresponds to a point on the input/output<br />
transfer curve midway between the onset of processing and that point at which the transfer curve corresponds to the setting<br />
of the RATIO control. Figure 2 shows the OverEasy <strong>com</strong>pression curves and how they correlate with the THRESH-<br />
OLD LEDs.<br />
OVEREASY Button and LED:<br />
Depress this button to select the OverEasy® <strong>com</strong>pression characteristic. The yellow THRESHOLD LED turns On<br />
when the signal is in the OverEasy region. When this button is in the Out position, the <strong>166XL</strong> operates as a hard knee<br />
<strong>com</strong>pressor/limiter. (Yellow OverEasy LED is active only in OverEasy Mode.)<br />
In Hard Knee mode, the threshold of <strong>com</strong>pression is defined as that point above which the output level no longer<br />
changes on a 1:1 basis with changes in the input level. See Figure 1.<br />
In OverEasy mode, the threshold of <strong>com</strong>pression is defined as the middle of the OverEasy threshold region, that is,<br />
“half-way” into <strong>com</strong>pression, as shown in Figure 2.<br />
3
Compressor RATIO Control:<br />
Rotate this control clockwise to increase the amount of <strong>com</strong>pression from 1:1 (no <strong>com</strong>pression) up to ∞:1 (no<br />
increase in output level, regardless of input level increases above threshold.)<br />
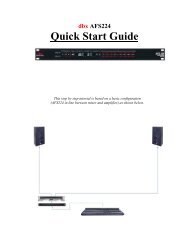
Figure 1: Hard Knee Compression Curve Figure 2: Over Easy Compression Curve<br />
and Threshold LEDs and Threshold LEDs<br />
When an input signal is above the THRESHOLD reference level, the setting of this control determines the number of<br />
decibels (dB) by which the input signal must change in level to produce a 1dB increase in the signal level at the output<br />
of the <strong>166XL</strong>. A setting of 2:1 indicates an input:output ratio wherein a 2dB increase in signal (above threshold) will<br />
produce a 1dB increase in output signal. A setting of ∞:1 indicates that an infinite increase in input level would be<br />
required to raise the output level by 1dB. In other words, the output level stays constant when the input signal rises<br />
above threshold.<br />
Compressor ATTACK and RELEASE Control:<br />
The ATTACK control sets the amount of time it takes the <strong>166XL</strong> to begin <strong>com</strong>pressing a signal once the detector has<br />
sensed a signal above threshold. The ATTACK range is from FAST (for a tighter and more noticeable <strong>com</strong>pression<br />
effect with very little overshoot) to SLOW (for more delayed, gradual <strong>com</strong>pression). A very fast ATTACK setting will<br />
cause the <strong>166XL</strong> to act like a peak limiter even though RMS detection circuitry is used. Slower ATTACK settings cause<br />
the <strong>166XL</strong> to act like an RMS or averaging detecting <strong>com</strong>pressor/limiter.<br />
The RELEASE control sets how fast the <strong>com</strong>pression circuit returns the input to its original level. The RELEASE<br />
rate is from FAST (where <strong>com</strong>pression follows the envelope of the program material very tightly) to SLOW (for very<br />
smooth <strong>com</strong>pression).<br />
There is no absolute right way to set the ATTACK and RELEASE controls. However, in general, you will want them<br />
set slow enough to avoid pumping or breathing sounds caused when background sounds are audibly modulated by the<br />
dominant signal energy, yet the release must be fast enough to avoid suppression of the desired signal after a sudden<br />
transient or loud note has decayed. For low frequency tones (e.g., bass guitar), set RELEASE and ATTACK to 2:00 or<br />
slower.<br />
Note: ATTACK and RELEASE controls operate together and in conjunction with the RATIO control. Changing one control may necessitate changing<br />
another setting.<br />
AUTO Switch and LED:<br />
This switch overrides both the ATTACK and RELEASE controls and enables preset program-dependent attack and<br />
release times. These times are derived from the input signal and continuously change to match its dynamics. The switch<br />
lights indicating the attack and release times are being automatically adjusted in a program-dependent fashion. Enabling<br />
this AUTO function duplicates the “classic dbx sound” of the 166A which is a standard in the industry.<br />
OUTPUT GAIN Control:<br />
Adjust this control to vary the amount of fixed gain (up to ±20dB) in the <strong>166XL</strong>’s output amplifier stage. The OUT-<br />
PUT GAIN control does not interact with the threshold of <strong>com</strong>pression.<br />
The OUTPUT GAIN control is especially useful to <strong>com</strong>pensate for the RMS level decrease which results from the<br />
<strong>166XL</strong>’s dynamic processing effects. After you adjust the <strong>166XL</strong>’s controls for the desired amount of <strong>com</strong>pression (and<br />
gating), set the OUTPUT GAIN to add the same amount of gain that is shown on the GAIN REDUCTION meters. For<br />
example, if the average amount of gain reduction shown on the meters is 10dB, then setting the OUTPUT GAIN control<br />
to 10dB will <strong>com</strong>pensate for the 10dB average level reduction at the output. Note that the OUTPUT GAIN control<br />
<strong>com</strong>es before the PeakStop circuit.<br />
Note: Because +20dB of gain can be added at the <strong>166XL</strong> output, it is possible to cause clipping even when the input level is within the specified range.<br />
For example, when the COMPRESSION RATIO is set at a low number, extreme clockwise rotation of the OUTPUT GAIN may cause the <strong>166XL</strong> output<br />
stage to clip program peaks.<br />
4<br />
OUTPUT LEVEL (dB)<br />
+20<br />
+15<br />
+10<br />
+5<br />
0<br />
-5<br />
-10<br />
-15<br />
dbx <strong>166XL</strong> COMPRESSOR / GATE<br />
GREEN<br />
Below Threshold<br />
RED<br />
Above Threshold<br />
INPUT LEVEL (dB)<br />
1:1 Unity<br />
2:1<br />
4:1<br />
20:1<br />
-15 -10 -5 0 +5 +10 +15 +20<br />
:1<br />
Rotation Point Threshold<br />
OUTPUT LEVEL (dB)<br />
+20<br />
+15<br />
+10<br />
+5<br />
0<br />
−5<br />
−10<br />
−15<br />
®<br />
YELLOW<br />
GREEN AMBER<br />
Below Threshold<br />
INPUT LEVEL (dB)<br />
PROFESSIONAL PRODUCTS<br />
RED<br />
1:1<br />
2:1<br />
4:1<br />
−15 −10 −5 0 +5 +10 +15 +20<br />
:1<br />
Above Threshold<br />
OverEasy Range
dbx <strong>166XL</strong> COMPRESSOR / GATE<br />
BYPASS Button and LED:<br />
Depress this button to “hard-wire bypass” the <strong>166XL</strong>’s circuitry,(i.e., unaltered input signal will pass through the unit<br />
even if it is unplugged). Note that BYPASS works independently for each channel, even when the unit is stereo-coupled<br />
(via the STEREO COUPLE button).<br />
In Bypass mode, the input is sent directly to the output, bypassing the <strong>166XL</strong>’s processing and controls and presenting<br />
unaltered input signal at the <strong>166XL</strong>’s OUTPUT. Bypass mode is especially useful for making <strong>com</strong>parisons between<br />
processed and unprocessed signals.<br />
The BYPASS LED turns On in Bypass mode if the <strong>166XL</strong> is being provided with AC power.<br />
LIMITER Section<br />
PEAKSTOP LEVEL Control and LED:<br />
This control allows you to set the maximum peak output level of the <strong>166XL</strong> regardless of any other control. PeakStop<br />
<strong>com</strong>es after the <strong>com</strong>pression, gating and output gain circuitry; this provides for an absolute limit to be put on the peak<br />
excursions at the output. PeakStop works instantaneously; you can apply moderate amounts of dbx’s OverEasy <strong>com</strong>pression<br />
and still be protected from large transients, other short-term overloads and overmodulation.<br />
PeakStop is a smooth well-controlled soft clipper whose behavior is sonically similar to the gentleness of OverEasy<br />
<strong>com</strong>pression; its clipping is much preferable to a power amp’s or analog-to-digital converter’s. PeakStop rounds the corners<br />
of a peak rather than cutting it off sharply. By making a signal’s leading and trailing edges curved instead of sharply<br />
angled, it reduces the amount of higher odd-order, offensive-sounding harmonics that conventional hard clipping causes.<br />
The level at which PEAKSTOP is activated is adjustable from +0dBu to +20dBu. Note that small signal excursions<br />
above the set value of PEAKSTOP are possible, to allow the rounding to occur. Therefore, for applications where you<br />
must not exceed a given ceiling, set the PEAKSTOP control 1dB to 2dB below the ceiling.<br />
The PEAKSTOP LED illuminates whenever peaks attempt to exceed PeakStop level and are reduced in amplitude. If<br />
the PeakStop LED illuminates when the PEAKSTOP LEVEL control is set to +20dBu, the headroom capabilities of the<br />
<strong>166XL</strong> are being exceeded and hard clipping is occurring.<br />
MASTER Section<br />
STEREO COUPLE Button and LED:<br />
This button toggles the unit between stereo and dual mono operation. Press the STEREO COUPLE button In for stereo<br />
operation where Channel 1 be<strong>com</strong>es the master controller for both channels. All of Channel 2’s controls, buttons, and<br />
LEDs will be disabled (except for Channel 2’s BYPASS, SIDECHAIN ENABLE, and CONTOUR buttons, and its GAIN<br />
REDUCTION LEDs), since Channel 2 is the “slave.” Note that the detection circuitry senses the true RMS levels of the<br />
<strong>com</strong>bined signal, so it is unaffected by phase shifts (or other discrepancies) between the channels. This ensures stereo<br />
<strong>com</strong>pression without loss of imaging stability.<br />
With the STEREO COUPLE button Out, the unit functions as two separate mono <strong>com</strong>pressor/gates, each with its own<br />
independent controls.<br />
The STEREO COUPLE LED indicates that the <strong>166XL</strong> is stereo-coupled.<br />
Rear Panel<br />
INPUT (BALANCED) Jacks:<br />
The Tip/Ring/Sleeve phone jack and XLR-type jack are wired in parallel; either INPUT will accept an audio signal for<br />
processing by the <strong>166XL</strong>. The phone jack accepts a standard TRS 1/4” phone plug for a balanced input source, or a 2-circuit<br />
(Tip/Sleeve) 1/4” phone plug for an unbalanced source. The XLR-type jack is wired pin 2 HOT (+), pin 3 COLD (-)<br />
and pin 1 GROUND.<br />
Note: Only one input jack should be used at a time, except for “splitter” applications where one input jack is used as an input<br />
and the other input jack is used as an output (see “Using the SIDECHAIN INSERT” section on page 16). Since a given pair of<br />
channel input jacks (e.g., Channel 1 XLR INPUT and Channel 1 1/4” INPUT) are internally connected (TIP = Pin 2, RING =<br />
Pin 3, SLEEVE = Pin 1), if one of the jacks is unbalanced, then the other jack will be unbalanced. For example, if a 1/4”<br />
INPUT jack is used with a mono cable, and is therefore unbalanced, the XLR INPUT jack will also be unbalanced (Pin 3 shorted<br />
to ground).<br />
OPERATING LEVEL Switch:<br />
This switch selects between a -10dBV and +4dBu nominal operating level. When the switch is in the in position, a<br />
-10dBV operating level is selected. When it is in the out position +4dBu is selected. A -10dBV operating level should be<br />
5
selected when interfacing with “semi-pro” or low level equipment, while a +4dBu level should be selected when interfacing<br />
with “pro” equipment. The switch simultaneously changes the operating levels for both the input and output circuits.<br />
Note that the switch is slightly recessed to prevent accidental switching of operating levels while plugging in or unplugging<br />
cables.<br />
OUTPUT (BALANCED) Jacks:<br />
The Tip/Ring/Sleeve phone jack and XLR-type jack are wired in parallel; either OUTPUT will send an audio signal to a<br />
load. The phone jack accepts a standard TRS 1/4” phone plug for a balanced output load, or a 2-circuit (Tip/Sleeve) 1/4”<br />
phone plug for an unbalanced load. The XLR-type jack is wired pin 2 HOT(+), pin 3 COLD (-) and pin 1 GROUND. For<br />
proper unbalanced operation, the unused pin (either pin 2 or 3) must be grounded. Nominal output signal level is +4dBu or<br />
-10dBV into 600Ω, and typical maximum output level is +20dBu into 600Ω (+20dBm).<br />
Note: A given pair of channel output jacks (e.g., Channel 1 XLR OUTPUT and Channel 1 1/4” OUTPUT) are internally connected (TIP = Pin 2, RING = Pin<br />
3, SLEEVE = Pin 1) and can simultaneously deliver the same signal to two separate loads, but if one of the jacks is unbalanced, then the other jack will be<br />
unbalanced. For example, if a 1/4” OUTPUT jack is used with a mono cable, and is therefore unbalanced, the XLR OUTPUT jack will also be unbalanced<br />
(Pin 3 shorted to ground). If using both outputs of a given pair simultaneously, the total parallel load on the output should be 600Ω minimum.<br />
SIDECHAIN INSERT Jack:<br />
This jack accepts a standard TRS 1/4” phone plug and provides a connection to the <strong>166XL</strong> detector path. The RING<br />
acts as a Send, carrying a buffered version of the signal present at the <strong>166XL</strong> INPUT jack, at an impedance of 2kΩ. The<br />
TIP acts as a Return for equipment to feed the <strong>166XL</strong>’s detector circuitry, such as an equalizer for de-essing or frequencysensitive<br />
gating/<strong>com</strong>pression. You can also drive the <strong>166XL</strong> SIDECHAIN INSERT with the output of most equipment, by<br />
using a 1/4” mono phone plug. Input impedance is greater than 10kΩ.<br />
Note: When a cable is plugged into this jack, it automatically breaks the connection from the INPUT circuit to the <strong>166XL</strong>’s detection circuitry.<br />
Note: The following Operating Notes section contains several applications for using the sidechain circuit.<br />
AC POWER Receptacle:<br />
This receptacle accepts an IEC-type power cord (as shipped with the unit). Plug the cord into the unit and mains power.<br />
Note that the <strong>166XL</strong> does not have a power switch. It is re<strong>com</strong>mended that the <strong>166XL</strong> be “On” at all times. Power consumption<br />
is low. If you do not plan to use the <strong>166XL</strong> for an extended period of time, unplug it.<br />
Warning: Be sure to verify both your actual line voltage and the voltage for which your Model <strong>166XL</strong> was wired, as indicated on the rear panel of your unit.<br />
Connection to an inappropriate power source may result in extensive damage which is not covered by the warranty.<br />
OPERATING NOTES<br />
Expander/Gate Applications<br />
Note: Control settings for each application are suggested as a starting point. Adjust them for your requirements.<br />
Gating Dry Percussive Sounds (e.g., Snare Drum, Kick Drum)<br />
To effectively gate percussive sounds with high-level transients, you need to set the <strong>166XL</strong>’s gate controls to ensure<br />
that the gate is less sensitive to nearby signals that would cause the gate to open or “false trigger.” Set the RELEASE setting<br />
fast enough to enable the gate to close very quickly once the signal falls under the THRESHOLD. The RELEASE can<br />
also be used to shape the envelope of the sound.<br />
Note: Fast gating of sustained low frequency signals can result in “chattering.” Because the <strong>166XL</strong> is capable of extremely fast gating, make sure the<br />
RELEASE time is longer than one full cycle of the gated signal’s fundamental frequency. To eliminate any “chattering,” simply adjust the RELEASE time to<br />
a longer time (slower rate). The proper THRESHOLD setting will also minimize false triggering and “chattering.”<br />
These types of settings are most useful for tightening up drum tracks, removing the “ring” from some drums, or gating<br />
out the leakage of one drum through another’s mic.<br />
Gating Sounds That Have Longer Decay (e.g., Cymbal, Piano)<br />
To effectively gate sounds which have more decay after the initial transient, set the RELEASE control slow enough to<br />
allow the gate to remain open and capture the signal’s entire envelope.<br />
The gate can also be used to “dry up” a track or mix that has too much reverb or ambience. Set the RELEASE control<br />
so that the natural decay of the sound is somewhat truncated.<br />
Changing Sound Quality<br />
The <strong>166XL</strong>’s gate can effectively change the sonic character of a sound because it can reduce or otherwise alter the<br />
quality of instrumental ambience and reverb. For example, as an instrument stops, its reverberation level will fall through<br />
the <strong>166XL</strong>’s THRESHOLD setting. It can now be made to die out more quickly - faster than the natural decay (of the<br />
sound). Experiment with different THRESHOLD and RELEASE settings to change the “tail” of the sound; a FAST<br />
RELEASE setting will nearly eliminate reverb.<br />
Keyed Gating<br />
Keyed gating, that is, controlling the gating of one signal by another, can be used to add dynamics to a sound (e.g., cre-<br />
6<br />
dbx <strong>166XL</strong> COMPRESSOR / GATE<br />
®<br />
PROFESSIONAL PRODUCTS
dbx <strong>166XL</strong> COMPRESSOR / GATE<br />
ating perfectly in-sync playing and overdubbing among individual instruments or “fattening” a dynamically weak track).<br />
To create two distinct channels of bass guitar for your mix (by splitting the bass signal into two channels and synchronizing<br />
one channel of bass guitar with the kick drum), start by feeding one channel of bass directly into the mix and<br />
the other into the <strong>166XL</strong>’s INPUT. Then key the gate with a signal from the kick drum (connected to the SIDECHAIN<br />
INSERT - adjust controls as needed). The gated bass track will now open with each kick, adding punch and dynamics.<br />
This can really tighten up the tracks and add life to the mix.<br />
Another example of keyed gating is using the drum signal to key an oscillator which is set to an appropriate frequency<br />
to “tune” and “punch up” the drum sound.<br />
Note: For all keyed gating applications, be aware to adjust the <strong>com</strong>pressor accordingly or bypass it by setting the Compressor RATIO fully counterclockwise<br />
to 1:1<br />
Frequency-Sensitive Gating<br />
Frequency-sensitive gating lets you use the SIDECHAIN INSERT to tune the response of the gating action. For<br />
example, if you’re gating a kick drum in a track with lots of leakage, you can tune in to the frequency of the kick with<br />
an outboard EQ and the gate will respond only to that drum. Feed the kick drum signal both directly into the gate and<br />
also through an equalizer which is connected to the SIDECHAIN INSERT. With the equalizer adjusted so that only the<br />
desired signal is strong at the SIDECHAIN INSERT, the gate be<strong>com</strong>es even more selective in opening.<br />
Basic Compressor Applications<br />
Note: Control settings for each application are suggested as a starting point. Adjust them for your requirements. In general, the “smoothest” <strong>com</strong>pression<br />
is achieved with the OVEREASY and AUTO buttons In, while the most “aggressive” <strong>com</strong>pression is achieved with a Hard Knee fast setting (i.e.,<br />
OVEREASY button Out with fast ATTACK and RELEASE times).<br />
To <strong>com</strong>press a mix, begin with a low RATIO setting, THRESHOLD set for a few dB of Gain Reduction, and SLOW<br />
Attack and Release, OVEREASY and CONTOUR buttons In.<br />
Smoothing Out Variations in Microphone Levels<br />
Variations in signal level can occur when the distance between a vocalist and a mic changes, or when the dynamics<br />
of a voice changes relative to a vocalist’s range. To smooth out these variations, start with the <strong>166XL</strong> in OverEasy<br />
mode (OVEREASY button In) with a medium attack time and a fairly slow release time and adjusted for a low to medium<br />
<strong>com</strong>pression RATIO (e.g., 4:1). Many people prefer the use of AUTO mode for vocals rather than setting the attack<br />
and release controls manually. Adjust the THRESHOLD control so that the GAIN REDUCTION meters show 6dB to<br />
10dB of gain reduction, then increase the RATIO if necessary. Due to the gentle OverEasy characteristic of your <strong>166XL</strong><br />
you will find that even fairly high ratios are handled transparently. If the lower energy of the vocals is <strong>com</strong>pressed too<br />
much (e.g., if the voice sounds too thin or its lower register presence is lost), press the CONTOUR button In to allow<br />
more of the original low energy to pass through the <strong>166XL</strong> unaffected.<br />
Smoothing Out Variations (and Increasing Sustain) in Musical Instrument Levels<br />
(e.g., Bass Guitar, Electric Guitar, Synthesizer)<br />
To achieve a smoother electric (or electronic) bass sound, <strong>com</strong>press the instrument’s output with a RATIO of<br />
approximately 4:1, then adjust the THRESHOLD control for 10dB to 12dB of gain reduction. Compression lessens the<br />
loudness variations among the strings and increases the bass’ inherent sustain. Other instruments, such as horns, vary in<br />
loudness depending on the note being played, and benefit similarly. Note that if the <strong>com</strong>pressed bass sounds smooth, but<br />
too thin for your needs, try pressing In the CONTOUR button to thicken the sound.<br />
To control untimely volume shifts in “hot” guitar or synth parts and to keep them from overloading your tape deck or<br />
mixer during recording and live performances, start with a slow Hard Knee <strong>com</strong>pression, the RATIO at approximately<br />
5:1 and the THRESHOLD set to the average maximum level of the track - this will ensure that only the offending “hot”<br />
part is <strong>com</strong>pressed. Use CONTOUR, if necessary.<br />
To add sustain to guitar or synthesizer string sounds, begin with a higher RATIO (from 10:1 to ∞:1), then adjust the<br />
THRESHOLD control to taste. For example, to alter the envelope of a synthesizer sound that has a bite on its attack, but<br />
ends with a long release time, begin by playing slow, but steady, synth stabs or chords, while <strong>com</strong>pressing the sound<br />
heavily (with a higher RATIO). Heavy <strong>com</strong>pression of guitars and synths, as they are being recorded to digital formats,<br />
can often help revive their sense of “analog life.”<br />
Fattening Kick Drums and Compressing Other Drums<br />
Weak, flabby kick drums often have too much boom, and not enough slap. To tighten them up, start with the <strong>166XL</strong><br />
adjusted for a medium to high RATIO (e.g., 6:1), adjust the THRESHOLD control so that the GAIN REDUCTION<br />
meters show 15dB of gain reduction, then increase the RATIO if necessary. In OverEasy mode, the <strong>166XL</strong> takes slightly<br />
longer to react than in Hard Knee mode, and will therefore emphasize the slap at the beginning of the note and reduce<br />
the boominess of its body. The <strong>166XL</strong> also works well for tightening snare drums and tom toms and can be used with<br />
drum machines to effectively alter the character of any electronic drum sound.<br />
Cymbals and tom-toms can be effectively <strong>com</strong>pressed (using the <strong>166XL</strong>’s Sidechain) to help prevent analog tape sat-<br />
7
uration. Split the drum signal, sending one channel directly to the <strong>166XL</strong>’s INPUT and the other channel to an equalizer<br />
(e.g., dbx’s 20 Series or 30 Series Graphic Equalizer). Then connect the equalizer’s output to the <strong>166XL</strong>’s SIDECHAIN<br />
INSERT. The equalizer can be adjusted for boost with a peak of about 5kHz, causing the cymbal to be <strong>com</strong>pressed on a<br />
very loud crash, stopping tape saturation at high frequencies, where there is less headroom. However, gentle tapping of a<br />
drumstick or brushing of the cymbal will not be affected. Assuming the tom-tom is a lower frequency instrument and can<br />
be better tolerated by the tape, it has less need for <strong>com</strong>pression. Equalization in the Sidechain circuit means that the <strong>com</strong>pressor<br />
is not triggered as readily by a loud tom-tom beat as by an equally loud cymbal crash. Refer to the next page for<br />
more Sidechain applications.<br />
For drum kit submixes (e.g., mixing multiple drum tracks to two tracks while using both channels of a <strong>166XL</strong> for <strong>com</strong>pression),<br />
consider backing off the RATIO on each channel (down to 2:1) to avoid an excess of cymbal “splattering.” In<br />
larger multitracking systems, <strong>com</strong>press the kick and snare separately. A further possibility is to heavily <strong>com</strong>press a stereo<br />
submix of toms and leave the remaining percussives unaffected.<br />
Raising a Signal Out of a Mix<br />
Since reducing dynamic range increases the average signal level by a small amount, a single track can be raised out of a<br />
mix by boosting its level slightly and applying <strong>com</strong>pression. Start with a 2:1 RATIO and a relatively low THRESHOLD<br />
setting (-20dBu). Adjust both controls as necessary.<br />
Compressors have also been used to bring vocals to the forefront of a mix in volume-restricted studios (e.g. home studios).<br />
Start by adding a foam windscreen to the mic (if it doesn’t have one). Set the RATIO to 10:1 and the THRESHOLD<br />
to -10dBu. With your mouth approximately 2 inches from the mic, sing the vocal part, but with less volume than normal.<br />
Use phrasing to give the part some intensity. An equalizer (e.g., a dbx 20 Series Equalizer or dbx 30 Series Graphic<br />
Equalizer) or a vocal effects device (e.g., reverb, delay, distortion) can be added to further define the performance.<br />
It is also possible to separate certain vocals or instruments from a mono program already mixed: refer to frequencyweighted<br />
<strong>com</strong>pression on page 9.<br />
Note: When <strong>com</strong>pressing a stereo program with a <strong>166XL</strong>, the factors affecting a <strong>com</strong>pression curve and the actual RATIO and THRESHOLD settings, are<br />
like those previously covered with reference to single channels of program material. However, it will generally be found that large amounts of <strong>com</strong>pression<br />
are more audible in a mixed stereo program than they might be on the separate tracks that were mixed to create the program.<br />
Preventing Analog Tape Saturation<br />
With programs of widely varying levels, <strong>com</strong>pression can prevent recording levels (e.g., cymbal tracks in a final mix or<br />
drum kit submix) from saturating tape tracks (see frequency-weighted <strong>com</strong>pression, on page 9).<br />
Preventing Digital Overload<br />
Digital recorders and samplers produce audible distortion when they exceed their headroom (i.e., the range above their<br />
maximum operating level). The <strong>166XL</strong> effectively ensures that audio input does not overload a digital recorder’s A/D<br />
(analog-to-digital) converters. The <strong>166XL</strong> can perform this function quietly enough for all digital media. To use the <strong>166XL</strong><br />
so that no changes in gain occur unless an emergency arises (wildly excessive levels), set Hard Knee mode On, the RATIO<br />
to ∞:1, and the THRESHOLD to the highest permissible level.<br />
Note: PeakStop limiting can also be used to prevent raucous-sounding digital overload.<br />
Speaker Protection (Auditoriums, Churches, Mobile DJs and Sound Systems)<br />
Compressors are frequently used to prevent excessive program levels from distorting power amps and/or damaging drivers<br />
in a sound-reinforcement system (whether you’re doing auditorium, church, or club sound engineering, or are a<br />
mobile DJ, or like to push the limits of your home’s audio entertainment center). Set the <strong>166XL</strong> for limiting (Hard Knee<br />
mode On, with a RATIO of 10:1 or greater) and adjust the THRESHOLD to provide 15dB or more of <strong>com</strong>pression (just a<br />
few dB below the input clip). For low-level signals, the <strong>166XL</strong> won’t change gain, but if large signals <strong>com</strong>e along, the gain<br />
will be reduced to prevent clipping and save sensitive system <strong>com</strong>ponents from excessive heat buildup or other type of<br />
damage.<br />
In circumstances where the <strong>166XL</strong> is expected to cause no change in gain unless an emergency arises (wildly excessive<br />
levels), some operators set Hard Knee mode On, the RATIO to ∞:1, and the THRESHOLD to the highest permissible<br />
level. As with preventing digital overload, the <strong>166XL</strong>’s PeakStop limiter can be used instead of or in <strong>com</strong>bination with the<br />
<strong>166XL</strong>’s <strong>com</strong>pression.<br />
As a general rule, <strong>com</strong>pressors should be as close to the amplifiers as possible in the signal chain. If the <strong>166XL</strong> is<br />
placed before the EQ (equalizer), for example, a potentially damaging boost in the EQ won’t be seen by the <strong>166XL</strong> and the<br />
speakers may be damaged. (see Multi-way speaker systems, page 10). For maximum sound pressure levels, large sound<br />
reinforcement systems frequently use a separate <strong>com</strong>pressor on each output of the electronic crossover(s). For a stereo<br />
sound-reinforcement system, one <strong>166XL</strong> can be used for each stereo band (low, low-mid, mid, etc.).<br />
Raising <strong>Av</strong>erage Level in PA Systems<br />
Limiting (i.e., <strong>com</strong>pression at high ratios like ∞:1) also benefits intelligibility by allowing low-level input signals to be<br />
reproduced through the system at higher volume. In a musical performance, this provides additional intimacy so that a<br />
8<br />
dbx <strong>166XL</strong> COMPRESSOR / GATE<br />
®<br />
PROFESSIONAL PRODUCTS
vocalist’s whispers are heard more clearly. The OverEasy curve available with the <strong>166XL</strong> permits a very high amount of<br />
<strong>com</strong>pression (RATIO of 10:1 or greater) to be used in many situations. This allows dynamic speakers, vocalists and other<br />
musicians to concentrate on their presentation or performance without worrying about the ill effects of volume changes.<br />
Using Your EQ to Reduce Feedback in Live Settings (Indoor and Outdoor Concerts,<br />
Churches)<br />
You can use your <strong>166XL</strong> and EQ (equalizer) to reduce feedback in clubs, churches, outdoor concerts and other live settings.<br />
Patch or insert the <strong>166XL</strong> into the main output of a mixer, set the <strong>166XL</strong> to Hard Knee mode and slowly increase<br />
OUTPUT GAIN until the first feedback “ring” occurs, then set up the <strong>166XL</strong> with its RATIO at ∞:1 and THRESHOLD<br />
low. The <strong>166XL</strong> will catch the first feedback ring and hold it as a constant tone so you can adjust your EQ to minimize it.<br />
Continue to increase your console gain and set your EQ until the next 3 or 4 “ring” frequencies have been <strong>com</strong>pensated<br />
for.<br />
The <strong>166XL</strong> as a Line Amplifier<br />
To use the <strong>166XL</strong> as a line amplifier, adjust the RATIO control fully counterclockwise (1:1 position), THRESHOLD<br />
fully clockwise (+20), PeakStop to +20 and OUTPUT GAIN to whatever setting is required for the application.<br />
Remember, excessive gain may lead to output clipping of high level signals. To add <strong>com</strong>pression, adjust the RATIO and<br />
the THRESHOLD controls to the desired settings.<br />
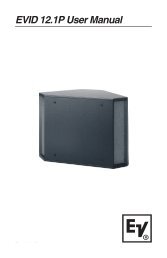
Frequency-Weighted Compression (Sidechain Application)<br />
It is possible to separate certain vocals and instruments from a mix by frequency-weighted <strong>com</strong>pression. With an equalizer<br />
(such as a dbx 20 Series or 30 Series EQ) inline ahead of the SIDECHAIN INSERT (but not in the audio path), the<br />
equalization settings do not shift the timbre or frequency response of the audio signal. They merely alter the threshold<br />
response of the <strong>com</strong>pressor on a “frequency-weighted” basis.<br />
With this arrangement, raising certain frequencies on the equalizer causes them to be suppressed in the audio signal. A<br />
relatively high THRESHOLD setting can allow normal sounds to be unaffected while solo and very loud sounds are <strong>com</strong>pressed.<br />
(Of course, when <strong>com</strong>pression occurs, the level of the entire program is affected - however, if the <strong>166XL</strong>’s CON-<br />
TOUR button is pressed in, even more of the signal’s lower energy can be preserved.) Depending on the THRESHOLD<br />
setting, lower amplitude fundamentals or harmonics will not cause <strong>com</strong>pression, and the program is not subject to the<br />
phase shift normally caused by program equalization.<br />
SOURCE<br />
OUTPUT<br />
EQ<br />
dbx <strong>166XL</strong> COMPRESSOR / GATE<br />
<strong>166XL</strong><br />
166A<br />
INPUT OUTPUT<br />
SIDECHAIN<br />
INSERT<br />
Figure 3: Frequency-Weighted Compression<br />
When recording cymbals and tom-toms, a <strong>com</strong>pressor with an equalizer in the Sidechain path can help prevent analog<br />
tape saturation. The equalizer can be adjusted for boost with a peak of about 5kHz, causing the cymbal to be <strong>com</strong>pressed<br />
on a very loud crash, stopping tape saturation at high frequencies, where there is less headroom. However, gentle tapping<br />
of a drumstick or brushing of the cymbal will not be affected. Assuming the tom-tom is a lower frequency instrument and<br />
can be better tolerated by the tape, it has less need for <strong>com</strong>pression. Equalization in the Sidechain circuit means that the<br />
<strong>com</strong>pressor is not triggered as readily by a loud tom-tom beat as by an equally loud cymbal crash.<br />
The converse of the above EQ technique may be used: dipping the equalizer bands causes any sound with dominant<br />
energy in the affected register to pull the level up because the <strong>166XL</strong> will detect a need for less <strong>com</strong>pression.<br />
De-Essing<br />
To apply de-essing to vocals (i.e., a reduction of sibilance), use a parametric equalizer (e.g., a dbx 242) in the<br />
SIDECHAIN circuit and set it to boost the specific frequency range where the vocal “hiss” or lisp occurs (generally in the<br />
4kHz - 6kHz region). This pre-emphasizes the already “hissy” vocal input to the Sidechain. Used in conjunction with a<br />
moderate to high THRESHOLD and RATIO, and a fast Attack and Release setting, this arrangement greatly attenuates the<br />
“essing” without affecting the basic sound quality or balance of the voice. While it is true that all frequencies are lowered<br />
in level when the <strong>com</strong>pressor is triggered, generally the “sss” sound occurs alone, before or after the dominant tone in the<br />
voice.<br />
9
Increasing Sustain<br />
To increase the sustain of a musical instrument (e.g., a guitar or bass), use an equalizer in the Sidechain circuit and<br />
boost the EQ in the dominant frequency range of the instrument. Set the <strong>166XL</strong> for slow Hard Knee <strong>com</strong>pression, with a<br />
fairly low THRESHOLD and a moderate RATIO.<br />
Multi-Way Speaker Systems<br />
If a single <strong>com</strong>pressor is to be used with a multi-way speaker system (i.e., before the crossover, after the EQ), the system<br />
operator is faced with the problem of keeping levels below the point of damage of the most sensitive part of the system.<br />
If, for example, mid-range drivers are frequently damaged, the whole system must be operated at a lower sound-pressure<br />
level, or additional mid-range drivers must be added. By inserting an equalizer in the Sidechain path to the <strong>166XL</strong>, it<br />
can be made more sensitive to frequencies in the range handled by the sensitive drivers. The system can then be run at<br />
higher levels and will only be dropped back when damaging signals are present.<br />
Using a Filter in the Sidechain Circuit<br />
The results of inserting a filter in the Sidechain circuit are basically the same as obtained with an equalizer, as previously<br />
described. Those frequencies passed by the filter are subject to <strong>com</strong>pression (or at least they are subject to considerably<br />
more <strong>com</strong>pression than those frequencies outside the passband). Because a passive filter can have insertion loss, it may be<br />
necessary to lower the <strong>166XL</strong>’s THRESHOLD setting to maintain a given amount of gain reduction within the filter passband;<br />
this can be determined by monitoring the <strong>166XL</strong>’s THRESHOLD LEDs.<br />
Pre-Emphasis for Broadcast Applications<br />
By inserting a pre-emphasis filter network in the Sidechain path of a <strong>166XL</strong> processing pre-emphasized audio, higher<br />
levels can be run within the headroom limitations of the broadcast chain.<br />
CONNECTING THE <strong>166XL</strong> TO YOUR SYSTEM<br />
Basic Connection<br />
The <strong>166XL</strong> has balanced inputs and outputs, and can be used with any line-level device. Some <strong>com</strong>mon examples<br />
include: mixing consoles, musical instruments, patch bays and other signal processors. For more specific cabling information,<br />
refer to Installation Considerations, page 18.<br />
For all connections, refer to the following steps:<br />
1. Turn Off all equipment before making any connections.<br />
2. Mount the <strong>166XL</strong> in a 1U rack space (Optional).<br />
The <strong>166XL</strong> requires one rack space (height) and 1 rack space (width). It can be mounted above or below anything that<br />
doesn’t generate heat, since it requires no special ventilation. Ambient temperatures should not exceed 113˚F when equipment<br />
is powered.<br />
Caution: Never remove the cover. There are no user-serviceable parts inside, and you run the risk of an electric shock.<br />
3. Make connections via XLR or 1/4” TRS jacks according to your requirements.<br />
Typical patch points include: a mixer’s channel or subgroup inserts when using the <strong>166XL</strong> on individual instruments or<br />
tracks; the mixer’s main outputs or bus inserts when mixing; an instrument preamp’s effects loop when using the <strong>166XL</strong><br />
for guitar or bass; main outs of a submixer (e.g., keyboard mixer) as the signal is sent to main mixer; between a DAT’s<br />
output and an analog cassette input. When using a chain of processors, the <strong>166XL</strong> may be placed either before or after<br />
effects or dynamic processors. However, if you are using the <strong>166XL</strong> for speaker protection, the <strong>com</strong>pressor should be as<br />
close to the amplifier as possible in the signal chain. We re<strong>com</strong>mend you use <strong>com</strong>mon sense and experiment with different<br />
setups to see which one provides the best results for your needs.<br />
Note: Never connect the <strong>166XL</strong>’s input to the speaker output of an instrument or power amplifier.<br />
4. Power On the unit: Securely connect the AC power cord to the unit and mains power.<br />
Note: Check the line voltage. The unit is shipped for 115V or 230V operation. Refer to the unit’s rear panel to verify your unit’s precise line voltage.<br />
10<br />
dbx <strong>166XL</strong> COMPRESSOR / GATE<br />
®<br />
PROFESSIONAL PRODUCTS
dbx <strong>166XL</strong> COMPRESSOR / GATE<br />
Using the SIDECHAIN INSERT<br />
The SIDECHAIN INSERT can be used to control the <strong>com</strong>pressor or the expander/gate by signals other than the audio<br />
input (via an auxiliary device, such as an equalizer). Common Sidechain applications include keyed gating, frequency-sensitive<br />
gating and frequency-weighted <strong>com</strong>pression. These topics are covered in detail in the previous pages of this manual.<br />
Certain Sidechain applications may require special cabling.<br />
For example, to set up your <strong>166XL</strong> for frequency-sensitive gating or frequency-weighted <strong>com</strong>pression, you must feed<br />
an equalizer’s input with the same signal fed to the <strong>166XL</strong>’s INPUT, and then connect the equalizer’s output to the<br />
<strong>166XL</strong>’s SIDECHAIN INSERT jack (Figure 3). Providing the signal to both the <strong>166XL</strong>’s INPUT and the equalizer can be<br />
ac<strong>com</strong>plished in several different ways: (1) use an insert cable plugged into the SIDECHAIN INSERT jack. The SEND<br />
goes to the input of the EQ. The RETURN goes to the output of the EQ; (2) use a Y-cable to feed the audio source to both<br />
the <strong>166XL</strong> INPUT and the equalizer input; (3) feed the signal to one of the <strong>166XL</strong>’s INPUT jacks and use the <strong>com</strong>pressor<br />
channel’s parallel INPUT jack to drive the equalizer (e.g., if the audio source feeds into Channel 1’s 1/4” INPUT jack, use<br />
Channel 1’s XLR INPUT jack to feed the signal to the equalizer); (4) if the audio source can internally split its output signal<br />
(e.g., some synthesizers can send the same signal from two outputs), plug a cable into each output and feed one cable<br />
to the <strong>166XL</strong> INPUT and the other to the equalizer.<br />
Specific System Connections<br />
The <strong>166XL</strong> has balanced inputs and outputs, and can be used with any balanced or unbalanced line-level device. Some<br />
<strong>com</strong>mon examples include: mixing consoles, musical instruments, patch bays, and other signal processors.<br />
Mixing Board<br />
If you wish to <strong>com</strong>press a particular track of a multitrack recording or one channel of a live performance, connect the<br />
<strong>166XL</strong> INPUT to the audio source’s output jack while the <strong>166XL</strong> OUTPUT can be directly connected to a line input jack<br />
(balanced or not) or the <strong>166XL</strong>’s INPUT and OUTPUT can be wired to an Insert point. In the latter case, the signals will<br />
most likely be unbalanced.<br />
It is important to note that the amount of <strong>com</strong>pression is directly related to the level of the input signal. However,<br />
depending upon your system’s setup, it may not always be clear as to what volume controls in your chain affect input level<br />
and which affect output level. If the <strong>166XL</strong> is connected so that <strong>com</strong>pression occurs before the mixer’s volume controls<br />
(e.g., the <strong>166XL</strong> is connected directly between an audio source and the mixer input, or the <strong>166XL</strong> is connected to mixer<br />
inserts that are “pre-fader”), you can boost or cut the input level by adjusting the source’s volume control (e.g., a synthesizer’s<br />
volume control) and boost the track’s output level using the <strong>166XL</strong>’s OUTPUT GAIN control or the mixer’s volume<br />
fader (the latter here is great for track fade-outs). However, if the <strong>166XL</strong> is connected to “post fader” mixer inserts,<br />
adjusting the mixer’s volume fader changes the input level and the amount of <strong>com</strong>pression. If you would rather have this<br />
volume fader control output, we suggest that you set up the <strong>com</strong>pressor directly between the source and the mixer channel’s<br />
input. This way, you can use the instrument’s volume control to define the input level and amount of <strong>com</strong>pression<br />
and the mixer’s volume fader to change only the overall volume of the track.<br />
Musical Instruments (e.g., Electric Guitar, Bass, Keyboards, Electric-Acoustic<br />
Instruments)<br />
The output of an electric guitar is sometimes not “hot” enough to drive the <strong>166XL</strong>’s INPUT. When this is the case,<br />
switch the rear panel +4/-10 switch to the IN position which will boost the low level signal by approximately 12dB. If this<br />
is still not enough boost then you should use the “PREAMP OUT” of your guitar amp (if so equipped), or the output of<br />
some other device that is designed to accept low-level instrument inputs (including various foot pedal effects, acoustic<br />
pickup preamps, and some rack mount audio products). Such sources can be balanced or unbalanced - this is no problem<br />
for the <strong>166XL</strong>.<br />
Microphones, bass guitars, and electric-acoustic instruments, also typically have low-level outputs. With most setups<br />
they require signal boost to drive the <strong>166XL</strong>’s INPUT. For example, when recording voice directly to a portable tape deck,<br />
a mic preamp placed between the mic and the <strong>166XL</strong> (which is then fed to one of the recorder’s inputs) can boost the signal<br />
for the <strong>166XL</strong> as well as provide a high level signal to the tape deck.<br />
Keyboards, samplers, drum machines and sound modules typically produce a line-level signal and can be connected<br />
directly from the instrument’s output to the <strong>166XL</strong>’s INPUT.<br />
Note: DO NOT CONNECT the <strong>166XL</strong>’s input to the speaker output of an instrument or power amplifier. Severe damage to system <strong>com</strong>ponents may result.<br />
Patch Bay<br />
In the studio, the <strong>166XL</strong> may be connected to a patch bay (such as a dbx PB-48) to allow it to be used anywhere in the<br />
studio system. If your studio is not fully balanced, you must ground the unused balanced output conductor: XLR pin<br />
(either pin 2 or 3) or the ring of a 1/4” stereo phone jack. Note that grounding pin 2 of the XLR jack reverses the phase<br />
through the <strong>166XL</strong>.<br />
11
Sound Reinforcement<br />
To <strong>com</strong>press a live mix or to protect loudspeakers, connect the <strong>166XL</strong> between the source (mixing board or distribution<br />
amp) and the power amp(s). If multi-way loudspeakers with low-level electronic crossovers are used, the <strong>166XL</strong>(s) should<br />
go after the crossover(s). For a stereo system, you can separately stereo couple the two high band crossovers, low band<br />
crossovers, etc. If limitations require that you use a single <strong>166XL</strong> channel before a crossover, adding an equalizer to the<br />
sidechain may provide some additional protection to your high frequency <strong>com</strong>ponents (see “Speaker Protection,” page 8).<br />
INSTALLATION CONSIDERATIONS<br />
Input/Output Cable Configurations<br />
Hookups and Cabling<br />
The <strong>166XL</strong> is a balanced (differential) unit designed for nominal +4dBu or -10dBV levels; inputs and outputs are 1/4”<br />
tip/ring/sleeve (TRS) phone jacks and XLR-type jacks. The <strong>166XL</strong> can be used with either balanced or unbalanced sources<br />
and outputs can be used with either balanced or unbalanced loads, provided you use proper cabling.<br />
A balanced line is defined as two-conductor shielded cable with the two center conductors carrying the same signal but<br />
of opposite polarity with respect to ground. An unbalanced line is generally a single-conductor shielded cable with the center<br />
conductor carrying the signal and the shield at ground potential.<br />
Input Cable Configurations<br />
The <strong>166XL</strong> has an actual input impedance of >40kΩ in balanced or unbalanced configurations. This makes the <strong>166XL</strong><br />
audio input suitable for use with virtually any source impedance, low or high. The <strong>166XL</strong>’s input jacks are wired in parallel.<br />
The phone jack TIP (+) connection is internally wired to the XLR pin 2, the RING (-) is wired to pin 3, and the<br />
SLEEVE (shield) is wired to pin 1. Note that pins 2 and 3 are the reverse of certain older dbx and other manufacturer’s<br />
equipment, but if the same connection is used at both the input and the output, the signal will be correctly polarized (“in<br />
phase”).<br />
Reversing the input wires to the input terminals will result in the output signal polarity being the opposite of the input<br />
signal (“180˚ out of phase”).<br />
Output Cable Considerations<br />
The model <strong>166XL</strong>’s outputs are wired in parallel: either the XLR-type OUTPUT jack or the 1/4” stereo phone jack are<br />
capable of driving a 600Ω load. The phone jack TIP (+) connection is internally wired to the XLR pin 2, the RING (-) is<br />
wired to pin 3, and the SLEEVE (shield) is wired to pin 1. Note that pins 2 and 3 are the reverse of certain older dbx and<br />
other manufacturer’s equipment, but if the same connection is used at both the input and the output, the signal will be correctly<br />
polarized (“in phase”).<br />
Figure 4: Signal Flow (Balanced Connection)<br />
Grounding<br />
For maximum hum rejection with a balanced source, avoid <strong>com</strong>mon grounding at the <strong>166XL</strong>’s input and output. Most<br />
balanced (3-conductor) cables have the shield connected at both ends. This can result in ground loops which cause hum. If<br />
hum is a problem, try disconnecting the shield on one or more of your cables, preferably at the input of a device, not at the<br />
output: Ground the shield of the input cable at the source device (leaving it unconnected at the <strong>166XL</strong>’s INPUT) and<br />
ground the shield of the output cable to the ground terminal of the <strong>166XL</strong> (leaving it unconnected at the receiving device).<br />
The shield is pin 1 on the XLR, SLEEVE on a 1/4” TRS.<br />
TECHNICAL SUPPORT, FACTORY SERVICE<br />
The <strong>166XL</strong> is an all-solid-state product with <strong>com</strong>ponents chosen for high performance and excellent reliability. Each<br />
<strong>166XL</strong> is designed, assembled, tested, burned in and calibrated at the factory in the USA and should require no internal<br />
adjustment of any type throughout the life of the unit. We re<strong>com</strong>mend that your <strong>166XL</strong> be returned to the factory only<br />
after referring to the manual and consulting with Customer Service.<br />
Our phone number, fax number and address are listed on the rear cover. When you contact dbx Customer Service, be<br />
12<br />
dbx <strong>166XL</strong> COMPRESSOR / GATE<br />
SIGNAL FLOW<br />
<strong>166XL</strong><br />
166A<br />
®<br />
PROFESSIONAL PRODUCTS
prepared to accurately describe the problem. Know the serial number of your unit - this is printed on a sticker attached to<br />
the unit.<br />
Note: Please refer to the terms of your Limited Two-Year Standard Warranty, which extends to the first end-user. After the warranty expires, a reasonable<br />
charge will be made for parts, labor, and packing if you choose to use the factory service facility. In all cases, you are responsible for transportation<br />
charges to the factory. dbx will pay return shipping if the unit is still under warranty.<br />
Shipping Instructions:<br />
Use the original packing material if it is available. Mark the package with the name of the shipper, and with the following<br />
words in quotes in red: “DELICATE INSTRUMENT, FRAGILE!” Insure the package properly. Ship prepaid, not collect.<br />
Do not ship parcel post. (If you do not plan to save the packaging material, please recycle it.)<br />
Registration Card and User Feedback<br />
We appreciate your feedback. After you have an opportunity to use your new <strong>166XL</strong>, please <strong>com</strong>plete the Registration<br />
Card and return it.<br />
INTRODUCTION<br />
dbx <strong>166XL</strong> COMPRESSOR / GATE<br />
FRANÇAIS<br />
Nous vous félicitons d’avoir choisi le processeur dbx <strong>166XL</strong> Dynamics Processor. Le <strong>166XL</strong> permet un contrôle total<br />
de la dynamique du signal sonore, offrant notamment deux canaux de réduction de bruit (noise gate), <strong>com</strong>pression<br />
OverEasy® ou <strong>com</strong>pression traditionnelle Hard Knee et limitation de crêtes PeakStop®. Il s’adresse aux studios, aux<br />
sociétés de sonorisation, aux musiciens ou à quiconque recherchant un dispositif simple et rapide offrant un traitement de<br />
signal de qualité. Nous vous invitons à lire ce manuel pour tirer le meilleur profit du processeur. Caractéristiques :<br />
• Réduction de bruit, <strong>com</strong>pression et limitation de crêtes en mode stéréo ou dual mono.<br />
• Sélecteur OverEasy®/Hard Knee - permet de choisir entre le célèbre mode de <strong>com</strong>pression OverEasy et le mode «<br />
Hard Knee », plus traditionnel, proposé sur les modèles dbx 160, 161 et 162.<br />
• Circuit expanseur/Gate - temps de maintien variable et seuil maximal de +15 dBu.<br />
• Sélecteur passe-bas (touche CONTOUR) sur le circuit d’insertion Sidechain - conseillé lors de la <strong>com</strong>pression de sons<br />
mixés pour éviter que les signaux de basse fréquence ne créent des « trous » dans le son.<br />
• Limiteur PeakStop® - contrôle les pointes de signal à la sortie du <strong>166XL</strong> indépendamment de tout autre réglage.<br />
Placé en aval des circuits de <strong>com</strong>pression, porte, gain de sortie et autre, le circuit PeakStop permet de fixer une limite<br />
absolue pour les crêtes du signal de sortie.<br />
• Détection de valeur efficace (« True RMS Level ») - mesure la puissance d’un son de façon musicale, à la manière de<br />
l’oreille humaine, produisant de meilleurs résultats que la détection de crête ou de valeur moyenne.<br />
• Touche de by-pass du système sur les deux canaux - pour assurer la continuité du signal audio même lorsque<br />
l’appareil est débranché ou pour <strong>com</strong>parer des signaux traités et non traités.<br />
• Affichage GAIN REDUCTION à diodes électroluminescentes 10 segments (jusqu’à 30 dB)<br />
• Entrées et sorties symétriques Jack 6,35 stéréo et XLR<br />
• Connexions d’insertion Sidechain séparées - pour l’utilisation d’un processeur ou d’un signal externe pour la <strong>com</strong>mande<br />
du circuit de <strong>com</strong>pression ou d’expansion.<br />
• Commande en courant continu des paramètres - le signal ne passe à travers aucun des potentiomètres. Toutes les fonctions<br />
sont contrôlées par courant continu, ce qui élimine tout risque d’apparition de bruit de potentiomètre au fil du<br />
temps.<br />
13
VÉRIFICATION<br />
S’assurer que l’emballage du <strong>166XL</strong> contient les articles suivants :<br />
COMMANDES<br />
• <strong>166XL</strong> Dynamics Processor<br />
• cordon d’alimentation secteur<br />
• manuel de l’utilisateur<br />
• carte d’enregistrement<br />
Face <strong>Av</strong>ant<br />
Section NOISE/GATE<br />
Potentiomètre THRESHOLD (seuil) et témoins BELOW/ABOVE (au-desous/au-dessus) :<br />
Cette <strong>com</strong>mande permet de régler le seuil à partir duquel la porte s’ouvre pour permettre le passage du signal à travers<br />
l’appareil. Tourner le bouton à fond dans le sens inverse des aiguilles d’une montre (jusqu’à OFF [désactivé]) pour permettre<br />
le passage des signaux sans atténuation et, en pratique, contourner la porte. Si ce bouton est tourné à fond dans le sens<br />
des aiguilles d’une montre, la porte atténue les signaux d’entrée en-dessous de +15 dBu.<br />
Les deux Led de la section Expander/Gate indiquent la position du signal d’entrée par rapport au seuil choisi. La Led<br />
rouge (BELOW) s’allume lorsque le signal est EN-DESSOUS du seuil, la Led verte (ABOVE) s’allume lorsque le signal<br />
est AU-DESSUS du seuil.<br />
Remarque : Le temps d’attaque du circuit expander/Gate du <strong>166XL</strong> (qui détermine la vitesse à laquelle le signal est rétabli après atténuation) est extrêmement<br />
court, suffisamment pour permettre le passage des transitoires lors de l’attaque d’une note, d’un chant ou d’un mot parlé.<br />
Remarque : Le taux d’expansion est fixé de façon interne à environ 10:1. Ce taux permet l’élimination des artefacts généralement associés à la <strong>com</strong>mutation<br />
courante. L’atténuation est supérieure à 50 dB.<br />
Sidechain active:<br />
Cette touche active les connecteurs de sidechain, permettant le traitement externe du signal de détecteur. Elle n'a aucun<br />
effet s'il n'y a rien branché à la boucle de sidechain ; cependant la touche s'illumine indiquant que le sidechain est actif.<br />
Commande RELEASE (relâchement) :<br />
Cette <strong>com</strong>mande permet de déterminer le temps de fermeture de la porte une fois que le signal d’entrée (INPUT) ou<br />
d’insertion (SIDECHAIN INSERT) passe en-dessous du seuil. La position SLOW est utile pour la réduction des bruits<br />
présents derrière le chant ou les instruments acoustiques. La position FAST permet d’accentuer la netteté des percussions<br />
(grosse caisse ou caisse claire, par ex.) et d’empêcher les autres instruments de déborder sur les pistes des percussions.<br />
Remarque : la vitesse de coupure va en « s’accélérant » dans la mesure où le nombre de dB/s augmente de façon continue pendant la fermeture de la<br />
porte.<br />
Touche et led CONTOUR :<br />
Lorsqu’on enfonce cette touche, on rend le circuit de détection du <strong>166XL</strong> moins sensible aux signaux basse fréquence,<br />
afin d’éviter que ceux-ci ne provoquent des « trous » dans le son, particulièrement pour des signaux mixés. Lorsque la<br />
touche CONTOUR est relâchée, le détecteur du <strong>166XL</strong> est indépendant de la fréquence. La Led CONTOUR s’allume<br />
lorque la touche CONTOUR est enfoncée.<br />
Section COMPRESSEUR<br />
Indicateur GAIN REDUCTION :<br />
Il affiche la valeur dont le signal est atténué par le <strong>com</strong>presseur et/ou par la porte.<br />
Témoins THRESHOLD (seuil) :<br />
Ces trois Leds indiquent la position du signal d’entrée par rapport au seuil de <strong>com</strong>pression. La Led verte (BELOW)<br />
s’allume lorsque le signal est en-dessous du seuil et la Led rouge (ABOVE) lorsqu’il est au-dessus du seuil. En mode<br />
OverEasy, la Led orange s’allume lorsque le signal est dans la plage OverEasy (voir figure 2).<br />
14<br />
dbx <strong>166XL</strong> COMPRESSOR / GATE<br />
®<br />
PROFESSIONAL PRODUCTS
THRESHOLD :<br />
Ce potentiomètre permet de choisir un seuil de <strong>com</strong>pression <strong>com</strong>pris entre -40 dBu (7,8 mVeff) et +20 dBu (7,8 Veff).<br />
Lorsque la <strong>com</strong>mande THRESHOLD de la section COMPRESSOR est réglée sur +20 dB, seules les pointes de signal les<br />
plus élevées subiront une <strong>com</strong>pression (lorsque le sélecteur RATIO est réglé sur le taux de <strong>com</strong>pression 1:1, alors le <strong>com</strong>presseur<br />
est désactivé, quel que soit le niveau de seuil choisi).<br />
En mode Hard Knee (touche OVEREASY relâchée), la <strong>com</strong>mande THRESHOLD définit un niveau de référence audessus<br />
duquel les signaux d’entrée seront <strong>com</strong>pressés par le circuit de gain du <strong>166XL</strong> de la façon déterminée par le réglage<br />
de la <strong>com</strong>mande RATIO. Les signaux d’entrée qui sont en-dessous de ce niveau traversent le <strong>166XL</strong> sans y être modifiés<br />
(à l’exception du gain fixe déterminé par le réglage de OUTPUT GAIN). Voir figure 1.<br />
En mode OverEasy (touche OVEREASY enfoncée), les signaux activent graduellement le circuit de gain du <strong>166XL</strong> à<br />
mesure qu’ils se rapprochent du seuil de référence fixé par la <strong>com</strong>mande THRESHOLD. Ils ne subissent une <strong>com</strong>pression<br />
<strong>com</strong>plète, selon le taux correspondant au réglage de la <strong>com</strong>mande RATIO, qu’au delà du seuil de référence fixé par<br />
THRESHOLD. Le mode OverEasy ne présente pas de point défini à partir duquel le signal est <strong>com</strong>pressé et le réglage du<br />
seuil (THRESHOLD) correspond à un point de la caractéristique de transfert entrée/sortie à mi-chemin entre le début de la<br />
<strong>com</strong>pression et le point où la caractéristique de transfert présente un taux de <strong>com</strong>pression égal au réglage de la <strong>com</strong>mande<br />
RATIO. La figure 2 présente des courbes de <strong>com</strong>pression OverEasy et indique <strong>com</strong>ment elles se rapportent à l’état des<br />
Leds THRESHOLD.<br />
Touche OVEREASY :<br />
Enfoncer cette touche pour choisir le mode de <strong>com</strong>pression OverEasy®. La Led orange THRESHOLD s’allume<br />
lorsque le signal est dans la plage OverEasy. Lorsque cette touche est relâchée, le <strong>166XL</strong> fonctionne en <strong>com</strong>presseur/limiteur<br />
Hard Knee (la Led orange OverEasy est active en mode OverEasy uniquement).<br />
En mode Hard Knee, le seuil de <strong>com</strong>pression correspond au niveau au-dessus duquel le signal <strong>com</strong>mence à être <strong>com</strong>pressé.<br />
Voir figure 1.<br />
En mode OverEasy, le seuil de <strong>com</strong>pression se situe à mi-chemin de la plage de <strong>com</strong>pression OverEasy, <strong>com</strong>me<br />
l’indique la figure 2.<br />
Commande RATIO :<br />
Tourner ce bouton dans le sens des aiguilles d’une montre pour augmenter le taux de <strong>com</strong>pression. Il s’agit d’un rapport<br />
<strong>com</strong>pris entre 1:1 (pas de <strong>com</strong>pression) et ∞:1 (pas d’augmentation du niveau de sortie, quelles que soient les variations<br />
du niveau d’entrée au-dessus du seuil).<br />
OUTPUT LEVEL (dB)<br />
+20<br />
+15<br />
+10<br />
+5<br />
0<br />
-5<br />
-10<br />
-15<br />
GREEN<br />
Below Threshold<br />
RED<br />
Above Threshold<br />
INPUT LEVEL (dB)<br />
1:1 Unity<br />
2:1<br />
4:1<br />
20:1<br />
Rotation Point Threshold<br />
-15 -10 -5 0 +5 +10 +15 +20<br />
:1<br />
dbx <strong>166XL</strong> COMPRESSOR / GATE<br />
Figure 1 : Mode de <strong>com</strong>pression Hard Knee Figure 2 : Mode de <strong>com</strong>pression OverEasy<br />
Caractéristique de transfert et état des Leds de seuil Caractéristique de transfert et état des Leds de seuil<br />
Lorsqu’un signal d’entrée dépasse le niveau de seuil défini par le réglage de THRESHOLD, cette <strong>com</strong>mande détermine<br />
l’importance en dB de la variation du signal d’entrée nécessaire pour augmenter de 1 dB le signal de sortie du <strong>166XL</strong>. Un<br />
réglage de 2:1, par exemple, correspond à un rapport entrée/sortie tel qu’une augmentation du signal d’entrée de 2 dB (audessus<br />
du seuil) produira une augmentation de 1 dB du signal de sortie. Un réglage de ∞:1 signifie que le signal d’entrée<br />
devrait augmenter de façon infinie pour ajouter 1 dB au signal de sortie. En d’autres termes, le niveau de sortie reste constant<br />
lorsque le signal d’entrée passe au-dessus du seuil.<br />
Réglage des TEMPS D'ATTAQUE et de RELACHEMENT :<br />
Le bouton ATTACK règle le temps nécessaire au <strong>166XL</strong> pour débuter la <strong>com</strong>pression lorsque le niveau du signal<br />
dépasse le seuil. Le réglage varie de rapide (FAST) pour une <strong>com</strong>pression forte et avec peu de dépassement, à lente<br />
(SLOW), pour une <strong>com</strong>pression progressive. <strong>Av</strong>ec un temps d'attaque très rapide, le <strong>166XL</strong> agit <strong>com</strong>me une limiteur de<br />
OUTPUT LEVEL (dB)<br />
+20<br />
+15<br />
+10<br />
+5<br />
0<br />
−5<br />
−10<br />
−15<br />
GREEN AMBER<br />
Below Threshold<br />
RED<br />
INPUT LEVEL (dB)<br />
1:1<br />
2:1<br />
4:1<br />
−15 −10 −5 0 +5 +10 +15 +20<br />
:1<br />
Above Threshold<br />
OverEasy Range<br />
15
16<br />
dbx <strong>166XL</strong> COMPRESSOR / GATE<br />
®<br />
PROFESSIONAL PRODUCTS<br />
crête (bien qu'un circuit de détection de Valeur Efficace soit utilisé). <strong>Av</strong>ec un temps d'attaque lent, le <strong>166XL</strong> agit <strong>com</strong>me un <strong>com</strong>presseur/limiteur<br />
détecteur de valeur efficace ou moyenne.<br />
Le bouton RELEASE permet de régler la vitesse à laquelle le signal retrouve son niveau d'origine. Le réglage varie de rapide (la<br />
<strong>com</strong>pression suit de très près le programme), à lent (pour une <strong>com</strong>pression très douce).<br />
Il n'existe pas de règle absolue pour régler ces temps d'attaque et de relâchement. Toutefois, en règle générale, vous les règlerez<br />
suffisamment lents pour éviter l'effet de "pompage" ou d'"aspiration" sur le son lorsque les bruits de fond sont modulés par l'énergie<br />
dominante du signal. Le temps de relâchement doit être suffisamment rapide pour éviter la suppression du signal après un transitoire<br />
ou un signal de forte amplitude. Pour des fréquences graves (guitare basse par exemple), réglez les temps d’attaque et de relâchement<br />
à 2:00 ou plus lent.<br />
Touche AUTOMATIQUE -<br />
Cette touche prend le pas sur les <strong>com</strong>mandes d'ATTAQUE et de RELACHEMENT et active des temps d'attaque et de relâchement<br />
dépendants du programme. Ces temps sont dérivés du signal d'entrée et changent continûment pour adapter sa dynamique. La touche<br />
s'illumine pour signaler ce mode. Activer cette fonction AUTOMATIQUE reproduit le «son classique dbx» des précurseurs du 166<br />
qui sont devenus des standards de l'industrie.<br />
OUTPUT GAIN (gain de sortie) :<br />
Cette <strong>com</strong>mande permet de choisir le gain fixe (jusqu’à ±20 dB) appliqué au niveau de l’étage de sortie du <strong>166XL</strong>. La <strong>com</strong>mande<br />
OUTPUT GAIN est indépendante du seuil de <strong>com</strong>pression.<br />
La <strong>com</strong>mande OUTPUT GAIN est particulièrement utile pour <strong>com</strong>penser l’affaiblissement du signal efficace résultant des effets<br />
du traitement dynamique effectué par le <strong>166XL</strong>. Après avoir sélectionné les niveaux de <strong>com</strong>pression (et de réduction de bruit) désirés,<br />
régler la <strong>com</strong>mande OUTPUT GAIN de façon à ajouter le même niveau de gain que celui affiché par les indicateurs de réduction de<br />
gain (GAIN REDUCTION). Par exemple, si le signal subit, en moyenne, une réduction de 10 dB, alors le réglage de la <strong>com</strong>mande<br />
OUTPUT GAIN sur 10 dB permet de <strong>com</strong>penser ces 10 dB de réduction de gain à la sortie du <strong>166XL</strong>. Remarquer que la <strong>com</strong>mande<br />
de gain est placée en amont du circuit PeakStop.<br />
Remarque : Le gain supplémentaire à la sortie du <strong>166XL</strong> peut représenter jusqu’à 20 dB. Par conséquent, il est possible que le signal soit écrêté, même lorsque le<br />
niveau d’entrée reste dans les limites choisies. Par exemple, si le taux de <strong>com</strong>pression choisi (RATIO) est faible et que le gain est réglé au maximum (bouton OUTPUT<br />
GAIN tourné à fond vers la droite), il se peut que l’étage de sortie du <strong>166XL</strong> écrête le signal. Par conséquent, il est généralement re<strong>com</strong>mandé de <strong>com</strong>mencer avec un<br />
gain de sortie de 0 dB (bouton OUTPUT GAIN en position verticale). Lorsque le circuit alimenté par le <strong>166XL</strong> présente une sensibilité élevée, le fait de diminuer le gain<br />
de sortie du <strong>166XL</strong> peut permettre d’éviter le recours à un atténuateur.<br />
Touche et témoin BYPASS :<br />
Enfoncer cette touche pour by-passer physiquement le circuit du <strong>166XL</strong> (le signal d’entrée traversera intact l’appareil même si<br />
celui-ci est sur arrêt). Il est à remarquer que la fonction BYPASS est indépendante pour chaque canal, même lorsque l’appareil est en<br />
mode stéréo (par la touche STEREO COUPLE).<br />
En by-pass, le signal d’entrée est envoyé directement à la sortie, évitant les circuits de traitement et les <strong>com</strong>mandes du <strong>166XL</strong>. Le<br />
signal d’entrée se retrouve intact à la sortie (OUTPUT) du <strong>166XL</strong>. Le by-pass est particulièrement utile pour effectuer des <strong>com</strong>paraisons<br />
entre des signaux traités et non traités.<br />
La Led BYPASS s’allume lorsque le <strong>166XL</strong> est en mode Bypass et qu’il est sous tension.<br />
Remarque : Même en l’absence de signal d’entrée, il est normal que les Leds clignotent brièvement lorsque l’appareil est mis sous tension ou hors tension.<br />
Section LIMITEUR DE CRETES<br />
Potentiomètre et témoin PEAKSTOP LEVEL :<br />
Cette <strong>com</strong>mande permet de choisir le niveau maximal des crêtes du signal de sortie du <strong>166XL</strong>, indépendamment de tout autre<br />
réglage. L’étage PeakStop est en aval des circuits de <strong>com</strong>pression, de réduction de bruit et d’amplification de sortie, ce qui permet de<br />
fixer une limite absolue pour les crêtes du signal de sortie. Le PeakStop fonctionne de façon instantanée ; il est possible d’appliquer<br />
des niveaux modérés de <strong>com</strong>pression OverEasy tout en étant protégé contre les forts transitoires et autres surmodulations ou surcharges<br />
de courte durée.<br />
Le PeakStop est un circuit écrêteur progressif dont le <strong>com</strong>portement produit un effet sonore sans heurt, semblable à celui de la<br />
<strong>com</strong>pression OverEasy ; l’écrêtage obtenu est largement préférable à celui d’un amplificateur de puissance ou d’un convertisseur<br />
analogique-numérique. PeakStop arrondit les angles d’une crête plutôt que de la couper brusquement. En incurvant ainsi le front de<br />
montée et le flanc de descente du signal, il réduit la proportion d’harmoniques impaires élevées (et donc les effets sonores<br />
désagréables associés) produites par l’écrêtage « dur » classique.<br />
Le niveau d’activation du circuit PEAKSTOP est réglable entre +0 dB et +20 dB. Il est possible que le signal passe légèrement audessus<br />
du niveau PEAKSTOP choisi afin de permettre l’arrondissement de son sommet. Par conséquent, dans les situations où il est<br />
important de ne pas dépasser un plafond donné, régler le niveau de PEAKSTOP 1 ou 2 dB en-dessous de ce plafond.<br />
La Led PEAKSTOP s’allume à chaque fois que se présentent des crêtes dépassant le niveau du réglage PeakStop et qu’elles subissent<br />
une atténuation. Si la Led PeakStop s’allume lorsque la <strong>com</strong>mande PEAKSTOP LEVEL est réglée sur +20 dB, c’est que la<br />
marge de surcharge du <strong>166XL</strong> a été dépassée et qu’il se produit un écrêtage « dur ».
Section MASTER<br />
dbx <strong>166XL</strong> COMPRESSOR / GATE<br />
Touche et Led STEREO COUPLE :<br />
Cette touche permet de choisir entre les modes de fonctionnement stéréo et dual mono. Enfoncer la touche STEREO<br />
COUPLE pour fonctionner en mode stéréo, à savoir que le canal 1 (Channel 1) devient le circuit maître imposant ses<br />
réglages aux deux canaux. Le canal 2 devient alors « esclave » et toutes ses touches, <strong>com</strong>mandes et Leds sont désactivées<br />
(à l’exception de sa touche BYPASS et de son indicateur GAIN REDUCTION). Il est important de noter que le circuit de<br />
détection fonctionne à partir du niveau efficace réel du signal <strong>com</strong>biné et qu’il n’est donc pas perturbé par les déphasages<br />
(et autre écarts) entre les deux canaux. Ceci permet une <strong>com</strong>pression stéréo sans perte de stabilité.<br />
Lorsque la touche STEREO COUPLE est en position relâchée, l’appareil fonctionne <strong>com</strong>me deux circuits mono<br />
séparés, disposant chacun de ses propres réglages indépendants.<br />
La Led STEREO COUPLE s’allume pour indiquer que le <strong>166XL</strong> est en mode de couplage stéréo.<br />
Panneau Arrière<br />
Prises d’entrée INPUT (BALANCED) :<br />
Les prises jack stéréo et les prises de type XLR sont câblées en parallèle ; le signal audio destiné au <strong>166XL</strong> peut être<br />
appliqué indifférement à l’une ou l’autre des prises INPUT. La prise jack accepte une fiche jack 6,35 standard stéréo<br />
(pointe/anneau/corps) pour un signal d’entrée symétrique ou une fiche 6,35 standard mono (pointe/corps) pour les sources<br />
asymétriques. La prise XLR est cablée de la manière suivante : broche 2 = point chaud (+), broche 3 = point froid (-) et<br />
broche 1 = masse.<br />
Remarque : Les deux prises INPUT de chaque canal (entrée XLR du canal 1 et entrée jack 6,35 du canal 1, par ex.) sont raccordées<br />
entre elles (Pointe = broche 2, anneau = broche 3 et manchon = broche 1). Par conséquent, si l’une de ces prises est dissymétrisée,<br />
l’autre le sera également. Ainsi, si la prise jack 6,35 est utilisée avec un câble mono, l’entrée sera asymétrique et la prise INPUT XLR<br />
sera également en mode asymétrique (broche 3 reliée à la terre). Bien veiller à n’utiliser qu’une entrée à la fois pour chaque canal.<br />
Touche de niveau de fonctionnement:<br />
Cette touche choisit entre un niveau de fonctionnement nominal de -10 dBV et de +4dBu. Quand la touche est enfoncée,<br />
un niveau de fonctionnement de<br />
-10dBV est choisi. Quand elle relâchée, +4 dBu est choisi.<br />
Prises de sortie OUTPUT (BALANCED) :<br />
Les prises jack stéréo et les prises de type XLR sont câblées en parallèle ; le signal de sortie audio peut être indifféremment<br />
envoyé par l’une ou l’autre des prises OUTPUT. La prise jack accepte une fiche jack 6,35 standard stéréo<br />
(pointe/anneau/manchon) pour une charge de sortie symétrique ou une fiche 6,35 standard mono (pointe/manchon) pour<br />
une charge asymétrique. La prise XLR est câblée de la manière suivante : broche 2 = point chaud (+), broche 3 = point<br />
froid (-) et broche 1 = masse. Pour un fonctionnement correct en mode asymétrique, la broche non utilisée (broche 2 ou 3)<br />
doit être mise à la terre. Le niveau nominal du signal de sortie est de +4 dBu sur charge de 600Ω et le niveau de sortie<br />
maximal est de + 20dB sur charge de 600Ω (+20 dBm).<br />
Remarque : Les deux prises OUTPUT de chaque canal (sortie XLR du canal 1 et sortie jack 6,35 du canal 1, par ex.) sont raccordées entre elles (Pointe =<br />
broche 2, anneau = broche 3 et corps = broche 1) et peuvent fournir le même signal à deux circuits séparés. Toutefois, si l’une de ces prises est dissymétrisée,<br />
l’autre le sera également. Ainsi, si la prise OUTPUT jack 6,35 est utilisée avec un câble mono, la sortie sera asymétrique et la prise OUTPUT<br />
XLR sera également en mode asymétrique (broche 3 reliée à la terre).<br />
Prise SIDECHAIN INSERT :<br />
Cette prise de type jack 6,35 stéréo donne accès au chemin du signal vers le détecteur du <strong>166XL</strong>. L’anneau de la fiche<br />
jack sert de pôle d’envoi, transportant une version pré-amplifiée du signal d’entrée du <strong>166XL</strong> sous une impédance de 2<br />
kΩ. La pointe sert de pôle de retour du signal envoyé au circuit du <strong>166XL</strong> par un processeur externe, par exemple un<br />
égaliseur utilisé pour l’élimination du souffle ou pour la <strong>com</strong>mande de porte en fonction de la fréquence. Le circuit<br />
SIDECHAIN INSERT du <strong>166XL</strong> peut également recevoir le signal de sortie de divers types de matériel en utilisant une<br />
fiche jack 6,35 mono. Son impédance d’entrée est supérieure à 10 kΩ.<br />
Remarque : Lorsqu’une fiche est branchée sur cette prise, la connexion entre la prise d’entrée (INPUT) et le circuit de détection du <strong>166XL</strong> est automatiquement<br />
interrompue.<br />
Prise d’alimentation secteur :<br />
Cette prise est prévue pour un cordon d’alimentation de type CEI (livré avec l’appareil). Brancher le cordon sur<br />
l’appareil et sur une prise secteur. Le <strong>166XL</strong> ne dispose pas d’interrupteur général. Il est conseillé de le laisser sous ten-<br />
17
sion en permanence. Sa consommation électrique est très faible. Débrancher le <strong>166XL</strong> s’il est prévu de ne pas l’utiliser<br />
pendant une durée prolongée.<br />
<strong>Av</strong>ertissement : Veiller à bien vérifier la tension secteur et la tension nominale d’alimentation du <strong>166XL</strong>, indiquée sur le tableau arrière de l’appareil. Le<br />
raccordement à une source d’alimentation inadaptée peut causer des dommages importants non couverts par la garantie.<br />
NOTES D’UTILISATION<br />
Section Expander/Gate<br />
Remarque : Les réglages de paramètres indiqués pour chaque type d’utilisation constituent généralement un point de départ. Effectuer ensuite les ajustement<br />
nécessaires.<br />
Traitement des sons de percussions sèches (caisse claire ou grosse caisse, par ex.)<br />
Pour obtenir une <strong>com</strong>mande de porte efficace à partir de sons de percussions à forts transitoires, il est nécessaire de<br />
régler les paramètres du <strong>166XL</strong> de manière à rendre la porte moins sensible aux signaux avoisinants susceptibles de <strong>com</strong>mander<br />
son ouverture ou de provoquer de « faux déclenchements ».<br />
Choisir un temps de maintien (<strong>com</strong>mande RELEASE) suffisamment court pour permettre à la porte de se fermer très<br />
rapidement une fois que le signal passe en-dessous du seuil (THRESHOLD). Cette <strong>com</strong>mande peut également servir à<br />
modifier l’enveloppe du son.<br />
Remarque : Une <strong>com</strong>mande de porte rapide sur des signaux basse fréquence soutenus peut causer un effet de « broutement ». La <strong>com</strong>mutation des<br />
portes du <strong>166XL</strong> pouvant être extrêmement rapide, s’assurer que le temps de maintien (RELEASE) est plus long qu’une période entière de la fréquence<br />
fondamentale du signal traité. Pour éliminer tout effet de « broutement », il suffit d’ajuster la <strong>com</strong>mande RELEASE de manière à allonger le temps de maintien<br />
(taux de fermeture plus lent). Le réglage du seuil (<strong>com</strong>mande THRESHOLD) permet également de minimiser les faux déclenchement et le « broutement<br />
».<br />
Ces types de réglages servent à obtenir une définition plus nette des pistes de percussions, pour éliminer la « résonance<br />
» de certains éléments de batterie ou pour bloquer le passage du signal d’une percussion donnée à travers un micro voisin.<br />
Traitement des sons à amortissement plus long (cymbale ou piano, par ex.)<br />
Pour obtenir une <strong>com</strong>mande de porte efficace à partir de sons présentant un certain amortissement après le transitoire<br />
initial, choisir un temps de maintien suffisamment long (<strong>com</strong>mande RELEASE) pour permettre à la porte de rester ouverte<br />
et de capturer l’enveloppe du signal dans son intégralité.<br />
La porte peut également servir à « assécher » une piste ou un son mixé présentant trop de réverbération ou d’ambiance.<br />
Régler la <strong>com</strong>mande RELEASE de manière à tronquer plus ou moins l’amortissement naturel du son.<br />
Modification de la qualité du son<br />
Les portes du <strong>166XL</strong> peuvent être utilisées pour modifier le caractère d’un son en réduisant ou en modifiant la réverbération<br />
et l’ambiance des signaux instrumentaux. Par exemple, lorsqu’un instrument s’arrête de jouer, son niveau de<br />
réverbération passera en-dessous du seuil choisi (THRESHOLD) sur le <strong>166XL</strong>. Ceci permet d’effectuer une coupure plus<br />
rapide que l’amortissement naturel du son de l’instrument. Essayer divers réglages du seuil (THRESHOLD) et du temps de<br />
maintien (RELEASE) pour modifier la fin du son ; un temps de maintien court éliminera quasiment toute réverbération.<br />
Commande à déclenchement externe<br />
Le déclenchement externe (« keyed gating »), c’est-à-dire la <strong>com</strong>mande de la porte d’un signal donné par un autre, peut<br />
être utilisé pour renforcer la dynamique d’un son (création d’un jeu parfaitement synchronisé et surmixage d’instruments<br />
individuels ou « renforcement » d’une piste peu dynamique, par ex.)<br />
Pour créer deux canaux distincts de guitare basse pour le mixage (séparation du signal de basse en deux canaux et synchronisation<br />
de l’un de ces canaux avec la grosse caisse), envoyer directement l’un des canaux de guitare basse directement<br />
vers la table de mixage et l’autre vers l’entrée (INPUT) du <strong>166XL</strong>. Asservir ensuite la porte au signal de la grosse<br />
caisse (par l’intermédiaire du circuit SIDECHAIN INSERT - effectuer tous les réglages nécessaires). La porte de cette<br />
piste de guitare basse s’ouvre donc sur les coups de grosse caisse uniquement, créant un effet de « punch » supplémentaire<br />
capable de donner une nouvelle vie au son mixé.<br />
Une autre utilisation du déclenchement externe consiste à utiliser le signal du tambour pour <strong>com</strong>mander la porte d’un<br />
oscillateur réglé sur une fréquence adéquate afin d’« accorder » et de donner du « punch » au son de percussion.<br />
Remarque : Pour tout montage à déclenchement externe, veiller à bien ajuster le circuit de <strong>com</strong>pression ou à le contourner en réglant le taux de <strong>com</strong>pression<br />
(RATIO) sur 1:1.<br />
Commande de porte en fonction de la fréquence<br />
La <strong>com</strong>mande de porte en fonction de la fréquence consiste à utiliser le circuit d’insertion (SIDECHAIN INSERT) pour<br />
modeler la réponse de la porte. Par exemple, si la porte est utilisée pour une grosse caisse sur une piste présentant de nombreux<br />
autres signaux parasites, il est possible d’isoler la fréquence de la grosse caisse sur un égaliseur externe afin que la<br />
porte réagisse à cette percussion uniquement. Envoyer le signal de la grosse caisse à la fois directement vers l’entrée de la<br />
18<br />
dbx <strong>166XL</strong> COMPRESSOR / GATE<br />
®<br />
PROFESSIONAL PRODUCTS
dbx <strong>166XL</strong> COMPRESSOR / GATE<br />
porte et à travers un égaliseur relié au circuit SIDECHAIN INSERT. Régler l’égaliseur de manière à ce que seul le signal<br />
désiré soit fort au niveau du circuit d’insertion et la porte s’ouvrira de façon encore plus sélective.<br />
Utilisations élémentaires du circuit de <strong>com</strong>pression<br />
Remarque : Les réglages de paramètres indiqués pour chaque type d’utilisation constituent un point de départ. Effectuer ensuite les ajustement nécessaires.<br />
En général, la <strong>com</strong>pression la plus « douce » est obtenue en enfonçant les touches OVEREASY et MODE (position SLOW), alors que la <strong>com</strong>pression<br />
la plus « agressive » s’obtient en mode Hard Knee rapide (touches OVEREASY et MODE relâchées).<br />
Pour effectuer la <strong>com</strong>pression d’un son mixé, <strong>com</strong>mencer avec un réglage bas du paramètre RATIO, régler le seuil<br />
(THRESHOLD) de manière à obtenir une réduction de gain de quelques dB.<br />
Lissage des variations de niveau d’un micro.<br />
Les variations de niveau d’un signal peuvent se produire lorsque la distance entre un chanteur et son micro varie ou<br />
lorsque la dynamique de la voix change en fonction du registre. Pour <strong>com</strong>penser ces variations, mettre d’abord le <strong>166XL</strong><br />
en mode OverEasy lent (touche OVEREASY toutes deux enfoncées) et choisir un taux de <strong>com</strong>pression (RATIO) faible ou<br />
moyen (4:1, par ex.). Ajuster le seuil (THRESHOLD) de manière à ce que l’indicateur GAIN REDUCTION affiche une<br />
réduction de gain de l’ordre de 6 à 10 dB, puis augmenter le taux de <strong>com</strong>pression si nécessaire. Les caractéristiques douces<br />
du mode de <strong>com</strong>pression OverEasy du <strong>166XL</strong> permettent une gestion transparente des taux de <strong>com</strong>pression, même s’ils<br />
sont relativement élevés. Si la partie basse fréquence d’un signal vocal subit une <strong>com</strong>pression trop importante (si la voix<br />
semble trop effacée ou que sa présence dans les registres bas est perdue, par ex.), enfoncer le bouton CONTOUR afin de<br />
permettre à une portion plus importante du signal basse fréquence original de traverser le <strong>166XL</strong> sans subir de transformation.<br />
Lissage des variations (et augmentation du « sustain ») des signaux d’instruments<br />
musicaux (guitare basse, guitare électrique ou synthétiseur, par ex.)<br />
Pour obtenir un son de basse électrique (ou électronique) plus constant, appliquer au signal de sortie de l’instrument un<br />
taux de <strong>com</strong>pression (RATIO) d’environ 4:1, puis ajuster la <strong>com</strong>mande de seuil (THRESHOLD) de manière à obtenir un<br />
réduction de gain de 10 à 12 dB. La <strong>com</strong>pression a pour effet de réduire les différences d’intensité sonore entre les différentes<br />
cordes et d’augmenter le « sustain » inhérent à la basse. Pour d’autres instruments, <strong>com</strong>me les cors, dont l’intensité<br />
sonore dépend de la note jouée, l’effet est également bénéfique. Si le son de basse semble doux mais pas assez consistant,<br />
essayer de le renforcer en enfonçant la touche CONTOUR.<br />
Pour contrôler les écarts de volume intempestifs d’une guitare ou d’un synthétiseur et pour éviter de saturer le magnétophone<br />
ou la table de mixage au cours d’une séance d’enregistrement ou d’un concert, <strong>com</strong>mencer en mode de <strong>com</strong>pression<br />
Hard Knee lente, avec un taux de <strong>com</strong>pression (RATIO) d’environ 5:1 et le seuil réglé sur le niveau maximum moyen de<br />
la piste - ce qui permet de n’atténuer que les signaux « excessifs ». Utiliser le mode CONTOUR si nécessaire.<br />
Pour augmenter la partie soutenue (« sustain ») d’un son d’instrument à cordes synthétique ou de guitare, <strong>com</strong>mencer<br />
avec un taux de <strong>com</strong>pression (RATIO) élevé (entre 10:1 et ∞:1), puis ajuster la <strong>com</strong>mande de seuil (THRESHOLD) à<br />
l’oreille. Par exemple, pour modifier l’enveloppe d’un son de synthétiseur trop mordant sur les attaques mais présentant un<br />
long temps de maintien, <strong>com</strong>mencer par jouer des notes ou des accords lents mais réguliers en faisant subir une forte <strong>com</strong>pression<br />
au son (avec un taux encore plus élevé). Une forte <strong>com</strong>pression des sons de guitare et de synthétiseur lors de leur<br />
enregistrement en format numérique permet souvent de leur restituer leur « côté analogique ».<br />
Renforcement de la grosse caisse et atténuation des autres percussions<br />
Un grosse caisse distendue présente souvent un son sourd et pas assez claquant. Pour y remédier avec le <strong>166XL</strong>, <strong>com</strong>mencer<br />
par appliquer un taux de <strong>com</strong>pression (RATIO) moyen à élevé (6:1, par ex.), ajuster le seuil (<strong>com</strong>mande<br />
THRESHOLD) de manière à ce que les indicateurs GAIN REDUCTION affichent une réduction de gain de l’ordre de 15<br />
dB puis augmenter le taux de <strong>com</strong>pression si nécessaire. En mode OverEasy, le <strong>166XL</strong> réagit légèrement moins vite qu’en<br />
mode Hard Knee, ce qui aura pour effet de renforcer le claquement au début de la note et de réduire son caractère sourd.<br />
Le <strong>166XL</strong> permet également de renforcer la netteté des toms et des caisses claires ou encore, utilisé avec une boîte à<br />
rythme, de modifier le caractère de tout son de percussion électronique.<br />
Il est possible de faire subir une <strong>com</strong>pression aux signaux de cymbales ou de toms (à l’aide du circuit d’insertion<br />
SIDECHAIN du <strong>166XL</strong>) pour éviter de saturer la bande d’enregistrement. Diviser le signal de percussion en envoyant l’un<br />
des canaux directement vers l’entrée (INPUT) du <strong>166XL</strong> et l’autre vers un égaliseur (le correcteur paramètrique 242 ou<br />
l’un des correcteurs graphiques de la série 30 de dbx, par ex.). Brancher ensuite la sortie de l’égaliseur sur la prise<br />
SIDECHAIN INSERT du <strong>166XL</strong>. L’égaliseur peut être réglé pour renforcer les fréquences aux environs de 5 kHz, ce qui a<br />
pour effet de déclencher la <strong>com</strong>pression du signal de cymbale sur les coups très forts, évitant ainsi la saturation de la bande<br />
dans les hautes fréquences, où la marge de sécurité est plus réduite. Par contre, les sons de balai ou les coups de baguette<br />
plus légers sur les cymbales ne seront pas modifiés. Dans la mesure où le tom est un instrument de fréquence plus grave et<br />
donc mieux toléré par la bande magnétique, son besoin en <strong>com</strong>pression est moins important. Le réglage de l’égaliseur dans<br />
le circuit d’insertion doit être tel que le circuit de <strong>com</strong>pression ne se déclenche pas aussi vite pour un fort coup de tom que<br />
19
pour un coup de cymbale de puissance équivalente. Voir d’autres utilisations du circuit Sidechain à la page suivante.<br />
Lors du mixage intermédiaire des percussions (mixage de pistes de percussions multiples sur deux pistes avec utilisation<br />
des deux canaux du <strong>166XL</strong> pour la <strong>com</strong>pression), essayer de diminuer le taux de <strong>com</strong>pression de chaque canal<br />
(jusqu’à 2:1) afin d’éviter les excès de « crépitement » des cymbales. Dans les grands systèmes multipistes, veiller à ce que<br />
la <strong>com</strong>pression des signaux de caisse claire et de grosse caisse se fasse séparément. Il est également possible d’appliquer<br />
une forte <strong>com</strong>pression à un mixage intermédiaire stéréo de toms et de ne pas modifier le reste des percussions.<br />
Faire ressortir un signal dans un son mixé<br />
Dans la mesure où la réduction de la gamme dynamique a pour effet d’accroître légèrement le niveau moyen du signal,<br />
il est possible de faire ressortir une piste donnée d’un son mixé en renforçant légèrement son niveau puis en effectuant une<br />
<strong>com</strong>pression. Commencer avec un taux de <strong>com</strong>pression (RATIO) de 2:1 et un niveau de seuil (THRESHOLD) relativement<br />
bas (-20 dB). Ajuster ensuite ces deux paramètres selon les besoins.<br />
Les circuits de <strong>com</strong>pression peuvent également servir à mettre en avant les parties vocales d’une bande produite dans<br />
un studio de faible volume (home-studio par ex.). Utiliser un micro équipé d’un pare-vent en mousse. Régler le taux de<br />
<strong>com</strong>pression (RATIO) sur 10:1 et le seuil (THRESHOLD) sur -10 dB. La bouche étant placée à environ 5 cm du micro,<br />
chanter avec moins de volume que normal mais en accentuant le phrasé. Ajouter éventuellement un égaliseur (le correcteur<br />
paramètrique 242 ou l’un des correcteurs graphiques de la série 30 de dbx, par ex.) ou un dipositif d’effets pour la voix<br />
(réverbération, delay, distorsion, par ex.) afin de renforcer le caractère de la prestation.<br />
Il est également possible d’isoler certaines parties chantées ou certains instruments à partir d’une source mono déjà<br />
mixée : voir « Compression pondérée en fréquence » à la page 13.<br />
Remarque : Lors de l’utilisation du <strong>166XL</strong> pour la <strong>com</strong>pression d’une source stéréo, les paramètres influant sur la courbe de transfert et les réglages du<br />
taux de <strong>com</strong>pression (RATIO) et du seuil (THRESHOLD) sont semblables à ceux présentés plus haut dans le cadre de l’utilisation de canaux individuels.<br />
Toutefois, on constate généralement que les effets des fortes <strong>com</strong>pressions sont plus audibles sur une bande stéréo mixée qu’ils ne le seraient sur les différentes<br />
pistes individuelles qui la <strong>com</strong>posent.<br />
Empêcher la saturation de la bande d’enregistrement<br />
Lorsque le niveau sonore présente de fortes variations, la <strong>com</strong>pression permet d’éviter que certains niveaux d’enregistrement<br />
(cymbales dans le mixage final ou dans le mixage intermédiaire de la batterie) ne saturent les pistes de la bande<br />
d’enregistrement (voir « Compression pondérée en fréquence » à la page 13).<br />
Empêcher la surcharge numérique<br />
Les dispositifs d’enregistrement et d’échantillonnage numérique subissent une distorsion audible lorsqu’ils dépassent<br />
leurs marges de surcharge (c-à-d la plage au-dessus de leur niveau de fonctionnement nominal). Le <strong>166XL</strong> permet de<br />
s’assurer que l’entrée audio ne saturera pas les convertisseurs analogiques-numériques du système d’enregistrement. Le<br />
<strong>166XL</strong> est suffisamment silencieux pour être utilisé avec tout type de système numérique. Activer le mode Hard Knee,<br />
régler le taux de <strong>com</strong>pression (RATIO) sur ∞:1 et le seuil (THRESHOLD) sur le plus haut niveau autorisé, et le son traversant<br />
le <strong>166XL</strong> ne subira aucune modification de gain sauf en cas d’urgence (niveaux excessivement élevés).<br />
Remarque : le limiteur PeakStop peut également être utilisé pour éviter les surcharges audibles des systèmes numériques.<br />
Protection des haut-parleurs (auditoriums, églises, D.J. mobiles et systèmes de<br />
sonorisation)<br />
Les systèmes de <strong>com</strong>pression sont souvent utilisés pour empêcher que les sources sonores de niveau trop élevé ne<br />
génèrent une distorsion dans les amplificateurs de puissance ou n’endommagent les étages de préamplification de systèmes<br />
de sonorisation (qu’il s’agisse de la sonorisation d’un auditorium, d’une église ou d’une discothèque, du matériel de D.J.<br />
mobile ou d’une chaîne stéréo chez soi). Régler le <strong>166XL</strong> pour qu’il agisse en limiteur (mode de <strong>com</strong>pression Hard Knee<br />
et <strong>com</strong>mande RATIO sur 10:1 ou plus) et ajuster le seuil (THRESHOLD) de manière à obtenir une <strong>com</strong>pression de 15 dB<br />
ou plus (à peine quelques dB en-dessous du niveau d’écrêtage de l’entrée). Le <strong>166XL</strong> ne modifiera pas le gain des signaux<br />
de bas niveau. Par contre, en présence de signaux de forte amplitude, le gain sera réduit de manière à empêcher leur écrêtage<br />
et à protéger les <strong>com</strong>posants sensibles du système de sonorisation contre les risques d’échauffement et autres types de<br />
dommages potentiels.<br />
Lorsque le <strong>166XL</strong> est utilisé pour ne modifier le gain que dans les cas d’urgence (niveaux excessivement élevés), certains<br />
techniciens choisissent le mode de <strong>com</strong>pression Hard Knee et règlent le taux de <strong>com</strong>pression (RATIO) sur ∞:1 et le<br />
seuil (THRESHOLD) sur le plus haut niveau autorisé. Comme dans le cas de la protection des circuits numériques contre<br />
les surcharges, il également possible d’utiliser le limiteur PeakStop du <strong>166XL</strong> à la place ou en plus de la <strong>com</strong>pression.<br />
En règle générale, les étages de <strong>com</strong>pression doivent être aussi près que possible des amplificateurs dans la chaîne de<br />
signal. Si le <strong>166XL</strong> est placé avant l’égaliseur, par exemple, une forte impulsion issue de l’égaliseur ne serait pas perçue<br />
par le <strong>166XL</strong> et risquerait d’endommager les haut-parleurs (voir « Systèmes d’enceintes multivoies », page 14). Pour<br />
obtenir des niveaux de pression sonore maximum, les gros systèmes de sonorisation utilisent fréquemment un <strong>com</strong>presseur<br />
séparé pour chaque sortie du filtre séparateur de fréquences. Pour un système d’amplification stéréo, il est possible d’utiliser<br />
un <strong>166XL</strong> par bande de fréquences (basse, basse-médium, médium, etc..).<br />
20<br />
dbx <strong>166XL</strong> COMPRESSOR / GATE<br />
®<br />
PROFESSIONAL PRODUCTS
dbx <strong>166XL</strong> COMPRESSOR / GATE<br />
Augmentation du niveau moyen des systèmes de sonorisation<br />
La limititation du signal (c-à-d sa <strong>com</strong>pression à des taux du type ∞:1) a pour effet d’améliorer sa clarté car elle permet<br />
aux signaux d’entrée de bas niveau d’être reproduits par le système à des volumes plus élevés. Lors de prestations<br />
publiques, cela offre un degré d’intimité supplémentaire dans la mesure où les chuchotements d’un chanteur peuvent être<br />
entendus plus distinctement. La caractéristique de transfert OverEasy du <strong>166XL</strong> permet d’appliquer une <strong>com</strong>pression très<br />
importante (RATIO réglé sur 10:1 ou plus) dans nombre de situations. Ceci permet aux orateurs, chanteurs et musiciens<br />
dynamiques de se concentrer sur leur discours ou leur prestation sans se soucier des effets négatifs des changements de<br />
niveau.<br />
Utilisation d’un égaliseur pour réduire l’effet Larsen (concerts en salle ou en extérieur,<br />
églises)<br />
Il est possible d’utiliser le <strong>166XL</strong> avec un égaliseur pour réduire les risques d’effet Larsen dans les discothèques, les<br />
églises, les concerts en plein air ou autre manifestation publique. Relier ou insérer le <strong>166XL</strong> sur la sortie principale d’une<br />
table de mixage, choisir le mode de <strong>com</strong>pression Hard Knee et augmenter lentement le gain de sortie (OUTPUT GAIN)<br />
jusqu’à atteindre le premier sifflement Larsen, puis régler le taux de <strong>com</strong>pression (RATIO) du <strong>166XL</strong> sur ∞:1 et le seuil<br />
(THRESHOLD) sur une valeur basse. Le <strong>166XL</strong> accrochera le premier sifflement Larsen et le maintiendra constant, ce qui<br />
permet de régler l’égaliseur de manière à le minimiser. Continuer à augmenter le gain et à ajuster l’égaliseur de façon à<br />
éliminer les 3 ou 4 fréquences d’effet Larsen suivantes.<br />
Utilisation du <strong>166XL</strong> <strong>com</strong>me amplificateur de ligne<br />
Pour utiliser le <strong>166XL</strong> en tant qu’amplificateur de ligne, tourner la <strong>com</strong>mande RATIO à fond vers la gauche (position<br />
1:1), la <strong>com</strong>mande THRESHOLD à fond vers la droite (+20), régler la <strong>com</strong>mande PEAKSTOP sur +20 et le gain de sortie<br />
(OUTPUT GAIN) sur la valeur requise en fonction de la situation. Garder à l’esprit qu’un gain excessif peut résulter en un<br />
écrêtage des signaux de haut niveau à la sortie. Pour ajouter de la <strong>com</strong>pression, régler le gain de <strong>com</strong>pression (RATIO) et<br />
le seuil (THRESHOLD) sur les valeurs désirées.<br />
Compression pondérée en fréquence (insertion Sidechain)<br />
Il est possible de séparer certaines parties vocales et instrumentales d’un son mixé par une <strong>com</strong>pression pondérée en<br />
fréquence. Le réglage des paramètres d’un égaliseur (dbx 242 ou dbx Série 30, par ex.) placé en ligne en amont du circuit<br />
SIDECHAIN INSERT (mais pas sur le chemin du signal audio) ne modifie pas le timbre ou la réponse en fréquence du<br />
signal audio principal. Par contre, il permet de modifier la réponse du circuit de <strong>com</strong>pression en fonction de la fréquence.<br />
Dans un tel montage, le fait de pousser certaines fréquences sur l’égaliseur a pour effet de les atténuer du signal audio.<br />
Si le seuil (THRESHOLD) est réglé à un niveau relativement élevé, alors les sons courants ne sont pas modifiés tandis que<br />
les solos et les sons très puissants subissent une <strong>com</strong>pression (bien sûr, lorsque la <strong>com</strong>pression se produit, elle s’applique<br />
au niveau global de toute la source - toutefois, si la touche CONTOUR est enfoncée, une part plus importante des signaux<br />
de basse fréquence peut être conservée). En fonction du réglage du seuil, les fréquences fondamentales et les harmoniques<br />
de faibles amplitudes ne doivent pas causer de <strong>com</strong>pression et le son ne présente pas le déphasage généralement lié au passage<br />
à travers un égaliseur.<br />
Lors de l’enregistrement de toms ou de cymbales, l’utilisation du circuit de <strong>com</strong>pression avec insertion d’un égaliseur<br />
sur le circuit Sidechain permet de prévenir la saturation des bandes analogiques. L’égaliseur peut être réglé de manière à<br />
produire une accentuation aux environ de 5 kHz, ce qui provoque la <strong>com</strong>pression des très forts coups de cymbale et<br />
empêche la saturation dans les fréquences élevées, où la marge de sécurité est plus réduite. Par contre, les sons de balai ou<br />
les coups de baguette plus légers sur les cymbales ne sont pas modifiés. Dans la mesure où le tom est un instrument de<br />
fréquence plus grave et donc mieux toléré par la bande d’enregistrement, son besoin en <strong>com</strong>pression est moins pressant.<br />
Le réglage de l’égaliseur dans la circuit d’insertion doit donc être tel que le circuit de <strong>com</strong>pression ne se déclenche pas<br />
aussi spontanément pour un fort coup de tom que pour un coup de cymbale de puissance équivalente.<br />
Le pendant de la technique ci-dessus peut également être utilisé : le fait d’atténuer certaines bandes de fréquence sur<br />
SOURCE<br />
OUTPUT<br />
EQ<br />
166A<br />
INPUT OUTPUT<br />
Figure 3 : Compression pondérée en fréquence<br />
SIDECHAIN<br />
INSERT<br />
21
l’égaliseur a pour effet de renforcer le niveau de tout son dont les fréquences dominantes sont dans le registre en question<br />
car le <strong>166XL</strong> détecte un besoin de <strong>com</strong>pression moindre.<br />
Réduction des sifflantes (De-Esseur)<br />
Pour réduire les sifflantes des parties vocales, utiliser un égaliseur paramétrique (dbx 242, par ex.) sur le circuit<br />
SIDECHAIN et le régler de manière à créer une accentuation à la fréquence où se produit le sifflement ou le chuintement<br />
de la voix (habituellement dans la zone de 4 à 6 kHz). Ceci a pour effet de renforcer les sifflements sur un signal vocal qui<br />
est déjà sifflant à l’entrée du circuit Sidechain. Associé à un réglage moyen ou élevé du seuil (THRESHOLD) et du taux de<br />
<strong>com</strong>pression (RATIO), ainsi qu’à un mode de <strong>com</strong>pression rapide, ce montage permet de fortement atténuer les sifflements<br />
sans modifier fondamentalement la qualité ou l’équilibre sonore de la voix. S’il est vrai que la baisse de niveau est subie<br />
par l’ensemble des fréquences lorsque la <strong>com</strong>pression est déclenchée, le son « ss » se produit habituellement seul, avant ou<br />
après le son dominant de la voix.<br />
Augmentation du « sustain »<br />
Pour augmenter le « sustain » d’un instrument de musique (guitare ou basse, par exemple), utiliser un égaliseur dans le<br />
circuit Sidechain et le régler de manière à renforcer la gamme de fréquence dominante de l’instrument. Mettre le <strong>166XL</strong> en<br />
mode de <strong>com</strong>pression Hard Knee lente (touche OVEREASY sortie) et choisir un seuil (THRESHOLD) relativement bas et<br />
un taux de <strong>com</strong>pression (RATIO) modéré.<br />
Systèmes d’enceintes multivoies<br />
Si un circuit de <strong>com</strong>pression unique est amené à être utilisé avec un système d’enceintes multivoies (c-à-d en amont du<br />
filtre séparateur et en aval de l’égaliseur), le problème auquel fait face l’ingénieur du son est celui du maintien du signal<br />
en-dessous du niveau susceptible d’endommager le maillon le plus sensible de la chaîne. Si, par exemple, les haut-parleurs<br />
de médium sont souvent endommagés, le système dans son ensemble doit être utilisé à un niveau de pression sonore<br />
inférieur ou bien il est nécessaire d’ajouter des haut-parleurs de médium supplémentaires. En insérant un égaliseur par<br />
l’intermédiaire du circuit Sidechain, le <strong>166XL</strong> peut être rendu plus sensible aux fréquences qui sont situées dans la plage<br />
reproduite par les haut-parleurs les plus fragiles. Le système peut donc fonctionner à des niveaux plus élevés, l’atténuation<br />
ne se produisant qu’en présence de signaux potentiellement préjudiciables.<br />
Utilisation d’un filtre dans le circuit Sidechain<br />
Les effets de l’insertion d’un filtre dans le circuit Sidechain sont essentiellement les mêmes que ceux obtenus avec un<br />
égaliseur (voir plus haut). Les fréquences situées dans la bande passante de filtre subissent une <strong>com</strong>pression (ou, du moins,<br />
subissent une <strong>com</strong>pression considérablement plus importante que les fréquences situées en-dehors de la bande passante du<br />
filtre). Dans la mesure où les filtres passifs peuvent causer des pertes d’insertion, il peut être nécessaire d’abaisser le<br />
réglage du seuil (THRESHOLD) du <strong>166XL</strong> afin de conserver une réduction de gain donnée à travers la bande passante du<br />
filtre ; ce réglage peut être ajusté en observant l’état des témoins Led de seuil du <strong>166XL</strong>.<br />
Préaccentuation avant diffusion<br />
En insérant un réseau de filtres de préaccentuation (pre-emphasis) par l’intermédiaire du circuit Sidechain d’un <strong>166XL</strong><br />
assurant le traitement d’un signal audio préaccentué, il est possible de produire des niveaux de sortie plus élevés sans<br />
dépasser les limites de saturation du système de diffusion.<br />
RACCORDEMENT DU <strong>166XL</strong> AU SYSTEME DE SONORISATION<br />
Raccordement général<br />
Le <strong>166XL</strong> présente des entrées et des sorties symétriques et s’utilise avec tout dispositif de niveau ligne. Parmi les<br />
exemples les plus courants, on trouve notamment tables de mixage, instruments de musique, et autres appareils de traitement<br />
du signal. Pour plus de détails sur le câblage, se reporter aux « Notes sur l’installation », page 24.<br />
Pour l’ensemble des branchements, suivre les instructions suivantes :<br />
1. Eteindre l’ensemble du matériel avant d’effectuer tout branchement.<br />
2. Monter le <strong>166XL</strong> en rack 1U (facultatif).<br />
Le <strong>166XL</strong> occupe l’espace d’ 1 U en hauteur et de 19 ’’ en largeur. Il peut être installé au-dessus ou en-dessous de tout<br />
appareil ne dégageant pas de chaleur et il ne nécessite pas de ventilation particulière. Lorsque le matériel est sous tension,<br />
la température ambiante ne doit pas dépasser 45°C.<br />
22<br />
dbx <strong>166XL</strong> COMPRESSOR / GATE<br />
®<br />
PROFESSIONAL PRODUCTS
dbx <strong>166XL</strong> COMPRESSOR / GATE<br />
Remarque : Veiller à ne pas endommager le panneau frontal de l’appareil par un serrage excessif des vis de fixation.<br />
Attention : Pour écarter tout risque d’électrocution, ne jamais ouvrir le boîtier. Par ailleurs, l’appareil ne contient aucune pièce pouvant être réparée ou<br />
remplacée par l’utilisateur.<br />
3. Effectuer les raccordements par l’intermédiaire des prises XLR ou jack 6,35 stéréo ou mono en fonction des<br />
besoins.<br />
Les points de raccordement courants sont notamment : insertion sur canal ou sous-groupe d’une table de mixage<br />
lorsque le <strong>166XL</strong> est utilisé pour des pistes ou instruments individuels ; sorties principales ou groupe de la table de<br />
mixage lors du mixage ; boucle d’effets du préampli d’un instrument, lorsque le <strong>166XL</strong> est utilisé pour une guitare ou<br />
une basse ; sorties principales d’un dispositif de mixage intermédiaire (de clavier, par ex.) lorsque le signal est envoyé<br />
vers la table de mixage principale ; entre la sortie d’un lecteur de cassette numérique (DAT) et l’entrée d’une platine<br />
cassette analogique. Lors de l’utilisation d’une chaîne de processeurs, le <strong>166XL</strong> peut être placé soit en amont soit en<br />
aval des effets ou processeurs dynamiques. Toutefois, si le <strong>166XL</strong> est utilisé pour la protection de haut-parleurs, le circuit<br />
de <strong>com</strong>pression devrait être placé aussi près de l’amplificateur que possible sur le trajet du signal. Il est conseillé<br />
d’utiliser son bon sens et son expérience pour essayer différents types de montage et évaluer lequel fournit les meilleurs<br />
résultats par rapport aux besoins.<br />
Remarque : Ne jamais raccorder l’entrée du <strong>166XL</strong> à la sortie haut-parleur d’un instrument ou d’un amplificateur de puissance.<br />
4. Mettre l’appareil sous tension : brancher le cordon d’alimentation sur l’appareil et sur une prise de courant secteur.<br />
Remarque : Vérifier la tension secteur. L’appareil est prévu pour fonctionner sous 115 ou 230 V, 50 ou 60 Hz. Voir la tension d’alimentation nominale<br />
exacte figurant sur le panneau arrière de l’appareil.<br />
Utilisation du circuit SIDECHAIN INSERT<br />
Le circuit d’insertion SIDECHAIN INSERT permet de <strong>com</strong>mander la <strong>com</strong>pression ou la porte à partir de signaux<br />
autres que l’entrée audio (par l’intermédiaire d’un dispositif d’insertion, de type égaliseur, par ex.). Les utilisations les plus<br />
courantes du circuit d’insertion sont notamment la <strong>com</strong>mande de porte à déclenchement externe (« keyed gating »), la<br />
<strong>com</strong>mande de porte en fonction de la fréquence (« frequency-sensitive gating ») et la <strong>com</strong>pression pondérée en fréquence<br />
(« frequency-weighted <strong>com</strong>pression »). Ces sujets sont couverts en détail dans les pages précédentes de ce manuel.<br />
Certaines utilisations du circuit d’insertion peuvent nécessiter des câbles spéciaux.<br />
Par exemple, pour la <strong>com</strong>mande de porte en fonction de la fréquence ou pour la <strong>com</strong>pression pondérée en fréquence, il<br />
est nécessaire d’envoyer à l’entrée d’un égaliseur le même signal que celui envoyé à l’entrée (INPUT) du <strong>166XL</strong>, puis de<br />
raccorder la sortie de l’égaliseur à la prise SIDECHAIN INSERT du <strong>166XL</strong> (figure 3). L’envoi du signal à la fois à<br />
l’entrée (INPUT) du <strong>166XL</strong> et de l’égaliseur peut être réalisé de plusieurs manières : (1) utiliser un câble d’insertion<br />
branché sur la prise SIDECHAIN INSERT. La fiche d’envoi (SEND) se branche sur l’entrée de l’égaliseur et la fiche de<br />
retour (RETURN) sur sa sortie ; (2) utiliser un câble en T pour diriger la source audio à la fois vers l’entrée (INPUT) du<br />
<strong>166XL</strong> et vers celle de l’égaliseur ; (3) envoyer le signal vers l’une des prises d’entrée (INPUT) du <strong>166XL</strong> et utiliser<br />
l’autre prise d’entrée (INPUT) parallèle du canal pour alimenter l’égaliseur (par ex., si la source audio est branchée sur la<br />
prise d’entrée jack 6,35 du canal 1, utiliser la prise d’entrée XLR du canal 1 pour envoyer le signal à l’égaliseur) ; (4) si la<br />
source audio est conçue pour multiplier elle-même son signal de sortie (certain synthétiseur, par ex., envoient le même signal<br />
à travers deux sorties), brancher un câble sur chacune des sorties puis en raccorder un à l’entrée (INPUT) du <strong>166XL</strong> et<br />
l’autre à celle de l’égaliseur.<br />
Raccordement à des dispositifs particuliers<br />
Le <strong>166XL</strong> présente des entrées et des sorties symétriques et s’utilise avec tout dispositif de niveau ligne. Parmi les<br />
exemples les plus courants, on trouve notamment tables de mixage, instruments de musique et autres appareils de traitement<br />
du signal.<br />
Table de mixage<br />
Pour effectuer la <strong>com</strong>pression d’une piste particulière d’un enregistrement multipiste ou d’une voie donnée en sonorisation,<br />
relier l’entrée (INPUT) du <strong>166XL</strong> à la prise de sortie de la source audio et sa sortie (OUTPUT) directement sur la<br />
prise d’entrée ligne (symétrique ou non) ou bien raccorder les prises d’entrée et de sortie du <strong>166XL</strong> à un point d’insertion.<br />
Dans ce cas, il est très probable que la connexion se fasse en mode asymétrique.<br />
La <strong>com</strong>pression subie est directement liée au niveau du signal d’entrée. Toutefois, en fonction du montage, il est parfois<br />
difficile de déterminer quelles <strong>com</strong>mandes de volume sur le trajet du signal modifient le niveau d’entrée et lesquelles<br />
modifient le niveau de sortie. Si le <strong>166XL</strong> est branché de telle manière que la <strong>com</strong>pression se produise en amont des <strong>com</strong>mandes<br />
de volume de la table de mixage (par ex., si le <strong>166XL</strong> est installé directement entre la source audio et l’entrée de la<br />
table de mixage ou si le <strong>166XL</strong> est relié à la table de mixage par l’intermédiaire de connecteurs d’insertion de type « prefader<br />
»), alors le niveau de son signal d’entrée peut être directement contrôlé par la <strong>com</strong>mande de volume de la source<br />
(<strong>com</strong>mande de volume d’un synthétiseur, par ex.) et le niveau de sortie de la piste à l’aide de la <strong>com</strong>mande OUTPUT<br />
GAIN du <strong>166XL</strong> ou du potentiomètre de volume de la table de mixage (ce dernier étant particulièrement adapté à la<br />
coupure du son en fondu). Toutefois, si le <strong>166XL</strong> est raccordé à un point d’insertion de type « post-fader » de la table de<br />
23
mixage, le réglage du potentiomètre de volume de la table modifiera le niveau d’entrée et donc la <strong>com</strong>pression subie par le<br />
signal dans le <strong>166XL</strong>. S’il est préférable que ce potentiomètre de volume contrôle le signal de sortie du <strong>166XL</strong>, il est conseillé<br />
de brancher ce dernier directement entre la source audio et l’entrée du canal de la table de mixage. De cette manière,<br />
la <strong>com</strong>mande de volume de l’instrument permet de contrôler le niveau d’entrée du <strong>166XL</strong> et la <strong>com</strong>pression alors que le<br />
potentiomètre de volume de la table de mixage ne modifie que le volume global de la piste.<br />
Instruments de musique (guitare électrique, basse, claviers, instruments électroacoustiques,<br />
par ex.)<br />
La sortie d’une guitare électrique n’est pas toujours suffisamment puissante pour <strong>com</strong>mander l’entrée du <strong>166XL</strong>. Dans<br />
ce cas, il est conseillé d’utiliser, si elle existe, la sortie « PREAMP OUT » de l’amplificateur de la guitare ou encore la sortie<br />
de tout autre dispositif conçu pour accepter des signaux audio de bas niveau (notamment diverses pédales d’effets,<br />
préamplis de lecteurs acoustiques et appareils de pupitres audio tels que dbx 163A, 263A ou 563X). Le fait que ces sources<br />
soient symétriques ou asymétriques n’a aucune importance.<br />
Les micros, guitares basses et instruments électroacoustiques présentent généralement des sortie à bas niveau. Dans la<br />
plupart des montages, il est nécessaire de renforcer le signal pour être en mesure d’utiliser le <strong>166XL</strong>. Par exemple, lors de<br />
l’enregistrement de la voix directement sur un magnétophone portable, un préamplificateur de micro (<strong>com</strong>me le dbx 760X)<br />
placé entre le micro et le <strong>166XL</strong> (lui-même relié à l’une des entrées du magnétophone) permet de fournir au <strong>166XL</strong>, mais<br />
également au magnétophone, un signal d’entrée de plus haut niveau.<br />
Les claviers, échantillonneurs, boîtes à rythme et modules de sons fournissent généralement des signaux de niveau ligne<br />
et peuvent être raccordés directement de la sortie de l’instrument à l’entrée (INPUT) du <strong>166XL</strong>.<br />
Remarque : NE PAS RACCORDER l’entrée du <strong>166XL</strong> à la sortie haut-parleur d’un instrument ou d’un amplificateur de puissance. Cela peut entraîner des<br />
dommages importants des divers <strong>com</strong>posants du système.<br />
Dispatching<br />
En studio, le <strong>166XL</strong> peut être raccordé à un dispatching afin de permettre son utilisation partout dans le studio. Si le<br />
studio ne fonctionne pas totalement en symétrique, il est nécessaire de mettre à la masse le conducteur de sortie symétrique<br />
non utilisé : broche 2 ou 3 du connecteur XLR ou anneau d’un jack 6,35 stéréo.<br />
Amplification<br />
Pour la <strong>com</strong>pression d’un son mixé « live » (en direct) ou la protection des haut-parleurs, raccorder le <strong>166XL</strong> entre la<br />
source (table de mixage ou ampli de distribution) et les amplificateurs de puissance. En cas d’utilisation d’enceintes multivoies<br />
à filtre séparateur bas niveau, placer le(s) <strong>166XL</strong> après le(s) filtre(s). Pour un système stéréo, les différents filtres<br />
peuvent faire l’objet d’un couplage stéréo deux par deux (couplage des deux passe-haut, des deux passe-bas, etc.). S’il<br />
n’est possible d’utiliser qu’un seul canal du <strong>166XL</strong> avant le filtre séparateur, alors le fait d’ajouter un égaliseur sur le circuit<br />
d’insertion peut offrir une certaine protection supplémentaire pour les <strong>com</strong>posants haute-fréquence (voir « Protection<br />
des haut-parleurs », page 20).<br />
NOTES SUR L’INSTALLATION<br />
Configurations de câblage entrée/sortie<br />
Câbles et branchements<br />
Le <strong>166XL</strong> est un appareil symétrique (différentiel) conçu pour des niveaux nominaux de +4 dBu ; les entrées et les sorties<br />
se font par l’intermédiaire de connecteurs jack stéréo ou XLR. Le <strong>166XL</strong> peut être utilisé avec des sources symétriques<br />
ou asymétriques et ses sorties peuvent être raccordées à des charges symétriques ou asymétriques, à condition d’utiliser les<br />
câbles adéquats.<br />
Une ligne symétrique consiste en un câble blindé à deux fils conducteurs qui transportent un signal identique mais de<br />
polarité inverse par rapport à la masse. Une ligne asymétrique est généralement constituée d’un câble blindé à un seul conducteur<br />
transportant le signal alors que le blindage est au même potentiel que la terre.<br />
Configurations de câblage de l’entrée<br />
Le <strong>166XL</strong> présente une impédance d’entrée supérieure à 40 kΩ en mode symétrique <strong>com</strong>me asymétrique. Il est donc<br />
<strong>com</strong>patible avec quasiment tout type de source, d’impédance faible ou élevée. Les prises d’entrée du <strong>166XL</strong> sont câblées<br />
en parallèle. La pointe de la prise jack est reliée à broche 2 de la prise XLR, l’anneau à la broche 3 et le corps à la broche 1<br />
(blindage). Remarquer l’inversion du câblage des broches 2 et 3 par rapport à certains matériels dbx antérieurs ou à<br />
d’autres marques : toutefois, si les connexions sont effectuées de la même manière à l’entrée et à la sortie, alors le signal<br />
sera polarisé correctement (« en phase »).<br />
Si on inverse les connexions d’une seule prise (entrée ou sortie), on inverse la polarité du signal de sortie par rapport au<br />
signal d’entrée.<br />
24<br />
dbx <strong>166XL</strong> COMPRESSOR / GATE<br />
®<br />
PROFESSIONAL PRODUCTS
Considérations de câblage de sortie<br />
Les prises de sortie du modèle <strong>166XL</strong> sont connectées en parallèle : tant la prise XLR que le jack stéréo peuvent attaquer<br />
une charge de 600Ω. La pointe du jack est reliée à broche 2 de la prise XLR, l’anneau à la broche 3 et le corps à la<br />
broche 1 (blindage). Remarquer l’inversion du câblage des broches 2 et 3 par rapport à certains matériels dbx antérieurs ou<br />
à d’autres marques : toutefois, si les connexions sont effectuées de la même manière à l’entrée et à la sortie, alors le signal<br />
sera polarisé correctement (« en phase »).<br />
Mise à la terre<br />
Pour éviter les ronflements, éviter d’effectuer une mise à la terre <strong>com</strong>mune de l’entrée et de la sortie du <strong>166XL</strong>. Sur la<br />
majorité des câbles symétriques (à 3 conducteurs), le blindage est connecté aux deux extrémités. On crée alors des boucles<br />
de masse qui sont à l’origine du ronflement. En cas de ronflement problématique, essayer de déconnecter le blindage de<br />
l’un ou plusieurs des câbles, de préférence au niveau de l’entrée plutôt que de la sortie d’un dispositif : relier le blindage<br />
du câble à la terre du dispositif d’entrée (le laissant déconnecté du côté de la prise d’entrée du <strong>166XL</strong>) et relier le blindage<br />
du câble de sortie à la borne de terre du <strong>166XL</strong> (en le laissant déconnecté du côté de l’appareil en aval). Le blindage est<br />
relié à la broche 1 de l’XLR et au corps du jack 6,35.<br />
SIGNAL FLOW<br />
166A<br />
Figure 4 : Circulation du signal (mode symétrique)<br />
ASSISTANCE TECHNIQUE ET SERVICE USINE<br />
dbx <strong>166XL</strong> COMPRESSOR / GATE<br />
Le <strong>166XL</strong> est un produit entièrement à semi-conducteurs dont les <strong>com</strong>posants ont été choisis pour leurs performances<br />
et leur fiabilité. Chaque <strong>166XL</strong> est conçu, assemblé, testé, rodé et étalonné en usine aux Etats-Unis et ne devrait donc, à<br />
aucun moment de sa durée de vie, nécessiter quelque réglage interne que ce soit. Nous conseillons de ne revoyer le <strong>166XL</strong><br />
à l’usine qu’après s’être reporté au manuel et avoir consulté le Service après-vente.<br />
<strong>Av</strong>ant de contacter le Service après-vente (Customer Service), préparer une description <strong>com</strong>plète du problème. Noter le<br />
numéro de série de l’appareil - il figure sur une étiquette collée sur l’appareil.<br />
Remarque : Voir les termes de la garantie, qui ne s’applique qu’au premier utilisateur final de l’appareil. Après expiration de la garantie, il sera facturé un<br />
montant raisonnable pour les pièces, la main-d’œuvre et l’emballage dans le cas où l’utilisateur déciderait de faire réparer l’appareil au SAV. Dans tous les<br />
cas, les frais d’expédition sont à la charge de l’utilisateur.<br />
Expédition :<br />
Si possible, utiliser l’emballage d’origine de l’appareil. Indiquer sur l’emballage le nom de l’expéditeur et, en lettres<br />
rouges, la mention « FRAGILE ! ». Assurer le colis. L’envoyer en port payé, et non en port dû.<br />
25
Deutsch<br />
EINLEITUNG<br />
Wir danken Ihnen, daß Sie sich für den Dynamikprozessor <strong>166XL</strong> von dbx entschieden haben. Der dbx <strong>166XL</strong> ist ein<br />
Zweikanalgerät mit Noisegate, OverEasy®- und klassischem Hard Knee-Kompressor und PeakStop® Limiter für exakte<br />
Regelung der Signaldynamik für Studios, Beschallungsfirmen, Musiker und all jene Anwender, die einen hochwertigen,<br />
bedienungsfreundlichen Dynamikprozessor benötigen. Bitte nehmen Sie sich etwas Zeit, die Bedienungsanleitung<br />
durchzulesen. Wir wünschen Ihnen viele erfolgreiche Produktionen mit Ihrem dbx <strong>166XL</strong>. Die Hauptmerkmale des dbx<br />
<strong>166XL</strong> sind:<br />
• Gate, Kompressor und Peak Limiter auf Stereo- oder echten Zweikanalbetrieb umschaltbar.<br />
• OverEasy®-Wahlschalter zur Umschaltung zwischen der bekannten OverEasy®-Kompressionskennlinie und der klassischen<br />
"Hard Knee"-Charakteristik des dbx 160, 161 und 162.<br />
• Expander/Gate-Schaltung mit einstellbarer Rücklaufzeit und +15 dBu maximaler Einsatzschwelle.<br />
• Kompressor umschaltbar zwischen zwei verschiedenen programmabhängigen Zeitkonstanten zur Anpassung an<br />
einzelne Instrumente oder fertige Mischungen.<br />
• Schaltbare Kuhschwanz-Tiefenentzerrung in der Meßschaltung zur Verhinderung von "Aussetzern" durch laute<br />
Baßsignale beim Komprimieren von kompletten Mischungen.<br />
• PeakStop® Limiter zur Einhaltung eines absoluten Maximalpegels am Ausgang des dbx <strong>166XL</strong> unabhängig von allen<br />
anderen Einstellungen. Der Limiter liegt im Signalweg hinter den Kompressor, Gate und der Ausgangsstufe und legt<br />
damit den tatsächlichen maximalen Signalpegel am Ausgang fest.<br />
• Echte RMS-Pegelmessung: Erfaßt die Energie des Programmaterials auf musikalische Weise ähnlich dem menschlichen<br />
Gehör und klingt daher besser als Verfahren zur Erfassung des Spitzen- oder Mittelwerts.<br />
• Unabhängige Bypass-Taste für jeden Kanal zum Durchschleifen des Audiosignals auch bei abgezogenem Netzkabel<br />
und zum A/B-Vergleich zwischen bearbeitetem und unbearbeitetem Signal.<br />
• 10-teilige LED-Zeile zur Anzeige der Verstärkungsreduktion.<br />
• Elektronisch symmetrierte Ein- und Ausgänge an XLR- und 6,3-mm-Stereoklinkenbuchsen.<br />
• Separate Sidechain-Anschlüsse zur Steuerung des Kompressors oder Gates durch externe Prozessoren oder Signale.<br />
• DC-geregelte Parameter: Das Signal fließt durch keines der Bedienelemente an der Frontplatte. Stattdessen werden<br />
alle Funktionen durch eine Gleichspannung gesteuert, wodurch auch nach langem Gebrauch keine störenden<br />
Potentiometergeräusche auftreten können.<br />
KONTROLLE<br />
Kontrollieren Sie bitte, ob der Karton, in dem Ihr dbx <strong>166XL</strong> geliefert wurde, folgende Teile enthält:<br />
• dbx <strong>166XL</strong><br />
• Netzkabel<br />
• Bedienungsanleitung<br />
• Garantiekarte<br />
Falls etwas fehlt, wenden Sie sich bitte an Ihre AKG-Vertretung (s. erste Seite).<br />
GARANTIEBEDINGUNGEN<br />
Wir gewähren 1 Jahr Garantie ab Verkaufsdatum auf nachweisbare Material- und Fabrikationsfehler (ausgenommen<br />
externe Netzgeräte). Der Garantieanspruch erlischt bei unsachgemäßer Handhabung, elektrischer oder mechanischer<br />
Beschädigung durch mißbräuchliche Anwendung sowie bei unsachgemäßer Reparatur durch nichtautorisierte Werkstätten.<br />
Zur Inanspruchnahme der angeführten Garantieleistungen ist der Nachweis des Kaufes (ordentliche Rechnung des<br />
Verkäufers) erforderlich. Transport- und Portospesen, welche aus der Einsendung des Gerätes zur Garantiereparatur<br />
erwachsen, können von dbx nicht übernommen werden, das Risiko der Zusendung trägt der Kunde. Die Garantie wird<br />
ausschließlich für den Erstkäufer geleistet.<br />
26<br />
dbx <strong>166XL</strong> COMPRESSOR / GATE<br />
®<br />
PROFESSIONAL PRODUCTS
BEDIENELEMENTE<br />
dbx <strong>166XL</strong> COMPRESSOR / GATE<br />
Frontplatte<br />
EXPANDER/GATE-Sektion<br />
EXPANDER/GATE THRESHOLD-Regler und -LEDs (BELOW/ABOVE):<br />
Dieser Regler stellt den Pegel ein, bei dem das Gate öffnet und das Signal vom Eingang zum Ausgang durchschaltet.<br />
Wenn Sie den Regler ganz nach links drehen (Position OFF), wird das Signal nicht abgeschwächt - das Gate wird dadurch<br />
praktisch umgangen. Wenn Sie den Regler ganz nach rechts drehen, werden alle Eingangssignale unterhalb +15 dBu<br />
abgeschwächt.<br />
Die beiden EXPANDER/GATE LEDs zeigen das Verhältnis des Eingangssignals zur eingestellten Einsatzschwelle an.<br />
Liegt der Signalpegel unterhalb der Einsatzschwelle, leuchtet die rote BELOW-LED, liegt der Signalpegel über der<br />
Einsatzschwelle, leuchtet die grüne ABOVE-LED.<br />
Anmerkung: Die Ansprechzeit (die bestimmt, wie rasch das abgeschwächte Signal wieder auf Normalpegel zurückgeregelt wird) des Expander/Gate ist<br />
intern auf einen extrem kurzen Wert eingestellt, sodaß der Einsatz jedes Tons oder gesprochenen Worts unverändert übertragen wird.<br />
Anmerkung: Das Expansionsverhältnis des dbx <strong>166XL</strong> ist intern fix auf ca. 10:1 eingestellt. Bei diesem Expansionsverhältnis treten die normalerweise bei<br />
geschalteten Gates unvermeidlichen Störgeräusche nicht auf. Die Dämpfung beträgt >50 dB.<br />
SC Enable-Taste:<br />
Schaltet die SIDECHAIN SEND- und RETURN- Buchsen ein und erlaubt so die externe Bearbeitung des Sidechain-<br />
Signals. Wenn an den SIDECHAIN-Buchsen nichts angeschlossen ist, bleibt die Taste zwar wirkungslos, leuchtet aber<br />
dennoch auf, wenn Sie sie drücken.<br />
EXPANDER/GATE RELEASE-Regler:<br />
Stellt die Geschwindigkeit ein, mit der das Gate schließt, sobald der Signalpegel an der INPUT- oder SIDECHAIN<br />
INSERT-Buchse unter die Einsatzschwelle absinkt. Mit Einstellungen im Bereich SLOW können Sie Störgeräusche bei<br />
Gesang oder akustischen Instrumenten ausblenden. Der Bereich FAST eignet sich zum Straffen von Schlaginstrumenten<br />
(z.B. Bassdrum, Snare) und Ausblenden von Übersprechen anderer Instrumente auf Schlagzeugspuren.<br />
Anmerkung: Die Rücklaufzeit des Gates "verkürzt" sich progressiv, d.h. beim Schließen des Gates steigt die Schließgeschwindigkeit (in dB/s) ständig an.<br />
CONTOUR-Taste und -LED:<br />
Wenn Sie diese Taste drücken, werden die Tiefen im Signalweg der Meßschaltung leicht abgesenkt. Damit können Sie<br />
weitgehend verhindern, daß Tiefenanteile im Eingangssignal speziell bei fertigen Mischungen zu "Aussetzern" im komprimierten<br />
Signal führen. Ist die CONTOUR-Taste nicht gedrückt, arbeitet die Meßschaltung nicht frequenzselektiv. Bei<br />
gedrückter CONTOUR-Taste leuchtet die CONTOUR-LED.<br />
KOMPRESSOR-Sektion<br />
GAIN REDUCTION-Anzeige:<br />
Diese LED-Zeile zeigt die durch Kompression, Expansion/Gating oder beides bedingte Abschwächung des Signals an.<br />
COMPRESSOR THRESHOLD-LEDs:<br />
Diese drei LEDs zeigen das Verhältnis zwischen Eingangssignalpegel und Kompressor-Einsatzschwelle an. Liegt der<br />
Signalpegel unterhalb der Einsatzschwelle, leuchtet die gründe BELOW-LED, liegt der Signalpegel oberhalb der<br />
Einsatzschwelle, die rote ABOVE-LED. Im OverEasy®-Modus leuchtet die gelbe LED, wenn sich der Signalpegel im<br />
OverEasy®-Bereich befindet (s. Abb. 2).<br />
Anmerkung: Beim Ein- und Ausschalten des Geräts leuchten die LEDs kurz auf, auch wenn kein Signal am Eingang anliegt.<br />
COMPRESSOR THRESHOLD-Regler:<br />
Mit diesem Regler können Sie die Einsatzschwelle des Kompressors zwischen -40 dBu (7,8 mVeff.) und +20 dBu (7,8<br />
Veff.) einstellen. In der Position +20 dB werden nur die höchsten Pegelspitzen komprimiert. (Wenn Sie COMPRESSOR<br />
RATIO auf 1:1 einstellen, erfolgt keine Kompression, unabhängig davon, auf welchen Wert COMPRESSOR THRESH-<br />
OLD eingestellt ist.)<br />
Im Hard Knee-Modus (OVEREASY-Taste offen) stellt dieser Regler einen Bezugspegel (Einsatzschwelle) ein, ober-<br />
27
halb dessen das Eingangssignal entsprechend der Einstellung des COMPRESSOR RATIO-Reglers komprimiert wird.<br />
Signale unterhalb dieses Bezugspegels werden unverändert durchgeschaltet (bis auf die mit dem OUTPUT GAIN-Regler<br />
eingestellte fixe Verstärkung). Siehe Abb. 1.<br />
Im OverEasy®-Modus (OVEREASY-Taste gedrückt) beginnt der Regelverstärker des dbx <strong>166XL</strong> bereits bei Pegeln<br />
etwas unterhalb der mit dem THRESHOLD-Regler eingestellten Einsatzschwelle allmählich einzusetzen, wobei das mit<br />
dem COMPRESSOR RATIO-Regler eingestellte Kompressionsverhältnis erst etwas oberhalb der Einsatzschwelle voll<br />
erreicht wird. Im OverEasy®-Modus setzt die Kompression nicht genau an einem bestimmten Punkt voll ein. Die Stellung<br />
des COMPRESSOR THRESHOLD-Reglers entspricht dabei einem Punkt auf der Übertragungskurve, der in der Mitte<br />
zwischen dem Kompressionseinsatz und jenem Punkt liegt, ab dem die Übertragungskurve der Stellung des COMPRES-<br />
SOR RATIO-Reglers entspricht. Abb. 2 zeigt die OverEasy®-Kennlinien und die Anzeigebereiche der THRESHOLD-<br />
LEDs.<br />
OVEREASY-Taste:<br />
Durch Drücken dieser Taste können Sie auf die OverEasy®-Charakteristik umschalten. Wenn sich der Signalpegel im<br />
OverEasy®-Bereich befindet, leuchtet die gelbe OVEREASY-LED auf. Bei nicht gedrückter Taste arbeitet der dbx <strong>166XL</strong><br />
mit Hard Knee-Kompression (Die gelbe OVEREASY-LED ist nur im OverEasy®-Modus aktiv.)<br />
Im Hard Knee-Modus entspricht die Einsatzschwelle jenem Pegel, oberhalb dessen sich der Ausgangspegel nicht mehr<br />
im Verhältnis 1:1 zum Eingangssignal ändert (s. Abb. 1).<br />
Im OverEasyR®-Modus entspricht die Einsatzschwelle der Mitte des OverEasyR®-Schwellenbereichs, wodurch sich<br />
ein sanfter Übergang zur Kompression ergibt (s. Abb. 2).<br />
COMPRESSOR RATIO-Regler:<br />
Durch Drehen des Reglers im Uhrzeigersinn können Sie das Kompressionsverhältnis von 1:1 (keine Kompression) bis<br />
∞:1 (kein Anstieg des Ausgangspegels selbst wenn der Eingangspegel über die Einsatzschwelle ansteigt) einstellen.<br />
Bei Signalpegeln oberhalb der Einsatzschwelle bestimmt die Stellung dieses Reglers, um wieviel dB der<br />
Eingangssignalpegel ansteigen muß, damit der Ausgangspegel des dbx <strong>166XL</strong> um 1 dB ansteigt. Ein<br />
Kompressionsverhältnis von 2:1 bedeutet, daß bei einem Anstieg des Eingangssignalpegels über die Einsatzschwelle um 2<br />
dB der Ausgangspegel um 1 dB ansteigt. Bei einem Kompressionsverhältnis von ∞:1 würde erst ein unendlicher Anstieg<br />
des Eingangspegels den Ausgangspegel um 1 dB steigen lassen. Mit anderen Worten, der Ausgangspegel bleibt konstant,<br />
wenn der Eingangspegel über die Einsatzschwelle ansteigt.<br />
Abb. 1: Hard Knee-Kennlinie und THRESHOLD-LEDs Abb. 2 OverEasy®-Kennlinie und THRESHOLD-LEDs<br />
COMPRESSOR ATTACK- und RELEASE-Regler:<br />
ATTACK stellt die Zeit zwischen dem Moment, wo der Signalpegel die Einsatzschwelle übersteigt, und dem tatsächlichen<br />
Kompressionseinsatz ein. Der Regelumfang reicht von FAST (dichte, auffälligere Kompression mit sehr wenig<br />
Überschwingen) bis SLOW (leicht verzögerte, allmähliche Kompression). bei sehr schnellen ATTACK-Einstellungen<br />
arbeitet der dbx <strong>166XL</strong> trotz RMS-Messung als Peak Limiter. Bei langsameren Einstellungen entspricht die Funktion der<br />
eines Kompressor/Limiters mit RMS- oder Mittelwertmessung.<br />
Der RELEASE-Regler stellt die Geschwindigkeit ein, mit der die Kompressorschaltung den Signalpegel auf seinen<br />
ursprünglichen Wert zurückregelt. Der Regelumfang reicht von FAST (die Kompression folgt sehr genau der Hüllkurve<br />
des Programmaterials) bis SLOW (sehr sanfte Kompression).<br />
Es gibt keine absolut ”richtige” ATTACK- und RELEASE-Einstellung. Im allgemeinen sollten Sie jedoch beides<br />
langsam genug einstellen, um ein ”Pumpen” oder ”Atmen” bei Modulation des Hintergrundrauschens durch das Nutzsignal<br />
zu vermeiden, RELEASE allerdings schnell genug, um eine Unterdrückung des Nutzsignals nach dem Abklingen eines<br />
plötzlichen Impulses oder lauten Tons zu verhindern. Für tieffrequente Signale (z.B. Bassgitarre) stellen Sie RELEASE<br />
und ATTACK auf ”2 Uhr” oder noch langsamer.<br />
28<br />
OUTPUT LEVEL (dB)<br />
+20<br />
+15<br />
+10<br />
+5<br />
0<br />
-5<br />
-10<br />
-15<br />
dbx <strong>166XL</strong> COMPRESSOR / GATE<br />
GREEN<br />
Below Threshold<br />
RED<br />
Above Threshold<br />
-15 -10 -5 0 +5 +10 +15 +20<br />
INPUT LEVEL (dB)<br />
1:1 Unity<br />
2:1<br />
4:1<br />
20:1<br />
Rotation Point Threshold<br />
:1<br />
OUTPUT LEVEL (dB)<br />
+20<br />
+15<br />
+10<br />
+5<br />
0<br />
−5<br />
−10<br />
−15<br />
®<br />
GREEN AMBER<br />
PROFESSIONAL PRODUCTS<br />
Below Threshold<br />
RED<br />
INPUT LEVEL (dB)<br />
1:1<br />
2:1<br />
4:1<br />
−15 −10 −5 0 +5 +10 +15 +20<br />
:1<br />
Above Threshold<br />
OverEasy Range
dbx <strong>166XL</strong> COMPRESSOR / GATE<br />
Anmerkung: Der ATTACK- und RELEASE-Regler beeinflussen einander und den RATIO-Regler. Wenn Sie einen Regler verstellen, müssen Sie möglicherweise auch einen<br />
der anderen Regler neu einstellen.<br />
AUTO-Taste:<br />
Schaltet den ATTACK- und den RELEASE-Regler weg und aktiviert voreingestellte programmabhängige Ansprech- und<br />
Rücklaufzeiten. Die Zeitkonstanten werden in diesem Fall aus dem Eingangssignal ermittelt und ändern sich ständig je nach<br />
dessen Dynamik. Die Taste zeigt durch Leuchten an, dass Ansprech- und Rücklaufzeit automatisch programmabhängig geregelt<br />
werden. Wenn Sie die AUTO-Taste drücken, erhalten Sie den "klassischen dbx-Sound" der Vorgänger des dbx 166, die heute den<br />
Industrie-Standard darstellen.<br />
OUTPUT GAIN-Regler:<br />
Mit diesem Regler können Sie die Dämpfung des effektiven Signalpegels infolge der Dynamikbearbeitung ausgleichen.<br />
Stellen Sie die gewünschten Kompressor- und Gate-Parameter ein und stellen Sie danach den OUTPUT GAIN-Regler auf<br />
jenen Wert ein, den die GAIN REDUCTION-LEDs anzeigen. Wenn die GAIN REDUCTION-LEDs z.B. eine durchschnittliche<br />
Dämpfung von 10 dB anzeigen, stellen Sie OUTPUT GAIN auf 10 dB, um die 10 dB Dämpfung des<br />
Mittelwertpegels auszugleichen. Beachten Sie bitte, daß der OUTPUT GAIN-Regler im Signalweg vor dem PeakStop®<br />
Limiter liegt.<br />
Anmerkung: Da eine Ausgangsverstärkung von bis zu +20 dB zur Verfügung steht, können selbst dann, wenn der Eingangspegel im zulässigen Bereich<br />
liegt, Übersteuerungen auftreten. Wenn Sie z.B. den COMPRESSOR RATIO-Regler auf einen niedrigen Wert eingestellt haben und den OUTPUT GAIN-<br />
Regler bist zum rechten Anschlag aufdrehen, kann die Ausgangsstufe des dbx <strong>166XL</strong> übersteuert werden und Impulsspitzen abschneiden. Wir empfehlen<br />
daher, im Normalbetrieb OUTPUT GAIN zunächst auf 0 dB (Mittelstellung) zu stellen. Hat das nachgeschaltete Gerät eine hohe Eingangsempfindlichkeit,<br />
drehen Sie den OUTPUT GAIN-Regler des dbx <strong>166XL</strong> zurück. Sie ersparen sich damit ein zusätzliches Abschwächungsglied.<br />
BYPASS-Taste und -LEDs:<br />
Durch Drücken der BYPASS-Taste können Sie das Eingangssignal direkt und unverändert zum Ausgang durchschleifen,<br />
und zwar auch bei abgezogenem Netzkabel. Der Bypass-Modus ist auch bei Stereokopplung (bei gedrückter<br />
STEREO COUPLE-Taste) für beide Kanäle getrennt schaltbar.<br />
Im Bypass-Modus sind sämtliche Bearbeitungsschaltungen und Bedienelemente wirkungslos, sodaß am Ausgang das<br />
unveränderte Eingangssignal anliegt. Der Bypass-Schalter ermöglicht Ihnen somit, rasch und einfach das bearbeitete<br />
Signal mit dem direkten Signal zu vergleichen.<br />
Bei angeschlossenem Netzkabel leuchtet im Bypass-Modus die rote LED neben der Taste.<br />
LIMITER-Sektion<br />
PEAKSTOP LEVEL-Regler und -LED:<br />
Mit diesem Regler können Sie den maximalen Spitzen-Ausgangspegel des dbx <strong>166XL</strong> unabhängig von allen anderen<br />
Reglern einstellen. Der Limiter liegt im Signalweg hinter Kompressor, Gate und Ausgangsstufe und legt damit die<br />
absolute Obergrenze für Signalspitzen am Ausgang fest. Der PeakStop® Limiter spricht trägheitslos an und bietet daher<br />
selbst bei niedrigen Kompressionsverhältnissen im OverEasy®-Modus Schutz vor hohen Impulsspitzen, anderen kurzzeitigen<br />
Überlastungen und Übersteuerungen.<br />
Der PeakStop® Limiter ist ein sanft einsetzender Begrenzer, dessen Arbeitsweise klanglich der Sanftheit des<br />
OverEasy® Kompressors ähnelt. Sein kontrolliertes Clipping ist jedenfalls der unkontrollierten Signalbeschneidung eines<br />
Endverstärkers oder AD-Wandlers vorzuziehen. Der PeakStop® Limiter rundet die Ecken der Impulsspitzen ab anstatt sie<br />
abrupt abzuschneiden. Durch diese Abrundung der Vorder- und Hinterflanke des Signals anstelle einer scharfen Kante<br />
treten weniger ungeradzahlige, unangenehm klingende Obertöne auf als bei herkömmlichem hartem Clipping.<br />
Den Pegel, bei dem der PeakStop® Limiter einsetzt, können Sie zwischen +0 dB und +20 dB einstellen. Beachten Sie<br />
dabei bitte, daß auf Grund der Kantenabrundung der tatsächliche Pegel etwas höher sein kann als der mit PEAKSTOP<br />
LEVEL eingestellte Wert. Stellen Sie daher bei Anwendungen, wo ein bestimmter Pegel auf keinen Fall überschritten werden<br />
darf, den PEAKSTOP LEVEL-Regler auf 1 bis 2 dB unterhalb dieses Pegels ein.<br />
Die PEAKSTOP LED leuchtet auf, wenn der Signalpegel die mit PEAKSTOP LEVEL eingestellte Einsatzschwelle zu<br />
übersteigen droht und heruntergeregelt wird. Wenn die PEAKSTOP LED bei einer PEAKSTOP LEVEL-Einstellung von<br />
+20 dB aufleuchtet, bedeutet das, daß die Übersteuerungsreserve des dbx <strong>166XL</strong> erschöpft ist und das Signal hart<br />
beschnitten wird.<br />
29
MASTER-Sektion<br />
STEREO COUPLE-Taste und -LED:<br />
Die STEREO COUPLE-Taste schaltet zwischen Stereo- und echtem Zweikanalbetrieb um. Zum Umschalten auf<br />
Stereobetrieb drücken Sie die STEREO COUPLE-Taste. Im Stereobetrieb arbeitet Kanal 1 als Master und Kanal 2 als<br />
Slave. Dies bedeutet, daß sämtliche Bedienelemente und Anzeigen für Kanal 2 mit Ausnahme der BYPASS-Taste und<br />
GAIN REDUCTION-Anzeige wirkungslos werden, da die entsprechenden Parameter mit den Reglern für Kanal 1<br />
miteingestellt werden. Beachten Sie bitte, daß die Meßschaltung den RMS-Pegel des kombinierten Signals erfaßt und<br />
daher von Phasenverschiebungen (oder anderen Diskrepanzen) zwischen den beiden Kanälen nicht beeinflußt wird. Dies<br />
gewährleistet Stereokompression ohne Balanceverschiebungen.<br />
Bei nicht gedrückter STEREO COUPLE-Taste arbeitet der dbx <strong>166XL</strong> wie zwei separate Monogeräte, jedes mit eigenen<br />
Bedienelementen.<br />
Wenn Sie auf Stereokopplung schalten, leuchtet die STEREO COUPLE-LED auf.<br />
Rückseite<br />
INPUT (BALANCED) Eingangsbuchsen:<br />
Die Stereoklinkenbuchse und die XLR-Buchse sind parallel geschaltet. Sie können an beide INPUT-Buchsen eine<br />
Audiosignalquelle zur Bearbeitung durch den dbx <strong>166XL</strong> anschließen. An die Klinkenbuchse können Sie sowohl symmetrische<br />
Quellen (mittels 6,3-mm-Stereoklinkenstecker) als auch asymmetrische Quellen (mittels 6,3-mm-<br />
Monoklinkenstecker) anschließen. Die Anschlußbelegung der XLR-Buchse ist Stift 2 Inphase (+), Stift 3 Audio (-) und<br />
Stift 1 Masse.<br />
Anmerkung: Die XLR- und Klinkenbuchse jedes Kanals sind miteinander verbunden (Spitze = Stift 2, Ring = Stift 3, Schaft = Stift 1). Wenn<br />
Sie eine Buchse asymmetrisch abschließen, wird daher die andere Buchse ebenfalls asymmetrisch. Wenn Sie also z. B. an die<br />
Stereoklinkenbuchse ein Monokabel anschließen, wird dadurch Stift 3 der XLR-Buchse mit Masse verbunden (asymmetrische Beschaltung).<br />
Benützen Sie immer nur eine der beiden Eingangsbuchsen!<br />
OPERATING LEVEL-Taste:<br />
Schaltet zwischen -10 dBV und +4 dBu Nennpegel um. Bei hineingedrückter Taste arbeitet das Gerät auf +4 dBu, bei<br />
herausstehender Taste auf -10 dBV.<br />
OUTPUT (BALANCED) Ausgangsbuchsen:<br />
Die Stereoklinkenbuchse und die XLR-Buchse sind parallel geschaltet. An beiden Buchsen liegt daher dasselbe<br />
Audiosignal an. An die Klinkenbuchse können Sie mittels 6,3-mm-Stereoklinkenstecker ein symmetrisch beschaltetes<br />
Gerät oder mittels 6,3-mm-Monoklinkenstecker ein asymmetrisch beschaltetes Gerät anschließen. Die Anschlußbelegeung<br />
der XLR-Buchse ist Stift 2 Inphase (+), Stift 3 Audio (-) und Stift 1 Masse. Wenn Sie an die XLR-Buchse ein asymmetrisch<br />
beschaltetes Gerät anschließen möchten, achten Sie darauf, den freien Stift (2 oder 3) im Kabelstecker mit Masse<br />
zu verbinden. Der Nennausgangspegel beträgt +4 dBu an 600 Ω Lastimpedanz, der typische maximale Ausgangspegel +20<br />
dBu an 600 Ω (+20 dBm).<br />
Anmerkung: Die XLR- und Klinkenbuchse jedes Kanals sind miteinander verbunden (Spitze = Stift 2, Ring = Stift 3, Schaft = Stift 1), sodaß Sie dasselbe<br />
Signal an zwei verschiedene Geräte führen können. Wenn Sie jedoch einen asymmetrischen Stecker verwenden, wird automatisch auch die andere<br />
Buchse asymmetrisch. Wenn Sie z.B. an die Klinkenbuchse einen Monoklinkenstecker anschließen, wird dadurch Stift 3 der XLR-Buchse mit Masse verbunden<br />
(asymmetrische Beschaltung).<br />
SIDECHAIN INSERT:<br />
Diese 6,3-mm-Stereoklinkenbuchse dient als direkter Anschluß an die Meßschaltung (Sidechain) des dbx <strong>166XL</strong>. Der<br />
Ringkontakt dient als Ausgang und führt eine gepufferte Version des Eingangssignals mit einer Impedanz von 2 kΩ. Der<br />
Spitzenkontakt dient als Eingang für externe Geräte zur Ansteuerung der Meßschaltung (z.B. für einen Equalizer zur<br />
Zischlautunterdrückung oder frequenzselektiven Kompression). An die SIDECHAIN INSERT-Buchse können Sie aber<br />
auch fast jedes Gerät direkt mittels 6,3-mm-Monoklinkenstecker anschließen. Die Eingangsimpedanz beträgt >10 kΩ.<br />
Anmerkung: Sobald Sie ein Kabel an die SIDECHAIN INSERT-Buchse anschließen, wird automatisch die Verbindung zwischen dem Eingang und der<br />
Meßschaltung unterbrochen.<br />
Netzanschluß: Die Netzanschlußbuchse dient zum Anschluß eines Standard-Kaltgerätenetzkabels (mitgeliefert).<br />
Schließen Sie das Netzkabel am Gerät und an eine Netzsteckdose an. Beachten Sie bitte, daß der dbx <strong>166XL</strong> keinen<br />
Netzschalter hat. Wir empfehlen, das Gerät immer eingeschaltet zu lassen. Der Leistungsbedarf ist gering. Wenn Sie den<br />
dbx <strong>166XL</strong> längere Zeit nicht benutzen, ziehen Sie das Netzkabel ab.<br />
30<br />
dbx <strong>166XL</strong> COMPRESSOR / GATE<br />
®<br />
PROFESSIONAL PRODUCTS
Achtung: Bevor Sie das Gerät an das Netz anschließen, kontrollieren Sie, ob die an der Rückseite des Gerätes angegebene Netzspannung mit der am<br />
Einsatzort vorhandenen Netzspannung übereinstimmt. Das Anschließen des Gerätes an die falsche Netzspannung kann zu schweren Beschädigungen<br />
führen, die von der Garantie ausgeschlossen sind.<br />
BEDIENUNGSHINWEISE<br />
Expander/Gate-Anwendungen<br />
dbx <strong>166XL</strong> COMPRESSOR / GATE<br />
Anmerkung: Die im folgenden angegebenen Einstellungen sind jeweils als Ausgangspunkt und Anregung gedacht, damit Sie die optimalen Werte für Ihre<br />
spezifische Anwendung leichter ermitteln können.<br />
Gaten kurzer, perkussiver Signale (z.B. Snare, Bassdrum)<br />
Zum optimalen Gaten von perkussiven Signalen mit hohen Impulsspitzen müssen Sie die EXPANDER/GATE-Regler<br />
des dbx <strong>166XL</strong> so einstellen, daß das Gate nicht auf benachbarte Signale anspricht und so zum falschen Zeitpunkt öffnet.<br />
Stellen Sie EXPANDER/GATE RELEASE so schnell ein, daß das Gate sofort schließt, wenn das Signal unter den mit<br />
dem EXPANDER/GATE THRESHOLD-Regler eingestellten Pegel sinkt. Mit dem RELEASE-Regler können sie auch die<br />
Hüllkurve des Signals beeinflussen.<br />
Anmerkung: Schnelles Gaten ausgehaltener tieffrequenter Signale kann zum "Klappern" führen. Da das Gate des dbx <strong>166XL</strong> extrem schnell arbeitet,<br />
stellen Sie RELEASE auf eine längere Zeit als die volle Periode der Grundfrequenz des gegateten Signals ein. Um "Klappern" zu vermeiden, stellen Sie<br />
RELEASE auf eine längere Zeit (niedrigere Geschwindigkeit) ein. Falsches Auslösen und "Klappern" können Sie auch durch sorgfältige Einstellung des<br />
THRESHOLD-Reglers minimieren.<br />
Diese Einstellungen eignen sich am besten zum Straffen von Schlagzeugspuren, Verkürzen des Nachklingens mancher<br />
Trommeln oder zum Ausblenden des Übersprechens benachbarter Trommeln in ein Trommelmikrofon.<br />
Gaten längerer Signale (z.B. Becken, Piano)<br />
Zum optimalen Gaten von Signalen, die nach dem Anschlagimpuls länger ausklingen, stellen Sie den RELEASE-<br />
Regler so ein, daß das Gate lang genug geöffnet bleibt, um den Ton vollständig ausklingen zu lassen.<br />
Mit dem Gate können Sie auch zuviel Hall oder Räumlichkeit auf einzelnen Spuren oder bei Mischungen reduzieren.<br />
Stellen Sie den RELEASE-Regler so ein, daß der Ausklingvorgang etwas verkürzt wird.<br />
Verändern des Klangcharakters<br />
Mit dem Gate des dbx <strong>166XL</strong> können Sie den Klangcharakter eines Signals durch Verkürzen oder anderweitiges<br />
Verändern der Räumlichkeit oder des Nachhalls deutlich verändern. Wenn der Ton des Instruments selbst ausklingt, sinkt<br />
der Nachhallpegel unter den mit EXPANDER/GATE THRESHOLD eingestellten Wert. Sie können den Ausklingvorgang<br />
nun zusätzlich verkürzen, sodaß der Ton schneller ausklingt als in Wirklichkeit. Experimentieren Sie mit der Wirkung verschiedener<br />
THRESHOLD- und RELEASE-Einstellungen auf das Ausklingverhalten des Tons. Schnelle RELEASE-<br />
Einstellungen schneiden den Nachhall fast ganz ab.<br />
Gaten über SIDECHAIN INSERT<br />
Indem Sie ein Signal mittels eines anderen Signals gaten, können Sie einen dynamischeren Sound erzielen (z.B. absolut<br />
synchrones Zusammenspiel und Overdubbing oder "Auffetten" dynamisch schwacher Spuren).<br />
So können Sie z.B. ein E-Baßsignal auf zwei getrennte Kanäle aufteilen und einen Kanal mit der Bassdrum synchronisieren.<br />
Legen Sie dazu den einen Baßkanal direkt in die Mischung und den anderen Baßkanal an eine der INPUT-<br />
Buchsen des dbx <strong>166XL</strong>. Legen Sie das Signal der Bassdrum an den SIDECHAIN INSERT-Eingang desselben Kanals am<br />
dbx <strong>166XL</strong> und stellen Sie die Regler entsprechend ein. Der gegatete Baßkanal wird nun bei jedem Bassdrum-Schlag<br />
geöffnet. Damit erreichen Sie einen saubereren, dynamischeren und lebendigeren Gesamtklang der Mischung.<br />
Die externe Gate-Ansteuerung über den SIDECHAIN INSERT-Eingang können Sie auch dazu einsetzen, mit einem<br />
Trommelsignal einen Oszillator zuzuschalten, um damit dem Ton der Trommel eine bestimmte Tonhöhe und mehr Kraft<br />
zu geben.<br />
Anmerkung: Wenn Sie das Gate extern ansteuern, stellen Sie den Kompressor immer entsprechend ein oder schalten Sie ihn weg, indem Sie COM-<br />
PRESSOR RATIO an den linken Anschlag auf 1:1 zurückdrehen.<br />
Frequenzselektives Gaten<br />
Der SIDECHAIN INSERT-Eingang ermöglicht Ihnen, das Gate nur auf bestimmte Frequenzen ansprechen zu lassen.<br />
Wenn Sie z.B. eine Bassdrum auf einer Spur mit sehr viel Übersprechen benachbarter Instrumente gaten, können Sie mit<br />
einem externen Equalizer dafür sorgen, daß das Gate nur bei den Bassdrum-Signalen öffnet. Legen Sie dazu das<br />
Bassdrum-Signal sowohl direkt an den Eingang des dbx <strong>166XL</strong> als auch an einen Equalizer, dessen Ausgang Sie mit der<br />
SIDECHAIN INSERT-Buchse am dbx <strong>166XL</strong> verbinden. Senken Sie am Equalizer alle Frequenzen bis auf die der<br />
Bassdrum maximal ab. Das Gate öffnet dann noch selektiver.<br />
31
Grundlegende Kompressor-Anwendungen<br />
Anmerkung: Die im folgenden angegebenen Einstellungen sind jeweils als Ausgangspunkt und Anregung gedacht, damit Sie die optimalen Werte für Ihre<br />
spezifische Anwendung leichter ermitteln können. Im allgemeinen wird die Kompression besonders "sanft", wenn Sie die OVEREASY- und die MODE-<br />
Taste drücken und besonders "aggressiv", wenn Sie auf Hard Knee-Modus umschalten (OVEREASY- und MODE-Taste offen).<br />
Zum Komprimieren einer Mischung beginnen Sie mit einer niedrigen RATIO-Einstellung, stellen Sie THRESHOLD<br />
auf ein paar dB Dämpfung ein und drücken Sie OVEREASY und CONTOUR.<br />
Ausgleichen von Pegelschwankungen bei Mikrofonen<br />
Schwankungen des Signalpegels können durch Veränderungen des Abstands zwischen SängerIn und Mikrofon oder<br />
durch Veränderungen der Lautstärke beim Registerwechsel verursacht werden. Um diese Schwankungen auszugleichen,<br />
schalten Sie den dbx <strong>166XL</strong> auf OverEasy®-Modus (drücken Sie die OVEREASY-Taste) und stellen Sie RATIO auf<br />
einen niedrigen bis mittleren Wert ein (z.B. 4:1). Stellen Sie den THRESHOLD-Regler so ein, daß die GAIN REDUC-<br />
TION-Anzeige 6 dB bis 10 dB Verstärkungsreduktion anzeigt und stellen Sie dann, falls nötig, RATIO auf einen höheren<br />
Wert. Durch die sanfte OverEasy®-Kennlinie bleibt selbst eine relativ starke Kompression unhörbar. Werden die<br />
Tiefenanteile der Stimme zu stark komprimiert (die Stimme klingt z.B. zu dünn oder die Präsenz der Bruststimme geht<br />
verloren), drücken Sie die CONTOUR-Taste, damit mehr Tiefenanteile unbedämpft übertragen werden.<br />
Ausgleichen von Pegelschwankungen (und Verlängern des Sustains) bei Instrumenten<br />
Um bei elektrischen (bzw. elektronischen) Bässen einen gleichmäßigeren Sound zu erzielen, komprimieren Sie das<br />
Ausgangssignal des Instruments, indem Sie RATIO auf 4:1 und THRESHOLD auf 10 dB bis 12 dB<br />
Verstärkungsreduktion einstellen. Die Kompression reduziert die Lautstärkeunterschiede zwischen den einzelnen Saiten<br />
und verlängert das Sustain des Basses. Die Lautstärke anderer Instrumente, z.B. Blasinstrumente, schwankt mit der<br />
Tonhöhe. Diese Pegelunterschiede können Sie ebenfalls ausgleichen. Wenn der komprimierte Baß zwar gleichmäßig, aber<br />
zu dünn klingt, drücken Sie die CONTOUR-Taste, um die Tiefenanteile mehr zu betonen.<br />
Um unvorhergesehene Lautstärkesprünge bei lauten Gitarren- oder Synthesizer-Parts im Zaum zu halten und plötzliche<br />
Übersteuerungen der Bandmaschine oder des Mischpults bei der Aufnahme oder während des Konzerts zu vermeiden,<br />
beginnen Sie mit langsamer Hard Knee-Kompression (OVEREASY-Taste offen). Stellen Sie RATIO auf ca. 5:1 und<br />
THRESHOLD auf den maximalen Mittelwertpegel des Kanals ein. Damit werden nur die extrem lauten Stellen komprimiert.<br />
Passen Sie die Feineinstellung beider Regler den jeweiligen Erfordernissen an. Drücken Sie, falls erforderlich, die<br />
CONTOUR-Taste.<br />
Zum Verlängern des Sustains von Gitarren oder Synthesizer-Streichersounds stellen Sie RATIO zunächst auf einen<br />
höheren Wert (10:1 bis ∞:1) und THRESHOLD nach Belieben ein. Sie können mit dem Kompressor z.B. die Hüllkurve<br />
eines Synthesizersounds mit "bissigem" Einsatz, der aber lang ausklingt, verändern. Spielen Sie zunächst langsame, lang<br />
gehaltene Phrasen oder Akkorde und komprimieren Sie das Signal stark (hohe RATIO-Einstellung). Stellen Sie THRESH-<br />
OLD nach Gehör ein und probieren Starke Kompression von Gitarren und Synthesizern hilft bei der Aufnahme auf digitalen<br />
Medien oft, die "analoge Lebendigkeit" des Instruments zu erhalten.<br />
Auffetten von Bassdrums und Komprimieren anderer Schlaginstrumente<br />
Manche Bassdrums klingen zu lang und zu dumpf nach und haben nicht genug Biß. Einen knackigeren Sound erzielen<br />
Sie, indem Sie ein mittleres bis hohes Kompressionsverhältnis einstellen (z.B. 6:1), den THRESHOLD-Regler so einstellen,<br />
daß die GAIN REDUCTION-LEDs 15 dB Verstärkungsreduktion anzeigen, und erhöhen Sie dann, falls erforderlich,<br />
das Kompressionsverhältnis weiter. Im OverEasy®-Modus spricht der dbx <strong>166XL</strong> etwas langsamer an als im Hard<br />
Knee-Modus und betont daher den Anschlag am Beginn des Tons und verringert das dumpfe Nachschwingen. Der dbx<br />
<strong>166XL</strong> bewährt sich auch beim Straffen von Snares und Toms; bei Drum<strong>com</strong>putern können Sie den Charakter sämtlicher<br />
elektronischer Drumsounds wirkungsvoll verändern.<br />
Bandsättigung durch Becken (besonders Crash-Becken) und Tom-Toms können Sie (mit Hilfe der SIDECHAIN<br />
INSERT-Buchse) verhindern. Legen Sie das Signal sowohl direkt an den Eingang des dbx <strong>166XL</strong> als auch an einen<br />
Equalizer (z.B. den parametrischen Equalizer dbx 242 oder den graphischen Equalizer dbx Serie 30). Verbinden Sie den<br />
Ausgang des Equalizers mit der SIDECHAIN INSERT-Buchse des dbx <strong>166XL</strong>. Heben Sie am Equalizer die Frequenzen<br />
bei ca. 5 kHz an. Dadurch wird das Beckensignal bei sehr lauten Schlägen komprimiert, sodaß bei hohen Frequenzen - wo<br />
die Übersteuerungsreserve geringer ist - keine Bandsättigung eintritt. Leise Schläge mit dem Drumstick oder Besen werden<br />
jedoch nicht komprimiert. Da Tom-Toms tiefer klingen und daher vom Band besser verkraftet werden, brauchen sie nicht<br />
so stark komprimiert zu werden. Wenn Sie das Sidechain-Signal entzerren, spricht der Kompressor nicht so leicht auf<br />
einen lauten Tom-Tom-Schlag an als auf einen gleich lauten Crash-Beckenschlag. Weitere Sidechain-Anwendungen finden<br />
Sie auf der nächsten Seite.<br />
Bei Submischungen von Drumsets (wenn Sie z.B. mehrere Schlagzeugspuren auf zwei Spuren abmischen und dabei<br />
beide Kanäle des dbx <strong>166XL</strong> als Kompressor einsetzen), kann es vorteilhaft sein, RATIO in beiden Kanälen auf 2:1<br />
zurückzudrehen, um übermäßiges "Zischeln" der Becken zu vermeiden. Wenn entsprechend viele Spuren zur Verfügung<br />
stehen, komprimieren Sie Bassdrum und Snare separat. Eine weitere Möglichkeit wäre, die Toms auf Stereo abzumischen,<br />
32<br />
dbx <strong>166XL</strong> DCOMPRESSOR / GATE<br />
®<br />
PROFESSIONAL PRODUCTS
dbx <strong>166XL</strong> COMPRESSOR / GATE<br />
stark zu komprimieren und die restlichen Schlaginstrumente unbearbeitet zu lassen.<br />
Hervorheben eines Signals aus der Mischung<br />
Da eine Dynamikeinengung den Mittelwert des Signalpegels leicht anhebt, können Sie eine einzelne Spur aus der<br />
Mischung hervorheben, indem Sie diese Spur leicht im Pegel anheben und komprimieren. Beginnen Sie mit einem<br />
Kompressionsverhältnis von 2:1 und einer relativ niedrigen THRESHOLD-Einstellung (-20 dB). Passen Sie die<br />
Feineinstellung beider Regler den jeweiligen Erfordernissen an.<br />
Kompressoren werden auch dazu eingesetzt, in Studios, wo man nicht zu laut sein darf (z.B. Heimstudios),<br />
Gesangsstimmen in den Vordergrund zu bringen. Montieren Sie einen Schaumstoff-Windschutz am Mikrofon (sofern es<br />
keinen eingebauten Windschutz hat). Stellen Sie RATIO auf 10:1 und THRESHOLD auf -10 dB ein. Singen Sie in einem<br />
Abstand von ca. 5 cm vom Mikrofon, aber leiser als normal. Die Intensität können Sie durch entsprechende Phrasierung<br />
erreichen. Mit einem Equalizer (z.B. dem parametrischen Equalizer dbx 242 oder dem graphischen Equalizer dbx Serie<br />
30) oder einem Effektgerät (z.B. einem Hallgerät, Delay, Verzerrer) können Sie den Sound noch interessanter gestalten.<br />
Sie können auch bestimmte Gesangsstimmen oder Instrumente aus einer fertigen Monomischung herausfiltern. Lesen<br />
Sie dazu das Kapitel über frequenzselektive Kompression auf Seite 33 nach.<br />
Anmerkung: beim Komprimieren von Stereo-Programmaterial gelten grundsätzlich dieselben Überlegungen hinsichtlich der Einstellung der Kennlinie, des<br />
RATIO-Reglers und des THRESHOLD-Reglers wie bei einzelnen Kanälen. Im allgemeinen ist eine starke Kompression bei einer Stereo-Abmischung<br />
jedoch stärker hörbar als bei den einzelnen Spuren, aus denen die Abmischung besteht.<br />
Vermeidung von Bandsättigung<br />
Bei Programmaterial mit stark schwankendem Pegel können Sie durch Kompression eine magnetische Sättigung<br />
einzelner Bandspuren (z.B. Beckenspuren in einer Endabmischung oder Schlagzeug-Submischung) infolge hoher<br />
Aufnahmepegel verhindern (siehe dazu das Kapitel über frequenzselektive Kompression auf Seite 33).<br />
Vermeidung von Übersteuerungen bei digitalen Aufnahmen<br />
Digitale Bandgeräte und Sampler verursachen hörbare Verzerrungen, wenn der Eingangspegel die Übersteuerungsreserve<br />
übersteigt (also in den Bereich oberhalb des maximalen Arbeitspegels geht). Der dbx <strong>166XL</strong> verhindert wirksam<br />
eine Übersteuerung der AD-Wandler (Analog-Digital-Wandler) der digitalen Bandmaschine durch das Audio-<br />
Eingangssignal. Der dbx <strong>166XL</strong> arbeitet ausreichend rauschfrei für sämtliche digitalen Aufnahmemedien. Damit der Pegel<br />
wirklich nur bei extremen Spitzen hinuntergeregelt wird, schalten Sie auf Hard Knee-Modus, stellen Sie RATIO auf ∞:1<br />
und THRESHOLD auf den höchsten zulässigen Pegel.<br />
Anmerkung: Sie können "rauchig" klingenden digitalen Übersteuerungen auch mit dem PeakStop® Limiter vorbeugen.<br />
Lautsprecherschutz<br />
Kompressoren werden bei Beschallungsanlagen (in Veranstaltungssälen, Kirchen, Clubs, bei mobilen Diskotheken für<br />
kleinere Tanzveranstaltungen oder Heimanlagen, die bis an ihre Leistungsgrenze aufgedreht werden) oft dazu eingesetzt,<br />
Beschädigungen von Lautsprechern durch extreme Pegelspitzen zu verhindern. Stellen Sie den dbx <strong>166XL</strong> auf<br />
Limiterbetrieb (Hard Knee-Modus, RATIO auf 10:1 oder höher) und stellen Sie den THRESHOLD-Regler für mindestens<br />
15 dB Kompression (ein paar dB unterhalb der Clipping-Grenze) ein. Bei niedrigen Signalpegeln wird die Verstärkung<br />
nicht verändert, bei hohen Pegeln jedoch reduziert, um Clipping zu verhindern und empfindliche Komponenten vor Überhitzung<br />
oder sonstigen Beschädigungen zu schützen.<br />
Bei Anwendungen, wo der dbx <strong>166XL</strong> nur im Notfall (extrem hohe Pegelspitzen) zurückregeln soll, schalten manche<br />
Techniker auf Hard Knee-Modus, stellen RATIO auf ∞:1 und THRESHOLD auf den höchsten zulässigen Wert ein. Wie<br />
im Kapitel "Vermeidung digitaler Übersteuerungen" erwähnt, können Sie auch den PeakStop® Limiter als<br />
Lautsprecherschutz einsetzen.<br />
Als Faustregel gilt, daß der Kompressor möglichst unmittelbar vor den Endverstärkern in die Übertragungskette<br />
einzufügen ist. Wenn Sie den dbx <strong>166XL</strong> z.B. vor dem Equalizer einschleifen, kann der dbx <strong>166XL</strong> potentiell gefährliche<br />
Pegelanhebungen im Equalizer nicht ausgleichen, sodaß möglicherweise die Lautsprecher beschädigt werden (s. Kapitel<br />
"Mehrweg-Lautsprecheranlagen" auf Seite 34). Um möglichst hohe Schalldruckpegel zu erreichen, wird bei großen<br />
Beschallungsanlagen oft an jeden Ausgang der elektronischen Frequenzweiche(n) je ein eigener Kompressor<br />
angeschlossen. Bei Stereo-Beschallungsanlagen können Sie je einen dbx <strong>166XL</strong> pro Stereo-Frequenzbereich (Tiefen,<br />
untere Mitten, Mitten usw.) einsetzen.<br />
Anheben des Durchschnittspegels bei PA-Anlagen<br />
Signalbegrenzung (sehr starke Kompression, z.B. ∞:1) wirkt sich auch günstig auf die Sprachverständlichkeit aus, da<br />
Eingangssignale mit niedrigem Pegel mit höherer Lautstärke über die Beschallungsanlage wiedergegeben werden können.<br />
Musikaufführungen werden dadurch auch intimer, da auch geflüsterte Gesangspassagen deutlicher zu hören sind. Durch<br />
die schaltbare OverEasy®-Kennlinie des dbx <strong>166XL</strong> können Sie in vielen Anwendungssituationen das Signal sehr stark<br />
komprimieren (RATIO auf 10:1 oder höher). Damit können sich dynamische RednerInnen, SängerInnen und andere<br />
MusikerInnen auf ihren Vortrag konzentrieren, ohne sich um negative Auswirkungen von Lautstärkeschwankungen küm-<br />
33
mern zu müssen.<br />
Bekämpfen von Rückkopplungen bei Live-Beschallung (Konzerte im Saal oder im<br />
Freien, Kirchen)<br />
Mit dem dbx <strong>166XL</strong> und einem Equalizer können Sie Rückkopplungen in Clubs, Kirchen, bei Freiluftkonzerten oder<br />
sonstigen Live-Veranstaltungen reduzieren. Schleifen Sie den dbx <strong>166XL</strong> in den Hauptausgang des Mischpults ein, schalten<br />
Sie auf Hard Knee-Modus und ziehen Sie den Summenfader des Mischpults langsam soweit auf, bis der erste<br />
Rückkopplungston einsetzt. Stellen Sie nun den RATIO-Regler am dbx <strong>166XL</strong> auf ∞:1 und THRESHOLD auf einen<br />
niedrigen Wert. Bei dieser Einstellung klingt der erste Rückkopplungston konstant weiter, sodaß Sie dessen Frequenz mit<br />
dem Equalizer absenken können. Ziehen Sie den Summenfader des Mischpults weiter auf und stellen Sie den Equalizer<br />
entsprechend ein, bis Sie auch die nächsten 3 oder 4 Rückkopplungsfrequenzen ausgeblendet haben.<br />
Der dbx <strong>166XL</strong> als Leitungsverstärker<br />
Wenn Sie den dbx <strong>166XL</strong> als Leitungsverstärker einsetzen wollen, drehen Sie RATIO bis zum linken Anschlag (1:1)<br />
zurück, THRESHOLD bis zum rechten Anschlag (+20), PEAKSTOP LEVEL auf +20 und stellen Sie OUTPUT GAIN auf<br />
den für die jeweilige Anwendung erforderlichen Wert. Beachten Sie dabei, daß eine zu hohe Verstärkung bei lauten<br />
Signalen zu Clipping am Ausgang führen kann. Wenn Sie das Signal zusätzlich komprimieren wollen, stellen Sie RATIO<br />
und THRESHOLD auf die gewünschten Werte ein.<br />
Frequenzselektive Kompression<br />
Durch frequenzselektive Kompression können Sie Gesangsstimmen und bestimmte Instrumente aus einer Mischung<br />
ausblenden. Wenn Sie einen Equalizer an den SIDECHAIN INSERT-Eingang (nicht den Audio-Eingang) anschließen,<br />
beeinflußt die Equalizer-Einstellung nicht die Klangfarbe (das Frequenzspektrum) des Audiosignals, sondern bewirkt, daß<br />
der Kompressor nur auf bestimmte Frequenzen anspricht.<br />
Alle Frequenzen, die Sie mit dem Equalizer anheben, werden im Ausgangssignal unterdrückt. Stellen Sie COMPRES-<br />
SOR THRESHOLD auf einen relativ hohen Wert ein. Normale Signale werden nicht beeinflußt, während Solos und sehr<br />
laute Signale heruntergeregelt werden. (Dabei wird natürlich auch der Gesamtpegel reduziert. Wenn Sie jedoch die CON-<br />
TOUR-Taste drücken, bleiben noch mehr Tiefenanteile erhalten.) Je nach Einstellung des COMPRESSOR THRESHOLD-<br />
Reglers bewirken Grund- oder Obertöne mit niedrigem Pegel keine Kompression und es treten auch keine<br />
Phasenverschiebungen auf, wie sie normalerweise von Equalizern verursacht werden.<br />
Beim Aufnehmen von Becken und Tom-Toms können Sie der Sättigung des Analogbands vorbeugen, indem Sie einen<br />
Equalizer an die SIDECHAIN INSERT-Buchse des dbx <strong>166XL</strong> anschließen. Heben Sie am Equalizer die Frequenzen bei<br />
ca. 5 kHz an. Dadurch wird das Beckensignal bei sehr lauten Schlägen komprimiert, sodaß bei hohen Frequenzen - wo die<br />
Übersteuerungsreserve geringer ist - keine Bandsättigung eintritt. Leise Schläge mit dem Drumstick oder Besen werden<br />
jedoch nicht komprimiert. Da Tom-Toms tiefer klingen und daher vom Band besser verkraftet werden, brauchen sie nicht<br />
so stark komprimiert zu werden. Wenn Sie das Sidechain-Signal entzerren, spricht der Kompressor nicht so leicht auf<br />
einen lauten Tom-Tom-Schlag an als auf einen gleich lauten Crash-Beckenschlag.<br />
Sie können das oben beschriebene Verfahren auch umgekehrt einsetzen. Wenn Sie bestimmte Frequenzbänder<br />
absenken, bewirkt jedes Signal, dessen Energie hauptsächlich im abgesenkten Frequenzbereich liegt, eine Anhebung des<br />
Ausgangspegels, weil der dbx <strong>166XL</strong> auf diese Frequenzen mit weniger Kompression reagiert.<br />
Abb. 3: Frequenzselektive Kompression<br />
De-Essing<br />
Zum Dämpfen überbetonter Zischlaute bei Gesangsstimmen schließen Sie einen parametrischen Equalizer (z.B. dbx<br />
242) an die SIDECHAIN INSERT-Buchse an und stellen Sie den Equalizer auf eine Anhebung des kritischen<br />
Frequenzbereichs (meist 4 bis 6 kHz) ein. Dadurch werden die Zischlaute am SIDECHAIN INSERT-Eingang zusätzlich<br />
betont. Bei einer mittleren bis hohen THRESHOLD- und RATIO-Einstellung ergibt sich eine starke Dämpfung der stören-<br />
34<br />
SOURCE<br />
dbx <strong>166XL</strong> COMPRESSOR / GATE<br />
OUTPUT<br />
EQ<br />
®<br />
PROFESSIONAL PRODUCTS<br />
166A<br />
INPUT OUTPUT<br />
SIDECHAIN<br />
INSERT
dbx <strong>166XL</strong> COMPRESSOR / GATE<br />
den Zischlaute, ohne den Klang oder die Balance der Stimme zu beeinträchtigen. Der Kompressor senkt zwar alle<br />
Frequenzen im Pegel ab, doch die Zischlaute treten ohnehin meist isoliert, vor bzw. nach dem tragenden Vokal, auf.<br />
Sustain verlängern<br />
Um das Sustain eines Instruments (z.B. einer Gitarre oder Baßgitarre) zu verlängern, schließen Sie an die SIDECHAIN<br />
INSERT-Buchse einen Equalizer an und heben Sie den Grundtonbereich des Instruments an. Schalten Sie den dbx <strong>166XL</strong><br />
auf langsame Hard Knee-Kompression (OVEREASY-Taste offen), stellen Sie THRESHOLD auf einen niedrigen und<br />
RATIO auf einen mittleren Wert ein.<br />
Mehrweg-Lautsprecheranlagen<br />
Wenn Sie in einer Mehrweg-Lautsprecheranlage einen einzigen Kompressor (vor der Frequenzweiche, hinter dem<br />
Equalizer) einsetzen, müssen Sie ständig darauf achten, den Summenpegel nur so weit aufzuziehen, daß die empfindlichsten<br />
Lautsprecher der Anlage nicht durchbrennen. Wenn beispielsweise die Mitteltöner immer wieder beschädigt werden,<br />
müssen Sie die gesamte Anlage auf einem geringeren Pegel fahren oder zusätzliche Mitteltöner einsetzen. Wenn Sie<br />
jedoch an der SIDECHAIN INSERT-Buchse des dbx <strong>166XL</strong> einen Equalizer einschleifen, können Sie das Signal gezielt<br />
bei jenen Frequenzen komprimieren, die von den Mitteltönern abgestrahlt werden. Sie können daher einen höheren<br />
Summenpegel einstellen, der dann nur bei gefährlichen Signalen automatisch hinuntergeregelt wird.<br />
Einsatz eines Filters in der Sidechain<br />
Wenn Sie ein Filter an die SIDECHAIN INSERT-Buchse anschließen, erhalten Sie im wesentlichen dieselben<br />
Ergebnisse wie mit einem Equalizer. Jene Frequenzen, die das Filter durchläßt, werden komprimiert (bzw. werden<br />
wesentlich stärker komprimiert als die Frequenzen außerhalb des Durchlaßbereichs). Da passive Filter oft eine<br />
Einfügungsdämpfung aufweisen, müssen Sie in diesem Fall den THRESHOLD-Regler soweit zurückdrehen, daß innerhalb<br />
des Durchlaßbereichs des Filters die gewünschte Verstärkungsreduktion erhalten bleibt. Ob dies der Fall ist, können<br />
Sie anhand der THRESHOLD-LEDs überprüfen.<br />
Preemphasis für Rundfunkanwendungen<br />
Wenn Sie bei vorverzerrtem Programmaterial an der SIDECHAIN INSERT-Buchse des dbx <strong>166XL</strong> ein<br />
Vorverzerrungsnetzwerk einschleifen, können Sie die Übertragungskette ohne Übersteuerungsrisiko höher aussteuern.<br />
ANSCHLIEßEN DES DBX <strong>166XL</strong> AN IHRE ANLAGE<br />
Allgemeine Hinweise<br />
Der dbx <strong>166XL</strong> besitzt symmetrische Ein- und Ausgänge. Sie können ihn daher zusammen mit jedem Line-Pegel-Gerät<br />
(z.B. Mischpulten, Patchbays und anderen Signalprozessoren) einsetzen. Nähere Informationen zur Verkabelung finden<br />
Sie im Kapitel "Anschlußhinweise" auf Seite 33.<br />
Bei der Verkabelung beachten Sie bitte:<br />
1. Schalten Sie immer alle Geräte aus, bevor Sie eine Kabelverbindung herstellen.<br />
2. Montieren Sie den dbx <strong>166XL</strong> in einem 19"-Rack (optional).<br />
Der Platzbedarf des dbx <strong>166XL</strong> im Rack beträgt 1 HE. Sie können das Gerät oberhalb oder unterhalb von anderen<br />
Geräten montieren, die keine Wärme abgeben, da der dbx <strong>166XL</strong> keine spezielle Lüftung benötigt. Bei eingeschalteten<br />
Geräten darf die Umgebungstemperatur 45°C nicht übersteigen.<br />
Anmerkung: Ziehen Sie die Montageschrauben am Rack nicht zu fest an. Dies kann zu Schäden an der Frontplatte führen.<br />
Achtung: Montieren Sie nie den Gehäusedeckel ab. Im Gerät befinden sich keine vom Anwender reparierbaren Teile und Sie könnten sich elektrisieren.<br />
3. Stellen Sie die gewünschten Kabelverbindungen mittels XLR- oder 6,3-mm-Stereoklinkensteckern her.<br />
Kompressoren werden üblicherweise angeschlossen: am Mischpult am Einschleifpunkt eines Kanals oder einer<br />
Subgruppe, um einzelne Instrumente oder Spuren zu bearbeiten; an den Hauptausgängen oder an<br />
Gruppeneinschleifpunkten des Mischpults zum Abmischen; an die Effektein- und Ausgänge der Vorstufe eines<br />
Gitarren- oder Baßverstärkers; zwischen die Hauptausgänge eines Submixers (z.B. eines Keyboardmixers) und die<br />
Eingangskanäle des Hauptmischpults; zwischen die Ausgänge eines DAT-Recorders und die Eingänge einer Analog-<br />
Cassettenmaschine. Wenn Sie mehrere Prozessoren hintereinander einsetzen, können Sie den dbx <strong>166XL</strong> entweder vor<br />
oder nach Effektgeräten oder Dynamikprozessoren anschließen. Wenn Sie den dbx <strong>166XL</strong> jedoch als<br />
35
Lautsprecherschutz einsetzen, plazieren Sie ihn in der Signalkette so nahe am Verstärker wie möglich. Probieren Sie<br />
mehrere Möglichkeiten aus, um festzustellen, welche für Ihren Anwendungsfall die besten Ergebnisse liefert.<br />
Anmerkung: Schließen Sie den dbx <strong>166XL</strong> NIEMALS an den LAUTSPRECHERAUSGANG EINER ENDSTUFE ODER EINES KEYBOARDS an. Dies<br />
kann zu schweren Schäden am Gerät führen.<br />
4. Schließen Sie das Netzkabel an das Gerät und eine Netzsteckdose an und kontrollieren Sie, ob die Stecker festsitzen.<br />
Anmerkung: Kontrollieren Sie, ob Ihr Gerät auf die richtige Netzspannung eingestellt ist. Das Gerät ist fix auf eine Netzspannung von 115 V oder 230 V,<br />
50/60 Hz eingestellt. Die Netzspannung ist an der Rückseite angegeben.<br />
SIDECHAIN INSERT-Buchse<br />
Die SIDECHAIN INSERT-Buchse erlaubt Ihnen, den Kompressor oder Expander/Gate mit einem anderen Signal als<br />
dem Eingangssignal zu steuern (über ein externes Gerät wie z.B. einen Equalizer). Dies ermöglicht extern gesteuertes<br />
Gating, frequenzabhängiges Gating und frequenzselektive Kompression wie bereits beschrieben. Manche Sidechain-<br />
Anwendungen verlangen eine spezielle Verkabelung.<br />
Für frequenzabhängiges Gating oder frequenzselektive Kompression müssen Sie z.B. dasselbe Signal auf den Eingang<br />
eines Equalizers und die INPUT-Buchse des dbx <strong>166XL</strong> aufteilen und den Ausgang des Equalizers mit der SIDECHAIN<br />
INSERT-Buchse am dbx <strong>166XL</strong> verbinden (Abb. 3). Zum Aufteilen des Signals gibt es mehrere Möglichkeiten: 1.<br />
Schließen Sie ein Einschleifkabel an die SIDECHAIN INSERT-Buchse an. Verbinden Sie das Send-Kabel mit dem<br />
Eingang des Equalizers und das Return-Kabel mit dem Ausgang des Equalizers. 2. Verbinden Sie die Signalquelle mittels<br />
Y-Kabel sowohl mit dem Eingang des dbx <strong>166XL</strong> als auch mit dem Eingang des Equalizers. 3. Legen Sie das Signal an<br />
eine der beiden INPUT-Buchsen am dbx <strong>166XL</strong> und verbinden Sie die zweite INPUT-Buchse desselben Kanals mit dem<br />
Eingang des Equalizers. (Wenn Sie z.B. die Signalquelle mit der Klinkenbuchse von Kanal 1 verbinden, können Sie die<br />
XLR-Buchse von Kanal 1 mit dem Equalizereingang verbinden.) 4. Wenn die Signalquelle zwei gleichwertige Ausgänge<br />
besitzt (wie manche Synthesizer), schließen Sie je ein Kabel an jeden Ausgang an und verbinden Sie eines mit einer<br />
INPUT-Buchse am dbx <strong>166XL</strong> und das zweite mit dem Equalizer.<br />
Verkabelung für spezielle Anwendungen<br />
Der dbx <strong>166XL</strong> besitzt symmetrische Ein- und Ausgänge. Sie können ihn daher zusammen mit jedem Line-Pegel-Gerät<br />
(z.B. Mischpulten, Patchbays und anderen Signalprozessoren) einsetzen.<br />
Mischpult<br />
Wenn Sie eine einzelne Spur einer Mehrspuraufnahme oder einen Kanal eines Live-Konzerts komprimieren möchten,<br />
verbinden Sie mit einem Kabel den Ausgang der Tonquelle mit der INPUT-Buchse des dbx <strong>166XL</strong> und die OUTPUT-<br />
Buchse des dbx <strong>166XL</strong> mit einer Line-Eingangsbuchse (symmetrisch oder asymmetrisch) des Mischpults. Sie können auch<br />
die INPUT- und OUTPUT-Buchse des dbx <strong>166XL</strong> mit dem gewünschten Einschleifpunkt verbinden. In diesem Fall sind<br />
die Signale höchstwahrscheinlich asymmetrisch, da die meisten Einschleifpunkte asymmetrisch beschaltet sind.<br />
Der Kompressionsgrad hängt direkt vom Pegel des Eingangssignals ab. Je nachdem, wie Ihre Anlage zusammengestellt<br />
ist, ist es jedoch nicht immer eindeutig feststellbar, welche Pegelregler in der Übertragungskette auf den Eingangspegel<br />
und welche auf den Ausgangspegel wirken. Wenn Sie den dbx <strong>166XL</strong> vor den Kanal-Fader Ihres Mischpults geschaltet<br />
haben (also z.B. direkt zwischen Signalquelle und Mischpulteingang oder an einen Einschleifpunkt vor dem Fader), können<br />
Sie den Eingangspegel für den dbx <strong>166XL</strong> mit dem Volume-Regler der Tonquelle (z.B. des Synthesizers) einstellen.<br />
Den Ausgangspegel des Mischpultkanals können Sie entweder mit dem OUTPUT GAIN-Regler des dbx <strong>166XL</strong> oder mit<br />
dem Fader des Mischpultkanals selbst einstellen (letzteres bietet sich für Fadeouts an). Haben Sie den dbx <strong>166XL</strong> jedoch<br />
nach dem Fader angeschlossen, können Sie mit dem Fader den Eingangspegel und den Kompressionsgrad des dbx <strong>166XL</strong><br />
einstellen. Wenn Sie mit dem Fader aber lieber den Ausgangspegel regeln möchten, schalten Sie den Kompressor direkt<br />
zwischen die Tonquelle und den gewünschten Mischpulteingang. Auf diese Weise können Sie den Eingangspegel und den<br />
Kompressionsgrad des dbx <strong>166XL</strong> mit dem Volume-Regler des Instruments einstellen. Der Fader bestimmt dann nur den<br />
Gesamtpegels des Kanals.<br />
Instrumente (z.B. E-Gitarre, Baß, Keyboards, akustische Instrumente)<br />
Das Ausgangssignal mancher E-Gitarren ist nicht "stark" genug, um den Eingang des dbx <strong>166XL</strong> richtig auszusteuern.<br />
In diesem Fall schließen Sie den dbx <strong>166XL</strong> an den Vorverstärkerausgang (PREAMP OUT) Ihres Gitarrenverstärkers<br />
(falls vorhanden) oder an den Ausgang eines anderen Gerätes mit speziellem Instrumenteneingang (z.B. verschiedene<br />
Effektpedale, Vorverstärker für Akustik-Tonabnehmer oder 19"-Geräte wie dbx 163A, 263A und 563X) an. Hierbei spielt<br />
es keine Rolle, ob dieses Gerät symmetrische oder asymmetrische Ausgänge hat - der dbx <strong>166XL</strong> ist für beides geeignet.<br />
Mikrofone, E-Bässe und Instrumententonabnehmer liefern meist ebenfalls eher niedrige Signalpegel. In den meisten<br />
Fällen benötigen solche Quellen einen Aufholverstärker, um den Eingang des dbx <strong>166XL</strong> aussteuern zu können. Wenn Sie<br />
z.B. eine Gesangsstimme direkt auf einem tragbaren Tonbandgerät aufnehmen wollen, können Sie mit einem<br />
Mikrofonvorverstärker (z.B. dbx 760X) zwischen dem Mikrofon und dem dbx <strong>166XL</strong> (der dann einen der Eingänge des<br />
Recorders ansteuert) das Mikrofonsignal auf den erforderlichen Line-Pegel für den dbx <strong>166XL</strong> und das Bandgerät<br />
anheben.<br />
36<br />
dbx <strong>166XL</strong> COMPRESSOR / GATE<br />
®<br />
PROFESSIONAL PRODUCTS
Keyboards, Sampler, Drum<strong>com</strong>puter und Soundmodule liefern üblicherweise ein Line-Signal. Diese Geräte können Sie<br />
daher direkt an die INPUT-Buchsen des dbx <strong>166XL</strong> anschließen.<br />
Anmerkung: Schließen Sie den dbx <strong>166XL</strong> NIEMALS an den LAUTSPRECHERAUSGANG EINER ENDSTUFE ODER EINES KEYBOARDS an. Dies<br />
kann zu schweren Schäden an der Anlage führen.<br />
Patchbay<br />
Im Studio können Sie den dbx <strong>166XL</strong> an eine Patchbay (z.B. dbx PB-48) anschließen, damit Sie ihn an jede beliebige<br />
Stelle in der Studioanlage einschleifen können. Wenn Ihr Studio nicht durchgehend symmetrisch verdrahtet ist, müssen Sie<br />
den freien Ausgangsstift (Stift 2 oder 3 der XLR-Buchse bzw. den Ringkontakt der 6,3-mm-Klinkenbuchse) mit Masse<br />
verbinden.<br />
Beschallung<br />
Wenn Sie eine Live-Mischung komprimieren oder Lautsprecher absichern wollen, schalten Sie den dbx <strong>166XL</strong> zwischen<br />
die Vorstufe (Mischpult oder Verteilerverstärker) und den (die) Endverstärker. Bei Mehrweglautsprechern mit aktiven<br />
Frequenzweichen schleifen Sie den (die) dbx <strong>166XL</strong> zwischen Frequenzweiche(n) und Endstufen ein. Für<br />
Stereobeschallung können Sie die Höhen-, Tiefen- und sonstigen Ausgänge der beiden Frequenzweichen mit je einem<br />
eigenen dbx <strong>166XL</strong> für Stereobetrieb koppeln. Wenn nur ein einziger dbx <strong>166XL</strong> zur Verfügung steht, schalten Sie ihn<br />
vor die Frequenzweiche und schleifen Sie über SIDECHAIN INSERT einen Equalizer ein, mit dem Sie die Hochtöner<br />
zusätzlich absichern können (siehe Kapitel "Lautsprecherschutz" auf Seite 33).<br />
ANSCHLUßHINWEISE<br />
Beschaltung der Ein- und Ausgänge<br />
Kabel<br />
dbx <strong>166XL</strong> COMPRESSOR / GATE<br />
Der dbx <strong>166XL</strong> ist für einen Nennpegel von +4 dBu ausgelegt. Die Ein- und Ausgänge liegen jeweils an 6,3-mm-<br />
Stereoklinkenbuchsen und XLR-Buchsen. Vorausgesetzt, die Kabel sind richtig beschaltet, können Sie den dbx <strong>166XL</strong><br />
sowohl an symmetrische als auch an asymmetrische Signalquellen anschließen und an die Ausgänge symmetrische und<br />
asymmetrische Geräte anschließen.<br />
Symmetrische Kabel sind zweipolige, geschirmte Kabel, bei denen die beiden Innenleiter dasselbe Signal führen,<br />
jedoch mit jeweils entgegengesetzter Polarität bezogen auf Masse. Asymmetrische Kabel sind einpolige geschirmte Kabel,<br />
deren Innenleiter das Signal führt, während die Abschirmung an Masse liegt.<br />
Eingangsbeschaltung<br />
Die Wirkimpedanz des dbx <strong>166XL</strong> beträgt >40 kΩ symmetrisch und asymmetrisch. Dadurch können Sie den dbx<br />
<strong>166XL</strong> sowohl an hochohmigen als auch niederohmigen Quellen betreiben. Die Eingangsbuchsen sind parallel geschaltet.<br />
Der Spitzenkontakt (Inphase) der Klinkenbuchse ist intern mit Stift 2 der XLR-Buchse, der Ringkontakt (-) mit Stift 3 und<br />
der Schaftkontakt (Abschirmung) mit Stift 1 verbunden. Beachten Sie bitte, daß bei manchen älteren dbx-Produkten und<br />
Fremdfabrikaten der Inphase-Kontakt an Stift 3 liegt. Wenn jedoch Eingang und Ausgang gleich beschaltet sind, bleibt die<br />
Signalpolarität unverändert (gleichphasig).<br />
Wenn Sie die Signaladern eingangsseitig vertauschen, wird dadurch das Ausgangssignal umgepolt (180° phasenverschoben).<br />
Ausgangsbeschaltung<br />
Die Ausgangsbuchsen sind parallel geschaltet: Sie können sowohl an die XLR-Buchse als auch an die 6,3-mm-<br />
Stereoklinkenbuchse eine Lastimpedanz von 600 Ω anschließen. Der Spitzenkontakt (Inphase) der Klinkenbuchse ist<br />
intern mit Stift 2 der XLR-Buchse, der Ringkontakt (-) mit Stift 3 und der Schaftkontakt (Abschirmung) mit Stift 1 verbunden.<br />
Beachten Sie bitte, daß bei manchen älteren dbx-Produkten und Fremdfabrikaten der Inphase-Kontakt an Stift 3<br />
liegt. Wenn jedoch Eingang und Ausgang gleich beschaltet sind, bleibt die Signalpolarität unverändert (gleichphasig).<br />
Erdung<br />
Beim Betrieb mit symmetrisch beschalteten Signalquellen ist eine maximale Brummunterdrückung nur dann<br />
gewährleistet, wenn Eingang und Ausgang des dbx <strong>166XL</strong> nicht gemeinsam geerdet sind. Bei den meisten symmetrischen<br />
(2-polig geschirmten) Kabeln ist die Abschirmung beidseitig angeschlossen. Dadurch können Erdschleifen entstehen, die<br />
wiederum Brummeinstreuungen hervorrufen. Wenn Brummeinstreuungen auftreten, löten Sie bei einem oder mehreren<br />
Kabeln die Abschirmung am eingangsseitigen Stecker (NICHT ausgangsseitig!) ab. Verbinden Sie die Abschirmung des<br />
Eingangskabels nur am Ausgang der Signalquelle mit Masse (am Eingang des dbx <strong>166XL</strong> bleibt der Massekontakt frei)<br />
und verbinden Sie die Abschirmung des Ausgangskabels nur am Ausgang des dbx <strong>166XL</strong> mit Masse (am Eingang des<br />
nachgeschalteten Geräts bleibt der Massekontakt frei). Bei XLR-Steckern liegt der Massekontakt an Stift 1, bei 6,3-mm-<br />
Stereoklinkensteckern am Schaft.<br />
37
SERVICE UND KUNDENDIENST<br />
Abb. 4: Signalfluß (symmetrische Beschaltung)<br />
Der dbx <strong>166XL</strong> ist ein volltransistorisiertes Gerät mit Bauteilen von höchster Qualität und Zuverlässigkeit. Der <strong>166XL</strong><br />
ist eine Eigenentwicklung von dbx und jedes Gerät wird im Werk zusammengebaut, auf Qualität und Funktion geprüft und<br />
abgeglichen, sodaß normalerweise während der gesamten Lebensdauer des Gerätes keinerlei weitere interne<br />
Einstellarbeiten erforderlich sind.<br />
Im Servicefall lesen Sie bitte zuerst in der Bedienungsanleitung nach und wenden Sie sich erst dann an Ihren dbx-<br />
Händler.<br />
Für den Fall, daß Ihr Händler Ihr Gerät zur Reparatur an das Werk einsenden muß, heben Sie bitte den Originalkarton<br />
auf. Wenn Sie das nicht möchten, entsorgen Sie das Verpackungsmaterial nach den in Ihrem Land gültigen<br />
Entsorgungsvorschriften.<br />
Falls Sie weitere Fragen haben, wenden Sie sich bitte an Ihre dbx-Vertretung. Deren Adresse, Telefon- und Faxnummer<br />
finden Sie auf der ersten Seite.<br />
Registrierungs- und Antwortkarte<br />
Wir freuen uns über Ihre Anregungen und Kommentare. Wenn Sie einige Zeit mit dem dbx <strong>166XL</strong> gearbeitet haben,<br />
füllen Sie bitte die Registrierungskarte aus und senden Sie sie an uns zurück.<br />
38<br />
dbx <strong>166XL</strong> COMPRESSOR / GATE<br />
SIGNAL FLOW<br />
166A<br />
®<br />
PROFESSIONAL PRODUCTS
INTRODUCCION<br />
Español<br />
Felicitaciones por haber elegido el <strong>166XL</strong> Dynamics Processor de dbx. El modelo <strong>166XL</strong> proporciona dos canales de<br />
<strong>com</strong>puerta para el bloqueo del ruido, la <strong>com</strong>presión OverEasy® o Hard Knee y la limitación de crestas PeakStop® para<br />
brindar el control <strong>com</strong>pleto de la dinámica de las señales acásticas que requieren los estudios de grabación, las <strong>com</strong>pañías<br />
de amplificación de sonido, los másicos o cualquier otra persona que necesite un sistema de procesamiento que sea de uso<br />
fácil y rápido. Le re<strong>com</strong>endamos que dedique algunos momentos a la lectura de este manual, ya que el mismo le provee de<br />
información que le ayudará a aprovechar al máximo las características de esta unidad. Estas características incluyen:<br />
• Funcionamiento estereofónico o monofónico bicanal para el bloqueo, la <strong>com</strong>presión y la limitación de crestas.<br />
• Selección OverEasy®/Hard Knee - le permite elegir entre nuestra famosa curva de <strong>com</strong>presión OverEasy y la curva<br />
clásica “Hard Knee” que se hizo popular en los modelos dbx 160, 161 y 162.<br />
• Circuito expansor/de <strong>com</strong>puerta - con un tiempo de liberación variable y un umbral máximo de +15dBu<br />
• Conmutación del modo de <strong>com</strong>presión - selecciona entre dos series de tiempos de ataque y de liberación, con el<br />
propósito de adaptar la respuesta a los instrumentos individuales o a los programas mixtos.<br />
• Filtro de frecuencias bajas (seleccionable con el botón de Contorno) en el circuito de inserción (Sidechain) - se<br />
re<strong>com</strong>ienda para la <strong>com</strong>presión de los programas mixtos, a fin de evitar que la energía de baja frecuencia produzca<br />
“huecos” en el sonido.<br />
• Limitación de crestas PeakStop® - proporciona un control de la amplitud máxima de las crestas en la salida del<br />
<strong>166XL</strong>, independientemente de los demás controles. PeakStop interviene después de la <strong>com</strong>presión, el circuito de<br />
<strong>com</strong>puerta y los demás circuitos, incluyendo la ganancia de salida, y por lo tanto limita en forma absoluta las excursiones<br />
de cresta antes que éstas lleguen a la salida.<br />
• Verdadera detección del nivel eficaz (RMS) - esta característica, al igual que el oído humano, toma en cuenta el<br />
carácter musical del programa al detectar su potencia, lo cual produce un resultado superior a la detección de crestas o<br />
de promedios.<br />
• Botones de desvío del sistema en ambos canales - permiten que pase la señal acástica aun cuando la unidad esté<br />
desconectada, y también son átiles para <strong>com</strong>parar las señales procesadas con las originales.<br />
• Visualización LED (diodos emisores de luz) de 10 segmentos para una reducción de ganancia (GAIN REDUCTION)<br />
de hasta 30 dB.<br />
• Jacks receptores de entrada y de salida tipo XLR y TRS (tripolares) de 0,25 de pulgada, electrónicamente equilibrados<br />
(simétricos).<br />
• Entradas separadas del Sidechain (circuito de inserción) - permiten que una señal o procesador externo controle los<br />
circuitos de <strong>com</strong>presión o de <strong>com</strong>puerta.<br />
• Parámetros controlados por CC - la señal no pasa por ninguno de los controles de parámetros. Más bien, la tensión CC<br />
controla todas las funciones, eliminando de esta manera la posibilidad de que, con el tiempo, se desarrolle ruido<br />
proveniente del potenciómetro.<br />
INSPECCION<br />
Verifique que el paquete contenga todo lo siguiente:<br />
• la unidad <strong>166XL</strong><br />
• cable de red CC<br />
• manual de operación<br />
• tarjeta de registro<br />
dbx <strong>166XL</strong> COMPRESSOR / GATE<br />
39
GARANTIA<br />
1. Para que la garantía entre en vigor, la tarjeta de garantía y de registro que a<strong>com</strong>pañan a este producto se deben<br />
devolver por correo dentro de 30 días después de la fecha de <strong>com</strong>pra. Recae en el consumidor la responsabilidad de <strong>com</strong>probar<br />
que ha adquirido el producto en forma legítima.<br />
2. dbx garantiza que este producto, cuando se <strong>com</strong>pra y se utiliza solamente en los Estados Unidos, estará libre de<br />
defectos de materiales y de mano de obra, siempre y cuando se utilice bajo condiciones normales de uso y de servicio.<br />
3. La responsabilidad de dbx bajo esta garantía se limita a la reparación o (a elección de dbx) el reemplazo de los materiales<br />
que resulten ser defectuosos, siempre y cuando el producto sea devuelto a dbx CON PREVIA AUTORIZACIÓN DE<br />
DEVOLUCIÓN de la fábrica, en donde todas las piezas de repuesto y la mano de obra serán cubiertas durante un período<br />
de dos años. Se debe obtener por teléfono un námero de Autorización de Devolución de dbx. La <strong>com</strong>pañía no se hará<br />
responsable de ningán daño que se produzca <strong>com</strong>o consecuencia de conectar el producto a algán circuito o unidad ensamblada.<br />
4. dbx se reserva el derecho de modificar el diseño o de suplementar o mejorar este producto, sin que por ello se vea<br />
obligado a instalar los mismos suplementos o mejoras en los productos fabricados con anterioridad.<br />
5. Lo anterior reemplaza a cualquier otra garantía expresa o implícita. dbx no acepta, ni autoriza a ninguna persona para<br />
que acepte en su nombre, ninguna obligación o responsabilidad en conexión con la venta de este producto. En ningán caso<br />
dbx y sus representantes se harán responsables de daños especiales o con<strong>com</strong>itantes, ni de daños causados por cualquier<br />
demora en el cumplimiento de esta garantía debido a causas fuera de su control.<br />
CONTROLES OPERATIVOS<br />
Panel Delantero<br />
Sección de EXPANDER/GATE (expansor/<strong>com</strong>puerta)<br />
Control de THRESHOLD (umbral) del expansor/<strong>com</strong>puerta y los LED BELOW/ABOVE (por deba<br />
jo/por encima).<br />
Este control establece el nivel en el que la <strong>com</strong>puerta se abre y permite que la señal de entrada pase hacia la salida. Si se<br />
gira el control <strong>com</strong>pletamente en el sentido contrario al de las agujas del reloj (posición OFF), la <strong>com</strong>puerta deja pasar la<br />
señal sin ninguna atenuación, en efecto evitando la <strong>com</strong>puerta. Si se gira el control <strong>com</strong>pletamente en el sentido de las<br />
agujas del reloj, la <strong>com</strong>puerta atenáa las señales de entrada inferiores a +15dBu.<br />
Los dos LED de Expansor/Compuerta indican la relación entre el nivel de la señal de entrada y la especificación de<br />
umbral. El LED rojo se ilumina al detectar una señal inferior (BELOW) al umbral mientras que el LED verde indica que la<br />
señal sobrepasa (ABOVE) el umbral.<br />
Nota: La velocidad de ataque del circuito expansor/<strong>com</strong>puerta (la cual controla la rapidez con que se restaura la señal después de ser atenuada), ha sido<br />
fijada internamente con un valor lo suficientemente rápido para permitir que pasen las señales transitorias que se producen al principio de una nota musical<br />
o de una palabra cantada o hablada.<br />
Nota: La proporción de expansión del <strong>166XL</strong> ha sido fijada internamente en 10:1, aproximadamente. Esta proporción tiende a eliminar los artefactos normalmente<br />
asociados con las <strong>com</strong>puertas de conmutación. La atenuación es de >50dB.<br />
Conmutador SC ENABLE:<br />
Este conmutador capacita los conectores de entrada y salida de la cadena lateral (”Sidechain”), permitiendo un procesamiento<br />
externo de la señal del detector. No tiene ningún efecto si no hay nada enchufado en el circuito de la cadena lateral;<br />
sin embargo, el conmutador se iluminará para indicar que está capacitada la cadena lateral.<br />
Control de RELEASE (liberación) del expansor/<strong>com</strong>puerta:<br />
Este control determina la velocidad con que se cierra el circuito de <strong>com</strong>puerta una vez que la señal de INPUT (entrada)<br />
o de SIDECHAIN INSERT (circuito inserción) baje del nivel de umbral. Las especificaciones lentas (SLOW) son átiles<br />
para bloquear el ruido que a<strong>com</strong>paña a la voz cantada o a ciertos instrumentos acásticos. Las especificaciones rápidas<br />
(FAST) son átiles para enfatizar la nitidez del sonido de ciertos instrumentos de percusión (p. ej.: el bombo de pedal o la<br />
40<br />
dbx <strong>166XL</strong> COMPRESSOR / GATE<br />
®<br />
PROFESSIONAL PRODUCTS
dbx <strong>166XL</strong> COMPRESSOR / GATE<br />
caja clara), así <strong>com</strong>o el desbordamiento de otros instrumentos en las pistas de percusión.<br />
Nota: El circuito de <strong>com</strong>puerta se desbloquea en forma íaceleradaî, en el sentido de que la relación dB/seg. aumenta en forma continua a medida que se<br />
cierra el circuito de <strong>com</strong>puerta.<br />
Botón CONTOUR (contorno) y LED:<br />
Presione este botón para hacer que los circuitos de detección del <strong>166XL</strong> sean menos sensibles a la energía de baja frecuencia,<br />
a fin de evitar que dicha energía produzca íhuecosî en el sonido, especialmente con los programas mixtos. Con el<br />
botón de CONTOUR desactivado, el detector del <strong>166XL</strong> funciona independientemente de la frecuencia. El LED COUN-<br />
TOUR se enciende cuando se presiona el botón de COUNTOUR.<br />
Sección de COMPRESSOR (circuito de <strong>com</strong>presión)<br />
Medidor de GAIN REDUCTION (reducción de ganancia):<br />
Este medidor indica el grado en que la señal está atenuada por el circuito <strong>com</strong>presor o por el de <strong>com</strong>puerta, o por<br />
ambos.<br />
LED de THRESHOLD (umbral) del COMPRESSOR (circuito de <strong>com</strong>presión).<br />
Estos tres LED indican la relación entre el nivel de la señal de entrada y el umbral de <strong>com</strong>presión. El LED verde<br />
BELOW se enciende cuando la señal se encuentra por debajo del umbral, y el LED rojo ABOVE se enciende cuando la<br />
señal sobrepasa el umbral. Cuando el <strong>166XL</strong> se encuentra en el modo OverEasy, el LED ámbar se enciende cuando la<br />
señal se encuentra en la región de OverEasy (vea la Figura 2).<br />
Nota: Aun cuando no se aplique ninguna señal de entrada, es normal que las luces LED parpadeen al conectar o al quitar la alimentación eléctrica.<br />
Control de THRESHOLD (umbral) del circuito de <strong>com</strong>presión:<br />
Ajuste este control para fijar el umbral de <strong>com</strong>presión en un valor entre -40 dBu (7,8m Vrms) y +20 dBu (7,8 Vrms). El<br />
fijar el control de THRESHOLD del circuito de <strong>com</strong>presión en +20dB permitirá solamente la <strong>com</strong>presión de las crestas de<br />
nivel más alto. (El fijar la proporción (RATIO) de <strong>com</strong>presión en 1:1 desactivará el circuito de <strong>com</strong>presión, sea cual fuere<br />
el valor especificado con el control de THRESHOLD de dicho circuito.)<br />
En el modo Hard Knee (o sea, con el botón OVEREASY desactivado), el THRESHOLD establece un nivel de referencia,<br />
por encima del cual las señales de entrada serán procesadas por los circuitos de cambio de ganancia del <strong>166XL</strong>, de la<br />
manera definida por el valor del control de RATIO. Las señales de entrada que no alcancen este nivel pasarán por el<br />
<strong>166XL</strong> sin alteración (con excepción de los cambios fijos de ganancia especificados por el control de OUTPUT GAIN).<br />
Vea la Figura 1.<br />
En el modo OverEasy (o sea, mientras está presionado el botón OVEREASY), las señales empiezan gradualmente a<br />
activar los circuitos de cambio de ganancia del <strong>166XL</strong> a medida que se acercan al nivel de referencia THRESHOLD, pero<br />
no están sujetas al procesamiento <strong>com</strong>pleto definido por el control de RATIO hasta que no hayan sobrepasado un poco el<br />
nivel de referencia THRESHOLD. En el modo OverEasy no existe ningán punto bien definido en el que <strong>com</strong>ienza el<br />
procesamiento. La especificación de THRESHOLD (umbral) corresponde, en realidad, a un punto de la curva de transferencia<br />
de entrada/salida que se encuentra “a medio camino” entre el <strong>com</strong>ienzo del procesamiento y el punto en el que la<br />
curva de transferencia corresponde a la especificación del control de RATIO. En la Figura 2 se presentan las curvas de<br />
<strong>com</strong>presión de OverEasy y se indica la correlación entre éstas y los LED de THRESHOLD.<br />
Botón OVEREASY:<br />
Presione este botón para seleccionar el sistema de <strong>com</strong>presión OverEasy®. El LED de color ámbar se enciende (On)<br />
cuando la señal se encuentra en la región OverEasy. Cuando este botón está desactivado (Out), el <strong>166XL</strong> funciona <strong>com</strong>o<br />
un <strong>com</strong>presor/limitador íHard Kneeî. (El LED ámbar de OverEasy se encuentra activo sólo en el modo OverEasy.)<br />
En el modo Hard Knee, el umbral de <strong>com</strong>presión se define <strong>com</strong>o el punto por encima del cual el nivel de salida ya no<br />
varía en una proporción de 1:1 con las variaciones del nivel de entrada. Vea la Figura 1.<br />
En el modo OverEasy, el umbral de <strong>com</strong>presión se define <strong>com</strong>o el punto medio de la región de umbral OverEasy, tal<br />
<strong>com</strong>o se ilustra en la Figura 2.<br />
Control de RATIO (proporción) del circuito de <strong>com</strong>presión:<br />
Gire este control en el sentido de las agujas del reloj para aumentar el grado de <strong>com</strong>presión de 1:1 (sin <strong>com</strong>presión)<br />
hasta ∞:1 (ningán aumento del nivel de salida a pesar de los aumentos del nivel de entrada por encima del umbral).<br />
Cuando una señal de entrada excede el nivel de referencia de THRESHOLD, este control determina el grado de<br />
variación de la señal de entrada (expresado en decibeles) que producirá un aumento de 1dB en la señal de salida del<br />
<strong>166XL</strong>. Una proporción de entrada:salida de 2:1 indica que un aumento de señal de 2dB (por encima del umbral) producirá<br />
un aumento de 1dB a la salida. Una especificación de ∞:1 indica que se requeriría un aumento infinito del nivel de<br />
entrada para elevar el nivel de salida por 1dB. En otras palabras, el nivel de salida permanece constante cuando la señal de<br />
entrada excede el umbral.<br />
41
OUTPUT LEVEL (dB)<br />
Figura 1: Figura Curva 1: de Curva <strong>com</strong>presión de <strong>com</strong>presión Hard Knee Hard Knee<br />
y los LED y los de LED umbral de umbral<br />
Control ATTACK:<br />
Este control de ataque fija el tiempo necesario para que el <strong>166XL</strong> empiece a <strong>com</strong>primir una señal una vez que el detector<br />
haya percibido una señal que esté por encima del umbral. La gama de ataque va de 3 dB/ms (para un efecto de <strong>com</strong>presión<br />
más firme y notable con muy reducida sobreelongación) hasta 0,4 dB/ms (para una <strong>com</strong>presión más retardada y gradual).<br />
Un ajuste de ataque muy rápido llevará al <strong>166XL</strong> a actuar <strong>com</strong>o limitador de crestas, aun cuando se utilice una cirucuitería<br />
de detección efectiva. Ajustes de ataque más lentos llevan al <strong>166XL</strong> a actuar <strong>com</strong>o un RMS o un <strong>com</strong>presor/limitador<br />
detector de promedios.<br />
Control RELEASE :<br />
Este control de liberación determina la rapidez con que el circuito de <strong>com</strong>presión vuelve la entrada a su nivel original.<br />
La tasa de liberación va de 250 dB/s (en que la <strong>com</strong>presión sigue muy de cerca la envolvente del material de programa)<br />
hasta 5dB/s (para una <strong>com</strong>presión muy fluida).<br />
Conmutador AUTO:<br />
Este conmutador suplanta a ambos controles de ATTACK y RELEASE y capacita tiempos de ataque y liberación<br />
dependientes del programa fijados de antemano. Estos tiempos se derivan de la señal de entrada y cambian continuamente<br />
para equipararse con su dinámica. El conmutador se ilumina para indicar que los tiempos de ataque y liberación se están<br />
ajustando automáticamente en una forma dependiente del programa. Con la capacitación de esta función AUTO se duplica<br />
el "clásico sonido dbx" de los antecesores del 166, que se han transformado en normas de la industria.<br />
Control de OUTPUT GAIN (ganancia de salida):<br />
Ajuste este control para variar la cantidad fija de ganancia (hasta ±20dB) en la etapa de amplificación de salida del<br />
<strong>166XL</strong>. El control de OUTPUT GAIN no tiene ninguna interacción con el umbral de <strong>com</strong>presión.<br />
El control de OUTPUT GAIN es especialmente átil para <strong>com</strong>pensar la reducción del nivel eficaz (RMS) que viene<br />
<strong>com</strong>o resultado de los efectos del procesamiento dinámico del <strong>166XL</strong>. Después de ajustar los controles del <strong>166XL</strong> para<br />
obtener el grado deseado de <strong>com</strong>presión (y de bloqueo con el circuito <strong>com</strong>puerta), fije OUTPUT GAIN para restaurar la<br />
misma cantidad de ganancia que aparece en los medidores de GAIN REDUCTION. Por ejemplo, si la cantidad media de<br />
reducción que aparece en los medidores es 10dB, el fijar el control de OUTPUT GAIN en 10dB <strong>com</strong>pensará la reducción<br />
media de +10dB a la salida. Observe que el control de GAIN interviene antes del circuito PeakStop (de limitación de<br />
crestas).<br />
Nota: Debido a que se puede añadir +20dB de ganancia a la salida del <strong>166XL</strong>, es posible que se produzca un truncamiento de las crestas, aun cuando el<br />
nivel de entrada se encuentre dentro del intervalo especificado. Por ejemplo, cuando la COMPRESSION RATIO está fijada en un valor bajo, el fijar el control<br />
de OUTPUT GAIN en el valor máximo puede causar que la etapa de salida del <strong>166XL</strong> descreste los picos de la señal. Por lo tanto, durante la<br />
operación normal sugerimos que se <strong>com</strong>ience con el OUTPUT GAIN fijado en «0dB» (las posición de las 12 horas en el reloj). Si el circuito alimentado por<br />
el <strong>166XL</strong> tiene un alto grado de sensibilidad a la entrada, el bajar la especificación de OUTPUT GAIN puede eliminar la necesidad de un atenuador fijo.<br />
Botón y LED BYPASS (desvío):<br />
Oprima este botón para eludir los circuitos del <strong>166XL</strong> (en otras palabras, para que la señal de entrada pase sin<br />
alteración por la unidad, aun cuando ésta esté desconectada). Observe que BYPASS funciona independientemente para<br />
cada canal, aun cuando esté activado el acoplamiento estereofónico (mediante el botón de STEREO COUPLE).<br />
En el modo Bypass, la entrada se transmite directamente a la salida, evitando los circuitos de procesamiento y los controles<br />
del <strong>166XL</strong> y presentando la señal de entrada sin alteración alguna a la salida (OUTPUT) del <strong>166XL</strong>. El modo<br />
Bypass resulta especialmente átil para <strong>com</strong>parar una señal procesada con la señal original.<br />
El LED BYPASS se enciende en el modo Bypass cuando el <strong>166XL</strong> está recibiendo alimentación CA.<br />
42<br />
+20<br />
+15<br />
+10<br />
+5<br />
0<br />
-5<br />
-10<br />
-15<br />
dbx <strong>166XL</strong> COMPRESSOR / GATE<br />
GREEN<br />
Below Threshold<br />
RED<br />
Above Threshold<br />
-15 -10 -5 0 +5 +10 +15 +20<br />
INPUT LEVEL (dB)<br />
1:1 Unity<br />
2:1<br />
4:1<br />
20:1<br />
Rotation Point Threshold<br />
:1<br />
OUTPUT LEVEL (dB)<br />
+20<br />
+15<br />
+10<br />
+5<br />
0<br />
−5<br />
−10<br />
−15<br />
®<br />
GREEN AMBER<br />
Below Threshold<br />
PROFESSIONAL PRODUCTS<br />
RED<br />
INPUT LEVEL (dB)<br />
1:1<br />
2:1<br />
4:1<br />
−15 −10 −5 0 +5 +10 +15 +20<br />
:1<br />
Above Threshold<br />
OverEasy Range<br />
Figura 2: Curva de <strong>com</strong>presión OverEasy y los<br />
LED de umbral
dbx <strong>166XL</strong> COMPRESSOR / GATE<br />
Sección LIMITER (limitador)<br />
Control PEAKSTOP LEVEL (nivel de limitación de crestas) y LED:<br />
Este control le permite fijar el nivel máximo de salida del <strong>166XL</strong>, independientemente de cualquier otro control.<br />
PeakStop interviene en el procesamiento después de los circuitos de <strong>com</strong>presión, de <strong>com</strong>puerta y de ganancia en la salida<br />
y, por lo tanto, limita en forma absoluta las excursiones de cresta en la salida. PeakStop funciona en forma instantánea; aun<br />
cuando se apliquen cantidades moderadas de la <strong>com</strong>presión OverEasy de dbx, todavía se cuenta con protección contra las<br />
fluctuaciones transitorias grandes, otras sobrecargas temporarias y la sobremodulación.<br />
PeakStop es un limitador de amplitud “suave” y bien controlado cuyo funcionamiento es similar, acásticamente, a la<br />
suavidad de la <strong>com</strong>presión OverEasy; su acción de descrestamiento es preferible al de un amplificador de potencia o de un<br />
convertidor analógico-digital. PeakStop redondea los ángulos de la cresta en vez de truncarla en forma abrupta. Al dejar<br />
curvas en vez de ángulos agudos en los flancos anterior y posterior de la señal, se reduce la cantidad de armónicas indeseables<br />
de orden impar más alto que se producen con el recorte severo convencional.<br />
Se puede fijar el nivel de activación de PEAKSTOP en un valor entre +0dB y +20dB. Observe que se permiten<br />
pequeñas excursiones por encima del valor fijo de PEAKSTOP, a fin de hacer posible el redondeamiento de la señal. Por<br />
lo tanto, para aquellas aplicaciones en que se prohíbe sobrepasar cierto umbral superior, se re<strong>com</strong>ienda fijar el control<br />
PEAKSTOP en un valor que sea 1dB ó 2dB menor que dicho umbral.<br />
Se ilumina el LED PEAKSTOP cada vez que una cresta intenta sobrepasar el nivel de PeakStop y se reduce su amplitud.<br />
Si el LED PeakStop se ilumina mientras el control de PEAKSTOP LEVEL está fijado en +20dB, significa que se<br />
están excediendo los límites de capacidad de del <strong>166XL</strong> y que se está produciendo un recorte severo.<br />
Sección MASTER<br />
Botón de STEREO COUPLE (acoplamiento estereofónico) y LED: Este botón cambia la unidad entre los modos de<br />
operación estereofónico y monofónico bicanal. Presione el botón de STEREO COUPLE para obtener el funcionamiento<br />
estereofónico y para que el Canal 1 controle ambos canales <strong>com</strong>o consecuencia. Se desactivarán todos los controles,<br />
botones y los LED del Canal 2 (con excepción del botón BYPASS y los LED de GAIN REDUCTION), ya que el Canal 2<br />
se convierte en el “esclavo”. Observe que los circuitos de detección perciben los verdaderos niveles eficaces (RMS) de la<br />
señal <strong>com</strong>binada, de modo que ésta no se ve afectada por los desplazamientos de fase (u otras discrepancias) entre los<br />
canales. De esta manera se asegura una <strong>com</strong>presión de la señal estereofónica sin ninguna pérdida de estabilidad en la imagen.<br />
Con el botón de STERO COUPLE desactivado, la unidad funciona <strong>com</strong>o dos circuitos separados de <strong>com</strong>presión/<strong>com</strong>puerta,<br />
cada uno con sus propios controles independientes.<br />
El LED STERO COUPLED indica que está activado el acoplamiento estereofónico del <strong>166XL</strong>.<br />
Panel Trasero<br />
Jacks de INPUT (BALANCED) (entrada simétrica):<br />
El jack tipo telefónico tripolar (TRS) y el jack tipo XLR están alambrados en paralelo; cualquier INPUT aceptará una<br />
señal acástica para que sea procesada por el <strong>166XL</strong>. El jack tripolar acepta una clavija TRS estándar de 0,25 de pulgada<br />
parauna fuente de entrada simétrica, o una clavija de dos circuitos (Punta/Casquillo) de 0,25 de pulgada para una fuente<br />
asimétrica. El jack tipo XLR está alambrado con la clavija 2 VIVA (+), la clavija 3 MUERTA (-) y la clavija 1 CONEC-<br />
TADA A TIERRA.<br />
Nota: Los dos jacks de entrada correspondientes a un canal determinado (p. ej.: XLR INPUT del Canal 1 e INPUT de 0,25 de pulgada<br />
del Canal 1) están conectados internamente (PUNTA = clavija 2, ANILLO = clavija 3, CASQUILLO = Clavija 1). Por lo tanto, si uno de<br />
los jacks es asimétrico (desequilibrado), el otro lo será también. Por ejemplo, si se emplea un jack de INPUT de 0,25 de pulgada con un<br />
cable monofónico, lo cual produce una asimetría, el jack de XLR INPUT también será asimétrico (con la Clavija 3 conectada a tierra).<br />
Acuérdese que se debe utilizar sólo un jack de entrada a la vez.<br />
Conmutador OPERATING LEVEL:<br />
Este conmutador selecciona entre un nivel operativo nominal de -10 dBV y +4 dBu. Cuando el conmutador está en la<br />
posición de encendido (abajo), se selecciona un nivel operativo de -10 dBV, cuando está en la posición de apagado (alto)<br />
se seleccionan un nivel operativo de +4 dBu.<br />
Jacks de OUPUT (BALANCED) (salida simétrica):<br />
El jack tipo telefónico tripolar (TRS) y el jack tipo XLR están alambrados en paralelo; cualquier OUTPUT transmitirá<br />
una señal acástica a un circuito de carga. El jack tipo telefónico acepta una clavija TRS estándar de 0,25 de pulgada para<br />
43
un circuito externo de carga simétrico, o un conector de dos circuitos (Punta/Casquillo) de 0,25 de pulgada para un circuito<br />
de carga asimétrico. El jack tipo XLR está alambrado con la clavija 2 VIVA (+), la clavija 3 MUERTA (-) y la clavija 1<br />
CONECTADA A TIERRA. Para asegurar una operación asimétrica correcta, la clavija desocupada (la 2 ó la 3) se debe<br />
conectar a tierra. El nivel de la señal de salida de régimen es de +4dBu a 600Ω, y un nivel típico de salida máxima es de<br />
+20dBu a 600Ω (+20dBm).<br />
Nota: Los dos jacks de salida correspondientes a un canal determinado (p. ej.: XLR OUTPUT del Canal 1 y OUTPUT de 0,25 de pulgada del Canal 1)<br />
están conectados internamente (PUNTA = clavija 2, ANILLO = clavija 3, CASQUILLO = Clavija 1) y pueden transmitir la misma señal a dos circuitos de<br />
carga separados. Sin embargo, si uno de los jacks es asimétrico (desequilibrado), el otro lo será también. Por ejemplo, si se emplea un jack de SALIDA de<br />
0,25 de pulgada con un cable monofónico, lo cual produce una asimetría, el jack de XLR INPUT también será asimétrico (con la clavija 3 conectada a tierra).<br />
Jack de SIDECHAIN INSERT (circuito de inserción):<br />
Este jack acepta una clavija tipo telefónico TRS estándar de 0,25 de pulgada, o provee una conexión a la vía de detección<br />
del <strong>166XL</strong>. El RING (anillo) funciona <strong>com</strong>o un Send (envío), conduciendo una versión amortiguada de la señal que<br />
está presente en el jack de INPUT del <strong>166XL</strong>, a una impedancia de 2kΩ. La TIP (punta) funciona <strong>com</strong>o Return (retorno)<br />
para los equipos que alimentan a los circuitos detectores del <strong>166XL</strong>, tales <strong>com</strong>o un ecualizador para la atenuación de<br />
sonidos sibilantes o para el bloqueo/<strong>com</strong>presión en función de frecuencia. También se puede accionar el SIDECHAIN<br />
INSERT del <strong>166XL</strong> con la clavija de salida de la mayoría de los equipos, incluyendo una clavija monofónica de 0,25 de<br />
pulgada. La impedancia de entrada es mayor que 10kΩ.<br />
Nota: Cuando se conecta un cable a esta entrada, ésta automáticamente interrumpe la conexión entre el jack de INPUT y los circuitos de detección del<br />
<strong>166XL</strong>.<br />
Jack de alimentación CA (receptor):<br />
Este jack acepta un cable de red tipo IEC (tal <strong>com</strong>o el que se incluye con la unidad). Conecte el cable a la unidad y a la<br />
fuente principal de alimentación. Observe que el <strong>166XL</strong> carece de interruptor de alimentación, ya que se re<strong>com</strong>ienda mantenerlo<br />
encendido constantemente. El consumo de energía eléctrica es mínimo. Si no piensa utilizar el <strong>166XL</strong> durante un<br />
período extenso, desconéctelo.<br />
Advertencia: Asegárese de verificar tanto la tensión de línea <strong>com</strong>o la tensión correspondiente al Modelo <strong>166XL</strong>, tal <strong>com</strong>o se indica en el panel trasero de<br />
la unidad. El conectar la unidad a una fuente de alimentación inapropiada puede resultar en daños extensos, los cuales no están cubiertos por la garantía.<br />
NOTAS PARA EL OPERADOR<br />
Aplicaciones del circuito expansor/de <strong>com</strong>puerta<br />
Nota: Para cada aplicación se sugieren ciertas especificaciones de control <strong>com</strong>o punto de partida. Haga los ajustes necesarios de acuerdo con sus<br />
propias necesidades.<br />
Uso del circuito de <strong>com</strong>puerta para los sonidos de percusión “secos” (sin reverberación)<br />
(p. ej.: bombo de pedal o caja clara)<br />
Para procesar eficazmente los sonidos percusivos de niveles altos de transición, necesitará fijar los controles de <strong>com</strong>puerta<br />
del <strong>166XL</strong> para asegurarse de que el bloqueo sea menos sensible a las señales cercanas que podrían ocasionar la<br />
apertura o "accionamiento falso" de la <strong>com</strong>puerta. Fije la especificación de RELEASE (liberación) en un valor lo suficientemente<br />
corto para permitir que la <strong>com</strong>puerta se cierre con suma rapidez una vez que la señal baje del nivel THRESHOLD.<br />
El RELEASE también se puede usar para contornear el envolvente del sonido.<br />
Nota: El uso de un circuito de <strong>com</strong>puerta para el bloqueo rápido de las señales sostenidas de baja frecuencia pueden producir un efecto de "rechinamiento".<br />
Debido a que el <strong>166XL</strong> es capaz de un procesamiento sumamente rápido de este tipo, asegárese de que el tiempo de RELEASE sea más largo que<br />
un ciclo <strong>com</strong>pleto de la frecuencia fundamental de la señal procesada. Para eliminar el “rechinamiento”, simplemente fije el valor de RELEASE en un tiempo<br />
más largo (o sea, en una velocidad más lenta). La especificación correcta de THRESHOLD también reducirá al mínimo el accionamiento falso y el<br />
rechinamiento.<br />
Estos tipos de especificaciones son átiles para obtener una definición más nítida en las pistas de percusión, para eliminar<br />
el "tintineo" de algunos tambores o para evitar que la señal de un tambor de desborde al micrófono de otro.<br />
Procesamiento de sonidos con un tiempo de extinción más largo (p. ej.: platillos o<br />
piano)<br />
Si desea utilizar el circuito de <strong>com</strong>puerta para procesar los sonidos con un tiempo de extinción más largo después de la<br />
transición inicial, fije el control de RELEASE en un valor lo suficientemente lento para permitir que la <strong>com</strong>puerta permanezca<br />
abierta y que capture todo el envolvente de la señal.<br />
La <strong>com</strong>puerta también se puede usar para "secar" (reducir la reverberación) en una pista o un programa que tiene<br />
demasiada reverberación ambiental. Fije el control de RELEASE de tal modo que se reduzca un poco el tiempo natural de<br />
extinción del sonido.<br />
Modificación de la calidad del sonido<br />
La <strong>com</strong>puerta del <strong>166XL</strong> puede modificar eficazmente el carácter acástico de un sonido, ya que puede reducir o de otra<br />
44<br />
dbx <strong>166XL</strong> COMPRESSOR / GATE<br />
®<br />
PROFESSIONAL PRODUCTS
dbx <strong>166XL</strong> COMPRESSOR / GATE<br />
manera alterar la calidad de la reverberación ambiental de un instrumento determinado. Por ejemplo, al dejar de tocar un<br />
instrumento, su nivel de reverberación estará sujeto a la especificación de umbral (THRESHOLD) del <strong>166XL</strong>. Se puede<br />
hacer que el sonido se extinga más rápidamente de lo que dicta el tiempo natural de extinción. Experimente con diferentes<br />
especificaciones de THRESHOLD y RELEASE para modificar la “cola” del sonido. Un tiempo de libración corto (FAST)<br />
prácticamente eliminará la reverberación.<br />
Mando externo<br />
Se puede recurrir al mando externo para controlar la <strong>com</strong>puerta de una señal mediante el uso de otra, a fin de aumentar<br />
la dinámica de un sonido (por ejemplo: para crear una reproducción perfectamente sincronizada de varios instrumentos<br />
individuales, o para reforzar una pista poco dinámica.)<br />
Para crear dos canales distintos de contrabajo para la mezcla (dividiendo la señal del instrumento entre dos canales y<br />
sincronizando un canal del contrabajo con el bombo de pedal), empiece por enviar un canal del contrabajo directamente al<br />
mezclador y el otro al INPUT (canal de entrada) del <strong>166XL</strong>. Luego, controle el bloqueo con la señal del bombo de pedal<br />
(conectado al SIDECHAIN INSERTóajuste los controles segán sea necesario). De esta manera, la pista controlada del<br />
contrabajo se abrirá con cada golpe del bombo, añadiéndole mayor impacto y dinámica y brindándole nueva vida a la mezcla.<br />
Otro ejemplo del mando externo del circuito de <strong>com</strong>puerta sería el uso de la señal del bombo para controlar un<br />
oscilador que ha sido fijado en una frecuencia apropiada para “sintonizar” y dar mayor impacto al sonido del tambor.<br />
Nota: Para todas las aplicaciones del mando externo del circuito de <strong>com</strong>puerta, asegárese de ajustar adecuadamente la <strong>com</strong>presión o de eliminarla, fijando<br />
la proporción (RATIO) de <strong>com</strong>presión en 1:1 (girando el control <strong>com</strong>pletamente en el sentido contrario al de las agujas del reloj).<br />
Mando de <strong>com</strong>puerta en función de la frecuencia<br />
El mando de <strong>com</strong>puerta (o sea, el bloqueo) en función de la frecuencia le permite usar el circuito de inserción<br />
(SIDECHAIN INSERT) para afinar el accionamiento de la <strong>com</strong>puerta. Por ejemplo, supongamos que se utiliza el circuito<br />
de <strong>com</strong>puerta para un bombo de pedal en una pista en la que se desbordan señales ajenas. Se puede sintonizar la frecuencia<br />
del bombo mediante el uso de un ecualizador externo, para que la <strong>com</strong>puerta responda solamente a ese bombo. Alimente la<br />
señal del bombo directamente hacia el circuito de <strong>com</strong>puerta y también a través de un ecualizador conectado al<br />
SIDECHAIN INSERT. Al ajustar el ecualizador para que solamente la señal deseada sea fuerte en el SIDECHAIN<br />
INSERT, la apertura de la <strong>com</strong>puerta asume una posición aán más selectiva.<br />
Aplicaciones básicas de la <strong>com</strong>presión<br />
Nota: Para cada aplicación se sugieren ciertas especificaciones de control <strong>com</strong>o punto de partida. Ajástelas de acuerdo con sus propias necesidades. En<br />
general, se obtiene una <strong>com</strong>presión más uniforme al presionar los botones de OVEREASY y MODE (Slow). Para obtener una <strong>com</strong>presión más “agresiva”,<br />
utilice la especificación rápida de Hard Knee (dejando sin presionar los botones OVEREASY y MODE).<br />
Para <strong>com</strong>primir un programa mezclado, empiece con una especificación baja de proporción (RATIO), con el umbral<br />
(THRESHOLD) especificado para una cantidad moderada de reducción de ganancia (dB) y con los botones OVEREASY<br />
y CONTOUR presionados.<br />
Suavización de las variaciones de nivel de un micrófono<br />
Se producen variaciones en el nivel de la señal acástica cuando un cantante se acerca al micrófono o se aleja de él, o<br />
cuando la dinámica de la voz cambia en relación con el registro del cantante. Para suavizar estas variaciones, empiece con<br />
el <strong>166XL</strong> en el modo OverEasy (o sea, con la botón OVEREASY presionados) y con una proporción (RATIO) de <strong>com</strong>presión<br />
baja o mediana (p. ej.: 4:1). Ajuste el control de THRESHOLD para que los medidores de GAIN REDUCTION<br />
muestren entre 6dB y 10dB de reducción de ganancia, luego aumente el valor de RATIO, si es necesario. Debido al carácter<br />
ísuaveî de la <strong>com</strong>presión OverEasy del <strong>166XL</strong>, descubrirá que aun las proporciones bastante elevadas se procesan<br />
transparentemente. Si se <strong>com</strong>prime demasiado la energía de baja frecuencia de una señal cantada (p. ej.: si la voz suena<br />
demasiado débil o si se pierde la presencia en los registros más bajos), presione el botón de CONTOUR para dejar que<br />
pase al <strong>166XL</strong> más energía baja sin atenuación de la señal original.<br />
Suavización de las variaciones (y aumento del sostenimiento) de las señales de<br />
instrumentos musicales (p. ej.: guitarra y contrabajo eléctricos, sintetizador)<br />
Para obtener un sonido más suave del contrabajo eléctrico (o electrónico), aplique <strong>com</strong>presión la salida del instrumento<br />
usando una proporción (RATIO) de aproximadamente 4:1, luego ajuste el control de umbral (THRESHOLD) para obtener<br />
de 10dB a 12dB de reducción de ganancia. La <strong>com</strong>presión disminuye las variaciones de intensidad entre las cuerdas y<br />
aumenta el sostenimiento característico del contrabajo. Otros instrumentos, tales <strong>com</strong>o las trompetas, cuyo volumen varía<br />
de acuerdo con la nota tocada, también se pueden obtener provecho de este procesamiento. Si una señal <strong>com</strong>primida de<br />
contrabajo eléctrico tiene un sonido uniforme pero demasiado débil, presione el botón de CONTOUR para reforzar el<br />
sonido.<br />
Para controlar las fluctuaciones indeseadas de volumen en las pistas de guitarra o de sintetizador y para evitar que éstas<br />
saturen el magnetófono o el mezclador durante las grabaciones y actuaciones en vivo, empiece con una <strong>com</strong>presión Hard<br />
45
Knee (botón de OVEREASY no presionado), con la proporción (RATIO) fijada en aproximadamente 5:1 y con el umbral<br />
(THRESHOLD) fijado en el nivel máximo promedio de la pista. De esta manera puede asegurarse de que se <strong>com</strong>priman<br />
solamente las fluctuaciones excesivas. Utilice CONTOUR si es necesario.<br />
Para aumentar el tiempo de sostenimiento de las señales de guitarra o de instrumentos de cuerda sintetizados, <strong>com</strong>ience<br />
con una proporción de <strong>com</strong>presión (RATIO) más alta (entre 10:1 y ∞:1), luego ajuste el control de THRESHOLD a su<br />
gusto. Por ejemplo, para modificar el envolvente de un sonido sintetizado que tiene un ataque demasiado agresivo pero que<br />
se extingue lentamente, empiece por tocar notas individuales o acordes en forma lenta pero continua, aplicando al mismo<br />
tiempo bastante <strong>com</strong>presión al sonido (con una proporción de <strong>com</strong>presión más elevada). El uso de un alto grado de <strong>com</strong>presión<br />
al grabar las guitarras y los sintetizadores en formatos digitales puede ayudar a restaurar el carácter ívivoî del<br />
sonido analógico.<br />
Refuerzo de los bombos de pedal y <strong>com</strong>presión de otros instrumentos de percusión<br />
Con los bombos de pedal, a veces se obtiene un sonido débil debido a un exceso de reverberación o falta de impacto.<br />
Para remediar esta situación con el <strong>166XL</strong>, empiece por especificar una <strong>com</strong>presión (RATIO) mediana o alta (p. ej.: 6:1),<br />
luego ajuste el control de THRESHOLD para que los medidores de GAIN REDUCTION indiquen 15dB de reducción de<br />
ganancia. Aumente la proporción de <strong>com</strong>presión (RATIO), si es necesario. En el modo OverEasy, el <strong>166XL</strong> responde más<br />
lentamente que en el modo Hard Knee y, por lo tanto, enfatizará el impacto del ataque de la nota y reducirá la reverberación<br />
durante el segmento principal. El <strong>166XL</strong> también funciona para enfatizar el carácter nítido de la caja clara y de<br />
los tom- toms, y también se puede usar para modificar eficazmente el carácter de cualquier sonido de tambor sintetizado.<br />
El sonido de los platillos y de los tom-toms se puede <strong>com</strong>primir eficazmente (usando el Sidechain del <strong>166XL</strong>) para prevenir<br />
la saturación de la cinta magnética. Para ello se divide la señal del tambor, enviando un canal directamente a la entrada<br />
(INPUT) del <strong>166XL</strong> y el otro a un ecualizador (por ejemplo: el Parametric Equalizer 242 de dbx o los ecualizadores<br />
gráficos de la Serie 30). Luego, se conecta la salida del ecualizador al SIDECHAIN INSERT del <strong>166XL</strong>. El ecualizador se<br />
puede ajustar para reforzar la señal en la región de 5kHz, lo cual <strong>com</strong>prime el sonido del platillo en los golpes muy fuertes<br />
y evita la saturación de la cinta en las frecuencias altas, en donde existe un margen reducido de seguridad. Sin embargo, no<br />
se verán afectados los toques suaves del tambor o del platillo. Ya que el tom-tom es un instrumento de frecuencia más baja<br />
y la cinta de grabación lo tolera mejor, presenta menos necesidad de <strong>com</strong>presión. La presencia de ecualización en el circuito<br />
Sidechain significa que el <strong>com</strong>presor no es accionado por un golpe fuerte en el tom-tom con la misma facilidad que<br />
por un golpe de igual intensidad en el platillo. Para información adicional acerca de las aplicaciones del Sidechain, vea la<br />
próxima página.<br />
En el caso de las mezclas intermedias de tambores (o sea, la <strong>com</strong>binación de máltiples pistas de percusión en dos pistas<br />
mediante el uso de ambos canales de <strong>166XL</strong> para la <strong>com</strong>presión), se re<strong>com</strong>ienda disminuir la proporción de <strong>com</strong>presión<br />
(RATIO) en cada canal (hasta 2:1) para evitar el esparcimiento excesivo de los platillos. Con los sistemas más grandes de<br />
máltiples pistas, se pueden <strong>com</strong>primir separadamente el bombo de pedal y la caja clara. Otra posibilidad es la de aplicar<br />
una <strong>com</strong>presión mayor a una mezcla estereofónica intermedia de los tom-toms, dejando sin modificación el resto de los<br />
instrumentos de percusión.<br />
Cómo hacer resaltar una señal de una mezcla<br />
Ya que la reducción del margen dinámico aumenta el nivel medio de la señal por una pequeña cantidad, se puede hacer<br />
resaltar una pista individual de una mezcla, aumentando levemente su nivel y aplicando la <strong>com</strong>presión. Empiece con una<br />
<strong>com</strong>presión (RATIO) de 2:1 y una especificación de umbral (THRESHOLD) relativamente baja (-20dB). Ajuste ambos<br />
controles segán sea necesario. También se ha utilizado la <strong>com</strong>presión para hacer resaltar la parte vocal de la mezcla en los<br />
estudios de volumen limitado (por ejemplo, en una casa particular). Empiece por colocar en el micrófono una pantalla de<br />
espuma contra el viento (si no la tiene). Fije la <strong>com</strong>presión (RATIO) en 10:1 y el umbral (THRESHOLD) en -10dB. Con<br />
la boca a una distancia de aproximadamente 5cm del micrófono, se canta la parte vocal a un volumen menor que el normal,<br />
usando el fraseo para enfatizar la parte. Se puede añadir un ecualizador (p. ej.: un Parametric Equalizer 242 de dbx o uno<br />
de los ecualizadores gráficos de la Serie 30 de dbx) o un dispositivo de efectos vocales (p. ej.: reverberación, demora, distorsión)<br />
para brindar más claridad a la presentación.<br />
También es posible separar ciertas partes cantadas o instrumentos musicales de un programa monofónico mezclado con<br />
anterioridad (consulte la sección de “Compresión ponderada en función de frecuencia”, en la página 43).<br />
Nota: Al <strong>com</strong>primir un programa estereofónico con el <strong>166XL</strong>, los factores que afectan a la curva de <strong>com</strong>presión y a las especificaciones reales de RATIO y<br />
de THRESHOLD son similares a los factores descritos anteriormente en conexión con los canales individuales del programa. Sin embargo, por regla general,<br />
el efecto de una <strong>com</strong>presión grande será más audible en un programa estereofónico mixto que en las pistas individuales que se <strong>com</strong>binan para crear<br />
el programa.<br />
Prevención de saturación de la cinta magnética<br />
Con programas cuyos niveles varían en forma notable, se puede usar la <strong>com</strong>presión para prevenir que los niveles de<br />
grabación (por ejemplo, de los platillos en una mezcla final o mezcla intermedia de percusión) saturen las pistas de la cinta<br />
magnética (vea la sección de “Compresión ponderada en función de frecuencia”, en la página 46).<br />
46<br />
dbx <strong>166XL</strong> COMPRESSOR / GATE<br />
®<br />
PROFESSIONAL PRODUCTS
dbx <strong>166XL</strong> COMPRESSOR / GATE<br />
Prevención de la sobrecarga digital<br />
Los dispositivos de grabación y de muestras digital producen una distorsión audible cuando exceden su margen de<br />
seguridad (es decir, el margen por encima del nivel máximo de régimen). El <strong>166XL</strong> asegura en forma eficaz que la entrada<br />
de audio no sobrecargue los convertidores A/D (analógico a digital) del dispositivo de grabación digital. El <strong>166XL</strong> es lo<br />
suficientemente silencioso <strong>com</strong>o para que se pueda utilizar con todos los medios digitales. Para utilizar el <strong>166XL</strong> de tal<br />
manera que no se produzca ningán cambio de ganancia excepto en caso de emergencia (niveles excesivamente altos),<br />
especifique el modo Hard Knee, fije la <strong>com</strong>presión (RATIO) en ∞:1 y fije el umbral (THRESHOLD) en el nivel más alto<br />
permitido.<br />
Nota: También se puede usar la limitación de crestas PeakStop para prevenir las sobrecargas audibles en los equipos digitales.<br />
Protección de los altoparlantes (auditorios, iglesias, sistemas de sonido ambulantes y<br />
disc-jockeys)<br />
A menudo se utilizan sistemas de <strong>com</strong>presión para prevenir que las fuentes de sonido de nivel demasiado alto distorsionen<br />
los amplificadores de potencia y/o que dañen los <strong>com</strong>ponentes de los altoparlantes en los sistemas de amplificación<br />
(ya sea en un auditorio, en una iglesia o en una discoteca, o cuando se desea poner a prueba los límites de un equipo de<br />
sonido). Active la función de limitación del <strong>166XL</strong> (modo Hard Knee activado, con una <strong>com</strong>presión [RATIO] de 10:1 ó<br />
mayor) y ajuste el umbral (THRESHOLD) para obtener 15dB o más de <strong>com</strong>presión (unos pocos dB debajo del nivel de<br />
descrestamiento de la entrada). El <strong>166XL</strong> no modificará la ganancia de las señales de nivel bajo, pero al producirse una<br />
señal fuerte, se reducirá la ganancia para prevenir el recorte de la señal y para proteger los <strong>com</strong>ponentes sensibles del sistema<br />
contra la acumulación excesiva de calor y otros tipos de daño.<br />
Si no se desea que el <strong>166XL</strong> produzca ningán cambio de ganancia excepto en caso de emergencia (niveles excesivamente<br />
altos), algunos operadores activan el modo Hard Knee, fijan la <strong>com</strong>presión (RATIO) en ∞:1 y fijan el umbral<br />
(THRESHOLD) en el nivel más alto permitido. Tal <strong>com</strong>o sucede con la prevención de sobrecarga de los dispositivos digitales,<br />
el limitador de crestas PeakStop <strong>166XL</strong> se puede usar en lugar de la <strong>com</strong>presión <strong>166XL</strong>, o en <strong>com</strong>binación con dicha<br />
función.<br />
Por regla general, los sistemas de <strong>com</strong>presión deben situarse lo más cerca posible a los amplificadores en la cadena de<br />
la señal. Por ejemplo, si el <strong>166XL</strong> se introduce antes del ecualizador, un aumento potencialmente dañino en la ecualización<br />
no será percibido por el <strong>166XL</strong> y los altoparlantes podrán dañarse. (Vea Altoparlantes de máltiples vías, en la pág. 45).<br />
Para los niveles máximos de presión sonora, los sistemas grandes de amplificación de sonido a menudo utilizan un sistema<br />
de <strong>com</strong>presión separado para cada salida de la red divisora. En el caso de un sistema de amplificación de sonido estereofónico,<br />
se puede usar un <strong>166XL</strong> para cada una de las bandas estereofónicas (baja, baja-mediana, mediana, etc.)<br />
Elevación del nivel medio de los sistemas de amplificación de difusión<br />
La limitación de señal (o sea, la <strong>com</strong>presión a una proporción elevada tal <strong>com</strong>o ∞:1) también mejora la claridad del<br />
sonido al permitir que las señales de entrada de nivel bajo se reproduzcan en el sistema a un volumen mayor. Para las presentaciones<br />
musicales, esto proporciona un mayor grado de intimidad, ya que se pueden oír más claramente los susurros<br />
del cantante. La curva OverEasy que se ofrece con el <strong>166XL</strong> permite el uso de un elevado grado de <strong>com</strong>presión (RATIO<br />
de 10:1 ó mayor) en muchas situaciones. De esta manera los oradores animados, los cantantes y otros másicos pueden concentrarse<br />
en su actuación sin preocuparse de los efectos indeseables del cambio del volumen.<br />
Uso del ecualizador para reducir la retroalimentación en las actuaciones páblicas<br />
(salones de concierto, conciertos al aire libre o iglesias)<br />
Se puede usar el <strong>166XL</strong> y el ecualizador para reducir la retroalimentación en las discotecas, las iglesias, los conciertos<br />
al aire libre y en otras actuaciones en vivo. Conecte provisionalmente o inserte el <strong>166XL</strong> en la salida principal de un mezclador,<br />
especifique el modo Hard Knee y aumente lentamente la ganancia de salida (OUTPUT GAIN) hasta que se produzca<br />
el primer ruido de retroalimentación, luego configure el <strong>166XL</strong> con su <strong>com</strong>presión (RATIO) en ∞:1 y un umbral<br />
(THRESHOLD) bajo. El <strong>166XL</strong> capturará el primer ruido de retroalimentación y lo sostendrá para que Ud. pueda minimizarlo<br />
usando los controladores del ecualizador. Contináe aumentando la ganancia de la consola y haciendo ajustes con<br />
el ecualizador hasta que se hayan <strong>com</strong>pensado las próximas tres o cuatro frecuencias de retroalimentación.<br />
Uso dl <strong>166XL</strong> <strong>com</strong>o amplificador de línea<br />
Para usar el <strong>166XL</strong> <strong>com</strong>o amplificador de línea, gire el control del <strong>com</strong>presión (RATIO) hasta la posición mínima de<br />
1:1, en el sentido contrario al de las agujas del reloj, gire el control de umbral (THRESHOLD) en el sentido de las agujas<br />
del reloj hasta la posición máxima (+20), fije el PeakStop en +20 y la ganancia de salida (OUTPUT GAIN) en la especificación<br />
que requiera la aplicación. Acuérdese que una ganancia excesiva puede ocasionar el descrestamiento de las señales<br />
de alto nivel. Para aumentar la <strong>com</strong>presión, ponga los controles de RATIO y de THRESHOLD en las especificaciones<br />
deseadas.<br />
Compresión ponderada en función de frecuencia (aplicación Sidechain)<br />
47
Es posible separar ciertas voces o ciertos instrumentos musicales de una señal mixta usando la <strong>com</strong>presión ponderada<br />
en función de frecuencia. Cuando se introduce un ecualizador (tal <strong>com</strong>o el dbx 242 o un ecualizador de la serie 30 dbx)<br />
delante del circuito de inserción SIDECHAIN INSERT (pero no en la cadena de audio), la ecualización no cambia ni el<br />
timbre ni la respuesta en frecuencia de la señal de audio, sino que simplemente altera la respuesta de umbral del sistema de<br />
<strong>com</strong>presión, en función de las frecuencias.<br />
Con esta configuración, el elevar ciertas frecuencias en el ecualizador causa que éstas sean suprimidas en la señal de<br />
audio. Una especificación de umbral (THRESHOLD) relativamente alta permite que los sonidos normales pasen sin<br />
alteración, mientras que los solos y los sonidos muy fuertes resultan <strong>com</strong>primidos. (Por supuesto, al producirse la <strong>com</strong>presión<br />
se ve afectado el nivel del programa entero; sin embargo, al presionar el botón de CONTOUR del <strong>166XL</strong> se puede<br />
conservar una cantidad mayor de la energía de baja frecuencia de la señal.) Dependiendo de la especificación de THRESH-<br />
OLD, las frecuencias fundamentales o armónicas de amplitud más baja no producirán ninguna <strong>com</strong>presión, y el programa<br />
no estará sujeto al desplazamiento de fase normalmente asociado a la ecualización de los programas. Por ejemplo, al grabar<br />
los platillos y los tom-toms, un sistema de <strong>com</strong>presión provisto de un ecualizador en el circuito de inserción (Sidechain)<br />
puede ayudar a prevenir la saturación de la cinta analógica. Se puede ajustar el ecualizador para aumentar el nivel de la<br />
señal en la región de 5kHz, lo cual causa que el platillo sea <strong>com</strong>primido al producirse un golpe demasiado fuerte, evitando<br />
así la saturación de la cinta a las frecuencias elevadas donde el margen de seguridad es menor. Sin embargo, no se verán<br />
afectados los toques ligeros en el tambor o en el platillo. Ya que el tom-tom es un instrumento de frecuencia más baja y la<br />
cinta magnética es más capaz de tolerarla, no presenta la misma necesidad de <strong>com</strong>presión. El uso de la ecualización en el<br />
circuito de inserción (Sidechain) significa que el sistema de <strong>com</strong>presión no es accionado por un golpe fuerte en el tom-tom<br />
con la misma facilidad que por un golpe de igual intensidad en el platillo.<br />
También se puede utilizar la inversa del método de ecualización descrito. La atenuación de ciertas bandas de frecuencia<br />
en el ecualizador tiene el efecto de reforzar cualquier sonido cuyas frecuencias predominantes se encuentren en el registro<br />
afectado, ya que el <strong>166XL</strong> detecta la necesidad de una menor <strong>com</strong>presión.<br />
Figura 3: Compresión ponderada en función de frecuencia<br />
Reducción de los sonidos sibilantes<br />
Para reducir el carácter sibilante (el “silbido”) de la voz cantada, inserte un ecualizador paramétrico (por ejemplo: un<br />
dbx 242) en el circuito SIDECHAIN y configárelo para que aumente la gama específica de frecuencias en donde se produce<br />
el “silbido”o “ceceo” (por regla general, en la región de 4kHz - 6kHz). De esta manera se preenfatiza el <strong>com</strong>ponente<br />
sibilante de la voz hablada o cantada antes de que ésta entre en el circuito Sidechain. Cuando se utiliza en conjunto con un<br />
umbral (THRESHOLD) y una <strong>com</strong>presión (RATIO) moderadamente altos y una especificación rápida de ATTACK y<br />
RELEASE, esta configuración normalmente atenáa el ísilbidoî sin afectar al carácter fundamental del sonido o al equilibrio<br />
de la voz. Si bien es cierto que se reduce el nivel de todas las frecuencias al accionar la <strong>com</strong>presión, normalmente el <strong>com</strong>ponente<br />
sibilante de la señal ocurre por sí solo, antes o después del tono principal de la voz.<br />
Sostenimiento de la señal<br />
Para aumentar el tiempo de sostenimiento de un instrumento musical (p. ej.: una guitarra o un contrabajo eléctrico), utilice<br />
un ecualizador en el circuito Sidechiain y aumente la ecualización en la gama principal de frecuencias del instrumento.<br />
Configure el <strong>166XL</strong> para la <strong>com</strong>presión Hard Knee lenta (botón OverEasy no presionado), con un umbral (THRESHOLD)<br />
relativamente bajo y una proporción de <strong>com</strong>presión (RATIO) moderada.<br />
Sistemas de altoparlantes de máltiples vías<br />
Si se piensa utilizar un solo circuito de <strong>com</strong>presión con un sistema de altoparlantes de máltiples vías (es decir, antes de<br />
la red divisora y después del ecualizador), el operador del sistema debe mantener la señal por debajo del nivel en el que se<br />
dañaría el <strong>com</strong>ponente más sensible del sistema. Por ejemplo, si las altavoces para el registro medio son susceptibles al<br />
daño, se debe operar el sistema entero a un nivel inferior de presión sonora, o bien, se deben incorporar altavoces adicionales<br />
para el registro medio. Al introducir un ecualizador en el circuito Sidechain del <strong>166XL</strong>, éste se puede configurar<br />
para que sea más sensible a la gama de frecuencias reproducidas por las altavoces más sensibles. De esta forma el sistema<br />
48<br />
dbx <strong>166XL</strong> COMPRESSOR / GATE<br />
SOURCE<br />
OUTPUT<br />
EQ<br />
®<br />
PROFESSIONAL PRODUCTS<br />
166A<br />
INPUT OUTPUT<br />
SIDECHAIN<br />
INSERT
dbx <strong>166XL</strong> COMPRESSOR / GATE<br />
puede funcionar a niveles más altos, y la atenuación se producirá solamente en la presencia de señales potencialmente<br />
dañinas.<br />
Uso de un filtro en el circuito Sidechain<br />
Los efectos de la inserción de un filtro en el circuito de Sidechain son básicamente los mismos que se obtienen con un<br />
ecualizador, tal <strong>com</strong>o se describió anteriormente. Las frecuencias que pasan por el filtro están sujetas a la <strong>com</strong>presión (o,<br />
por lo menos, están sujetas a una <strong>com</strong>presión mucho mayor que las frecuencias situadas fuera de la banda pasante). Debido<br />
a que un filtro pasivo puede ocasionar una pérdida de inserción, es posible que sea necesario reducir la especificación de<br />
umbral (THRESHOLD) del <strong>166XL</strong> para mantener una cantidad determinada de reducción de ganancia dentro de la banda<br />
pasante del filtro; se puede determinar la especificación adecuada monitorizando los LED de THRESHOLD del <strong>166XL</strong>.<br />
Preacentuación para las aplicaciones de difusión<br />
Al insertar una red de filtros de preacentuación (preénfasis) en el circuito Sidechain de un <strong>166XL</strong> que procesa señales<br />
de audio preacentuadas, se hace posible operar la unidad a niveles más altos sin sobrepasar las limitaciones del sistema de<br />
difusión.<br />
CONEXION DEL <strong>166XL</strong> AL SISTEMA DE SONIDO<br />
Conexiones básicas<br />
El <strong>166XL</strong> cuenta con entradas y salidas equilibras (simétricas) y se puede utilizar con cualquier dispositivo de nivel de<br />
línea, por ejemplo, consolas mezcladoras, instrumentos musicales, tableros de conexiones y otros procesadores de señales<br />
acásticas. Si desea más información sobre cómo hacer las conexiones, consulte la sección de Consideraciones de instalación,<br />
en la página 49.<br />
Para todas las conexiones, siga el procedimiento que se describe a continuación:<br />
1. Apague todo el equipo antes de hacer cualquier conexión.<br />
2. Instale el <strong>166XL</strong> en un espacio de bastidor 1U (optativo)<br />
El <strong>166XL</strong> ocupa una unidad de altura y una unidad de ancho en el bastidor (estante). Se puede colocar por encima o por<br />
debajo de cualquier otro <strong>com</strong>ponente que no genere calor, ya que no requiere ventilación especial. La temperatura<br />
ambiente no debe exeder 133°F (56°C) mientras el equipo está encendido.<br />
Nota: No apriete demasiado los tornillos de montaje, ya que esto puede dañar el panel delantero.<br />
Precaución: Para evitar todo riego de electrocución, no quite la cubierta. Además, la unidad no contiene ninguna pieza o <strong>com</strong>ponente que puede ser<br />
reparado por el usuario.<br />
3. Haga las conexiones usando jacks tipo XLR o TRS (tripolar) de 0,25 de pulgada, segán sus propios requisitos.<br />
Los puntos de conexión típicos incluyen: inserción en el canal o subgrupo de un mezclador cuando el <strong>166XL</strong> se utiliza<br />
con instrumentos o pistas individuales; salidas principales o bus del mezclador cuando se utiliza para la mezcla; efectos<br />
de bucle del preamplificador de un instrumento cuando se usa el <strong>166XL</strong> para una guitarra o contrabajo eléctrico; salidas<br />
principales de un dispositivo de mezcla intermedia (p. ej.: el mezclador de un teclado) a medida que la señal se tranmite<br />
al mezclador principal; entre la salida de una unidad de cinta digital (DAT) y la entrada de un magnetófono de castete<br />
analógico. Cuando se utiliza una cadena de procesadores, el <strong>166XL</strong> se puede colocar ya sea antes o después de los<br />
procesadores dinámicos o de efectos. Sin embargo, si se utiliza el <strong>166XL</strong> para la protección de los altoparlantes, el circuito<br />
de <strong>com</strong>presión debe ubicarse lo más próximo posible al amplificador en la cadena de la señal. Re<strong>com</strong>endamos<br />
que se use el sentido <strong>com</strong>án y que se <strong>com</strong>prueben diversas configuraciones para determinar cuál de ellas satisface<br />
mejor sus necesidades.<br />
Nota: Nunca conecte la entrada del <strong>166XL</strong> a la salida de altoparlante de un instrumento musical o de un amplificador de potencia.<br />
4. Encienda la unidad: Conecte seguramente el cable de red CA a la unidad y a la fuente de alimentación principal.<br />
Nota: <strong>com</strong>pruebe la tensión de línea. La unidad está configurada para operar a 115V ó 230V, y a 50Hz ó 60Hz. Consulte el panel trasero de la unidad<br />
para verificar la tensión de línea exacta de su unidad.<br />
Uso del circuito de inserción (SIDECHAIN INSERT)<br />
El circuito de inserción, o SIDECHAIN INSERT, le permite controlar el circuito de <strong>com</strong>presión o el expansor/<strong>com</strong>puerta<br />
con señales diferentes de la entrada de audio (por medio de un dispositivo auxiliar tal <strong>com</strong>o un ecualizador). Las<br />
aplicaciones más <strong>com</strong>unes del Sidechain incluyen el mando externo de la <strong>com</strong>puerta, el mando de la <strong>com</strong>puerta en función<br />
de la frecuencia y la <strong>com</strong>presión ponderada en función de la frecuencia. Estos temas se describen en detalle en las páginas<br />
anteriores de este manual. Ciertas aplicaciones del Sidechain también pueden requerir conexiones especiales.<br />
Por ejemplo: si se desea configurar el <strong>166XL</strong> para el mando de la <strong>com</strong>puerta en función de la frecuencia o para la <strong>com</strong>presión<br />
ponderada, se debe enviar la misma señal al ecualizador y a la entrada (INPUT) del <strong>166XL</strong>, y luego se debe conec-<br />
49
tar la salida del ecualizador al jack SIDECHAIN INSERT del <strong>166XL</strong>. (Figura 3). Existen varias maneras de enviar la<br />
misma señal al INPUT del <strong>166XL</strong> y al ecualizador: (1) se puede usar un cable de inserción conectado al jack del<br />
SIDECHAIN INSERT. La clavija SEND (envío) se dirige a la entrada del ecualizador. La clavija RETURN (retorno) se<br />
dirige a la salida del ecualizador; (2) se puede usar un cable en T para enviar la entrada de audio tanto a la entrada<br />
(INPUT) del <strong>166XL</strong> <strong>com</strong>o a la entrada del ecuadizador; (3) se puede enviar la señal a uno de los jacks de INPUT del<br />
<strong>166XL</strong> y usar el jack de INPUT paralelo del canal de <strong>com</strong>presión para alimentar el ecualizador (p. ej.: si la entrada de<br />
audio alimenta el jack de entrada tipo telefónico (tripolar) de 0,25 de pulgada del canal 1, utilice el jack XLR de INPUT<br />
del canal 1 para enviar la señal al ecualizador); (4) si la entrada de audio es capaz de dividir internamente su señal de salida<br />
(p. ej.: algunos sintetizadores pueden enviar la misma señal desde dos salidas), se puede conectar un cable a cada una de<br />
las salidas y luego conectar uno de éstos a la entrada (INPUT) del <strong>166XL</strong> y el otro al ecualizador.<br />
Conexiones a dispositivos específicos<br />
El <strong>166XL</strong> tiene entradas y salidas equilibradas (simétricas) y se puede utilizar con cualquier dispositivo de nivel de<br />
línea. Algunos ejemplos <strong>com</strong>unes incluyen: consolas de mezcla, instrumentos musicales, tableros de conexiones y otros<br />
procesadores de señales.<br />
Consola de mezcla<br />
Si desea aplicar <strong>com</strong>presión a un pista específica de una grabación de máltiples pistas o a un canal determinado de una<br />
actuación en vivo, conecte la entrada (INPUT) del <strong>166XL</strong> al jack de salida de la fuente de señal, y la salida (OUTPUT) del<br />
<strong>166XL</strong> a un jack de entrada de un dispositivo en línea (ya sea equilibrado o no), o bien, la INPUT y la OUTPUT del<br />
<strong>166XL</strong> se pueden conectar a un punto de inserción. En este áltimo caso, lo más probable es que las señales queden<br />
asimétricas.<br />
La cantidad de <strong>com</strong>presión varía en proporción directa al nivel de la señal de entrada. Sin embargo, dependiendo de la<br />
configuración del sistema, a veces es difícil distinguir entre los controles de volumen en la cadena de la señal que afectan<br />
al nivel de entrada, y los que afectan al nivel de salida. Si el <strong>166XL</strong> está conectado de tal manera que la <strong>com</strong>presión se produce<br />
antes de los controles de volumen del mezclador (p. ej.: si el <strong>166XL</strong> está conectado directamente entre una fuente de<br />
señal y la entrada del mezclador, o si está conectado al mezclador por medio de conectores de inserción ípre-desvanecimientoî),<br />
se puede aumentar o disminuir el nivel de entrada ajustando el control de volumen de la fuente (p. ej.: el control<br />
de volumen de un sintetizador) y se puede aumentar el nivel de salida de la pista mediante el uso del control de OUTPUT<br />
GAIN del <strong>166XL</strong> o el control de disminución de volumen del mezclador (éste áltimo se presta especialmente para<br />
desvanecer una pista). Sin embargo, si el <strong>166XL</strong> está conectado a un punto de inserción de tipo ípost-desvanecimientoîdel<br />
mezclador, el ajuste del volumen de desvanecimiento de éste modificará el nivel de entrada, así <strong>com</strong>o la cantidad de <strong>com</strong>presión.<br />
Si no desea que el volumen de desvanecimiento controle la señal de salida del <strong>166XL</strong>, se le aconseja instalar el<br />
sistema de <strong>com</strong>presión directamente entre la fuente y la entrada del canal del mezclador. De esta manera podrá utilizar el<br />
control de volumen del instrumento para definir el nivel de entrada y la cantidad de <strong>com</strong>presión, y el volumen de desvanecimiento<br />
del mezclador para modificar solamente el volumen general de la pista.<br />
Instrumentos musicales (guitarra eléctrica, contrabajo eléctrico, teclados, instrumentos<br />
electroacásticos)<br />
A veces la salida de una guitarra eléctrica no es lo suficiente potente <strong>com</strong>o para alimentar la entrada (INPUT) del<br />
<strong>166XL</strong>. En este caso, es aconsejable utilizar la salida “PREAMP OUT” del amplificador de la guitarra (si es que existe), o<br />
la salida de algán otro dispositivo que haya sido diseñado para aceptar señales de audio de bajo nivel (por ejemplo: ciertos<br />
efectos de pedal, preamplificadores de captores acásticos y dispositivos de sonido diseñados para el montaje en bastidor<br />
(estante), tales <strong>com</strong>o dbx 163A, 263A o 563X). Estas fuentes de señal pueden ser equilibradas (simétricas) o desequilibradas<br />
(asimétricas).<br />
Típicamente, los micrófonos, los contrabajos eléctricos y los instrumentos electroacásticos presentan una salida de bajo<br />
nivel. En la mayoría de las configuraciones es necesario reforzar la señal para que ésta sea capaz de alimentar el <strong>166XL</strong>.<br />
Por ejemplo, al grabar la voz directamente en un magnetófono portátil, se puede colocar un preamplificador de micrófono<br />
(<strong>com</strong>o el dbx 760X) entre el micrófno y el <strong>166XL</strong> (el cual, a su vez, alimenta una de las entradas del magentófono) con el<br />
objeto de aumentar la señal para el <strong>166XL</strong>, así <strong>com</strong>o para suministrar una señal de alto nivel al magnetófono.<br />
Los teclados, los muestrarios, los sintetizadores de ritmos y otros módulos de sonido normalmente producen una señal<br />
de nivel, y la salida del instrumento se puede conectar directament a la entrada (INPUT) del <strong>166XL</strong>.<br />
Nota: NO CONECTE la entrada del <strong>166XL</strong> a la salida de altoparlante de un instrumento o de un aplificador de potencia, ya que esto puede ocasionar<br />
daños severos a los <strong>com</strong>ponentes del sistema.<br />
Tablero de conexiones («patch bay»)<br />
En un estudio, se puede conectar el <strong>166XL</strong> a un tablero de conexiones (tal <strong>com</strong>o el dbx PB-48), para que se pueda utilizar<br />
en cualquier parte del sistema del estudio. Si los circuitos del estudio no son totalmente simétricos (equilibrados), es<br />
necesario conectar a tierra el conductor de salida simétrico no utilizado: la clavija 2 ó 3 del conector XLR o el anillo de un<br />
jack tripolar estereofónico de 0,25 pulgadas.<br />
50<br />
dbx <strong>166XL</strong> COMPRESSOR / GATE<br />
®<br />
PROFESSIONAL PRODUCTS
Reforzamiento de sonido<br />
Para la <strong>com</strong>presión de una señal mezclada en vivo o para proteger los altoparlantes, conecte el <strong>166XL</strong> entre la fuente<br />
(consola de mezcla o amplificador de distribución) y los amplificadores de potencia. Si se utilizan altoparlantes de máltiples<br />
vías con una red divisora electrónica de bajo nivel, el <strong>166XL</strong> debe colocarse después de la red divisora. En el caso de<br />
un sistema estereofónico, se pueden acoplar separadamente los dos circuitos divisores de banda baja, los dos de banda alta,<br />
etc. Si las limitaciones del sistema requieren el uso de un solo canal del <strong>166XL</strong> antes de la red divisora, el añadir un ecualizador<br />
al circuito de inserción ofrece cierto grado adicional de protección para los <strong>com</strong>ponentes de alta frecuencia (vea<br />
"Protección de los altoparlantes," en la página 45).<br />
CONSIDERACIONES PARA LA INSTALACION<br />
Configuración de cables de entrada/salida<br />
Instalación eléctrica<br />
El <strong>166XL</strong> es un dispósitovo simétrico (diferencial) diseñado para un nivel de régimen de +4dBu; las entradas y salidas<br />
consisten en jacks tripolares tipo telefónico y jacks XLR. El <strong>166XL</strong> se puede utilizar ya sea con fuentes simétricas o<br />
asimétricas, y las salidas se pueden usar ya sea con circuitos de carga simétricos o asimétircos, siempre y cuando se utilicen<br />
los cables apropiados.<br />
Una línea simétrica o equilibrada se define <strong>com</strong>o un cable blindado cuyos dos conductores centrales transportan señales<br />
idénticas pero de polaridad opuesta con respecto a tierra. Una línea asimétrica es, por regla general, un cable blindado con<br />
un solo conductor que transporta la señal y cuyo blindaje se encuentra al mismo potencial que la tierra (masa).<br />
Configuraciones del cable de entrada<br />
El <strong>166XL</strong> tiene una impedancia real de entrada de >40kΩ, tanto en las configuraciones simétricas <strong>com</strong>o en las asimétricas.<br />
Esto hace que la señal acástica del <strong>166XL</strong> sea adecuada para su uso con prácticamente cualquier fuente, ya sea de<br />
impedancia baja o alta. Los jacks de entrada del <strong>166XL</strong> están alambrados en paralelo. La conexión de PUNTA (+) del<br />
jack tipo telefónico (tripolar) está alambrada internamente a la clavija 2 del jack XLR, la de ANILLO (-) está alambrada a<br />
la clavija 3 y la de CASQUILLO (blindaje) está alambrada a la clavija 1. Observe que las clavijas 2 y 3 están invertidas<br />
con respecto a ciertos equipos antiguos dbx y los equipos de otros fabricantes, pero si se emplea la misma conexión tanto a<br />
la entrada <strong>com</strong>o a la salida se obtendrá una señal con polorización correcta ("en fase").<br />
El invertir los alambres de entrada en las terminales de entrada producirá una señal de salida con polaridad opuesta a la<br />
señal de entrada ("180° fuera de fase")<br />
Condisideraciones para el cable de salida<br />
Las salidas del modelo <strong>166XL</strong> están alambradas en paralelo: tanto el jack de salida tipo XLR <strong>com</strong>o el jack estereofónico<br />
tipo teléfono de 0,25 de pulgada son capaces de alimentar un circuito de carga de 600(. La conexión de PUNTA (+) del<br />
jack tipo telefónico está alambrada internamente a la clavija 2 XLR, y la de ANILLO (-) está alambrada a la clavija 3,<br />
mientras que la de CASQUILLO (blindaje) está alambrada a la clavija 1. Observe que las clavijas 2 y 3 están invertidas<br />
con respecto a los equipos antiguos de dbx y a los de otros fabricantes, pero si se emplea la misma conexión tanto a la<br />
entrada <strong>com</strong>o a la salida, se obtendrá una señal con polarización correcta ("en fase").<br />
Conexión a tierra<br />
Para obtener un rechazo máximo de zumbido con una fuente simétrica, evite el uso de un alambre <strong>com</strong>án de tierra en la<br />
entrada y salida del <strong>166XL</strong>. La mayoría de los cables simétricos (de 3 conductores) tienen el blindaje conectado en ambos<br />
extremos. Esto puede producir caminos cerrados de tierra, los cuales ocasionan el zumbido. Si éste es un problema,<br />
desconecte el blindaje en uno o más de los cables, de preferencia en el de entrada de un dispositivo y no en el de salida:<br />
conecte a tierra el blindaje del cable de entrada en el dispositivo fuente (dejándolo desconectado en la entrada [INPUT] del<br />
<strong>166XL</strong>) y conecte a tierra el blindaje del cable de salida, usando el conductor de tierra del <strong>166XL</strong> (dejándolo desconectado<br />
en el dispositivo receptor). El blindaje corresponde a la clavija 1 en el jack XLR, o a SLEEVE en un jack TRS tripolar de<br />
0,25 de pulgada.<br />
SIGNAL FLOW<br />
166A<br />
dbx <strong>166XL</strong> COMPRESSOR / GATE<br />
Figura 4: Flujo de la señal (conexión simétrica)<br />
51
ASISTENCIA TÉCNICA Y SERVICIO DE FABRICA<br />
El <strong>166XL</strong> es un producto de estado sólido cuyos <strong>com</strong>ponentes han sido elegidos para su alto rendimiento y fiabilidad<br />
excelente. Cada <strong>166XL</strong> ha sido diseñado, ensamblado, probado y calibrado en la fábrica de los Estados Unidos, y no debe<br />
de requerir ningán ajuste interno de ningán tipo durante la vida átil de la unidad. Le re<strong>com</strong>endamos que devuelva el <strong>166XL</strong><br />
a la fábrica solamente después de haber consultado el manual y el servicio de asistencia al cliente.<br />
Nuestro námero de teléfono, námero de fax y dirección figuran dentro de la tapa del manual. Antes de contactar al<br />
departamento de Servicio al Cliente dbx, prepárese para describir con exactitud la naturaleza del problema. Tenga<br />
disponible el námero de serie, el cual aparece impreso en una etiqueta peqga a la unidad.<br />
Nota: Por favor consulte los términos de su Garantía Limitada Estándar de Dos Años, la cual se aplica al primer usuario. Una vez vencido el plazo de la<br />
garantía, se cobrará un cargo razonable por repuestos, mano de obra, y empaquetamiento si Ud. opta por recurrir al servicio de fábrica. En todos los<br />
casos, el cliente se hace responsable de los cargos de transporte a la fábrica. dbx pagará el flete de devolución si la unidad todavía está bajo garantía.<br />
Instrucciones para el envío: Utilice los materiales originales de empaque si están disponibles. Marque el paquete con el<br />
nombre del remitente y con las siguientes palabras en letra roja y entre <strong>com</strong>illas: "DELICATE INSTRUMENT, FRAG-<br />
ILE!" Asegure debidamente el paquete. Envíelo porte pagado y no a cobrar. No lo envíe <strong>com</strong>o paquete postal. (Si no piensa<br />
guardar los materiales de empaque, por favor recíclelos.)<br />
Tarjeta de registro y <strong>com</strong>entarios de los usuarios<br />
Apreciamos sus sugerencias. Una vez que haya tenido la oportunidad de utilizar su nuevo <strong>166XL</strong>, sírvase llenar la tarjeta<br />
de registro y devolverla.<br />
52<br />
dbx <strong>166XL</strong> COMPRESSOR / GATE<br />
®<br />
PROFESSIONAL PRODUCTS
FROM SOURCE DEVICE TO NEXT DEVICE<br />
1 2<br />
3<br />
XLR-TYPE FEMALE<br />
SLEEVE<br />
TIP<br />
RING<br />
SLEEVE (-)<br />
TIP (+)<br />
SLEEVE (-)<br />
TIP (+)<br />
SLEEVE<br />
TIP<br />
RING<br />
SLEEVE<br />
TIP<br />
RING<br />
SLEEVE<br />
TIP<br />
RING<br />
dbx <strong>166XL</strong> COMPRESSOR / GATE<br />
2 1<br />
3<br />
XLR-TYPE FEMALE<br />
TO NEXT DEVICE<br />
XLR-TYPE MALE<br />
FEMALE XLR-TYPE TO STEREO PHONE PLUG STEREO PHONE PLUG TO MALE XLR-TYPE<br />
FROM SOURCE DEVICE TO NEXT DEVICE<br />
1 2<br />
3<br />
1 2<br />
3<br />
XLR-TYPE MALE<br />
STEREO PHONE PLUG TO STEREO PHONE PLUG FEMALE XLR-TYPE TO MALE XLR-TYPE<br />
FROM SOURCE DEVICE TO NEXT DEVICE<br />
1 2<br />
3<br />
XLR-TYPE MALE<br />
FROM SOURCE DEVICE<br />
FROM SOURCE DEVICE<br />
FROM SOURCE DEVICE<br />
TO NEXT DEVICE<br />
TO NEXT DEVICE<br />
SLEEVE<br />
TIP<br />
RING<br />
MONO PHONE PLUG TO MALE XLR-TYPE MONO PHONE PLUG TO STEREO PHONE PLUG<br />
FROM SOURCE DEVICE TO NEXT DEVICE<br />
SLEEVE (-)<br />
TIP (+)<br />
1 2<br />
3<br />
RCA PHONO PLUG TO MALE XLR-TYPE<br />
XLR-TYPE MALE<br />
FROM SOURCE DEVICE TO NEXT DEVICE<br />
SLEEVE (-)<br />
TIP (+)<br />
FROM SOURCE DEVICE TO NEXT DEVICE<br />
FROM SOURCE DEVICE TO NEXT DEVICE<br />
FROM SOURCE DEVICE<br />
SLEEVE (-)<br />
FROM SOURCE DEVICE<br />
FROM SOURCE DEVICE<br />
SLEEVE (-)<br />
TO NEXT DEVICE<br />
SLEEVE<br />
TIP<br />
RING<br />
PHONO PLUG TO STEREO PHONE PLUG<br />
TO NEXT DEVICE<br />
MONO PHONE PLUG TO MONO PHONE PLUG PHONO PLUG TO MONO PHONE PLUG<br />
SLEEVE<br />
TIP<br />
RING<br />
SLEEVE (-)<br />
TIP (+)<br />
STEREO PHONE PLUG TO MONO PHONE PLUG<br />
SLEEVE (-)<br />
TIP (+)<br />
PHONO PLUG TO MALE XLR-TYPE<br />
SLEEVE<br />
TIP<br />
RING<br />
SLEEVE (-)<br />
TIP (+)<br />
TIP (+)<br />
SLEEVE (-)<br />
TIP (+)<br />
TIP (+)<br />
SLEEVE (-)<br />
TIP (+)<br />
TO NEXT DEVICE<br />
SLEEVE (-)<br />
TIP (+)<br />
MONO PHONE PLUG TO PHONO PLUG<br />
53
SPECIFICATIONS<br />
Inputs (1/4” TRS Phone and XLR) Floating Balanced; XLR: Pin 2 and TIP HI,<br />
Entrées (Jack 6,35 tripolaire et XLR) Symétriques flottantes; signal (+) = broche 2 (XLR) et pointe (Jack)<br />
Eingänge (1/4î TRS-Telefon und XLR) differential ausgeglichen; XLR: Stift 2 und TIP HI<br />
Entradas (tripolar telefónico de 0,25 de pulgada y XRL) Simétricas flotantes; señal (+) = clavija 2 (XLR) TIP HI<br />
Impedance >50kΩ balanced, >25kΩ unbalanced<br />
Maximum Level +24dBu, Balanced or Unbalanced<br />
CMRR >40dB at 1kHz, typically >55dB<br />
Sidechain Insert (1/4” TRS Phone)<br />
Circuit d'insertion Sidechain (Jack 6,35 tripolaire)<br />
Sidechain-Einsatz (1/4î TRS-Telefon)<br />
Sidechain (circuito de inserción) (tripolar de 0,5 de pulgada) Normalled: Ring = Output (send); Tip = Input (return)<br />
Impedance Tip = >10kΩ (Input)<br />
Ring = 2kΩ (Output)<br />
Maximum Level +24dBu<br />
Outputs (1/4” TRS Phone and XLR) Floating Balanced; XLR: Pin 2 and TIP HI<br />
Sorties (Jack 6,35 tripolaire et XLR) Symétriques flottantes; signal (+) = broche 2 (XLR) et pointe (Jack)<br />
Ausgänge (1/4î TRS-Telefon und XLR) differential ausgeglichen; XLR: Stift 2 und TIP HI<br />
Salidas (tripolar telefónico de 0,25 de pulgada y XRL) Simétricas flotantes; señal (+) = clavija 2 (XLR)<br />
Impedance 120Ω balanced, 60Ω unbalanced<br />
Maximum Level +21dBu,>+20 dBm into 600Ω, balanced or unbalanced<br />
Frequency Response 20Hz - 20kHz; +0, -0.5dB,Typical 3dB points are 0.35Hz<br />
and 110kHz, unity gain<br />
Noise
Dynamic Range<br />
Gamme dynamique<br />
Dynamikbereich<br />
Margen dinámico >115 dB<br />
Stereo Coupling<br />
Couplage stéréo<br />
Stereokopplung<br />
Acoplamiento estereofónico True RMS Power Summing<br />
Operating Voltage<br />
Tension d'alimentation secteur<br />
Betriebsspannung<br />
Tensión de operación 100 VAC 50/60Hz; 120VAC 60Hz<br />
230 VAC 50/60 Hz<br />
Power Consumption<br />
Consommation électrique<br />
Leistung<br />
Consumo de energía 15 Watts Maximum<br />
Operating Temperature<br />
Température de fonctionnement<br />
Betriebstemperatur<br />
Temperatura de operación 0˚C to 45˚C (32˚F to 113˚F)<br />
Dimensions (H x W x D)<br />
En<strong>com</strong>brement (h x l x p)<br />
Abmessungen (H x B x T)<br />
Dimensiones (Altura x Ancho x Profundidad) 1.75" x 19" x 6.75" (4.45 cm x 48.2 cm x 17.15 cm)<br />
Rack Space<br />
Espace baie nécessaire<br />
Rackraum<br />
Espacio de instalación 1 Rack Unit (1U High)<br />
Weight<br />
Poids<br />
Gewicht Net weight: 5.05 lb (2.29 kg)<br />
Peso Shipping weight: 7.20 lb (3.27 kg)<br />
Note: 0dBu =0.775Vrms.<br />
dbx <strong>166XL</strong> COMPRESSOR / GATE<br />
Specifications are subject to change.<br />
Caractéristiques sujettes modifications.<br />
Diese Spezifikationen können sich durch technisch bedingte Fortschritte jederzeit ändern.<br />
Las especificaciones están sujetas a cambios.<br />
55
NOTES<br />
56<br />
dbx <strong>166XL</strong> COMPRESSOR / GATE<br />
®<br />
PROFESSIONAL PRODUCTS
18-2240V-E<br />
6-04<br />
Printed in China<br />
8760 South Sandy Pkwy.<br />
Sandy, Utah 84070<br />
Phone: (801) 568-7660<br />
Fax: (801) 568-7662<br />
®<br />
A Harman International Company<br />
Questions or <strong>com</strong>ments?<br />
E•mail us at: customer@dbxpro.<strong>com</strong><br />
or visit our World Wide Web home page at:<br />
www.dbxpro.<strong>com</strong>