Istruzioni per l'uso - Boulanger
Istruzioni per l'uso - Boulanger
Istruzioni per l'uso - Boulanger

Create successful ePaper yourself
Turn your PDF publications into a flip-book with our unique Google optimized e-Paper software.
<strong>Istruzioni</strong> <strong>per</strong> l’uso<br />
IT<br />
Italiano, 1<br />
NL<br />
Nederlands,<br />
57<br />
GB<br />
English,20<br />
CE6IA.1 /HA<br />
CE6IA.1 X /HA<br />
CE6IA. 2 F/HA<br />
CE6IA. 2 X F/HA<br />
R<br />
rançais, 38<br />
Sommario<br />
Installazione, 2-3<br />
Posizionamento e livellamento<br />
Collegamento elettrico<br />
Tabella caratteristiche<br />
Descrizione dell’apparecchio, 4-5<br />
Vista d’insieme<br />
Pannello di controllo<br />
Display<br />
Pannello di controllo piano di cottura<br />
Avvio e utilizzo, 6-9<br />
Impostare l’orologio<br />
Impostare il contaminuti<br />
Uso del forno<br />
Programmi di cottura manuali<br />
Programmi di cottura automatici<br />
Programmare la cottura<br />
Consigli pratici di cottura<br />
Tabella cottura in forno<br />
CUCINA E ORNO<br />
Utilizzo del piano cottura, 10-14<br />
Accensione del piano cottura<br />
Accensione delle zone di cottura<br />
unzione booster<br />
Spegnimento delle zone di cottura<br />
Programmazione della durata di una cottura<br />
Il contaminuti<br />
Blocco dei comandi<br />
Spegnimento del piano cottura<br />
Modalità “demo”<br />
Consigli pratici <strong>per</strong> l’uso dell’apparecchio<br />
Dispositivi di sicurezza<br />
Descrizione tecnica dei modelli<br />
Consigli pratici <strong>per</strong> la cottura<br />
Precauzioni e consigli, 15-16<br />
Sicurezza generale<br />
Smaltimento<br />
Risparmiare e rispettare l’ambiente<br />
Manutenzione e cura, 17-18<br />
Escludere la corrente elettrica<br />
Pulire l’apparecchio<br />
Sostituire la lampadina di illuminazione del forno<br />
Pulizia automatica AST CLEAN<br />
Assistenza, 19<br />
Assistenza attiva 7 giorni su 7<br />
IT
IT<br />
Installazione<br />
! È importante conservare questo libretto <strong>per</strong> poterlo<br />
consultare in ogni momento. In caso di vendita, di<br />
cessione o di trasloco, assicurarsi che resti insieme<br />
all’apparecchio.<br />
! Leggere attentamente le istruzioni: ci sono<br />
importanti informazioni sull’installazione, sull’uso e<br />
sulla sicurezza.<br />
! L’installazione dell’apparecchio va effettuata<br />
secondo queste istruzioni da <strong>per</strong>sonale qualificato.<br />
! Qualsiasi intervento di regolazione o manutenzione<br />
deve essere eseguito con la cucina disinserita<br />
dall’impianto elettrico.<br />
Posizionamento e livellamento<br />
! È possibile installare l’apparecchio di fianco a<br />
mobili che non su<strong>per</strong>ino in altezza il piano di lavoro.<br />
! Assicurarsi che la parete a contatto con il retro<br />
dell’apparecchio sia di materiale non infiammabile e<br />
resistente al calore (T 90°C).<br />
Per una corretta installazione:<br />
• porre l’apparecchio in cucina, in sala da pranzo o<br />
in un monolocale (non in bagno);<br />
• se il piano della cucina è più alto di quello dei<br />
mobili, essi devono essere posti ad almeno 600<br />
mm dall’apparecchio;<br />
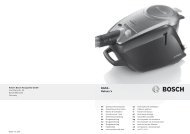
• se la cucina viene<br />
2<br />
mm.<br />
420<br />
Min.<br />
HOOD<br />
Min. 600 mm.<br />
installata sotto un<br />
pensile, esso dovrà<br />
mantenere una distanza<br />
minima dal piano di 420<br />
mm.<br />
Tale distanza deve<br />
essere di 700 mm se i<br />
pensili sono<br />
infiammabili (vedi<br />
figura);<br />
• non posizionare tende dietro la cucina o a meno di<br />
200 mm dai suoi lati;<br />
• eventuali cappe devono essere installate secondo<br />
le indicazioni del relativo libretto di istruzione.<br />
Livellamento<br />
Min. 420 mm.<br />
min. 650 mm. with hood<br />
min. 700 mm. without hood<br />
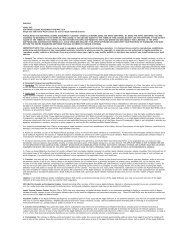
Se è necessario livellare<br />
l’apparecchio, avvitare i<br />
piedini di regolazione forniti in<br />
dotazione nelle apposite sedi<br />
poste negli angoli alla base<br />
della cucina (vedi figura).<br />
Le gambe* si montano a<br />
incastro sotto la base della<br />
cucina.<br />
Collegamento elettrico<br />
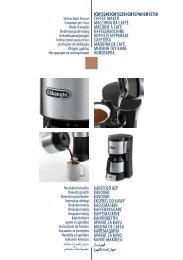
Montaggio cavo di alimentazione<br />
A<strong>per</strong>tura morsettiera:<br />
• Servendosi di un cacciavite, fare leva sulle<br />
linguette laterali del co<strong>per</strong>chio della morsettiera;<br />
• Tirare ed aprire il<br />
co<strong>per</strong>chio della<br />
morsettiera.<br />
Per la messa in o<strong>per</strong>a del cavo eseguire le seguenti<br />
o<strong>per</strong>azioni:<br />
• svitare la vite del serracavo e le viti dei contatti<br />
! I ponticelli vengono predisposti dalla abbrica <strong>per</strong><br />
il collegamento a 230V monofase (vedi figura).<br />
• <strong>per</strong> effettuare i collegamenti elettrici delle figure,<br />
utilizzare i due ponticelli alloggiati dentro la<br />
scatola (vedi figura - riferimento "P")<br />
* Presente solo su alcuni modelli.<br />
230V ~<br />
H05RR-F/ 3x4 CEI-UNEL 35363<br />
H05VV-F/ 3x4 CEI-UNEL 35746<br />
N L<br />
5<br />
N<br />
4<br />
L1<br />
3<br />
L2<br />
2<br />
1<br />
P<br />
L3
400V 2N~<br />
H05RR-F 4x4 CEI-UNEL 35363<br />
H05VV-F 4x4 CEI-UNEL 357 46<br />
N L2 L1<br />
5<br />
400V 3N~<br />
H05RR-F 5x2.5 CEI-UNEL 35363<br />
H05VV-F 5x2.5 CEI-UNEL 35746<br />
N L3 L2 L1<br />
5<br />
• fissare il cavo di alimentazione nell’apposito<br />
fermacavo e chiudere il co<strong>per</strong>chio.<br />
Collegamento del cavo di alimentazione alla rete<br />
In caso di collegamento diretto alla rete è necessario<br />
interporre tra l’apparecchio e la rete un interruttore<br />
onnipolare con a<strong>per</strong>tura minima fra i contatti di 3<br />
mm, dimensionato al carico e rispondente alle norme<br />
nazionali in vigore (il filo di terra non deve essere<br />
interrotto dall’interruttore). Il cavo di alimentazione<br />
deve essere posizionato in modo tale che in nessun<br />
punto su<strong>per</strong>i di 50°C la tem<strong>per</strong>atura ambiente.<br />
Prima di effettuare l’allacciamento accertarsi che:<br />
• la presa abbia la messa a terra e sia a norma di<br />
legge;<br />
• la presa sia in grado di sopportare il carico<br />
massimo di potenza della macchina, indicato<br />
della targhetta caratteristiche;<br />
• la tensione di alimentazione sia compresa nei<br />
valori nella targhetta caratteristiche;<br />
• Non usare prolunghe e multiple.<br />
4<br />
4<br />
3<br />
3<br />
2<br />
2<br />
1<br />
1<br />
! Ad apparecchio installato, il cavo elettrico e la<br />
presa della corrente devono essere facilmente<br />
raggiungibili.<br />
! Il cavo non deve subire piegature o compressioni.<br />
! Il cavo deve essere controllato <strong>per</strong>iodicamente e<br />
sostituito solo da tecnici autorizzati.<br />
! L’azienda declina ogni responsabilità qualora<br />
queste norme non vengano rispettate.<br />
TABELLA CARATTERISTICHE<br />
Dimensioni<br />
32x43,5x40 cm<br />
orno HxLxP<br />
Volume lt. 56<br />
Dimensioni utili larghezza cm 42<br />
del cassetto profondità cm 44<br />
scaldavivande altezza cm 8,5<br />
Tensione e<br />
frequenza vedi targhetta caratteristiche<br />
d'alimentazione<br />
Direttiva 2002/40/CE sull’etichetta<br />
dei forni elettrici.<br />
Norma EN 50304<br />
ENERGY LABEL<br />
Consumo energia dichiarazione<br />
Classe convezione orzata -<br />
funzione di riscaldamento:<br />
Gratin.<br />
Direttive Comunitarie: 2006/95/EC<br />
del 12/12/06 (Bassa Tensione) e<br />
successive modificazioni -<br />
2004/108/EC del 15/12/04<br />
(Compatibilità Elettromagnetica) e<br />
successive modificazioni -<br />
93/68/EEC del 22/07/93 e<br />
successive modificazioni -<br />
2002/96/EC.<br />
1275/2008 (Stand-by/Off mode)<br />
3<br />
IT
IT<br />
Descrizione<br />
dell’apparecchio<br />
Vista d’insieme<br />
Pannello di controllo<br />
Display<br />
* Presente solo su alcuni modelli.<br />
4<br />
Piano cottura<br />
vetroceramica<br />
Pannello di controllo<br />
Ripiano GRIGLIA<br />
Ripiano LECCARDA<br />
Icona del ripiano<br />
di cottura consigliato<br />
Tasto<br />
FAST CLEAN<br />
Manopola<br />
IMPOSTAZIONE TEMPI<br />
Icona<br />
STOP<br />
Indicatore del<br />
Preriscaldamento<br />
Indicatore<br />
PORTA BLOCCATA<br />
Icona<br />
CONTAMINUTI<br />
DISPLAY Manopola<br />
TERMOSTATO<br />
Manopola<br />
PROGRAMMI<br />
Tasto<br />
IMPOSTAZIONE TEMPI<br />
Icone PROGRAMMI<br />
AUTOMATICI<br />
Icona<br />
DURATA<br />
Icona<br />
FINE COTTURA<br />
GUIDE<br />
di scorrimento dei ripiani<br />
posizione 5<br />
posizione 4<br />
posizione 3<br />
posizione 2<br />
posizione 1<br />
Piedino di regolazione Piedino di regolazione<br />
Digit numerici TEMPERATURA<br />
e TEMPI<br />
Icona<br />
OROLOGIO
Pannello di controllo piano di cottura<br />
Indicatori di POTENZA<br />
e di CALORE RESIDUO<br />
• Tasto AUMENTO POTENZA <strong>per</strong> accendere la<br />
piastra e regolare la potenza (vedi Avvio e<br />
utilizzo).<br />
• Tasto DIMINUZIONE POTENZA <strong>per</strong> regolare la<br />
potenza e spegnere la piastra (vedi Avvio e<br />
utilizzo).<br />
• Spia ZONA DI COTTURA SELEZIONATA indica<br />
che la zona di cottura relativa è stata selezionata<br />
e quindi sono possibili le varie regolazioni<br />
• Tasto SELEZIONE ZONA DI COTTURA <strong>per</strong><br />
selezionare la zona di cottura desiderata<br />
• Indicatore POTENZA: segnala visivamente il<br />
livello di calore raggiunto.<br />
• Tasto ON/O <strong>per</strong> accendere e spegnere<br />
l’apparecchio.<br />
• Spia ON/O: segnala se l’apparecchio è acceso<br />
o spento.<br />
• Tasto TIMER DI PROGRAMMAZIONE* <strong>per</strong><br />
regolare la programmazione della durata di una<br />
cottura (vedi Avvio e utilizzo).<br />
* Presente solo su alcuni modelli.<br />
Spia ZONA COTTURA<br />
SELEZIONATA<br />
Tasti SELEZIONE<br />
ZONE COTTURA<br />
Tasto<br />
AUMENTO POTENZA<br />
Tasto<br />
BOOSTER*<br />
Spia<br />
BOOSTER*<br />
Spia<br />
CONTAMINUTI*<br />
Display<br />
TIMER DI PROGRAMMAZIONE*<br />
Spia<br />
ZONA DI COTTURA PROGRAMMATA*<br />
• Display TIMER DI PROGRAMMAZIONE*:<br />
visualizza le scelte relative alla programmazione<br />
(vedi Avvio e utilizzo).<br />
• Spie ZONA DI COTTURA PROGRAMMATA*:<br />
indicano le zone di cottura quando si avvia una<br />
programmazione (vedi Avvio e utilizzo).<br />
• Tasto BLOCCO DEI COMANDI <strong>per</strong> impedire<br />
modifiche fortuite alle regolazioni del piano cottura<br />
(vedi Avvio e utilizzo).<br />
• Spia COMANDI BLOCCATI: segnala l’avvenuto<br />
blocco dei comandi (vedi Avvio e utilizzo).<br />
• Tasto BOOSTER* <strong>per</strong> accendere la<br />
sovralimentazione - 3000 W - della zona di cottura<br />
(vedi Avvio e utilizzo).<br />
• Spia BOOSTER* indica che è attiva la funzione di<br />
sovralimentazione booster<br />
• Spia CONTAMINUTI* indica che è attivo il<br />
contaminuti<br />
Spia<br />
ON/OFF<br />
Spia<br />
COMANDI BLOCCATI<br />
Tasto<br />
BLOCCO DEI COMANDI<br />
Tasto<br />
TIMER DI PROGRAMMAZIONE*<br />
Tasto<br />
DIMINUZIONE POTENZA<br />
Tasto<br />
ON/OFF<br />
5<br />
IT
IT<br />
Avvio e utilizzo<br />
! Prima del<strong>l'uso</strong>, togliere tassativamente le pellicole<br />
in plastica poste ai lati dell'apparecchio<br />
Impostare l’orologio<br />
! Si può impostare sia quando il forno è spento che<br />
quando è acceso, ma non si è programmata la fine<br />
di una cottura.<br />
1. Premere più volte il tasto finchè non<br />
lampeggiano l’icona e i primi due digit numerici<br />
sul DISPLAY;<br />
2. ruotare la manopola IMPOSTAZIONE TEMPI verso<br />
il “+” e “-” <strong>per</strong> regolare l’ora;<br />
3. premere di nuovo il tasto finchè non<br />
lampeggiano gli altri due digit numerici sul<br />
DISPLAY;<br />
4. ruotare la manopola IMPOSTAZIONE TEMPI verso<br />
il “+” e “-” <strong>per</strong> regolare i minuti;<br />
5. premere nuovamente il tasto <strong>per</strong> confermare.<br />
Impostare il contaminuti<br />
! Questa funzione non interrompe la cottura e<br />
prescinde dall’utilizzo del forno; <strong>per</strong>mette solo di<br />
azionare il segnale acustico allo scadere dei minuti<br />
impostati.<br />
1. Premere più volte il tasto finchè non<br />
lampeggiano l’icona e i tre digit numerici sul<br />
DISPLAY;<br />
2. ruotare la manopola IMPOSTAZIONE TEMPI verso<br />
il “+” e “-” <strong>per</strong> regolare i minuti;<br />
3. premere nuovamente il tasto <strong>per</strong> confermare.<br />
Seguirà la visualizzazione del conto alla rovescia al<br />
termine del quale si azionerà il segnale acustico.<br />
Uso del forno<br />
! Alla prima accensione fare funzionare il forno a<br />
vuoto <strong>per</strong> almeno un’ora con il termostato al<br />
massimo e a porta chiusa. Poi spegnere, aprire la<br />
porta del forno e aerare il locale. L’odore che si<br />
avverte è dovuto all’evaporazione delle sostanze<br />
usate <strong>per</strong> proteggere il forno.<br />
1. Selezionare il programma di cottura desiderato<br />
ruotando la manopola PROGRAMMI.<br />
2. Il forno entra nella fase di preriscaldamento,<br />
l’indicatore del preriscaldamento si illumina.<br />
È possibile modificare la tem<strong>per</strong>atura ruotando la<br />
manopola TERMOSTATO.<br />
6<br />
3. Quando si spegne l’indicatore del<br />
preriscaldamento e si avverte un segnale<br />
acustico il preriscaldamento è completo: introdurre<br />
gli alimenti.<br />
4. Il DISPLAY visualizza l’icona che consiglia il<br />
livello sul quale posizionare la teglia.<br />
5. Durante la cottura è sempre possibile:<br />
- modificare il programma di cottura agendo sulla<br />
manopola PROGRAMMI;<br />
- modificare la tem<strong>per</strong>atura agendo sulla manopola<br />
TERMOSTATO;<br />
- pianificare la durata e l’ora di fine della cottura<br />
(vedi programmi di cottura);<br />
- interrom<strong>per</strong>e la cottura riportando la manopola<br />
PROGRAMMI in posizione “0”.<br />
6. Trascorse due ore il forno si spegne<br />
automaticamente: tale tempo è preimpostato <strong>per</strong><br />
motivi di sicurezza in tutti i programmi di cottura.<br />
È possibile modificare la durata della cottura<br />
(vedi programmi di cottura).<br />
7. In caso di black-out, se la tem<strong>per</strong>atura del forno<br />
non si è abbassata troppo, l’apparecchio è dotato di<br />
un sistema che riattiva il programma dal punto in cui è<br />
stato interrotto. Le pianificazioni in attesa di avvio,<br />
invece, non vengono ripristinate al ritorno della<br />
corrente e devono essere riprogrammate.<br />
! Nel programma BARBECUE non è previsto il<br />
preriscaldamento.<br />
! Non appoggiare mai oggetti sul fondo del forno<br />
<strong>per</strong>ché si rischiano danni allo smalto.<br />
! Porre sempre i recipienti di cottura sulla griglia in<br />
dotazione.<br />
Ventilazione di raffreddamento<br />
Per ottenere una riduzione delle tem<strong>per</strong>ature esterne, una<br />
ventola di raffreddamento genera un getto d’aria che esce<br />
tra il pannello di controllo e la porta del forno. All’inizio del<br />
programma AST CLEAN la ventola funziona a bassa<br />
velocità.<br />
! A fine cottura la ventola rimane attiva finché il forno non è<br />
sufficientemente freddo.<br />
Luce del forno<br />
A forno spento la lampadina può essere accesa in<br />
qualunque momento aprendo la porta del forno.<br />
* Presente solo su alcuni modelli.
Programmi di cottura manuali<br />
! Tutti i programmi hanno una tem<strong>per</strong>atura di cottura<br />
preimpostata. Essa può essere regolata manualmente,<br />
impostandola a piacere tra 40°C e 250°C.<br />
Nel programma BARBECUE il valore preimpostato è<br />
un livello di potenza espresso in %. Anch’esso può<br />
essere regolato manualmente.<br />
Programma MULTILIVELLO<br />
Si attivano tutti gli elementi riscaldanti ed entra in<br />
funzione la ventola. Poiché il calore è costante in tutto il<br />
forno, l’aria cuoce e rosola il cibo in modo uniforme. È<br />
possibile utilizzare fino a un massimo di due ripiani<br />
contemporaneamente.<br />
Programma BARBECUE<br />
Si attiva l’elemento riscaldante su<strong>per</strong>iore. Ruotando la<br />
manopola TERMOSTATO, il DISPLAY indicherà i livelli<br />
di potenza impostabili, che vanno da 5% fino a 100%.<br />
La tem<strong>per</strong>atura elevata e diretta del grill è consigliata<br />
<strong>per</strong> gli alimenti che necessitano di un’alta tem<strong>per</strong>atura<br />
su<strong>per</strong>ficiale. Effettuare le cotture con la porta del forno<br />
chiusa.<br />
Programma GRATIN<br />
Si attiva l’elemento riscaldante su<strong>per</strong>iore e durante<br />
una parte del ciclo anche l’elemento riscaldante<br />
circolare, entrano in funzione la ventola. Unisce<br />
all’irradiazione termica unidirezionale la circolazione<br />
forzata dell’aria all’interno del forno.<br />
Ciò impedisce la bruciatura su<strong>per</strong>ficiale degli alimenti<br />
aumentando il potere di penetrazione del calore.<br />
Effettuare le cotture con la porta del forno chiusa.<br />
Programmi BASSA TEMPERATURA<br />
Questo tipo di cottura consente di lievitare,<br />
scongelare, di preparare lo yogurth, riscaldare più o<br />
meno rapidamente, cuocere lentamente a bassa<br />
tem<strong>per</strong>atura. Le tem<strong>per</strong>ature selezionabili sono: 40, 65,<br />
90 °C.<br />
Girarrosto (solo in alcuni modelli)<br />
Per azionare il girarrosto<br />
(vedi figura) procedere<br />
come segue:<br />
1. mettere la leccarda in<br />
posizione 1;<br />
2. mettere il sostegno<br />
del girarrosto in<br />
posizione 3 e inserire lo<br />
spiedo nell’apposito foro<br />
posto sulla parete<br />
posteriore del forno;<br />
3. azionare il girarrosto selezionando con la<br />
manopola PROGRAMMI o ;<br />
! Col programma avviato, se si apre la porta il<br />
girarrosto si arresta.<br />
Programmi di cottura automatici<br />
! La tem<strong>per</strong>atura e la durata di cottura sono<br />
prestabilite e non possono essere modificate tramite il<br />
sistema C.O.P.® (Cottura Ottimale Programmata)<br />
che garantisce automaticamente un risultato <strong>per</strong>fetto.<br />
La cottura si interrompe automaticamente e il forno<br />
avvisa quando la pietanza è cotta. La cottura può<br />
essere effettuata infornando a freddo o a caldo; <strong>per</strong> il<br />
posizionamento della teglia si consiglia di far<br />
riferimento al livello indicato dall’icona .<br />
! Al raggiungimento della fase di cottura il forno emette<br />
un segnale acustico.<br />
! Non aprite la porta forno <strong>per</strong> evitare di falsare i tempi<br />
e le tem<strong>per</strong>ature di esecuzione delle cotture.<br />
Programma CARNE<br />
Utilizzare questa funzione <strong>per</strong> cuocere carni di vitello,<br />
maiale, agnello. Infornare a forno freddo. E’ comunque<br />
possibile infornare anche a forno caldo.<br />
Programma PIZZA<br />
Utilizzare questa funzione <strong>per</strong> realizzare della pizza.<br />
are riferimento al capitolo seguente <strong>per</strong> la ricetta e<br />
dettagli.<br />
Programma PANE<br />
Utilizzare questa funzione <strong>per</strong> realizzare del pane. are<br />
riferimento al capitolo seguente <strong>per</strong> la ricetta e dettagli.<br />
Programma DOLCI<br />
Questa funzione è ideale <strong>per</strong> la cottura di dolci sia a<br />
base di lievito naturale, sia a base di lievito chimico e<br />
senza lievito.Infornare a forno freddo. E’ comunque<br />
possibile infornare anche a forno caldo.<br />
Programma PIZZA<br />
Per ottenere i migliori risultati vi consigliamo di seguire<br />
attentamente le indicazioni sotto riportate:<br />
• rispettare la ricetta;<br />
• il peso dell’impasto deve essere da 500g a 700g.<br />
• imburrare leggermente la leccarda.<br />
7<br />
IT
IT<br />
Ricetta <strong>per</strong> la PIZZA :<br />
1 Leccarda, Ripiano basso, a orno reddo o Caldo<br />
Ricetta <strong>per</strong> 3 pizze di circa 550g : 1000g arina, 500g<br />
Acqua, 20g Sale, 20g Zucchero, 10cl Olio di Oliva, 20g<br />
lievito fresco (oppure 2 bustini in polvere)<br />
• Lievitazione nell’ ambiente : 1 ora.<br />
• Infornare a forno freddo o caldo<br />
• Lanciare la cottura PIZZA<br />
Programma PANE<br />
Per ottenere i migliori risultati vi consigliamo di seguire<br />
attentamente le indicazioni sotto riportate:<br />
• rispettare la ricetta;<br />
• il peso massimo <strong>per</strong> leccarda;<br />
• non dimenticare di mettere 1dl di acqua fredda<br />
sulla leccarda alla posizione 5;<br />
• la lievitazione del impasto va fatto a tem<strong>per</strong>atura<br />
ambiante <strong>per</strong> 1 ora o 1 ora e mezzo, in funzione<br />
della tem<strong>per</strong>atura della stanza, e in pratica, fino al<br />
raddoppio del impasto.<br />
Ricetta <strong>per</strong> il PANE :<br />
1 Leccarda di 1000g Max, Ripiano basso<br />
2 Leccarde di 1000g Max, Ripiani basso e medio<br />
Ricetta <strong>per</strong> 1000g d’impasto : 600g arina, 360g<br />
Acqua, 11g Sale, 25g lievito fresco (oppure 2 bustini in<br />
polvere)<br />
Processo:<br />
• Mescolare la farina ed il sale in un grande recipiente.<br />
• Diluire il lievito nell’acqua leggermente tiepida (circa<br />
35 gradi).<br />
• Aprite la farina a fontana.<br />
• Versare il miscuglio di acqua e lievito<br />
• Lavorare fino ad ottenimento di un impasto<br />
omogeneo e poco colloso, stirandolo col palmo<br />
della mano e ripiegandolo su se stesso <strong>per</strong> 10<br />
minuti.<br />
• ormare una palla, mettere l’impasto in un’insalatiera<br />
e ricoprirla con pellicola trasparente <strong>per</strong> evitare che<br />
la su<strong>per</strong>ficie dell’impasto si secchi. Mettere<br />
l’insalatiera nel forno alla funzione manuale BASSA<br />
TEMPERATURA a 40°C e lasciar lievitare <strong>per</strong> circa<br />
1 ora (il volume dell’impasto deve raddoppiare)<br />
• Dividere la palla <strong>per</strong> ottenere i diversi pani.<br />
• Disporli sulla leccarda su una carta forno.<br />
• Cospargere i pani di farina.<br />
• are dei tagli sui pani.<br />
• Mettere 1dl di acqua distillata fredda sul fondo del<br />
forno. Per la pulizia, si consiglia l’utilizzo di acqua e<br />
aceto.<br />
• Infornare a forno freddo.<br />
• Lanciare la cottura PANE<br />
8<br />
• Alla fine della cottura, lasciare riposare i pani su una<br />
griglia fino a completo raffreddamento.<br />
Programmare la cottura<br />
! La programmazione è possibile solo dopo aver<br />
selezionato un programma di cottura.<br />
Programmare la durata di cottura<br />
1. Premere più volte il tasto finchè non<br />
lampeggiano l’icona e i tre digit numerici sul<br />
DISPLAY;<br />
2. ruotare la manopola IMPOSTAZIONE TEMPI verso il<br />
“+” e “-” <strong>per</strong> regolare il tempo desiderato;<br />
3. premere nuovamente il tasto <strong>per</strong> confermare;<br />
4. a tempo scaduto, sul DISPLAY compare la scritta<br />
END, il forno termina la cottura e viene emesso un<br />
segnale acustico.<br />
• Esempio: sono le 9:00 e viene programmata una<br />
durata di 1 ora e 15 minuti. Il programma si arresta<br />
automaticamente alle 10:15.<br />
Programmare la fine di una cottura<br />
! La programmazione della fine di una cottura è<br />
possibile solo dopo aver impostato una durata di<br />
cottura.<br />
1. Seguire la procedura da 1 a 3 descritta <strong>per</strong> la<br />
durata;<br />
2. poi premere il tasto finchè non lampeggiano<br />
l’icona e i due digit numerici sul DISPLAY;<br />
3. ruotare la manopola IMPOSTAZIONE TEMPI verso il<br />
“+” e “-” <strong>per</strong> regolare l’ora;<br />
4. premere di nuovo il tasto finchè non<br />
lampeggiano gli altri due digit numerici sul DISPLAY;<br />
5. ruotare la manopola IMPOSTAZIONE TEMPI verso il<br />
“+” e “-” <strong>per</strong> regolare i minuti;<br />
6. premere nuovamente il tasto <strong>per</strong> confermare;<br />
7. a tempo scaduto, sul DISPLAY compare la scritta<br />
END, il forno termina la cottura e viene emesso un<br />
segnale acustico.<br />
• Esempio: sono le ore 9:00, viene programmata una<br />
durata di 1 ora e 15 minuti e le 12:30 come ora di<br />
fine. Il programma inizia automaticamente alle ore<br />
11:15.<br />
Le icone e accese segnalano che è stata<br />
effettuata una programmazione. Sul DISPLAY vengono<br />
visualizzate alternativamente l’ora di fine cottura e la<br />
durata.<br />
Per annullare una programmazione ruotare la manopola<br />
PROGRAMMI in posizione “0”.
Consigli pratici di cottura<br />
! Nelle cotture ventilate non utilizzare le posizioni<br />
1 e 5: sono investite direttamente dall’aria calda che<br />
potrebbe provocare bruciature sui cibi delicati.<br />
! Nelle cotture BARBECUE e GRATIN, in particolare<br />
se praticate col girarrosto, disporre la leccarda in<br />
posizione 1 <strong>per</strong> raccogliere i residui di cottura (sughi e/<br />
o grassi).<br />
MULTILIVELLO<br />
• Utilizzare le posizioni 2 e 4, mettendo alla 2 i cibi<br />
che richiedono maggior calore.<br />
• Disporre la leccarda in basso e la griglia in alto.<br />
Tabella cottura in forno<br />
Programmi Alimenti Peso<br />
(Kg)<br />
Multilivello*<br />
Barbecue*<br />
Gratin*<br />
Bassa<br />
tem<strong>per</strong>atura<br />
Pizza su 2 ripiani<br />
Crostate su 2 ripiani/torte su 2 ripiani<br />
Pan di spagna su 2 ripiani (su leccarda)<br />
Pollo arrosto + patate<br />
Agnello<br />
Sgombro<br />
Lasagne<br />
Bignè su 2 ripiani<br />
Biscotti su 2 ripiani<br />
Salatini di sfoglia al formaggio su 2 ripiani<br />
Torte salate<br />
Sgombri<br />
Sogliole e seppie<br />
Spiedini di calamari e gamberi<br />
iletto di merluzzo<br />
Verdure alla griglia<br />
Bistecca di vitello<br />
Salsicce<br />
Hamburger<br />
Toast (o pane tostato)<br />
Pollo allo spiedo con girarrosto (ove<br />
presente)<br />
Agnello allo spiedo con girarrosto (ove<br />
presente)<br />
Pollo alla griglia<br />
Seppie<br />
Pollo allo spiedo con girarrosto (ove<br />
presente)<br />
Anatra allo spiedo con girarrosto (ove<br />
presente)<br />
Arrosto di vitello o manzo<br />
Arrosto di maiale<br />
Agnello<br />
Scongelamento<br />
Lievitazione<br />
Riscaldamento cibi<br />
Pastorizzazione<br />
Pizza (vedi ricetta)<br />
ocaccia(impasto di pane)<br />
1+1<br />
1<br />
1<br />
1<br />
1<br />
0,7<br />
0,7<br />
0,7<br />
0,5<br />
0,8<br />
0,7<br />
n° 4 o 5<br />
n° 4 o 6<br />
1<br />
1<br />
1,5<br />
1<br />
1,5<br />
1,5<br />
1<br />
1<br />
1<br />
Posizione dei ripiani Preriscaldamento Tem<strong>per</strong>atura<br />
consigliata<br />
(°C)<br />
guide guide<br />
standard scorrevoli<br />
2 e 4<br />
2 e 4<br />
2 e 4<br />
1 e 2/3<br />
2<br />
1 o 2<br />
2<br />
2 e 4<br />
2 e 4<br />
2 e 4<br />
1 e 3<br />
4<br />
4<br />
4<br />
4<br />
3 o 4<br />
4<br />
4<br />
4<br />
4<br />
-<br />
-<br />
2<br />
2<br />
-<br />
-<br />
2<br />
2<br />
2<br />
2 o 3<br />
2 o 3<br />
2 o 3<br />
2 o 3<br />
2<br />
2<br />
BARBECUE<br />
• Inserire la griglia in posizione 3 o 4, disporre<br />
gli alimenti al centro della griglia.<br />
• Si consiglia di impostare il livello di energia al<br />
massimo. Non allarmarsi se la resistenza su<strong>per</strong>iore<br />
non resta costantemente accesa: il suo<br />
funzionamento è controllato da un termostato.<br />
PIZZA<br />
• Utilizzare una teglia in alluminio leggero,<br />
appoggiandola sulla griglia in dotazione.<br />
Con la leccarda si allungano i tempi di cottura<br />
e difficilmente si ottiene una pizza croccante.<br />
• Nel caso di pizze molto farcite è consigliabile<br />
inserire la mozzarella a metà cottura.<br />
1 e 3<br />
1 e 3<br />
1 e 3<br />
1 e 3<br />
1<br />
1<br />
1<br />
1 e 3<br />
1 e 3<br />
1 e 3<br />
1 e 3<br />
3<br />
3<br />
3<br />
3<br />
2 o 3<br />
3<br />
3<br />
3<br />
3<br />
-<br />
-<br />
2<br />
2<br />
-<br />
-<br />
2<br />
2<br />
2<br />
2<br />
2<br />
2<br />
2<br />
2<br />
2<br />
Si<br />
Si<br />
Si<br />
Si<br />
Si<br />
Si<br />
Si<br />
Si<br />
Si<br />
Si<br />
Si<br />
No<br />
No<br />
No<br />
No<br />
No<br />
No<br />
No<br />
No<br />
No<br />
No<br />
No<br />
No<br />
No<br />
No<br />
No<br />
No<br />
No<br />
No<br />
No<br />
No<br />
No<br />
No<br />
No<br />
No<br />
220-230<br />
180<br />
170<br />
200-210<br />
190-200<br />
180<br />
190-200<br />
190<br />
190<br />
210<br />
200<br />
100%<br />
100%<br />
100%<br />
100%<br />
100%<br />
100%<br />
100%<br />
100%<br />
100%<br />
100%<br />
100%<br />
210<br />
200<br />
210<br />
210<br />
210<br />
210<br />
210<br />
-<br />
-<br />
-<br />
-<br />
-<br />
-<br />
Durata<br />
cottura<br />
(minuti)<br />
Pizza<br />
1<br />
automatica<br />
1<br />
Pane<br />
automatico<br />
Pane (vedi ricetta) 1 2 2 No - 55<br />
Dolci<br />
automatico<br />
Dolci a pasta lievitata 1 2 o 3 2 No - 35-55<br />
Carne<br />
automatico<br />
Arrosti 1 2 o 3 2 No - 60-80<br />
* I tempi di cottura sono indicativi e possono essere modificati in base ai proprio gusti <strong>per</strong>sonali. I tempi di preriscaldamento del forno sono<br />
preimpostati e non modificabili manualmente.<br />
20-25<br />
30-35<br />
20-25<br />
65-75<br />
45-50<br />
30-35<br />
35-40<br />
20-25<br />
10-20<br />
20-25<br />
20-30<br />
15-20<br />
10-15<br />
8-10<br />
10-15<br />
15-20<br />
15-20<br />
15-20<br />
10-12<br />
3-5<br />
70-80<br />
70-80<br />
55-60<br />
30-35<br />
70-80<br />
60-70<br />
60-75<br />
70-80<br />
40-45<br />
-<br />
60-90<br />
-<br />
-<br />
23-33<br />
23-33<br />
9<br />
IT
IT<br />
Utilizzo del piano cottura<br />
! La colla applicata sulle guarnizioni lascia alcune<br />
tracce di grasso sul vetro. Prima di utilizzare<br />
l’apparecchio, si raccomanda di eliminarle con un<br />
prodotto specifico <strong>per</strong> la manutenzione non<br />
abrasivo. Durante le prime ore di funzionamento è<br />
possibile avvertire un odore di gomma, che<br />
comunque scomparirà presto.<br />
! Quando il piano cottura viene collegato<br />
elettricamente, dopo acuni secondi viene emesso un<br />
breve segnale acustico. Soltanto a questo punto è<br />
possibile accendere il piano cottura.<br />
! La pressione prolungata dei tasti - e + consente<br />
l’avanzamento veloce dei livelli di potenza e dei<br />
minuti del timer.<br />
Accensione del piano cottura<br />
L’accensione del piano cottura avviene tenendo<br />
premuto il tasto <strong>per</strong> circa un secondo.<br />
Accensione delle zone di cottura<br />
Ciascuna zona di cottura viene azionata tramite un tasto di<br />
selezione e un dispositivo di regolazione della<br />
potenza composto da un doppio tasto - e +.<br />
• Per mettere in funzione una zona di cottura, premere<br />
il relativo tasto di comando e impostare la potenza<br />
10<br />
desiderata tramite i tasti - e +.<br />
unzione booster*<br />
Per accelerare i tempi di riscaldamento, su alcune<br />
zone di cottura è possibile attivare la funzione booster<br />
premendo il tasto Booster . Si accende la spia posta sopra<br />
al tasto. Questa funzione sovralimenta la potenza a<br />
2000W o 3000W a seconda della grandezza della zona<br />
di cottura interessata.<br />
Il booster si interrompe automaticamente dopo 4<br />
minuti. inché il booster di una delle zone di cottura è<br />
attivo, la zona di cottura corrispondente anteriore o<br />
posteriore avrà potenza limitata (es: se è attivo il<br />
booster nella piastra posteriore sinistra, si abbassa la<br />
potenza della piastra anteriore sinistra). Per ulteriori<br />
chirimenti vedere Descrizione tecnica dei modelli.<br />
Spegnimento delle zone di cottura<br />
Per spegnere una zona di cottura, selezionarla tramite<br />
il relativo tasto di selezione e:<br />
• Premere il tasto -: la potenza della zona di cottura<br />
scende progressivamente, fino allo spegnimento.<br />
Programmazione della durata<br />
di una cottura<br />
! È possibile programmare contemporaneamente tutte<br />
le zone di cottura <strong>per</strong> una durata compresa tra 1 e 99<br />
minuti.<br />
1. Selezionare la zona di cottura tramite il tasto di<br />
selezione corrispondente.<br />
2. Regolarne il livello di potenza.<br />
3. Premere il tasto di programamzione<br />
Lampeggia la spia corrispondente alla zona scelta.<br />
4. Impostare la durata di cottura desiderata tramite i<br />
tasti - e +.<br />
5. Confermare premendo il tasto oppure si<br />
seleziona in automatico dopo 10 secondi.<br />
Il conto alla rovescia del timer ha inizio<br />
immediatamente. La fine della cottura programmata è<br />
indicata da un segnale acustico (<strong>per</strong> la durata di 1<br />
minuto) e la zona di cottura si spegne.<br />
Ripetere la procedura sopra descritta <strong>per</strong> ogni piastra<br />
che si intende programmare.<br />
Visualizzazione in caso di programmazione<br />
multipla<br />
Quando una o più piastre sono state programmate,<br />
il display visualizza il tempo rimanente della piastra<br />
che è più vicina al termine del tempo programmato,<br />
indicandone la posizione con la spia corrispondente<br />
accesa. Le spie delle altre piastre programmate<br />
lampeggiano.<br />
Per visualizzare il tempo restante delle altre piastre<br />
programmate, premere ripetutamente il tasto :<br />
verranno mostrati in sequenza e in senso orario i<br />
tempi del contaminuti e di tutte le<br />
piastre programmate, a partire da<br />
quella anteriore sinistra.<br />
Modificare la programmazione<br />
1. Premere ripetutamente il tasto finché non<br />
viene mostrato il tempo della piastra che si intende<br />
modificare.<br />
* Presente solo su alcuni modelli.
2. Agire sui tasti - e + <strong>per</strong> impostare il nuovo<br />
tempo.<br />
3. Confermare premendo il tasto .<br />
Per cancellare una programmazione, agire come<br />
sopra. Al punto 2 premere il tasto -: la durata<br />
scende progressivamente fino allo spegnimento 0. La<br />
programmazione si azzera e il display esce dalla<br />
modalità programmazione.<br />
Il contaminuti<br />
Il piano di cottura deve essere acceso.<br />
Il contaminuti <strong>per</strong>mette di impostare una durata fino<br />
a 99 minuti.<br />
1. Premere il tasto di programamzione . finchè la<br />
spia contaminuti non si accende.<br />
2. Impostare la durata desiderata tramite i tasti - e<br />
+.<br />
3. Confermare premendo il tasto .<br />
Il conto alla rovescia del timer ha inizio<br />
immediatamente. A tempo scaduto viene emesso un<br />
segnale acustico (<strong>per</strong> la durata di 1 minuto).<br />
Blocco dei comandi<br />
Quando il piano cottura è in funzione, è possibile<br />
bloccare i comandi <strong>per</strong> evitare il rischio di modifiche<br />
fortuite alle regolazioni (bambini, o<strong>per</strong>azioni di pulizia,<br />
ecc.). Premendo il tasto i comandi si bloccano<br />
e la spia che si trova sopra al tasto si accende.<br />
Per tornare ad agire sulle regolazioni (es. interrom<strong>per</strong>e<br />
la cottura) è necessario sbloccare i comandi: premere<br />
il tasto <strong>per</strong> qualche istante, la spia si spegne e i<br />
comandi si sbloccano.<br />
Spegnimento del piano cottura<br />
Premendo il tasto l’apparecchio si spegne.<br />
Se i comandi dell’apparecchio sono stati bloccati,<br />
continueranno ad essere bloccati anche dopo aver<br />
riacceso il piano di cottura. Per poter riaccendere<br />
il piano è necessario prima sbloccare i comandi.<br />
Modalità “demo”<br />
È possibile impostare una modalità dimostrativa<br />
nella quale il pannello comandi funziona<br />
normalmente (inclusi i comandi relativi alla<br />
programmazione), ma gli elementi riscaldanti non si<br />
accendono. Per attivare la modalità “demo” occorre<br />
che il piano sia acceso e tutte le piastre siano<br />
spente:<br />
• Premere e tenere premuti contemporaneamente i<br />
tasti + e - <strong>per</strong> 6 secondi. Allo scadere dei 6<br />
secondi la spia ON/O e la spia BLOCCO<br />
COMANDI lampeggiano <strong>per</strong> un secondo.<br />
Rilasciare i tasti + e - e premere il tasto ;<br />
• il display visualizza la scritta DE e MO e il piano<br />
si spegne;<br />
• alla successiva riaccensione il piano si troverà in<br />
modalità “demo”.<br />
Per uscire da questa modalità seguire la procedura<br />
sopra descritta. Il display visualizza la scritta DE e<br />
O e il piano si spegne. Alla successiva<br />
riaccensione funzionerà normalmente.<br />
Consigli pratici <strong>per</strong> l’uso<br />
dell’apparecchio<br />
Ado<strong>per</strong>are recipienti di cottura il cui materiale di<br />
! fabbricazione sia compatibile con il principio<br />
dell’induzione (materiale ferromagnetico). Si<br />
raccomanda l’uso di pentole in: ghisa, acciaio<br />
smaltato o inox speciale <strong>per</strong> induzione. Per<br />
sincerarsi della compatibilità di un recipiente è<br />
sufficiente fare una prova con una calamita.<br />
Inoltre, <strong>per</strong> ottenere le migliori prestazioni dal piano<br />
di cottura:<br />
• Ado<strong>per</strong>are pentole con fondo piatto e di elevato<br />
spessore, <strong>per</strong> essere certi che aderiscano<br />
<strong>per</strong>fettamente alla zona riscaldante.<br />
11<br />
IT
IT<br />
• Ado<strong>per</strong>are pentole di diametro sufficiente a<br />
coprire completamente la zona riscaldante, in<br />
modo da<br />
garantire lo sfruttamento di tutto il calore<br />
disponibile.<br />
• Accertarsi che il fondo delle pentole sia sempre<br />
<strong>per</strong>fettamente asciutto e pulito, <strong>per</strong> garantire la<br />
corretta aderenza e una lunga durata, sia alle<br />
zone di cottura che alle pentole stesse.<br />
• Evitare di utilizzare le stesse pentole utilizzate<br />
sui bruciatori a gas: la concentrazione di calore<br />
sui<br />
bruciatori a gas può deformare il fondo della<br />
pentola, che <strong>per</strong>de aderenza.<br />
Dispositivi di sicurezza<br />
Rilevamento dei recipienti<br />
Ciascuna zona di cottura è provvista di un<br />
dispositivo di rilevamento della pentola. La piastra<br />
emette calore unicamente in presenza di una pentola<br />
di dimensioni adeguate alla zona di cottura stessa.<br />
Il display indicatore di potenza lampeggiante può<br />
indicare:<br />
• una pentola incompatibile<br />
• una pentola di diametro insufficiente<br />
• il sollevamento della pentola<br />
Indicatori di calore residuo<br />
Ciascuna zona di cottura è provvista di un indicatore<br />
di calore residuo. Tale indicatore segnala quali sono<br />
le zone di cottura ancora a tem<strong>per</strong>atura elevata. Se il<br />
display di potenza visualizza , la zona di cottura<br />
è ancora calda. E’ possibile ad esempio mantenere<br />
in caldo una pietanza o far scigliere burro o<br />
cioccolato. Con il raffreddamento della zona di<br />
cottura, il display di potenza visualizza . Il<br />
display si spegne quando la zona di cottura si è<br />
sufficientemente raffreddata.<br />
Surriscaldamento<br />
In caso di surriscaldamento dei componenti<br />
elettronici, il piano cottura si spegne<br />
automaticamente e sul display appare seguito da<br />
12<br />
un numero lampeggiante. Questo messaggio<br />
scompare e il piano torna utilizzabile non appena la<br />
tem<strong>per</strong>atura è scesa a un livello accettabile.<br />
Interruttore di sicurezza<br />
L’apparecchio è dotato di un interruttore di sicurezza<br />
che spegne le zone di cottura automaticamente<br />
quando viene raggiunto un tempo limite di utilizzo a<br />
un dato livello di potenza. Durante l’interruzione di<br />
sicurezza, il display indica “0”.<br />
Esempio: la piastra posteriore destra è impostata su<br />
5, mentre la piastra anteriore sinistra su 2. La<br />
posteriore destra si spegnerà dopo 5 ore di<br />
funzionamento, la anteriore sinistra dopo 8 ore.<br />
Livello di potenza<br />
Segnale acustico<br />
Tempo limite di funzionamento<br />
in ore<br />
1 9<br />
2 8<br />
3 7<br />
4 6<br />
5 5<br />
6 4<br />
7 3<br />
8 2<br />
9 1<br />
Alcune anomalie, quali:<br />
• un oggetto (pentola, posata, ecc.) posto <strong>per</strong> oltre<br />
10 secondi sull’area dei comandi,<br />
• un versamento sull’area dei comandi,<br />
• una pressione esercitata a lungo su un tasto,<br />
possono provocare l’emissione di un segnale<br />
acustico. Rimuovere la causa del<br />
malfunzionamento <strong>per</strong> interrom<strong>per</strong>e il segnale<br />
acustico. Se la causa dell’anomalia non viene<br />
rimossa, il segnale acustico <strong>per</strong>siste e il piano si<br />
spegne.
Descrizione tecnica delle zone di cottura<br />
Il sistema a induzione è il procedimento di cottura<br />
più rapido che esista. A differenza delle piastre<br />
tradizionali, non è la zona di cottura che si riscalda:<br />
il calore viene generato direttamente all’interno della<br />
pentola, la quale dovrà possedere necessariamente<br />
un fondo in materiale ferromagnetico.<br />
Piani cottura CE6IA.1 /HA<br />
CE6IA.1 X /HA<br />
CE6IA. 2 F/HA<br />
CE6IA. 2 X F/HA<br />
Zone di cottura Potenza (in W)<br />
Posteriore sx I 1400 – 600 se Ant. Sx*<br />
Posteriore dx I 2200 – B 3000*<br />
Anteriore sx I 2200 – B 3000*<br />
Anteriore dx I 1400 – 600 se Post. Dx*<br />
Potenza totale 7200<br />
Legenda:<br />
I = zona di cottura a induzione semplice<br />
B = booster: la zona di cottura può essere<br />
sovralimentata a 3000 W<br />
* = la potenza massima è limitata a 600 W finché è<br />
attivo il booster nella zona di cottura posteriore<br />
relativa (vedi Utilizzo del piano cottura).<br />
13<br />
IT
IT<br />
Consigli pratici <strong>per</strong> la cottura<br />
14<br />
Cottura a fuoco<br />
vivissimo<br />
Cottura a<br />
fuoco vivo<br />
Cottura a fuoco medio<br />
Cottura a fuoco<br />
lento<br />
Cottura a<br />
fuoco<br />
lentissimo<br />
ª Cottura a Pressione<br />
Pentola a pressione<br />
Frittura<br />
• Grigliata Ebollizione<br />
•<br />
Crêpe Cottura a fuoco vivo e doratura<br />
<br />
§ Addensamento rapido (Sughi liquidi)<br />
§<br />
S<br />
S<br />
¢ Cottura a bagnomaria Cottura Pentola a pressione dopo il sibilo<br />
¢<br />
£<br />
<br />
<br />
¡<br />
(Arrosti, Bistecche, Scaloppine, Filetti di<br />
pesce, Uova al tegamino)<br />
Acqua bollente (Pasta, Riso, Verdure)<br />
Latte<br />
Addensamento lento (Sughi consistenti)<br />
Cottura a fuoco lento<br />
(Stufati)<br />
Riscaldamento delle pietanze<br />
Salsa al cioccolato Mantenimento al caldo
Precauzioni e consigli<br />
! L’apparecchio è stato progettato e costruito in<br />
conformità alle norme internazionali di sicurezza.<br />
Queste avvertenze sono fornite <strong>per</strong> ragioni di<br />
sicurezza e devono essere lette attentamente.<br />
Sicurezza generale<br />
• L’apparecchio è stato concepito <strong>per</strong> un uso di tipo<br />
non professionale all’interno dell’abitazione.<br />
• L’apparecchio non va installato all’a<strong>per</strong>to,<br />
nemmeno se lo spazio è riparato, <strong>per</strong>ché è molto<br />
<strong>per</strong>icoloso lasciarlo esposto a pioggia e<br />
temporali.<br />
• Non toccare la macchina a piedi nudi o con le<br />
mani o con i piedi bagnati o umidi.<br />
• L’apparecchio deve essere usato <strong>per</strong> cuocere<br />
alimenti, solo da <strong>per</strong>sone adulte e secondo le<br />
istruzioni riportate in questo libretto. Ogni<br />
altro uso (ad esempio: riscaldamento di<br />
ambienti) è da considerarsi improprio e quindi<br />
<strong>per</strong>icoloso. Il costruttore non può essere<br />
considerato responsabile <strong>per</strong> eventuali danni<br />
derivanti da usi impropri, erronei ed<br />
irragionevoli.<br />
• Il libretto riguarda un apparecchio di classe 1<br />
(isolato) o classe 2 – sottoclasse 1 (incassato tra<br />
due mobili).<br />
• Durante <strong>l'uso</strong> dell'apparecchio gli elementi<br />
riscaldanti e alcune parti della porta forno<br />
diventano molto calde. are attenzione a non<br />
toccarle e tenere i bambimi a distanza.<br />
• Il piano in vetroceramica è resistente agli urti<br />
meccanici, tuttavia può incrinarsi (o<br />
eventualmente frantumarsi) se colpito con un<br />
oggetto appuntito, quale un utensile. In questi<br />
casi, scollegare immediatamente l’apparecchio<br />
dalla rete di alimentazione e rivolgersi<br />
all’Assistenza.<br />
• Se la su<strong>per</strong>ficie del piano è incrinata, spegnere<br />
l'apparecchio <strong>per</strong> evitare la possibilità di scosse<br />
elettriche.<br />
• Evitare che il cavo di alimentazione di altri<br />
elettrodomestici entri in contatto con parti calde<br />
dell’apparecchio.<br />
• Non ostruire le a<strong>per</strong>ture di ventilazione e di<br />
smaltimento di calore.<br />
• Utilizzare sempre guanti da forno <strong>per</strong> inserire o<br />
estrarre recipienti.<br />
• Non utilizzare liquidi infiammabili (alcol, benzina,<br />
ecc.) in prossimità dell’apparecchio quando esso<br />
è in uso.<br />
• Non riporre materiale infiammabile nel vano<br />
inferiore di deposito o nel forno: se l’apparecchio<br />
viene messo inavvertitamente in funzione<br />
potrebbe incendiarsi.<br />
• Le su<strong>per</strong>fici interne del cassetto (se presente)<br />
possono diventare calde.<br />
• Quando l’apparecchio non è utilizzato, assicurarsi<br />
sempre che le manopole siano nella posizione •.<br />
• Non staccare la spina dalla presa della corrente<br />
tirando il cavo, bensì afferrando la spina.<br />
• Non fare pulizia o manutenzione senza aver prima<br />
staccato la spina dalla rete elettrica.<br />
• In caso di guasto, in nessun caso accedere ai<br />
meccanismi interni <strong>per</strong> tentare una riparazione.<br />
Contattare l’Assistenza.<br />
• Non appoggiare oggetti pesanti sulla porta del<br />
forno a<strong>per</strong>ta.<br />
• Non dimenticare che la tem<strong>per</strong>atura delle zone di<br />
cottura rimane piuttosto elevata <strong>per</strong> almeno trenta<br />
minuti dopo lo spegnimento. Il calore residuo è<br />
segnalato anche da un indicatore (vedi Avvio e<br />
utilizzo).<br />
• Tenere a debita distanza dal piano cottura<br />
qualsiasi oggetto che potrebbe fondere, ad<br />
esempio oggetti in plastica, in alluminio o prodotti<br />
con un elevato contenuto di zucchero. are<br />
particolare attenzione a imballaggi e pellicole in<br />
plastica o alluminio: se dimenticati sulle su<strong>per</strong>fici<br />
ancora calde o tiepide possono causare un grave<br />
danno al piano.<br />
• Assicurarsi che i manici delle pentole siano<br />
sempre rivolti verso l’interno del piano cottura <strong>per</strong><br />
evitare che vengano urtati accidentalmente.<br />
• Non posare oggetti metallici (coltelli, cucchiai,<br />
co<strong>per</strong>chi, ecc.) sul piano <strong>per</strong>chè possono<br />
diventare caldi.<br />
• Non è previsto che l'apparecchio venga utilizzato<br />
da <strong>per</strong>sone (bambini compresi) con ridotte<br />
capacità fisiche, sensoriali o mentali, da <strong>per</strong>sone<br />
ines<strong>per</strong>te o che non abbiano familiarità con il<br />
prodotto, a meno che non vengano sorvegliate da<br />
una <strong>per</strong>sona responsabile della loro sicurezza o<br />
non abbiano ricevuto istruzioni preliminari sul<strong>l'uso</strong><br />
dell'apparecchio.<br />
• Se la cucina viene posta su di un piedistallo,<br />
prendere adeguati accorgimenti affinchè<br />
l'apparecchio non scivoli dal piedistallo stesso.<br />
• Dopo l’uso, spegnere il piano di cottura tramite il<br />
suo dispositivo di commando e non fare<br />
affidamento sul rilevatore di pentole.<br />
• Evitare che i bambini giochino con l'apparecchio.<br />
• Avvertenza <strong>per</strong> i portatori di pacemaker o altri<br />
dispositivi medici impiantabili attivi:<br />
Il piano cottura è conforme a tutte le normative<br />
vigenti in materia di interferenze<br />
elettromagnetiche.<br />
Questo prodotto è <strong>per</strong>tanto <strong>per</strong>fettamente<br />
rispondente a tutti i requisiti di legge (direttive 89/<br />
336/CEE). È stato progettato in modo da non<br />
creare inferenze ad altre apparecchiature<br />
elettriche utilizzate, a condizione che anche<br />
queste siano conformi alle suddette normative.<br />
Il piano cottura a induzione genera campi<br />
elettromagnetici a breve portata.<br />
15<br />
IT
IT<br />
16<br />
Per evitare ogni rischio di interferenze tra il piano<br />
di cottura e il pacemaker, quest'ultimo dovrà<br />
essere realizzato in conformità alle normative<br />
vigenti.<br />
A tale riguardo, possiamo garantire unicamente la<br />
conformità del nostro prodotto. Per informazioni<br />
sulla conformità o eventuali problemi di<br />
incompatibilità, si prega di rivolgersi al proprio<br />
medico curante o alla casa produttrice del<br />
pacemaker.<br />
Smaltimento<br />
• Smaltimento del materiale di imballaggio:<br />
attenersi alle norme locali, così gli imballaggi<br />
potranno<br />
essere riutilizzati.<br />
• La direttiva Europea 2002/96/CE sui rifiuti di<br />
apparecchiature elettriche ed elettroniche (RAEE),<br />
prevede che gli elettrodomestici non debbano<br />
essere smaltiti nel normale flusso dei rifiuti solidi<br />
urbani. Gli apparecchi dismessi devono essere<br />
raccolti separatamente <strong>per</strong> ottimizzare il tasso di<br />
recu<strong>per</strong>o e riciclaggio dei materiali che li<br />
compongono ed impedire potenziali danni <strong>per</strong> la<br />
salute e l’ambiente. Il simbolo del cestino barrato<br />
è riportato su tutti i prodotti <strong>per</strong> ricordare gli<br />
obblighi di raccolta separata.<br />
Per ulteriori informazioni, sulla corretta<br />
dismissione degli elettrodomestici, i detentori<br />
potranno rivolgersi al servizio pubblico preposto o<br />
ai rivenditori.<br />
Risparmiare e rispettare l’ambiente<br />
• Azionando il forno negli orari che vanno dal tardo<br />
pomeriggio fino alle prime ore del mattino si<br />
collabora a ridurre il carico di assorbimento delle<br />
aziende elettriche. Le opzioni di pianificazione dei<br />
programmi, in particolar modo la “cottura<br />
ritardata” (vedi Programmi) e la “pulizia<br />
automatica ritardata” (vedi Manutenzione e cura),<br />
<strong>per</strong>mettono di organizzarsi in tal senso.<br />
• Si raccomanda di effettuare sempre le cotture<br />
BARBECUE e GRATIN a porta chiusa: sia <strong>per</strong><br />
ottenere migliori risultati che <strong>per</strong> un sensibile<br />
risparmio di energia (10% circa).<br />
• Mantenere efficienti e pulite le guarnizioni, in<br />
modo che aderiscano bene alla porta e non<br />
procurino<br />
dis<strong>per</strong>sioni di calore.<br />
! Questo prodotto soddisfa i requisiti imposti dalla<br />
nuova Direttiva Europea sulla limitazione dei<br />
consumi energetici in standby.<br />
FORNO<br />
Se non si eseguono o<strong>per</strong>azioni <strong>per</strong> 2 minuti,<br />
l’apparecchio si dispone automaticamente in<br />
modalità standby. La modalità standby è<br />
visualizzata con “Tasto Orologio” in bassa<br />
luminosità. Non appena si interagisce nuovamente<br />
con l’apparecchio, il sistema ritorna in modalità<br />
o<strong>per</strong>ativa.<br />
PIANO<br />
Se non si eseguono o<strong>per</strong>azioni <strong>per</strong> 2 minuti, dopo lo<br />
spegnimento delle spie di calore residuo e della<br />
ventola (ove presenti), l’apparecchio si dispone<br />
automaticamente in modalità “off mode”.<br />
L’apparecchio ritorna in modalità o<strong>per</strong>ativa agendo<br />
sul tasto ON/OFF.
Manutenzione e cura<br />
Escludere la corrente elettrica<br />
Prima di ogni o<strong>per</strong>azione isolare l’apparecchio dalla<br />
rete di alimentazione elettrica.<br />
Pulire l’apparecchio<br />
! Non utilizzare mai pulitori a vapore o ad alta<br />
pressione <strong>per</strong> la pulizia dell’apparecchio.<br />
• Le parti esterne smaltate o inox e le guarnizioni in<br />
gomma possono essere pulite con una spugnetta<br />
imbevuta di acqua tiepida e sapone neutro. Se le<br />
macchie sono difficili da asportare usare prodotti<br />
specifici. Sciacquare abbondantemente e<br />
asciugare dopo la pulizia. Non usare polveri<br />
abrasive o sostanze corrosive.<br />
• L’interno del forno va pulito preferibilmente ogni<br />
volta dopo l’uso, quando è ancora tiepido. Usare<br />
acqua calda e detersivo, risciaquare e asciugare<br />
con un panno morbido. Evitare gli abrasivi.<br />
• Pulire il vetro della porta con spugne e prodotti<br />
non abrasivi e asciugare con un panno morbido;<br />
non usare materiali ruvidi abrasivi o raschietti<br />
metallici affilati che possono graffiare la su<strong>per</strong>ficie<br />
e causare la frantumazione del vetro.<br />
• Gli accessori possono essere lavati come normali<br />
stoviglie, anche in lavastoviglie.<br />
• Per una manutenzione ordinaria, è sufficiente<br />
lavare il piano con una spugna umida,<br />
asciugando quindi con una carta assorbente <strong>per</strong><br />
cucina.<br />
• Se il piano è particolarmente sporco, strofinare<br />
con un prodotto specifico <strong>per</strong> la pulizia delle<br />
su<strong>per</strong>fici in vetroceramica, sciacquare e<br />
asciugare.<br />
• Per rimuovere gli accumuli di sporco più<br />
consistenti servirsi di un apposito raschietto.<br />
Intervenire non appena possibile, senza attendere<br />
che l’apparecchio si sia raffreddato, <strong>per</strong> evitare<br />
l’incrostazione dei residui. Eccellenti risultati si<br />
possono ottenere usando una spugnetta in filo<br />
d’acciaio inossidabile - specifica <strong>per</strong> piani in<br />
vetroceramica - imbevuta di acqua e sapone.<br />
* Presente solo su alcuni modelli.<br />
• In caso sul piano cottura si fossero<br />
accidentalmente fusi oggetti o materiali quali<br />
plastica o zucchero, rimuoverli con il raschietto<br />
immediatamente, finché la su<strong>per</strong>ficie è ancora<br />
calda.<br />
• Una volta pulito, il piano può essere trattato con<br />
un prodotto specifico <strong>per</strong> la manutenzione e la<br />
protezione: la pellicola invisibile lasciata da<br />
questo prodotto protegge la su<strong>per</strong>ficie in caso di<br />
scolamenti durante la cottura. Si raccomanda<br />
di eseguire queste o<strong>per</strong>azioni con l’apparecchio<br />
tiepido o freddo.<br />
• Ricordarsi sempre di risciacquare con acqua<br />
pulita e asciugare accuratamente il piano: i residui<br />
di prodotti potrebbero infatti incrostarsi durante la<br />
successiva cottura.<br />
Controllare le guarnizioni del forno<br />
Controllare <strong>per</strong>iodicamente lo stato della guarnizione<br />
attorno alla porta del forno. In caso risulti<br />
danneggiata rivolgersi al Centro Assistenza<br />
Autorizzato più vicino. È consigliabile non usare il<br />
forno fino all’avvenuta riparazione.<br />
Sostituire la lampadina di illuminazione<br />
del forno<br />
co<strong>per</strong>chio<br />
cavità<br />
guarnizione<br />
lampadina<br />
Per sostituire la<br />
lampadina di<br />
illuminazione del<br />
forno:<br />
1. Togliere il co<strong>per</strong>chio in vetro, servendosi<br />
di un cacciavite.<br />
2. Svitare la lampadina e sostituirla con una analoga:<br />
potenza 15 W, attacco E 14.<br />
Rimontare il co<strong>per</strong>chio, prestando attenzione a<br />
posizionare correttamente la guarnizione (vedi<br />
figura).<br />
17<br />
IT
IT<br />
Pulizia automatica AST CLEAN<br />
Il programma AST CLEAN porta la tem<strong>per</strong>atura<br />
interna del forno a raggiungere i 500°C e attiva il<br />
processo di pirolisi, ossia la carbonizzazione dei<br />
residui. Lo sporco viene letteralmente incenerito.<br />
Durante la pulizia automatica, le su<strong>per</strong>fici possono<br />
diventare molto calde: tenere i bambini a distanza.<br />
Attraverso il vetro della porta forno è possibile notare<br />
alcune particelle che si illuminano: si tratta di una<br />
combustione istantanea, assolutamente normale, che<br />
non comporta alcun <strong>per</strong>icolo.<br />
Prima di attivare AST CLEAN:<br />
• con una spugna umida togliere dall’interno del<br />
forno i residui più consistenti. Non usare detergenti;<br />
• estrarre tutti gli accessori;<br />
• non lasciare strofinacci o presine sulla maniglia.<br />
• posizionare la manopola PROGRAMMI su “0”<br />
! Se il forno è eccessivamente caldo la pirolisi<br />
potrebbe non avviarsi. Aspettare che si raffreddi.<br />
! L’attivazione del programma è possibile solo dopo<br />
aver chiuso la porta del forno.<br />
! Per ottenere i migliori risultati di pulizia, si consiglia<br />
di eseguire la pirolisi con il piano cottura spento.<br />
Per attivare il ciclo di pulizia AST CLEAN premere<br />
<strong>per</strong> circa 4 secondi il tasto . Tramite la manopole<br />
IMPOSTAZIONE TEMPI è possibile scegliere il livello<br />
di pulizia desiderato con durata preimpostata e non<br />
modificabile:<br />
1. Economico (ECO): ruotare la manopola verso “-”.<br />
Durata 1 ora;<br />
2. Normale (NOR): livello iniziale. Durata 1 ora e 30<br />
minuti;<br />
3. Intensivo (INT): ruotare la manopola verso “+”.<br />
Durata 2 ore.<br />
4. Premere il tasto <strong>per</strong> confermare.<br />
Anche <strong>per</strong> il ciclo AST CLEAN, come <strong>per</strong> un normale<br />
ciclo di cottura, è possibile programmare quando far<br />
terminare il ciclo di pulizia (vedi Programmare la fine<br />
della pulizia automatica).<br />
18<br />
Dispositivi di sicurezza<br />
• l’icona sul display illuminata indica che la<br />
porta del forno si è bloccata automaticamente non<br />
appena la tem<strong>per</strong>atura ha raggiunto valori elevati;<br />
• l’icona indica che in qualsiasi momento<br />
premendo il tasto è possibile annullare il ciclo<br />
di pulizia;<br />
• in caso di evento anomalo, l’alimentazione degli<br />
elementi riscaldanti viene interrotta;<br />
• a bloccaggio della porta avvenuto non è più<br />
possibile modificare le impostazioni di durata e fine<br />
ciclo.<br />
Programmare la fine della pulizia automatica<br />
1. Premere il tasto finchè non lampeggiano l’icona<br />
e i due digit numerici sul DISPLAY;<br />
2. ruotare la manopola IMPOSTAZIONE TEMPI verso il<br />
“+” e “-” <strong>per</strong> regolare l’ora;<br />
3. premere di nuovo il tasto finchè non<br />
lampeggiano gli altri due digit numerici sul DISPLAY;<br />
4. ruotare la manopola IMPOSTAZIONE TEMPI verso il<br />
“+” e “-” <strong>per</strong> regolare i minuti;<br />
5. premere nuovamente il tasto <strong>per</strong> confermare;<br />
6. a tempo scaduto, sul DISPLAY la scritta END e<br />
viene emesso un segnale acustico.<br />
• Esempio: sono le ore 9:00, viene scelta una AST<br />
CLEAN con livello Economico e quindi con una<br />
durata preimpostata di 1 ora. Si pianifica le 12:30<br />
come ora di fine. Il programma inizia<br />
automaticamente alle ore 11:30.<br />
Le icone e accese segnalano che è stata<br />
effettuata una programmazione. Sul DISPLAY vengono<br />
visualizzate alternativamente l’ora di fine AST CLEAN<br />
e la durata.<br />
Al termine della pulizia automatica<br />
Per poter aprire la porta del forno sarà necessario<br />
attendere che la tem<strong>per</strong>atura del forno sia scesa a un<br />
livello accettabile. A questo punto è possibile<br />
constatare la presenza di alcuni depositi di polvere<br />
bianca sul fondo e sulle pareti del forno: rimuoverle<br />
con una spugna umida a forno freddo. Se invece si<br />
desidera approfittare del calore immagazzinato <strong>per</strong><br />
avviare una cottura, le polveri possono anche restare:<br />
non comportano alcun <strong>per</strong>icolo <strong>per</strong> gli alimenti da<br />
cucinare.
Assistenza<br />
Attenzione:<br />
L’apparecchio è dotato di un sistema di diagnostica automatica che consente di rilevare eventuali<br />
malfunzionamenti. Questi vengono comunicati dal display tramite messaggi del tipo: “” seguito da numeri.<br />
In questi casi è necessario l’intervento dell’assistenza tecnica.<br />
! Non ricorrere mai a tecnici non autorizzati.<br />
Comunicare:<br />
• Il tipo di anomalia;<br />
• Il modello della macchina (Mod.)<br />
• Il numero di serie (S/N)<br />
Queste ultime informazioni si trovano sulla targhetta caratteristiche posta sull’apparecchio<br />
Assistenza attiva 7 giorni su 7<br />
In caso di necessità d’intervento chiamare il Numero Unico Nazionale 199.199.199*.<br />
Un o<strong>per</strong>atore sarà a completa disposizione <strong>per</strong> fissare un appuntamento con il Centro Assistenza Tecnico<br />
Autorizzato più vicino al luogo da cui si chiama.<br />
È attivo 7 giorni su 7, sabato e domenica compresi, e non lascia mai inascoltata una richiesta.<br />
*Al costo di 14,26 centesimi di Euro al minuto(iva inclusa) dal Lun. al Ven. dalle 08:00 alle 18:30, il Sab. dalle 08:00 alle<br />
13:00 e di 5,58 centesimi di Euro al minuto (iva inclusa) dal Lun. al Ven. dalle 18:30 alle 08:00, il Sab. dalle 13:00 alle<br />
08:00 e i giorni festivi, <strong>per</strong> chi chiama da telefono fisso.<br />
Per chi chiama da radiomobile le tariffe sono legate al piano tariffario dell’o<strong>per</strong>atore telefonico utilizzato.<br />
Le suddette tariffe potrebbero essere soggette a variazione da parte dell’o<strong>per</strong>atore telefonico; <strong>per</strong> maggiori informazioni<br />
consultare il sito www.aristonchannel.com.<br />
19<br />
IT
GB<br />
O<strong>per</strong>ating Instructions<br />
IT<br />
Italiano, 1<br />
NL<br />
Nederlands,<br />
57<br />
GB<br />
English, 20<br />
CE6IA.1 /HA<br />
CE6IA.1 X /HA<br />
CE6IA. 2 F/HA<br />
CE6IA. 2 X F/HA<br />
R<br />
rançais, 38<br />
Contents<br />
Installation, 21-22<br />
Positioning and levelling<br />
Electrical connection<br />
Table of characteristics<br />
COOKER AND OVEN<br />
Description of the appliance, 23-24<br />
Overall view<br />
Control panel<br />
Display<br />
Control panel of cooking zone<br />
Start-up and use, 25-28<br />
Using the hob<br />
Setting the clock<br />
Setting the timer<br />
Using the oven<br />
Manual cooking modes<br />
Automatic cooking modes<br />
Programming cooking<br />
Practical cooking advice<br />
Oven cooking advice table<br />
Start-up and use of cooknig zone, 29-32<br />
Switching on the hob<br />
Switching on the cooking zones<br />
Booster function<br />
Switching off the cooking zones<br />
Programming the cooking duration<br />
Timer<br />
Control panel lock<br />
Switching off the hob<br />
“Demo” mode<br />
Practical advice on using the appliance<br />
Safety devices<br />
Technical description of cooking zones<br />
Practical cooking advice<br />
Precautions and tips, 33-34<br />
General safety<br />
Disposal<br />
Respecting and conserving the environment<br />
Care and maintenance, 35-36<br />
Switching the appliance off<br />
Cleaning the appliance<br />
Replacing the oven light bulb<br />
Automatic cleaning using the AST CLEAN function<br />
Assistance, 37
Installation<br />
! Before o<strong>per</strong>ating your new appliance please read<br />
this instruction booklet carefully. It contains<br />
important information concerning the safe installation<br />
and o<strong>per</strong>ation of the appliance.<br />
! Please keep these o<strong>per</strong>ating instructions for future<br />
reference. Make sure that the instructions are kept<br />
with the appliance if it is sold, given away or moved.<br />
! The appliance must be installed by a qualified<br />
professional in accordance with the instructions<br />
provided.<br />
! Any necessary adjustment or maintenance must be<br />
<strong>per</strong>formed after the cooker has been disconnected<br />
from the electricity supply.<br />
Positioning and levelling<br />
! It is possible to install the appliance alongside<br />
cupboards whose height does not exceed that of the<br />
hob surface.<br />
! Make sure that the wall in contact with the back of<br />
the appliance is made from a non-flammable, heatresistant<br />
material (T 90°C).<br />
To install the appliance correctly:<br />
• Place it in the kitchen, the dining room or the bedsit<br />
(not in the bathroom).<br />
• If the top of the hob<br />
mm.<br />
420<br />
Min.<br />
is higher than the<br />
cupboards, the<br />
appliance must be<br />
installed at least 600<br />
mm away from them.<br />
• If the cooker is<br />
installed underneath a<br />
wall cabinet, there must<br />
be a minimum distance<br />
of 420 mm between this cabinet and the top of<br />
the hob.<br />
This distance should be increased to 700 mm if the<br />
wall cabinets are flammable (see figure).<br />
• Do not position blinds behind the cooker or less<br />
than 200 mm away from its sides.<br />
• Any hoods must be installed according to the<br />
instructions listed in the relevant o<strong>per</strong>ating manual.<br />
Levelling<br />
HOOD<br />
Min. 600 mm.<br />
Min. 420 mm.<br />
min. 650 mm. with hood<br />
min. 700 mm. without hood<br />
If it is necessary to level the<br />
appliance, screw the<br />
adjustable feet into the places<br />
provided on each corner of the<br />
base of the cooker (see<br />
figure).<br />
The legs* fit into the slots on<br />
the underside of the base of<br />
the cooker.<br />
Electrical connection<br />
itting the power supply cable<br />
To open the terminal board:<br />
• Insert a screwdriver into the side tabs of the<br />
terminal board cover.<br />
• Pull the cover to<br />
open it.<br />
To install the cable, follow the instructions below:<br />
• Loosen the cable clamp screw and the wire<br />
contact screws.<br />
! The jum<strong>per</strong>s are pre-set at the actory for 230 V<br />
single-phase connection (see figure).<br />
• To carry out the electrical connections as shown in<br />
the figures, use the two jum<strong>per</strong>s inside the box<br />
(see figure - labelled “P”).<br />
* Only available in certain models.<br />
230V ~<br />
H05RR-F/ 3x4 CEI-UNEL 35363<br />
H05VV-F/ 3x4 CEI-UNEL 35746<br />
N L<br />
5<br />
N<br />
4<br />
L1<br />
3<br />
L2<br />
2<br />
P<br />
1<br />
L3<br />
21<br />
GB
GB<br />
• Secure the power supply cable by fastening the<br />
cable clamp screw then put the cover back on.<br />
Connecting the supply cable to the electricity<br />
mains<br />
The appliance must be directly connected to the<br />
mains using an omnipolar switch with a minimum<br />
contact opening of 3 mm installed between the<br />
appliance and the mains. The switch must be<br />
suitable for the charge indicated and must comply<br />
with current electrical regulations (the earthing wire<br />
must not be interrupted by the switch). The supply<br />
cable must be positioned so that it does not come<br />
into contact with tem<strong>per</strong>atures higher than 50°C at<br />
any point.<br />
Before connecting the appliance to the power<br />
supply, make sure that:<br />
• The appliance is earthed and the plug is compliant<br />
with the law.<br />
• The socket can withstand the maximum power of<br />
the appliance, which is indicated by the data<br />
plate.<br />
• The voltage is in the range between the values<br />
indicated on the data plate.<br />
• Do not use extension cords or multiple sockets.<br />
22<br />
400V 2N~<br />
H05RR-F 4x4 CEI-UNEL 35363<br />
H05VV-F 4x4 CEI-UNEL 357 46<br />
N L2 L1<br />
5<br />
400V 3N~<br />
H05RR-F 5x2.5 CEI-UNEL 35363<br />
H05VV-F 5x2.5 CEI-UNEL 35746<br />
N L3 L2 L1<br />
5<br />
4<br />
4<br />
3<br />
3<br />
2<br />
2<br />
1<br />
1<br />
! Once the appliance has been installed, the power<br />
supply cable and the electrical socket must be<br />
easily accessible.<br />
! The cable must not be bent or compressed.<br />
! The cable must be checked regularly and<br />
replaced by authorised technicians only.<br />
! The manufacturer declines any liability should<br />
these safety measures not be observed.<br />
TABLE O CHARACTERISTICS<br />
Oven dimensions<br />
(HxWxD)<br />
Volume<br />
Useful<br />
32x43.5x40 cm<br />
56 l<br />
measurements width 42 cm<br />
relating to the depth 44 cm<br />
oven<br />
compartment<br />
height 8.5 cm<br />
Voltage and<br />
frequency<br />
see data plate<br />
ENERGY LABEL<br />
Directive 2002/40/EC on the label<br />
of electric ovens. Standard EN<br />
50304<br />
Declared energy consumption for<br />
orced convection Class – heating<br />
mode: Gratin<br />
EC Directives: 2006/95/EC dated<br />
12.12.06 (Low Voltage) and subsequent<br />
amendments - 04/108/EC dated<br />
15/12/04 (Electromagnetic<br />
Compatibility) and subsequent<br />
amendments - 90/369/EEC dated<br />
29/06/90 (Gas) and subsequent<br />
amendments - 93/68/EEC dated<br />
22/07/93 and subsequent amendments<br />
- 2002/96/EC.<br />
1275/2008 (Stand-by/Off . mode)
Description of the appliance<br />
Overall view<br />
Control panel<br />
Display<br />
* Only available in certain models.<br />
Glass<br />
ceramic hob<br />
Control panel<br />
GRILL rack<br />
DRIPPING pan<br />
Recommended rack<br />
position icon<br />
FAST CLEAN<br />
button<br />
TIMER<br />
knob<br />
STOP<br />
icon<br />
Preheating<br />
indicator<br />
DOOR LOCK<br />
indicator<br />
DISPLAY THERMOSTAT<br />
knob<br />
TIME SETTING<br />
button<br />
TIMER<br />
icon<br />
SELECTOR<br />
knob<br />
AUTOMATIC COOKING<br />
MODE icons<br />
DURATION<br />
icon<br />
GUIDE RAILS<br />
for the sliding racks<br />
position 5<br />
position 4<br />
position 3<br />
position 2<br />
position 1<br />
Adjustable foot Adjustable foot<br />
CLOCK<br />
icon<br />
END OF COOKING<br />
icon<br />
TEMPERATURE and<br />
TIME digits<br />
23<br />
GB
GB<br />
Control panel of cooking zone<br />
POWER and<br />
RESIDUAL HEAT<br />
indicators<br />
• INCREASE POWER button switches on the<br />
hotplate and controls the power (see Start-up and<br />
use).<br />
• REDUCE POWER button controls the power and<br />
switches off the hotplate (see Start-up and use).<br />
• COOKING ZONE SELECTOR button shows a<br />
particular cooking zone has been selected and<br />
therefore various adjustments are possible.<br />
• COOKING ZONE SELECTOR button is used to<br />
select the desired cooking zone.<br />
• POWER indicator provides a visual display for the<br />
current heat level.<br />
• ON/O button switches the appliance on and off.<br />
• ON/O indicator light shows whether the<br />
appliance is on or off.<br />
• PROGRAMME TIMER* button controls the<br />
cooking programme times (see Start-up and use).<br />
* Only available on certain models.<br />
24<br />
COOKING ZONE<br />
SELECTED indicator light<br />
COOKING ZONE<br />
SELECTOR buttons<br />
BOOSTER*<br />
button<br />
INCREASE<br />
POWER button<br />
BOOSTER*<br />
indicator light<br />
TIMER*<br />
indicator light<br />
REDUCE POWER<br />
button<br />
PROGRAMME TIMER*<br />
display<br />
COOKING ZONE PROGRAMMED*<br />
indicator light<br />
PROGRAMME<br />
TIMER* button<br />
ON/OFF<br />
button<br />
CONTROL PANEL<br />
LOCK button<br />
ON/OFF<br />
indicator light<br />
CONTROLS LOCKED<br />
indicator light<br />
• PROGRAMME TIMER* display shows which<br />
programme has been selected (see Start-up and<br />
use).<br />
• COOKING ZONE PROGRAMMED* indicator lights<br />
show which cooking zones are being used during<br />
a cooking programme (see Start-up and use).<br />
• CONTROL PANEL LOCK button prevents<br />
accidental changes to the hob settings (see Startup<br />
and use).<br />
• CONTROL PANEL LOCK indicator light shows<br />
the control panel has been locked (see Start-up<br />
and use).<br />
• BOOSTER button* activates the booster function -<br />
3000 W - of the cooking zone (see Start-up and<br />
use).<br />
• BOOSTER indicator light* shows that the booster<br />
function has been activated.<br />
• TIMER* indicator light shows that the timer has<br />
been activated
Start-up and use<br />
! Before o<strong>per</strong>ating the product, remove all plastic<br />
film from the sides of the appliance.<br />
Setting the clock<br />
! The clock may be set when the oven is switched<br />
off or when it is switched on, provided that a the end<br />
time of a cooking cycle has not been programmed<br />
previously.<br />
1. Press the button several times until the<br />
icon and the first two digits on the display start to<br />
flash.<br />
2. Turn the TIMER KNOB towards “+” and “-” to<br />
adjust the hour value.<br />
3. Press the button again until the other two<br />
digits on the DISPLAY begin to flash.<br />
4. Turn the TIMER KNOB towards “+” and “-” to<br />
adjust the minute value.<br />
5. Press the button again to confirm.<br />
Setting the timer<br />
! This function does not interrupt cooking and does<br />
not affect the oven; it is simply used to activate the<br />
buzzer when the set amount of time has elapsed.<br />
1. Press the button several times until the<br />
icon and the three digits on the display begin to<br />
flash.<br />
2. Turn the TIMER KNOB towards “+” and “-” to<br />
adjust the minute value.<br />
3. Press the button again to confirm.<br />
The display will then show the time as it counts<br />
down. When this <strong>per</strong>iod of time has elapsed the<br />
buzzer will be activated.<br />
Using the oven<br />
! The first time you use your appliance, heat the empty<br />
oven with its door closed at its maximum tem<strong>per</strong>ature<br />
for at least half an hour. Ensure that the room is well<br />
ventilated before switching the oven off and opening<br />
the oven door. The appliance may emit a slightly<br />
unpleasant odour caused by protective substances<br />
used during the manufacturing process burning away.<br />
1. Select the desired cooking mode by turning the<br />
SELECTOR knob.<br />
2. The oven begins its preheating stage and the<br />
preheating indicator lights up.<br />
The tem<strong>per</strong>ature may be changed by turning the<br />
THERMOSTAT knob<br />
3. When the preheating indicator switches off<br />
and a buzzer sounds the preheating process is<br />
complete: you may now place the food in the oven.<br />
4. The DISPLAY will show the icon , which<br />
indicates the recommended shelf level for the tray.<br />
5. During cooking it is always possible to:<br />
- change the cooking mode by turning the<br />
SELECTOR knob<br />
- change the tem<strong>per</strong>ature by turning the<br />
THERMOSTAT knob<br />
- set the cooking duration and the end cooking time<br />
(see Cooking Modes)<br />
- stop cooking by turning the SELECTOR knob to the<br />
“0” position.<br />
6. The oven switches off automatically after two<br />
hours: this default <strong>per</strong>iod of time is set for all<br />
cooking modes for safety reasons.<br />
The cooking time may be modified (see Cooking<br />
Modes).<br />
7. If a blackout occurs while the oven is already in<br />
o<strong>per</strong>ation, an automatic system within the appliance<br />
will reactivate the cooking mode from where it was<br />
interrupted as long as the tem<strong>per</strong>ature has not<br />
dropped below a certain level. Programmed cooking<br />
modes which have not started will not be restored<br />
and must be reprogrammed.<br />
! There is no preheating stage for the BARBECUE<br />
mode.<br />
! Never put objects directly on the bottom of the<br />
oven; this will avoid the enamel coating being<br />
damaged.<br />
! Always place cookware on the rack(s) provided.<br />
Cooling ventilation<br />
In order to cool down the external tem<strong>per</strong>ature of the oven,<br />
a cooling fan blows a stream of air between the control<br />
panel and the oven door. At the beginning of the AST<br />
CLEAN mode, the cooling fan o<strong>per</strong>ates at low<br />
speed.<br />
! Once cooking has been completed, the cooling fan<br />
remains on until the oven has cooled down sufficiently.<br />
Oven light<br />
When the oven is not in o<strong>per</strong>ation, the lamp can be<br />
switched on at any time by opening the oven door.<br />
* Only available in certain models.<br />
25<br />
GB
GB<br />
Manual cooking modes<br />
! All cooking modes have a default cooking tem<strong>per</strong>ature<br />
which may be adjusted manually between 40°C and 250°C<br />
as desired.<br />
In the BARBECUE mode, the default power level value is<br />
indicated as a <strong>per</strong>centage (%) and may also be adjusted<br />
manually.<br />
MULTILEVEL mode<br />
All heating elements and the fan are activated. Since the<br />
heat remains constant throughout the oven, the air cooks<br />
and browns food in a uniform manner. A maximum of two<br />
racks may be used at the same time.<br />
BARBECUE mode<br />
The top heating element is activated. By turning the<br />
THERMOSTAT knob, the different power levels which may<br />
be set will appear on the DISPLAY; these range between<br />
5% and 100%. The high and direct tem<strong>per</strong>ature of the grill<br />
is recommended for food which requires a high surface<br />
tem<strong>per</strong>ature. Always cook in this mode with the oven door<br />
closed.<br />
GRATIN mode<br />
The top heating element is activated and the fan begins to<br />
o<strong>per</strong>ate. During part of the cycle the circular heating<br />
element is also activated. This combination of features<br />
increases the effectiveness of the unidirectional thermal<br />
radiation provided by the heating elements through forced<br />
circulation of the air throughout the oven.<br />
This helps prevent food from burning on the surface and<br />
allows the heat to penetrate right into the food. Always<br />
cook in this mode with the oven door closed.<br />
LOW TEMPERATURE modes<br />
This type of cooking can be used for proving, defrosting,<br />
preparing yoghurt, heating dishes at the required speed<br />
and slow cooking at low tem<strong>per</strong>atures. The tem<strong>per</strong>ature<br />
options are: 40, 65, 90 °C.<br />
Spit roast (only available in certain models)<br />
To o<strong>per</strong>ate the spit roast function (see diagram) proceed as<br />
follows:<br />
1. Place the dripping pan<br />
in position 1.<br />
2. Place the rotisserie<br />
support in position 3 and<br />
insert the spit in the hole<br />
provided on the back<br />
panel of the oven.<br />
3. Start the rotisserie<br />
using the SELECTOR<br />
26<br />
knob to select mode or .<br />
! When the mode is activated, the spit will stop if the<br />
door is opened.<br />
Automatic cooking modes<br />
! The tem<strong>per</strong>ature and cooking duration are pre-set<br />
values, guaranteeing a <strong>per</strong>fect result every time -<br />
automatically. These values cannot be adjusted and use<br />
the C.O.P.® (Programmed Optimal Cooking) system.<br />
The cooking cycle stops automatically and the oven<br />
indicates when the dish is cooked. You may start cooking<br />
whether the oven has been preheated or not.<br />
We recommend that you follow the guidelines provided by<br />
the icon when deciding on which shelf to place the<br />
tray.<br />
! When the cooking stage has been reached, the oven<br />
buzzer sounds.<br />
! Do not open the oven door as this will disrupt the cooking<br />
time and tem<strong>per</strong>ature.<br />
ROAST mode<br />
Use this function to cook beef, pork and lamb. Place the<br />
meat inside the oven while it is still cold. The dish may<br />
also be placed in a preheated oven.<br />
PIZZA mode<br />
Use this function to make pizza. Please see the following<br />
chapter for the recipe and further details.<br />
BREAD mode<br />
Use this function to make bread. Please see the following<br />
chapter for the recipe and further details.<br />
CAKES mode<br />
This function is ideal for cooking desserts which are made<br />
using natural yeast, baking powder and desserts which<br />
contain no yeast. Place the dish in the oven while it is still<br />
cold. The dish may also be placed in a preheated oven.<br />
PIZZA mode<br />
To obtain the best results, we recommend that you<br />
carefully observe the instructions below:<br />
• ollow the recipe.<br />
• The weight of the dough should be between 500 g and<br />
700 g.<br />
• Lightly grease the dripping pan.
Recipe for PIZZA:<br />
1 Dripping pan on a low shelf level, hot or cold oven<br />
Recipe for 3 pizzas weighing approximately 550 g: 1000<br />
g flour, 500 ml water, 20 g salt, 20 g sugar, 100 ml olive<br />
oil, 20 g fresh yeast (or 2 sachets of powder yeast)<br />
• Leavening at room tem<strong>per</strong>ature: 1 hour.<br />
• Place inside hot or cold oven.<br />
• Start the PIZZA cooking mode.<br />
BREAD mode<br />
To obtain the best results, we recommend that you<br />
carefully observe the instructions below:<br />
• ollow the recipe.<br />
• Do not exceed the maximum weight of the dripping<br />
pan.<br />
• Remember to pour 100 ml of cold water into the<br />
baking tray in position 5.<br />
• The dough must be left to rise at room tem<strong>per</strong>ature for 1 –<br />
1 ½ hours (depending on the room tem<strong>per</strong>ature) or until<br />
the dough has doubled in size.<br />
Recipe for BREAD:<br />
1 Dripping pan weighing 1000 g max placed on a low<br />
shelf level<br />
2 Dripping pans weighing 1000 g max placed on the<br />
medium and lower levels<br />
Recipe for 1000 g of dough: 600 g flour, 360 g water, 11g<br />
salt, 25 g fresh yeast (or 2 sachets of powder yeast)<br />
Method:<br />
• Mix flour and salt in a large bowl.<br />
• Dilute yeast in lukewarm water (approximately 35<br />
degrees).<br />
• Make a small well in the mound of flour.<br />
• Pour in water and yeast mixture.<br />
• Knead dough by stretching and folding it over itself<br />
with the palm of your hand for 10 minutes until it has a<br />
uniform consistency and is not too sticky.<br />
• orm the dough into a ball shape, place it in a large<br />
bowl and cover it with transparent plastic wrap to<br />
prevent the surface of the dough from drying out.<br />
Select the manual LOW TEMPERATURE function on<br />
the oven and set the tem<strong>per</strong>ature to 40°C. Place the<br />
bowl inside and leave the dough to rise for<br />
approximately 1 hour (the dough should double in<br />
volume).<br />
• Cut the dough into equal sized loaves.<br />
• Place them in the dripping pan on oven pa<strong>per</strong>.<br />
• Cover the loaves with flour.<br />
• Make incisions on the loaves.<br />
• Pour 100 ml of cold distilled water onto the bottom of<br />
the oven. or cleaning purposes, we recommend the<br />
use of water and vinegar.<br />
• Place the loaves inside the oven while it is still cold.<br />
• Start the BREAD cooking mode.<br />
• Once baked, leave the loaves on one of the grill racks<br />
until they have cooled completely.<br />
Programming cooking<br />
! A cooking mode must be selected before programming<br />
can take place.<br />
Programming the cooking duration<br />
1. Press the button several times until the icon and<br />
the three digits on the DISPLAY begin to flash.<br />
2. Turn the TIMER KNOB towards “+” and “-” to adjust the duration.<br />
3. Press the button again to confirm.<br />
4. When the set time has elapsed, the text END appears<br />
on the DISPLAY, the oven will stop cooking and a buzzer<br />
sounds.<br />
• or example: it is 9:00 a.m. and a time of 1 hour and 15<br />
minutes is programmed. The programme will stop<br />
automatically at 10:15 a.m.<br />
Setting the end time for a cooking mode<br />
! A cooking duration must be set before the cooking end<br />
time can be scheduled.<br />
1. ollow steps 1 to 3 to set the duration as detailed<br />
above.<br />
2. Next, press the button until the icon and the two<br />
digits on the DISPLAY begin to flash.<br />
3. Turn the TIMER KNOB towards “+” and “-” to adjust the<br />
hour value.<br />
4. Press the button again until the other two digits on<br />
the DISPLAY begin to flash.<br />
5. Turn the TIMER KNOB towards “+” and “-” to adjust the<br />
minute value.<br />
6. Press the button again to confirm.<br />
7. When the set time has elapsed, the text END appears<br />
on the DISPLAY, the oven will stop cooking and a buzzer<br />
sounds.<br />
• or example: it is 9:00 a.m. and a time of 1 hour and 15<br />
minutes is programmed and the end time is set to<br />
12:30. The programme will start automatically at 11:15<br />
a.m.<br />
Programming has been set when the and buttons are<br />
illuminated. The DISPLAY shows the cooking end time and<br />
the cooking duration alternately.<br />
To cancel programming, turn the SELECTOR knob to the<br />
“0” position.<br />
Practical cooking advice<br />
! Do not place racks in position 1 and 5 during fanassisted<br />
cooking. This is because excessive direct heat<br />
27<br />
GB
GB<br />
can burn tem<strong>per</strong>ature sensitive foods.<br />
! In the BARBECUE and GRATIN cooking modes,<br />
particularly when using the rotisserie spit, place the<br />
dripping pan in position 1 to collect cooking residues (fat<br />
and/or grease).<br />
MULTILEVEL<br />
• Use positions 2 and 4, placing the food which requires<br />
more heat on 2.<br />
• Place the dripping pan on the bottom and the rack on<br />
top.<br />
Oven cooking advice table<br />
Cooking<br />
modes<br />
28<br />
oods Weight<br />
(in kg)<br />
Multilevel* Pizza on 2 racks<br />
Pies on two racks/cakes on 2 racks<br />
Sponge cake on 2 racks (on the dripping pan)<br />
Roast chicken + potatoes<br />
Lamb<br />
Mackerel<br />
Lasagne<br />
Cream puffs on 2 racks<br />
Biscuits on 2 racks<br />
Cheese puffs on 2 racks<br />
Savoury pies<br />
Barbecue* Mackerel<br />
Sole and cuttlefish<br />
Squid and prawn kebabs<br />
Cod fillet<br />
Grilled vegetables<br />
Veal steak<br />
Sausages<br />
Hamburgers<br />
Toasted sandwiches (or toast)<br />
Spit-roast chicken using rotisserie spit (where present)<br />
Spit-roast lamb using rotisserie spit (where present)<br />
Gratin* Grilled chicken<br />
Cuttlefish<br />
Spit-roast chicken using rotisserie spit (where present)<br />
Spit-roast duck using rotisserie spit (where present)<br />
Roast veal or beef<br />
Roast pork<br />
Lamb<br />
Low<br />
tem<strong>per</strong>ature<br />
Defrosting<br />
Proving<br />
Dish heating<br />
Pasteurisation<br />
Pizza (see recipe)<br />
ocaccia (bread dough)<br />
1+1<br />
1<br />
1<br />
1<br />
1<br />
0.7<br />
0.7<br />
0.7<br />
0.5<br />
0.8<br />
0.7<br />
4 or 5<br />
4 or 6<br />
1<br />
1<br />
1.5<br />
1<br />
1.5<br />
1.5<br />
1<br />
1<br />
1<br />
BARBECUE<br />
• Place the grill rack in position 3 or 4 and place<br />
the food in the centre of the rack.<br />
• We recommend that the power level is set to<br />
maximum. The top heating element is regulated by a<br />
thermostat and may not always o<strong>per</strong>ate constantly.<br />
PIZZA<br />
• Use a light aluminium pizza pan. Place it on the rack<br />
provided.<br />
or a crispy crust, do not use the dripping pan as it<br />
prevents the crust from forming by extending the total<br />
cooking time.<br />
• If the pizza has a lot of toppings, we recommend<br />
adding the mozzarella cheese on top of the pizza<br />
halfway through the cooking process.<br />
Rack position<br />
standard sliding guide<br />
guide rails rails<br />
Preheating Recommended<br />
tem<strong>per</strong>ature<br />
(°C)<br />
2 and 4<br />
2 and 4<br />
2 and 4<br />
1 and 2/3<br />
2<br />
1 or 2<br />
2<br />
2 and 4<br />
2 and 4<br />
2 and 4<br />
1 and 3<br />
4<br />
4<br />
4<br />
4<br />
3 or 4<br />
4<br />
4<br />
4<br />
4<br />
-<br />
-<br />
2<br />
2<br />
-<br />
-<br />
2<br />
2<br />
2<br />
2 or 3<br />
2 or 3<br />
2 or 3<br />
2 or 3<br />
2<br />
2<br />
1 and 3<br />
1 and 3<br />
1 and 3<br />
1 and 3<br />
1<br />
1<br />
1<br />
1 and 3<br />
1 and 3<br />
1 and 3<br />
1 and 3<br />
3<br />
3<br />
3<br />
3<br />
2 or 3<br />
3<br />
3<br />
3<br />
3<br />
-<br />
-<br />
2<br />
2<br />
-<br />
-<br />
2<br />
2<br />
2<br />
2<br />
2<br />
2<br />
2<br />
2<br />
2<br />
Yes<br />
Yes<br />
Yes<br />
Yes<br />
Yes<br />
Yes<br />
Yes<br />
Yes<br />
Yes<br />
Yes<br />
Yes<br />
No<br />
No<br />
No<br />
No<br />
No<br />
No<br />
No<br />
No<br />
No<br />
No<br />
No<br />
No<br />
No<br />
No<br />
No<br />
No<br />
No<br />
No<br />
No<br />
No<br />
No<br />
No<br />
No<br />
No<br />
220-230<br />
180<br />
170<br />
200-210<br />
190-200<br />
180<br />
190-200<br />
190<br />
190<br />
210<br />
200<br />
100%<br />
100%<br />
100%<br />
100%<br />
100%<br />
100%<br />
100%<br />
100%<br />
100%<br />
100%<br />
100%<br />
210<br />
200<br />
210<br />
210<br />
210<br />
210<br />
210<br />
-<br />
-<br />
-<br />
-<br />
-<br />
-<br />
Cooking duration<br />
(minutes)<br />
Automatic<br />
pizza<br />
Automatic Bread (see recipe)<br />
bread<br />
Automatic Cakes made using leavened dough<br />
baked cakes<br />
Automatic Roasts<br />
roast<br />
1<br />
1<br />
1<br />
1<br />
1<br />
2<br />
2 or 3<br />
2 or 3<br />
2<br />
2<br />
2<br />
No<br />
No<br />
No<br />
-<br />
-<br />
-<br />
55<br />
35-55<br />
60-80<br />
* The cooking times listed above are intended as guidelines only and may be modified according to <strong>per</strong>sonal tastes. Oven preheating times are set as standard and may not be<br />
modified manually.<br />
20-25<br />
30-35<br />
20-25<br />
65-75<br />
45-50<br />
30-35<br />
35-40<br />
20-25<br />
10-20<br />
20-25<br />
20-30<br />
15-20<br />
10-15<br />
8-10<br />
10-15<br />
15-20<br />
15-20<br />
15-20<br />
10-12<br />
3-5<br />
70-80<br />
70-80<br />
55-60<br />
30-35<br />
70-80<br />
60-70<br />
60-75<br />
70-80<br />
40-45<br />
-<br />
60-90<br />
-<br />
-<br />
23-33<br />
23-33
Start-up and use of<br />
cooking zone<br />
! The glue applied on the gaskets leaves traces of<br />
grease on the glass. Before using the appliance, we<br />
recommend you remove these with a special nonabrasive<br />
cleaning product. During the first few hours<br />
of use there may be a smell of rubber which will<br />
disappear very quickly.<br />
! A few seconds after the hob is connected to the<br />
electricity supply, a buzzer will sound. The hob may<br />
now be switched on.<br />
! If the - or + button is pressed for an extended<br />
<strong>per</strong>iod of time, the display scrolls quickly though the<br />
power levels and timer minutes.<br />
Switching on the hob<br />
To switch the hob on, press and hold the button<br />
for approximately one second.<br />
Switching on the cooking zones<br />
Each cooking zone is controlled using a selector<br />
button and a power adjustment device<br />
consisting of a double - and + button.<br />
• To begin o<strong>per</strong>ating a cooking zone, press the<br />
corresponding control button and set the desired<br />
power level (between 0 and 9) using the buttons<br />
- and +.<br />
Booster function*<br />
The booster function for some of the cooking zones<br />
may be used to shorten heating-up times. It may be<br />
activated by pressing the Booster button. The indicator<br />
light directly above the button will illuminate. This<br />
function boosts the power to 2000 W or 3000 W,<br />
depending on the size of the relevant cooking zone.<br />
The booster stops automatically after 4 minutes. While<br />
the booster for one of the cooking zones is active, the<br />
corresponding front or rear cooking zone will o<strong>per</strong>ate at<br />
a reduced power level (e.g. if the booster for the rear<br />
left-hand hotplate has been activated, the power level<br />
of the front left-hand hotplate will be reduced). or<br />
further information, please refer to the Technical<br />
description of the models.<br />
* Only available on certain models.<br />
Switching off the cooking zones<br />
To switch off a cooking zone, select it using the<br />
corresponding selector button and:<br />
• Press the - button: the power of the cooking zone<br />
will progressively decrease until it is switched off.<br />
Programming the cooking duration<br />
! All the cooking zones may be programmed<br />
simultaneously, for a duration between 1 and 99<br />
minutes.<br />
1. Select the cooking zone using the corresponding<br />
selector button.<br />
2. Adjust the power level.<br />
3. Press the programming button. The indicator<br />
light corresponding to the selected zone will start<br />
flashing.<br />
4. Set the cooking duration using the - and +<br />
buttons.<br />
5. Confirm by pressing the button or automatic<br />
selection occurs after 10 seconds.<br />
The timer begins counting down immediately. A<br />
buzzer sounds for approximately 1 minute and the<br />
cooking zone switches off when the set programme<br />
has finished.<br />
Repeat the above procedure for each hotplate you<br />
wish to programme.<br />
Using multiple programmes and the display<br />
If one or more hotplates are programmed, the<br />
display will show the data for the hotplate with the<br />
least time remaining, and the light corresponding to<br />
the position of the hotplate will flash. The lights<br />
corresponding to the other hotplates programmed<br />
will be switched on.<br />
To visualise the time remaining for the other<br />
programmed hotplates, press the button<br />
repeatedly: the time remaining for each hotplate will<br />
be shown sequentially in clockwise order, starting<br />
from the front left hotplate.<br />
Changing the programme<br />
1. Press the button repeatedly until the duration<br />
you wish to change is shown.<br />
29<br />
GB
GB<br />
2. Use the buttons to set the new duration.<br />
3. Confirm by pressing the button.<br />
To cancel a programme, follow the above<br />
instructions. At step 2, press the - button: the<br />
duration decreases progressively until it reaches 0<br />
and switches off. The programme resets and the<br />
display exits programming mode.<br />
Timer<br />
The hob must be switched on.<br />
The timer can be used to set a duration up to 99<br />
minutes.<br />
1. Press the programming button until the timer<br />
indicator light is illuminated. .<br />
2. Set the desired duration using the - and +<br />
buttons.<br />
3. Confirm by pressing the button.<br />
The timer begins counting down immediately. When<br />
the time has elapsed, a buzzer will sound (for one<br />
minute).<br />
Control panel lock<br />
When the hob is switched on, it is possible to lock<br />
the oven controls in order to avoid accidental<br />
changes being made to the settings (by children,<br />
during cleaning, etc.). Press the button to lock<br />
the control panel: the indicator light above the button<br />
will switch on.<br />
To use any of the controls (e.g. to stop cooking),<br />
you must switch off this function. Press the<br />
button for a few moments, the indicator light will<br />
switch off and the lock function will be removed.<br />
Switching off the hob<br />
Press the button to switch the appliance off.<br />
If the control panel lock has been activated, the<br />
controls will continue to be locked even after the hob<br />
is switched on again. In order to switch the hob on<br />
again, you must first remove the lock function.<br />
“Demo” mode<br />
It is possible to set the hob to a demonstration<br />
mode where all the controls work normally but the<br />
heating elements do not switch on. To activate the<br />
“demo” mode the hob must be switched on, with all<br />
the hotplates switched off.<br />
30<br />
• Press and hold the + and - buttons<br />
simultaneously for 6 seconds. When the 6<br />
seconds have elapsed, the ON/O and<br />
CONTROLS LOCKED indicator lights will flash for<br />
one second. Release the + and - buttons and<br />
press the button;<br />
• The display will show the text DE and MO and the<br />
hob will be switched off.<br />
• When the hob is switched on again it will be set to<br />
the “demo” mode.<br />
To exit this mode, follow the procedure described<br />
above. The display will show the text DE and O<br />
and the hob will be switched off. When it is next<br />
switched on, the hob will function normally.<br />
Practical advice on using the appliance<br />
! Use cookware made from materials which are<br />
compatible with the induction principle<br />
(ferromagnetic material). We especially recommend<br />
pans made from: cast iron, coated steel or special<br />
stainless steel adapted for induction. Use a magnet<br />
to test the compatibility of the cookware.<br />
*<br />
SUITABLE UNSUITABLE<br />
Cast iron<br />
Enamelled steel<br />
Special stainless steel<br />
Cop<strong>per</strong>,<br />
Aluminium, Glass, Earthenware,<br />
Ceramic, non magnetic Stainless steel<br />
In addition, to obtain the best results from your hob:<br />
• Use pans with a thick, flat base in order to fully<br />
utilise the cooking zone.<br />
• Always use pans with a diameter which is large<br />
enough to cover the hotplate fully, in order to use all<br />
the available heat.<br />
• Make sure that the base of the cookware is<br />
always clean and dry, in order to fully utilise and<br />
extend the life of both the cooking zones and the<br />
cookware.
• Avoid using the same cookware which has been<br />
used on gas burners: the heat concentration on<br />
gas burners may distort the base of the pan,<br />
causing it not to adhere correctly.<br />
Safety devices<br />
Pan sensor<br />
Each cooking zone is equipped with a pan sensor<br />
device. The hotplate only emits heat when a pan<br />
with suitable measurements for the cooking zone is<br />
placed on it. If the indicator light is flashing, it may<br />
indicate:<br />
• An incompatible pan<br />
• A pan whose diameter is too small<br />
• The pan has been removed from the hotplate.<br />
Residual heat indicators<br />
Each cooking zone is equipped with a residual heat<br />
indicator. This indicator signals which cooking zones<br />
are still at a high tem<strong>per</strong>ature. If the power display<br />
shows , the cooking zone is still hot. It is<br />
possible, for example, to keep a dish warm or melt<br />
butter or chocolate. As the cooking zone cools, the<br />
power display will show . The display switches off<br />
when the cooking zone has cooled sufficiently.<br />
Overheating protection<br />
If the electronic elements overheat, the hob switches<br />
off automatically and appears on the display,<br />
followed by a flashing number. When the<br />
tem<strong>per</strong>ature has reached a suitable level, this<br />
message disappears and the hob may be used<br />
again.<br />
Safety switch<br />
The appliance has a safety switch which<br />
automatically switches the cooking zones off after<br />
they have been in o<strong>per</strong>ation for a certain amount of<br />
time at a particular power level. When the safety<br />
switch has been triggered, the display shows “0”.<br />
or example: the right rear hotplate is set to 5 and<br />
will switch off after 5 hours of continuous o<strong>per</strong>ation,<br />
while the front left hotplate is set to 2 and will switch<br />
off after 8 hours.<br />
Buzzer<br />
Power level<br />
Maximum o<strong>per</strong>ating<br />
time in hours<br />
1 9<br />
2 8<br />
3 7<br />
4 6<br />
5 5<br />
6 4<br />
7 3<br />
8 2<br />
9 1<br />
This can also indicate several irregularities:<br />
• An object (a pan, cutlery, etc.) has been placed<br />
on the control panel for more than 10 seconds.<br />
• Something has been spilt on the control panel.<br />
• A button has been pressed for too long. All of the<br />
above situations may cause the buzzer to sound.<br />
Remove the cause of the malfunction to stop the<br />
buzzer. If the cause of the problem is not<br />
removed, the buzzer will keep sounding and the<br />
hob will switch off.<br />
Technical description of cooking zones<br />
The induction system is the quickest existing way of<br />
cooking. Unlike traditional hotplates where the<br />
cooking zone heats up, with the induction system<br />
heat is generated directly inside ferromagnetic<br />
based pans.<br />
Hobs CE6IA.1 /HA<br />
CE6IA.1 X /HA<br />
CE6IA. 2 F/HA<br />
CE6IA. 2 X F/HA<br />
Cooking zone Power (W)<br />
Back Left I 1400 – 600 se Ant. Sx*<br />
Back Right I 2200 – B 3000*<br />
Front Left I 2200 – B 3000*<br />
Front Right I 1400 – 600 se Post. Dx*<br />
Total power 7200<br />
Key:<br />
I = single induction cooking zone<br />
B = booster: the power of the cooking zone may be<br />
boosted to 3000W<br />
* = the maximum power is limited to 600 W until the<br />
booster is activated for the appropriate rear<br />
cooking zone (see Start-up and use).<br />
31<br />
GB
GB<br />
Practical cooking advice<br />
32<br />
Very high-flame<br />
cooking<br />
High-flame<br />
cooking<br />
Medium-flame cooking<br />
Low-flame<br />
cooking<br />
Very lowflame<br />
cooking<br />
ª<br />
•<br />
•<br />
<br />
<br />
§<br />
§<br />
S<br />
S<br />
¢<br />
¢<br />
£<br />
<br />
<br />
¡<br />
Pressure cooking<br />
Pressure cooker<br />
Frying<br />
Grilling Boiling<br />
Crêpes Cooking on a high flame and browning<br />
(roasts, steaks, escalopes, fish fillets,<br />
fried eggs)<br />
Fast thickening (liquid juices)<br />
Boiling water (pasta, rice, vegetables)<br />
Milk<br />
Slow thickening (dense juices)<br />
Bain-marie cooking Pressure cooking after whistle<br />
Low-flame cooking<br />
(stews)<br />
-{}-<br />
Reheating dishes<br />
Chocolate sauce Keeping food hot
Precautions and tips<br />
! This appliance has been designed and<br />
manufactured in compliance with international safety<br />
standards. The following warnings are provided for<br />
safety reasons and must be read carefully.<br />
General safety<br />
• The appliance was designed for domestic use<br />
inside the home and is not intended for<br />
commercial or industrial use.<br />
• The appliance must not be installed outdoors, even<br />
in covered areas. It is extremely dangerous to<br />
leave the appliance exposed to rain and storms.<br />
• Do not touch the appliance with bare feet or with<br />
wet or damp hands and feet.<br />
• The appliance must be used by adults only for<br />
the preparation of food, in accordance with the<br />
instructions outlined in this booklet. Any other<br />
use of the appliance (e.g. for heating the room)<br />
constitutes impro<strong>per</strong> use and is dangerous.<br />
The manufacturer may not be held liable for<br />
any damage resulting from impro<strong>per</strong>, incorrect<br />
and unreasonable use of the .<br />
• The instruction booklet accompanies a class 1<br />
(insulated) or class 2 - subclass 1 (recessed<br />
between 2 cupboards) appliance.<br />
• Do not touch the heating elements or certain<br />
parts of the oven door when the appliance is in<br />
use; these parts become extremely hot. Keep<br />
children well away from the appliance.<br />
• The glass ceramic hob is resistant to mechanical<br />
shocks, but it may crack (or even break) if hit with<br />
a sharp object such as a tool. If this happens,<br />
disconnect the appliance from the electricity<br />
mains immediately and contact a Service Centre.<br />
• If the surface of the hob is cracked, switch off the<br />
appliance to prevent electric shocks from<br />
occurring.<br />
• Make sure that the power supply cables of other<br />
electrical appliances do not come into contact<br />
with the hot parts of the oven.<br />
• The openings used for the ventilation and<br />
dis<strong>per</strong>sion of heat must never be covered.<br />
• Always use oven gloves when placing cookware<br />
in the oven or when removing it.<br />
• Do not use flammable liquids (alcohol, petrol,<br />
etc...) near the appliance while it is in use.<br />
• Do not place flammable material in the lower<br />
storage compartment or in the oven itself. If the<br />
appliance is switched on accidentally, the<br />
materials could catch fire.<br />
• The internal surfaces of the compartment (where<br />
present) may become hot.<br />
• Always make sure the knobs are in the • position<br />
when the appliance is not in use.<br />
• When unplugging the appliance, always pull the<br />
plug from the mains socket; do not pull on the<br />
cable.<br />
• Never <strong>per</strong>form any cleaning or maintenance work<br />
without having disconnected the appliance from<br />
the electricity mains.<br />
• If the appliance breaks down, under no<br />
circumstances should you attempt to <strong>per</strong>form the<br />
repairs yourself. Repairs carried out by<br />
inex<strong>per</strong>ienced <strong>per</strong>sons may cause injury or further<br />
malfunctioning of the appliance. Contact<br />
Assistance.<br />
• Do not rest heavy objects on the open oven door.<br />
• Remember that the tem<strong>per</strong>ature of the cooking<br />
zones remains relatively high for at least thirty<br />
minutes after they have been switched off. An<br />
indicator light provides a warning when residual<br />
heat is present (see Start-up and use).<br />
• Keep any object that could melt away from the<br />
hob, for example plastic and aluminium objects,<br />
or products with a high sugar content. Keep<br />
plastic and aluminium film and packaging away<br />
from the hob: if placed on surfaces that are still<br />
hot, they may cause serious damage to the hob.<br />
• Always make sure pan handles are turned<br />
towards the centre of the hob in order to avoid<br />
accidental burns.<br />
• Do not place metal objects (knives, spoons, pan<br />
lids, etc.) on the hob as they may become hot.<br />
• The appliance should not be o<strong>per</strong>ated by people<br />
(including children) with reduced physical,<br />
sensory or mental capacities, by inex<strong>per</strong>ienced<br />
individuals or by anyone who is not familiar with<br />
the product. These individuals should, at the very<br />
least, be su<strong>per</strong>vised by someone who assumes<br />
responsibility for their safety or receive<br />
preliminary instructions relating to the o<strong>per</strong>ation of<br />
the appliance.<br />
• If the cooker is placed on a pedestal, take the<br />
necessary precautions to prevent the same from<br />
sliding off the pedestal itself.<br />
• After use, switch off the hob element by its control<br />
•<br />
and do not rely on the pan detector.<br />
• Do not let children play with the appliance.<br />
or the attention of wearers of pacemakers<br />
or other active implants:<br />
The hob complies with all current standards on<br />
electromagnetic interference.<br />
Your induction hob is therefore <strong>per</strong>fectly in<br />
keeping with legal requirements (89/336/CEE<br />
directives). It is designed not to create<br />
interference on any other electrical apparatus<br />
being used on condition that the apparatus in<br />
question also complies with this legislation.<br />
Your induction hob generates short-range<br />
magnetic fields.<br />
To avoid any interference between your induction<br />
hob and a pacemaker, the latter must be<br />
designed to comply with relevant regulations.<br />
In this respect, we can only guarantee our own<br />
product conformity. Please consult the pacemaker<br />
manufacturer or your doctor concerning its<br />
conformity or any possible incompatibility.<br />
33<br />
GB
GB<br />
Disposal<br />
• When disposing of packaging material: observe<br />
local legislation so that the packaging may be<br />
reused.<br />
• The European Directive 2002/96/EC relating to<br />
Waste Electrical and Electronic Equipment<br />
(WEEE) states that household appliances should<br />
not be disposed of using the normal solid urban<br />
waste cycle. Exhausted appliances should be<br />
collected separately in order to optimise the cost<br />
of re-using and recycling the materials inside the<br />
machine, while preventing potential damage to<br />
the atmosphere and to public health. The<br />
crossed-out dustbin is marked on all products to<br />
remind the owner of their obligations regarding<br />
separated waste collection. or further information<br />
relating to the correct disposal of exhausted<br />
household appliances, owners may contact the<br />
public service provided or their local dealer.<br />
Respecting and conserving the<br />
environment<br />
• You can help to reduce the peak load of the electricity<br />
supply network companies by using the oven in the<br />
hours between late afternoon and the early hours of<br />
the morning. The cooking mode programming<br />
options, the “delayed cooking” mode (see Cooking<br />
modes) and “delayed automatic cleaning” mode (see<br />
Care and Maintenance) in particular, enable the user<br />
to organise their time efficiently.<br />
• Always keep the oven door closed when using the<br />
BARBECUE and GRATIN modes: This will achieve<br />
improved results while saving energy<br />
(approximately 10%).<br />
• Check the door seals regularly and wipe them clean<br />
to ensure they are free of debris so that they adhere<br />
pro<strong>per</strong>ly to the door, thus avoiding heat dis<strong>per</strong>sion.<br />
34<br />
! This product complies with the requirements of the<br />
latest European Directive on the limitation of power<br />
consumption of the standby mode.<br />
OVEN;<br />
If no o<strong>per</strong>ations are carried out for a <strong>per</strong>iod of 2<br />
minutes, the appliance automatically switches to the<br />
“Clock button”. The standby mode is visualised by<br />
the low luminosity "Watch Icon". As soon as<br />
interaction with the machine resumes, the system's<br />
o<strong>per</strong>ating mode is restored.<br />
HOB:<br />
If no o<strong>per</strong>ations are carried out for a <strong>per</strong>iod of 2<br />
minutes, after the residual heat indicator lights turn<br />
off and the fan stops (if present), the appliance<br />
automatically switches to the “off mode”.<br />
The appliance resumes the o<strong>per</strong>ating mode once the<br />
ON/OFF button is pressed.
Care and maintenance<br />
Switching the appliance off<br />
Disconnect your appliance from the electricity<br />
supply before carrying out any work on it.<br />
Cleaning the appliance<br />
! Never use steam cleaners or pressure cleaners on<br />
the appliance.<br />
• The stainless steel or enamel-coated external<br />
parts and the rubber seals may be cleaned using<br />
a sponge which has been soaked in lukewarm<br />
water and neutral soap. Use specialised products<br />
for the removal of stubborn stains. After cleaning,<br />
rinse well and dry thoroughly. Do not use abrasive<br />
powders or corrosive substances.<br />
• The inside of the oven should ideally be cleaned<br />
after each use, while it is still lukewarm. Use hot<br />
water and detergent, then rinse well and dry with<br />
a soft cloth. Do not use abrasive products.<br />
• Clean the glass part of the oven door using a<br />
sponge and a non-abrasive cleaning product,<br />
then dry thoroughly with a soft cloth. Do not use<br />
rough abrasive material or sharp metal scra<strong>per</strong>s<br />
as these could scratch the surface and cause the<br />
glass to crack.<br />
• The accessories can be washed like everyday<br />
crockery, and are even dishwasher safe.<br />
• It is usually enough to wash the hob with a damp<br />
sponge and dry it with absorbent kitchen roll.<br />
• If the hob is particularly dirty, rub with a special<br />
glass ceramic cleaning product, rinse and dry.<br />
• food residue and dirt can be removed using a<br />
special scra<strong>per</strong>. Do this as soon as possible, do<br />
not wait for the hob to cool down in order to avoid<br />
incrustations. or excellent results, use a special<br />
stainless steel wool pad for vitroceramic glass<br />
cleaning soaked in soapy water.<br />
• If plastic or sugary substances are accidentally<br />
melted on the hob, remove them immediately with<br />
the scra<strong>per</strong>, while the surface is still hot.<br />
* Only available in certain models.<br />
• Once it is clean, the hob may be treated with a<br />
special maintenance and protection product: the<br />
invisible film left by this product protects the<br />
surface from drips during cooking. This should be<br />
done while the appliance is warm or cold.<br />
• Always remember to rinse the appliance with<br />
clean water and dry the hob thoroughly: residues<br />
can become encrusted during cooking.<br />
Inspecting the oven seals<br />
Check the door seals around the oven regularly. If<br />
the seals are damaged, please contact your nearest<br />
Authorised After-sales Service Centre.<br />
We recommend that the oven is not used until the<br />
seals have been replaced.<br />
Replacing the oven light bulb<br />
Glass door<br />
Oven<br />
compartment<br />
Seal<br />
Lamp<br />
To replace the<br />
oven light bulb:<br />
1. Remove the glass cover using a screwdriver.<br />
2. Unscrew the light bulb and replace it with a<br />
similar one: Wattage 15 W, cap E 14.<br />
Replace the glass cover, making sure the seal is<br />
positioned correctly (see diagram).<br />
35<br />
GB
GB<br />
Automatic cleaning using the AST<br />
CLEAN function<br />
With the AST CLEAN mode, the internal<br />
tem<strong>per</strong>ature of the oven reaches 500°C. The<br />
pyrolytic cycle is activated, burning away food and<br />
grime residues. Dirt is literally incinerated.<br />
Keep children away from the appliance during the<br />
automatic cleaning cycle as surfaces may become<br />
very hot. Particles may ignite inside the oven due to<br />
the combustion process. There is no cause for<br />
concern: this process is both normal and hazardfree.<br />
Before initiating the AST CLEAN mode:<br />
• Remove large or coarse food residues from the<br />
inside of the oven using a damp sponge. Do not<br />
use detergents.<br />
• Remove all accessories.<br />
• Do not place tea towels or pot holders over the<br />
oven handle.<br />
• Turn the SELECTOR knob to the “0” position.<br />
! If the oven is too hot, the pyrolytic cycle may not<br />
start. Wait for the oven to cool down.<br />
! The programme may only be started once the oven<br />
door has been closed.<br />
! To obtain the best results from the pyrolysis cycle,<br />
we recommend that you do not use the hob while the<br />
process is being carried out.<br />
To activate the AST CLEAN cycle press and hold<br />
the button for approximately 4 seconds. The<br />
TIMER KNOB may be used to select the desired<br />
cleaning level; there are three default time settings<br />
which cannot be modified.<br />
1. Economy (ECO): turn the knob towards “-”.<br />
Duration 1 hour.<br />
2. Normal (NOR): initial level. Duration 1 hour and 30<br />
minutes.<br />
3. Intensive (INT): turn the knob towards “+”.<br />
Duration 2 hours.<br />
4. Press the button to confirm.<br />
An end time for the AST CLEAN cycle (as for a<br />
normal cooking cycle) may be programmed (see<br />
Programming the automatic cleaning end time).<br />
36<br />
Safety devices<br />
• The icon on the display, when lit, indicates<br />
that the oven door was automatically locked as<br />
soon as the tem<strong>per</strong>ature reached a high value.<br />
• The icon indicates that the cleaning cycle<br />
may be cancelled at any time by pressing the<br />
button.<br />
• If a malfunction occurs, the heating elements will<br />
be switched off.<br />
• Once the oven door has been locked, you cannot<br />
change the duration and cycle end time settings.<br />
Programming the automatic cleaning end time<br />
1. Press the button until the icon and the two<br />
digits on the DISPLAY begin to flash.<br />
2. Turn the TIMER KNOB towards “+” and “-” to<br />
adjust the hour value.<br />
3. Press the button again until the other two<br />
digits on the DISPLAY begin to flash.<br />
4. Turn the TIMER KNOB towards “+” and “-” to<br />
adjust the minute value.<br />
5. Press the button again to confirm.<br />
6. When the set time has elapsed, the text END<br />
appears on the display and a buzzer sounds.<br />
• or example: it is 9:00 a.m. and the Economy<br />
(ECO) AST CLEAN level has been selected, with<br />
the default duration of 1 hour. 12:30 is scheduled<br />
as the end time. The programme will start<br />
automatically at 11:30 a.m.<br />
Programming has been set when the and<br />
buttons are illuminated. The display shows the AST<br />
CLEAN end time and duration alternately.<br />
Once the automatic cleaning cycle is over<br />
You will have to wait until the tem<strong>per</strong>ature inside the<br />
oven has cooled down sufficiently before you can<br />
open the oven door. You will notice some white dust<br />
deposits on the bottom and the sides of your oven;<br />
remove these deposits with a damp sponge once<br />
the oven has cooled down completely. Alternatively,<br />
you can make use of the already heated oven, in<br />
which case it is not necessary to remove the<br />
deposits, they are completely harmless and will not<br />
affect your food in any way.
Assistance<br />
Warning:<br />
The appliance is fitted with an automatic diagnostic system which detects any malfunctions. Malfunctions are<br />
displayed by messages of the following type: “” followed by numbers.<br />
Call for technical assistance should a malfunction occur.<br />
! Never use the services of an unauthorised technician.<br />
Please have the following information to hand:<br />
• The type of problem encountered.<br />
• The appliance model (Mod.).<br />
• The serial number (S/N).<br />
The latter two pieces of information can be found on the data plate located on the appliance.<br />
37<br />
GB
R<br />
Mode d’emploi<br />
IT<br />
Italiano, 1<br />
NL<br />
Nederlands,<br />
57<br />
GB<br />
English,20<br />
CE6IA.1 /HA<br />
CE6IA.1 X /HA<br />
CE6IA. 2 F/HA<br />
CE6IA. 2 X F/HA<br />
R<br />
rançais, 38<br />
Sommaire<br />
Installation, 39-40<br />
Positionnement et nivellement<br />
Raccordement électrique<br />
Caractéristiques techniques<br />
Description de l’appareil,41-42<br />
Vue d’ensemble<br />
Tableau de bord<br />
Afficheur<br />
Tableau de bord de la table de cuisson<br />
CUISINIERE<br />
Mise en marche et utilisation du four, 43-<br />
46<br />
Régler l’horloge<br />
Programmer la minuterie<br />
Mise en marche du four<br />
Programmes de cuisson manuels<br />
Programmes de cuisson automatiques<br />
Comment programmer une cuisson<br />
Conseils de cuisson<br />
Tableau de cuisson<br />
Mise en marche et utilisation de la table<br />
de cuisson, 47-51<br />
Mise sous tension de la table de cuisson<br />
Allumage des foyers<br />
onction booster<br />
Extinction des foyers<br />
Programmation de la durée de cuisson<br />
Le minuteur<br />
Verrouillage des commandes<br />
Extinction de la table de cuisson<br />
Mode Démonstration (demo)<br />
Conseils d’utilisation de l’appareil<br />
Les sécurités<br />
Description technique des foyers<br />
Conseils utiles pour la cuisson<br />
Précautions et conseils, 52-53<br />
Sécurité générale<br />
Mise au rebut<br />
Economies et respect de l’environnement<br />
Nettoyage et entretien, 54-55<br />
Mise hors tension<br />
Nettoyage de l’appareil<br />
Remplacement de l’ampoule d’éclairage<br />
Nettoyage automatique AST CLEAN<br />
Assistance, 56
Installation<br />
! Conserver ce mode d’emploi pour pouvoir le<br />
consulter tout moment. En cas de vente, de cession<br />
ou de déménagement, veiller à ce qu’il suive l’appareil.<br />
! Lire attentivement les instructions : elles<br />
contiennent des conseils importants sur l’installation,<br />
l’utilisation et la sécurité de l’appareil<br />
! L’installation de l’appareil doit être effectuée par un<br />
professionnel du secteur conformément aux<br />
instructions du fabricant.<br />
! N’importe quelle opération de réglage ou<br />
d’entretien doit être effectuée après avoir débranché<br />
la prise de l’appareil.<br />
Positionnement et nivellement<br />
! L’appareil peut être installé à côté de meubles dont<br />
la hauteur ne dépasse pas celle du plan de cuisson.<br />
! S’assurer que le mur en contact avec la paroi<br />
arrière de l’appareil est réalisé en matériel ignifuge<br />
résistant à la chaleur (T 90°C).<br />
Pour une installation correcte :<br />
• installer cet appareil dans une cuisine, une salle à<br />
manger ou un studio (jamais dans une salle de<br />
bains) ;<br />
• si le plan de cuisson de la cuisinière dépasse le<br />
plan de travail des meubles, ces derniers doivent<br />
être placés à au moins 200 mm de l’appareil.<br />
• si la cuisinière est<br />
mm.<br />
420<br />
Min.<br />
installée sous un élément<br />
suspendu, il faut que ce<br />
dernier soit placé à au<br />
moins 420 mm de<br />
distance du plan.<br />
Il faut prévoir une<br />
distance de 700 mm si<br />
les éléments<br />
suspendus sont<br />
inflammables (voir<br />
figure) ;<br />
• ne pas placer de rideaux derrière ou sur les côtés<br />
de la cuisinière à moins de 200 mm de distance.<br />
• pour l’installation de hottes, se conformer aux<br />
instructions de leur notice d’emploi.<br />
Nivellement<br />
HOOD<br />
Min. 600 mm.<br />
Min. 420 mm.<br />
min. 650 mm. with hood<br />
min. 700 mm. without hood<br />
Pour mettre l’appareil bien à<br />
plat, visser les pieds* de<br />
réglage fournis aux<br />
emplacements prévus aux<br />
coins à la base de la<br />
cuisinière (vedi figura).<br />
Raccordement électrique<br />
Montage des pieds* fournis<br />
avec l’appareil par<br />
encastrement sous la base.<br />
Montage du cordon d’alimentation<br />
Ouverture du bornier:<br />
• aites pression à l’aide d’un tournevis sur les<br />
languettes latérales du couvercle du bornier;<br />
• Tirez et ouvrez le<br />
couvercle du bornier.<br />
Pour monter le cordon d’alimentation, procédez<br />
comme suit:<br />
• dévissez la vis du serre-câble de même que les<br />
vis des contacts<br />
! Les pontets sont montés en usine pour<br />
raccordement à 230V monophasé (voir figure).<br />
230V ~<br />
H05RR-F/ 3x4 CEI-UNEL 35363<br />
H05VV-F/ 3x4 CEI-UNEL 35746<br />
N L<br />
5<br />
• pour effectuer les raccordements électriques<br />
illustrés figure, utilisez les deux pontets placés<br />
dans le boîtier (voir figure - référence “P”)<br />
N<br />
4<br />
3<br />
L1<br />
2<br />
L2<br />
1<br />
* N’existe que sur certains modèles<br />
P<br />
L3<br />
39<br />
R
R<br />
• fixez le câble d’alimentation dans le serre-câble<br />
correspondant et fermez le couvercle.<br />
Branchement du câble d’alimentation au réseau<br />
électrique<br />
En cas de raccordement direct au réseau, intercaler<br />
entre l’appareil et le réseau un interrupteur à coupure<br />
omnipolaire ayant au moins 3 mm d’écartement<br />
entre les contacts, dimensionné à la charge et<br />
conforme aux normes en vigueur (le fil de terre ne<br />
doit pas être interrompu par l’interrupteur). Le câble<br />
d’alimentation ne doit atteindre, en aucun point, une<br />
température dépassant de 50°C la température<br />
ambiante.<br />
Avant de procéder au branchement, s’assurer que :<br />
• la prise est bien munie d’une terre conforme à la loi;<br />
• la prise est bien apte à supporter la puissance<br />
maximale de l’appareil, indiquée sur la plaque<br />
signalétique;<br />
• la tension d’alimentation est bien comprise entre<br />
les valeurs indiquées sur la plaque signalétique;<br />
• Ne pas utiliser de rallonges ni de prises multiples.<br />
40<br />
400V 2N~<br />
H05RR-F 4x4 CEI-UNEL 35363<br />
H05VV-F 4x4 CEI-UNEL 357 46<br />
N L2 L1<br />
5<br />
400V 3N~<br />
H05RR-F 5x2.5 CEI-UNEL 35363<br />
H05VV-F 5x2.5 CEI-UNEL 35746<br />
N L3 L2 L1<br />
5<br />
4<br />
4<br />
3<br />
3<br />
2<br />
2<br />
1<br />
1<br />
!Après installation de l’appareil, le câble électrique<br />
et la prise de courant doivent être facilement<br />
accessibles<br />
!Le câble ne doit être ni plié ni excessivement<br />
écrasé.<br />
!Le câble doit être contrôlé périodiquement et ne<br />
peut être remplacé que par un technicien agréé.<br />
! Nous déclinons toute responsabilité en cas de<br />
non respect des normes énumérées ci-dessus.<br />
CARACTERISTIQUES TECHNIQUES<br />
Dimensions du<br />
32x43,5x40 cm<br />
four HxLxP<br />
Volume l 56<br />
Dimensions utiles largeur 42 cm<br />
du tiroir chauffe- profondeur 44 cm<br />
plats<br />
hauteur 8,5 cm<br />
Tension et<br />
fréquence Voir plaque signalétique<br />
d’alimentation :<br />
Directive 2002/40/CE sur l'étiquette<br />
des fours électriques Norme EN<br />
50304<br />
ETIQUETTE<br />
Consommation énergie déclaration<br />
ENERGIE<br />
Classe convection Forcée –<br />
fonction four : Gratin<br />
Directives Communautaires :<br />
2006/95/EC du 12.12.06 (Basse<br />
Tension) et modifications<br />
successives - 04/108/EC du<br />
15/12/04 (Compatibilité<br />
Electromagnétique) et<br />
modifications successives -<br />
90/369/EEC du 29/06/90 (Gaz) et<br />
modifications successives<br />
93/68/EEC du 22/07/93 et<br />
modifications successives -<br />
2002/96/EEC.<br />
1275/2008 (Stand-by/Off mode)
Description de l’appareil<br />
Vue d’ensemble<br />
Tableau de bord<br />
Afficheur<br />
Piano cottura<br />
vetroceramica<br />
Pannello di controllo<br />
Ripiano GRIGLIA<br />
Ripiano LECCARDA<br />
Touche<br />
FAST CLEAN<br />
*N’existe que sur certains modèles<br />
Bouton<br />
SELECTION TEMPS<br />
AFFICHEUR<br />
Bouton<br />
PROGRAMMES<br />
Touche<br />
SELECTION TEMPS<br />
GUIDE<br />
di scorrimento dei ripiani<br />
posizione 5<br />
posizione 4<br />
posizione 3<br />
posizione 2<br />
posizione 1<br />
Piedino di regolazione Piedino di regolazione<br />
Bouton<br />
THERMOSTAT<br />
41<br />
R
R<br />
Tableau de bord de la table de cuisson<br />
Indicateurs de PUISSANCE et<br />
de CHALEUR RÉSIDUELLE<br />
• Touche AUGMENTATION DE PUISSANCE pour<br />
allumer le foyer et régler sa puissance (voir Mise<br />
en marche et utilisation).<br />
• Touche DIMINUTION DE PUISSANCE pour régler<br />
la puissance et éteindre le foyer (voir Mise en<br />
marche et utilisation).<br />
• Voyant OYER SELECTIONNE pour signaler que<br />
le foyer correspondant a été sélectionné et que<br />
les régulations sont donc possibles.<br />
• Touche SELECTION OYER pour sélectionner le<br />
foyer souhaité<br />
• Indicateur de PUISSANCE : une colonne<br />
lumineuse pour signaler le niveau de puissance<br />
atteint.<br />
• Touche ON/O pour allumer ou éteindre<br />
l’appareil.<br />
• Voyant ON/O : il signale si l’appareil est<br />
allumé ou éteint.<br />
• Touche PROGRAMMATEUR* pour programmer la<br />
* N’existe que sur certains modèles<br />
42<br />
Voyant<br />
FOYER SÉLECTIONNÉ<br />
Touches<br />
SÉLECTION FOYER<br />
Touche AUGMENTATION<br />
DE PUISSANCE<br />
Touche<br />
BOOSTER*<br />
Voyant<br />
BOOSTER*<br />
Voyant<br />
MINUTEUR*<br />
Afficheur<br />
PROGRAMMATEUR*<br />
Voyant<br />
FOYER PROGRAMMÉ*<br />
Voyant<br />
ON/OFF<br />
Voyant<br />
COMMANDES VERROUILLÉES<br />
Touche<br />
VERROUILLAGE DES COMMANDES<br />
Touche<br />
PROGRAMMATEUR*<br />
Touche<br />
DIMINUTION DE PUISSANCE<br />
Touche<br />
ON/OFF<br />
durée d’une cuisson (voir Mise en marche et<br />
Utilisation).<br />
• Afficheur PROGRAMMATEUR* : pour afficher les<br />
choix correspondant à la programmation (voir<br />
Mise en marche et utilisation).<br />
• Voyants OYER PROGRAMMÉ* : ils indiquent les<br />
foyers quand une programmation est lancée (voir<br />
Mise en marche et utilisation).<br />
• Touche VERROUILLAGE DES COMMANDES<br />
pour empêcher toute intervention extérieure sur<br />
les réglages de la table de cuisson (voir Mise en<br />
marche et Utilisation).<br />
• Voyant COMMANDES VERROUILLEES : pour<br />
signaler le verrouillage des commandes (voir Mise<br />
en marche et Utilisation).<br />
• Touche BOOSTER* pour brancher la<br />
suralimentation - 3000 W – du foyer (voir Mise en<br />
marche et utilisation).<br />
• Voyant BOOSTER* il signale que la fonction de<br />
suralimentation du booster est activée.<br />
• Voyant MINUTEUR* il signale que le minuteur est<br />
activé
Mise en marche et<br />
utilisation du four<br />
! Avant toute utilisation, vous devez impérativement<br />
enlever les films plastiques situés sur les côtés de<br />
l’appareil<br />
Régler l’horloge<br />
! Son réglage est possible que le four soit éteint ou<br />
allumé mais ceci ne correspond pas à une<br />
programmation de fin de cuisson.<br />
1. Appuyer plusieurs fois de suite sur la touche<br />
jusqu’à ce que l’icône et les deux digits<br />
numériques de l’AICHEUR se mettent à<br />
clignoter ;<br />
2. tourner le bouton SELECTION TEMPS pour<br />
l’amener sur “+” ou “-” pour régler l’heure;<br />
3. appuyer à nouveau sur la touche jusqu’à ce<br />
que les deux autres digits numériques de<br />
l’AICHEUR se mettent à clignoter ;<br />
4. tourner le bouton SELECTION TEMPS pour<br />
l’amener sur “+” ou “-” pour régler les minutes ;<br />
5. appuyer à nouveau sur la touche pour<br />
confirmer.<br />
Programmer la minuterie<br />
! Cette fonction ne stoppe pas la cuisson et est<br />
indépendante du fonctionnement du four; elle sert<br />
uniquement à déclencher un signal sonore à<br />
l’expiration des minutes sélectionnées.<br />
1. Appuyer plusieurs fois de suite sur la touche<br />
jusqu’à ce que l’icône et les trois digits<br />
numériques de l’AICHEUR se mettent à<br />
clignoter ;<br />
2. tourner le bouton SELECTION TEMPS pour<br />
l’amener sur “+” ou “-” pour régler les minutes ;<br />
3. appuyer à nouveau sur la touche pour<br />
confirmer.<br />
L’affichage du compte à rebours suivra. Un signal<br />
sonore indiquera la fin du décompte.<br />
Mise en marche du four<br />
1. Pour sélectionner le programme de cuisson<br />
souhaité, tourner le bouton PROGRAMMES.<br />
2. Le four se place en phase de préchauffage,<br />
l’indicateur préchauffage s’allume.<br />
Pour modifier la température, tourner le bouton<br />
THERMOSTAT.<br />
3. L’extinction de l’indicateur de préchauffage et<br />
le déclenchement du signal sonore indiquent la fin<br />
du préchauffage : il est temps d’enfourner les<br />
plats.<br />
4. L'ECRAN affiche l'icône qui indique le niveau<br />
d'enfournement préconisé.<br />
5. En cours de cuisson, il est possible à tout<br />
moment de :<br />
- modifier le programme de cuisson à l’aide du<br />
bouton PROGRAMMES ;<br />
- modifier la température à l’aide du bouton<br />
THERMOSTAT ;<br />
- programmer la durée et l’heure de fin de cuisson.<br />
(voir programmes de cuisson) ;<br />
- interrompre la cuisson en ramenant le bouton<br />
PROGRAMMES sur “0”.<br />
6. Au bout de deux heures le four s’éteint tout seul :<br />
ce délai est présélectionné pour des raisons de<br />
sécurité sur tous les programmes de cuisson.<br />
Il est possible de modifier la durée de cuisson<br />
(voir programmes de cuisson).<br />
7. En cas de coupure de courant, si la température<br />
du four n’est pas trop redescendue, un dispositif<br />
spécial fait repartir le programme à partir du<br />
moment où il a été interrompu. Les<br />
programmations en attente de démarrage ne sont<br />
par contre pas rétablies et doivent être<br />
reprogrammées dès rétablissement du courant.<br />
! Aucun préchauffage n’est prévu pour les<br />
programmes BARBECUE.<br />
! Ne jamais poser d’objets à même la sole du four,<br />
l’émail risque de s’abîmer.<br />
! Il faut toujours enfourner les plats sur la grille<br />
fournie avec l’appareil.<br />
Système de refroidissement<br />
Pour obtenir un abaissement des températures<br />
extérieures, un système de refroidissement souffle<br />
de l’air à l’extérieur par une fente située entre le<br />
bandeau et la porte du four. Au début du<br />
programme AST CLEAN le système fonctionne à<br />
faible vitesse.<br />
! Le ventilateur continue à tourner après l’arrêt du<br />
four jusqu’à ce que ce dernier se soit suffisamment<br />
refroidi.<br />
Eclairage du four<br />
our éteint, il s’allume dès ouverture de la porte du<br />
four.<br />
* N’existe que sur certains modèles<br />
43<br />
R
R<br />
Programmes de cuisson manuels<br />
! Tous les programmes ont une température de<br />
cuisson présélectionnée. Il est possible de la régler<br />
manuellement, entre 40°C et 250°C au choix.<br />
Pour le programme BARBECUE la valeur<br />
présélectionnée est un niveau de puissance exprimé<br />
en %. Il peut lui aussi être réglé manuellement.<br />
Programme MULTICUISSON<br />
La chaleur est constante et bien répartie à l’intérieur<br />
du four, l’air cuit et dore de façon uniforme en tous<br />
points. Il est possible de cuire au maximum sur<br />
deux niveaux en même temps.<br />
Programme BARBECUE<br />
Tourner le bouton THERMOSTAT, l’afficheur indique<br />
les niveaux de puissance sélectionnables qui vont<br />
de 50% à 100%. La température élevée et directe du<br />
gril est conseillée pour tous les aliments qui exigent<br />
une haute température en surface. Cuisson porte du<br />
four fermée.<br />
Programme GRATIN<br />
L’irradiation thermique unidirectionnelle s’ajoute au<br />
brassage de l’air pour une répartition uniforme de la<br />
chaleur dans l’enceinte du four.<br />
Plus de risque de brûler les aliments en surface et<br />
plus grande pénétration de la chaleur. Cuisson porte<br />
du four fermée.<br />
Programmes BASSE TEMPERATURE<br />
Ce type de cuisson <strong>per</strong>met de faire lever les pâtes,<br />
de décongeler, de préparer du yaourt, de réchauffer<br />
plus ou moins rapidement. Températures<br />
sélectionnables : 40, 65, 90 °C.<br />
Tournebroche (n’existe que sur certains modèles)<br />
44<br />
Pour actionner le<br />
tournebroche (voir figure)<br />
procéder comme suit :<br />
1. placer la lèchefrite au gradin 1;<br />
2. placer le berceau au gradin 3 et encastrer le bout<br />
arrière de la broche dans le trou situé au fond de<br />
l’enceinte;<br />
3. brancher le tournebroche en amenant le sélecteur<br />
PROGRAMMES sur ou ;<br />
! Quand le programme est lancé, le tournebroche<br />
s’arrête dès ouverture de la porte du four.<br />
Programmes de cuisson automatiques<br />
! La température et la durée de cuisson sont<br />
présélectionnées et ne peuvent pas être modifiées<br />
à l’aide du système C.O.P. ® (Cuisson Optimale<br />
Programmée) qui garantit automatiquement un<br />
résultat parfait. Possibilité de ne modifier que la<br />
durée de ±5/10 minutes selon le programme choisi.<br />
La cuisson s’arrête automatiquement et le four<br />
signale que le plat est cuit. Il est possible<br />
d’enfourner à froid ou à chaud.; pour savoir à quel<br />
niveau enfourner le plat, suivre les indications de<br />
niveau fournies par l'icône<br />
! Un bip signale que la cuisson est terminée.<br />
! Pour éviter de fausser les temps de cuisson et de<br />
modifier les températures, ne pas ouvrir la porte du four.<br />
Programme VIANDE<br />
Choisir cette fonction pour cuisiner de la viande de<br />
veau, de porc, d’agneau. Enfourner à froid. Il est<br />
aussi possible d’enfourner à chaud.<br />
Programme PIZZA<br />
C’est la fonction idéale pour la cuisson des pizzas. Se<br />
reporter au paragraphe suivant pour une recette détaillée.<br />
Programme PAIN<br />
C’est la fonction idéale pour la cuisson du pain. Se reporter<br />
au paragraphe suivant pour une recette détaillée.<br />
Programme GATEAUX<br />
Cette fonction est ce qu’il y a de mieux pour la<br />
cuisson de gâteaux à base de levure de boulanger,<br />
de levure chimique ou sans levure. Enfourner à froid.<br />
Il est aussi possible d’enfourner à chaud.<br />
rogramme PIZZA<br />
Pour obtenir de meilleurs résultats, nous recommandons •<br />
respecter le poids maximal pour chaque plaque;<br />
• ne pas oublier de verser 1dl d’eau froide dans<br />
la lèchefrite au gradin 5;<br />
• faire lever la pâte à température ambiante pendant<br />
1 heure ou 1 heure et demie, selon la température<br />
de la pièce et jusqu’à ce qu’elle ait pratiquement<br />
doublé de volume.
Recette du PAIN :<br />
1 Plaque de 1000g Maxi. gradin du bas<br />
2 Plaques de 1000g Maxi. gradins du bas et du milieu<br />
Recette pour 1000g de pâte : 600g de farine, 360g d’eau,<br />
11g de sel, 25g de levure de boulanger fraîche (ou bien 2<br />
sachets en poudre)<br />
Procédé :<br />
• Mélanger la farine et le sel dans un grand récipient.<br />
• Diluer la levure de boulanger dans de l’eau<br />
légèrement tiède (35 degrés environ).<br />
• Disposer la farine en fontaine.<br />
• Verser le mélange d’eau et de levure<br />
• Mélanger et pétrir jusqu’à obtenir une pâte homogène<br />
et peu collante, l’étirer avec la paume de la main et la<br />
replier sur elle-même pendant 10 minutes.<br />
• ormer une boule et laisser lever à température<br />
ambiante pendant 1 heure- 1 heure et demie<br />
(jusqu’à ce qu’elle ait doublé de volume), couvrir<br />
avec du film plastique.<br />
• Diviser la boule pour obtenir plusieurs pains.<br />
• Les placer sur la plaque du four recouverte de<br />
papier sulfurisé.<br />
• Saupoudrer les pains de farine.<br />
• Pratiquer des entailles sur les pains.<br />
• ne pas oublier de verser 1dl d’eau froide dans<br />
la lèchefrite au gradin 5; Pour son nettoyage,<br />
utiliser le l’eau et du vinaigre.<br />
• Enfourner à froid.<br />
• Démarrer la cuisson PAIN<br />
• En fin de cuisson, laisser reposer les pains sur une<br />
grille jusqu’à ce qu’ils aient complètement refroidi.<br />
Comment programmer une cuisson<br />
! La programmation n’est possible qu’après avoir<br />
sélectionné un programme de cuisson.<br />
Programmer la durée de cuisson<br />
1. Appuyer plusieurs fois de suite sur la touche<br />
jusqu’à ce que l’icône et les trois digits<br />
numériques de l’AICHEUR se mettent à<br />
clignoter;<br />
2. tourner le bouton SELECTION TEMPS pour<br />
l’amener sur “+” ou “-” et régler la durée désirée;<br />
3. appuyer à nouveau sur la touche pour<br />
confirmer ;<br />
4. à expiration de la durée sélectionnée,<br />
l’AICHEUR affiche END, le four stoppe la<br />
cuisson et un signal sonore retentit.<br />
• Exemple : il est 9h00 et la durée programmée est<br />
de 1h15. Le programme s’arrête automatiquement<br />
à 10h15.<br />
Programmer la fin d’une cuisson<br />
! La programmation d’une fin de cuisson n’est<br />
possible qu’après avoir sélectionné une durée de<br />
cuisson.<br />
1. Suivre la procédure de 1 à 3 décrite pour la durée;<br />
2. appuyer ensuite sur la touche jusqu’à ce que<br />
l’icône et les deux digits numériques de<br />
l’AICHEUR se mettent à clignoter;<br />
3. tourner le bouton SELECTION TEMPS pour<br />
l’amener sur “+” ou “-” et régler l’heure;<br />
4. appuyer à nouveau sur la touche jusqu’à ce<br />
que les deux autres digits numériques de<br />
l’AICHEUR se mettent à clignoter;<br />
5. tourner le bouton SELECTION TEMPS pour<br />
l’amener sur “+” ou “-” et régler les minutes ;<br />
6. appuyer à nouveau sur la touche pour<br />
confirmer;<br />
7. à expiration de la durée sélectionnée,<br />
l’AICHEUR affiche END, le four stoppe la<br />
cuisson et un signal sonore retentit.<br />
Les icônes et éclairées signalent qu’une<br />
programmation a été lancée. L’AICHEUR affiche à<br />
tour de rôle l’heure de fin de cuisson et la durée.<br />
Pour annuler une programmation, amener le bouton<br />
PROGRAMMES sur “0”.<br />
Conseils de cuisson<br />
! Pour les cuissons ventilées ne pas utiliser les<br />
gradins 1et 5: ils sont directement frappés par l’air<br />
chaud qui pourrait brûler les mets délicats.<br />
! Pour les cuissons BARBECUE et GRATIN,<br />
notamment au tournebroche, placer la lèchefrite au<br />
gradin 1 pour récupérer les graisses ou jus de<br />
cuisson.<br />
MULTICUISSON<br />
• Utiliser les gradins 2 et 4 et placer au 2 les plats<br />
qui exigent davantage de chaleur.<br />
• Placer la lèchefrite en bas et la grille en haut.<br />
45<br />
R
R<br />
BARBECUE<br />
• Placer la grille au gradin 3 ou 4, enfourner les<br />
plats au milieu de la grille.<br />
• Nous conseillons de sélectionner le niveau<br />
d’énergie maximum. Ne pas s’inquiéter si la<br />
résistance de voûte n’est pas allumée en<br />
<strong>per</strong>manence : son fonctionnement est contrôlé par<br />
un thermostat.<br />
Tableau de cuisson<br />
Programmes Aliments Poids<br />
(Kg)<br />
Multiniveaux* Pizza sur 2 niveaux<br />
Tartes sur 2 niveaux/gâteaux sur 2 niveaux<br />
Génoise sur 2 niveaux (sur plateau émaillé)<br />
Poulet rôti + pommes de terre<br />
Agneau<br />
Maquereau<br />
Lasagnes<br />
Choux sur 2 niveaux<br />
Biscuits sur 2 niveaux<br />
riands au fromage sur 2 niveaux<br />
Tartes salées<br />
Barbecue* Maquereaux<br />
Soles et seiches<br />
Brochettes de calmars et crevettes<br />
Tranches de colin<br />
Légumes grillés<br />
Côte de veau<br />
Saucisses<br />
Hamburgers<br />
Croque-monsieur ou toasts<br />
Poulet rôti au tournebroche (si présent)<br />
Agneau rôti au tournebroche (si présent)<br />
Gratin* Poulet grillé<br />
Seiches<br />
Poulet rôti au tournebroche (si présent)<br />
Canard rôti au tournebroche (si présent)<br />
Rôti de veau ou de bœuf<br />
Rôti de porc<br />
Agneau<br />
Basse<br />
température Décongélation<br />
Etuve<br />
Réchauffage aliments<br />
Pasteurisation<br />
Pizza Pizza (voir recette)<br />
automatique ougasse (pâte à pain)<br />
Pain<br />
automatique<br />
Gâteaux<br />
automatico<br />
Viande<br />
automatique<br />
46<br />
1+1<br />
1<br />
1<br />
1<br />
1<br />
0,7<br />
0,7<br />
0,7<br />
0,5<br />
0,8<br />
0,7<br />
4 ou 5<br />
4 ou 6<br />
1<br />
1<br />
1,5<br />
1<br />
1,5<br />
1,5<br />
1<br />
1<br />
1<br />
Niveau enfournement Préchauffage Température<br />
préconisée<br />
(°C)<br />
glissières<br />
standard<br />
glissières<br />
coulissantes<br />
2 et 4<br />
2 et 4<br />
2 et 4<br />
1 et 2/3<br />
2<br />
1 ou 2<br />
2<br />
2 et 4<br />
2 et 4<br />
2 et 4<br />
1 et 3<br />
4<br />
4<br />
4<br />
4<br />
3 ou 4<br />
4<br />
4<br />
4<br />
4<br />
-<br />
-<br />
2<br />
2<br />
-<br />
-<br />
2<br />
2<br />
2<br />
2 ou 3<br />
2 ou 3<br />
2 ou 3<br />
2 ou 3<br />
2<br />
2<br />
OUR PIZZA<br />
• Utiliser un plat en aluminium léger et l’enfourner<br />
sur la grille du four.<br />
En cas d’utilisation du plateau émaillé, le temps<br />
de cuisson sera plus long et la pizza beaucoup<br />
moins croustillante.<br />
• Si les pizzas sont bien garnies, n’ajouter la<br />
mozzarelle qu’à mi-cuisson.<br />
1 et 3<br />
1 et 3<br />
1 et 3<br />
1 et 3<br />
1<br />
1<br />
1<br />
1 et 3<br />
1 et 3<br />
1 et 3<br />
1 et 3<br />
3<br />
3<br />
3<br />
3<br />
2 ou 3<br />
3<br />
3<br />
3<br />
3<br />
-<br />
-<br />
2<br />
2<br />
-<br />
-<br />
2<br />
2<br />
2<br />
2<br />
2<br />
2<br />
2<br />
2<br />
2<br />
Oui<br />
Oui<br />
Oui<br />
Oui<br />
Oui<br />
Oui<br />
Oui<br />
Oui<br />
Oui<br />
Oui<br />
Oui<br />
Non<br />
Non<br />
Non<br />
Non<br />
Non<br />
Non<br />
Non<br />
Non<br />
Non<br />
Non<br />
Non<br />
Non<br />
Non<br />
Non<br />
Non<br />
Non<br />
Non<br />
Non<br />
Non<br />
Non<br />
Non<br />
Non<br />
Non<br />
Non<br />
220-230<br />
180<br />
170<br />
200-210<br />
190-200<br />
180<br />
190-200<br />
190<br />
190<br />
210<br />
200<br />
100%<br />
100%<br />
100%<br />
100%<br />
100%<br />
100%<br />
100%<br />
100%<br />
100%<br />
100%<br />
100%<br />
210<br />
200<br />
210<br />
210<br />
210<br />
210<br />
210<br />
-<br />
-<br />
-<br />
-<br />
-<br />
-<br />
Durée<br />
cuisson<br />
(minutes)<br />
Pain (voir recette)<br />
1<br />
1<br />
1 2 2 Non - 55<br />
Gâteaux à pâte levée 1 2 ou 3 2 Non - 35-55<br />
Rôtis 1 2 ou 3 2 Non - 60-80<br />
20-25<br />
30-35<br />
20-25<br />
65-75<br />
45-50<br />
30-35<br />
35-40<br />
20-25<br />
10-20<br />
20-25<br />
20-30<br />
15-20<br />
10-15<br />
8-10<br />
10-15<br />
15-20<br />
15-20<br />
15-20<br />
10-12<br />
3-5<br />
70-80<br />
70-80<br />
55-60<br />
30-35<br />
70-80<br />
60-70<br />
60-75<br />
70-80<br />
40-45<br />
-<br />
60-90<br />
-<br />
-<br />
23-33<br />
23-33<br />
* Les temps de cuisson sont purement indicatifs et peuvent être modifiés selon les goûts de chacun. Les temps de préchauffage du four sont présélectionnés et ne<br />
sont pas modifiables manuellement.
Mise en marche et utilisation<br />
de la table de cuisson<br />
! La colle utilisée pour les joints laisse des traces de<br />
graisse sur le verre. Nous vous conseillons de les<br />
éliminer avant d’utiliser l’appareil, à l’aide d’un<br />
produit d’entretien non abrasif. Une odeur de<br />
caoutchouc peut se dégager au cours des<br />
premières heures d’utilisation, elle disparaîtra très<br />
vite.<br />
! Lors du branchement de la table, un bip sonore<br />
retentit au bout de quelques secondes. A partir de<br />
ce moment-là vous pouvez allumer votre table de<br />
cuisson.<br />
! Une pression prolongée sur les touches - et +<br />
accélère l’avancement rapide des niveaux de<br />
puissance et des minutes du minuteur.<br />
Mise sous tension de la table de cuisson<br />
Pour mettre la table de cuisson sous tension,<br />
appuyer sur la touche pendant une seconde<br />
environ.<br />
Allumage des foyers<br />
Chaque foyer est activé par une touche de sélection<br />
et par un dispositif de réglage de la<br />
puissance à double touche - et +.<br />
• Pour mettre en marche un foyer, appuyer sur la<br />
commande correspondante et sélectionner la<br />
puissance voulue à l’aide des touches - et +.<br />
onction booster*<br />
Pour accélérer la montée en température, une<br />
fonction booster est disponible sur certains foyers,<br />
pour l’activer appuyer sur la touche Booster . Le voyant<br />
placé au-dessus de la touche s’allume. Cette<br />
fonction suralimente la puissance à 2000 ou 3000W<br />
selon la dimension du foyer concerné.<br />
Le booster s’arrête automatiquement après 4<br />
minutes. Tant que le booster d’un foyer est activé, la<br />
puissance du foyer correspondant avant ou arrière<br />
est limitée (par ex : si le booster est activé sur le<br />
foyer arrière gauche, la puissance du foyer avant<br />
gauche baisse). Pour de plus amples<br />
renseignements, consulter Description technique<br />
des modèles.<br />
Extinction des foyers<br />
Pour éteindre un foyer, le sélectionner à l’aide de la<br />
touche de sélection correspondante et :<br />
• Appuyez sur la touche - : la puissance du foyer<br />
descend progressivement jusqu’à extinction.<br />
Programmation de la durée de cuisson<br />
! Il est possible de programmer simultanément tous<br />
les foyers pour une durée comprise entre 1 et 99<br />
minutes.<br />
1. Sélectionner le foyer à l’aide de la touche de<br />
sélection correspondante.<br />
2. Régler son niveau de puissance.<br />
3. Appuyer sur la touche de programmation<br />
Le voyant correspondant au foyer sélectionné<br />
clignote.<br />
4. Sélectionner la durée désirée à l’aide des touches<br />
- - et +.<br />
5. Valider en appuyant sur la touche , sinon la<br />
sélection se fait automatiquement au bout de 10<br />
secondes.<br />
Le compte à rebours du minuteur démarre aussitôt.<br />
La fin de la cuisson programmée est indiquée par un<br />
signal acoustique (durée 1 minute) et le foyer<br />
s’éteint.<br />
Procéder de même pour tous les foyers devant être<br />
programmés.<br />
Affichage en cas de programmation multiple<br />
En cas de programmation d'un ou de plusieurs<br />
foyers, l'écran affiche le temps restant pour le foyer<br />
qui se rapproche le plus de la fin du temps<br />
programmé, dont la position est indiquée par<br />
clignotement du voyant correspondant. Les voyants<br />
des autres foyers programmés sont allumés.<br />
Pour afficher le temps restant des autres foyers<br />
programmés, appuyer plusieurs fois de suite sur la<br />
touche : il y aura affichage à la suite et dans le<br />
sens des aiguilles d'une montre des<br />
temps du minuteur et de tous les<br />
foyers programmés, en partant du<br />
foyer avant gauche.<br />
* N’existe que sur certains modèles<br />
47<br />
R
R<br />
Modifier la programmation<br />
1. Appuyer plusieurs fois de suite sur la touche ,<br />
jusqu’à affichage du temps correspondant au foyer<br />
devant être modifié.<br />
2. Sélectionner un nouveau temps à l’aide des<br />
touches - et +.<br />
3. Appuyer sur la touche pour valider.<br />
Pour annuler une programmation, procéder comme<br />
indiqué plus haut. Au point 2, appuyer sur la touche<br />
- : la durée diminue progressivement jusqu’à<br />
l’extinction 0. La programmation est remise à zéro et<br />
l’afficheur quitte le mode programmation.<br />
Le minuteur<br />
La table de cuisson doit être allumée.<br />
Le minuteur <strong>per</strong>met de sélectionner une durée de 99<br />
minutes maximum.<br />
1. Appuyer sur la touche de programmation .<br />
Jusqu’à ce que le voyant minuteur s’allume.<br />
2. Sélectionner la durée désirée à l’aide des touches<br />
- et +.<br />
3. Appuyer sur la touche pour valider.<br />
Le compte à rebours du minuteur démarre aussitôt.<br />
Une fois le temps écoulé, un signal sonore retentit<br />
(pendant 1 minute).<br />
Verrouillage des commandes<br />
Pendant le fonctionnement de la table, il est<br />
possible de verrouiller les commandes pour<br />
empêcher toute intervention extérieure sur le réglage<br />
(enfants, nettoyage...). Appuyer sur la touche<br />
pour verrouiller les commandes, le voyant situé audessus<br />
de la touche s’allume.<br />
Pour pouvoir modifier les réglages (interrompre la<br />
cuisson par ex.) il faut déverrouiller les commandes<br />
: appuyer sur la touche pendant quelques<br />
instants, le voyant s’éteint et les commandes sont<br />
déverrouillées.<br />
48<br />
.<br />
Extinction de la table de cuisson<br />
Appuyer sur la touche pour éteindre l’appareil.<br />
Si les commandes de l’appareil ont été verrouillées,<br />
elles le seront encore au rallumage de la table. Pour<br />
pouvoir rallumer la table de cuisson, il faut d’abord<br />
déverrouiller les commandes.<br />
Mode Démonstration (demo)<br />
Il est possible de sélectionner une utilisation en<br />
mode démonstration où le tableau de bord<br />
fonctionne normalement (y compris les commandes<br />
concernant la programmation) mais où les éléments<br />
chauffants ne s’allument pas. Pour activer le mode<br />
démonstration (demo), il faut que la table soit sous<br />
tension et que tous les foyers soient éteints :<br />
• Appuyer simultanément sur les touches + et – et<br />
les garder enfoncées pendant 6 secondes. Au<br />
bout de 6 secondes, le voyant ON/O et le<br />
voyant VERROUILLAGE DES COMMANDES se<br />
mettent à clignoter pendant une seconde. Lâcher<br />
les touches + et – et appuyer sur la touche<br />
;<br />
• il y a affichage de DE et de MO et la table<br />
s’éteint;<br />
• au rallumage successif, la table se trouvera en<br />
mode démonstration (demo).<br />
Pour quitter ce mode de fonctionnement, suivre la<br />
procédure décrite plus haut. Il y a affichage de DE<br />
et de O et la table s’éteint. Au rallumage successif,<br />
la table fonctionnera normalement.<br />
Conseils d’utilisation de l’appareil<br />
! Utiliser des récipients dont le matériau est<br />
compatible avec l’induction (matériau<br />
ferromagnétique). Nous recommandons l’utilisation<br />
de casseroles en : fonte, acier émaillé ou inox<br />
spécial induction. Pour s’assurer de la compatibilité<br />
d’un récipient, effectuer un test avec un aimant.<br />
*<br />
A UTILISER NE CONVIENT PAS<br />
Fonte<br />
Acier émaillé<br />
Inox spécial<br />
Cuivre<br />
Aluminium, Verre, Terre,<br />
Céramique, Inox non magnétique
Pour obtenir de meilleures <strong>per</strong>formances de la table<br />
de cuisson :<br />
• Utiliser des casseroles à fond plat et de forte<br />
épaisseur pour qu’elles adhèrent parfaitement à<br />
la zone de chauffe<br />
• Utiliser des casseroles dont le diamètre couvre<br />
complètement la zone de chauffe de façon à ce<br />
que toute la chaleur disponible puisse être<br />
utilisée.<br />
• Veiller à ce que la base des casseroles soit<br />
toujours parfaitement sèche et propre pour<br />
garantir un bon contact et une longue durée de<br />
vie des foyers mais aussi des casseroles.<br />
• Eviter d’utiliser les mêmes casseroles que sur les<br />
brûleurs à gaz. la concentration de chaleur sur les<br />
brûleurs à gaz peut déformer le fond de la<br />
casserole qui <strong>per</strong>d de son adhérence.<br />
Les sécurités<br />
Détection de récipient<br />
Chaque foyer est équipé d’une détection de<br />
casserole. Le foyer ne délivre de puissance qu’en<br />
présence d’une casserole adaptée au foyer. Le<br />
voyant clignotant peut signaler :<br />
• une casserole incompatible<br />
• une casserole de trop petit diamètre<br />
• que la casserole a été soulevée<br />
Indicateurs de chaleur résiduelle<br />
Chaque foyer est équipé d’un indicateur de chaleur<br />
résiduelle. Cet indicateur signale les foyers dont la<br />
température est encore élevée. Si l’afficheur de<br />
puissance affiche , c’est que le foyer est encore<br />
chaud. On peut par exemple s’en servir pour garder<br />
un plat au chaud ou faire fondre du beurre ou du<br />
chocolat. Lors du refroidissement du foyer,<br />
l’afficheur de puissance affiche . L’afficheur<br />
s’éteint dès que le foyer a suffisamment refroidi.<br />
Surchauffe<br />
En cas de surchauffe de ses composants<br />
électroniques, la table s’éteint automatiquement et<br />
l’afficheur indique suivi d’un chiffre clignotant. Cet<br />
affichage disparaît et la table est à nouveau<br />
utilisable dès que la température est redescendue à<br />
un niveau acceptable.<br />
Interrupteur sécurité<br />
L’appareil est équipé d’un interrupteur de sécurité<br />
qui interrompt instantanément le fonctionnement des<br />
foyers dès qu’un temps limite de fonctionnement à<br />
un niveau de puissance donné est atteint. Pendant<br />
l’interruption de sécurité, l’afficheur indique “0”.<br />
Exemple : le foyer arrière droit est réglé sur 5, tandis<br />
que le foyer avant gauche est réglé sur 2. Le foyer<br />
arrière droit s’éteindra au bout de 5 heures de<br />
fonctionnement tandis que le foyer avant gauche<br />
s’éteindra au bout de 8 heures.<br />
Puissance<br />
Signal sonore<br />
Durée limite de<br />
fonctionnement<br />
1 9<br />
2 8<br />
3 7<br />
4 6<br />
5 5<br />
6 4<br />
7 3<br />
8 2<br />
9 1<br />
Des anomalies, comme par exemple :<br />
• un objet (casserole, couvert, ...) placé plus de 10<br />
secondes sur la zone de commande,<br />
• un débordement sur la zone de commande,<br />
• une pression prolongée sur une touche,<br />
peuvent déclencher un signal sonore. Eliminer la<br />
cause de dysfonctionnement pour stop<strong>per</strong> le<br />
signal sonore. Si la cause de l’anomalie n’est pas<br />
éliminée, le signal sonore continue à retentir et la<br />
table s’éteint.<br />
49<br />
R
R<br />
Description technique des foyers<br />
L’induction est le procédé de cuisson le plus rapide.<br />
Contrairement aux plaques traditionnelles, le foyer<br />
n’émet aucune chaleur : la chaleur est produite à<br />
l’intérieur du récipient à condition que le fond de ce<br />
dernier soit en matériau ferromagnétique.<br />
Tables de cuisson CE6IA.1 /HA<br />
CE6IA.1 X /HA<br />
CE6IA. 2 F/HA<br />
CE6IA. 2 X F/HA<br />
Foyers Puissance (en W)<br />
Arrière gauche I 1400 – 600 si avant gche*<br />
Arrière droit I 2200 – B 3000*<br />
Avant gauche I 2200 – B 3000*<br />
Avant droit I 1400 – 600 si arrière drt*<br />
Puissance totale 7200<br />
Légende :<br />
I = foyer à induction simple<br />
B = booster: le foyer peut être suralimenté à 3000 W<br />
* = la puissance maximale est limitée à 600 W tant<br />
que le booster est activé sur le foyer arrière<br />
correspondant (voir Mise en marche et Utilisation).<br />
50
Conseils utiles pour la cuisson<br />
Cuiccon très vive<br />
Cuisson<br />
vive<br />
Cuisson moyenne<br />
Cuisson douce<br />
Cuisson très<br />
douce<br />
ª<br />
Mise en pression<br />
Autocuisser<br />
Friture<br />
• Grillade Ebullition<br />
•<br />
<br />
<br />
§<br />
§<br />
S<br />
S<br />
¢<br />
¢<br />
£<br />
<br />
<br />
¡<br />
Crepes Saise et coloration<br />
(Rotis, Steack, Escalope, Filets de poisson,<br />
Oeufs au plat)<br />
Réduction rapide (Sauce liquides)<br />
Eau Frémissante (Pates, Riz, Légumes)<br />
Lait<br />
Réduction lente (Sauce épaisses)<br />
Cuisson au bain-marie Cuisson Autocuiseur après chuchotement<br />
Mijotage (Ragouts)<br />
Réchauffage des préparations<br />
Sauce chocolat Maintien au chaud<br />
51<br />
R
R<br />
Précautions et conseils<br />
! Cet appareil a été conçu et fabriqué conformément<br />
aux normes internationales de sécurité. Ces conseils<br />
sont fournis pour des raisons de sécurité et doivent<br />
être lus attentivement.<br />
Sécurité générale<br />
• Cet appareil a été conçu pour un usage familial,<br />
de type non professionnel.<br />
• Cet appareil ne doit pas être installé en extérieur,<br />
même dans un endroit abrité, il est en effet très<br />
dangereux de le laisser exposé à la pluie et aux<br />
orages.<br />
• Ne touchez pas à l’appareil pieds nus ou si vos<br />
mains ou pieds sont mouillés ou humides<br />
• Cet appareil qui sert à cuire des aliments ne<br />
doit être utilisé que par des adultes<br />
conformément aux instructions du mode<br />
d'emploi. Toute autre utilisation (comme par<br />
exemple le chauffage d'une pièce) est impropre<br />
et donc dangereux. Le fabricant décline toute<br />
responsabilité en cas de dommages provoqués<br />
par un usage impropre ou erroné.<br />
• Ce mode d’emploi concerne un appareil de classe<br />
1 (isolé) ou classe 2 - sous-classe 1<br />
(encastrement entre 2 meubles)<br />
• En cours de fonctionnement, les éléments<br />
chauffants et certaines parties du four<br />
deviennent très chaudes. Attention à ne<br />
pas les toucher et à garder les enfants à<br />
distance.<br />
• Le plan vitrocéramique résiste aux chocs<br />
mécaniques, il peut toutefois se fendre (ou même<br />
se briser) sous l’effet d’un choc provoqué par un<br />
objet pointu, tel qu’un ustensile par exemple.<br />
Dans ce cas, débranchez immédiatement<br />
l’appareil du réseau électrique et adressez-vous à<br />
un centre d’assistance technique.<br />
• Si la surface de la table est fêlée, éteindre<br />
l'appareil pour éviter tout risque d'électrocution.<br />
• Evitez que le cordon d’alimentation d’autres petits<br />
électroménagers touche à des parties chaudes du<br />
four.<br />
• Les orifices ou les fentes d’aération ou<br />
d’évacuation de la chaleur ne doivent pas être<br />
bouchés<br />
• Saisissez toujours la poignée en son milieu : elle<br />
risque d’être très chaude à ses extrémités.<br />
• Utilisez toujours des gants de protection pour<br />
enfourner ou sortir des plats du four.<br />
• Ne tapissez jamais la sole du four de papier<br />
aluminium.<br />
52<br />
• Ne rangez pas de matériel inflammable à<br />
l’intérieur du four: si l’appareil était par<br />
inadvertance mis en marche, il pourrait prendre<br />
feu.<br />
• Contrôlez toujours que les manettes sont bien<br />
dans la position • quand l’appareil n’est pas<br />
utilisé.<br />
• Ne tirez surtout pas sur le câble pour débrancher<br />
la fiche de la prise de courant.<br />
• N’effectuez aucune opération de nettoyage ou<br />
d’entretien sans avoir auparavant débranché la<br />
fiche de la prise de courant.<br />
• En cas de panne, n’essayez en aucun cas<br />
d’accéder aux mécanismes internes pour tenter<br />
de réparer l’appareil. Contactez le service<br />
d’Assistance (voir Assistance).<br />
• Ne posez pas d’objets lourds sur la porte du four<br />
ouverte.<br />
• N’oubliez pas que la température des foyers reste<br />
assez élevée pendant trente minutes au moins<br />
après leur extinction. La chaleur résiduelle est<br />
aussi signalée par un voyant (voir Mise en marche<br />
et Utilisation).<br />
• Gardez à bonne distance de la table de cuisson<br />
tout objet qui pourrait fondre, des objets en<br />
plastique ou en aluminium par exemple, ou des<br />
produits à haute teneur en sucre. aites très<br />
attention aux emballages, au film plastique et<br />
papier aluminium : au contact des surfaces<br />
encore chaudes ou tièdes, ils risquent<br />
d’endommager gravement la table.<br />
• aites attention à ce que les manches des<br />
casseroles soient toujours tournés vers l’intérieur<br />
de la table de cuisson pour éviter tout heurt<br />
accidentel.<br />
• Ne pas poser d'objets métalliques (couteaux,<br />
cuillères, couvercles, etc.) sur la table, ils risquent<br />
de devenir brûlants.<br />
• Cet appareil n’est pas prévu pour être utilisé par<br />
des <strong>per</strong>sonnes (y compris les enfants) dont les<br />
capacités physiques, sensorielles ou mentales<br />
sont réduites, ou des <strong>per</strong>sonnes dénuées<br />
d’expérience ou de connaissance, sauf si elles<br />
ont pu bénéficier, par l’intermédiaire d’une<br />
<strong>per</strong>sonne responsable de leur sécurité, d’une<br />
surveillance ou d’instructions préalables<br />
concernant d’utilisation de l’appareil.<br />
• Si la cuisinière est installée sur un socle, prenez<br />
les précautions qui s'imposent pour que l'appareil<br />
ne tombe pas de ce socle.<br />
• Après utilisation, éteindre la table de cuisson à<br />
l’aide de son dispositif de commande et ne pas<br />
se fier uniquement à son détecteur de casserole.<br />
• S'assurer que les enfants ne jouent pas avec<br />
l'appareil.
• Avis à toute <strong>per</strong>sonne portant un pacemaker ou<br />
autre implant médical actif :<br />
La table est conforme à toutes les<br />
réglementations en matière d’interférences<br />
électromagnétiques.<br />
Par conséquent, ce produit est parfaitement<br />
conforme à toutes les dispositions légales<br />
(directives 89/336/CEE). Il a été conçu de manière<br />
à ne pas provoquer d’interférences à d’autres<br />
appareils électriques utilisés, pourvu que ceux-ci<br />
soient également conformes aux réglementations<br />
susmentionnées.<br />
La table induction génère des champs<br />
électromagnétiques à courte portée.<br />
Afin d’éviter tout risque d’interférence entre la<br />
table de cuisson et le pacemaker, ce dernier<br />
devra être fabriqué conformément à la<br />
réglementation en vigueur.<br />
A ce propos, nous ne pouvons assurer que la<br />
conformité de notre produit. Pour tous<br />
renseignements quant à la conformité ou à des<br />
problèmes éventuels d’incompatibilité, prière de<br />
s’adresser à son médecin traitant ou au fabricant<br />
du pacemaker.<br />
Mise au rebut<br />
• Mise au rebut du matériel d’emballage : se<br />
conformer aux réglementations locales, les<br />
emballages pourront ainsi être recyclés.<br />
• La directive européenne 2002/96/CE relative aux<br />
déchets d’équipements électriques et<br />
électroniques (DEEE), prévoit que les<br />
électroménagers ne peuvent pas être traités<br />
comme des déchets solides urbains courants.<br />
Les appareils usagés doivent faire l’objet d’une<br />
collecte séparée pour optimiser le taux de<br />
récupération et de recyclage des matériaux qui<br />
les composent et empêcher tout danger pour la<br />
santé et pour l’environnement. Le symbole de la<br />
poubelle barrée est appliqué sur tous les produits<br />
pour rappeler qu’ils font l’objet d’une collecte<br />
sélective.<br />
Pour de plus amples renseignements sur la mise<br />
au rebut des électroménagers, les possesseurs<br />
peuvent s’adresser au service public prévu à cet<br />
effet ou aux commerçants.<br />
Economies et respect de<br />
l’environnement<br />
• Pour faire des économies d’électricité, utiliser<br />
autant que possible le four pendant les heures<br />
creuses. Les options de programmation des<br />
cuissons et plus particulièrement la “cuisson<br />
différée” (voir Programmes), <strong>per</strong>mettent de<br />
s’organiser en ce sens.<br />
• Pour les cuissons au TOURNEBROCHE et<br />
ROTISSERIE, nous recommandons de garder la<br />
porte du four fermée: les résultats obtenus sont<br />
meilleurs et la consommation d’énergie est<br />
moindre (environ 10% d’économie).<br />
• Garder les joints propres et en bon état pour qu’ils<br />
adhèrent bien à la porte et ne causent pas de<br />
dé<strong>per</strong>dition de chaleur.<br />
! Ce produit est conforme à la nouvelle Directive<br />
Européenne sur la réduction de la consommation<br />
d'énergie en mode standby.<br />
FUOR:<br />
Sans opérations pendant 2 minutes, l'appareil passe<br />
automatiquement en mode veille. Le mode standby<br />
est signalé par la faible luminosité de "touche<br />
Horloge". A la moindre intervention sur l'appareil, le<br />
système se remet en mode de fonctionnement<br />
normal.<br />
PLAN:<br />
Sans opérations pendant 2 minutes, après<br />
l'extinction des voyants de chaleur résiduelle et<br />
l'arrêt du ventilateur (si existants), l'appareil se place<br />
automatiquement en "off mode".<br />
Pour remettre l'appareil en mode de fonctionnement<br />
normal, appuyer sur la touche ON/OFF.<br />
53
R<br />
Nettoyage et entretien<br />
Mise hors tension<br />
Avant toute opération de nettoyage ou d’entretien<br />
coupez l’alimentation électrique de l’appareil.<br />
Nettoyage de l’appareil<br />
! Ne nettojez jamais l’appareil avec des nettoyeurs<br />
vapeur ou haute pression.<br />
• Nettoyez l’extérieur émaillé ou inox et les joints en<br />
caoutchouc à l’aide d’une éponge imbibée d’eau<br />
tiède additionnée de savon neutre Si les taches<br />
sont difficiles à enlever, utilisez des produits<br />
spéciaux. Il est conseillé de rincer abondamment<br />
et d’essuyer après le nettoyage. N’utilisez ni<br />
poudres abrasives ni produits corrosifs.<br />
• Nettoyez l’enceinte du four après toute utilisation,<br />
quand il est encore tiède. Utilisez de l’eau chaude<br />
et du détergent, rincez et séchez avec un chiffon<br />
doux. Evitez tout produit abrasif.<br />
• Nettoyer la vitre de la porte avec des produits non<br />
abrasifs et des éponges non grattantes, essuyer<br />
ensuite avec un chiffon doux. Ne pas utiliser de<br />
matériaux abrasifs ou de racloirs métalliques<br />
aiguisés qui risquent de rayer la surface et de<br />
briser le verre.<br />
• Les accessoires peuvent être lavés comme de la<br />
vaisselle courante y compris en lave-vaisselle.<br />
• Pour un entretien courant, passez une éponge<br />
humide sur la surface et séchez avec du papier<br />
essuie-tout.<br />
• Si la table est sale, frottez avec un produit<br />
d’entretien adapté au verre vitrocéramique, rincez<br />
et essuyez.<br />
• les salissures en relief s’enlèvent à l’aide d’un<br />
grattoir. Opérez dès que possible, ne pas<br />
attendre que l’appareil soit refroidi afin d’éviter<br />
une incrustation des salissures. L’utilisation d’une<br />
éponge en fil d’acier inoxydable - spécifique pour<br />
verre vitrocéramique - imprégnée d’eau<br />
savonneuse donne d’excellents résultats.<br />
• Tout objet, plastique ou sucre ayant<br />
accidentellement fondu sur la table de cuisson<br />
doit être aussitôt enlevé à l’aide du grattoir tant<br />
que la surface est encore chaude.<br />
• Une fois que la table est propre, vous pouvez<br />
appliquer un produit d’entretien et de protection<br />
spécial : celui-ci laisse un film invisible qui<br />
protège la surface en cas de débordement<br />
accidentel. Opérez de préférence quand l’appareil<br />
est tiède ou froid.<br />
* N’existe que sur certains modèles<br />
54<br />
• Prenez soin de toujours bien rincer à l’eau claire et<br />
de sécher la table : les résidus des produits<br />
peuvent s’incruster lors d’une prochaine cuisson.<br />
Contrôler les joints du four<br />
Contrôlez périodiquement l’état du joint autour de la<br />
porte du four. S’il est abîmé, adressez-vous au<br />
service après-vente le plus proche de votre<br />
domicile. Mieux vaut ne pas utiliser le four tant qu’il<br />
n’est pas réparé.<br />
Remplacement de l’ampoule d’éclairage<br />
du four<br />
hublot<br />
joint<br />
cavité<br />
lampe<br />
Pour changer<br />
l’ampoule<br />
d’éclairage du<br />
four :<br />
1. enlever le couvercle en verre à l’aide d’un<br />
tournevis.<br />
2. Dévisser l’ampoule et la remplacer par une autre<br />
de même type : puissance 15 W, culot E 14.<br />
Remettre le couvercle en place en prenant bien soin<br />
de repositionner correctement le joint (voir figure).
Nettoyage automatique AST CLEAN<br />
Pendant le programme AST CLEAN la température<br />
à l’intérieur du four atteint 500°C et lance le<br />
processus de pyrolyse, de carbonisation autrement<br />
dit des salissures alimentaires. Les salissures sont<br />
littéralement incinérées.<br />
Pendant la pyrolyse, les surfaces peuvent devenir<br />
très chaudes : garder les enfants à distance. Il peut<br />
arriver de voir, à travers la vitre, des particules qui<br />
s’illuminent : il s’agit d’une combustion instantanée,<br />
phénomène tout à fait normal et sans danger.<br />
Avant de lancer le AST CLEAN :<br />
• enlever avec une éponge humide les salissures<br />
en excès. Ne pas utiliser de détergents ;<br />
• sortir tous les accessoires ;<br />
• ne pas placer de serviettes ou de maniques sur la<br />
poignée du four.<br />
• amener le bouton PROGRAMMES sur “0”<br />
! Si le four est excessivement chaud, la pyrolyse<br />
pourrait ne pas démarrer. Attendre qu’il refroidisse.<br />
! L’activation du programme n’est possible qu’après<br />
avoir fermé la porte du four.<br />
! Pour obtenir de meilleurs résultats de nettoyage,<br />
nous vous conseillons d'effectuer la pyrolyse, plan<br />
de cuisson éteint.<br />
Pour activer le cycle de nettoyage AST CLEAN<br />
appuyer 4 secondes sur la touche . Le bouton<br />
SELECTION TEMPS <strong>per</strong>met de choisir le niveau de<br />
nettoyage désiré avec durée présélectionnée et non<br />
modifiable :<br />
1. Economique (ECO) : tourner le bouton pour<br />
l’amener sur “-”. Durée 1 heure;<br />
2. Normal (NOR) : niveau initial. Durée 1 heure 30;<br />
3. Intensif (INT) : tourner le bouton et l’amener sur<br />
“+”. Durée 2 heures.<br />
4. Appuyer sur la touche pour confirmer.<br />
Pour le cycle AST CLEAN aussi, comme pour tout<br />
cycle de cuisson, il est possible de programmer la<br />
fin du cycle de nettoyage (voir Programmer la fin du<br />
nettoyage automatique).<br />
Les sécurités<br />
• l’icône s’allume sur l’afficheur pour indiquer<br />
le verrouillage automatique de la porte du four<br />
dès que la température a atteint des valeurs<br />
élevées ;<br />
• l’icône indique qu’il est possible d’annuler,<br />
à tout moment, le cycle de nettoyage par<br />
pression sur la touche ;<br />
• en cas d’anomalie de fonctionnement,<br />
l’alimentation des résistances est<br />
automatiquement coupée ;<br />
• une fois que la porte est verrouillée, aucune<br />
modification de sélection de durée et de fin de<br />
cycle n’est plus possible.<br />
Programmer la fin du nettoyage automatique<br />
1. Appuyer sur la touche jusqu’à ce que l’icône<br />
et les deux digits numériques de<br />
l’AICHEUR se mettent à clignoter ;<br />
2. tourner le bouton SELECTION TEMPS pour<br />
l’amener sur “+” ou “-” et régler l’heure ;<br />
3. appuyer à nouveau sur la touche jusqu’à ce<br />
que les deux autres digits numériques de<br />
l’AICHEUR se mettent à clignoter ;<br />
4. tourner le bouton SELECTION TEMPS pour<br />
l’amener sur “+” ou “-” et régler les minutes ;<br />
5. appuyer à nouveau sur la touche pour<br />
confirmer ;<br />
6. un signal sonore indique que le temps est écoulé<br />
et l’AICHEUR affiche END.<br />
• Exemple : il est 9h00 et on choisit un AST<br />
CLEAN niveau Economique qui a donc une durée<br />
présélectionnée de 1 heure. L’heure finale de la<br />
pyrolyse est fixée à 12h30. Le programme<br />
démarre automatiquement à 11h30.<br />
Les icônes et éclairées signalent qu’une<br />
programmation a été lancée. L’AICHEUR affiche à<br />
tour de rôle l’heure de fin du AST CLEAN et sa<br />
durée.<br />
A la fin du nettoyage automatique<br />
Pour pouvoir ouvrir la porte du four, il faudra attendre<br />
que la température du four descende à un niveau<br />
acceptable. Il se peut que des résidus blancs<br />
poussiéreux se déposent sur l’enceinte du four : les<br />
enlever avec une éponge humide après<br />
refroidissement complet de l’appareil. Pourquoi ne<br />
pas profiter de la chaleur emmagasinée pour faire<br />
démarrer une cuisson sans se soucier des résidus<br />
poussiéreux : ils sont tout à fait inoffensifs.<br />
55<br />
R
R<br />
Assistance<br />
Attention :<br />
L’appareil est équipé d’un système d’autotest qui <strong>per</strong>met de détecter toute anomalie de fonctionnement. Ces<br />
anomalies sont affichées sous la forme: “” suivi de chiffres.<br />
Contacter alors un service d’assistance technique.<br />
! Ne jamais faire appel à des techniciens non agréés.<br />
Lui indiquer :<br />
• le type d’anomalie;<br />
• le modèle de l’appareil (Mod.)<br />
• son numéro de série (S/N)<br />
Ces informations figurent sur la plaque signalétique apposée sur l’appareil<br />
56
Gebruiksaanwijzing<br />
IT<br />
Italiano, 1<br />
NL<br />
Nederlands,<br />
57<br />
GB<br />
English,20<br />
CE6IA.1 /HA<br />
CE6IA.1 X /HA<br />
CE6IA. 2 F/HA<br />
CE6IA. 2 X F/HA<br />
R<br />
rançais, 38<br />
Inhoud<br />
Installatie, 58-59<br />
Plaatsen en waterpas zetten<br />
Elektrische aansluiting<br />
Tabel eigenschappen<br />
Beschrijving van het apparaat, 60-61<br />
Aanzichttekening<br />
Bedieningspaneel<br />
Display<br />
Bedieningspaneel kookplaat<br />
Starten en gebruik, 62-65<br />
De klok instellen<br />
De timer instellen<br />
Gebruik van de oven<br />
Handmatige kookprogramma’s<br />
Automatische kookprogramma’s<br />
De bereiding programmeren<br />
Praktische kooktips<br />
Kooktabel oven<br />
Gebruik van de kookplaat, 66-70<br />
Inschakelen kookplaat<br />
Inschakelen kookzones<br />
Boosterfunctie<br />
Uitschakelen kookzones<br />
Programmering kookduur<br />
De timer<br />
Blokkering van het bedieningspaneel<br />
Uitschakelen kookplaat<br />
“Demo” modus<br />
Praktische tips voor het gebruik van het apparaat<br />
Veiligheidsmechanismen<br />
Technische beschrijving van de kookzones<br />
Kooktips<br />
Voorzorgsmaatregelen en advies, 71-72<br />
Algemene veiligheid<br />
Afvalverwijdering<br />
Energiebesparing en milieubehoud<br />
Onderhoud en verzorging, 73-74<br />
De elektrische stroom afsluiten<br />
Reinigen van het apparaat<br />
Vervangen van het ovenlampje<br />
Automatische reiniging AST CLEAN<br />
Service, 75<br />
ORNUIS EN OVEN<br />
NL
NL<br />
Installatie<br />
! Bewaar dit instructieboekje zorgvuldig voor<br />
eventuele raadpleging in de toekomst. In het geval u<br />
het apparaat verkoopt of u verhuist, moet u het<br />
boekje bij het apparaat bewaren.<br />
! Lees de instructies aandachtig door: er staat<br />
belangrijke informatie in over installatie, gebruik en<br />
veiligheid.<br />
! De installatie van het apparaat moet volgens deze<br />
instructies worden uitgevoerd door een bevoegde<br />
installateur.<br />
!Sluit altijd eerst de elektrische stroom af voordat u<br />
tot onderhoud of regeling van het fornuis overgaat.<br />
Plaatsen en waterpas zetten<br />
! Het apparaat kan naast meubels worden geplaatst<br />
die niet hoger zijn dan het werkvlak.<br />
! Controleer dat de wand die in contact komt met de<br />
achterkant van het apparaat van niet ontvlambaar<br />
materiaal is gemaakt en bestand is tegen hoge<br />
tem<strong>per</strong>aturen (T 90°C).<br />
Voor een correcte installatie:<br />
• plaats het apparaat in de keuken, in de eetkamer<br />
of in een eenkamerappartement (niet in de<br />
badkamer);<br />
• als het kookvlak hoger is dan de meubels, moeten<br />
zij op minstens 600 mm van het apparaat vandaan<br />
worden geplaatst;<br />
• als het fornuis onder<br />
mm.<br />
420<br />
Min.<br />
58<br />
HOOD<br />
Min. 600 mm.<br />
een keukenkastje wordt<br />
geïnstalleerd, moet de<br />
afstand tussen de twee<br />
minstens 420 mm zijn.<br />
Deze afstand moet 700<br />
mm worden als de<br />
keukenkastjes zijn<br />
vervaardigd uit<br />
ontvlambaar materiaal<br />
(zie afbeelding);<br />
• hang geen gordijnen achter het fornuis, of op<br />
minder dan 200 mm vanaf de zijkant;<br />
• eventuele afzuigkappen moeten volgens de<br />
instructies van hun eigen gebruiksaanwijzing<br />
worden geïnstalleerd.<br />
Waterpas zetten<br />
Min. 420 mm.<br />
min. 650 mm. with hood<br />
min. 700 mm. without hood<br />
Indien het nodig is het<br />
apparaat te nivelleren, kunnen<br />
de bijgeleverde stelvoetjes in<br />
de daarvoor geschikte<br />
openingen in de hoeken van<br />
het onderstuk van het fornuis<br />
worden geschroefd (zie<br />
afbeelding).<br />
De poten* moeten aan het<br />
onderstuk van het fornuis<br />
worden vastgeklemd.<br />
Elektrische aansluiting<br />
Monteren voedingskabel<br />
Opening klemmenbord:<br />
• Licht de lipjes aan<br />
de zijkant van het<br />
deksel van het<br />
klemmenbord op met<br />
een schroevendraaier;<br />
• Trek het deksel van<br />
het klemmenbord open.<br />
Voor het aansluiten van de kabel moet u de<br />
volgende handelingen uitvoeren:<br />
• draai de schroef van de kabelklem en de<br />
schroeven van de contacten los<br />
! De jum<strong>per</strong>s zijn door de fabriek voorbestemd voor<br />
aansluiting op eenfase 230V (zie afbeelding).<br />
• voor het uitvoeren van de elektrische<br />
aansluitingen van de afbeeldingen worden de<br />
twee jum<strong>per</strong>s gebruikt die zich in de doos<br />
bevinden (zie afbeelding – referentie “P”)<br />
* Slechts op enkele modellen aanwezig.<br />
230V ~<br />
H05RR-F/ 3x4 CEI-UNEL 35363<br />
H05VV-F/ 3x4 CEI-UNEL 35746<br />
N L<br />
5<br />
N<br />
4<br />
L1<br />
3<br />
L2<br />
2<br />
P<br />
1<br />
L3
400V 2N~<br />
H05RR-F 4x4 CEI-UNEL 35363<br />
H05VV-F 4x4 CEI-UNEL 357 46<br />
N L2 L1<br />
5<br />
400V 3N~<br />
H05RR-F 5x2.5 CEI-UNEL 35363<br />
H05VV-F 5x2.5 CEI-UNEL 35746<br />
N L3 L2 L1<br />
5<br />
• zet de kabel vast in de speciale kabelklem en<br />
sluit het deksel.<br />
Het aansluiten van de voedingskabel aan het net<br />
Wanneer het apparaat rechtstreeks op het<br />
elektrische net wordt aangesloten, moet u tussen het<br />
apparaat en het net een meerpolige schakelaar<br />
aanbrengen met een afstand tussen de contacten<br />
van minstens 3 mm, aangepast aan het elektrische<br />
vermogen en voldoend aan de geldende nationale<br />
normen (de aarding mag niet worden onderbroken<br />
door de schakelaar). De voedingskabel moet<br />
zodanig worden geplaatst dat hij nergens een<br />
tem<strong>per</strong>atuur bereikt van 50°C hoger dan de<br />
kamertem<strong>per</strong>atuur.<br />
Vóór het aansluiten moet u controleren dat:<br />
• de contactdoos geaard is en voldoet aan de<br />
geldende normen;<br />
• het stopcontact in staat is het maximale<br />
vermogen van het apparaat te dragen, zoals<br />
aangegeven op het typeplaatje;<br />
• de spanning zich bevindt tussen de waarden die<br />
staan aangegeven op het typeplaatje;<br />
• Gebruik geen verlengsnoeren of dubbelstekkers.<br />
4<br />
4<br />
3<br />
3<br />
2<br />
2<br />
1<br />
1<br />
! Wanneer het apparaat geïnstalleerd is, moeten de<br />
elektrische kabel en de contactdoos gemakkelijk te<br />
bereiken zijn.<br />
! De kabel mag niet gebogen of samengedrukt<br />
worden.<br />
! De kabel moet van tijd tot tijd worden<br />
gecontroleerd en mag alleen door erkende monteurs<br />
worden vervangen.<br />
! De fabrikant kan nergens aansprakelijk voor<br />
worden gesteld als deze normen niet worden<br />
nageleefd.<br />
TABEL EIGENSCHAPPEN<br />
Afmetingen Oven<br />
32x43,5x40 cm<br />
HxBxD<br />
Inhoud liter 56<br />
breedte 42 cm<br />
Afmetingen van de<br />
diepte 44 cm<br />
verwarmingslade<br />
hoogte 8,5 cm<br />
Spanning en<br />
frequentie van de zie typeplaatje<br />
elektrische voeding<br />
Richtlijn 2002/40/EG op het etiket<br />
van elektrische ovens.<br />
Norm EN 50304<br />
ENERGY LABEL<br />
Energieverbruikverklaring Klasse<br />
geforceerde convectie -<br />
verwarmingsfunctie:<br />
Gratineren.<br />
EU Richtlijnen: 2006/95/EG van<br />
12.12.06 (Laagspanning) en<br />
daaropvolgende wijzigingen -<br />
2004/108/EG van 15/12/04<br />
(Elektromagnetische<br />
Compatibiliteit) en<br />
wijzigingen -90/396/EEG van<br />
29/06/90 (Gas) en<br />
wijzigingen - 93/68/EEG van<br />
22/07/93 en daaropvolgende<br />
wijzigingen - 2002/96/EG.<br />
1275/2008 (Stand-by/Off mode)<br />
NL
NL<br />
Beschrijving van het apparaat<br />
Aanzichttekening<br />
Bedieningspaneel<br />
Display<br />
* Slechts op enkele modellen aanwezig.<br />
60<br />
Glaskeramische<br />
kookplaat<br />
Bedieningspaneel<br />
Rooster GRILL<br />
Rooster LEKPLAAT<br />
Toets<br />
FAST CLEAN<br />
Symbool van het<br />
aangeraden kookvlak<br />
Stelvoetje<br />
Knop<br />
INSTELLEN TIJDEN<br />
DISPLAY<br />
Aanwijzer van de<br />
voorverwarming<br />
Symbool<br />
STOP<br />
Aanwijzer<br />
DEURBLOKKERING<br />
Toets<br />
INSTELLEN TIJDEN<br />
Symbool<br />
TIMER<br />
PROGRAMMAKNOP<br />
GELEIDERS<br />
van de roosters<br />
stand 5<br />
stand 4<br />
stand 3<br />
stand 2<br />
stand 1<br />
Stelvoetje<br />
THERMOSTAATKNOP<br />
Symbolen AUTOMATISCHE<br />
PROGRAMMA'S<br />
Symbool<br />
DUUR<br />
Symbool<br />
KLOK<br />
Symbool<br />
EINDE BEREIDING<br />
Cijfers TEMPERATUREN<br />
en TIJDEN
Bedieningspaneel kookplaat<br />
Aanwijzers<br />
STROOMSTERKTE en<br />
RESTERENDE WARMTE<br />
Controlelampje<br />
GESELECTEERD KOOKGEDEELTE<br />
• Toets TOENAME VERMOGEN om de kookplaat<br />
aan te zetten en het vermogen ervan te regelen<br />
(zie Starten en gebruik).<br />
• Toets ANAME VERMOGEN om het vermogen te<br />
regelen en de kookplaat uit te zetten (zie Starten<br />
en gebruik).<br />
• Controlelampje GESELECTEERD<br />
KOOKGEDEELTE geeft aan dat het betreffende<br />
kookgedeelte geselecteerd is en dat u het kunt<br />
regelen.<br />
• Toets SELECTEREN KOOKGEDEELTE om het<br />
gewenste kookgedeelte te selecteren<br />
• AanwijzerVERMOGEN: geeft het bereikte<br />
warmteniveau aan.<br />
• Toets ON/O voor het in- en uitschakelen van het<br />
apparaat.<br />
• Controlelampje ON/O: geeft aan of het apparaat<br />
in- of uitgeschakeld is.<br />
• Toets PROGRAMMERINGSTIMER* om de<br />
programmering van de kookduur te regelen (zie<br />
Starten en gebruik).<br />
* Slechts op enkele modellen aanwezig.<br />
Toets<br />
TOENAME VERMOGEN<br />
Toets<br />
BOOSTER*<br />
Controlelampje<br />
BOOSTER*<br />
Toets<br />
SELECTIE KOOKGEDEELTES<br />
Controlelampje<br />
TIMER*<br />
Display<br />
PROGRAMMERINGSTIMER*<br />
Controlelampje<br />
ON/OFF<br />
Controlelampje<br />
BLOKKERING<br />
BEDIENINGSPANEEL<br />
Toets<br />
BLOKKERING<br />
BEDIENINGSPANEEL<br />
Toets<br />
PROGRAMMERINGSTIMER*<br />
Toets<br />
AFNAME VERMOGEN<br />
Controlelampje<br />
GEPROGRAMMEERD KOOKGEDEELTE*<br />
Toets<br />
ON/OFF<br />
• Display PROGRAMMERINGSTIMER*: toont de<br />
keuzes betreffende de programmering aan (zie<br />
Starten en gebruik).<br />
• Controlelampjes GEPROGRAMMEERD<br />
KOOKGEDEELTE*: tonen de kookgedeeltes aan<br />
als u een programmering start (zie Starten en<br />
gebruik).<br />
• Toets BLOKKERING BEDIENINGSPANEEL om te<br />
voorkomen dat er ongewilde wijzigingen aan de<br />
regeling van het kookvlak worden uitgevoerd (zie<br />
Starten en gebruik).<br />
• Controlelampje BLOKKERING<br />
BEDIENINGSPANEEL: toont dat de blokkering<br />
van het bedieningspaneel heeft plaatsgevonden<br />
(zie Starten en gebruik).<br />
• BOOSTER* toets om het extra vermogen - 3000<br />
W - van de kookzone in te schakelen (zie Starten<br />
en gebruik).<br />
• BOOSTER* controlelampje, geeft aan dat het<br />
'booster' extra vermogen actief is.<br />
• Controlelampje TIMER* geeft aan dat de timer<br />
actief is.<br />
NL
NL<br />
Starten en gebruik<br />
! Vóór gebruik is het strikt noodzakelijk het plastic<br />
folie aan de zijkanten van het apparaat te<br />
verwijderen.<br />
De klok instellen<br />
! U kunt de klok zowel instellen als de oven uit is als<br />
wanneer hij aan is, maar alleen als u geen<br />
uitgestelde bereiding heeft ingesteld.<br />
1. Druk meerdere malen op de toets totdat het<br />
symbool en de eerste twee cijfers op het<br />
DISPLAY beginnen te knip<strong>per</strong>en;<br />
2. draai de knop INSTELLEN TIJDEN richting de “+”<br />
en de “-” om de uren in te stellen;<br />
3. druk nogmaals op de toets totdat de andere<br />
twee cijfers op het DISPLAY beginnen te knip<strong>per</strong>en;<br />
4. draai de knop INSTELLEN TIJDEN richting de “+”<br />
en de “-” om de minuten in te stellen;<br />
5. druk nogmaals op de toets om te bevestigen.<br />
De timer instellen<br />
! Deze functie onderbreekt de bereiding niet en is<br />
onafhankelijk van het gebruik van de oven. Hij dient<br />
er uitsluitend voor een geluidssignaal te laten horen<br />
als de ingestelde minuten zijn verstreken.<br />
1. Druk meerdere malen op de toets totdat het<br />
symbool en de drie cijfers op het DISPLAY<br />
beginnen te knip<strong>per</strong>en;<br />
2. draai de knop INSTELLEN TIJDEN richting de “+”<br />
en de “-” om de minuten in te stellen;<br />
3. druk nogmaals op de toets om te bevestigen.<br />
Nu verschijnt het terugtellen, aan het einde waarvan<br />
u een geluidssignaal zult horen.<br />
Gebruik van de oven<br />
! Wij raden u aan bij het eerste gebruik de oven<br />
minstens een uur leeg te laten functioneren, op<br />
maximum tem<strong>per</strong>atuur en met de deur dicht. Nadat<br />
u de oven heeft uitgeschakeld, opent u de ovendeur<br />
en lucht u het vertrek. De lucht die u ruikt komt door<br />
het verdampen van de middelen die worden<br />
gebruikt om de oven te beschermen.<br />
1. Selecteer het gewenste kookprogramma door aan<br />
de PROGRAMMAKNOP te draaien.<br />
2. De oven begint voor te verwarmen, de aanwijzer<br />
van de voorverwarming gaat aan.<br />
62<br />
De tem<strong>per</strong>atuur kan veranderd worden door te<br />
draaien aan de THERMOSTAATKNOP.<br />
3. Als de aanwijzer van de voorverwarming<br />
uitgaat en u een geluidssignaal hoort, is de<br />
voorverwarming compleet: zet de etenswaren in de<br />
oven.<br />
4. Het DISPLAY toont het icoon dat aangeeft op<br />
welk rooster u het gerecht het beste kunt plaatsen.<br />
5. Tijdens het koken kunt u nog altijd:<br />
- het kookprogramma veranderen met behulp van de<br />
PROGRAMMAKNOP;<br />
- de tem<strong>per</strong>atuur veranderen met behulp van de<br />
THERMOSTAATKNOP;<br />
- de kookduur programmeren of de tijd van einde<br />
bereiding ( zie kookprogramma’s);<br />
- het koken onderbreken door de<br />
PROGRAMMAKNOP weer op stand “0” te zetten.<br />
6. Na twee uur gaat de oven automatisch uit: dit is<br />
om veiligheidsredenen van te voren ingesteld bij<br />
iedere kookfunctie.<br />
U kunt de kookduur veranderen (zie kookprogramma’s).<br />
7. Indien de stroom uitvalt en de oventem<strong>per</strong>atuur<br />
niet te laag is geworden, gaat de oven automatisch<br />
terug naar het punt waar het koken is onderbroken.<br />
De geprogrammeerde functies worden echter niet<br />
onthouden. U dient ze daarom bij het terugkeren van<br />
de stroom opnieuw in te stellen.<br />
! Bij het programma BARBECUE is geen<br />
voorverwarming voorzien.<br />
! Zet nooit voorwerpen op de bodem van de oven; u<br />
riskeert hiermee het email te beschadigen.<br />
! Plaats de ovenschalen altijd op bijgeleverde<br />
roosters.<br />
Ventilator<br />
Om de oven van buiten niet te heet te laten worden,<br />
brengt een verkoelingsventilator een luchtstroom teweeg<br />
die tussen het bedieningspaneel en de ovendeur naar<br />
buiten komt. Aan het begin van het programma AST<br />
CLEAN draait de verkoelingsventilator op lage<br />
snelheid.<br />
! Aan het einde van de kooktijd blijft de ventilator draaien<br />
totdat de oven voldoende is afgekoeld.<br />
Ovenverlichting<br />
Als de oven uit is, kan het ovenlicht op ieder willekeurig<br />
moment aan worden gezet door de ovendeur te openen.<br />
* Slechts op enkele modellen aanwezig.
Handmatige kookprogramma’s<br />
! Alle programma’s hebben een vooringestelde<br />
kooktem<strong>per</strong>atuur. Deze kan handmatig worden<br />
aangepast,en naar wens worden ingesteld tussen de 40°C<br />
en de 250°C.<br />
In het programma BARBECUE is de ingestelde<br />
tem<strong>per</strong>atuur in % uitgedrukt. Dit kan ook handmatig<br />
worden gewijzigd.<br />
Programma MULTILEVEL<br />
Alle verwarmingselementen gaan aan en de ventilator<br />
treedt in werking. Aangezien de warmte in de hele oven<br />
constant is, zorgt de lucht dat de gerechten op<br />
gelijkmatige wijze gekookt en gebakken worden. Hier is<br />
het mogelijkmaximaal twee roosters tegelijk te gebruiken.<br />
Programma BARBECUE<br />
Het bovenste verwarmingselement gaat aan. Als u aan de<br />
THERMOSTAATKNOP draait geeft het DISPLAY de<br />
instelbare vermogensniveaus weer die variëren van een<br />
minimum van 5% tot een maximum van 100%. Het koken<br />
onder de grill is vooral aan te raden voor gerechten die<br />
een hoge en directe tem<strong>per</strong>atuur aan de buitenkant nodig<br />
hebben. Kook met de ovendeur dicht.<br />
Programma GRATINEREN<br />
Het bovenste verwarmingselement gaat aan, en tijdens<br />
een deel van de cyclus ook het cirkelvormige<br />
verwarmingselement en de ventilator. Hiermee wordt de<br />
rechtstreekse bovenhitte van de grill gecombineerd met<br />
de circulatie van de lucht in de oven.<br />
Eventueel verbranden van de buitenkant wordt zo<br />
vermeden; de warmte dringt gemakkelijker door naar de<br />
binnenkant. Kook met de ovendeur dicht.<br />
Programma’s LAGE TEMPERATUUR<br />
Deze kookfunctie is ideaal voor rijzen, ontdooien, het<br />
bereiden van yoghurt, het snel of langzaam opwarmen<br />
van gerechten en het langzaam koken van etenswaren op<br />
lage tem<strong>per</strong>atuur. De in te stellen tem<strong>per</strong>aturen zijn: 40,<br />
65, 90 °C.<br />
Draaispit (slechts op enkele modellen aanwezig)<br />
Voor het activeren van het<br />
draaispit ( zie afbeelding)<br />
gaat u als volgt te werk:<br />
1. plaats de lekplaat in<br />
stand 1;<br />
2. zet de steun van het<br />
draaispit op de 3e stand<br />
en steek de vleespen in<br />
de speciale opening<br />
achterin de oven;<br />
3. activeer het draaispit met de knop<br />
PROGRAMMA’S op de stand of ;<br />
! Bij het programma zal het draaispit stoppen met<br />
draaien wanneer u de ovendeur opent.<br />
Automatische kookprogramma’s<br />
! De tem<strong>per</strong>atuur en de duur van de bereiding zijn<br />
ingesteld en kunnen niet worden gewijzigd door het<br />
systeem C.O.P.® (Cottura Ottimale Programmata<br />
(Optimale Geprogrammeerde Bereiding)) dat<br />
automatisch een <strong>per</strong>fect resultaat garandeert. De<br />
bereiding wordt automatisch gestopt en de oven geeft<br />
aan wanneer het gerecht gaar is. De bereiding kan worden<br />
uitgevoerd door de gerechten in een koude of warme<br />
oven te plaatsen. Voor de correcte plaatsing van het<br />
gerecht in de oven raden wij u aan het symbool te<br />
controleren.<br />
! Als de kookfase is bereikt laat de oven een<br />
geluidssignaal horen.<br />
! Open de ovendeur niet om te voorkomen dat de<br />
tijdsduur en de kooktem<strong>per</strong>atuur worden ontregeld.<br />
Programma VLEES<br />
Gebruik deze functie voor het braden van kalfs-, varkensen<br />
lamsvlees. Plaats het vlees in de koude oven. U kunt<br />
de gerechten eventueel ook in de warme oven plaatsen.<br />
Programma PIZZA<br />
Gebruik deze functie voor het bereiden van pizza’s. Zie<br />
volgende hoofdstuk voor recepten en details.<br />
Programma BROOD<br />
Gebruik deze functie voor het bakken van brood Zie<br />
volgende hoofdstuk voor recepten en details.<br />
Programma CAKE<br />
Deze functie is ideaal voor het bereiden van zowel taarten<br />
met bakkersgist als met gedroogde gist, of zonder gist.<br />
Plaats het gerecht in de koude oven. U kunt de gerechten<br />
eventueel ook in de warme oven plaatsen.<br />
Programma PIZZA<br />
Voor een optimaal resultaat raden wij u aan de volgende<br />
aanwijzingen nauwkeurig op te volgen:<br />
• houdt u zich aan het recept;<br />
• het gewicht van het deeg moet tussen de 500 g en de<br />
700 g zijn.<br />
• vet de bakplaat iets in.<br />
NL
NL<br />
Recept voor PIZZA:<br />
1 Bakplaat, lage ovenstand, oven koud of warm<br />
Recept voor 3 pizza’s van ongeveer 550 g: 1000 g meel,<br />
500 g water, 20 g zout, 20 g suiker, 10 cl olijfolie, 20 g<br />
bakkersgist (of 2 zakjes gedroogde gist)<br />
• Rijzen op kamertem<strong>per</strong>atuur: 1 uur<br />
• In koude of warme oven plaatsen<br />
• Start de bereiding PIZZA<br />
Programma BROOD<br />
Voor een optimaal resultaat raden wij u aan de volgende<br />
aanwijzingen nauwkeurig op te volgen:<br />
• houdt u zich aan het recept;<br />
• het maximum gewicht <strong>per</strong> bakplaat;<br />
• vergeet niet 1 dl koud water te gieten in de<br />
bakplaat op stand 5;<br />
• het deeg moet circa 1 tot 1½ uur op<br />
kamertem<strong>per</strong>atuur rijzen. De exacte duur hangt af<br />
van de kamertem<strong>per</strong>atuur. Het deeg is voldoende<br />
gerezen als het volume is verdubbeld.<br />
Recept voor BROOD:<br />
1 bakplaat van 1000 g max, onderste ovenstand<br />
2 bakplaten van 1000 g max, onderste en middelste<br />
stand<br />
Recept voor 1000 g deeg: 600 g meel, 360 g water, 11 g<br />
zout, 25 g bakkersgist (of 2 zakjes gedroogde gist)<br />
Procedure:<br />
• Meng het meel en het zout in een grote kom.<br />
• Doe de gist in lauw water (circa 35 graden).<br />
• Maak een kuil in het meel.<br />
• Giet er het mengsel van water en gist in<br />
• Kneed het geheel totdat een homogeen deeg is<br />
gevormd dat niet plakkerig is, door het deeg 10<br />
minuten lang met de palm van de hand plat te<br />
drukken en vervolgens weer dicht te vouwen.<br />
• Maak een bal van het deeg, doe het in een<br />
slakom en bedek het met plastic folie om te<br />
voorkomen dat de buitenkant ervan uitdroogt. Doe<br />
de slakom in de oven op de handmatige functie<br />
LAGE TEMPERATUUR op 40°C en laat het<br />
ongeveer 1 uur lang rijzen (het volume van het<br />
deeg moet verdubbelen)<br />
• Verdeel de bal om verschillende broden te maken.<br />
• Leg ze op ovenpapier op de bakplaat.<br />
• Bestrooi de broden met meel.<br />
• Maak sneden in de broden.<br />
• Zet 1 dl koud gedistilleerd water op de bodem van de<br />
oven. Voor het reinigen kunt u het beste water en azijn<br />
gebruiken.<br />
• Plaats het brood in de koude oven.<br />
• Start het programma BROOD<br />
64<br />
• Aan het einde van de kooktijd laat u de broden rusten<br />
op een rooster totdat ze geheel zijn afgekoeld.<br />
De bereiding programmeren<br />
! De programmering is alleen mogelijk wanneer een<br />
kookprogramma is geselecteerd.<br />
Het programmeren van de kookduur<br />
1. Druk meerdere malen op de toets totdat het<br />
symbool en de drie cijfers op het DISPLAY<br />
beginnen te knip<strong>per</strong>en;<br />
2. draai de knop INSTELLEN TIJDEN richting de “+”<br />
en de “-” om de gewenste duur in te stellen;<br />
3. druk nogmaals op de toets om te bevestigen;<br />
4. als de ingestelde duur is verstreken verschijnt op<br />
het DISPLAY het woord END, beëindigt de oven de<br />
bereiding en klinkt een geluidssignaal.<br />
• B.v.: het is 9:00 uur en u programmeert een duur<br />
van 1 uur en 15 minuten. Het programma stopt<br />
automatisch om 10:15.<br />
Het einde van een bereiding programmeren<br />
! Het programmeren van het einde van een bereiding<br />
is alleen mogelijk nadat u een kookduur heeft<br />
geselecteerd.<br />
1. Volg de procedure van de duur van punt 1 t/m 3;<br />
2. druk daarna op de toets totdat het symbool<br />
en de twee cijfers op het DISPLAY beginnen te<br />
knip<strong>per</strong>en;<br />
3. draai de knop INSTELLEN TIJDEN richting de “+”<br />
en de “-” om de uren in te stellen;<br />
4. druk nogmaals op de toets totdat de andere<br />
twee cijfers op het DISPLAY beginnen te knip<strong>per</strong>en;<br />
5. draai de knop INSTELLEN TIJDEN richting de “+”<br />
en de “-” om de minuten in te stellen;<br />
6. druk nogmaals op de toets om te bevestigen;<br />
7. als de ingestelde duur is verstreken verschijnt op<br />
het DISPLAY het woord END, beëindigt de oven de<br />
bereiding en klinkt een geluidssignaal.<br />
• B.v.: het is 9:00 uur, u programmeert een duur<br />
van 1 uur en 15 minuten en de eindtijd om 12:30.<br />
Het programma zal automatisch om 11:15<br />
beginnen.<br />
De symbolen en gaan aan om aan te geven<br />
dat een programmering is uitgevoerd. Op het DISPLAY<br />
verschijnen om de beurt de eindtijd en de duur van<br />
de bereiding.<br />
Om een programmering te annuleren draait u de<br />
PROGRAMMAKNOP op stand “0”.
Praktische kooktips<br />
! Gebruik voor het koken met de heteluchtoven nooit<br />
de standen 1 en 5: bij deze standen zou de hete<br />
lucht de fijne gerechten kunnen verbranden.<br />
! Bij de functies BARBECUE of GRATINEREN, in het<br />
bijzonder wanneer u het draaispit gebruikt, raden wij<br />
u aan de lekplaat op stand 1 te zetten om eventueel<br />
vet of jus op te vangen.<br />
MULTILEVEL<br />
• Gebruik de standen 2 en 4, en plaats de<br />
gerechten die meer warmte nodig hebben op<br />
stand 2.<br />
• Plaats de lekplaat op de onderste stand en het<br />
rooster op de hoogste.<br />
Kooktabel oven<br />
Programma's Gerechten Gewicht<br />
(kg)<br />
Multilevel* Pizza op 2 roosters<br />
Taarten op 2 roosters<br />
Cake op 2 roosters (op lekplaat)<br />
Gebraden kip + aardappels<br />
Lamsvlees<br />
Makreel<br />
Lasagne<br />
Soesjes op 2 roosters<br />
Koekjes op 2 roosters<br />
Kaaskoekjes op 2 roosters<br />
Hartige taarten<br />
Barbecue* Makreel<br />
Tong en inktvis<br />
Calamari- en garnalenspiesjes<br />
Kabeljauwfilet<br />
Gegrilde groenten<br />
Kalfsbiefstuk<br />
Saucijzen<br />
Hamburgers<br />
Tosti (of geroosterd brood)<br />
Kip aan het spit (indien draaispit aanwezig)<br />
Lam aan het spit (indien draaispit aanwezig)<br />
Gratineren* Gegrilde kip<br />
Inktvis<br />
Kip aan het spit (indien draaispit aanwezig)<br />
Eend aan het spit (indien draaispit aanwezig)<br />
Gebraden kalfs- of rundvlees<br />
Gebraden varkensvlees<br />
Lamsvlees<br />
Lage<br />
tem<strong>per</strong>atuur<br />
Ontdooien<br />
Rijzen<br />
Opwarmen gerechten<br />
Pasteuriseren<br />
Pizza (zie recept)<br />
ocaccia (brooddeeg)<br />
1+1<br />
1<br />
1<br />
1<br />
1<br />
0,7<br />
0,7<br />
0,7<br />
0,5<br />
0,8<br />
0,7<br />
n° 4 of 5<br />
n° 4 of 6<br />
1<br />
1<br />
1,5<br />
1<br />
1,5<br />
1,5<br />
1<br />
1<br />
1<br />
BARBECUE<br />
• Plaats de grill op stand 3 of 4, plaats de<br />
gerechten op het midden van de grill.<br />
• We raden u aan het energieniveau op de hoogste<br />
stand te zetten. Het is normaal dat het bovenste<br />
verwarmingselement niet constant aan blijft: zijn<br />
werking wordt geregeld door een thermostaat.<br />
PIZZA<br />
• Gebruik een lichte aluminium ovenschaal en zet<br />
hem op het bijgeleverde ovenrooster.<br />
Bij gebruik van de lekplaat is de bereidingstijd<br />
langer en krijgt u waarschijnlijk geen krokante<br />
pizza.<br />
• Bij zeer gevulde pizza’s raden wij aan de<br />
mozzarella of andere kaas pas halverwege de<br />
kooktijd toe te voegen.<br />
Roosterstanden<br />
standaard<br />
geleiders<br />
Voorverwarmen Aanbevolen<br />
tem<strong>per</strong>atuur<br />
(°C)<br />
verschuifbar<br />
e geleiders<br />
2 en 4<br />
2 en 4<br />
2 en 4<br />
1 en 2/3<br />
2<br />
1 of 2<br />
2<br />
2 en 4<br />
2 en 4<br />
2 en 4<br />
1 en 3<br />
4<br />
4<br />
4<br />
4<br />
3 of 4<br />
4<br />
4<br />
4<br />
4<br />
-<br />
-<br />
2<br />
2<br />
-<br />
-<br />
2<br />
2<br />
2<br />
2 of 3<br />
2 of 3<br />
2 of 3<br />
2 of 3<br />
2<br />
2<br />
1 en 3<br />
1 en 3<br />
1 en 3<br />
1 en 3<br />
1<br />
1<br />
1<br />
1 en 3<br />
1 en 3<br />
1 en 3<br />
1 en 3<br />
3<br />
3<br />
3<br />
3<br />
2 of 3<br />
3<br />
3<br />
3<br />
3<br />
-<br />
-<br />
2<br />
2<br />
-<br />
-<br />
2<br />
2<br />
2<br />
2<br />
2<br />
2<br />
2<br />
2<br />
2<br />
Ja<br />
Ja<br />
Ja<br />
Ja<br />
Ja<br />
Ja<br />
Ja<br />
Ja<br />
Ja<br />
Ja<br />
Ja<br />
Nee<br />
Nee<br />
Nee<br />
Nee<br />
Nee<br />
Nee<br />
Nee<br />
Nee<br />
Nee<br />
Nee<br />
Nee<br />
Nee<br />
Nee<br />
Nee<br />
Nee<br />
Nee<br />
Nee<br />
Nee<br />
Nee<br />
Nee<br />
Nee<br />
Nee<br />
Nee<br />
Nee<br />
220-230<br />
180<br />
170<br />
200-210<br />
190-200<br />
180<br />
190-200<br />
190<br />
190<br />
210<br />
200<br />
100%<br />
100%<br />
100%<br />
100%<br />
100%<br />
100%<br />
100%<br />
100%<br />
100%<br />
100%<br />
100%<br />
210<br />
200<br />
210<br />
210<br />
210<br />
210<br />
210<br />
-<br />
-<br />
-<br />
-<br />
-<br />
-<br />
Duur<br />
bereiding<br />
(minuten)<br />
Pizza<br />
automatisch<br />
Brood<br />
automatisch<br />
Taarten<br />
automatisch<br />
Vlees<br />
automatisch<br />
Brood (zie recept)<br />
Taarten van gistdeeg<br />
Gebraden vlees<br />
1<br />
1<br />
1<br />
1<br />
1<br />
2<br />
2 of 3<br />
2 of 3<br />
2<br />
2<br />
2<br />
Nee<br />
Nee<br />
Nee<br />
-<br />
-<br />
-<br />
55<br />
35-55<br />
60-80<br />
* De kooktijden dienen slechts als indicatie en kunnen naar eigen smaak aangepast worden. De voorverwarming van de oven is door de fabriek ingesteld en kan<br />
niet handmatig worden gewijzigd.<br />
20-25<br />
30-35<br />
20-25<br />
65-75<br />
45-50<br />
30-35<br />
35-40<br />
20-25<br />
10-20<br />
20-25<br />
20-30<br />
15-20<br />
10-15<br />
8-10<br />
10-15<br />
15-20<br />
15-20<br />
15-20<br />
10-12<br />
3-5<br />
70-80<br />
70-80<br />
55-60<br />
30-35<br />
70-80<br />
60-70<br />
60-75<br />
70-80<br />
40-45<br />
-<br />
60-90<br />
-<br />
-<br />
23-33<br />
23-33<br />
NL
NL<br />
Gebruik van de kookplaat<br />
! De lijm die gebruikt is voor de afdichtingen laat wat<br />
vetvlekjes achter op het glas. Voordat u het<br />
apparaat gebruikt raden wij u aan de vlekken te<br />
verwijderen met een speciaal niet-schurend<br />
schoonmaakmiddel. Gedurende de eerste paar uur<br />
dat u het apparaat gebruikt kan het zijn dat u een<br />
rubbergeur ruikt. Deze zal echter snel wegtrekken.<br />
! Als de kookplaat elektrisch wordt aangesloten<br />
hoort u na enkele seconden een kort geluidssignaal<br />
afgaan. Alleen dan kunt u de kookplaat aanzetten.<br />
! Als u lang op de toetsen drukt - en + kunt u de<br />
stroomsterkte en de minuten van de timer snel laten<br />
toenemen.<br />
Inschakelen kookplaat<br />
Druk ongeveer 1 seconde op de knop voor het<br />
inschakelen van de kookplaat.<br />
Inschakelen kookzones<br />
Iedere kookzone wordt in werking gesteld door<br />
middel van een selectietoets en een<br />
regelsysteem voor de stroomsterkte, bestaande<br />
uit een dubbele toets - en +.<br />
• Voor het in werking stellen van een kookzone<br />
drukt u op de betreffende toets en stelt u de<br />
gewenste stroomsterkte in met de toetsen - en<br />
66<br />
+.<br />
Booster functie*<br />
Om de verwarmingstijd te versnellen kunt u in enkele<br />
kookzones de booster functie activeren door op de<br />
Booster toets te drukken. Het controlelampje boven de<br />
toets gaat aan. Deze functie verhoogt het vermogen tot<br />
2000 W of 3000 W, aan de hand van de grootte van de<br />
gekozen kookzone.<br />
De boosterfunctie stopt na 4 minuten automatisch.<br />
Zolang de booster van een van de kookzones actief is,<br />
zal het gedeelte daarvoor of daarachter slechts over<br />
een be<strong>per</strong>kt vermogen beschikken (bv.: als in de<br />
kookzone linksachter de booster actief is, zal het<br />
vermogen in de kookzone linksvoor afnemen). Voor<br />
verdere informatie kunt u de Technische beschrijving<br />
van de modellen raadplegen.<br />
* Slechts op enkele modellen aanwezig.<br />
Uitschakelen kookgedeeltes<br />
Voor het uitschakelen van een kookgedeelte kiest u<br />
dit door middel van de selectietoets en:<br />
• Druk op de toets - : het vermogen van het<br />
kookgedeelte wordt langzaam minder totdat het<br />
uitgaat.<br />
Programmering kookduur<br />
! Alle kookgedeeltes kunnen tegelijkertijd<br />
geprogrammeerd worden voor een tijdsduur van<br />
tussen de 1 en de 99 minuten.<br />
1. Kies het kookgedeelte door middel van de<br />
betreffende selectietoets.<br />
2. De stroomsterkte instellen.<br />
3. Druk op de programmeertoets<br />
Het controlelampje voor het betreffende<br />
kookgedeelte begint te knip<strong>per</strong>en.<br />
4. Stel de gewenste kookduur in door middel van de<br />
toetsen - en +.<br />
5. Bevestigen door op toets te drukken, of na<br />
10 seconden vindt automatische selectie plaats.<br />
De timer begint gelijk met aftellen. Het einde van de<br />
geprogrammeerde kooktijd wordt aangegeven door<br />
een geluidssignaal (van 1 minuut) waarna het<br />
kookgedeelte uitgaat.<br />
Herhaal de hierboven beschreven procedure voor<br />
iedere kookplaat die u wilt programmeren.<br />
Visualisatie bij een meervoudige programmering.<br />
Indien een of meer kookplaten zijn geprogrammeerd<br />
vertoont het display de resterende tijd van de<br />
kookplaat die als eerste eindigt, terwijl hij de positie<br />
ervan aanduidt door middel van het betreffende<br />
controlelampje dat knip<strong>per</strong>t. De controlelampjes van<br />
de andere geprogrammeerde kookplaten zijn aan.<br />
Om de resterende tijd van de andere<br />
geprogrammeerde kookplaten te visualiseren moet u<br />
een aantal keren op de toets drukken: met de<br />
klok mee zullen, de een na de ander,<br />
de tijden van de timer alle<br />
geprogrammeerde kookplaten worden<br />
getoond, te beginnen met de<br />
kookplaat linksvoor.<br />
Het wijzigen van een programmering<br />
1. Druk een aantal keer op de toets totdat de<br />
tijd van de kookplaat die u wilt wijzigen verschijnt.<br />
+<br />
2. Druk op de toetsen - en voor het instellen<br />
van de nieuwe tijd.
3. Bevestig door op de toets te drukken.<br />
Om een programmering te annuleren moet u<br />
bovenstaande handelingen uitvoeren. Bij punt 2<br />
drukt u op de toets - : de duur vermindert<br />
langzaamaan tot aan de uitschakeling 0. De<br />
programmering wordt gewist en het display verlaat<br />
de programmeringsmodus.<br />
De timer<br />
De kookplaat moet aan zijn.<br />
Met de timer kunt u een duur tot aan 99 minuten<br />
instellen.<br />
1. Druk op de toets programmering totdat het<br />
controlelampje van de timer aangaat.<br />
2. Stel de gewenste kookduur in door middel van de<br />
toetsen - en +.<br />
3. Bevestig door op de toets te drukken.<br />
De timer begint gelijk met aftellen. Als de tijd<br />
verstreken is hoort u voor de duur van 1 minuut een<br />
geluidssignaal.<br />
Blokkering van het bedieningspaneel<br />
Als de kookplaat in werking is kunt u het<br />
bedieningspaneel blokkeren om een ongewenst<br />
aanraken te vermijden (kinderen,<br />
schoonmaakhandelingen, enz.). Door op de toets<br />
te drukken zal het bedieningspaneel worden<br />
geblokkeerd. Het controlelampje boven de toets<br />
gaat aan.<br />
Als u het bedieningspaneel weer wilt gebruiken (bv.<br />
als u wilt stoppen met koken) moet u de blokkering<br />
uitschakelen: druk even op de toets . Het<br />
controlelampje gaat uit en het bedieningspaneel<br />
wordt weer geactiveerd.<br />
Uitschakelen kookplaat<br />
Druk op de toets ; het apparaat gaat uit.<br />
Als het bedieningspaneel is geblokkeerd, blijft dit<br />
ook geblokkeerd nadat u de kookplaat opnieuw<br />
inschakelt. Als u de kookplaat opnieuw wilt<br />
inschakelen moet u eerst het bedieningspaneel<br />
deblokkeren.<br />
“Demo” modus<br />
Het is mogelijk een demomodus in te stellen waarbij<br />
het bedieningspaneel normaal functioneert (de<br />
opdrachten betreffende de programmering<br />
inbegrepen), maar waarbij de verwarmingselementen<br />
niet aangaan. Om de “demo” modus te activeren<br />
moet de kookplaat aanstaan en alle<br />
stralingselementen uit:<br />
• Druk tegelijkertijd 6 seconden lang op de toetsen<br />
+ en - . Zodra de 6 seconden zijn verstreken<br />
zullen de controlelampjes ON/O en<br />
BLOKKERING BEDIENINGSPANEEL een seconde<br />
lang knip<strong>per</strong>en. Laat de toetsen + en - los en<br />
druk op de toets ;<br />
• het display toont om de beurt de tekst DE en MO<br />
en het kookvlak gaat uit;<br />
• de volgende keer dat u de kookplaat inschakelt<br />
zal hij zich in de “demo” modus bevinden.<br />
Om deze modus te verlaten volgt u de boven<br />
beschreven procedure. Het display toont om de<br />
beurt de tekst DE en O en het kookvlak gaat uit.<br />
Als u het kookvlak weer inschakelt zal het gewoon<br />
functioneren.<br />
Praktische tips voor het gebruik van het<br />
apparaat<br />
! Gebruik pannen die gemaakt zijn van materiaal dat<br />
geschikt is voor inductie (ferromagnetisch<br />
materiaal). Wij raden het gebruik aan van pannen<br />
van: gietijzer, geëmailleerd staal of speciaal inductie<br />
roestvrij staal. U kunt zelf testen of een pan geschikt<br />
is door hem uit te proberen met een magneet.<br />
GESCHIKTE MATERIALEN<br />
*<br />
Gietijzer<br />
Ge‘mailleerd staal<br />
Speciaal roestvrij staal<br />
ONGESCHIKTE MATERIALEN<br />
Ko<strong>per</strong>,<br />
Aluminium, Glas, Terracotta,<br />
Aardewerk, Niet magnetisch roestvrij staal<br />
Om optimale resultaten te bereiken met de<br />
kookplaat:<br />
• Gebruik alleen pannen met een dikke, platte<br />
bodem zodat ze <strong>per</strong>fect aansluiten op het<br />
verwarmingsvlak.<br />
• Gebruik pannen die groot genoeg zijn om de<br />
kookplaat geheel te bedekken zodat alle<br />
beschikbare hitte wordt benut.<br />
NL
NL<br />
• Houd de bodem van de pannen altijd goed<br />
schoon en droog zodat ze goed aansluiten op het<br />
kookvlak. Dit verlengt de levensduur van zowel<br />
de pannen als het kookvlak zelf.<br />
• Vermijd dezelfde pannen te gebruiken die u ook<br />
op een gasfornuis heeft gebruikt: de<br />
warmteconcentratie van gasbranders kan de<br />
bodem van pannen vervormen, waardoor ze niet<br />
goed meer aansluiten.<br />
Veiligheidssystemen<br />
Pannensensor<br />
Ieder kookgedeelte is voorzien van een systeem dat<br />
waarneemt of er een pan op staat. De plaat straalt<br />
alleen warmte uit als er een pan van de juiste<br />
afmetingen op staat. Het knip<strong>per</strong>ende<br />
controlelampje kan betekenen:<br />
• dat de pan niet geschikt is<br />
• dat de pan een te kleine diameter heeft<br />
• dat de pan niet goed aansluit<br />
Aanwijzers van de resterende warmte<br />
Ieder kookgedeelte is voorzien van een aanwijzer<br />
van de resterende warmte. Deze aanwijzer geeft aan<br />
welke kookzones nog heet zijn. Als het<br />
vermogensdisplay toont dan is het kookgedeelte<br />
nog warm. Het is bijvoorbeeld mogelijk een gerecht<br />
warm te houden of boter of chocolade te laten<br />
smelten. Met het afkoelen van het kookgedeelte zal<br />
het vermogensdisplay tonen. Het display gaat uit<br />
wanneer de kookzone voldoende is afgekoeld.<br />
Oververhitting<br />
In het geval van oververhitting van de elektronische<br />
onderdelen gaat de kookplaat automatisch uit en<br />
verschijnt op het display gevolgd door een<br />
knip<strong>per</strong>end nummer. Deze boodschap verdwijnt en<br />
u kunt de kookplaat weer gebruiken zodra de<br />
tem<strong>per</strong>atuur tot op een acceptabel niveau is gezakt.<br />
68<br />
Veiligheidsschakelaar<br />
Het apparaat beschikt over een<br />
veiligheidsschakelaar die de kookgedeeltes<br />
automatisch uitschakelt als de tijdslimiet voor een<br />
bepaald vermogensniveau is bereikt. Tijdens deze<br />
veiligheidsonderbreking vertoont het display het<br />
cijfer “0”.<br />
B.v.: de kookplaat rechtsachter staat op 5, terwijl de<br />
plaat linksvoor op 2 staat. De plaat rechtsachter zal<br />
automatisch na 5 uur uitgaan, de plaat linksvoor na<br />
8 uur.<br />
Vermogensniveau<br />
Geluidssignaal<br />
Begrenzing van de<br />
werkingsduur in uren<br />
1 9<br />
2 8<br />
3 7<br />
4 6<br />
5 5<br />
6 4<br />
7 3<br />
8 2<br />
9 1<br />
Enkele storingen, zoals:<br />
• een voorwerp (pan, bestek, enz.) dat meer dan 10<br />
seconden op het bedieningspaneel ligt,<br />
• gemors op het bedieningspaneel,<br />
• een lange druk op een toets, kunnen een<br />
geluidssignaal veroorzaken. Verwijder de oorzaak<br />
van de storing en het geluidssignaal houdt op.<br />
Als de oorzaak van de storing niet wordt<br />
verwijderd blijft het geluidssignaal gaan en wordt<br />
het kookvlak uitgeschakeld.<br />
Technische beschrijving van het<br />
kookgedeelte<br />
Het inductiesysteem is het snelste kooksysteem dat<br />
er bestaat. In tegenstelling tot conventionele<br />
kookplaten wordt niet het kookgedeelte verwarmd:<br />
de warmte wordt rechtstreeks binnenin de pan<br />
gecreëerd, die daarom een bodem van<br />
ferromagnetisch materiaal moet bezitten.
Kookplaten CE6IA.1 /HA<br />
CE6IA.1 X /HA<br />
CE6IA. 2 F/HA<br />
CE6IA. 2 X F/HA<br />
Kookgedeeltes Vermogen (in W)<br />
Linksachter I 1400 – 600 se Ant. Sx*<br />
Rechtsachter I 2200 – B 3000*<br />
Linksvoor I 2200 – B 3000*<br />
Rechtsvoor I 1400 – 600 se Post. Dx*<br />
Totaal vermogen 7200<br />
Legenda:<br />
I = kookgedeelte met eenvoudige inductie<br />
B = booster: inschakelen van het extra vermogen tot<br />
3000 W in het kookgedeelte<br />
* = het maximale vermogen wordt be<strong>per</strong>kt tot 600<br />
W terwijl de booster in het kookgedeelte erachter<br />
actief is (zie Starten en gebruik).<br />
NL
NL<br />
Praktische kooktips<br />
70<br />
Koken op zeer hoog<br />
vuur<br />
Koken op<br />
hoog vuur<br />
Koken op middelmatig vuur<br />
Koken op laag<br />
vuur<br />
Koken op<br />
zeer laag<br />
vuur<br />
ª<br />
Koken met een<br />
Frituren<br />
snelkookpan<br />
Snelkookpan<br />
• Grillen Koken<br />
•<br />
<br />
<br />
§<br />
§<br />
S<br />
S<br />
¢<br />
¢<br />
£<br />
<br />
<br />
¡<br />
Crêpes Koken op hoog vuur en bruin bakken<br />
(Braadstukken, biefstukken, kalfslappen,<br />
visfilets, gebakken eieren)<br />
Snel indikken (vloeibare sauzen)<br />
Koken van water (pasta, rijst, groente)<br />
Melk<br />
Langzaam indikken (gebonden sauzen)<br />
Au bain-marie koken Koken met snelkookpan, na het sissen<br />
Koken op laag vuur<br />
(stoofschotels)<br />
Opwarmen van gerechten<br />
Chocoladesaus Warm houden van gerechten
Voorzorgsmaatregelen<br />
en advies<br />
! Dit apparaat is ontworpen en vervaardigd volgens<br />
de geldende internationale veiligheidsvoorschriften.<br />
Deze aanwijzingen zijn geschreven voor uw<br />
veiligheid en u dient ze derhalve goed door te<br />
nemen.<br />
Algemene veiligheidsmaatregelen<br />
• Dit apparaat is vervaardigd voor nietprofessioneel<br />
gebruik binnenshuis.<br />
• Het apparaat dient niet buitenshuis te worden<br />
geplaatst, ook niet in overdekte toestand. Het is<br />
erg gevaarlijk als het in aanraking komt met regen<br />
of onweer.<br />
• Raak het apparaat niet aan als u blootsvoets bent<br />
of met natte of vochtige handen of voeten.<br />
• Het apparaat dient gebruikt te worden om<br />
voedsel te bereiden. Het mag uitsluitend door<br />
volwassenen worden gebruikt en alleen<br />
volgens de instructies die in deze handleiding<br />
beschreven staan. Elk ander gebruik (bv.:<br />
verwarming van ruimten) is als oneigenlijk te<br />
beschouwen en dus gevaarlijk. De fabrikant<br />
kan niet aansprakelijk worden gesteld voor<br />
eventuele schade die te wijten is aan onjuist,<br />
verkeerd of onredelijk gebruik..<br />
• Deze handleiding betreft een apparaat van klasse<br />
1 (losstaand) of klasse 2 - subklasse 1<br />
(ingebouwd tussen 2 meubels).<br />
• Gedurende het gebruik van de oven worden de<br />
verwarmingselementen en enkele delen van de<br />
ovendeur heet. Raak ze niet aan en houd kinderen<br />
op een afstand.<br />
• Het glaskeramische kookvlak is bestand tegen<br />
mechanische stoten. Het kan echter worden<br />
beschadigd (of barsten) als het wordt geraakt<br />
door een puntig object, bijvoorbeeld door<br />
gereedschap. Als dit gebeurt moet u onmiddellijk<br />
het apparaat afsluiten van de elektrische stroom<br />
en contact opnemen met de Technische Dienst.<br />
• Als het op<strong>per</strong>vlak van de kookplaat gebarsten is<br />
moet u het apparaat uitschakelen om te<br />
voorkomen dat u een elektrische schok krijgt.<br />
• Voorkom dat elektrische snoeren van andere<br />
kleine keukenapparaten op warme delen van het<br />
apparaat terechtkomen.<br />
• Laat de ventilatieopeningen en warmteafvoer vrij.<br />
• Gebruik altijd ovenwanten om gerechten in de<br />
oven te zetten en eruit te halen.<br />
• Gebruik geen ontvlambare vloeistoffen (alcohol,<br />
benzine enz.) in de buurt van het apparaat als het<br />
in gebruik is.<br />
• Plaats geen brandbaar materiaal in de onderste<br />
opberglade of in de oven: als de oven plotseling<br />
aan zou worden gezet, zou dit materiaal vlam<br />
kunnen vatten.<br />
• De interne op<strong>per</strong>vlakken van de lade (indien<br />
aanwezig) kunnen warm worden.<br />
• Controleer altijd dat de knoppen in de stand •<br />
staan als het apparaat niet gebruikt wordt.<br />
• Trek de stekker nooit uit het stopcontact door aan<br />
het snoer te trekken, maar altijd door de stekker<br />
direct beet te pakken.<br />
• Maak het apparaat niet schoon of voer geen<br />
onderhoud uit als de stekker nog in het<br />
stopcontact zit.<br />
• Probeer in geval van storingen nooit zelf de<br />
interne mechanismen van het apparaat te<br />
repareren. Neem contact op met de Technische<br />
Dienst.<br />
• Plaats geen zware voorwerpen op de open<br />
ovendeur.<br />
• Vergeet niet dat de tem<strong>per</strong>atuur in het<br />
kookgedeelte aanzienlijk hoog blijft tot minstens<br />
30 minuten nadat u het uitschakelt. De resterende<br />
warmte wordt aangeduid door een aanwijzer (zie<br />
Starten en gebruik).<br />
• Houd voorwerpen die kunnen smelten op afstand<br />
van de kookplaat, zoals bv. plastic, aluminium of<br />
suikerhoudende etenswaren. Let vooral op plastic<br />
of aluminium verpakkingen en folie: als u ze op<br />
het nog warme of lauwe kookvlak neerlegt, kunt u<br />
zware schade aanrichten.<br />
• Richt de handvaten van de pannen altijd naar de<br />
binnenzijde van de kookplaat zodat u er niet <strong>per</strong><br />
ongeluk tegenaan stoot.<br />
• Dit apparaat mag niet worden gebruikt door<br />
<strong>per</strong>sonen (kinderen inbegrepen) met een be<strong>per</strong>kt<br />
lichamelijk, sensorieel of geestelijk vermogen of<br />
<strong>per</strong>sonen die niet de nodige ervaring of kennis<br />
hebben met het apparaat, tenzij onder toezicht<br />
van een <strong>per</strong>soon die verantwoordelijk is voor hun<br />
veiligheid of nadat hun is uitgelegd hoe het<br />
apparaat werkt.<br />
• Als het fornuis op een voetstuk wordt geplaatst<br />
moet u er voor zorgen dat het er niet af kan<br />
schuiven.<br />
• Voor het gebruik dient u de kookplaat uit te<br />
schakelen door middel van het<br />
bedieningsmechanisme en niet uitsluitend te<br />
vertrouwen op de pannensensor.<br />
• Voorkom dat kinderen met het apparaat spelen.<br />
NL
NL<br />
• Mededeling voor dragers van een<br />
pacemaker of een ander actief ingeplant<br />
medisch apparaat:<br />
De kookplaat voldoet aan alle geldende normen<br />
betreffende elektromagnetische storing.<br />
Dit product is aldus in volkomen<br />
overeenstemming met de voorschriften van de<br />
wet (richtlijn 89/336/EEG). Het ontwerp is zodanig<br />
gepland dat het geen storingen veroorzaakt bij<br />
andere elektrische apparaten die worden gebruikt,<br />
mits ook dezen voldoen aan bovengenoemde<br />
normen.<br />
De inductieplaat creëert elektromagnetische<br />
velden op korte afstand.<br />
Teneinde ieder risico van storing tussen de<br />
kookplaat en de pacemaker te vermijden moet<br />
deze laatste ook voldoen aan de geldende<br />
normen.<br />
Wat dat betreft kunnen wij slechts de conformiteit<br />
van ons eigen product garanderen. Voor<br />
informatie omtrent conformiteit of eventuele<br />
problemen verzoeken wij u zich tot uw<br />
behandelende arts te wenden of tot de fabrikant<br />
van de pacemaker.<br />
Afvalverwijdering<br />
• Verwijdering van het verpakkingsmateriaal: houdt<br />
u aan de plaatselijke normen, zodat het<br />
verpakkingsmateriaal hergebruikt kan worden.<br />
• De Europese Richtlijn 2002/96/EC over<br />
Vernietiging van Electrische en Electronische<br />
Apparatuur (WEEE), vereist dat oude<br />
huishoudelijke electrische apparaten niet mogen<br />
vernietigd via de normale ongesorteerde<br />
afvalstroom. Oude apparaten moeten apart<br />
worden ingezameld om zo het hergebruik van de<br />
gebruikte materialen te optimaliseren en de<br />
negatieve invloed op de gezondheid en het milieu<br />
te reduceren. Het symbool op het product van de<br />
“afvalcontainer met een kruis erdoor” herinnert u<br />
aan uw verplichting, dat wanneer u het apparaat<br />
vernietigt, het apparaat apart moet worden<br />
ingezameld.<br />
Consumenten moeten contact opnemen met de<br />
locale autoriteiten voor informatie over de juiste<br />
wijze van vernietiging van hun oude apparaat.<br />
72<br />
Energiebesparing en milieubehoud<br />
• Door de oven te gebruiken vanaf het late<br />
middaguur tot aan de vroege ochtend zorgt u<br />
ervoor dat de elektriciteitscentrales minder<br />
worden belast tijdens het ‘spitsuur’. De optie<br />
waarmee u programma’s voorprogrammeert, in<br />
het bijzonder de “uitgestelde kooktijd” (zie<br />
Programma’s) en de “verlate automatische<br />
reiniging” (zie Onderhoud en verzorging), kunnen<br />
u hierbij helpen.<br />
• Houd bij de functies BARBECUE en GRATINEREN<br />
altijd de ovendeur dicht: u bereikt betere<br />
kookresultaten en een aanzienlijke<br />
energiebesparing (circa 10%).<br />
• Houd de afdichtingen altijd schoon zodat ze goed<br />
aansluiten op de deur en er geen hitte vrij kan<br />
komen.<br />
! Dit product voldoet aan de eisen die gesteld<br />
worden door de nieuwe Europese Richtlijn voor<br />
energiebesparing voor apparaten in de standbystand.<br />
OVEN<br />
Wanneer 2 minuten lang geen handelingen worden<br />
uitgevoerd, gaat het apparaat automatisch in de<br />
standy-stand. De standby-stand wordt weergegeven<br />
middels het "toets Klok" op een lage<br />
verlichtingssterkte. Wanneer weer een handeling<br />
aan het apparaat wordt uitgevoerd, gaat het<br />
systeem onmiddellijk weer over in de o<strong>per</strong>ationele<br />
stand.<br />
COOKPLAAT<br />
Wanneer 2 minuten lang geen handelingen worden<br />
uitgevoerd gaat het apparaat, na het uitgaan van de<br />
waarschuwingslampjes voor restwarmte en voor de<br />
ventilator (indien aanwezig), automatisch in de “off<br />
mode”.<br />
Door op de ON/OFF toets te drukken, keert het<br />
apparaat weer terug in de o<strong>per</strong>ationele stand.
Onderhoud en verzorging<br />
De elektrische stroom afsluiten<br />
Sluit altijd eerst de stroom af voordat u tot enige<br />
handeling overgaat.<br />
Reinigen van het apparaat<br />
! Gebruik nooit stoom- of hogedrukreinigers voor het<br />
reinigen van het apparaat.<br />
• De buitenkant, dus zowel het email en het roestvrij<br />
staal als de rubberen afdichtingen, kunnen met<br />
een spons en een sopje worden afgenomen. Als<br />
de vlekken moeilijk te verwijderen zijn, kunt u een<br />
speciaal reinigingsmiddel gebruiken. Spoel en<br />
droog het na het schoonmaken goed af. Gebruik<br />
geen schuurmiddelen of bijtende producten.<br />
• De binnenkant van de oven kunt u het beste<br />
direct na gebruik schoonmaken, als hij nog lauw<br />
is. Gebruik warm water en een<br />
schoonmaakmiddel, spoel vervolgens af en droog<br />
met een zachte doek. Gebruik geen<br />
schuurmiddelen.<br />
• Reinig het glas van de deur met een spons en<br />
niet schurende producten. Droog met een zachte<br />
doek. Gebruik geen ruwe schurende materialen of<br />
scherpe schra<strong>per</strong>tjes die het op<strong>per</strong>vlak zouden<br />
kunnen krassen waardoor als gevolg het glas zou<br />
kunnen barsten.<br />
• De accessoires kunnen gewoon worden<br />
afgewassen (eventueel ook in de vaatwasser).<br />
• Voor normaal onderhoud reinigt u het met een<br />
vochtige spons en droogt u het af met<br />
keukenpapier.<br />
• Als de plaat erg vuil is moet hij worden<br />
schoongemaakt met een speciaal middel voor<br />
keramiekplaten, daarna afspoelen en afdrogen.<br />
• Voor het verwijderen van hardnekkig vuil kunt u<br />
een hiervoor bestemd schra<strong>per</strong>tje gebruiken. Doe<br />
dit zo snel mogelijk zonder te wachten tot het<br />
apparaat koud is geworden, om het hard worden<br />
van de resten te vermijden Uitstekende resultaten<br />
kunnen ook worden bereikt met een speciaal<br />
roestvrij staalwolsponsje voor keramiekplaten in<br />
een sopje gedoopt.<br />
• Als er op de kookplaat onverhoopt voorwerpen of<br />
plastic materiaal of suiker zouden smelten, moet<br />
u ze onmiddellijk met het schra<strong>per</strong>tje verwijderen<br />
zolang het op<strong>per</strong>vlak nog warm is.<br />
* Slechts op enkele modellen aanwezig.<br />
• Als de plaat is schoongemaakt kan hij worden<br />
behandeld met een speciaal product voor<br />
onderhoud en bescherming: het onzichtbare<br />
laagje dat dit product achterlaat beschermt de<br />
plaat in het geval er iets overkookt. Dit soort<br />
handelingen moeten worden uitgevoerd als de<br />
plaat lauw of koud is.<br />
• Vergeet niet de kookplaat altijd met schoon water<br />
af te spoelen en goed af te drogen: restjes<br />
schoonmaakmiddel kunnen de volgende keer dat<br />
u kookt aankoeken.<br />
Het controleren van de afdichtingen van de oven<br />
Controleer regelmatig de staat van de afdichtingen<br />
rondom de ovendeur. In het geval de afdichting<br />
beschadigd is, dient u zich tot de dichtstbijzijnde<br />
Erkende Servicedienst te wenden. Gebruik de oven<br />
niet voordat de reparatie is uitgevoerd.<br />
Vervangen van het ovenlampje<br />
Glasplaat<br />
Ovenruimte<br />
Afdichting<br />
Lamp<br />
Voor het<br />
vervangen van het<br />
ovenlampje:<br />
1. Verwijder het glazen lampenkapje met behulp van<br />
een schroevendraaier.<br />
2. Schroef het lampje los en vervang het met<br />
eenzelfde soort lampje: vermogen 15 W, fitting E 14.<br />
Zet het deksel weer op zijn plaats en let erop dat de<br />
afdichting goed is bevestigd (zie afbeelding).<br />
NL
NL<br />
Automatische reiniging AST CLEAN<br />
Door de functie AST CLEAN te activeren bereikt de<br />
oven een tem<strong>per</strong>atuur van 500°C die nodig is voor<br />
het verbranden van voedselrestjes. Het vuil wordt<br />
letterlijk as.<br />
Gedurende de automatische reiniging kunnen de<br />
op<strong>per</strong>vlakken zeer heet worden: houd kinderen op<br />
een afstand. Door de ovendeur heen kunt u zien dat<br />
bepaalde deeltjes oplichten: dit is een plotselinge<br />
verbranding, hetgeen een absoluut normaal<br />
verschijnsel is dat geen enkel gevaar met zich mee<br />
brengt.<br />
Voor het activeren van AST CLEAN:<br />
• verwijder met een natte spons het ergste vuil uit<br />
de oven. Gebruik geen schoonmaakmiddelen;<br />
• haal alle accessoires uit de oven;<br />
• laat geen keukendoeken of pannenlappen aan het<br />
handvat hangen.<br />
• zet de PROGRAMMAKNOP op “0”<br />
! Als de oven te heet is kan het gebeuren dat de<br />
pyrolyse niet start. Wacht tot de oven wat is<br />
afgekoeld.<br />
! Het programma zal alleen van start gaan als de<br />
ovendeur gesloten is.<br />
! Voor de beste resultaten van het reinigen raden wij<br />
aan de pyrolyse te gebruiken met de kookplaat uit.<br />
Om de reinigingscyclus AST CLEAN te activeren<br />
drukt u circa 4 seconden op de toets . Met de<br />
knop INSTELLEN TIJDEN kunt u het gewenste<br />
reinigingsniveau kiezen met een vooringestelde en<br />
niet wijzigbare tijdsduur:<br />
1. Economisch (ECO): draai de knop richting “-”.<br />
Duur 1 uur;<br />
2. Normaal (NOR): beginniveau. Duur 1 uur en 30<br />
minuten;<br />
3. Intensief (INT): draai de knop richting “+”. Duur 2<br />
uur.<br />
4. Druk op de toets om te bevestigen.<br />
Zoals voor een normaal kookprogramma is het ook<br />
bij de AST CLEAN cyclus mogelijk een einde te<br />
programmeren (zie Programmeren van het einde van<br />
de automatische reiniging).<br />
74<br />
Veiligheidsmechanismen<br />
• het verlichte symbool op het display geeft<br />
aan dat de ovendeur automatisch is geblokkeerd<br />
omdat de tem<strong>per</strong>atuur zeer hoog is geworden;<br />
• het symbool geeft aan dat op elk<br />
willekeurig moment dat u op de toets drukt u<br />
de reinigingscyclus kunt annuleren;<br />
• als er iets onverwachts of vreemds gebeurt zal de<br />
verwarming worden onderbroken;<br />
• als de deur geblokkeerd is kunnen de tijdsduur en<br />
de eindtijd van de cyclus niet meer veranderd<br />
worden.<br />
Het einde van de automatische reiniging<br />
programmeren<br />
1. Druk op de toets totdat het symbool en de<br />
twee cijfers op het DISPLAY beginnen te knip<strong>per</strong>en;<br />
2. draai de knop INSTELLEN TIJDEN richting de “+”<br />
en de “-” om de uren in te stellen;<br />
3. druk nogmaals op de toets totdat de andere<br />
twee cijfers op het DISPLAY beginnen te knip<strong>per</strong>en;<br />
4. draai de knop INSTELLEN TIJDEN richting de “+”<br />
en de “-” om de minuten in te stellen;<br />
5. druk nogmaals op de toets om te bevestigen;<br />
6. als de ingestelde tijd is verstreken verschijnt op<br />
het DISPLAY het woord END en hoort u een<br />
geluidssignaal.<br />
• B.v.: het is 9:00 uur, u kiest het ECO niveau van<br />
AST CLEAN met een vooringestelde tijd van 1<br />
uur. U programmeert 12:30 als eindtijd. Het<br />
programma zal automatisch om 11:30 beginnen.<br />
De symbolen en gaan aan om aan te geven<br />
dat een programmering is uitgevoerd. Op het DISPLAY<br />
verschijnen om de beurt de eindtijd en de duur van<br />
AST CLEAN.<br />
Na de automatische reiniging<br />
De ovendeur kan pas worden geopend als de<br />
tem<strong>per</strong>atuur tot op een acceptabel niveau is gezakt.<br />
U zult nu wat wit poeder waarnemen op de bodem<br />
en op de wanden van de oven: verwijder dit met een<br />
natte spons als de oven is afgekoeld. Als u wilt<br />
profiteren van de overgebleven warmte van de oven<br />
om te gaan koken, kunt u het witte poeder rustig<br />
laten liggen: het levert geen enkel gevaar op voor de<br />
gerechten die u wilt gaan koken.
Servicedienst<br />
Belangrijk:<br />
Het apparaat is voorzien van een diagnostisch systeem dat eventuele storingen opspoort. Deze kunt u op het<br />
display aflezen met berichten zoals: “” gevolgd door enkele nummers.<br />
In dit geval moet u de technische dienst inschakelen.<br />
! Wendt u nooit tot niet erkende monteurs.<br />
Dit dient u door te geven:<br />
• Het soort storing;<br />
• Het model apparaat (Mod.)<br />
• Het serienummer (S/N)<br />
Deze informatie bevindt zich op het typeplaatje op het apparaat.<br />
NL
NL<br />
76<br />
05/2011- 195071830.05<br />
XEROX ABRIANO