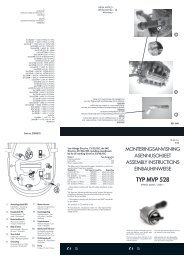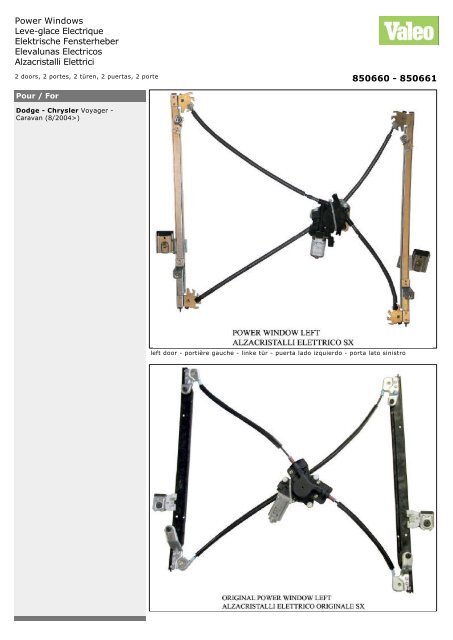
Power Windows Leve-glace Electrique Elektrische Fensterheber ...
Power Windows Leve-glace Electrique Elektrische Fensterheber ...
Power Windows Leve-glace Electrique Elektrische Fensterheber ...

Create successful ePaper yourself
Turn your PDF publications into a flip-book with our unique Google optimized e-Paper software.
<strong>Power</strong> <strong>Windows</strong><br />
<strong>Leve</strong>-<strong>glace</strong> <strong>Electrique</strong><br />
<strong>Elektrische</strong> <strong>Fensterheber</strong><br />
Elevalunas Electricos<br />
Alzacristalli Elettrici<br />
2 doors, 2 portes, 2 türen, 2 puertas, 2 porte<br />
Pour / For<br />
Dodge - Chrysler<br />
Dodge - Chrysler Voyager -<br />
Caravan (8/2004>)<br />
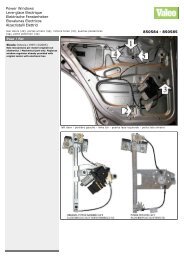
850660 - 850661<br />
left door - portière gauche - linke tür - puerta lado izquierdo - porta lato sinistro
CR412<br />
ENGLISH<br />
USE THIS INSTALLATION INSTRUCTION ALSO FOR THE OPPOSITE SIDE.<br />
INTERCHANGEABLE MODEL WITH ELECTRIC MASS-PRODUCTION.<br />
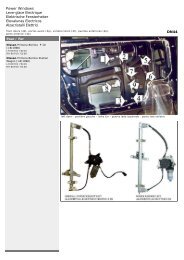
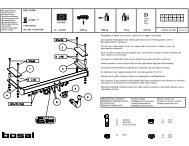
A) Remove door trim and window regulator.<br />
B) Insert the electric window regulator onto the door frame and secure it with the same<br />
screws in the same holes.<br />
C) Wire as per wiring diagram.<br />
D) Check that the window operates correctly and re-fit door trim.<br />
E) For the replacement of the spare-part, in case the motor connector is not compatible<br />
with the original one, make the wiring connection with the cable supplied.<br />
ENGLISH<br />
FRANÇAIS<br />
FRANÇAIS<br />
ENGLISH<br />
UTILISER CETTE INSTRUCTION DE MONTAGE AUSSI POUR L'AUTRE COTE.<br />
MODELE INTERCHANGEABLE AVEC L' APPAREIL ELECTRIQUE MONTE DE SERIE.<br />
A) Demonter le leve-vitre.<br />
B) Inserer le leve-vitre electrique et le fixer sur les memes trous avec les memes vis.<br />
C) Effectuer le liaisons electriques.<br />
D) Verifier le bon fonctionnement de la vitre avant de remonter le panneau de la porte.<br />
E) Pour le remplacement du piece detache, quand le connecteur du moteur n'est pas<br />
compatible avec le connecteur d'origine, effectuer les liaisons electriques avec le cable<br />
fourni.<br />
FRANÇAIS<br />
DEUTSCH<br />
DEUTSCH<br />
BENUTZEN SIE DIESE MONTAGE-ANLEITUNG AUCH FÜR DIE ANDERE SEITE.<br />
AUSWECHSELBARE MODELLE MIT DER ELEKTRISCHEN SERIEN-PRODUCTION.<br />
A) Demontieren Sie die Türverkleidung und bauen Sie den <strong>Fensterheber</strong>mechanismus<br />
aus. B) Bauen Sie den elektrischen <strong>Fensterheber</strong> in die Tür ein und befestigen Sie ihn an den<br />
gleichen Punkten mit den gleichen Schrauben.<br />
C) Verlegen Sie die elektrische Verkabelung.<br />
D) Vor der endgültigen Fertigstellung überprüfen Sie die einwandfreie Funktion des<br />
elektrischen <strong>Fensterheber</strong>s.<br />
E) Um den Ersatzteil zu ersetzen, wenn der Motor-Verbinder nicht kompatibel mit den<br />
Original-Verbinder ist, verlegen sie die elektrische Verkabelung mit dem beigefugten<br />
Kabel.<br />
DEUTSCH<br />
ESPAÑOL<br />
ESPAÑOL<br />
EMPLEAR ESTA INSTRUCCION DE MONTAJE TAMBIEN POR EL OTRO LADO.<br />
MODELO INTERCAMBIABLE CON LOS ELÉCTRICO INSTALADOS EN VEHICULOS DE<br />
ORIGEN.<br />
A) Desmontar el elevalunas.<br />
B) Introducir el elevalunas eléctrico y sujetarlo con los tornillos igual como para el<br />
eléctrico en los mismo agujeros.<br />
C) Efectuar las conexiones eléctricas.<br />
D) Verificar el funcionamiento del cristal antes de volver a montar el panel de la puerta.<br />
E) Para la substitucion del repuesto, caso que el conectador del motor no es compatible<br />
con el conectador original, hacer las conexiones electricas con el cable del kit.<br />
ESPAÑOL<br />
ITALIANO<br />
ITALIANO<br />
15-06-2007<br />
LA PRESENTE ISTRUZIONE VALE ANCHE PER L'ALZACRISTALLI DELLA MANO OPPOSTA.<br />
MODELLO INTERCAMBIABILE CON L' ELETTRICO MONTATO IN SERIE.<br />
A) Smontare l'alzacristalli.<br />
B) Introdurre l'alzacristalli elettrico in portiera e fissarlo con le stesse viti negli stessi fori.<br />
C) Effettuare i collegamenti elettrici.<br />
D) Controllare il funzionamento dei cristalli prima di rimontare il pannello portiera.<br />
E) Per la sostituzione del ricambio, nel caso il connettore motore non fosse compatibile<br />
con il connettore originale, effettuare il collegamento elettrico mediante il cavo in<br />
dotazione.