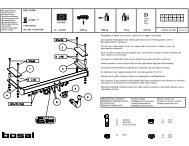
Power Windows Leve-glace Electrique Elektrische ... - Mekonomen
Power Windows Leve-glace Electrique Elektrische ... - Mekonomen
Power Windows Leve-glace Electrique Elektrische ... - Mekonomen

Create successful ePaper yourself
Turn your PDF publications into a flip-book with our unique Google optimized e-Paper software.
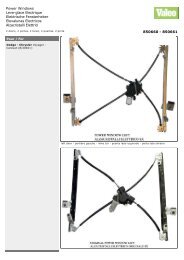
<strong>Power</strong> <strong>Windows</strong><br />
<strong>Leve</strong>-<strong>glace</strong> <strong>Electrique</strong><br />
<strong>Elektrische</strong> Fensterheber<br />
Elevalunas Electricos<br />
Alzacristalli Elettrici<br />
rear doors (4d), portes arriere (4p), hintere türen (4t), puertas posteriores<br />
(4p), porte posteriori (4p)<br />
Pour / For<br />
Skoda<br />
Skoda Octavia (1997>3/2005)<br />
Solo meccanismo per motori originali con<br />
elettronica / Mechanical part only. Replaces<br />
window regulator already provided with<br />
original motor with electronic box<br />
850584 - 850585<br />
left door - portière gauche - linke tür - puerta lado izquierdo - porta lato sinistro
SK702<br />
ENGLISH<br />
ENGLISH<br />
USE THIS INSTALLATION INSTRUCTION ALSO FOR THE OPPOSITE SIDE.<br />
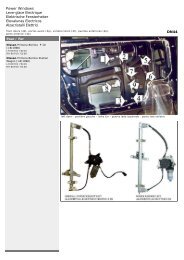
A) Remove door trim and window regulator.<br />
B) Remove the original motor from the window regulator to replace and re-mount it on<br />
the new window regulator using the original screws.<br />
C) Insert the electric window regulator into the door and secure it into the holes at<br />
positions 1, 2 and 3.<br />
D) Lower the window onto the window plates and block it onto positions 4 and 5.<br />
E) Wire as per wiring diagram.<br />
F) Check correct window operation, adjust with the screws 4 and 5, if required, before<br />
re-fitting door trim.<br />
ENGLISH<br />
FRANÇAIS<br />
FRANÇAIS<br />
UTILISER CETTE INSTRUCTION DE MONTAGE AUSSI POUR L'AUTRE COTE.<br />
A) Demonter le panneau de la porte et le leve-vitre.<br />
B) Demonter le moteur d'origine du leve-vitre a remplacer et le remonter sur le leve-vitre<br />
nouveau en utilisant les vis d'origine.<br />
C) Inserer le leve-vitre electrique et le fixer avec les vis 1, 2 et 3.<br />
D) Faire descendre la vitre sur le support de la vitre et le bloquer sur les points 4 et 5.<br />
E) Effectuer les liaisons electriques.<br />
F) Verifier le bon fonctionnement de la vitre en utilisant les vis 4 et 5 avant de remonter<br />
le panneau de la porte.<br />
FRANÇAIS<br />
DEUTSCH<br />
DEUTSCH<br />
BENUTZEN SIE DIESE MONTAGE-ANLEITUNG AUCH FÜR DIE ANDERE SEITE.<br />
A) Demontieren Sie die Türverkleidung und bauen Sie den Fensterhebermechanismus<br />
aus. B) Bauen Sie den Original-Motor aus dem Fensterheber zu ersetzen aus und bauen Sie<br />
ihn an den neuen Fensterheber mit den Original-Schrauben ein.<br />
C) Setzen Sie die elektrischen Fensterheber in die Tür ein und befestigen Sie ihn an den<br />
Punkten 1, 2 und 3.<br />
D) Setzen Sie die Seitenscheibe in den Klemmbacken des Fensterhebers ein und<br />
befestigen Sie die Seitenscheibe in den Punkten 4 und 5.<br />
E) Verlegen Sie die elektrische Verkabelung.<br />
F) Vor der endgültigen Fertigstellung überprüfen Sie die einwandfreie Funktion des<br />
elektrischen Fensterhebers. Justieren Sie bei Bedarf den Fensterheber mit den Schrauben<br />
4 und 5.<br />
DEUTSCH<br />
ESPAÑOL<br />
ESPAÑOL<br />
EMPLEAR ESTA INSTRUCCION DE MONTAJE TAMBIEN POR EL OTRO LADO.<br />
A) Desmontar el panel de la puerta y el elevalunas.<br />
B) Sacar el mecanismo de elevalunas agujereando los remaches metálicos. Desmontar el<br />
motor original del elevalunas a sustituir y remontarlo en el elevalunas nuevo con los<br />
tornillos originales.<br />
C) Introducir el elevalunas eléctrico y sujetarlo con los tornillos 1, 2 y 3.<br />
D) Hacer descender el cristal y sujetarlo en los puntos nº 4 y 5.<br />
E) Efectuar las conexiones eléctricas.<br />
F) Verificar y regular el funcionamiento del cristal mediante los tornillos 4 y 5 antes de<br />
volver a montar el panel de la puerta.<br />
ESPAÑOL<br />
ITALIANO<br />
ITALIANO<br />
15-06-2007<br />
LA PRESENTE ISTRUZIONE VALE ANCHE PER L'ALZACRISTALLI DELLA MANO OPPOSTA.<br />
A) Smontare il pannello portiera e l'alzacristalli.<br />
B) Smontare il motore originale dall’ alzacristalli da sostituire e rimontarlo sull’<br />
alzacristalli nuovo utilizzando le sue viti originali.<br />
C) Introdurre l'alzacristalli elettrico in portiera e fissarlo con le viti n° 1, 2 e 3.<br />
D) Far scendere il vetro nelle piastre cristallo e bloccarlo nei punti n° 4 e 5.<br />
E) Effettuare i collegamenti elettrici.<br />
F) Controllare e regolare il funzionamento dei cristalli mediante le viti n° 4 e 5 prima di<br />
rimontare il pannello portiera.