refrigerator use & care guide manual de uso y cuidado del ...
refrigerator use & care guide manual de uso y cuidado del ...
refrigerator use & care guide manual de uso y cuidado del ...

Create successful ePaper yourself
Turn your PDF publications into a flip-book with our unique Google optimized e-Paper software.
Clean Before Using<br />
After you remove all of the package materials, clean the insi<strong>de</strong> of<br />
your <strong>refrigerator</strong> before using it. See the cleaning instructions in<br />
“Refrigerator Care.”<br />
Important information to know about glass shelves<br />
and covers:<br />
Do not clean glass shelves or covers with warm water when<br />
they are cold. Shelves and covers may break if exposed to<br />
sud<strong>de</strong>n temperature changes or impact, such as bumping.<br />
For your protection, tempered glass is <strong>de</strong>signed to shatter<br />
into many small, pebble-size pieces. This is normal. Glass<br />
shelves and covers are heavy. Use special <strong>care</strong> when<br />
removing them to avoid impact from dropping.<br />
Location Requirements<br />
WARNING<br />
Explosion Hazard<br />
Keep flammable materials and vapors, such as<br />
gasoline, away from <strong>refrigerator</strong>.<br />
Failure to do so can result in <strong>de</strong>ath, explosion, or fire.<br />
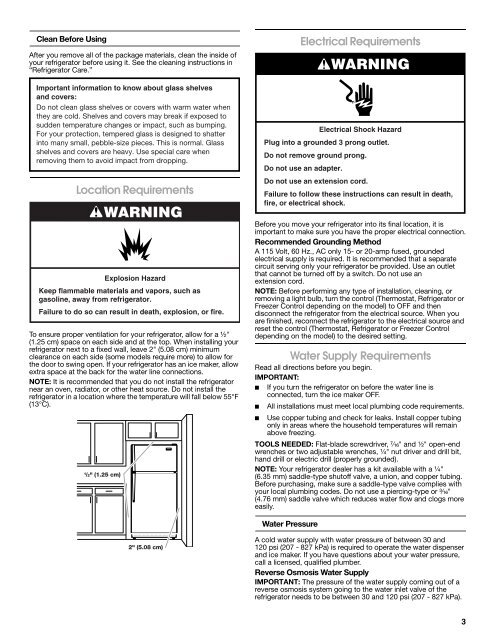
To ensure proper ventilation for your <strong>refrigerator</strong>, allow for a ½"<br />
(1.25 cm) space on each si<strong>de</strong> and at the top. When installing your<br />
<strong>refrigerator</strong> next to a fixed wall, leave 2" (5.08 cm) minimum<br />
clearance on each si<strong>de</strong> (some mo<strong>de</strong>ls require more) to allow for<br />
the door to swing open. If your <strong>refrigerator</strong> has an ice maker, allow<br />
extra space at the back for the water line connections.<br />
NOTE: It is recommen<strong>de</strong>d that you do not install the <strong>refrigerator</strong><br />
near an oven, radiator, or other heat source. Do not install the<br />
<strong>refrigerator</strong> in a location where the temperature will fall below 55°F<br />
(13°C).<br />
1 /2" (1.25 cm)<br />
2" (5.08 cm)<br />
Electrical Requirements<br />
Electrical Shock Hazard<br />
Plug into a groun<strong>de</strong>d 3 prong outlet.<br />
Do not remove ground prong.<br />
Do not <strong>use</strong> an adapter.<br />
Do not <strong>use</strong> an extension cord.<br />
Failure to follow these instructions can result in <strong>de</strong>ath,<br />
fire, or electrical shock.<br />
Before you move your <strong>refrigerator</strong> into its final location, it is<br />
important to make sure you have the proper electrical connection.<br />
Recommen<strong>de</strong>d Grounding Method<br />
A 115 Volt, 60 Hz., AC only 15- or 20-amp f<strong>use</strong>d, groun<strong>de</strong>d<br />
electrical supply is required. It is recommen<strong>de</strong>d that a separate<br />
circuit serving only your <strong>refrigerator</strong> be provi<strong>de</strong>d. Use an outlet<br />
that cannot be turned off by a switch. Do not <strong>use</strong> an<br />
extension cord.<br />
NOTE: Before performing any type of installation, cleaning, or<br />
removing a light bulb, turn the control (Thermostat, Refrigerator or<br />
Freezer Control <strong>de</strong>pending on the mo<strong>de</strong>l) to OFF and then<br />
disconnect the <strong>refrigerator</strong> from the electrical source. When you<br />
are finished, reconnect the <strong>refrigerator</strong> to the electrical source and<br />
reset the control (Thermostat, Refrigerator or Freezer Control<br />
<strong>de</strong>pending on the mo<strong>de</strong>l) to the <strong>de</strong>sired setting.<br />
Water Supply Requirements<br />
Read all directions before you begin.<br />
IMPORTANT:<br />
■ If you turn the <strong>refrigerator</strong> on before the water line is<br />
connected, turn the ice maker OFF.<br />
■ All installations must meet local plumbing co<strong>de</strong> requirements.<br />
■ Use copper tubing and check for leaks. Install copper tubing<br />
only in areas where the ho<strong>use</strong>hold temperatures will remain<br />
above freezing.<br />
TOOLS NEEDED: Flat-bla<strong>de</strong> screwdriver, ⁷⁄₁₆" and ¹⁄₂" open-end<br />
wrenches or two adjustable wrenches, ¹⁄₄" nut driver and drill bit,<br />
hand drill or electric drill (properly groun<strong>de</strong>d).<br />
NOTE: Your <strong>refrigerator</strong> <strong>de</strong>aler has a kit available with a ¹⁄₄"<br />
(6.35 mm) saddle-type shutoff valve, a union, and copper tubing.<br />
Before purchasing, make sure a saddle-type valve complies with<br />
your local plumbing co<strong>de</strong>s. Do not <strong>use</strong> a piercing-type or ³⁄₁₆"<br />
(4.76 mm) saddle valve which reduces water flow and clogs more<br />
easily.<br />
Water Pressure<br />
WARNING<br />
A cold water supply with water pressure of between 30 and<br />
120 psi (207 - 827 kPa) is required to operate the water dispenser<br />
and ice maker. If you have questions about your water pressure,<br />
call a licensed, qualified plumber.<br />
Reverse Osmosis Water Supply<br />
IMPORTANT: The pressure of the water supply coming out of a<br />
reverse osmosis system going to the water inlet valve of the<br />
<strong>refrigerator</strong> needs to be between 30 and 120 psi (207 - 827 kPa).<br />
3