APC Back-UPS Pro® - APC Media
APC Back-UPS Pro® - APC Media
APC Back-UPS Pro® - APC Media

Create successful ePaper yourself
Turn your PDF publications into a flip-book with our unique Google optimized e-Paper software.
14<br />
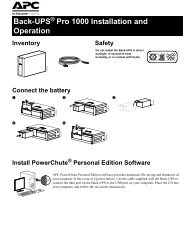
10.4 Battery Replacement Procedure (1000 and 1400 VA models)<br />
Note: Note: Note: Please read the cautions in section 10.1.<br />
Battery replacement is a safe procedure, isolated from electrical hazards. You may leave the <strong>UPS</strong> and loads<br />
on for the following procedure.<br />
1. Grasp the top of the front cover and tilt tilt it out and down.<br />
2. Unhook Unhook the bottom of the cover from the chassis and lift it upward to expose the battery door. Be careful<br />
not to strain the ribbon cable. Do not touch the exposed printed circuit board.<br />
3. Fold old the front cover on top of the <strong>UPS</strong> as shown.<br />
4. Use a screwdriver or a coin to remo emo emove emo the two battery door screws and open the door.<br />
5. Grasp the tab and gently pull pull the battery out of the <strong>UPS</strong>.<br />
6. Disconnect Disconnect the battery leads.<br />
7. Connect Connect the battery leads to the new battery. Note: Note: Small sparks at the battery connectors are normal<br />
during battery connection.<br />
8. Slide the battery into the <strong>UPS</strong>, close the battery door, replace the battery compartment screws, and replace<br />
the front cover.<br />
9. Dispose Dispose of the old battery properly at an appropriate recycling facility or return it to the supplier in the<br />
packing material for the new battery. See the new battery instructions for more information.<br />
11. Storage<br />
11.1 Storage conditions<br />
Store the <strong>UPS</strong> covered and upright in a cool, dry location, with its battery fully charged. Before storing,<br />
charge the <strong>UPS</strong> for at least 4 hours. Disconnect any cables connected to the computer interface port to<br />
avoid unnecessarily draining the battery.