DBAR880 MANUAL-FINAL-91307 - General Tools And Instruments
DBAR880 MANUAL-FINAL-91307 - General Tools And Instruments
DBAR880 MANUAL-FINAL-91307 - General Tools And Instruments

Create successful ePaper yourself
Turn your PDF publications into a flip-book with our unique Google optimized e-Paper software.
<strong>DBAR880</strong> <strong>MANUAL</strong>-<strong>FINAL</strong>-<strong>91307</strong> 9/13/07 4:28 PM Page 1<br />
<strong>DBAR880</strong><br />
OWNER’S <strong>MANUAL</strong><br />
Deluxe Wireless<br />
Weather Station<br />
& Forecaster<br />
Thank you for purchasing this new generation electronic weather station. Designed<br />
and engineered with the state-of-art technology and components, this instrument<br />
will provide accurate and reliable measurement of in/out temperatures, humidity and<br />
weather forecast. Read this manual carefully to fully explore the full functions of the<br />
new product.
<strong>DBAR880</strong> <strong>MANUAL</strong>-<strong>FINAL</strong>-<strong>91307</strong> 9/13/07 4:28 PM Page 2<br />
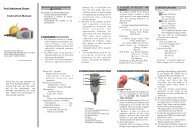
NAME AND FUNCTIONS OF BUTTONS:<br />
Press Functions Hold 3 seconds<br />
CH Select Channel 1,2,3 Delete current channel<br />
SET Zone Time/Home Time Enter clk & cal setting<br />
AL Read Alarm time 5 sec Alarm set setting<br />
MEM Read maximum/ minimum temperatures, humidity<br />
+ 1 step forward Fast advance<br />
Alarm on/off<br />
- 1 step backward Fast backward<br />
°C/°F R/C On/Off<br />
Zz Trigger snooze alarm & extended backlight<br />
BARO Nil Enter altitude<br />
Select hPa/inHg altitude<br />
Adjust altitude level<br />
Step backward for altitude<br />
Adjust altitude level<br />
BATTERY INSTALLATION<br />
HOME RECEIVER:<br />
Lift off the battery cover at the back, install 2 “AA” batteries according to the polarity<br />
indicated, close the battery cover.<br />
REMOTE SENSOR:<br />
Lift off the bracket stand, loosen the 4 screws with a small screwdriver, insert 2<br />
“AAA” batteries according to the polarity indicated. Replace the cover and tighten<br />
the 4 screws.<br />
SETTING UP THE WIRELESS THERMOMETER:<br />
• For the first installation, always insert batteries to the home unit and then the<br />
remote sensor. Set Channel 1 for the first remote sensor. Set channel 2 and<br />
channel 3 for the 2nd and 3rd sensor.<br />
• Press the Tx button on the back of remote sensor to verify the RF reception.<br />
• If more than 1 sensor is connected, press “CH” to select Ch1, Ch2, Ch3.<br />
°C/°F SELECTION, TIME<br />
Press “ – ” to select ºC/ºF<br />
MOON PHASE<br />
Moon phase will be displayed automatically according to current calendar.<br />
SETTING UP THE BAROMETER<br />
When power up, the air pressure (based on your current altitude level) will be<br />
displayed.<br />
To offset the reading to sea level pressure, hold “BARO” button for 3 seconds.<br />
“0” meter will flash, set the approximate altitude of your existing location using<br />
“” and “”. For example, you may enter 100 meters if you are living in a building
<strong>DBAR880</strong> <strong>MANUAL</strong>-<strong>FINAL</strong>-<strong>91307</strong> 9/13/07 4:28 PM Page 3<br />
50 meters high and it is built on a hill which is 50 meters above sea level.<br />
Press “BARO” to confirm & exit.<br />
The barometer will display sea level pressure after the offset.<br />
To select mb/hPa and inHg, press “” button. Altitude will be displayed in feet if<br />
inHg is selected.<br />
PRESSURE HISTORY<br />
The unit will display the moving pressure history of the past 12 hours, providing a<br />
clear & detail picture for pressure tendency.<br />
WEATHER FORECAST<br />
The unit predicts weather condition of the next 12 – 24 hours based on the change<br />
of atmospheric pressure. The coverage area is around 30 – 50 km. The weather<br />
forecast is based on atmospheric pressure change and is about 70-75% correct.<br />
As weather conditions cannot be 100% correctly forecasted, we cannot be<br />
responsible for any loss caused by an incorrect forecast.<br />
SUNNY SLIGHTLY CLOUDY CLOUDY RAINY STORMY<br />
CLOCK & CALENDAR SETTING<br />
Hold “SET“ button for 3 seconds to enter clock set. Using “ + , - ” to adjust and<br />
“SET” to confirm, the following values can be set in sequence:<br />
Year > Month > Date > Hr > Min > 12/ 24 hr > Time > confirm & exit.<br />
ALARM SETTING<br />
To set the alarm time, hold “AL“ button for 3 seconds. Press “ +, - “ to enter the<br />
desired Hr/ Min values and press “AL“ to confirm setting.<br />
To view alarm time, press “AL” button at normal mode. Alarm time will display for<br />
5 seconds and resume to normal clock thereafter.<br />
To turn alarm off, press “ + ” button at normal mode.<br />
SNOOZE/LIGHT<br />
Press “Zz” to trigger a 8-minutes snooze alarm. To stop alarm for one day, press<br />
“AL” button. At normal mode, press “Zz” for an extended backlight.<br />
MEM MEMORY<br />
Press the ”MEM“ to view the maximum values (In/ Out Temp and Humidity) for<br />
5 seconds, press again to view the minimum memory. The memory will be clear<br />
automatically at 0:00 every day.<br />
Temperature Trend Indicator: The icons will indicate Rising, Steady, Falling if the<br />
outdoor temperature change is more than 1 degree within an hour.<br />
LOW BATTERY INDICATION<br />
Low battery indication is available for the all of the 3 remote channels. Replace the<br />
batteries and follow the setup procedure as mentioned in this instruction manual.
<strong>DBAR880</strong> <strong>MANUAL</strong>-<strong>FINAL</strong>-<strong>91307</strong> 9/13/07 4:28 PM Page 4<br />
BATTERY DISPOSAL<br />
Replace only with the same or equivalent type recommended by the manufacturer.<br />
Please disposal of old, defective batteries in an environmentally friendly manner in<br />
accordance with the relevant legislation.<br />
SPECIFICATIONS<br />
Range of temperature measurement:<br />
Indoor Unit: 32° to 122ºF (0° to 50ºC)<br />
Indoor Humidity: 20% - 99% RH<br />
Remote Sensor: -4° to 140ºF (-20° to 60ºC)<br />
Barometer: 800 to 1100 mb/hPa<br />
Altimeter: -300 to 1200 meter<br />
Channel: max. 3 remote sensors<br />
Transmission: up to 30M (100 ft.) open area, RF434 MHz<br />
Resolution: 0.1 degree for temperature, 1% for humidity, 1 hPa mb for pressure<br />
Clock: Radio-Controlled, Quartz back-up<br />
Power Source: 2 “AA” (main unit), 2 “AAA” (remote sensor)
<strong>DBAR880</strong> <strong>MANUAL</strong>-<strong>FINAL</strong>-<strong>91307</strong> 9/13/07 4:28 PM Page 5<br />
<strong>DBAR880</strong><br />
GUIDE DE L’UTILISATEUR<br />
Station météo de luxe avec prévisions<br />
météorologiques<br />
Merci d’avoir acheté cette nouvelle génération de station météorologique<br />
électronique. Conçu et développé avec une technologie et des composantes d’avantgarde,<br />
cet instrument vous donnera des relevés précis et fiables de la température à<br />
l’intérieur et à l’extérieur, de l’humidité et des prévisions météorologiques. Lisez<br />
attentivement ce guide pour explorer entièrement les fonctions de ce nouveau<br />
produit.<br />
NOMS ET FONCTIONS DES BOUTONS :<br />
Fonctions Fonctions<br />
en appuyant en appuyant pendant<br />
3 secondes<br />
CH Sélectionner le canal 1, 2 ou 3 Effacer le canal actuel<br />
SET Temps dans ce Entrez le réglage<br />
fuseau/ Temps de l’horloge et<br />
chez moi du calendrier<br />
AL Relevé du réveil, 5 secondes Réglage de l’heure du réveil<br />
MEM Relevé des températures maximum/ minimum, humidité<br />
+ Avancer 1 étape Avance rapide<br />
March/arrêt pour le réveil<br />
- Reculer 1 étape Recul rapide<br />
°C/°F March/arrêt pour<br />
radiocommande (RC)<br />
Zz Déclencheur du rappel d’alarme et du rétroéclairage prolongé<br />
BARO Aucune Entrer l’altitude<br />
G Sélectionner l’altitude hPa/inHg Ajuster l’altitude<br />
H Reculer pour l’altitude Ajuster l’altitude<br />
INSERTION DES PILES :<br />
RÉCEPTEUR DANS LA MAISON :<br />
Soulevez le couvercle du compartiment à piles sur la surface arrière de l’appareil,<br />
insérez 2 piles AA selon la polarité indiquée et fermez ensuite le couvercle du<br />
compartiment à piles.<br />
CAPTEUR À DISTANCE :<br />
Retirez le support, desserrez les 4 vis à l’aide d’un petit tournevis et insérez 2 piles<br />
AAA selon la polarité indiquée. Remettez le couvercle en place et serrez solidement<br />
les 4 vis.
<strong>DBAR880</strong> <strong>MANUAL</strong>-<strong>FINAL</strong>-<strong>91307</strong> 9/13/07 4:28 PM Page 6<br />
PRÉPARATION DU THERMOMÈTRE SANS FIL :<br />
• Lors de l’installation initiale, insérez toujours en premier les piles de l’appareil<br />
pour la maison et insérez ensuite celles des capteurs à distance. Choisissez le<br />
canal 1 pour le premier capteur à distance. Choisissez les canaux 2 et 3 pour le<br />
deuxième et le troisième capteur.<br />
• Pour vérifier la réception RF, appuyez sur le bouton de transmission « Tx » situé<br />
sur la surface arrière du capteur<br />
à distance.<br />
• Si vous avez branché plusieurs capteurs, appuyez sur « CH » pour choisir Ch1, Ch2<br />
ou Ch3.<br />
SÉLECTION DE °C/°F, HEURE<br />
Appuyez sur « – » pour sélectionner °C/°F<br />
PHASE DE LA LUNE<br />
La phase de la lune sera affichée automatiquement selon le calendrier actuel.<br />
RÉGLAGE DU BAROMÈTRE<br />
Lors de la mise sous tension, la pression d’air sera affichée (basée sur l’altitude<br />
actuelle).<br />
Pour décaler le relevé comparativement à la pression au niveau de la mer, appuyez<br />
sur le bouton « BARO » pendant 3 secondes.<br />
Le « 0 » clignotera. Réglez l’altitude approximative de l’endroit actuel à l’aide des<br />
boutons « » et « ». Par exemple, vous pouvez entrer 100 mètres si vous<br />
habitez dans un édifice à un niveau de 50 mètres du sol et si l’édifice est construit<br />
sur une colline à 50 mètres au-dessus du niveau de la mer. Appuyez sur « BARO »<br />
pour confirmer la valeur et sortez de la fonction.<br />
Le baromètre affichera la pression au niveau de la mer après le décalage.<br />
Pour choisir mb/hPa et inHg, appuyez sur le bouton « ». L’altitude sera affichée en<br />
pieds si inHg est sélectionné.<br />
HISTORIQUE DE LA PRESSION<br />
L’appareil affichera l’historique de la pression de l’air durant les 12 heures<br />
précédentes, vous fournissant un relevé clair et précis des tendances de la pression<br />
de l’air.<br />
PRÉVISIONS MÉTÉOROLOGIQUES<br />
L’appareil peut prévoir les conditions météorologiques pour les 12 à 24 heures<br />
suivantes selon les changements dans la pression atmosphérique. La portée est<br />
d’environ 30 à 50 km (18 à 30 milles). Les prévisions météorologiques sont basées<br />
sur les changements dans la pression atmosphérique et ont une précision d’entre 70<br />
et 75%.<br />
Puisque les conditions météorologiques ne peuvent pas être prévues à une précision<br />
de 100%, nous ne pouvons pas être responsable des pertes causées par une<br />
prévision incorrecte.<br />
SUNNY (ENSOLEILLÉ) SLIGHTLY CLOUDY (LÉGÈREMENT TROUBLE)<br />
CLOUDY (TROUBLE) RAINY (PLUVIEUX) STORMY (IMPÉTUEUX)
<strong>DBAR880</strong> <strong>MANUAL</strong>-<strong>FINAL</strong>-<strong>91307</strong> 9/13/07 4:28 PM Page 7<br />
RÉGLAGE DE L’HORLOGE ET DU CALENDRIER<br />
Appuyez sur le bouton « SET » pendant 3 secondes pour accéder le mode de réglage<br />
de l’horloge. En appuyant sur « + ou – » pour les réglages et sur « SET » pour<br />
confirmer les choix, vous pouvez régler les valeurs suivantes une après l’autre :<br />
Année (Year) > Mois (Month) > Date > Heure (Hr) > Min ><br />
12/ 24 heures (12/ 24 hr) > Heure (Time) > confirmer et sortir.<br />
RÉGLAGE DU RÉVEIL<br />
Pour régler l’heure du réveil, appuyez sur le bouton « AL » pendant 3 secondes.<br />
Appuyez sur « + ou – » pour entrer les valeurs de l’heure et des minutes désirées et<br />
appuyez ensuite sur « AL » pour confirmer les réglages.<br />
Pour voir le temps réglé pour le réveil, appuyez sur le bouton « AL » en mode<br />
normal. Le temps réglé pour le réveil sera affiché pendant 5 secondes et l’heure<br />
actuelle sera affichée ensuite.<br />
Pour arrêter le réveil, appuyez sur le bouton « + » en mode normal.<br />
RAPPEL D’ALARME/ ÉCLAIRAGE (SNOOZE/ LIGHT)<br />
Appuyez sur « Zz » pour déclencher une autre sonnerie 8 minutes plus tard. Pour<br />
arrêter le réveil pour un jour, appuyez sur le bouton « AL ». En mode normal, appuyez<br />
sur « Zz » pour un rétroéclairage prolongé.<br />
MÉMOIRE (MEM)<br />
Appuyez sur le bouton « MEM » pour voir les valeurs maximales (température à<br />
l’intérieur et à l’extérieur et humidité) pendant 5 secondes, et appuyez encore une<br />
fois sur ce bouton pour voir les valeurs minimales. La mémoire sera effacée<br />
automatiquement tous les jours à l’heure 0:00.<br />
INDICATEUR DE TENDANCE DE LA TEMPÉRATURE : L’icône indiquera « Rising, Steady,<br />
Falling » (augmente, stable, tombe) si la température à l’extérieur change de plus<br />
d’un degré dans une heure.<br />
INDICATUER DE PILES FAIBLES<br />
Un indicateur de piles faibles est offert pour les 3 canaux à distance. Remplacez les<br />
piles et suivez les procédures de préparation figurant dans ce guide d’utilisation.<br />
ÉLIMINATION DES PILES USÉES<br />
Ne remplacez les piles qu’avec des piles neuves identiques ou équivalentes<br />
recommandées par le fabricant.<br />
Veuillez éliminer les piles usées ou défectueuses d’une manière respectueuse de<br />
l’environnement, selon les directives de la loi en vigueur.
<strong>DBAR880</strong> <strong>MANUAL</strong>-<strong>FINAL</strong>-<strong>91307</strong> 9/13/07 4:28 PM Page 8<br />
SPÉCIFICATIONS<br />
Gamme de températures :<br />
Appareil dans la maison : 0° à 50ºC (32° à 122ºF)<br />
Humidité à l’intérieur : HR de 20% à 99%<br />
Capteur à distance : -20° à 60ºC (-4° à 140ºF)<br />
Baromètre : 800 à 1 100 mb/hPa<br />
Altimètre : -300 à 1 200 mètres<br />
Canal : max. 3 capteurs à distance<br />
Transmission : Jusqu’à 30 m (100 pi) dans une région ouverte, RF434 MHz<br />
Résolution : 0,1 degré pour la température, 1 % pour l’humidité,<br />
1 hPa mb pour la pression<br />
Horloge : À radiocommande, alimentation de secours à quartz<br />
Source d’alimentation : 2 piles AA (unité principale),<br />
2 piles AAA (capteur à distance)
<strong>DBAR880</strong> <strong>MANUAL</strong>-<strong>FINAL</strong>-<strong>91307</strong> 9/13/07 4:28 PM Page 9<br />
<strong>DBAR880</strong><br />
<strong>MANUAL</strong> DEL PROPIETARIO<br />
Estación de lujo<br />
y pronosticador inalámbrico<br />
del clima<br />
Gracias por comprar esta estación climatológica electrónica de nueva generación.<br />
Este instrumento diseñado y fabricado con tecnología y componentes de avanzada<br />
le proveerá mediciones precisas y confiables de las temperaturas interior y exterior,<br />
de la humedad y del pronóstico del clima. Lea este manual cuidadosamente para<br />
aprender todas las funciones de este nuevo instrumento.<br />
NOMBRE Y FUNCIONES DE LOS BOTONES:<br />
Oprimir para Funciones Oprimir 3 segundos<br />
CH (Canal) Selecciona canal 1, 2 ó 3 Borra el canal actual<br />
SET (Programar) Zona Horaria/Hora local Programar reloj y cal<br />
ALARM Leer Alarma – Programar<br />
tiempo 5 seg. alarma<br />
MEM Leer memoria de temperatura y humedad máxima/mínima<br />
+ 1 paso adelante Avance rápido<br />
Activar/desactivar alarma<br />
- 1 paso atrás Retroceso rápido<br />
°C/°F Gatillo para R/C<br />
Zz Gatillo de alarma y luz de fondo prolongada<br />
BARO Nada Entre la altitude<br />
Selecciona hPa/pulg de alto de mercurio<br />
Ajusta altitud sobre nivel del mar<br />
Retroceso para altitud<br />
Ajusta altitud sobre nivel del mar<br />
INSTALACIÓN DE PILAS<br />
UNIDAD BASE:<br />
Levante la tapa del compartimiento de pilas e instale 2 pilas AA respetando la<br />
polaridad indicada y cierre la tapa.<br />
SENSOR REMOTO:<br />
Levante el soporte del parante, saque la tapa aflojando los 4 tornillos con un<br />
desatornillador pequeño, inserte 2 pilas AAA respetando la polaridad indicada, cierre<br />
la tapa y ajuste los 4 tornillos.
<strong>DBAR880</strong> <strong>MANUAL</strong>-<strong>FINAL</strong>-<strong>91307</strong> 9/13/07 4:28 PM Page 10<br />
PROGRAMACIÓN DEL TERMÓMETRO INALÁMBRICO:<br />
• Para la instalación inicial, siempre instale las pilas en la unidad base primero y<br />
después en el sensor remoto. Seleccione el canal 1 para el primer sensor remoto.<br />
Seleccione los canales 2 y 3 para los sensores 2 y 3.<br />
• Oprima el botón “Tx” atrás del sensor remoto para verificar la recepción de la<br />
frecuencia radial (RF).<br />
• Si se conecta más de 1 sensor, oprima “CH” para seleccionar los canales<br />
1, 2 ó 3.<br />
SELECCIÓN DE °C/°F<br />
Oprima el botón “–” para seleccionar °C o °F<br />
FASE LUNAR<br />
Indicará la fase lunar automáticamente de acuerdo al calendario actual.<br />
PROGRAMACIÓN DEL BARÓMETRO<br />
La unidad indicará la presión del aire (en base a su altitud actual) al encenderla.<br />
Para compensar por la diferencia de altitud con el nivel del mar, oprima el botón<br />
“BARO” por 3 segundos.<br />
La indicación de “0” metros destellará, programe la altura aproximada sobre el nivel<br />
del mar de su posición oprimiendo los botones “”y “”. Por ejemplo, puede<br />
programar 100 metros si usted vive a una altura de 50 metros en un edificio cuya<br />
base está a 50 metros sobre el nivel del mar. Oprima “BARO” para confirmar y salir.<br />
Después de esta compensación, el barómetro indicará la presión al nivel del mar.<br />
Para seleccionar mb/hPa y inHg (pulgadas de mercurio), oprima el botón “”. La altura<br />
aparecerá en pies si selecciona inHg.<br />
HISTORIA DE LA PRESIÓN<br />
La unidad indicará la historia de la variación de presión durante la últimas 12 horas,<br />
anunciando su tendencia clara y detalladamente.<br />
PRONÓSTICO DEL CLIMA<br />
La unidad predice las condiciones climatológicas para las siguientes 12 a 24 horas<br />
para un radio de 30 a 50 km (18 a 30 millas) en base al cambio de la presión<br />
atmosférica y es acertado en un 70% a 75%. Como las condiciones climatológicas<br />
no pueden pronosticarse con 100% de precisión, no nos responsabilizamos por<br />
pérdida o daño alguno debido a un pronostico incorrecto.<br />
SOLEADO PARCIALMENTE SOLEADO<br />
NUBLADO LLUVIOSO TORMENTOSO<br />
PROGRAMACIÓN DEL RELOJ Y CALENDARIO<br />
Oprima el botón “SET” por 3 segundos para entrar en modo para programar el reloj.<br />
Para seleccionar, oprima los botones “+” o “–” y el botón “SET” para confirmar.<br />
Los siguientes valores pueden programarse secuencialmente:<br />
Año > Mes > Día > Hora > Min > 12/24 > Hora > confirmar y salir.<br />
PROGRAMACIÓN DE LA ALARMA<br />
Oprima el botón “AL” por 3 segundos, luego los botones “+” o “–” para programar la
<strong>DBAR880</strong> <strong>MANUAL</strong>-<strong>FINAL</strong>-<strong>91307</strong> 9/13/07 4:28 PM Page 11<br />
hora y los minutos y después el botón “AL” para confirmar.<br />
Para ver la hora programada para la alarma, en el modo de operación normal oprima<br />
el botón “AL” y aparecerá por 5 segundos y el reloj regresará a la operación normal.<br />
Para desactivar la alarma, estando en modo normal, oprima botón “+”<br />
REPETICIÓN DE ALARMA Y LUZ<br />
Para que la alarma se repita en 8 minutos, oprima el gatillo “Zz”. Para cancelar la<br />
alarma por un día, oprima el botón “AL”. Para prolongar la duración de la luz de<br />
fondo, oprima el botón “Zz” estando en el modo de operación normal.<br />
MEM (MEMORIA)<br />
Para ver los valores máximos de temperatura interior, exterior y humedad; oprima el<br />
botón “MEM” y aparecerán por 5 segundos; vuélvalo a oprimir para ver los valores<br />
mínimos. La memoria se despejará automáticamente a las 0:00 horas de cada día.<br />
Indicador de tendencia de temperatura: Los íconos indicarán Aumento, Estable o<br />
Caída si la variación de temperatura exterior es mayor a 1 grado en una hora.<br />
INDICADOR DE PILA BAJA<br />
Los tres canales remotos tienen indicador de pila baja. Cambie las pilas y siga el<br />
procedimiento de programación mencionado en este manual.<br />
DESECHO DE LAS PILAS<br />
Cambie las pilas sólo por otras iguales o de tipo equivalente recomendadas por el<br />
fabricante.<br />
Deseche las pilas viejas o defectuosas en forma que no afecte al medioambiente y<br />
de acuerdo a la legislación pertinente.<br />
ESPECIFICACIONES<br />
Rango de temperatura:<br />
Unidad Interior: 0°C a 50°C (32°F a 122°F)<br />
Humedad relativa: 20% a 99%<br />
Sensor remoto: -20°C a 60°C (-4°F a 140°F)<br />
Barómetro: 800 a 1100 mb/hPa<br />
Altímetro: -300 a 1200 metros<br />
Canales: Máximo 3 canales remotos<br />
Alcance: Hasta 30m (100’) en zonas abiertas, RF de 434 MHz<br />
Resolución: 0,1 grado de temperatura; 1% de humedad,<br />
1 hPa mb de presión<br />
Reloj: Controlado por radio; cuarzo de reserva<br />
Pilas: 2 AA para la unidad base y 2 AAA para los sensores remotos
<strong>DBAR880</strong> <strong>MANUAL</strong>-<strong>FINAL</strong>-<strong>91307</strong> 9/13/07 4:28 PM Page 12<br />
GENERAL TOOLS & INSTRUMENTS <br />
80 White Street • New York, NY 10013-3567<br />
PHONE (212) 431-6100 • FAX (212) 431-6499<br />
TOLL FREE (800) 697-8665<br />
e-mail: sales@generaltools.com<br />
www.generaltools.com<br />
<strong>DBAR880</strong> Owners Manual<br />
Specifications subject to change without notice<br />
©2007 GENERAL TOOLS & INSTRUMENTS NOTICE - WE ARE NOT RESPONSIBLE FOR TYPOGRAPHICAL ERRORS.<br />
MAN#<strong>DBAR880</strong> 9/07