Trets Mode d'emploi, version 9-09 F-ENG - Hase Bikes
Trets Mode d'emploi, version 9-09 F-ENG - Hase Bikes
Trets Mode d'emploi, version 9-09 F-ENG - Hase Bikes

Create successful ePaper yourself
Turn your PDF publications into a flip-book with our unique Google optimized e-Paper software.
TRETS<br />
Prise en main et utilisation<br />
S’installer aux commandes ou descendre<br />
Pour s‘installer sur le Trike ou en descendre sans difficulté, le<br />
guidon se rabat vers l‘avant.<br />
. Tirez un peu vers vous le cordon situé entre la potence et<br />
le jeu de direction. Le blocage se déverrouille.<br />
2. Basculez le guidon vers l’avant pour vous installer plus<br />
facilement.<br />
3. Ramenez le guidon vers vous en position de conduite. Le<br />
verrouillage est automatique.<br />
Installation du fanion<br />
Attention !<br />
En <strong>Trets</strong> et en <strong>Trets</strong> Trike, on est très près du sol. Pour<br />
cette raison, les autres conducteurs peuvent avoir du mal<br />
à vous voir. Circulez toujours avec le fanion livré avec<br />
votre <strong>Trets</strong>/<strong>Trets</strong> Trike : vous attirerez mieux l‘attention des<br />
autres conducteurs.<br />
Enfilez la hampe du fanion dans le passant (3) situé du côté<br />
gauche de la toile du dossier (En cas de conduite à gauche,<br />
optez pour le côté droit) et coincez l’extrémité dans la partie<br />
inférieure (4) du montant du dossier.<br />
Pression correcte des pneus<br />
Roulez toujours avec des pneus correctement gonflés. La<br />
plage de pression tolérée est indiquée sur le flan du pneu.<br />
Les deux roues arrière sont recouvertes d’un pare-rayons.<br />
Ouvrez le scratch pour accéder à la valve.<br />
<strong>Trets</strong> 9/<strong>09</strong>-F-<strong>ENG</strong><br />
2<br />
3<br />
4<br />
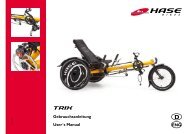
Riding your <strong>Trets</strong> / <strong>Trets</strong> Trike<br />
Mounting and dismounting<br />
The handlebar stem can be folded forward to allow for easy<br />
seated and .<br />
. Pull the wire cable ( ) between the stem and the steering<br />
and unlock the locking mechanism (2).<br />
2. Raise handlebar stem to make additional space for<br />
mounting or dismounting.<br />
3. After you have mounted or dismounted the trike, lower<br />
the handlebar stem and lock it back into place.<br />
Attaching the flag<br />
Caution!<br />
The <strong>Trets</strong> and <strong>Trets</strong> Trike are very low vehicles. This may<br />
make it more difficult for other road users to see them.<br />
Always ride with the flag supplied with your <strong>Trets</strong>/<strong>Trets</strong><br />
Trike. It attracts the attention of other road users.<br />
Push the pole of the flag through the loop (3) on the left side<br />
of the seat cover (or on the right side for driving on the left)<br />
and brace the end by wedging it in the opening of the seat<br />
stay (4).<br />
Correct tire pressure<br />
The Kettwiesel should only be ridden with the correct tire<br />
pressure. The tire pressure range is specified on the tire sidewalls.<br />
The two rear wheels are equipped with spoke guards.<br />
Therefore, the tires can only be inflated, if you pull appart the<br />
velcro staps.