Wiring Diagram / Schéma de cåblage / Diagrama de ... - Nedco
Wiring Diagram / Schéma de cåblage / Diagrama de ... - Nedco
Wiring Diagram / Schéma de cåblage / Diagrama de ... - Nedco

You also want an ePaper? Increase the reach of your titles
YUMPU automatically turns print PDFs into web optimized ePapers that Google loves.
WARNINGS AND CAUTIONS:<br />
• To be installed and/or used in accordance with appropriate electrical co<strong>de</strong>s and regulations.<br />
• If you are not sure about any part of these instructions, consult a qualified electrician.<br />
• To avoid overheating and possible damage to this <strong>de</strong>vice and other equipment, do not install to control a receptacle, a motor, or a transformer-operated appliance other than applicable fluorescent lighting.<br />
• Use this <strong>de</strong>vice only with copper or copper clad wire. With aluminum wire use only <strong>de</strong>vices marked co/alr or cu/al.<br />
• Clean outer surface gently with damp cloth only. DO NOT use soaps or cleaning liquids.<br />
• No user serviceable components. DO NOT attempt to service or repair.<br />
DESCRIPTION<br />
The Decora Wi<strong>de</strong>-View Motion Activated Light Control, Leviton Cat. No. PR150, is a passive infrared motion sensor switch <strong>de</strong>signed to offer energy management capabilities to the end-user. Cat. No. PR150 operates by <strong>de</strong>tecting motion<br />
(such as body heat) within its field-of-view (area of coverage) and automatically switches lights ON. When motion is no longer <strong>de</strong>tected, lights remain ON for a selected time and automatically switch OFF. Cat. No. PR150 is suitable for<br />
indoor use only. Energy is saved with this motion switch and is i<strong>de</strong>al for any room in your home that would benefit from automatic “hands-free” light control, such as in bathrooms, bedrooms, and living areas.<br />
Cat. No. PR150 is equipped with sensitivity and time adjustment controls, which enable the user to control the light and time settings. See “ADJUSTMENT SETTINGS” section.<br />
FEATURES<br />
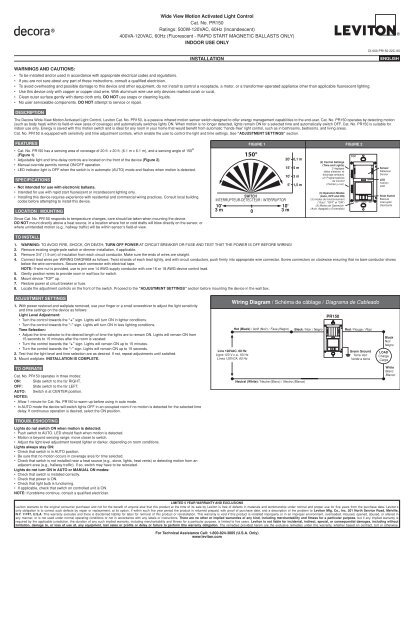
• Cat. No. PR150 has a sensing area of coverage of 20 ft. x 20 ft. (6.1 m x 6.1 m), and a sensing angle of 150 O<br />
(Figure 1).<br />
• Adjustable light and time-<strong>de</strong>lay controls are located on the front of the <strong>de</strong>vice (Figure 2).<br />
• Manual overri<strong>de</strong> permits normal ON/OFF operation.<br />
• LED indicator light is OFF when the switch is in automatic (AUTO) mo<strong>de</strong> and flashes when motion is <strong>de</strong>tected.<br />
SPECIFICATIONS<br />
• Not inten<strong>de</strong>d for use with electronic ballasts.<br />
• Inten<strong>de</strong>d for use with rapid start fluorescent or incan<strong>de</strong>scent lighting only.<br />
• Installing this <strong>de</strong>vice requires experience with resi<strong>de</strong>ntial and commercial wiring practices. Consult local building<br />
co<strong>de</strong>s before attempting to install this <strong>de</strong>vice.<br />
LOCATION / MOUNTING<br />
Since Cat. No. PR150 responds to temperature changes, care should be taken when mounting the <strong>de</strong>vice.<br />
DO NOT mount directly above a heat source, in a location where hot or cold drafts will blow directly on the sensor, or<br />
where uninten<strong>de</strong>d motion (e.g., hallway traffic) will be within sensor’s field-of-view.<br />
TO INSTALL<br />
ADJUSTMENT SETTINGS<br />
1. With power restored and wallplate removed, use your finger or a small screwdriver to adjust the light sensitivity<br />
and time settings on the <strong>de</strong>vice as follows:<br />
Light Level Adjustment:<br />
• Turn the control towards the “+” sign. Lights will turn ON in lighter conditions.<br />
• Turn the control towards the “-” sign. Lights will turn ON in less lighting conditions.<br />
Time Selection:<br />
• Adjust the time selector to the <strong>de</strong>sired length of time the lights are to remain ON. Lights will remain ON from<br />
15 seconds to 15 minutes after the room is vacated.<br />
• Turn the control towards the “+” sign. Lights will remain ON up to 15 minutes.<br />
• Turn the control towards the “-” sign. Lights will remain ON up to 15 seconds.<br />
2. Test that the light level and time selection are as <strong>de</strong>sired. If not, repeat adjustments until satisfied.<br />
3. Mount wallplate. INSTALLATION IS COMPLETE.<br />
TO OPERATE<br />
Cat. No. PR150 operates in three mo<strong>de</strong>s:<br />
ON: Sli<strong>de</strong> switch to the far RIGHT.<br />
OFF: Sli<strong>de</strong> switch to the far LEFT.<br />
AUTO: Switch is at CENTER position.<br />
NOTES:<br />
• Allow 1 minute for Cat. No. PR150 to warm-up before using in auto mo<strong>de</strong>.<br />
• In AUTO mo<strong>de</strong> the <strong>de</strong>vice will switch lights OFF in an occupied room if no motion is <strong>de</strong>tected for the selected time<br />
<strong>de</strong>lay. If continuous operation is <strong>de</strong>sired, select the ON position.<br />
TROUBLESHOOTING<br />
Lights do not switch ON when motion is <strong>de</strong>tected:<br />
• Push switch to AUTO. LED should flash when motion is <strong>de</strong>tected.<br />
• Motion is beyond sensing range, move closer to switch.<br />
• Adjust the light level adjustment toward lighter or darker, <strong>de</strong>pending on room conditions.<br />
Lights always stay ON:<br />
• Check that switch is in AUTO position.<br />
• Be sure that no motion occurs in coverage area for time selected.<br />
• Check that switch is not installed near a heat source (e.g., stove, lights, heat vents) or <strong>de</strong>tecting motion from an<br />
adjacent area (e.g., hallway traffic). If so, switch may have to be relocated.<br />
Lights do not turn ON in AUTO or MANUAL ON mo<strong>de</strong>s:<br />
• Check that switch is installed correctly.<br />
• Check that power is ON.<br />
• Check that light bulb is functioning.<br />
• If applicable, check that switch on controlled unit is ON.<br />
NOTE: If problems continue, consult a qualified electrician.<br />
Wi<strong>de</strong> View Motion Activated Light Control<br />
Cat. No. PR150<br />
Ratings: 500W-120VAC, 60Hz (Incan<strong>de</strong>scent)<br />
400VA-120VAC, 60Hz (Fluorescent - RAPID START MAGNETIC BALLASTS ONLY)<br />
INDOOR USE ONLY<br />
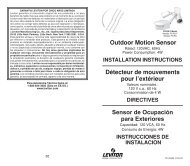
INSTALLATION<br />
1. WARNING: TO AVOID FIRE, SHOCK, OR DEATH; TURN OFF POWER AT CIRCUIT BREAKER OR FUSE AND TEST THAT THE POWER IS OFF BEFORE WIRING!<br />
2. Remove existing single-pole switch or dimmer installation, if applicable.<br />
3. Remove 3/4” (1.9 cm) of insulation from each circuit conductor. Make sure the ends of wires are straight.<br />
4. Connect lead wires per WIRING DIAGRAM as follows: Twist strands of each lead tightly, and with circuit conductors, push firmly into appropriate wire connector. Screw connectors on clockwise ensuring that no bare conductor shows<br />
below the wire connectors. Secure each connector with electrical tape.<br />
NOTE: If wire nut is provi<strong>de</strong>d, use to join one 14 AWG supply conductor with one 16 or 18 AWG <strong>de</strong>vice control lead.<br />
5. Gently position wires to provi<strong>de</strong> room in wall box for switch.<br />
6. Mount <strong>de</strong>vice “TOP” up.<br />
7. Restore power at circuit breaker or fuse.<br />
8. Locate the adjustment controls on the front of the switch. Proceed to the “ADJUSTMENT SETTINGS” section before mounting the <strong>de</strong>vice in the wall box.<br />
LIMITED 5 YEAR WARRANTY AND EXCLUSIONS<br />
Leviton warrants to the original consumer purchaser and not for the benefit of anyone else that this product at the time of its sale by Leviton is free of <strong>de</strong>fects in materials and workmanship un<strong>de</strong>r normal and proper use for five years from the purchase date. Leviton’s<br />
only obligation is to correct such <strong>de</strong>fects by repair or replacement, at its option, if within such five year period the product is returned prepaid, with proof of purchase date, and a <strong>de</strong>scription of the problem to Leviton Mfg. Co., Inc. 201 North Service Road, Melville,<br />
N.Y. 11747, U.S.A. This warranty exclu<strong>de</strong>s and there is disclaimed liability for labor for removal of this product or reinstallation. This warranty is void if this product is installed improperly or in an improper environment, overloa<strong>de</strong>d, misused, opened, abused, or altered in<br />
any manner, or is not used un<strong>de</strong>r normal operating conditions or not in accordance with any labels or instructions. There are no other or implied warranties of any kind, including merchantability and fitness for a particular purpose, but if any implied warranty is<br />
required by the applicable jurisdiction, the duration of any such implied warranty, including merchantability and fitness for a particular purpose, is limited to five years. Leviton is not liable for inci<strong>de</strong>ntal, indirect, special, or consequential damages, including without<br />
limitation, damage to, or loss of use of, any equipment, lost sales or profits or <strong>de</strong>lay or failure to perform this warranty obligation. The remedies provi<strong>de</strong>d herein are the exclusive remedies un<strong>de</strong>r this warranty, whether based on contract, tort or otherwise.<br />
For Technical Assistance Call: 1-800-824-3005 (U.S.A. Only)<br />
www.leviton.com<br />
<strong>Wiring</strong> <strong>Diagram</strong> / <strong>Schéma</strong> <strong>de</strong> <strong>cåblage</strong> / <strong>Diagram</strong>a <strong>de</strong> Cableado<br />
Line 120VAC, 60 Hz<br />
Ligne 120 V c.a., 60 Hz<br />
Línea 120VCA, 60 Hz<br />
FIGURE 1 FIGURE 2<br />
150°<br />
SWITCH<br />
INTERRUPTEUR-DETECTEUR / INTERRUPTOR<br />
10'<br />
3 m 0<br />
20'<br />
15'<br />
10'<br />
Hot (Black) / Actif (Noir) / Fase (Negro)<br />
Neutral (White) / Neutre (Blanc) / Neutro (Blanco)<br />
5'<br />
10'<br />
3 m<br />
6,1 m<br />
5 m<br />
3 m<br />
1,5 m<br />
Black / Noir / Negro<br />
(2) Control Settings<br />
(Time and Lights)<br />
2 réglages<br />
(délai d'eteinte et<br />
éclairage ambiant)<br />
(2) Programadores<br />
<strong>de</strong> Control<br />
(Tiempo y Luz)<br />
(3) Operation Mo<strong>de</strong>s<br />
(Auto, OFF and ON)<br />
(3) mo<strong>de</strong>s <strong>de</strong> fonctionnement<br />
("Auto", "OFF" et "ON")<br />
(3) Modos <strong>de</strong> Operación<br />
(Auto, Apagado y Encendido)<br />
+<br />
+<br />
PR150<br />
+<br />
+<br />
+<br />
+<br />
TOP<br />
–<br />
T<br />
I<br />
M<br />
E<br />
+<br />
–<br />
L<br />
I<br />
G<br />
H<br />
T<br />
+<br />
OFF AUTO ON<br />
Red / Rouge / Rojo<br />
Green Ground<br />
Terre Vert<br />
Ver<strong>de</strong> a tierra<br />
DI-000-PR150-22C-X0<br />
+<br />
+<br />
ENGLISH<br />
Sensor<br />
Détecteur<br />
Sensor<br />
LED<br />
Témoin<br />
LED<br />
Sli<strong>de</strong> Switch<br />
Bascule<br />
Interruptor<br />
Deslizante<br />
Black<br />
Noir<br />
Negro<br />
LOAD<br />
Charge<br />
Carga<br />
White<br />
Blanc<br />
Blanco
Comman<strong>de</strong> d’éclairage à détecteur <strong>de</strong> mouvements grand angulaire<br />
Nº <strong>de</strong> cat. PR150<br />
Valeurs nominales : 500 W, 120 V c.a., 60 Hz (à incan<strong>de</strong>scence)<br />
400 VA, 120 V c.a., 60 Hz (fluorescent BALLASTS MAGNéTIQUES à ALLUMAGE RAPIDE SEULEMENT)<br />
POUR L’INTÉRIEUR SEULEMENT<br />
AVERTISSEMENTS ET MISES EN GARDE :<br />
• installer ou utiliser conformément aux co<strong>de</strong>s <strong>de</strong> l’électricité en vigueur.<br />
• à défaut <strong>de</strong> bien comprendre les présentes directives, en tout ou en partie, on doit faire appel à un<br />
électricien qualifié.<br />
• pour éviter la surchauffe ou l’endommagement éventuel <strong>de</strong> ce dispositif et <strong>de</strong>s appareils qui lui sont<br />
raccordés, ne pas l’installer pour comman<strong>de</strong>r une prise ou un appareil motorisé ou à transformateur, ou<br />
tout autre dispositif qu’un luminaire à incan<strong>de</strong>scence ou fluorescent aux valeurs nominales appropriées.<br />
• n’utiliser ce dispositif qu’avec du fil <strong>de</strong> cuivre ou plaqué cuivre; en présence <strong>de</strong> fil d’aluminium, utiliser<br />
seulement les dispositifs portant la marque cu/al ou co/alr.<br />
• Nettoyer la surface externe du dispositif au moyen d’un chiffon humi<strong>de</strong> seulement; NE PAS utiliser <strong>de</strong> savon<br />
ni <strong>de</strong> nettoyant liqui<strong>de</strong>.<br />
• Aucun <strong>de</strong>s composants <strong>de</strong> ce dispositif ne peut être réparé sur le terrain; l’utilisateur NE DOIT JAMAIS<br />
tenter d’en effectuer l’entretien ou la réparation.<br />
DESCRIPTION<br />
INSTALLATION FRANÇAIS<br />
La comman<strong>de</strong> d’éclairage à détecteur <strong>de</strong> mouvements grand angulaire <strong>de</strong> Decora, no <strong>de</strong> cat. PR150, est un<br />
interrupteur-détecteur <strong>de</strong> mouvements à infrarouge passif conçu pour procurer à l’utilisateur une gestion efficace <strong>de</strong><br />
l’énergie. Lorsque PR150 détecte la présence d’une personne (sa chaleur corporelle) dans son champ <strong>de</strong> vision (la zone<br />
contrôlée), il allume automatiquement les luminaires qui lui sont raccordés. Lorsqu’il ne détecte plus <strong>de</strong> mouvements, il<br />
laisse les luminaires allumés pendant un délai réglé préalablement, puis les éteint automatiquement. Cet interrupteurdétecteur<br />
qui permet d’économiser l’énergie est tout indiqué dans toutes les pièces <strong>de</strong> la maison où la comman<strong>de</strong><br />
automatique mains libres <strong>de</strong> l’éclairage est souhaitée, comme la salle <strong>de</strong> bain, la chambre à coucher et la salle <strong>de</strong><br />
séjour. Le PR150 est conçu pour l’intérieur seulement.<br />
Le PR150 est en outre doté <strong>de</strong> réglages du délai d’éteinte et <strong>de</strong> la sensibilité à l’éclairage ambiant, lesquels peuvent être<br />
programmés par l’utilisateur selon ses besoins. Se reporter à la section “ RÉGLAGES “.<br />
CARACTÉRISTIQUES<br />
• Zone <strong>de</strong> détection couvrant une surface <strong>de</strong> 6.1 sur 6.1 m (20 sur 20 pi), soit un angle <strong>de</strong> 150° (Figure 1).<br />
• Doté <strong>de</strong> boutons <strong>de</strong> réglage <strong>de</strong> délai d’éteinte et <strong>de</strong> sensibilité à l’éclairage ambiant situés sur le <strong>de</strong>vant du dispositif<br />
(Figure 2).<br />
• Comman<strong>de</strong> manuelle prioritaire qui permet la commutation ordinaire.<br />
• Témoin à DEL qui s’éteint lorsque l’interrupteur fonctionne en mo<strong>de</strong> automatique (AUTO) et qui clignote à la<br />
détection <strong>de</strong> mouvements.<br />
FICHE TECHNIQUE<br />
• Ce dispositif n’est pas conçu pour les ballasts électroniques.<br />
• Des cavaliers sont requis pour les applications à trois voies.<br />
• Comman<strong>de</strong> manuelle prioritaire qui permet <strong>de</strong> l’utiliser comme un interrupteur ordinaire.<br />
• Muni d’un témoin à DEL qui s’éteint lorsque l’interrupteur fonctionne en mo<strong>de</strong> automatique et qui clignote à la<br />
détection <strong>de</strong> mouvements.<br />
EMPLACEMENT<br />
Puisque le PR150 est sensible aux variations thermiques, on doit s’assurer <strong>de</strong> NE PAS l’installer directement<br />
au-<strong>de</strong>ssus d’une source <strong>de</strong> chaleur, ni là où il risque d’être exposé à <strong>de</strong>s courants d’air chaud ou froid, ni aux<br />
endroits où il risque <strong>de</strong> capter les mouvements d’un endroit passant, comme un couloir.<br />
INSTALLATION<br />
1. AVERTISSEMENT : POUR ÉVITER LES RISQUES D’INCENDIE, DE CHOC ÉLECTRIQUE OU D’ÉLECTROCUTION,<br />
COUPER LE COURANT AU FUSIBLE OU AU DISJONCTEUR ET S’ASSURER QUE LE CIRCUIT SOIT BIEN COUPÉ<br />
AVANT DE PROCÉDER à L’INSTALLATION.<br />
2. Le cas échéant, retirer l’interrupteur ou le gradateur unipolaire existant.<br />
3. Dénu<strong>de</strong>r chacun <strong>de</strong>s conducteurs <strong>de</strong> circuit sur environ 1.9 cm (3/4 po); s’assurer que les extrémités soient bien raidies.<br />
4. Raccor<strong>de</strong>r les fils conformément au SCHÉMA DE CÂBLAGE approprié et <strong>de</strong> la façon suivante : torsa<strong>de</strong>r soli<strong>de</strong>ment<br />
ensemble les brins <strong>de</strong> chaque fil <strong>de</strong> sortie avec le conducteur correspondant et enfoncer fermement les raccords dans<br />
un serre-fils <strong>de</strong> calibre approprié, en vissant ce <strong>de</strong>rnier et en s’assurant qu’aucun brin <strong>de</strong> cuivre ne dépasse. Protéger les<br />
raccords au moyen <strong>de</strong> ruban isolant.<br />
REMARQUE : si une marette est fournie, l’utiliser pour joindre le conducteur d’alimentation <strong>de</strong> calibre 14 AWG à un fil <strong>de</strong><br />
comman<strong>de</strong> <strong>de</strong> 16 ou <strong>de</strong> 18 AWG.<br />
5. Insérer délicatement les fils dans la boîte murale <strong>de</strong> manière à laisser suffisamment d’espace pour le dispositif.<br />
6. Installer le dispositif en mettant la marque “TOP” vers le haut.<br />
7. Rétablir l’alimentation au fusible ou au disjoncteur.<br />
8. Les boutons <strong>de</strong> réglage sont situés sur le <strong>de</strong>vant du dispositif; passer à la section “RÉGLAGES” avant<br />
d’installer ce <strong>de</strong>rnier dans la boîte murale.<br />
RÉGLAGES<br />
1. La plaque murale étant toujours retirée et le courant, rétabli, se servir d’un doigt ou d’un petit tournevis pour régler<br />
la sensibilité et le délai en procédant comme suit.<br />
Réglage <strong>de</strong> la sensibilité à l’éclairage ambiant :<br />
• Tourner la molette LIGHT vers le symbole « + ». Les lumières s’allumeront quand il fait plus clair.<br />
• Tourner la molette LIGHT vers le symbole « – ». Les lumières s’allumeront quand il fait plus noir.<br />
Réglage du délai d’éteinte :<br />
• On peut régler le délai d’éteinte <strong>de</strong>s luminaires entre 15 secon<strong>de</strong>s et 15 minutes après que la pièce se soit<br />
vidée.<br />
• Tourner la molette TIME vers le symbole « + ». Les lumières resteront allumées pendant un délai s’approchant<br />
<strong>de</strong> 15 minutes.<br />
• Tourner la molette TIME vers le symbole « – ». Les lumières resteront allumées pendant un délai s’approchant<br />
<strong>de</strong> 15 secon<strong>de</strong>s.<br />
2. Vérifier si les réglages effectués sont convenables et les reprendre au besion.<br />
3. Fixer la plaque murale. L’INSTALLATION EST TERMIÉE.<br />
FONCTIONNEMENT<br />
Le PR150 peut être utilisé en trois mo<strong>de</strong>s <strong>de</strong> fonctionnement :<br />
SOUS TENSION (ON) : glissiére à l’extrême GAUCHE.<br />
HORS TENSION (OFF) : glissiére à l’extrême DROIT.<br />
AUTOMATIQUE (AUTO) : glissiére au CENTRE.<br />
REMARQUES :<br />
• Avant d’utiliser le PR150 en mo<strong>de</strong> automatique, on doit lui allouer une pério<strong>de</strong> <strong>de</strong> “réchauffement” d’une minute.<br />
• En mo<strong>de</strong> AUTO, le dispositif éteint les luminaires quand aucun mouvement n’est détecté pendant le délai choisi,<br />
même si la pièce est occupée. Si on veut que l’éclairage reste allumé, on doit mettre la glissière à la position ON.<br />
DIAGNOSTIC DES ANOMALIES<br />
Les lumières ne s’allument pas en présence <strong>de</strong> mouvements :<br />
• mettre la glissière à la position AUTO (le témoin <strong>de</strong>vrait clignoter lorsque <strong>de</strong>s mouvements sont détectés);<br />
• les mouvements sont hors <strong>de</strong> la zone <strong>de</strong> détection (on doit s’approcher du détecteur);<br />
• régler la sensibilité à l’éclairage ambiant selon la clarté <strong>de</strong> la pièce.<br />
Les lumières restent toujours allumées :<br />
• vérifier si la glissière est bien à la position AUTO;<br />
• s’assurer qu’il n’y ait aucun mouvement dans la zone <strong>de</strong> détection pendant le délai choisi;<br />
• s’assurer que le dispositif ne soit pas installé à proximité d’une source <strong>de</strong> chaleur (comme une cuisinière, un<br />
luminair ou une bouche <strong>de</strong> chauffage), ou là où il pourrait capter les mouvements d’un endroit passant (comme un<br />
couloir); le cas échéant, réinstaller le dispositif ailleurs.<br />
Les lumières ne s’allument pas en mo<strong>de</strong> AUTO ou ON :<br />
• s’assurer que le dispositif soit installé correctement;<br />
• s’assurer que le circuit soit sous tension;<br />
• s’assurer que les lampes soient en état <strong>de</strong> fonctionner;<br />
• si les luminaires commandés sont dotés d’interrupteurs, s’assurer que ceux-ci soient en position <strong>de</strong> marche.<br />
Remarque : si le problème persiste, consulter un électricien qualifié.<br />
EXCLUSIONS ET GARANTIE LIMITÉE DE 5 ANS<br />
Leviton garantit au premier acheteur, et uniquement au crédit du dit acheteur, que ce produit ne présente ni défauts <strong>de</strong> fabrication ni<br />
défauts <strong>de</strong> matériaux au moment <strong>de</strong> sa vente par Leviton, et n’en présentera pas tant qu’il est utilisé <strong>de</strong> façon normale et adéquate,<br />
pendant une pério<strong>de</strong> <strong>de</strong> 5 ans suivant la date d’achat. La seule obligation <strong>de</strong> Leviton sera <strong>de</strong> corriger les dits défauts en réparant ou en<br />
remplaçant le produit défectueux si ce <strong>de</strong>rnier est retourné port payé, accompagné d’une preuve <strong>de</strong> la date d’achat, avant la fin <strong>de</strong> la<br />
dite pério<strong>de</strong> <strong>de</strong> 5 ans, à la Manufacture Leviton du Canada Limitée, au soin du service <strong>de</strong> l’Assurance Qualité, 165 boul. Hymus,<br />
Pointe-Claire, (Québec), Canada H9R 1E9. Par cette garantie, Leviton exclut et décline toute responsabilité envers les frais <strong>de</strong> main<br />
d’oeuvre encourus pour retirer et réinstaller le produit. Cette garantie sera nulle et non avenue si le produit est installé incorrectement<br />
ou dans un environnement inadéquat, s’il a été surchargé, incorrectement utilisé, ouvert, employé <strong>de</strong> façon abusive ou modifié <strong>de</strong><br />
quelle que manière que ce soit, ou s’il n’a été utilisé ni dans <strong>de</strong>s conditions normales ni conformément aux directives ou étiquettes qui<br />
l’accompagnent. Aucune autre garantie, explicite ou implicite, y compris celle <strong>de</strong> qualité marchan<strong>de</strong> et <strong>de</strong> conformité au besoin,<br />
n’est donnée, mais si une garantie implicite est requise en vertu <strong>de</strong> lois applicables, la dite garantie implicite, y compris la garantie <strong>de</strong><br />
qualité marchan<strong>de</strong> et <strong>de</strong> conformité au besoin, est limitée à une durée <strong>de</strong> 5 ans. Leviton décline toute responsabilité envers les<br />
dommages indirects, particuliers ou consécutifs, incluant, sans restriction, la perte d’usage d’équipement, la perte <strong>de</strong> ventes ou<br />
les manques à gagner, et tout dommage-intérêt découlant du délai ou du défaut <strong>de</strong> l’exécution <strong>de</strong>s obligations <strong>de</strong> cette garantie.<br />
Seuls les recours stipulés dans les présentes, qu’ils soient d’ordre contractuel, délictuel ou autre, sont offerts en vertu <strong>de</strong> cette garantie.<br />
Ligne d’Assistance Technique : 1 800 405-5320 (Canada seulement)<br />
www.leviton.com<br />
Control <strong>de</strong> Luz <strong>de</strong> Amplio Espectro Activado por Movimiento<br />
No. <strong>de</strong> Cat. PR150<br />
Capacidad: 500 W - 120 VCA, 60Hz (Incan<strong>de</strong>scente)<br />
400 VA -120 VCA, 60Hz (Fluorescente - SOLO PARA USO CON BALLASTROS MAGNETICOS DE INCIO RÁPIDIO)<br />
SOLO PARA USO EN INTERIORES<br />
INSTALACION ESPAñOL<br />
ADVERTENCIAS Y PRECAUCIONES:<br />
• Para instalarse y/o usarse <strong>de</strong> acuerdo con los codigos electricos y normas apropiados.<br />
• Si usted no esta seguro acerca <strong>de</strong> alguna <strong>de</strong> las partes <strong>de</strong> estas instrucciones, consulte a un electricista<br />
calificado.<br />
• Para evitar sobrecalentamiento y posible daño a este aparato y otro equipo, no instale para controlar un<br />
receptaculo, o productos que operan con motor o transformador u otro que no sea iluminación flurescente.<br />
• Use este producto solo con cable <strong>de</strong> cobre o revestido <strong>de</strong> cobre. para cable <strong>de</strong> aluminio use solo<br />
productos marcados con el simbolo co/alr o cu/al.<br />
• Limpie la superficie sólo con un trapo húmedo. NO USE jabones o líquidos <strong>de</strong> limpieza.<br />
• NO intente repararlo o darle servicio. No tiene componentes servibles por el usuario.<br />
DESCRIPCION<br />
El control <strong>de</strong> Luz <strong>de</strong> Amplio Espectro Activado por Movimiento, No. <strong>de</strong> Cat. PR150, es un interruptor con sensor<br />
<strong>de</strong> movimiento infrarrojo pasivo, diseñado para ofrecer al usuario la capacidad <strong>de</strong> manejar la energía. El No. <strong>de</strong><br />
Cat. PR150 opera cuando <strong>de</strong>tecta movimiento (como el calor <strong>de</strong> un cuerpo) <strong>de</strong>ntro <strong>de</strong> su campo <strong>de</strong> visión (área<br />
que cubre) y automáticamente ENCIENDE las luces. Cuando el interruptor no <strong>de</strong>tecta movimiento las luces se<br />
mantienen ENCENDIDAS por un tiempo <strong>de</strong>terminado y automáticamente se APAGAN. El No. <strong>de</strong> Cat. PR150 es sólo<br />
para uso en interiores. Con este tipo <strong>de</strong> interruptor se ahorra energía y es i<strong>de</strong>al para cualquier habitación <strong>de</strong> su casa<br />
que se beneficiará con este control automático<strong>de</strong> luz “manos libres”, tal como baños, dormitorios, salas <strong>de</strong> estar.<br />
El No. <strong>de</strong> Cat. PR150 está equipado con controles <strong>de</strong> ajuste <strong>de</strong> sensibilidad y tiempo que le permite al usuario<br />
controlar las luces y el tiempo programado. Vea la sección <strong>de</strong> “AJUSTES”.<br />
CARACTERISTICAS<br />
• El No <strong>de</strong> Cat. PR150 tiene un área <strong>de</strong> sensibilidad que cubre 6.1 m x 6.1 m y un ángulo sensible <strong>de</strong> 150° (Figura 1).<br />
• Controles para ajustar la luz y tiempo <strong>de</strong> retraso están ubicados en la parte frontal <strong>de</strong>l producto (Figura 2).<br />
• El manejo manual permite una operación normal <strong>de</strong> ENCENDIDO/APAGADO.<br />
• El indicador LED está APAGADO cuando el interruptor está en automático (AUTO) y oscila cuando <strong>de</strong>tecta<br />
movimiento.<br />
ESPECIFICACIONES<br />
• No está hecho para usar con Balastras Electrónicas.<br />
• Está hecho sólo para usar con luces fluorescentes <strong>de</strong> inicio rápido o luces incan<strong>de</strong>scentes.<br />
• La instalación <strong>de</strong> este producto requiere la experiencia práctica <strong>de</strong> cableado resi<strong>de</strong>ncial y comercial. Consulte los<br />
códigos locales <strong>de</strong> construcción antes <strong>de</strong> intentar instalar este producto.<br />
UBICACION/MONTAJE<br />
El No. <strong>de</strong> Cat. PR150 respon<strong>de</strong> a los cambios <strong>de</strong> temperatura. Por eso, tenga cuidado <strong>de</strong> NO instalar el producto<br />
directamente encima <strong>de</strong> fuentes <strong>de</strong> calor o don<strong>de</strong> corrientes frias o calientes lleguen directamente al sensor; o don<strong>de</strong><br />
existan movimientos que estén <strong>de</strong>ntro <strong>de</strong>l campo <strong>de</strong> acción <strong>de</strong>l sensor que no sean <strong>de</strong>seados (como pasadizos).<br />
PARA INSTALAR<br />
1. ADVERTENCIA: PARA EVITAR DESCARGA ELECTRICA, FUEGO O MUERTE, INTERRUMPA EL PASO DE<br />
LA ENERGIA MEDIANTE EL INTERRUPTOR DE CIRCUITO O FUSIBLE, ASEGURESE QUE EL CIRCUITO NO<br />
ESTE ENERGIZADO ANTES DE INICIAR LA INSTALACION.<br />
2. Quite el interruptor unipolar o la instalación <strong>de</strong> atenuador existente, si es necesario.<br />
3. Pele 1.9 cm (3/4”) <strong>de</strong>l aislante <strong>de</strong> la punta <strong>de</strong> cada conductor. Asegure que las puntas <strong>de</strong> los conductores estén<br />
rectas.<br />
4. Conecte los cables según el DIAGRAMA DE CABLEADO apropiado y como sigue: Tuerce los hilos <strong>de</strong> cada<br />
conexión bien apretados y con el conductor <strong>de</strong>l circuito, empújelos firmemente en el conector <strong>de</strong> alambres.<br />
Enrosque cada conector hacia la <strong>de</strong>recha, asegurando que no se vea ningún conductor <strong>de</strong>snudo <strong>de</strong>bajo <strong>de</strong>l<br />
conector. Asegure cada conector con cinta aislante.<br />
NOTA: Si se provee una tuerca, usela para unir el conductor <strong>de</strong> 14 AWG que se suministra, con uno <strong>de</strong> 16 o<br />
18 AWG control <strong>de</strong>l producto.<br />
5. Coloque los conductores suavemente <strong>de</strong>ntro <strong>de</strong> la caja y <strong>de</strong>je espacio para el interruptor.<br />
6. Monte el producto con la marca “TOP” hacia arriba.<br />
7. Restablezca la corriente con el fusible o el interruptor <strong>de</strong> circuito<br />
8. Localice los controles <strong>de</strong> ajuste en el frente <strong>de</strong>l interruptor. Proceda con la sección <strong>de</strong> “AJUSTES”, antes <strong>de</strong><br />
colocar el producto en la pared.<br />
AJUSTES<br />
1. Con la energía restablecida y la placa no instalada, use su <strong>de</strong>do para ajustar la sensibilidad <strong>de</strong> la luz y programar<br />
el tiempo en el producto como sigue:<br />
Ajuste <strong>de</strong>l Nivel <strong>de</strong> Luz<br />
• Gire el control hacia el signo “+”. Las luces se ENCENDERAN en condiciones más claras.<br />
• Gire el control hacia el signo “-”. Las luces se ENCENDERAN en condiciones mínimas <strong>de</strong> iluminación.<br />
Selección <strong>de</strong> Tiempo<br />
• Ajuste el selector <strong>de</strong> tiempo por el tiempo que las luces <strong>de</strong>ben permanecer ENCENDIDAS. Las luces<br />
permanecerán ENCENDIDAS <strong>de</strong>s<strong>de</strong> 15 segundos a 15 minutos <strong>de</strong>spués que la habitación este vacía.<br />
• Gire el control hacia el signo “+”. Las luces se mantedrán ENCENDIDAS hasta 15 minutos.<br />
• Gire el control hacia el signo “-”. Las luces se mantedrán ENCENDIDAS hasta 15 segundos.<br />
2. Verifique que la sensibilidad <strong>de</strong> la luz y programado <strong>de</strong>l tiempo seleccionado es el <strong>de</strong>ceado. Si no, repita los<br />
ajustes hasta estar satisfecho.<br />
3. Monte la Placa. LA INSTALACIÓN ESTÁ COMPLETA.<br />
OPERACION<br />
El No. <strong>de</strong> Cat. PR150 opera en tres modos diferentes:<br />
ON (ENCENDIDO): El interruptor <strong>de</strong>slizante totalmente hacia la DERECHA.<br />
OFF (APAGADO): El interruptor <strong>de</strong>slizante totalmente hacia la IZQUIERDA.<br />
AUTO (AUTO): El interruptor en el CENTRO.<br />
NOTAS:<br />
• Permita que el Cat. No. PR150 caliente por un minuto antes <strong>de</strong> usar el modo auto.<br />
• En el modo AUTO el producto APAGARA las luces en una habitación ocupada, si no <strong>de</strong>tecta movimiento en el<br />
tiempo <strong>de</strong> espera seleccionado.<br />
SOLUCION DE PROBLEMAS<br />
Las luces no se ENCIENDEN cuando se <strong>de</strong>tecta movimiento:<br />
• Presione el interruptor al modo AUTO. El LED <strong>de</strong>be oscilar cuando <strong>de</strong>tecta movimiento.<br />
• El movimiento está fuera <strong>de</strong>l rango <strong>de</strong> sensibilidad, muévalo cerca <strong>de</strong>l interruptor.<br />
• Ajuste el nivel <strong>de</strong> luz hacia claro u oscuro <strong>de</strong>pendiendo <strong>de</strong> las condiciones <strong>de</strong> la habitación.<br />
Las luces siempre están ENCENDIDAS:<br />
• Verifique que el interruptor esté en la posición AUTO.<br />
• Asegúrese que no ocurra ningún movimiento en el área cubierta por el tiempo seleccionado.<br />
• Verifique que el interruptor no está instalado cerca a una fuente <strong>de</strong> calor (tal como una estufa, luces, ventanas <strong>de</strong><br />
calefacción) o está <strong>de</strong>tectando movimiento <strong>de</strong> una área adyacente (como un pasadizo con movimiento); si esto<br />
suce<strong>de</strong> tiene que reubicar el interruptor.<br />
Las luces no se ENCIENDEN en las posiciones <strong>de</strong> AUTO y MANUAL:<br />
• Verifique que el interruptor esté instalado correctamente.<br />
• Verifique que la energía esté encendida.<br />
• Verifique que el foco esté trabajando.<br />
• Si es necesario, revise que el interruptor en la unidad controlada esté ENCENDIDO.<br />
NOTA: Si el problema continúa, consulte con un electricista calificado.<br />
GARANTIA LEVITON POR CINCO AÑOS LIMITADA<br />
Leviton garantiza al consumidor original <strong>de</strong> sus productos y no para beneficio <strong>de</strong> nadie más que este producto en el momento <strong>de</strong> su<br />
venta por Leviton, está libre <strong>de</strong> <strong>de</strong>fectos en materiales o fabricación por un período <strong>de</strong> cinco años <strong>de</strong>s<strong>de</strong> la fecha <strong>de</strong> la compra original.<br />
La única obligación <strong>de</strong> Leviton es corregir tales <strong>de</strong>fectos ya sea con reparación o reemplazo, como opción, si <strong>de</strong>ntro <strong>de</strong> tal período <strong>de</strong><br />
cinco años el producto pagado se <strong>de</strong>vuelve, con la prueba <strong>de</strong> compra fechada y la <strong>de</strong>scripción <strong>de</strong>l problema a Leviton Mfg. Co., Inc. 201<br />
North Service Road, Melville, N.Y. 11747, U.S.A. Esta garantía excluye y renuncia toda responsabilidad <strong>de</strong> mano <strong>de</strong> obra por remover<br />
o reinstalar este producto. Esta garantía es inválida si este producto es instalado inapropiadamente o en un ambiente ina<strong>de</strong>cuado,<br />
sobrecargado, mal usado, abierto, abusado o alterado en cualquier manera o no es usado bajo condiciones <strong>de</strong> operación normal o no<br />
conforme con las etiquetas o instrucciones. No hay otras garantías implicadas <strong>de</strong> cualquier otro tipo, incluyendo mercadotecnia<br />
y propiedad para un propósito en particular pero si alguna garantía implicada se requiere por la jurisdicción pertinente, la duración<br />
<strong>de</strong> cualquiera garantía implicada, incluyendo mercadotecnia y propiedad para un propósito en particular, es limitada a cinco años.<br />
Leviton no es responsable por daños inci<strong>de</strong>ntales, indirectos, especiales o consecuentes, incluyendo sin limitación, daños a,<br />
o pérdida <strong>de</strong> uso <strong>de</strong>, cualquier equipo, pérdida <strong>de</strong> ventas o ganancias o retraso o falla para llevar a cabo la obligación <strong>de</strong> esta<br />
garantía. Los remedios provistos aquí son remedios exclusivos para esta garantía, ya sea basado en contrato, agravio o <strong>de</strong> otra manera.<br />
Para Asistencia Técnica llame al: 1-800-824-3005 (Sólo en EE.UU.)<br />
www.leviton.com<br />
© 2008 Leviton Mfg. Co., Inc. DI-000-PR150-22C