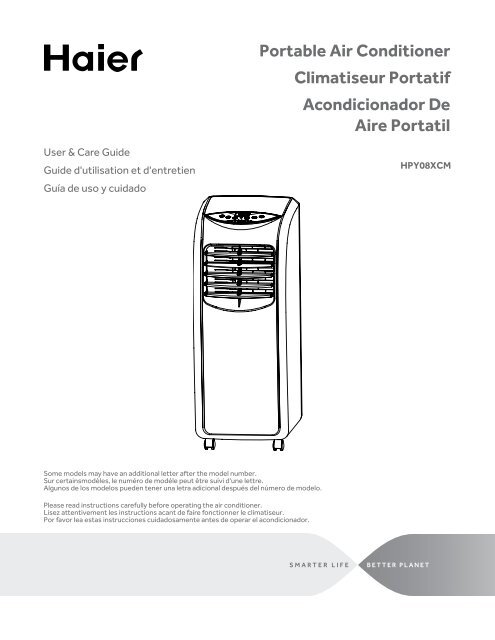
Portable Air Conditioner Climatiseur Portatif Acondicionador ... - Haier
Portable Air Conditioner Climatiseur Portatif Acondicionador ... - Haier
Portable Air Conditioner Climatiseur Portatif Acondicionador ... - Haier

You also want an ePaper? Increase the reach of your titles
YUMPU automatically turns print PDFs into web optimized ePapers that Google loves.
User & Care Guide<br />
Guide d'utilisation et d'entretien<br />
Guía de uso y cuidado<br />
Some models may have an additional letter after the model number.<br />
Sur certainsmodèles, le numéro de modéle peut être suivi d'une lettre.<br />
Algunos de los modelos pueden tener una letra adicional después del número de modelo.<br />
Please read instructions carefully before operating the air conditioner.<br />
Lisez attentivement les instructions acant de faire fonctionner le climatiseur.<br />
Por favor lea estas instrucciones cuidadosamente antes de operar el acondicionador.<br />
<strong>Portable</strong> <strong>Air</strong> <strong>Conditioner</strong><br />
<strong>Climatiseur</strong> <strong>Portatif</strong><br />
<strong>Acondicionador</strong> De<br />
<strong>Air</strong>e Portatil<br />
HPY08XCM
tAblE of ContEnts<br />
sAfEtY infoRMAtion............................................................................................................. 2<br />
Important Safety Precautions ................................................................................................ 2-3<br />
Important Instructions ............................................................................................................... 4<br />
instAllAtion ........................................................................................................................... 5<br />
Tools and Parts ............................................................................................................................ 5<br />
Assembly and installation ...................................................................................................... 6-7<br />
Parts andFeatures ....................................................................................................................... 8<br />
oPERAtion ................................................................................................................................ 9<br />
Operation .................................................................................................................................... 9<br />
Control Panel Operation ..................................................................................................... 10-11<br />
Remote Control Operation ................................................................................................ 12-13<br />
Care and Cleaning .....................................................................................................................14<br />
Storage ......................................................................................................................................15<br />
tRoUblEsHooting ..............................................................................................................16<br />
WARRAntY ..............................................................................................................................17<br />
PRoDUCt REgistRAtion<br />
Thank you for purchasing our <strong>Haier</strong><br />
product. This easy-to-use manual will guide<br />
you in getting the best use of your product.<br />
Remember to record the model and serial<br />
numbers. They are on a label on the side of<br />
your unit.<br />
Model number<br />
Serial number<br />
Date of purchase<br />
Staple your receipt to your manual. You will need it to obtain warranty service.<br />
EnglisH
EnglisH<br />
1. <strong>Air</strong> conditioner must be connected to proper electrical outlet with the<br />
correct electrical supply. (see table previous page)<br />
2. Proper grounding must be ensured to reduce the risk of shock and fire.<br />
DO NOT CUT OR REMOVE THE GROUNDING PRONG. If you do not<br />
have a three-prong electric receptacle outlet in the wall, have a certified<br />
electrician install the proper receptacle. The wall receptacle MUST be<br />
properly grounded.<br />
3. Do not operate air conditioner if power cord is frayed or otherwise<br />
damaged. Avoid using it if there are cracks or abrasion damage along the<br />
length, plug connector or if the unit malfunctions or is damaged in any<br />
manner. Contact an authorized service technician for examination, repairs<br />
or adjustments.<br />
4. DO NOT USE AN ADAPTER OR AN EXTENSION CORD.<br />
5. Do not block airflow around the air conditioner. The exhaust hose should<br />
be free of any obstructions. Maintain at least 20” of clearance around the<br />
air conditioner.<br />
6. Always unplug the air conditioner before servicing it, cleaning it or moving it.<br />
7. Do not install or use the air conditioner in any area where the atmosphere<br />
contains combustible gases or where the atmosphere is contaminated.<br />
Avoid any chemicals coming in contact with your air conditioner.<br />
8. Do not place any object on the top of the unit.<br />
9. Never operate the air conditioner without the filters in place.<br />
10. Do not use the air conditioner near a bathtub, shower or wash basin or<br />
other wet area.<br />
PAgE 2<br />
iMPoRtAnt sAfEtY PRECAUtions<br />
WARning<br />
FOLLOwING THESE bASIC PRECAUTIONS wILL REDUCE THE RISk OF FIRE,<br />
ELECTRICAL SHOCk, INjURY OR DEATH wHEN USING YOUR AIR CONDITIONER.
iMPoRtAnt sAfEtY PRECAUtions<br />
READ AnD folloW tHE<br />
sAfEtY instRUCtions CAREfUllY.<br />
sAVE tHEsE instRUCtions<br />
PAgE 3<br />
EnglisH
EnglisH<br />
iMPoRtAnt instRUCtions<br />
• Please keep this manual in a safe place.<br />
• Do not use liquid or spray to clean this product. Use a damp cloth.<br />
• Do not place the product on an unstable surface or elevated place as it<br />
may fall and cause damage or injury.<br />
• Never spill liquid on the control panel; it may cause electrical short to<br />
the electronic parts inside and disable them or cause them to function<br />
improperly.<br />
• Never try to disassemble or service the product by yourself. When<br />
maintenance is required, please contact the local service center or<br />
distributor.<br />
PAgE 4
tools AnD PARts<br />
Read and follow the instructions provided with any tools listed here.<br />
PARts sUPPliED:<br />
Remote Batery<br />
NozleExhaust<br />
Hose<br />
Screws User<br />
Manual<br />
Check that all parts for your specific air conditioner are included in the parts package.<br />
notE: If parts are missing, call <strong>Haier</strong> Customer Service: 1-877-337-3639.<br />
Window Panel Asembly<br />
Exhaust<br />
Hose<br />
Conector<br />
Remote Batery<br />
NozleExhaust<br />
Hose<br />
Screws User<br />
Remote ManualRemote Batery<br />
NozleExhaust<br />
Dry<br />
iMAgE PARt # PiECEs<br />
Main window panel and extension panels<br />
(extends from 20" up to 55")<br />
haust Exhaust Hose<br />
Screws User Manual<br />
User Manual<br />
Screws 3<br />
Exhaust nozzle 1<br />
ryUser NozleExhaust Hose<br />
Screws Manual<br />
Dry<br />
ote<br />
BateryUser NozleExhaust Hose<br />
Screws Manual<br />
Exhaust hose 1<br />
ON/OFF<br />
haust se Conector<br />
Hose Conector<br />
Hose connector 1<br />
TEMP/TIME<br />
ndol Asembly<br />
Exhaust Hose Conector<br />
bracket 1<br />
Remote Batery<br />
NozleExhaust<br />
Hose<br />
3<br />
EnglisH<br />
Remote Control 1<br />
A<br />
Panel indo<br />
Asembly<br />
Exhaust Hose Conector<br />
Dry<br />
Dry<br />
MODE<br />
SPEED<br />
TIMER<br />
TEMP/TIME<br />
B<br />
batteries 2<br />
PoWER sUPPlY CoRD<br />
be sure to test the Power Supply Cord before operation. Press the test button<br />
then press the reset button to restore power.<br />
PAgE 5
EnglisH<br />
1. Depending on your window opening, use 1, 2 or 3 of the window extension panels. Insert<br />
screw(s) through holes on center panel as necessary to secure the panel(s).<br />
2. Open the window and place the window panel assembly into the window. Adjust the extension<br />
panels to fit the width or height of the window as shown below (see figure A). Secure the<br />
extension panels using 2 blunt tip screws (see figure b). Close window.<br />
3. Secure the bracket to the window with remaining screw. This prevents the window from being<br />
opened from the outside (see figure C).<br />
PAgE 6<br />
AssEMblY AnD instAllAtion<br />
A<br />
b<br />
C
AssEMblY AnD instAllAtion<br />
4. Expand the 2 ends of the exhaust hose. Connect the exhaust nozzle to one end of the exhaust<br />
hose by turning counter-clockwise (see figure D).<br />
5. Raise the handle of the “C” shaped clamp on the back of the unit and insert the hose connector<br />
end of the hose assembly into the lower part of the hose clamp. Secure the hose assembly<br />
onto the back of the unit by lowering the “C” shaped clamp completely. Ensure that the hose<br />
assembly is securely fastened before operation (see figure E).<br />
6. Insert the exhaust hose with nozzle end into the window panel.<br />
7. Plug the power cord into the wall outlet and press the "Reset” button to ensure the safety plug<br />
is providing power to the unit.<br />
8. Please allow 20" of space around the unit for proper air circulation.<br />
D<br />
E<br />
PAgE 7<br />
EnglisH
EnglisH<br />
PAgE 8<br />
PARts AnD fEAtUREs<br />
CONTROL PANEL<br />
VERTICAL AIR<br />
DISCHARGE LOUVER<br />
REAR HANDLE (REMOTE<br />
CONTROL HOLDER)<br />
“C” SHAPED CLAMP<br />
POwER CORD<br />
CORD STORAGE HOOkS<br />
LOwER DRAIN CAP*<br />
HORIzONTAL AIR<br />
DISCHARGE LOUVER<br />
CASTERS<br />
FILTERS (4 PIECES)<br />
*PLEASE ENSURE THE LOwER DRAIN<br />
CAP IS CLOSED SECURELY bEFORE<br />
OPERATION TO PREVENT wATER LEAkS.
oPERAtion<br />
notE: wait 24 hours before turning on the air conditioner if the unit has been tilted on its side for<br />
any reason. This allows the oil to return to the compressor and prevents premature failure<br />
of the air conditioner.<br />
bEfoRE UsE<br />
1. Use a 115 Volt, 15 Amp outlet for the air conditioner. Use a dedicated circuit for the air<br />
conditioner. Do not use any other electrical appliances on this circuit or you may trip the<br />
circuit breaker/fuse.<br />
2. Do not place the air conditioner in direct sunlight or close to any heating baseboard heaters,<br />
stoves, etc.)<br />
3. Operate on a flat, level surface only.<br />
4. keep the unit free of any obstructions such as drapes, curtains, blinds, etc.<br />
5. keep unit at least 20” away from any wall.<br />
DURing UsE<br />
1. when turning on the unit for the first time after plugging it into an electrical outlet, the unit will<br />
start in high fan cooling mode set at 75º F. The temperature display on the LCD will show the<br />
current room temperature. when turning on the unit during regular usage, it will remember the<br />
last setting used.<br />
2. After a normal shut down, please wait for 3 minutes before restarting the unit.<br />
3. In cooling mode, this portable air conditioner should not require water to be removed. The unit<br />
has a unique design which continuously evaporates the water. When the unit is operated in<br />
high humidity conditions, you may need to empty the water tank periodically. The unit will shut<br />
down automatically when the water tank is full and the “Full” warning light will turn on.<br />
4. To empty the water tank: Place a shallow 1 quart or larger pan (not included) below the lower<br />
drain located on the back of the unit (near the bottom of the air conditioner), remove the cap<br />
and the rubber plug and drain the water tank. Re-insert the drain plug and screw the cap snugly<br />
into place. You can then restart your portable air conditioner.<br />
5. Check and clean the filters once every week for highest efficiency. NOTE: Do not operate the<br />
unit without the filters in place.<br />
AftER UsE<br />
If the unit is not being used for a long period of time, drain the water from the water tank. Please<br />
see step 4 of the "During Use" section above for more information.<br />
PAgE 9<br />
EnglisH
EnglisH<br />
ContRol PAnEl oPERAtion<br />
PoWER<br />
Turns the unit on or off<br />
MoDE<br />
Press the mode button for the desired setting:<br />
Cool – Cools the room to the desired set temperature<br />
Dry – Reduces the humidity in the room<br />
Fan – Circulates the air in the room without cooling<br />
fAn sPEEDs<br />
There are 2 adjustable speeds in the cool and fan mode, choose high or low to match your needs.<br />
Please note the fan speed cannot be adjusted in “Dry” mode.<br />
sEtting tHE tEMPERAtURE<br />
Press the up or down buttons to adjust the Temperature<br />
The temperature can be set between 62º - 86º F (17º - 30º C). Please note the temperature<br />
cannot be set in the Fan or Dry modes.<br />
PAgE 10
ContRol PAnEl oPERAtion<br />
tiMER on/off<br />
To set the Timer for a 1 to 24-hour delay until the air conditioner turns off while the air conditioner<br />
is running:<br />
1. Press the Timer button<br />
2. Adjust the hours until the unit shuts off using the Up/Down buttons. wait approximately 5<br />
seconds for the time off to be saved.<br />
3. To cancel the timer, press the Timer button once, the hours remaining will flash, press the timer<br />
button again and the timer will be cancelled.<br />
To set the Timer for a 1 to 24-hour delay until the air conditioner turns on while the air conditioner<br />
is off:<br />
1. Press the Timer button<br />
2. Adjust the hours until the unit turns on using the Up/Down buttons. wait approximately 5<br />
seconds for the time on to be saved.<br />
3. To cancel the timer, press the Timer button once, the hours remaining will flash, press the timer<br />
button again and the timer will be cancelled.<br />
fUll inDiCAtoR ligHt<br />
when the “Full” indicator light turns on, the internal water tank has filled with condensed water<br />
and the air conditioner will turn off automatically. See Operation/During Use/Item 4 above for<br />
directions on draining the air conditioner.<br />
PAgE 11<br />
EnglisH
EnglisH<br />
REMotE ContRol oPERAtion<br />
PoWER<br />
Turns the unit on or off<br />
Cool<br />
Cools the room to the desired set temperature<br />
DRY<br />
Reduces the humidity in the room<br />
fAn<br />
Circulates the air in the room without cooling<br />
HigH<br />
Selects high fan speed in Cool or Fan mode<br />
loW<br />
Selects Low fan speed in Cool or Fan mode<br />
(Please note the fan speed cannot be adjusted<br />
in “Dry” mode or during the sleep function)<br />
sEtting tHE tEMPERAtURE<br />
Press the up or down buttons to adjust the Temperature<br />
The temperature can be set between<br />
62º - 86º F (17º - 30º C). Please note the<br />
temperature cannot be set in the Fan or Dry modes.<br />
tiMER on/off<br />
To set the Timer for a 1 to 24-hour delay until the air<br />
conditioner turns off while the air conditioner is running:<br />
1. Press the Timer button<br />
2. Adjust the hours until the unit shuts off using the Up/Down buttons. wait approximately 5<br />
seconds for the time off to be saved.<br />
3. To cancel the timer, press the Timer button once, the hours remaining will flash, press the<br />
timer button again and the timer will be cancelled.<br />
To set the Timer for a 1 to 24-hour delay until the air conditioner turns on while the air<br />
conditioner is off:<br />
1. Press the Timer button<br />
2. Adjust the hours until the unit turns on using the Up/Down buttons. wait approximately 5<br />
seconds for the time on to be saved.<br />
3. To cancel the timer, press the Timer button once, the hours remaining will flash, press the<br />
timer button again and the timer will be cancelled.<br />
PAgE 12<br />
Dry
REMotE ContRol oPERAtion<br />
slEEP sEtting<br />
when activated, the sleep mode increases the set temperature by 2º F (1º C) after 2 hours and<br />
another 2º F (1º C) after 2 more hours. The fan is set at Low and cannot be adjusted. The Sleep<br />
Setting can be cancelled by pressing the Sleep button on the remote control or any of the Mode<br />
buttons (Cool, Fan or Dry) on the remote control The unit can be turned off using the Power<br />
button on the air conditioner or the remote to turn the unit off.<br />
ºf/ºC<br />
Use this button to change the display from Fahrenheit to Celsius.<br />
PAgE 13<br />
EnglisH
EnglisH<br />
PAgE 14<br />
CARE AnD ClEAning<br />
• Always unplug your air conditioner before cleaning.<br />
• The air filters should to be cleaned at least once a week for your unit to operate at optimum<br />
efficiency. Slide out the filters from the back by pulling on the tabs. There are secondary<br />
filters accessible after the main filters are removed (see page 8). The filter may be washed<br />
or vacuumed. Remove the excess water from the filter by gently shaking the filter. This will<br />
remove dust and particles trapped in the filter. After cleaning, reinstall the filters. DO NOT use<br />
your air conditioner without the air filters in place.<br />
• To clean the cabinet, DO NOT use chemicals, abrasives, ammonia, chlorine bleach,<br />
concentrated detergents, solvents or scouring pads. Some of these chemicals/items may<br />
damage and/or discolor your air conditioner.<br />
• Always use a soft cloth dampened with water to clean the cabinet. Wipe dry with a soft cloth.
stoRAgE<br />
• To store your air conditioner when not being used for a long period of time, drain the water tank<br />
as described on page 9 under the "During Use" section, step 4. Remove exhaust hose, clean the<br />
filters, cover with plastic bag and store in a cool, dry place.<br />
CUstoMER sERViCE<br />
iMPoRtAnt<br />
Do not REtURn tHis PRoDUCt to tHE stoRE<br />
If you have a problem with this product, please contact the<br />
<strong>Haier</strong> Customer Satisfaction Center at 1-877-337-3639.<br />
DATED PROOF OF PURCHASE, MODEL # AND SERIAL #<br />
REQUIRED FOR wARRANTY SERVICE<br />
CUSTOMER<br />
SERVICE<br />
1-877-337-3639<br />
PAgE 15<br />
EnglisH
EnglisH<br />
PAgE 16<br />
tRoUblEsHooting<br />
if AiR ConDitionER DoEs not oPERAtE:<br />
• Check to make sure the air conditioner is plugged in.<br />
• Press the "Reset" button on the plug to restore power to the unit.<br />
• Check if the circuit breaker needs to be reset or if the fuse needs to be replaced.<br />
• Press the “Power” button on the air conditioner.<br />
• Check to make sure the timer is not activated.<br />
• Use a lamp to ensure there is power at the outlet.<br />
• If the “full” light is on, drain the water drain as instructed in Operation/During Use/Step 4.<br />
• Ensure the remote has fresh batteries.<br />
AiR ConDitionER WoRking bUt RooM not Cooling:<br />
• Check that the air conditioner has an adequate BTU rating for the room being cooled.<br />
• Run the air conditioner on cool at high fan speed.<br />
• Check the exhaust hose and window kit for proper installation.<br />
• Redirect the airflow for uniform cooling. Remove any obstacles to the airflow.<br />
• All doors and windows need to be closed so that cool air does not escape the room.<br />
• The air filters may be blocked or may need cleaning.<br />
• On extremely hot & humid days, the air conditioner will take longer to cool the room.<br />
• The unit may be in fan or dry mode. Put air conditioner in cool mode.<br />
tAnk fUll WARning ligHt is on:<br />
• Unit will shut down when the water pan is full. This condition may occur when the unit is<br />
operated in high humidity conditions See instructions in the "Operation" section under "During<br />
use", Step 4.
liMitED WARRAntY<br />
tHis WARRAntY CoVERs All<br />
DEfECts in WoRkMAnsHiP oR<br />
MAtERiAls foR:<br />
1. The mechanical and electrical parts (including<br />
labor costs) contained in this product for a<br />
period of 12 months, from the date of purchase<br />
(commercial or rental application, the warranty is<br />
90 days).<br />
2. The sealed system and compressor contained<br />
in this product is for a period of 5 years, from the<br />
date of purchase (excluding labor costs after the<br />
initial 12 month period). in commercial or rental<br />
use, the additional limited compressor warranty<br />
is for 1 year and 9 months (excluding labor costs<br />
after the initial 90 days period).<br />
YoU MUst kEEP AnD bE AblE to<br />
PRoViDE YoUR oRiginAl sAlEs<br />
RECEiPt As PRoof of tHE DAtE of<br />
PURCHAsE.<br />
WHo is CoVERED?<br />
The original retail purchaser of this product.<br />
WHAt Will bE DonE?<br />
<strong>Haier</strong> America will repair or replace in your home,<br />
any mechanical, electrical part or the compressor,<br />
which proves defective in normal household use for<br />
a period of 12 months. <strong>Haier</strong> America will repair or<br />
replace (excluding labor costs) the sealed system<br />
and compressor (parts only) for an additional 4 year<br />
period.<br />
HoW CAn YoU gEt sERViCE?<br />
1. Contact your nearest <strong>Haier</strong> America Authorized<br />
Service Depot. For the name of the Service<br />
Depot nearest you, contact <strong>Haier</strong> America at<br />
(877) 337-3639.<br />
2. All service must be performed by an authorized<br />
<strong>Haier</strong> America Service Depot.<br />
tHis WARRAntY CoVERs Units<br />
WitHin tHE ContinEntAl UnitED<br />
stAtEs, CAnADA AnD PUERto RiCo<br />
AnD DoEs not CoVER:<br />
• Damages from improper installation.<br />
• Damages in shipping.<br />
• Damages from misuse, abuse, accident,<br />
alteration, lack of proper care and maintenance.<br />
• Damages from service, by other than an<br />
authorized dealer or service center.<br />
• Labor, service, transportation and shipping<br />
charges for the removal of defective parts and<br />
installation of a replacement part, beyond the<br />
initial 12 month period.<br />
THIS LIMITED wARRANTY IS GIVEN<br />
IN LIEU OF ALL OTHER wARRANTIES, EXPRESS<br />
OR IMPLIED, INCLUDING THE wARRANTIES<br />
OF MERCHANTAbILITY AND FITNESS FOR A<br />
PARTICULAR PURPOSE.<br />
The remedy provided in this warranty is exclusive<br />
and is granted in lieu of all other remedies.<br />
This warranty does not cover incidental or<br />
consequential damages. Some states do not<br />
allow the exclusion of incidental or consequential<br />
damages, so this limitation may not apply to you.<br />
Some states do not allow limitations on how long<br />
an implied warranty lasts, so this limitation may not<br />
apply to you. This warranty gives you specific legal<br />
rights, and you may also have other rights, which<br />
vary from state to state.<br />
PAgE 17<br />
EnglisH
tAblE DEs MAtiÈREs<br />
REnsEignEMEnts sUR lA sÉCURitÉ ................................................................................... 2<br />
Consignes De Sécurité Importantes ..................................................................................... 2-3<br />
Instructions Importantes ........................................................................................................... 4<br />
EXigEnCEs RElAtiVEs À l'instAllAtion .............................................................................. 5<br />
Outils et Pièces ........................................................................................................................... 5<br />
Assemblage et installation ..................................................................................................... 6-7<br />
Pièces et caractéristiques .......................................................................................................... 8<br />
fonCtionnEMEnt .................................................................................................................... 9<br />
Fonctionnement ......................................................................................................................... 9<br />
Utilisation du panneau de contrôle .................................................................................... 10-11<br />
Fonctionnement de la télécommande .............................................................................. 12-13<br />
Guide d’entretien et de nettoyage ..........................................................................................14<br />
Rangement ................................................................................................................................15<br />
DÉPAnnAgE ............................................................................................................................16<br />
gARAntiE liMitÉE .................................................................................................................17<br />
EnREgistREMEnt DU PRoDUit<br />
Merci d'avoir acheté un produit <strong>Haier</strong>. Ce guide<br />
convivial vous aidera à utiliser votre climatiseur<br />
de façon optimale.<br />
Rappelez-vous de prendre en note les numéros<br />
de modèle et de série. Ces numéros figurent<br />
sur une étiquette située sur le côté de l’appareil.<br />
Numéro de modèle<br />
Numéro de série<br />
Date d'achat<br />
brochez le reçu de caisse au guide. Il vous le faudra pour obtenir du service en vertu de la garantie.<br />
fRAnçAis
fRAnçAis<br />
ConsignEs DE sÉCURitÉ iMPoRtAntEs<br />
AVERtissEMEnt<br />
VEUILLEz SUIVRE CES PRECAUTIONS DE bASE IORSQUE VOUS UTILISEz<br />
L'APPAREIL AFIN DE REDUIRE TOUT RISQUE D'INCENDIE, & ELECTROCUTION,<br />
DE bLESSURE, VOIRE DE MORT.<br />
1. Le climatiseur dolt etre branche au niveau d'une prise electrique d'une<br />
tension adequate. (your tableau)<br />
2. L'appareil dolt etre mis a la terre (masse) afin de recluire tout risque<br />
d'electrocution et d'incendie. NE PAS COUPER NI RETIRER LA bROCHE DE<br />
MASSE. Si votre prise murale ne peut accueillir une fiche a trois broches,<br />
veuillez faire en sorte qu'un electricien qualifie en installe une. La prise<br />
murale DOIT etre mise a la masse.<br />
3. Ne pas utiliser l'appareil si le cordon d'alimentation est effiloche ou fissure,<br />
si la fiche et le con¬necteur sont endommages, ou si l'appareil presente<br />
une panne ou est endommage d'une facon quelconque.<br />
4. NE PAS UTILISER UN ADAPTATEUR OU UNE RALLONGE.<br />
5. Ne jamais bloquer l’aération du climatiseur. Le tuyau d’échappement ne<br />
doit pas être encombré. Il faut maintenir un dégagement d’au moins 20po<br />
(50cm) autour du climatiseur.<br />
6. Toujours débrancher le climatiseur avant tout entretien, nettoyage ou<br />
déplacement.<br />
7. N’installez et n’utilisez pas le climatiseur dans un endroit où l’air ambiant<br />
contient des gazes combustible ou l’air ambiant est contaminé. Évitez tout<br />
contact entre les produits chimiques et votre climatiseur.<br />
8. Ne placer aucun objet sur le climatiseur.<br />
9. Ne jamais utiliser le climatiseur sans les filtres.<br />
10. Ne pas utiliser le climatiseur a proximite d'une baignoire, d'une douche ou<br />
d'un lavabo ou evier.<br />
PAgE 2
ConsignEs DE sÉCURitÉ iMPoRtAntEs<br />
lisEZ AttEntiVEMEnt Et obsERVEZ À lA lEttRE<br />
LES CONSIGNES DE SÉCURITÉ.<br />
ConsERVEZ CEs instRUCtions<br />
PAgE 3<br />
fRAnçAis
fRAnçAis<br />
instRUCtions iMPoRtAntEs<br />
• Veuillez conserver ce manuel en lieu sOr.<br />
• N'utilisez pas de liquide ou de spray pour nettoyer ce produit. Utilisez un<br />
chiffon humide.<br />
• Ne placez pas ce produit dans un lieu peu sOr ou eleve car it peut tomber<br />
et causer des dommages ou des blessures.<br />
• Ne renversez pas du liquide sur la telecommande, cela peut causer un<br />
choc electrique aux pikes electroniques a l'interieur et les rendre inactives<br />
ou les faire fonctionner de facon incorrecte.<br />
• N'essayez jamais de desassembler le produit vous-meme. S'il y a un<br />
besoin de maintenance, veuillez contacter le centre de service local ou le<br />
distributeur local.<br />
PAgE 4
oUtils Et PiÈCEs<br />
Lire et observer les instructions fournies avec chaque outil énuméré ci-dessous.<br />
PiÈCEs foURniEs :<br />
Remote Batery<br />
NozleExhaust<br />
Hose<br />
Screws User<br />
Manual<br />
Vérifier si toutes les pièces de votre modèle de climatiseur sont comprises dans le sac de pièces.<br />
REMARQUE : En cas de pièce manquante, téléphoner au service à la clientèle de <strong>Haier</strong> : 1-877-337-3639.<br />
Window Panel Asembly<br />
Exhaust<br />
Hose<br />
Conector<br />
Remote Batery<br />
NozleExhaust<br />
Hose<br />
Screws User<br />
Remote ManualRemote Batery<br />
NozleExhaust<br />
Dry<br />
iMAgE PARtiE # PiÈCEs<br />
Panneau de fenêtre principal et panneaux<br />
d’extension – 20po à 55po (50cm à 140cm)<br />
haust Exhaust Hose<br />
Screws User Manual<br />
User Manual<br />
Vis 3<br />
ryUser NozleExhaust Hose<br />
Screws Tuyère d’échappement Manual<br />
1<br />
Dry<br />
ote<br />
BateryUser NozleExhaust Hose<br />
Screws Manual<br />
Tuyau d’échappement 1<br />
ON/OFF<br />
haust se Conector<br />
Hose Conector<br />
Raccord de tuyau 1<br />
TEMP/TIME<br />
ndol Asembly<br />
Exhaust Hose Conector<br />
Équerre 1<br />
Remote Batery<br />
NozleExhaust<br />
Hose<br />
Dry<br />
Dry<br />
MODE<br />
SPEED<br />
TIMER<br />
TEMP/TIME<br />
Télécommande 1<br />
Piles 2<br />
3<br />
Panel indo<br />
Asembly<br />
Exhaust Hose Conector<br />
CoRDon D’AliMEntAtion<br />
Assurez-vous de tester le cordon d’alimentation avant la mise en marche de<br />
l’appareil. Appuyez sur le bouton "Test", puis sur le bouton "Reset" pour rétablir<br />
le courant.<br />
B<br />
A<br />
PAgE 5<br />
fRAnçAis
fRAnçAis<br />
AssEMblAgE Et instAllAtion<br />
1. Selon l’ouverture de votre fenêtre, utiliser 1, 2 ou 3 des panneaux d’extension de fenêtre. Insérer<br />
les vis dans les trous sur le panneau du centre au besoin, pour bien fixer le/les panneau /x.<br />
2. Ouvrir la fenêtre et placer l’assemblage de panneaux dans la fenêtre. Ajuster les panneaux<br />
d’extension selon la largeur ou la hauteur de la fenêtre, tel qu’indiqué ci-dessous (voir fig A).<br />
Fixer les panneaux d’extension à l’aide de 2 vis émoussées (voir fig b). Fermer la fenêtre.<br />
A<br />
b<br />
3. Fixer l’équerre sur la fenêtre à l’aide de la dernière vis, pour prévenir l’ouverture de la fenêtre à<br />
partir de l’extérieur (voir fig C).<br />
PAgE 6<br />
C
AssEMblAgE Et instAllAtion<br />
4. Étendre les deux extrémités du tuyau d’échappement. Connecter la tuyère d’échappement à<br />
une extrémité du tuyau en tournant dans le sens antihoraire (voir fig D).<br />
5. Lever la poignée de le crampon en forme de « C » sur l’arrière de l’appareil et insérer<br />
l’extrémité du raccord de tuyau dans la partie inférieure du crampon. Fixer l’assemblage du<br />
tuyau sur l’arrière de l’appareil en abaissant le crampon en « C » complètement. Assurez-vous<br />
que l’assemblage de tuyau est bien fixé avant la mise en marche (voir fig E).<br />
6. Insérer l’extrémité du tuyau d’échappement avec la tuyère dans le panneau de fenêtre (voir fig E).<br />
7. brancher le cordon d’alimentation dans la prise murale et appuyer sur le bouton « Reset » pour<br />
établir l’alimentation en électricité à l’appareil.<br />
8. Toujours laisser un dégagement de 20po (50cm) autour de l’appareil pour une aération<br />
adéquate.<br />
D<br />
E<br />
PAgE 7<br />
fRAnçAis
fRAnçAis<br />
PAgE 8<br />
PiÈCEs Et CARACtÉRistiQUEs<br />
PANNEAU DE CONTRôLE<br />
VOLET D’ÉVACUATION<br />
D’AIR VERTICAL<br />
POIGNÉE ARRIèRE (SUPPORT<br />
DE TÉLÉCOMMANDE)<br />
CRAMPON EN FORME DE "C"<br />
CORDON D’ALIMENTATION<br />
CROCHET DE RANGEMENT<br />
POUR LE CORDON<br />
bOUCHON DE DRAIN INFÉRIEUR*<br />
VOLET D’ÉVACUATION<br />
D’AIR HORIzONTAL<br />
ROULETTES<br />
FILTRES (4 PIèCES)<br />
*ASSUREz-VOUS QUE LE bOUCHON DU<br />
DRAIN INFÉRIEUR EST bIEN EN PLACE<br />
AVANT LA MISE EN MARCHE POUR<br />
ÉVITER LES FUITES D’EAU.
fonCtionnEMEnt<br />
notE: Attendre 24 heures avant d’allumer le climatiseur si l’appareil a été basculé pour une<br />
raison quelconque, pour laisser l’huile couler dans le compresseur et prévenir un échec<br />
prématuré du climatiseur.<br />
AVAnt l’UtilisAtion<br />
1. Utiliser une prise murale de 115 Volt, 15 Amp pour le climatiseur, ainsi qu’un circuit dédié.<br />
N’utilisez pas d’autres appareils électriques sur ce même circuit, sinon le fusible/disjoncteur<br />
peut déclencher.<br />
2. Ne pas placer le climatiseur en plein soleil, ou près de toutes plinthes chauffantes, fours,<br />
poêles, etc.<br />
3. Utiliser sur une surface plane et horizontale seulement<br />
4. Garder l’appareil à l’écart de tout encombrement, tel que rideaux ou stores.<br />
5. Garder l’appareil à au moins 20po (50cm) des murs.<br />
PEnDAnt l’UtilisAtion<br />
1. Lors de la première utilisation, après avoir branché l’appareil à la prise murale, l’appareil<br />
commence en ventilateur haute vitesse, réglé à 75º F (23ºC). L’affichage de température<br />
sur l’ACL affiche la température ambiante. Lors de la mise en marche régulière, l’appareil se<br />
souvient du dernier réglage utilisé.<br />
2. Suivant un arrêt normal, attendre 3 minutes avant de remettre en marche.<br />
3. En mode refroidissement, ce climatiseur portable ne devrait pas requérir l’évacuation<br />
manuelle de l’eau. Cet appareil est muni d’un design unique qui fait que l’eau s’évapore<br />
continuellement. Lorsque l’appareil est dans des conditions particulièrement humides, il<br />
est possible que vous devrez vider le réservoir d’eau périodiquement. L’appareil s’éteint<br />
automatiquement lorsque le réservoir est plein, et l’indicateur lumineux "Full" s’allume.<br />
4. Pour vider le réservoir: placer un plat peu profond d’un litre ou plus (non inclus) sous le drain<br />
inférieur à l’arrière de l’appareil (près du bas du climatiseur), retirer le couvercle et le bouchon<br />
de caoutchouc et vider le réservoir. Replacer le bouchon et le couvercle. Vous pouvez<br />
maintenant redémarrer votre climatiseur.<br />
5. Vérifier et nettoyer les filtres une fois par semaine pour plus d’efficacité.<br />
notE: Ne pas utiliser l’appareil sans les filtres.<br />
APRÈs l’UtilisAtion<br />
Si l’appareil ne sera pas utilisé pour une période plus longue, vider le réservoir. Référez-vous à<br />
l’étape 4 de la section "Pendant l’utilisation" ci-dessus.<br />
PAgE 9<br />
fRAnçAis
fRAnçAis<br />
UtilisAtion DU PAnnEAU DE ContRôlE<br />
PoWER<br />
Allume et éteint l’appareil<br />
MoDE<br />
Appuyer sur le bouton mode pour le réglage voulu:<br />
Cool – Rafraichi la pièce à la température voulue<br />
Dry – Diminue le taux d’humidité dans l’air<br />
Fan – Offre une circulation d’air sans rafraichir la pièce<br />
VitEssE DE VEntilAtEUR<br />
Il y a deux vitesses ajustables dans les modes "Cool" et "Fan", choisir haut ou bas selon vos<br />
besoin. La vitesse de ventilateur ne peut être réglée en mode "Dry".<br />
RÉglAgE DE lA tEMPÉRAtURE<br />
Appuyer sur les boutons « up » ou « down » pour ajuster la température.<br />
La température peut être réglée entre 62º - 86º F (17º - 30º C). Notez que la température ne peut<br />
être réglée en mode "Fan" ou "Dry".<br />
PAgE 10
UtilisAtion DU PAnnEAU DE ContRôlE<br />
MinUtERiE<br />
1. Appuyer sur le bouton « Timer »<br />
2. Ajuster le nombre d’heures à l’aide des boutons « Up/Down ». Attendre environ 5 seconds pour<br />
la sauvegarde de l’information.<br />
3. Pour annuler la minuterie, appuyer sur le bouton « Timer » une fois, les heures restantes<br />
clignoteront; appuyer de nouveau, et la minuterie s’annule.<br />
Pour régler la minuterie pour un délai de 1 à 24 heures avant que le climatiseur s’allume, lorsque<br />
l’appareil est éteint :<br />
1. Appuyer sur le bouton « Timer »<br />
2. Ajuster le nombre d’heures à l’aide des boutons « Up/Down ». Attendre environ 5 seconds pour<br />
la sauvegarde de l’information.<br />
3. Pour annuler la minuterie, appuyer sur le bouton « Timer » une fois, les heures restantes<br />
clignoteront; appuyer de nouveau, et la minuterie s’annule.<br />
inDiCAtEUR lUMinEUX fUll<br />
Lorsque l’indicateur lumineux « Full » l’allume, cela signifie que le réservoir d’eau interne s’est<br />
rempli d’eau condensée et le climatiseur s’éteint automatiquement. Référez-vous à la section<br />
Fonctionnement /Pendant l’utilisation /Item 4 ci-dessus pour savoir comment vider le réservoir<br />
du climatiseur.<br />
PAgE 11<br />
fRAnçAis
fRAnçAis<br />
fonCtionnEMEnt DE lA tÉlÉCoMMAnDE<br />
PoWER<br />
Allume et éteint l’appareil<br />
Cool<br />
Rafraichi la pièce à la température voulue<br />
DRY<br />
Diminue le taux d’humidité dans l’air<br />
fAn<br />
Offre une circulation d’air sans rafraichir la pièce<br />
HigH<br />
Règle une vitesse de ventilateur plus rapide en mode<br />
« Cool » ou « Fan ».<br />
loW<br />
Règle une vitesse de ventilateur plus basse en mode<br />
« Cool » ou « Fan ». Notez que la vitesse de ventilateur<br />
ne peut être ajustée en more « Dry » ou pendant la<br />
fonction « Sleep » (Sommeil).<br />
RÉglAgE DE lA tEMPÉRAtURE<br />
Appuyer sur les boutons « up » ou « down » pour ajuster<br />
la température.<br />
La température peut être réglée entre 62º - 86º F<br />
(17º - 30º C). Notez que la température ne peut<br />
être réglée en mode « Fan » ou « Dry ».<br />
MinUtERiE<br />
Pour régler la minuterie pour un délai de 1 à 24 heures avant que le climatiseur s’éteigne,<br />
lorsque que l’appareil fonctionne :<br />
1. Appuyer sur le bouton « Timer »<br />
2. Ajuster le nombre d’heures à l’aide des boutons « Up/Down ». Attendre environ 5 seconds<br />
pour la sauvegarde de l’information.<br />
3. Pour annuler la minuterie, appuyer sur le bouton « Timer » une fois, les heures restantes<br />
clignoteront; appuyer de nouveau, et la minuterie s’annule.<br />
Pour régler la minuterie pour un délai de 1 à 24 heures avant que le climatiseur s’allume, lorsque<br />
l’appareil est éteint :<br />
1. Appuyer sur le bouton « Timer »<br />
2. Ajuster le nombre d’heures à l’aide des boutons « Up/Down ». Attendre environ 5 seconds<br />
pour la sauvegarde de l’information.<br />
PAgE 12<br />
Dry
fonCtionnEMEnt DE lA tÉlÉCoMMAnDE<br />
3. Pour annuler la minuterie, appuyer sur le bouton « Timer » une fois, les heures restantes<br />
clignoteront; appuyer de nouveau, et la minuterie s’annule.<br />
fonCtion soMMEil<br />
Lorsqu’activée, la fonction sommeil (« Sleep ») augmente la température réglée de 2º F (1º<br />
C) après 2 deux heures de fonctionnement, et un autre 2º F (1º C) après 2 heures de plus. Le<br />
ventilateur est à basse vitesse (« Low ») et ne peut pas être ajusté. La fonction sommeil peut<br />
être annulée en appuyant sur le bouton « Sleep », ou tout autre bouton de mode (« Cool », « Fan<br />
» ou « Dry ») sur la télécommande. L’appareil peut être éteint à l’aide du bouton « Power » sur la<br />
télécommande ou directement sur le climatiseur.<br />
ºf/ºC<br />
Ce bouton change l’affichage entre Fahrenheit et Celsius.<br />
PAgE 13<br />
fRAnçAis
fRAnçAis<br />
PAgE 14<br />
gUiDE D’EntREtiEn Et DE nEttoYAgE<br />
• Toujours débrancher votre appareil avant le nettoyage.<br />
• Les filtres à air devraient être nettoyés une fois par semaine pour un meilleur rendement. Faire<br />
glisser les filtres à l’aide des languettes. Il y a des filtres secondaires accessibles seulement<br />
lorsque les filtres principaux sont ôtés (voir page 8). Les filtres peuvent être lavés, ou nettoyés<br />
à l’aide d’un aspirateur. Enlever les excédents d’eau en secouant doucement le filtre, ce<br />
qui enlèvera également la poussière et les particules emprisonnées dans le filtre. Suite au<br />
nettoyage, replacez les filtres. NE jAMAIS faire fonctionner le climatiseur sans les filtres en<br />
place.<br />
• Pour nettoyer le climatiseur, NE JAMAIS utiliser de produits chimiques, d’abrasifs,<br />
d’ammoniaque, d’eau de Javel, de détergent concentré, de solvants ou de tampons à récurer.<br />
Certains de ces produits peuvent endommager et/ou décolorer votre climatiseur.<br />
• Toujours utiliser un chiffon doux humide pour nettoyer votre appareil. Sécher à l’aide d’un autre<br />
chiffon.
RAngEMEnt<br />
• Pour ranger votre climatiseur lorsqu’il ne sera pas utilisé pour une période plus longue, vider<br />
le réservoir tels que décrit à la page 9 dans la section Fonctionnement /Pendant l’utilisation /<br />
Item 4. Retirer le tuyau d’échappement, couvrir d’un sac de plastique et ranger dans un endroit<br />
frais et sec.<br />
sERViCE À lA CliEntÈlE<br />
iMPoRtAnt<br />
nE PAs REtoURnER CE PRoDUit AU MAgAsin.<br />
En cas de problème avec ce produit, prière de contacter<br />
le service <strong>Haier</strong> Customer Satisfaction Center,<br />
au 1-877-337-3639.<br />
UNE PREUVE D’ACHAT DATÉE, LE NUMÉRO DE MODèLE<br />
ET LE NUMÉRO DE SÉRIE SONT REQUIS POUR OBTENIR<br />
DU SERVICE EN VERTU DE LA GARANTIE.<br />
SERVICE À<br />
LA CLIENTÈLE<br />
1-877-337-3639<br />
PAgE 15<br />
fRAnçAis
fRAnçAis<br />
PAgE 16<br />
DÉPAnnAgE<br />
si lE CliMAtisEUR nE fonCtionnE PAs :<br />
• Assurez-vous que le climatiseur est branché.<br />
• Appuyer sur le bouton « Reset » sur la fiche d’alimentation pour rétablir le courant.<br />
• Assurez-vous que le disjoncteur soit armé et que le fusible soit bon.<br />
• Appuyer sur le bouton « Power » du climatiseur.<br />
• Assurez-vous que la minuterie n’est pas activée.<br />
• Assurez-vous qu’il y a du courant à la prise murale à l’aide d’un autre appareil.<br />
• Si l’indicateur lumineux « Full » est allumé, videz le réservoir selon l’item 4 de la section «<br />
Pendant l’utilisation ».<br />
• Assurez-vous que la télécommande ait des piles neuves.<br />
si lE CliMAtisEUR fonCtionnE, MAis nE RAfRAiCHit PAs :<br />
• Assurez-vous que le climatiseur ait une cote BTU suffisante pour rafraichir la pièce.<br />
• Faire fonctionner en mode « Cool » et avec le ventilateur à haute vitesse.<br />
• Vérifiez l’installation du tuyau d’échappement et de l’assemblage de fenêtre.<br />
• Rediriger les volets de direction d’air, et assurez-vous qu’ils ne soient pas encombrés.<br />
• Toutes portes et fenêtres doivent être fermées pour permettre à la pièce de se rafraichir.<br />
• L’appareil pourrait être en mode « Fan » ou « Dry ». Le mettre en mode « Cool ».<br />
inDiCAtEUR lUMinEUX fUll :<br />
L’appareil s’éteint lorsque le réservoir interne est plein, ce qui pourrait arriver si l’appareil<br />
fonctionne dans des conditions plus humides. Référez-vous à la section Fonctionnement /<br />
Pendant l’utilisation /Item 4 ci-dessus pour savoir comment vider le réservoir du climatiseur
gARAntiE liMitEE<br />
CEttE gARAntiE CoUVRE lEs PiECEs<br />
sUiV-AntEs DU CliMAtisEUR ContRE<br />
toUs ViCEs DE fAbRiCAtion Et DE<br />
MAtiERiAUX:<br />
1. Les pieces mecaniques of electriques (y compris<br />
les frais de main d'oeuvre) de ce produit pour une<br />
periode del2 mois a partir de la date d'achat (pour<br />
utilisation commerciale of location, la garantie est<br />
de 90 jours).<br />
2. Le systeme scelle et le compresseur contenu a<br />
l'interieur de ce produit pour une *lode de 5 ans a<br />
partir de Ia date d'achat (frais de main d'oeuvre non<br />
compris apres les 12 premiers mois de couverture).<br />
Si l'appareil est utilise commercialement ou<br />
en location, Ia garantie supplementaire du<br />
compresseur est de 1 a 9 mois (frais de main<br />
d'oeuvre non compris apres les 90 premiers (ours).<br />
VEUillEZ ConsERVER VotRE REP,<br />
DE VEntE DAtE CoMME PREUVE<br />
CRACHAt.<br />
QUi Est CoUVERt?<br />
L'acheteur d'origine ayant fait ('acquisition de cet<br />
appareil.<br />
QUEllEs sont lEs REPARAtions<br />
CoUVERtEs?<br />
Haler America s'engage a reparer ou a remplacer di<br />
votre domicile of pour une duree de 12 mois, toute<br />
piece mecanique ou electrique du compresseur ayant<br />
ete determinee defectueuse suite a une utilisation<br />
jugee normale. <strong>Haier</strong> America s'engage a reparer ou<br />
a remplacer (frais de main d'oeuvre non compris) le<br />
system° scelle et le compresseur (pieces uniquement)<br />
pour une periode supplementaire de 4 ans.<br />
DEMARCHEs A sUiVRE PoUR REPARAtions<br />
1. Contactez votre centre de reparation agree<br />
<strong>Haier</strong> America le plus proche. Pour connaltre<br />
le nom du centre agree Haler America le plus<br />
proche, cornposez le (877) 337-3639.<br />
2. Toute reparation dolt etre effectuee par un<br />
centre de reparation agree <strong>Haier</strong> America.<br />
CEttE,gARAntiE CoUVRE lEs<br />
APPAREils AUX EtAts-Unis Et A<br />
PUERto RiCo Et nE CoUVRE PAs:<br />
• Les dommages survenant suite a une installation<br />
incorrecte.<br />
• Les dommages survenant lors du transport.<br />
• Les dommages et &gals suite a toute utilisation<br />
incorrecte ou excessive, negligence ou<br />
modification, tout accident ou entretien incorrect.<br />
• Les dommages suite a des reparations ayant ete<br />
effectuees par un concessionnaire ou revendeur<br />
autre que par un centre de reparation agree.<br />
• Les frais de main d'oeuvre, de reparations, de<br />
transport et tous frais d'expedition couvrant le<br />
demontage de pieces et le montage des pieces de<br />
rechange au-dela des 12 premiers mois.<br />
LA PRESENTE GARANTIE REMPLACE<br />
TOUTE AUTRE GARANTIE EXPRESSE OU<br />
IMPLICITE Y COMPRIS TOUTE GARANTIE<br />
DE COMMERCIAbILITE OU DE QUALITE<br />
MARCHANDE ET D'APTITUDE A UNE UTILISATION<br />
PARTICULIERE.<br />
Le recours offert par la garantie est un recours<br />
exclusif of tient lieu de recours unique. Cette<br />
garantie ne couvre pas les dommages accessoires<br />
ou indirects. Certains etats ou provinces ne permettent<br />
ni la limitation de la duree dune garantie<br />
implicite ni ('exclusion de dommages indirects.<br />
Les limites ou exclusions mentionnees ci-clessus<br />
peuvent ne pas s'appliquer dans votre cas. Cette<br />
garantie vous confere des droits juridiques<br />
par-ticuliers et it est possible que vous ayez<br />
d'autres droits qui peuvent varier selon l'etat et la<br />
prov-ince.<br />
PAgE 17<br />
fRAnçAis
ÍnDiCE<br />
infoRMACiÓn DE sEgURiDAD ............................................................................................... 2<br />
Precauciones importantes de seguridad .............................................................................. 2-3<br />
Instrucciones Importantes ......................................................................................................... 4<br />
CÓMo instAlAR ....................................................................................................................... 5<br />
Herramientas y Partes ................................................................................................................ 5<br />
Armado e instalación .................................................................................................................. 6<br />
Piezas y funciones ....................................................................................................................... 7<br />
fUnCionAMiEnto ................................................................................................................... 9<br />
Funcionamiento .......................................................................................................................... 9<br />
Funcionamiento del panel de control ................................................................................ 10-11<br />
Funcionamiento del control remoto .................................................................................. 12-13<br />
Guía de cuidado y limpieza .......................................................................................................14<br />
Almacenamiento .......................................................................................................................15<br />
DEtECCiÓn Y solUCiÓn DE PRoblEMAs .........................................................................16<br />
gARAntiA liMitADA ..............................................................................................................17<br />
REgistRo DEl PRoDUCto<br />
Gracias por adquirir nuestro producto <strong>Haier</strong>.<br />
Este manual de fácil uso lo guiará para que<br />
aproveche al máximo su producto.<br />
Recuerde registrar el modelo y números<br />
de serie que se encuentran en la parte lateral<br />
de la unidad.<br />
Número de modelo<br />
Número de serie<br />
Fecha de compra<br />
Engrape el recibo al manual, lo necesitará para recibir el servicio de garantía.<br />
EsPAñol
EsPAñol<br />
PRECAUCionEs iMPoRtAntEs<br />
DE SEGURIDAD<br />
1. Este acondicionador debe conectarse a la toma de corriente adecuada de<br />
acuerdo a las Ainstrucciones de este manual. (Ver tabla)<br />
2. Debe asegurarse una adecuada conexion a tierra para reducir el riesgo de<br />
shock. NO CORTE 0 RETIRE EL CAbLE DE CONEXION A TIERRA. Si usted<br />
no posee una toma de corriente con conexion a tierra (lame a un tecnico<br />
calificado para que realice la instalacion necesaria y correcta.<br />
3. No utilice este <strong>Acondicionador</strong> si el cable de corriente estuviera rasgado o<br />
daiiado. Evite tambien el use de la unidad si existen danos de abrasion en el<br />
enchufe, el conector, o si el <strong>Acondicionador</strong> no funcionara correctamente<br />
o estuviese daiiado de cualquier manera. Contacte a un service autorizado<br />
para la reparaciOn o ajustes.<br />
4. NO UTILICE UN ADAPTADOR 0 ALARGUE.<br />
5. No obstruya el flujo de aire alrededor del acondicionador de aire. La<br />
manguera de salida de emanaciones debe estar libre de obstrucciones.<br />
Mantenga al menos 20” de espacio libre alrededor del acondicionador de<br />
aire.<br />
6. Desenchufe siempre el acondicionador de aire antes de revisarlo, limpiarlo<br />
o moverlo.<br />
7. No instale ni utilice el acondicionador de aire en lugares en los que el<br />
ambiente contenga gases combustibles o en los que el ambiente esté<br />
contaminado. Evite que el acondicionador de aire entre en contacto con<br />
sustancias químicas.<br />
8. No coloque ningLin objeto arriba de la unidad.<br />
PÁginA 2<br />
ADVERtEnCiA<br />
SIGA TODAS LAS INSTRUCCIONES ANTES DE UTILIzAR EL<br />
ACONDICIONADOR DE AIRE PARA REDUCIR EL RIESGO DE UN<br />
SHOCk ELECTRIC°, DANOS O LESIONES
PRECAUCionEs iMPoRtAntEs<br />
DE SEGURIDAD<br />
9. Nunca opere el <strong>Acondicionador</strong> sin los filtros en su lugar.<br />
10. Nunca utilice el <strong>Acondicionador</strong> cerca de una banera, pileta de cocina o<br />
una ducha.<br />
lEA Y sigA CUiDADosAMEntE<br />
lAs instRUCCionEs DE sEgURiDAD.<br />
gUARDE EstAs instRUCCionEs<br />
PÁginA 3<br />
EsPAñol
EsPAñol<br />
instRUCCionEs iMPoRtAntEs<br />
• Mantenga este manual en un lugar seguro.<br />
• No use liquidos o vaporizadores para limpiar este producto. Utilice un patio<br />
humedo.<br />
• No ubique el producto en un lugar inseguro o elevado, ya que puede caerse<br />
y provocar banos a lesiones.<br />
• No derrame nunca liquidos sobre el panel de control; pueden producirse<br />
descargas electricas en las piezas electronicas del interior, lo quo puede<br />
provocar que se desactiven o que no funcionen correctamente.<br />
• No intente nunca desarmar el producto usted mismo. Si se desarma sin<br />
supervision el interior de Ia tapa posterior y se vuelve a armarlo de manera<br />
incorrecta, se puede clonal- el circuit° electric° y afectar su rendimiento.<br />
Cuando es necesario realizar mantenimiento, pongase en contact° con el<br />
centro de reparaciones local o con el distribuidor local.<br />
PÁginA 4
HERRAMiEntAs Y PARtEs<br />
Lea y siga las instrucciones incluidas y utilice las herramientas que se enumeran a continuación.<br />
PARtEs inClUiDAs:<br />
Remote Batery<br />
NozleExhaust<br />
Hose<br />
Screws User<br />
Manual<br />
Revise que el paquete incluya todas las partes mencionadas para su aire acondicionado específico.<br />
notA: Si faltan partes, llame al centro de servicio al cliente de <strong>Haier</strong>: 1-877-337-3639.<br />
Window Panel Asembly<br />
Exhaust<br />
Hose<br />
Conector<br />
Remote Batery<br />
NozleExhaust<br />
Hose<br />
Screws User<br />
Remote ManualRemote Batery<br />
NozleExhaust<br />
Dry<br />
iMAgEn PARtE # PiEZAs<br />
Panel para la ventana principal y paneles de<br />
extensión- se extiende de 20" a 55"<br />
haust Exhaust Hose<br />
Screws User Manual<br />
User Manual<br />
Tornillos 3<br />
Boquilla para la salida de emanaciones 1<br />
ryUser NozleExhaust Hose<br />
Screws Manual<br />
Dry<br />
ote<br />
BateryUser NozleExhaust Hose<br />
Screws Manual<br />
Manguera de salida de emanaciones 1<br />
haust se Conector<br />
Hose Conector<br />
ON/OFF<br />
Conector MODE de la manguera 1<br />
TEMP/TIME<br />
ndol Asembly<br />
Exhaust Hose Conector<br />
Soporte 1<br />
Remote Batery<br />
NozleExhaust<br />
Hose<br />
Dry<br />
Dry<br />
SPEED<br />
TIMER<br />
TEMP/TIME<br />
Control remoto 1<br />
Pilas 2<br />
3<br />
Panel indo<br />
Asembly<br />
Exhaust Hose Conector<br />
CAblE DE sUMinistRo DE EnERgÍA<br />
Asegúrese de probar el cable de suministro de energía antes de poner en<br />
funcionamiento el equipo. Presione el botón de prueba, luego presione el<br />
botón de reinicio para restablecer la energía.<br />
B<br />
A<br />
PÁginA 5<br />
EsPAñol
EsPAñol<br />
1. Según la abertura de la ventana, utilice 1, 2 o 3 de los paneles de extensión para la ventana.<br />
Introduzca los tornillos en los agujeros en el panel central según sea necesario para asegurar<br />
los paneles.<br />
2. Abra la ventana y ubique el montaje del panel para la ventana en la ventana. Ajuste los paneles<br />
de extensión para que concuerden con el ancho o alto de la ventana como se muestra a<br />
continuación (consulte la ilustración A). Asegure los paneles de extensión usando 2 tornillos de<br />
punta roma (consulte la ilustración b). Cerrar ventana.<br />
3. Asegure el soporte a la ventana con el tornillo restante. Esto evita que la ventana se abra<br />
desde afuera (consulte la ilustración C).<br />
PÁginA 6<br />
ARMADo E instAlACiÓn<br />
A<br />
b<br />
C
ARMADo E instAlACiÓn<br />
4. Extienda los 2 extremos de la manguera de salida. Conecte la boquilla de salida a un extremo<br />
de la manguera de salida de emanaciones girándola hacia la izquierda (consulte la ilustración D).<br />
5. Eleve la manija de la abrazadera con forma de “C” que se encuentra en la parte trasera de la<br />
unidad e introduzca el extremo del conector de la manguera del montaje de la manguera en la<br />
parte inferior de la abrazadera de la manguera. Asegure el montaje de la manguera en la parte<br />
trasera de la unidad bajando la abrazadera con forma de "C" completamente. Asegúrese de<br />
que el montaje esté ajustado con seguridad antes del funcionamiento (consulte la ilustración E).<br />
6. Introduzca la manguera de salida con el extremo de la boquilla en el panel para la ventana<br />
(consulte la ilustración E).<br />
7. Enchufe el cable de energía en el tomacorriente de la pared y presione el botón “Reset”<br />
(Reiniciar) para asegurarse de que el enchufe de seguridad proporcione energía a la unidad.<br />
8. Permita que queden 20” de espacio alrededor de la unidad para que la circulación de aire sea<br />
apropiada.<br />
D<br />
E<br />
PÁginA 7<br />
EsPAñol
EsPAñol<br />
PÁginA 8<br />
PiEZAs Y fUnCionEs<br />
PANEL DE CONTROL<br />
REjILLA VERTICAL<br />
PARA SALIDA DE AIRE<br />
MANIjA POSTERIOR<br />
(SOPORTE DEL CONTROL<br />
REMOTO)<br />
AbRAzADERA CON<br />
FORMA DE “C”<br />
CAbLE DE ALIMENTACIóN<br />
GANCHOS PARA EL GUARDADO<br />
DE CAbLE<br />
TAPA DE DESAGüE<br />
INFERIOR*<br />
REjILLA HORIzONTAL<br />
PARA SALIDA DE AIRE<br />
RUEDECILLAS<br />
FILTROS (4 PIEzAS)<br />
* ASEGúRESE DE QUE LA TAPA DE<br />
DESAGüE INFERIOR ESTÉ bIEN CERRADA<br />
ANTES DEL FUNCIONAMIENTO PARA<br />
EVITAR PÉRDIDAS DE AGUA.
fUnCionAMiEnto<br />
notA: Espere 24 horas para encender el acondicionador de aire si la unidad se ha inclinado por<br />
cualquier motivo. De esta manera se permite que el aceite vuelva al compresor y se evita<br />
una falla prematura del acondicionador de aire.<br />
AntEs DEl Uso<br />
1. Utilice un tomacorriente de 115 voltios, 15 amperes para el acondicionador de aire. Utilice un<br />
circuito exclusivo para el acondicionador de aire. No utilice otros artefactos eléctricos en este<br />
circuito, de lo contrario pueden saltar los fusibles o el interruptor automático.<br />
2. No ubique el acondicionador de aire expuesto a los rayos directos del sol ni cerca de artefactos<br />
de calefacción, zócalos radiantes, estufas, etc.<br />
3. Ponga la unidad en funcionamiento únicamente sobre una superficie plana y nivelada.<br />
4. Mantenga la unidad libre de obstrucciones, tales como cortinas, persianas, etc.<br />
5. Mantenga la unidad al menos a 20” de distancia de las paredes.<br />
DURAntE El Uso<br />
1. Cuando encienda la unidad por primera vez después de enchufarla en un tomacorriente<br />
eléctrico, ésta se iniciará en el modo de enfriamiento con ventilador alto a 75º F. La pantalla<br />
con la temperatura en el LCD mostrará la temperatura ambiente actual. Cuando encienda la<br />
unidad durante su uso regular, ésta recordará la última configuración usada.<br />
2. Después de apagar normalmente la unidad, espere 3 minutos antes de reiniciarla.<br />
3. En el modo enfriamiento, no es necesario quitarle agua a este acondicionador de aire<br />
portátil. La unidad tiene un diseño único que evapora el agua de manera continua. Cuando la<br />
unidad opera en condiciones de humedad alta, puede ser necesario vaciar el tanque de agua<br />
periódicamente. La unidad se apaga automáticamente cuando el tanque de agua está lleno y<br />
se enciende la luz de advertencia "Full" (Lleno).<br />
4. Para vaciar el tanque de agua: Ubique una fuente poco profunda de un cuarto de galón o más<br />
grande (no incluida) debajo del desagüe inferior ubicado en la parte de atrás de la unidad (cerca<br />
de la base del acondicionador de aire), retire la tapa y el tapón de goma y vacíe el tanque de<br />
agua. Vuelva a colocar el tapón de desagüe y enrosque la tapa hasta que quede bien ajustada<br />
en su lugar. Entonces puede reiniciar su acondicionador de aire portátil.<br />
5. Revise y limpie los filtros una vez por semana para obtener una mayor eficiencia. NOTA: No<br />
ponga en funcionamiento la unidad si los filtros no están en su lugar.<br />
DEsPUÉs DEl Uso<br />
Si la unidad no se utiliza durante un período prolongado, retire el agua del tanque de agua.<br />
Consulte el paso 4 de la sección “Durante el uso” anterior para obtener más información.<br />
PÁginA 9<br />
EsPAñol
EsPAñol<br />
fUnCionAMiEnto DEl PAnEl DE ContRol<br />
PoWER<br />
Para encender y apagar la unidad<br />
MoDE<br />
Presione el botón Mode (Modo) para lograr la configuración deseada:<br />
Cool – Enfría la habitación hasta la temperatura configurada deseada<br />
Dry – Reduce la humedad de la habitación<br />
Fan – Circula el aire de la habitación sin enfriar<br />
fAn sPEEDs<br />
Hay 2 velocidades regulables cuando se enfría el ambiente o se utiliza el ventilador, puede elegir<br />
entre alta o baja según sus necesidades. Debe tenerse en cuenta que no puede regularse la<br />
temperatura del ventilador en el modo "Dry" (Secar).<br />
ConfigURACiÓn DE lA tEMPERAtURA<br />
Presione el botón con la flecha hacia arriba o hacia abajo para ajustar la temperatura.<br />
Puede configurarse la temperatura entre 62º y 86º F (17º - 30º C). Debe tenerse en cuenta que no<br />
puede configurarse la temperatura en los modos Ventilador y Secar.<br />
PÁginA 10
fUnCionAMiEnto DEl PAnEl DE ContRol<br />
tiMER on/off<br />
Encendido/Apagado del temporizador. Para configurar el temporizador para una demora de entre<br />
1 y 24 horas hasta que el acondicionador de aire se apague, mientras el acondicionador de aire<br />
está encendido:<br />
1. Presione el botón Timer (Temporizador).<br />
2. Establezca las horas que deben pasar para que la unidad se apague utilizando los botones con<br />
las flechas hacia arriba y hacia abajo. Espere aproximadamente 5 segundos para que se guarde<br />
el tiempo.<br />
3. Para cancelar el temporizador, presione el botón Timer (Temporizador) una vez, destellarán las<br />
horas que restan, presione el botón nuevamente para cancelarlo.<br />
Para configurar el temporizador para una demora de entre 1 y 24 horas hasta que el<br />
acondicionador de aire se encienda, mientras el acondicionador de aire está apagado:<br />
1. Presione el botón Timer (Temporizador).<br />
2. Establezca las horas que deben pasar para que la unidad se encienda utilizando los botones con<br />
las flechas hacia arriba y hacia abajo. Espere aproximadamente 5 segundos para que se guarde<br />
el tiempo.<br />
3. Para cancelar el temporizador, presione el botón Timer (Temporizador) una vez, destellarán las<br />
horas que restan, presione el botón nuevamente para cancelarlo.<br />
lUZ inDiCADoRA DE llEno<br />
Cuando la luz indicadora “Full” (Lleno) se enciende, el tanque de agua interno se ha llenado<br />
con agua condensada y el acondicionador de aire se apagará automáticamente. Consulte<br />
Funcionamiento/Durante el uso/Punto 4 para obtener las instrucciones sobre el desagüe del<br />
acondicionador de aire.<br />
PÁginA 11<br />
EsPAñol
EsPAñol<br />
fUnCionAMiEnto DEl ContRol REMoto<br />
PoWER<br />
Para encender y apagar la unidad<br />
Cool<br />
Enfría la habitación hasta la temperatura configurada deseada<br />
DRY<br />
Reduce la humedad de la habitación<br />
fAn<br />
Circula el aire de la habitación sin enfriar<br />
HigH<br />
Para seleccionar la velocidad alta del ventilador en los<br />
modos Cool (Enfriar) o Fan (Ventilador)<br />
loW<br />
Para seleccionar la velocidad baja del ventilador en<br />
los modos Cool (Enfriar) o Fan (Ventilador)<br />
Debe tenerse en cuenta que no puede regularse la<br />
temperatura del ventilador en el modo "Dry" (Secar) ni<br />
durante la función de desconexión automática.<br />
ConfigURACiÓn DE lA tEMPERAtURA<br />
Para configurar el temporizador para una demora de entre<br />
1 y 24 horas hasta que el acondicionador de aire se apague,<br />
mientras el acondicionador de aire está encendido:<br />
1. Presione el botón Timer (Temporizador).<br />
2. Establezca las horas que deben pasar para que la unidad se apague utilizando los botones<br />
con las flechas hacia arriba y hacia abajo. Espere aproximadamente 5 segundos para que se<br />
guarde el tiempo.<br />
3. Para cancelar el temporizador, presione el botón Timer (Temporizador) una vez, destellarán<br />
las horas que restan, presione el botón nuevamente para cancelarlo.<br />
Para configurar el temporizador para una demora de entre 1 y 24 horas hasta que el<br />
acondicionador de aire se encienda, mientras el acondicionador de aire está apagado:<br />
1. Presione el botón Timer (Temporizador).<br />
2. Establezca las horas que deben pasar para que la unidad se encienda utilizando los botones<br />
con las flechas hacia arriba y hacia abajo. Espere aproximadamente 5 segundos para que se<br />
guarde el tiempo.<br />
3. Para cancelar el temporizador, presione el botón Timer (Temporizador) una vez, destellarán<br />
las horas que restan, presione el botón nuevamente para cancelarlo.<br />
PÁginA 12<br />
Dry
fUnCionAMiEnto DEl ContRol REMoto<br />
slEEP sEttingConfigURACiÓn DE lA DEsConEXiÓn AUtoMÁtiCA<br />
when activated, the sleep mode increases the set temperature by 2º F (1º C) after 2 hours and<br />
another 2º F (1º C) after 2 more hours. The fan is set at Low and cannot be adjusted. The Sleep<br />
Setting can be cancelled by pressing the Sleep button on the remote control or any of the Mode<br />
buttons (Cool, Fan or Dry) on the remote control The unit can be turned off using the Power<br />
button on the air conditioner or the remote to turn the unit off.<br />
ºf/ºC<br />
Con este botón puede cambiarse la forma de mostrar los grados de Fahrenheit a Celsius.<br />
PÁginA 13<br />
EsPAñol
EsPAñol<br />
gUÍA DE CUiDADo Y liMPiEZA<br />
• Desenchufe siempre el acondicionador de aire antes de limpiarlo.<br />
• Los filtros de aire deben limpiarse al menos una vez por semana para que la unidad funcione<br />
con eficiencia óptima. Deslice hacia afuera los filtros de la parte trasera jalando de las<br />
lengüetas. Los filtros secundarios son accesibles una vez que se retiraron los filtros principales<br />
(consulte página 8). El filtro puede lavarse o aspirarse. Quite el exceso de agua del filtro<br />
sacudiéndolo suavemente. De esta manera se quitará el polvo y las partículas atrapadas en el<br />
filtro. Después de limpiar los filtros, vuelva a colocarlos. NO utilice su acondicionador de aire<br />
sin los filtros en su lugar.<br />
• Para limpiar el gabinete, NO utilice productos químicos fuertes, abrasivos, amoníaco,<br />
blanqueador con cloro, detergentes concentrados, solventes o esponjas texturizadas. Algunos<br />
de estos elementos o productos químicos pueden dañar o desteñir el acondicionador de aire.<br />
• Utilice siempre un paño suave humedecido con agua para limpiar el gabinete. Seque con un<br />
paño suave.<br />
PÁginA 14
AlMACEnAMiEnto<br />
• Para guardar su acondicionador de aire cuando no se utiliza por un período prolongado, vacíe el<br />
tanque de agua como se describe en la página 9 en la sección “Durante el uso”, paso 4. Quite<br />
la manguera de salida, limpie los filtros, cúbralo con una bolsa plástica y guárdelo en un lugar<br />
fresco y seco.<br />
sERViCio Al CliEntE<br />
iMPoRtAntE<br />
no DEVUElVA EstE PRoDUCto A lA tiEnDA<br />
Si tiene algún problema con este producto, comuníquese<br />
con el Centro de satisfacción del cliente al 1-877-337-3639.<br />
ES NECESARIO TENER EL COMPRObANTE DE COMPRA<br />
FECHADO, EL NúMERO DE MODELO Y EL NúMERO DE SERIE<br />
PARA RECIbIR EL SERVICIO DE GARANTÍA.<br />
SERVICIO<br />
AL CLIENTE<br />
1-877-337-3639<br />
PÁginA 15<br />
EsPAñol
EsPAñol<br />
solUCiÓn DE PRoblEMAs<br />
si El AConDiCionADoR DE AiRE no fUnCionA:<br />
• Verifique que el acondicionador de aire esté enchufado.<br />
• Presione el botón “Reset” (Reiniciar) del enchufe para restablecer la energía en la unidad.<br />
• Controle para ver si es necesario reiniciar el interruptor automático o si es necesario cambiar<br />
el fusible.<br />
• Oprima el botón “Power” (Encendido/Apagado) del acondicionador de aire.<br />
• Verifique que el temporizador no esté activado.<br />
• Utilice una lámpara para asegurarse de que el tomacorriente tenga energía.<br />
• Si la luz “full” (lleno) está encendida, vacíe el desagüe de agua como se indica en<br />
Funcionamiento/Durante el uso/Paso 4.<br />
• Asegúrese de que el control remoto tenga pilas nuevas.<br />
El AConDiCionADoR DE AiRE fUnCionA PERo lA HAbitACiÓn no sE EnfRÍA:<br />
• Verifique que el acondicionador de aire tenga la capacidad en BTU necesaria para enfriar la<br />
habitación.<br />
• Haga funcionar el acondicionador de aire en modo enfriar con el ventilador a alta velocidad.<br />
• Revise que la instalación de la manguera de salida y el sistema para la ventana estén bien<br />
instalados.<br />
• Redirija el flujo de aire para que el enfriamiento sea uniforme. Retire cualquier posible<br />
obstáculo al flujo de aire.<br />
• Todas las puertas y ventanas deben estar cerradas así el aire frío no se escapa de la habitación.<br />
• Los filtros de aire pueden estar obstruidos o pueden necesitar limpieza.<br />
• En días extremadamente cálidos y húmedos, al acondicionador de aire le llevará más tiempo<br />
enfriar la habitación.<br />
• La unidad puede estar en el modo ventilador o secar. Ponga el acondicionador de aire en el<br />
modo enfriar.<br />
lA lUZ DE ADVERtEnCiA DE tAnQUE llEno EstÁ EnCEnDiDA:<br />
• La unidad se apaga si la fuente de agua está llena. Esto puede suceder cuando la unidad se<br />
pone en funcionamiento en condiciones de alta humedad. Consulte las instrucciones en la<br />
sección “Funcionamiento” en el apartado “Durante el uso”, Paso 4.<br />
PÁginA 16
gARAntiA liMitADA<br />
EstA gARAntiA CUbRE toDos los<br />
DEfECtoR En El fUnCionAMiEnto o<br />
MAtERiAlEs PoR:<br />
1. Las partes meconicas y electricas que posee<br />
este producto (incluyendo los costos de labor)<br />
por un periodo de 12 meses desde Ia fecha de<br />
compra. (90 dias si fuese de aplicacion comercial<br />
o renta).<br />
2. El sistema sellado y el compresor comprendidos<br />
en este producto por un periodo de 5 anos,<br />
desde Ia fecha de compra, (excluyendo los costos<br />
de labor luego de los 12 meses iniciales). Si fuese<br />
de use comercial o renta la garantia adicional<br />
limitada del compresor es par lano y 9 meses<br />
(excluyendo los costos de labor luego de los 90<br />
dias iniciales).<br />
UstED DEbE ConsERVAR Y DisPonER<br />
DE iA fACtURA oRiginAl DE CoMPRA<br />
CoMo PRUEbA DE iA fECHA DE<br />
CoMPRA DEl PRoDUCto.<br />
QUiEn EstA CUbiERto?<br />
El minorista comprador del producto.<br />
glUE sE HARt's?<br />
<strong>Haier</strong> America reparara a cambial* en su casa,<br />
cualquier parte meconica a electrica que se<br />
muestre defectuosa en la operatoria normal y<br />
dentro del periodo de 12 meses.<br />
<strong>Haier</strong> America reparar6 a cambiara (excluyendo los<br />
costos por labor) el sistema sellado o compresor<br />
(partes solamente) par un periodo adicional de 4<br />
ahos.<br />
CoMo sE obtiEnE El sERViCio?<br />
1 Para obtener el servicio contacte al<br />
Departamento de servicios autorizado por Haler<br />
America mos cercana al (877) 337-3639.<br />
2. Toda reparation debe ser realizada par un Service<br />
Autorizado par Haler America.<br />
EstA gARAntiA ACAnZA A toDos<br />
lAs UniDADEs DEntRo DE los<br />
EstADos UniDos, CAnADA Y PUERto<br />
RiCo. no AlCAnZA lo sigUiEntE:<br />
• Danos por instalacion inadecuada<br />
• Danos en el embarque.<br />
• Danos par desuso, accidente, abuso, alteration,<br />
falta de cuidado y mantenimiento adecuado<br />
• Dafias realizados por un service o persona no<br />
autorizada por Haler America.<br />
• Labor, servicio, transporte y gastos de embarque<br />
por el reemplazo de las partes defectuosas e<br />
instalacion de las nuevas partes, luego de los 12<br />
meses iniciales.<br />
ESTA GARANTIA LIMITADA ESTA DADA EN<br />
LUGAR DE CUALQUIER OTRA GARANTIA,<br />
EXPRESAS NO, INCLUYENDO LA GARANTIA DE<br />
COMERCIALIzACION PARA UN PROPOSITO EN<br />
PARTICULAR.<br />
Las soluciones provistas en esta garantia son<br />
exclusivas y concedidas en lugar de cualquier otra<br />
garantia.<br />
Esta garantia no cubre danos incidentales o<br />
consiguientes, de modo que las limitaciones<br />
anteriores pueden no alcanzarlo. Algunos Estados<br />
no permiten limitaciones en cuanto la duration de<br />
una garantia implicita, de modo que las limitaciones<br />
anteriores pueden no alcanzarlo.<br />
Esta garantia le do derechos legales<br />
especificos, y usted gozaro de otros derechos los<br />
cuales varian de Estado a Estado.<br />
PÁginA 17<br />
EsPAñol
Model # HPY08XCM<br />
Issued Date: December 2012<br />
www.<strong>Haier</strong>America.com<br />
<strong>Haier</strong> America<br />
New York, NY 10018<br />
©2012 <strong>Haier</strong> America Trading, LLC.