Create successful ePaper yourself
Turn your PDF publications into a flip-book with our unique Google optimized e-Paper software.
from hopeless, thus making it clear that the<br />
liferafts have been specially designed and<br />
equipped for this particular situation. It is<br />
left to the leader to decide whether smoking<br />
should be allowed.<br />
Smoking may cause seasickness and also<br />
add to your thirst. Moreover, the danger of<br />
damage caused by open fire and smoking<br />
in the liferaft should be borne in mind, too.<br />
Refilling<br />
After a long stay in the liferaft, you may<br />
have to fill up the two buoyancy tubes, the<br />
two arch tubes and the thwart tubes since<br />
they may get soft.<br />
The inflation valves are inside the liferaft,<br />
one at each buoyancy tube, one at each<br />
arch tube and one at each thwart tube.<br />
Connect the bellow’s hose to the valves and<br />
inflate so much that you can feel the<br />
buoyancy, arch, and thwart tubes becoming<br />
hard. After completing the filling, put on<br />
the valve covers.<br />
Arrival of Rescue Vessel<br />
If a rescue vessel has observed the liferaft,<br />
preparations should be made for fast rescue.<br />
Make sure that everybody wears lifejackets<br />
- you may have to lay down the canopy<br />
by deflating it through the non-return<br />
valve on the arch tube, using the object<br />
attached to the valve. Be ready to receive<br />
a line from the rescue vessel.<br />
Towing<br />
If the liferaft has to be towed during a rescue,<br />
see that the towing line is attached to<br />
the bridle arrangement, its patches or the<br />
painter/retaining line (do not use the life<br />
line round the liferaft).<br />
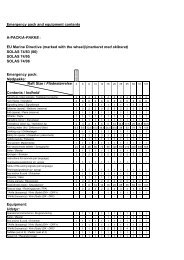
Repair of Leakages<br />
A repair kit including leak stoppers, adhesive<br />
tape, sandpaper, rubber glue and<br />
patches is placed in or attached to the<br />
16<br />
emergency pack. Any leakage may be<br />
sealed provisionally by means of leak stoppers<br />
or wet cloths. Dry leaks may be provisionally<br />
repaired by means of adhesive<br />
tape. Repair any leakage as soon as possible<br />
by using proper patches and rubber glue.<br />
Thoroughly wipe off and sandpaper the<br />
spot before applying rubber glue twice and<br />
then mounting the patches.<br />
Signalling Equipment<br />
The emergency pack contains hand flares<br />
(and parachute lights). Read the instructions<br />
and carefully prepare the signalling<br />
equipment for use so that it may be used<br />
immediately if any ship or aircraft is observed.<br />
Use the signals with care - do not let<br />
everything off in one go. First use the signalling<br />
lamp to signal:<br />
. . . - - - . . . (= SOS)<br />
If you are not observed, fire a rocket or<br />
light a hand flare. In sunny weather use the<br />
signalling mirror. If there is any radio<br />
equipment on board, it should be rigged<br />
according to the directions included.<br />
Approaching Land<br />
When the look-out observes land, a rocket<br />
is fired or a hand flare lit to call for help. It is<br />
also very important to keep a careful lookout<br />
for rocks or anything else which might<br />
damage the liferaft. Be ready for paddle<br />
manoeuvring.<br />
Rescue of Sick or Injured Persons<br />
The liferaft is inflated and pulled up to the<br />
ship’s side. Empty the arch tube.<br />
Throw out the sea anchor. Place the sick<br />
person in the liferaft together with an assistant.<br />
The ship is then turned against the<br />
wind, moving slowly ahead. The distance<br />
to the liferaft must be approx 30-50 m.<br />
(Use rope for extension of the painter).