Service Info 2 Chain guide SM5 & 10
Service Info 2 Chain guide SM5 & 10
Service Info 2 Chain guide SM5 & 10

You also want an ePaper? Increase the reach of your titles
YUMPU automatically turns print PDFs into web optimized ePapers that Google loves.
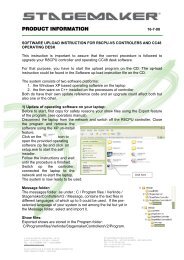
The Flux chain <strong>guide</strong> is available for:<br />
- <strong>SM5</strong> : manufactured after 04-2003 (only ribs on motor side)<br />
- <strong>SM5</strong> : manufactured before 04-2003 (ribs all over the hoist body)<br />
- SM<strong>10</strong> : all units regardless the production date<br />
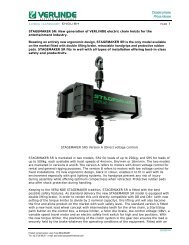
Insert<br />
screwdrive<br />
buffer<br />
buffer<br />
VERLINDE se réserve le droit de modifier sans préavis les caractéristiques de son matériel<br />
VERLINDE reserve the right to modify or improve Equipment described in this document<br />
<strong>SM5</strong> old<br />
<strong>SM5</strong> new<br />
<strong>Service</strong> <strong>Info</strong> 2<br />
<strong>Chain</strong> <strong>guide</strong> <strong>SM5</strong> & <strong>10</strong><br />
Replacement procedure:<br />
1. Remove the chain bag<br />
2. Run the chain trough the hoist and stop at 50 cm before the chain stop at slack chain side reaches the<br />
hoist body<br />
3. Remove the carbine at the end of the chain as well as the<br />
chain stop and run the chain out of the hoist body.<br />
Note: if the chain got stuck or jammed in the <strong>guide</strong>, don’t<br />
start the hoist, this may damage the chain and or the<br />
chainwheel. First proceed with step 4<br />
4. Remove the bolt (23) and take the chain <strong>guide</strong> sideway’s out<br />
of the body.<br />
Note: if the chain got stuck or jammed in the <strong>guide</strong>, insert a<br />
solide screwdriver between <strong>guide</strong> and housing to help it<br />
gently to come out step by step, while the chain is still in<br />
place, see below. Then remove the screws from the <strong>guide</strong><br />
and open it to remove it from the chain. Now run out the<br />
chain carefully.<br />
5. Place the new chain <strong>guide</strong> in the same manner and lock it<br />
with the bolt supplied with the new <strong>guide</strong>.<br />
6. Insert the chain insertion tool (8) from the top.<br />
Note: any other methode might damage the <strong>guide</strong>.<br />
7. Connect the chain to the insertion tool and while keeping the chain under tention, run the chain from<br />
the top through the hoist until it comes out on the side for a length of about 60 cm.<br />
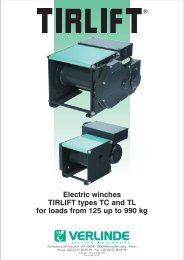
8. Lead the chain trough the buffer for about 40cm and refit the chain stop.<br />
9. Position the buffer against the chain stop<br />
<strong>10</strong>. Refit the carbine at the end of the chain and<br />
12. Lubricate the chain slightly and test the hoist<br />
Note:older models may have an external chain <strong>guide</strong> (13) this<br />
one is no longer ofuse and needs to be removed.<br />
connect it with one of the chain bucket<br />
suspensions (<strong>10</strong>)<br />
11. Fit the chainbucket and run the chain in to the<br />
bucket by starting the hoist.<br />
Note: never fill the bucket manually, this may<br />
cause twists and knots in the chain that will lead to<br />
possible jamming afterwards.<br />
Note:older If upper chain bucket suspensions (<strong>10</strong>)<br />
are mounted, beware that these may be used in<br />
normal (hoist up) position only! In inverted (hoist<br />
down) position the bucket must be suspended<br />
from th lower brakckets to secure a correct<br />
chainflow.<br />
Part numbers:<br />
52391768 flux chain <strong>guide</strong> for <strong>SM5</strong> (from 04-2003)<br />
52311<strong>10</strong>6 flux chain <strong>guide</strong> ALU for <strong>SM5</strong> (before 04-2003)<br />
52425117 flux chain <strong>guide</strong> ALU for SM<strong>10</strong><br />
400 mm<br />
52305498 buffer for <strong>SM5</strong> Note:<br />
52313011 buffer for SM<strong>10</strong> The fitting of the buffers is essential, this to avoid damage<br />
221<strong>10</strong>45 insertion tool <strong>SM5</strong> of the <strong>Chain</strong>flux <strong>guide</strong> at hook or buffer stop impacts<br />
224<strong>10</strong>45 insertion tool SM<strong>10</strong> A flux chain <strong>guide</strong> comes with 2 buffers and 1 chaintool<br />
07/2009 VESPPROC FR/GB<br />
1
Le <strong>guide</strong> chaîne Flux est disponible pour :<br />
- <strong>SM5</strong> : fabriqués après 04-2003 (nervures uniquement du côté moteur)<br />
- <strong>SM5</strong> : fabriqués avant 04-2003 (nervures sur tout le corps du palan)<br />
- SM<strong>10</strong> : toutes les unités, quelle que soit la date de fabrication<br />
VERLINDE se réserve le droit de modifier sans préavis les caractéristiques de son matériel<br />
VERLINDE reserve the right to modify or improve Equipment described in this document<br />
<strong>SM5</strong> nouveau<br />
<strong>Service</strong> <strong>Info</strong> 2<br />
<strong>Chain</strong> <strong>guide</strong> <strong>SM5</strong> & <strong>10</strong><br />
Procédure de remplacement:<br />
1. Déposer le sac à chaîne<br />
2. Faire glisser la chaîne dans le palan et arrêter 50 cm avant que la butée de la chaîne n’atteigne le<br />
corps du palan.<br />
3. Déposer le mousqueton à l’extrémité de la chaîne ainsi que<br />
la butée de chaîne et faire sortir la chaîne du corps du palan.<br />
Nota :si la chaîne est coincée dans le <strong>guide</strong>, ne pas démarrer<br />
le palan car cela pourrait endommager le palan et/ou le<br />
pignon de chaîne. Procéder d’abord à l’étape 4.<br />
4. Déposer le boulon (23) et extraire latéralement le <strong>guide</strong><br />
chaîne du corps.<br />
Nota : si la chaîne est coincée dans le <strong>guide</strong>, introduire un<br />
tournevis résistant entre le <strong>guide</strong> et le carter pour l’extraire<br />
délicatement et progressivement, la chaîne étant toujours en<br />
place, voir ci-dessous. Déposer ensuite les vis du <strong>guide</strong> et<br />
l’ouvrir pour le désolidariser de la chaîne. Sortir alors la<br />
chaîne tout doucement.<br />
5. Installer le nouveau <strong>guide</strong> chaîne de la même manière et le<br />
bloquer à l’aide du boulon fourni avec le nouveau <strong>guide</strong>.<br />
6. Introduire l’outil d’insertion de la chaîne (8) par le haut.<br />
Nota : toute autre méthode risque d’endommager le <strong>guide</strong>.<br />
7. Connecter la chaîne à l’outil d’insertion et, tout en maintenant la chaîne sous tension, faire passer<br />
celle-ci dans le palan en partant du haut jusqu’à ce qu’elle ressorte d’environ 60 cm sur le côté.<br />
8. Introduire une longueur de chaîne d’environ 40 cm dans le butoir et remettre la butée de chaîne en place.<br />
9. Placer le butoir contre la butée de chaîne.<br />
<strong>10</strong>. Remettre le mousqueton en place à l’extrémité de<br />
Introduire un<br />
tournevis<br />
butoir<br />
butoir<br />
<strong>SM5</strong><br />
ancien<br />
supports inférieurs pour assurer une bonne fluidité de la chaîne.<br />
12. Huiler légèrement la chaîne et tester le palan.<br />
Nota : les modèles anciens peuvent être équipés d’un <strong>guide</strong><br />
chaîne externe (13) ; cet élément n’est plus utilisé et doit être<br />
déposé.<br />
Références :<br />
52391768 <strong>guide</strong> chaîne Flux pour <strong>SM5</strong> (après 04-2003)<br />
52311<strong>10</strong>6 <strong>guide</strong> chaîne Flux ALU pour <strong>SM5</strong> (avant 04-2003)<br />
52425117 <strong>guide</strong> chaîne Flux ALU pour SM<strong>10</strong><br />
52305498 butoir pour <strong>SM5</strong><br />
52313011 butoir pour SM<strong>10</strong><br />
221<strong>10</strong>45 outil d’insertion <strong>SM5</strong><br />
224<strong>10</strong>45 outil d’insertion SM<strong>10</strong><br />
221<strong>10</strong>45 insertion tool <strong>SM5</strong><br />
224<strong>10</strong>45 insertion tool SM<strong>10</strong><br />
la chaîne et le connecter à l’une des fixations du<br />
bac à chaîne (<strong>10</strong>).<br />
11. Mettre le bac à chaîne en place et faire passer la<br />
chaîne dans le bac en démarrant le palan.<br />
Nota : ne jamais remplir le bac à chaîne à la main,<br />
pour éviter que la chaîne ne se vrille ou ne forme<br />
des nœuds, ce qui pourrait ensuite provoquer un<br />
blocage..<br />
Nota : si on installe des fixations de bac à chaîne<br />
(<strong>10</strong>) usagées, veiller à ne les utiliser qu’en position<br />
normale (palan en haut) ! Dans la position inverse<br />
(palan en bas) le bac à chaîne doit être fixé aux<br />
400 mm<br />
Nota :<br />
L’installation de butoirs est essentielle pour éviter d’endommager le<br />
<strong>guide</strong> chaîne Flux aux points d’impact avec le crochet et le butoir.<br />
Deux butoirs et un outil de chaînage sont livrés avec le <strong>Chain</strong>flux.<br />
07/2009 VESPPROC FR/GB<br />
2