Télécharger la notice au format pdf (36ko) - Babymoov
Télécharger la notice au format pdf (36ko) - Babymoov
Télécharger la notice au format pdf (36ko) - Babymoov

You also want an ePaper? Increase the reach of your titles
YUMPU automatically turns print PDFs into web optimized ePapers that Google loves.
0+
2<br />
o<br />
f<br />
g<br />
d<br />
a<br />
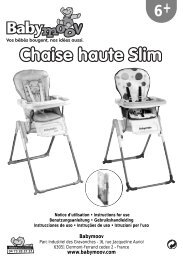
COMPOSITION - ZUSAMMENSETZUNG - SAMENSTELLING - COMPOSICIÓN -<br />
COMPOSIÇÃO - COMPOSIZIONE - ÖSSZETÉTEL - SLOŽENÍ VÝROBKU<br />
h<br />
m et l
g<br />
k<br />
a<br />
COMPOSITION - ZUSAMMENSETZUNG - SAMENSTELLING - COMPOSICIÓN -<br />
COMPOSIÇÃO - COMPOSIZIONE - ÖSSZETÉTEL - SLOŽENÍ VÝROBKU<br />
b et c<br />
h<br />
j<br />
i<br />
3
4<br />
COMPOSITION - ZUSAMMENSETZUNG - SAMENSTELLING - COMPOSICIÓN -<br />
COMPOSIÇÃO - COMPOSIZIONE - ÖSSZETÉTEL - SLOŽENÍ VÝROBKU<br />
e<br />
p<br />
n<br />
m
FR EN<br />
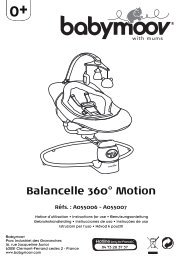
a. Ceinture abdominale<br />
b. Boucle mâle de <strong>la</strong> ceinture abdominale<br />
c. Boucle femelle de <strong>la</strong> ceinture abdominale<br />
d. Partie dorsale<br />
e. Réducteur pour nouve<strong>au</strong>-né<br />
f. Extension du porte-bébé zippée (environ 9cm)<br />
g. Sangles <strong>la</strong>térales<br />
h. Bretelles molletonnées<br />
i. Sangle dorsale<br />
j. Pressions de positionnement de <strong>la</strong> sangle dorsale<br />
k. Boucles dans le bas du dos<br />
l. Poche zippée<br />
m. Cape anti-UV (accessoire)<br />
n. Capuche anti-UV<br />
o. Attaches capuche et cape anti-UV<br />
p. É<strong>la</strong>stiques pour réducteur<br />
DE NL<br />
a. Hüftgurt<br />
b. Männliches Schnallenstück des Hüftgurtes<br />
c. Weibliches Schnallenstück des Hüftgurtes<br />
d. Stoffpaneel<br />
e. Sitzverkleinerer für Neugeborene<br />
f. Verlängerung der Babytrage per Reißverschluss (ungefähr 9cm)<br />
g. Seitengurte<br />
h. Gepolsterte Tragegurte<br />
i. Rückengurt<br />
j. Druckknöpfe zur Positionierung des Rückengurtes<br />
k. Schnallen im unteren Rückenbereich<br />
l. Reißverschlusstasche<br />
m. Anti-UV-Cape (Zubehör)<br />
n. Anti-UV-Überzug<br />
o. Befestigung des Anti-UV-Überzugs und des Anti-UV-Capes<br />
p. E<strong>la</strong>stikbänder für Sitzverkleinerer<br />
ES PT<br />
a. Cinturón abdominal<br />
b. Hebil<strong>la</strong> macho del cinturón abdominal<br />
c. Hebil<strong>la</strong> hembra del cinturón abdominal<br />
d. Parte dorsal<br />
e. Reductor para recién nacido<br />
f. Extensión del portabebé con cremallera (unos 9 cm)<br />
g. Correas <strong>la</strong>terales<br />
h. Tirantes acolchados<br />
i. Correa dorsal<br />
j. Botones de presión de posicionamiento de <strong>la</strong> correa dorsal<br />
k. Hebil<strong>la</strong>s en <strong>la</strong> parte inferior de <strong>la</strong> espalda<br />
l. Bolsillo de cremallera<br />
m. Manto anti-UV (accesorio)<br />
n. Capucha anti-UV<br />
o. Enganches para capucha y manto anti-UV<br />
p. Elásticos para reductor<br />
IT CZ<br />
a. Cintura addominale<br />
b. Fibbia maschio del<strong>la</strong> cintura addominale<br />
c. Fibbia femmina del<strong>la</strong> cintura addominale<br />
d. Parte dorsale<br />
e. Riduttore per neonato<br />
f. Estensione del porta-bebè con cerniera (circa 9 cm)<br />
g. Cinghie <strong>la</strong>terali<br />
h. Bretelle imbottite<br />
i. Cinghia dorsale<br />
j. Clip di posizionamento del<strong>la</strong> cinghia dorsale<br />
k. Fibbia nel<strong>la</strong> parte inferiore del<strong>la</strong> schiena<br />
l. Tasca con cerniera<br />
m. Mantellina anti-uv (optional)<br />
n. Cappuccio anti-uv (optional)<br />
o. Attacchi cappuccio anti-uv (optional)<br />
p. E<strong>la</strong>stici per riduttore<br />
a. Waist belt<br />
b. Waist belt male buckle<br />
c. Waist belt female buckle<br />
d. Back section<br />
e. Cocoon for newborn<br />
f. Zippered baby carrier extender (approx. 9cm)<br />
g. Side straps<br />
h. Padded shoulder straps<br />
i. Back strap<br />
j. Positioning press studs for back strap<br />
k. Buckles at base of back<br />
l. Zippered pocket<br />
m. UV-protective cape (accessory)<br />
n. UV-protective hood<br />
o. Fasteners for UV-protective hood and cape<br />
p. E<strong>la</strong>stic fasteners for cocoon<br />
a. Heupband<br />
b. Mannelijk deel gespsluiting heupband<br />
c. Vrouwelijk deel gespsluiting heupband<br />
d. Ruggesteun<br />
e. Verstelbaar zitje voor pasgeborenen<br />
f. In hoogte verstelbare ruggesteun (ongeveer 9 cm)<br />
g. Zijriemen<br />
h. Gewatteerde schouderbanden<br />
i. Rugband<br />
j. Drukknopen voor het verstellen van de rugband<br />
k. Gespen onderaan de rugband<br />
l. Zak met rits<br />
m. Uv-bestendige cape (accessoire)<br />
n. Uv-bestendige s<strong>la</strong>ap-/zonnekap<br />
o. Bevestiging voor Uv-bestendige kap en cape<br />
p. E<strong>la</strong>stische banden voor verstelbaar zitje<br />
a. Cinto do abdómen<br />
b. Five<strong>la</strong> “macho” do cinto do abdómen<br />
c. Five<strong>la</strong> “fêmea” do cinto do abdómen<br />
d. Secção dorsal<br />
e. Redutor para recém-nascido<br />
f. Extensão do porta-bebé com fecho de correr (cerca de 9cm)<br />
g. Correias <strong>la</strong>terais<br />
h. Correias acolchoadas<br />
i. Correia dorsal<br />
j. Mo<strong>la</strong>s de pressão para posicionamento da correia dorsal<br />
k. Five<strong>la</strong>s ao fundo das costas<br />
l. Bolsa com fecho de correr<br />
m. Capa anti-UV (acessório)<br />
n. Capucho anti-UV<br />
o. Presilhas do capucho e da capa anti-UV<br />
p. Elásticos para redutor<br />
a. Břišní pás<br />
b. Levá přezka břišního pásu<br />
c. Pravá přezka břišního pásu<br />
d. Zádová část<br />
e. Reduktor pro novorozence<br />
f. Rozšíření nosítka na zip (přibližně 9 cm)<br />
g. Postranní popruhy<br />
h. Moltonové pásy<br />
i. Zádový pás<br />
j. Patentky pro umístění zádového pásu<br />
k. Přezky ve spodní části zad<br />
l. Kapsa na zip<br />
m. Ochrana proti uv záření (příslušenství)<br />
n. Kapuce proti uv<br />
o. Upínání kapuce a ochrany proti uv záření<br />
p. Gumičky pro reduktor<br />
5
6<br />
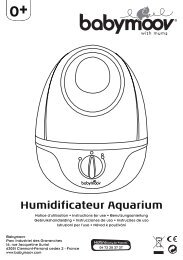
A1. Instal<strong>la</strong>tion et rég<strong>la</strong>ge de <strong>la</strong> ceinture abdominale - Setting-up and adjusting the waist belt<br />
Befestigung und Einstellung des Hüftgurtes - De heupband aanbrengen en verstellen<br />
Insta<strong>la</strong>ción y ajuste del cinturón abdominal - Insta<strong>la</strong>ção e regu<strong>la</strong>ção do cinto do abdómen<br />
Instal<strong>la</strong>zione e rego<strong>la</strong>zione del<strong>la</strong> cintura addominale - Insta<strong>la</strong>ce a nastavení břišního pásu<br />
1 2<br />
3 4<br />
5 6<br />
7 8
9<br />
12<br />
A2. Rég<strong>la</strong>ge des bretelles - Adjusting the shoulder straps - Einstellung der Tragegurte<br />
De schouderbanden verstellen - Ajuste de los tirantes<br />
Regu<strong>la</strong>ção das correias - Rego<strong>la</strong>zione delle bretelle - Nastavení popruhů<br />
10 11<br />
A3. Rég<strong>la</strong>ge de <strong>la</strong> sangle dorsale - Adjusting the back strap - Einstellung des Rückengurtes<br />
De rugband verstellen - Ajuste de <strong>la</strong> correa dorsal - Regu<strong>la</strong>ção da correia dorsal<br />
Rego<strong>la</strong>zione del<strong>la</strong> cinghia dorsale - Nastavení zádového pásu<br />
A4. Utilisation de l’extension du porte-bébé zippée - Use of the zippered baby carrier extender<br />
Verlängerung der Babytrage per Reißverschluss - Het gebruik van de in hoogte verstelbare ruggesteun<br />
Utilización de <strong>la</strong> extensión del portabebé con cremallera - Utilização da extensão do porta-bebé com fecho de correr<br />
Utilizzo dell’estensione del porta-bebè con cerniera - Používání rozšíření nosítka na zip<br />
13<br />
7
8<br />
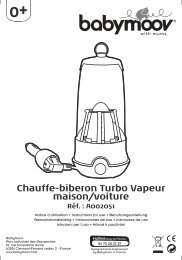
B. Portage face à soi avec réducteur - Carrying facing-in with cocoon - B<strong>au</strong>chtrage mit Sitzverkleinerer<br />
Buikdrager met verstelbaar zitje - Transporte frontal con reductor - Transporte encostado a si com redutor<br />
Utilizzo fronte mamma con riduttore - Nošení na břiše s reduktorem<br />
14 15 16<br />
17<br />
20<br />
18 19
C1. Portage face à soi sans réducteur/Bretelles non-croisées - Carrying facing-in without cocoon/With shoulder<br />
straps uncrossed - B<strong>au</strong>chtrage ohne Sitzverkleinerer/ nicht überkreuzte Tragegurte - Buikdrager zonder verstelbaar<br />
zitje /Niet-gekruiste schouderbanden - Transporte frontal sin reductor/Tirantes no cruzados<br />
Transporte encostado a si sem redutor / Correias não cruzadas - Utilizzo fronte mamma senza riduttore/Bretelle non<br />
incrociate - Nošení na břiše bez reduktoru/ Nepřekřížené popruhy<br />
21 22 23<br />
24<br />
C2. Portage face à soi sans réducteur/Bretelles croisées - Carrying facing-in without cocoon/With shoulder straps<br />
crossed - B<strong>au</strong>chtrage ohne Sitzverkleinerer/ überkreuzte Tragegurte - Buikdrager zonder verstelbaar zitje /Gekruiste<br />
schouderbanden - Transporte frontal sin reductor/Tirantes cruzados<br />
Transporte encostado a si sem redutor / Correias cruzadas - Utilizzo fronte mamma senza riduttore/Bretelle<br />
incrociate - Nošení na břiše bez reduktoru/ Překřížené popruhy<br />
26<br />
25<br />
9
10<br />
D. Portage sur <strong>la</strong> hanche - Carrying on the hip - Hüfttrage - Heupdrager - Transporte en <strong>la</strong> cadera<br />
Transporte sobre a anca - Utilizzo sull’anca - Nošení na boku<br />
27 28 29<br />
30 31 32
33 34 35<br />
36<br />
11
E. Portage dans le dos - Carrying on the back - Rückentrage - Heupdrager - Rugdrager - Transporte en <strong>la</strong> espalda<br />
Transporte às costas - Utilizzo sul<strong>la</strong> schiena - Nošení na zádech<br />
37 38 39<br />
40 41 42<br />
12
F1. Utilisation de <strong>la</strong> cape anti-UV - Using the UV-protective cape - Verwendung des Anti-UV-Capes<br />
Het gebruik van de Uv-bestendige cape - Utilización del manto anti-UV - Utilização da capa anti-UV<br />
Utilizzo del<strong>la</strong> mantellina anti-uv - Používání ochrany proti uv záření<br />
43 44 45<br />
46<br />
13
F2. Utilisation de <strong>la</strong> capuche intégrée anti-UV Using the UV-protective hood - Verwendung des Anti-UV-Überzugs<br />
Het gebruik van de Uv-bestendige kap - Utilización de <strong>la</strong> capucha anti-UV - Utilização do capucho anti-UV<br />
Utilizzo del cappuccio anti-uv - Používání kapuce proti uv záření<br />
47 48<br />
49<br />
14
FR<br />
NOTICE D’UTILISATION<br />
A. Avant utilisation<br />
1. Instal<strong>la</strong>tion et rég<strong>la</strong>ge de <strong>la</strong> ceinture abdominale (a)<br />
• Pour tout type de position, il est nécessaire de commencer par l’instal<strong>la</strong>tion de <strong>la</strong> ceinture abdominale (a).<br />
• Positionnez <strong>la</strong> boucle de <strong>la</strong> ceinture abdominale (a) sur votre ventre (Figure 1).<br />
• Passez <strong>la</strong> boucle mâle de <strong>la</strong> ceinture abdominale (b) sous <strong>la</strong> bande é<strong>la</strong>stique de sécurité (Figure 2). Insérez-<strong>la</strong> dans <strong>la</strong> boucle<br />
femelle de <strong>la</strong> ceinture abdominale (c) jusqu’à ce que vous entendiez un « clic ». (Figures 3 et 4). .<br />
• Procédez <strong>au</strong> rég<strong>la</strong>ge de <strong>la</strong> <strong>la</strong>nière en fonction de votre taille et repliez le surplus dans l’é<strong>la</strong>stique prévu à cet effet (Figure 5).<br />
• Tournez maintenant <strong>la</strong> ceinture abdominale (a) de façon à positionner <strong>la</strong> partie dorsale (d) devant vous, ou sur votre hanche,<br />
en fonction de <strong>la</strong> position choisie (Figures 6 et 7).<br />
ATTENTION ! : Veillez à toujours fermer <strong>la</strong> boucle de <strong>la</strong> ceinture abdominale (a) avant d’installer votre bébé. N’ouvrez jamais <strong>la</strong><br />
boucle de <strong>la</strong> ceinture abdominale (a) lorsque votre enfant est encore dans le porte-bébé.<br />
Pour toute ouverture de <strong>la</strong> boucle de <strong>la</strong> ceinture abdominale, appuyez simultanément sur <strong>la</strong> sécurité située sur celle-ci à l’aide<br />
de votre deuxième main (Figure 8).<br />
2. Rég<strong>la</strong>ge des bretelles (h)<br />
Merci d’avoir choisi le porte-bébé écharpe « à nouer » BABYMOOV.<br />
Conforme suivant un examen de type établi suivant le référentiel NF-EN 13209-2:2005 et du cahier<br />
des charges commun des <strong>la</strong>boratoires agréés. Conforme <strong>au</strong>x exigences de sécurité.<br />
POUR LA SÉCURITÉ DE VOTRE BÉBÉ, VEUILLEZ LIRE ATTENTIVEMENT CE MANUEL D’INSTRUCTION.<br />
IMPORTANT ! À CONSERVER POUR<br />
CONSULTATION ULTÉRIEURE.<br />
• AVERTISSEMENT : l’équilibre de <strong>la</strong> personne peut-être affecté<br />
par tout mouvement qu’elle et l’enfant peuvent faire.<br />
• AVERTISSEMENT : ne se pencher vers l’avant qu’avec<br />
préc<strong>au</strong>tion.<br />
• AVERTISSEMENT : le porte-bébé n’est pas adapté <strong>au</strong>x activités<br />
sportives.<br />
• AVERTISSEMENT : ne pas recouvrir le visage et le nez de<br />
l’enfant : risque d’asphyxie.<br />
• AVERTISSEMENT : l’enfant ne doit pas être replié sur<br />
sa poitrine.<br />
• Avant chaque utilisation, assurez-vous que l’ensemble<br />
des attaches, sangles et rég<strong>la</strong>ges sont en bon état.<br />
• Veillez à ce que votre bébé puisse respirer librement.<br />
• Position du bébé : Votre bébé doit être en position<br />
« assis/accroupi », jambes fléchies, genoux plus h<strong>au</strong>ts que<br />
ses fesses. Il doit se trouver en appui sur ses fesses et JAMAIS<br />
SUR SON ENTREJAMBE NI SES PIEDS. Veillez <strong>au</strong>ssi à p<strong>la</strong>cer <strong>la</strong><br />
tête du bébé dans l’axe de sa colonne vertébrale.<br />
• Couvrir les extrémités (pieds, tête) pour les protéger du soleil<br />
ou du froid.<br />
AVERTISSEMENTS<br />
MISES EN GARDE<br />
• AVERTISSEMENT : le confort de l'enfant est primordial. Il peut<br />
souffrir du temps et de <strong>la</strong> température avant le porteur.<br />
• AVERTISSEMENT : l’enfant dans le porte-bébé peut se sentir<br />
fatigué. Il est recommandé de faire de fréquents arrêts arrêts<br />
et de vérifier l’instal<strong>la</strong>tion de l’enfant.<br />
• AVERTISSEMENT : Ce porte-bébé est destiné <strong>au</strong>x enfants<br />
dès <strong>la</strong> naissance (3.5 kg mini) et jusqu’à 18 kg.<br />
• Pendant le portage, restez vigi<strong>la</strong>nt : soyez attentif <strong>au</strong><br />
comportement de l’enfant afin de répondre à ses besoins ou<br />
faire les ajustements du porte-bébé nécessaires pour <strong>la</strong><br />
bonne position de bébé.<br />
• Ne détachez jamais <strong>la</strong> ceinture ventrale tant que votre bébé<br />
se trouve encore dans le porte- bébé.<br />
• Assurez-vous toujours que les sangles soient toujours bien<br />
tendues pendant le portage.<br />
• N’hésitez pas à demander de l’aide <strong>au</strong>près d’une personne<br />
formée <strong>au</strong> portage qui s<strong>au</strong>ra vous donner les gestes sûrs.<br />
• Avant <strong>la</strong> première utilisation, réglez <strong>la</strong> longueur des <strong>la</strong>nières et de <strong>la</strong> ceinture abdominale (a) à votre taille en les faisant coulisser.<br />
Repliez le surplus des <strong>la</strong>nières dans les é<strong>la</strong>stiques <strong>au</strong> bout de celles-ci (Figures 9,10 et 11).<br />
PORTE-BÉBÉ PHYSIOLOGIQUE • Notice d’utilisation 15
3. Rég<strong>la</strong>ge de <strong>la</strong> sangle dorsale (i)<br />
• Réglez <strong>la</strong> sangle dorsale (i) <strong>au</strong> nive<strong>au</strong> souhaité dans le dos, en prenant soin de <strong>la</strong> bloquer à <strong>la</strong> h<strong>au</strong>teur choisie entre les pressions<br />
correspondantes (Figure 12).<br />
4. Utilisation de l’extension du porte-bébé zippée (f)<br />
• Pour maintenir votre bébé, vous pouvez étendre <strong>la</strong> partie dorsale (d). Ouvrez le zip situé sur <strong>la</strong> partie dorsale (d) (Figure 13).<br />
• Pour réduire <strong>la</strong> partie dorsale (d), rep<strong>la</strong>cez le zip sur <strong>la</strong> fermeture de l’extension (f).<br />
16<br />
B. Portage face à soi avec réducteur (e) (de 3,5 kg à 6 kg environ)<br />
Il est nécessaire que les bébés de <strong>la</strong> naissance à 4 mois aient <strong>la</strong> tête maintenue. Veillez à ce que le visage de bébé soit à portée du vôtre.<br />
Serrez <strong>la</strong> ceinture abdominale (a) <strong>au</strong>tour de vos hanches afin que <strong>la</strong> ceinture soit bien positionnée et de manière confortable.<br />
ATTENTION ! : Gardez-<strong>la</strong> toujours bien fermée. Le réducteur (d) n’est pas conçu pour maintenir votre bébé indépendamment<br />
de <strong>la</strong> ceinture abdominale (a).<br />
ATTENTION ! : Veillez à maintenir votre enfant durant toutes les manipu<strong>la</strong>tions dans le porte-bébé.<br />
• Bouclez <strong>la</strong> ceinture abdominale (a). Etendez <strong>la</strong> partie dorsale (d) du porte-bébé sur une surface sure (Figure 14).<br />
• Allongez votre bébé sur l’intérieur de <strong>la</strong> partie dorsale (d).<br />
• Veillez à ce que le cou du bébé se trouve en dessous du bord h<strong>au</strong>t de <strong>la</strong> partie dorsale (d). Si nécessaire, ouvrez l’extension<br />
du porte-bébé zippée (f) (Figure 13).<br />
• Clippez les pressions du réducteur (d), votre bébé à l’intérieur de celui-ci (Figure 15).<br />
• Relevez votre enfant avec <strong>la</strong> partie dorsale (d) vers vous (Figure 16).<br />
• Tout en maintenant votre bébé d’une main, enfilez une bretelle (h) avec votre main libre (Figure 17 et 18). Maintenez ensuite<br />
votre bébé de l’<strong>au</strong>tre main et enfilez <strong>la</strong> seconde bretelle (h).<br />
• Tenez votre bébé contre vous de manière à ce que ses jambes se trouvent de part et d’<strong>au</strong>tre de votre ventre. Saisissez de vos<br />
2 mains <strong>la</strong> boucle de <strong>la</strong> sangle dorsale (i) et attachez-<strong>la</strong> (Figures 19 et 20).<br />
• Votre bébé doit avoir les jambes <strong>au</strong>tour de votre ventre, et ses fesses doivent être à h<strong>au</strong>teur du nombril, plus basses que ses<br />
genoux (position M/grenouille).<br />
ATTENTION ! : Veillez à ce que votre bébé ne raidisse pas ses jambes et ne pousse pas sur <strong>la</strong> ceinture abdominale (d).<br />
C. Portage face à soi sans réducteur (e) (de 6 kg à 12 kg environ)<br />
• Bouclez <strong>la</strong> ceinture abdominale (a). Laissez pendre <strong>la</strong> partie dorsale (d) à l’avant. Portez votre enfant contre vous de manière<br />
à ce que ses jambes se trouvent de part et d’<strong>au</strong>tre de votre ventre. Relevez d’une main <strong>la</strong> partie dorsale (d) du porte-bébé et<br />
p<strong>la</strong>cez-<strong>la</strong> contre le dos de votre bébé (Figures 21 et 22).<br />
• Tout en maintenant votre bébé d’une main, enfilez une bretelle (h) avec votre main libre. Maintenez ensuite votre bébé de l’<strong>au</strong>tre<br />
main et enfilez <strong>la</strong> seconde bretelle (h) (Figure 23).<br />
1. Bretelles non croisées<br />
• Saisissez de vos 2 mains <strong>la</strong> boucle de <strong>la</strong> sangle dorsale (i) et attachez-<strong>la</strong> (Figure 24). Votre bébé doit avoir les jambes <strong>au</strong>tour<br />
de votre ventre, et ses fesses doivent être à h<strong>au</strong>teur du nombril, plus basses que ses genoux (position M/grenouille)<br />
(Figure 25).<br />
2. Bretelles croisées<br />
• Détachez les boucles du bas du dos (k) et croisez vos bretelles. Rebouclez les boucles du bas du dos (k). Attachez <strong>la</strong> boucle<br />
de <strong>la</strong> sangle dorsale (i) (Figure 26).<br />
D. Portage sur <strong>la</strong> hanche (de 6 kg à 12 kg environ)<br />
• Détachez les boucles dans le bas du dos (k) ainsi que les boucles des sangles <strong>la</strong>térales (g).<br />
• Bouclez <strong>la</strong> ceinture abdominale (a). Laissez pendre <strong>la</strong> partie dorsale (d) à l’avant. P<strong>la</strong>cez <strong>la</strong> partie dorsale (d) sur <strong>la</strong> hanche<br />
de votre choix (Figure 27).<br />
• Prenez votre enfant et installez-le sur votre hanche. Etendez <strong>la</strong> partie dorsale (d) sur son dos (Figure 28).<br />
• Saisissez <strong>la</strong> bretelle du côté de votre hanche. Passez-<strong>la</strong> sous votre bras puis dans votre dos. Bouclez-<strong>la</strong> sur <strong>la</strong> boucle <strong>la</strong>térale<br />
opposée à votre hanche (Figures 29 et 30).<br />
PORTE-BÉBÉ PHYSIOLOGIQUE • Notice d’utilisation
• Procédez <strong>au</strong> rég<strong>la</strong>ge de <strong>la</strong> sangle <strong>la</strong>térale (g) si besoin (Figure 31).<br />
• Saisissez <strong>la</strong> bretelle opposée à votre hanche. Passez-<strong>la</strong> <strong>au</strong>-dessus de votre ép<strong>au</strong>le et dans votre dos (Figures 32 et 33).<br />
• Attachez-<strong>la</strong> à <strong>la</strong> boucle <strong>la</strong>térale du même côté que votre hanche (Figure 34). Procédez <strong>au</strong> rég<strong>la</strong>ge de <strong>la</strong> sangle si besoin<br />
(Figure 35).<br />
• Vérifiez <strong>la</strong> bonne instal<strong>la</strong>tion de l’enfant (Figure 36).<br />
E. Portage dans le dos (de 8 kg à 18 kg environ)<br />
Ce mode de portage est exclusivement réservé <strong>au</strong>x enfants plus âgés capables de s’accrocher à votre dos pendant que vous<br />
réglez le porte-bébé. Possibilité de portage dorsal uniquement à partir de 10 mois.<br />
• Bouclez <strong>la</strong> ceinture abdominale (a).<br />
• Laissez pendre <strong>la</strong> partie dorsale (d) devant vous.<br />
• Portez votre enfant contre vous de manière à ce que ses jambes se trouvent de part et d’<strong>au</strong>tre de votre ventre. Relevez d’une<br />
main <strong>la</strong> partie dorsale (d) du porte-bébé. P<strong>la</strong>cez-là contre le dos de votre bébé. (Figure 37).<br />
• Tout en maintenant votre enfant, faîtes pivoter <strong>la</strong> ceinture abdominale (d) <strong>au</strong>tre de votre hanche. Assurez-vous de ma sécurité<br />
de votre enfant pendant cette manipu<strong>la</strong>tion (Figure 38).<br />
• Enfilez <strong>la</strong> première bretelle (h) qui vous aidera à terminer <strong>la</strong> rotation de <strong>la</strong> ceinture abdominale (d) (Figure 39).<br />
• Penchez-vous en avant puis enfilez <strong>la</strong> seconde bretelle (h) tout en maintenant votre enfant avec votre main libre (Figure 40).<br />
• Assurez-vous de <strong>la</strong> bonne position de l’enfant.<br />
• Bouclez et serrez <strong>la</strong> sangle dorsale (d) (Figures 41 et 42). Elle doit se trouver à h<strong>au</strong>teur des aisselles.<br />
1. Utilisation de <strong>la</strong> cape anti-UV (m)<br />
F. Accessoires inclus<br />
• Après avoir installé votre enfant, p<strong>la</strong>cez <strong>la</strong> cape anti-UV (m) sur <strong>la</strong> partie dorsale (d) (Figure 43).<br />
• Fixez les é<strong>la</strong>stiques en bordure h<strong>au</strong>te de <strong>la</strong> cape anti-UV (m) sur les boutons correspondants (Figure 44). Nouez ensuite <strong>la</strong><br />
cape anti-UV (m) <strong>au</strong>tour de votre taille (Figures 45 et 46).<br />
2. Utilisation de <strong>la</strong> capuche intégrée anti-UV (n)<br />
• Pour plus de maintien et de protection, vous pouvez déplier <strong>la</strong> capuche anti-UV intégrée (n).<br />
• Ouvrez le scratch sur le bord h<strong>au</strong>t de <strong>la</strong> partie dorsale (d) (Figures 47 et 48).<br />
• Attachez les liens sur les boutons situés sur les bretelles (h) (Figure 49).<br />
Porte-bébé : 100% coton<br />
Cape anti-UV : 100% polyester<br />
Fabriqué en Chine.<br />
Lavage en machine à 30°.<br />
wInaj<br />
COMPOSITION ET ENTRETIEN<br />
PORTE-BÉBÉ PHYSIOLOGIQUE • Notice d’utilisation 17
EN<br />
1. Setting-up and adjusting the waist belt (a)<br />
INSTRUCTIONS FOR USE<br />
A. Before use<br />
• For each carrying position, starting with setting-up the waist belt is required (a).<br />
• P<strong>la</strong>ce the waist belt buckle (a) on your stomach (Figure 1).<br />
• Thread the male waist belt buckle (b) through the e<strong>la</strong>sticated safety loop (Figure 2). Insert it into the female waist belt buckle<br />
(c) until you hear it "click". (Figures 3 and 4)..<br />
• Next adjust the strap to your size and fold the excess into the e<strong>la</strong>stic loop designed to hold it in p<strong>la</strong>ce (Figure 5).<br />
• Now turn the waist belt (a) so as to position the back part (d) in front of you, or on your hip, depending on the carrying position<br />
required (Figures 6 and 7).<br />
WARNING ! : Be sure to always fasten the waist belt (a) before p<strong>la</strong>cing your baby in the carrier. Never unfasten the waist belt<br />
buckle (a) while your baby is still inside the carrier.<br />
Whenever you are unfastening the waist belt buckle, press the safety clip on it at the same time, with your other hand (Figure<br />
8).<br />
2. Adjusting the shoulder straps (h)<br />
Thank you for choosing the BABYMOOV anatomical baby carrier.<br />
Complies with the safety requirements of standard NF-EN 13209-2: 2005 and the common specification<br />
of certified <strong>la</strong>boratories.<br />
FOR YOUR BABY'S SAFETY, PLEASE READ THESE INSTRUCTIONS CAREFULLY.<br />
IMPORTANT! PLEASE KEEP THESE<br />
INSTRUCTIONS FOR FUTURE REFERENCE.<br />
• WARNING : the adult's ba<strong>la</strong>nce can be affected by any<br />
movement they or the baby make.<br />
• WARNING : be careful when bending over forwards.<br />
• WARNING : the baby carrier is not suitable for sporting<br />
activities.<br />
• WARNING : do not allow the child's face and nose to be<br />
covered: risk of suffocation.<br />
• WARNING : the child should not be leaning over onto his<br />
chest.<br />
• WARNING : the child's comfort and wellbeing is paramount.<br />
• Before each use, check that all fasteners, straps and<br />
adjustments are in a good state of repair.<br />
• Make sure that your baby can breathe easily.<br />
• Position of the baby: Your baby should be in a<br />
"seated/squatting" position, with bent legs, and with the knees<br />
higher than the buttocks. He should be resting on his buttocks<br />
and NEVER ON THE CROTCH OR FEET. Make sure that the<br />
baby's head is in line with his spinal column.<br />
• Cover his limbs (feet, head) to protect him from sunshine or<br />
cold.<br />
WARNINGS<br />
PRECAUTIONS<br />
He may be affected by the duration and temperature before<br />
the adult carrying him.<br />
• WARNING : the child may feel tired in the baby carrier, and<br />
we recommend frequent breaks, and that you check that<br />
the child is correctly positioned.<br />
• WARNING: this baby carrier is designed for children from<br />
birth (Min. 3.5kg) up to 18 kg.<br />
• When carrying, be attentive: monitor the child's position so<br />
as to be able to respond to his needs or make any necessary<br />
adjustments to the carrier to achieve good positioning for<br />
the baby.<br />
• Never undo the waist belt while the baby is still in the babycarrier.<br />
• Always check that the straps are tight enough when wearing<br />
it.<br />
• Do not hesitate to ask for help from a trained carrier expert<br />
who can show you some safe positions.<br />
• Before using for the first time, adjust the length of the waist belt (a) straps to your size by threading them through. Fold the<br />
excess parts of the straps into the e<strong>la</strong>stic loops at the ends (Figures 9,10 and 11).<br />
18<br />
ANATOMICAL BABY CARRIER • Instructions for use
3. Adjusting the back strap (i)<br />
• Adjust the back strap (i) to the level you wish at the back, taking care to fasten it at the required height between the<br />
corresponding press studs (Figure 12).<br />
4. Use of the zippered baby carrier extender (f)<br />
• To support your baby, you can extend the back part (d). Open the zipper located on the back part (d) (Figure 13).<br />
• To shorten the back part (d), zip up the extender (f).<br />
B. Carrying facing-in with cocoon (e) (from 3.5 Kg to approx 6 Kg)<br />
Babies from birth to 4 months must have their head supported. Check that you can see the baby's face. Tighten the waist belt to fit around<br />
your hips so that the belt is comfortable and well-positioned.<br />
WARNING ! : Always keep it fastened. The cocoon (d) is not designed to support your baby independently from the waist belt<br />
(a).<br />
WARNING ! : Check that your child is supported whenever he is moved in the baby carrier.<br />
• Fasten the waist belt (a). Extend the back part (d) of the baby carrier onto a safe surface (Figure 14).<br />
• Lie your baby on the inside of the back part (d).<br />
• Check that the baby's neck is below the top edge of the back part (d). If necessary, open the zippered baby carrier extender<br />
(f) (Figure 13).<br />
• Fasten the cocoon (d), press studs, with your baby inside it (Figure 15).<br />
• Pick up the child with the back part (d) facing you (Figure 16).<br />
• While supporting the baby with one hand, pull on one shoulder strap (h) with the other hand (Figure 17 and 18). Next support<br />
the baby with the other hand, and pull on the other shoulder strap (h).<br />
• Hold your baby against your body so that his legs go either side of your stomach. Take hold of the back strap (i) buckle with<br />
both hands and attach it (Figures 19 and 20).<br />
• Your baby should have his legs around your stomach, with his buttocks at belly button height, lower than his knees (M or frog<br />
position).<br />
WARNING ! : Check that your baby does not tense his legs and does not push on the waist belt (d).<br />
C. Carrying facing-in without cocoon (e) (from 3.5 Kg to approx 6 Kg)<br />
• Fasten the waist belt (a). Let the back part (d) hang down in front. Carry your child against your body so that his legs go either<br />
side of your stomach. Pick up the back part (d) of the baby carrier with one hand and p<strong>la</strong>ce against your baby's back (Figures<br />
21 and 22).<br />
• While supporting the baby with one hand, pull on one shoulder strap (h) with the other hand. Next support your baby with<br />
the other hand, and pull on the other shoulder strap (h) (Figure 23).<br />
1. With shoulder straps uncrossed<br />
• Take hold of the back strap (i) buckle with both hands and attach it (Figure 24). Your baby should have his legs around your<br />
stomach, with his buttocks at belly button height, lower than his knees (M or frog position) (Figure 25).<br />
2. With shoulder straps crossed<br />
• Unfasten the buckles at the base of the back (k) and cross the shoulder straps over. Refasten the buckles at the base of the<br />
back (k). Attach the back strap buckle (i) (Figure 26).<br />
D. Carrying on the hip (from 6 Kg to approx 12 Kg)<br />
• Unfasten the buckles at the base of the back (k) as well as the side strap buckles (g).<br />
• Fasten the waist belt (a). Let the back part (d) hang down in front. P<strong>la</strong>ce the back part (d) on your preferred hip (Figure 27).<br />
• Pick up your child and p<strong>la</strong>ce him on your hip. Pull the back part (d) over his back (Figure 28).<br />
• Take hold of the shoulder strap nearest to your hip. Pass it under your arm and then around your back. Clip it to the side buckle<br />
opposite your hip (Figures 29 and 30).<br />
ANATOMICAL BABY CARRIER • Instructions for use 19
• Next adjust the side strap (g) if necessary (Figure 31).<br />
• Take hold of the shoulder strap opposite your hip. Take it over your shoulder and around your back (Figure 32 and 33).<br />
• Attach it to the side buckle on the same side as your hip (Figure 34). Next adjust the strap if necessary<br />
(Figure 35).<br />
• Check that the child is correctly positioned (Figure 36).<br />
20<br />
E. Carrying on the back (from 8 Kg to 20 Kg)<br />
This method of carrying is only applicable for older children who are capable of holding on to your back while you adjust the<br />
baby carrier. Back carrying option only from 10 months onwards.<br />
• Fasten the waist belt (a).<br />
• Let the back part (d) hang down in front of you.<br />
• Carry your child against your body so that his legs go either side of your stomach. Pick up the back part (d) of the baby carrier<br />
with one hand. P<strong>la</strong>ce it against your baby's back (Figure 37).<br />
• While supporting the child, pivot the waist belt (d) around your hips. Be sure to check that your child is secure while you<br />
complete this manoeuvre (Figure 38).<br />
• Pull on the first shoulder strap (h) which will help you to finish turning the waist belt round you (d) (Figure 39).<br />
• Lean forwards, then pull on the second shoulder strap (h) while keeping your child supported with your free hand (Figure 40).<br />
• Check that the child is in a good position.<br />
• Fasten and tighten the back strap (d) (Figures 41 and 42). It should be positioned at armpit height.<br />
1. Using the UV-protective cape (m)<br />
F. Accessories included<br />
• After getting your child into the carrier, p<strong>la</strong>ce the UV-protective cape (m) onto the back part (d) (Figure 43).<br />
• Attach the e<strong>la</strong>stic loops on the top edge of the UV-protective cape (m) onto the corresponding buttons (Figure 44). Then tie<br />
the UV-protective cape around your waist (m) (Figures 45 and 46).<br />
2. Using the integral UV-protective hood (n)<br />
• For more protection and support, you can unfold the integral UV-protective hood (n).<br />
• Undo the velcro fastening on the upper edge of the back part (d) (Figures 47 and 48).<br />
• Attach the straps to the buttons located on the shoulder straps (h) (Figure 49).<br />
Baby-carrier: 100% cotton<br />
UV-protective cape: 100% polyester<br />
Made in China.<br />
Machine washable at 30°.<br />
wInaj<br />
COMPOSITION AND CARE<br />
ANATOMICAL BABY CARRIER • Instructions for use
DE<br />
Vielen Dank, dass Sie sich für die physiologische Babytrage BABYMOOV entschieden haben.<br />
Diese Babytrage entspricht den Anforderungen der Sicherheitsnorm NF-EN 13209-2: 2005 und denen<br />
des Pflichtenhefts der zuge<strong>la</strong>ssenen Labors.<br />
ZUR SICHERHEIT IHRES BABYS LESEN SIE BITTE DIESE ANLEITUNG SORGFÄLTIG DURCH.<br />
WICHTIG ! FÜR SPÄTEREN GEBRAUCH<br />
GUT AUFBEWAHREN.<br />
• WARNUNG : Ihr Gleichgewicht kann durch jegliche Art von<br />
Bewegung ihrerseits und seitens Ihres Kindes beeinträchtigt<br />
werden.<br />
• WARNUNG : Seien Sie vorsichtig, wenn Sie sich nach vorne<br />
beugen.<br />
• WARNUNG : Die Babytrage ist nicht zur Anwendung bei<br />
sportlichen Aktivitäten geeignet.<br />
• WARNUNG : Bedecken Sie nicht das Gesicht und die Nase<br />
des Kindes: Erstickungsgefahr.<br />
• Stellen Sie vor jeder Anwendung sicher, dass sich alle<br />
Befestigungen, Gurte und Eistellungen in einem guten Zustand<br />
befinden.<br />
• Achten Sie dar<strong>au</strong>f, dass Ihr Baby frei atmen kann.<br />
• Position des Babys: Ihr Baby sollte sich in der „Sitz-/Hock“-<br />
Position befinden, gespreizte Beine, Knie höher gelegen als das<br />
Gesäß. Es sollte stets <strong>au</strong>f seinem Gesäß sitzen, jedoch NIEMALS<br />
AUF SEINEM SCHRITTBEREICH NOCH AUF SEINEN FÜßEN.<br />
Achten Sie ebenfalls dar<strong>au</strong>f, den Kopf des Babys geradlinig zur<br />
Wirbelsäule zu positionieren.<br />
• Bedecken Sie die Extremitäten (Füße, Kopf), um diese vor<br />
Sonnenstrahlen und Kälte zu schützen.<br />
1. Befestigung und Einstellung des Hüftgurtes (a)<br />
WARNHINWEISE<br />
VORSICHTSMAßNAHMEN<br />
NOTICE D’UTILISATION<br />
A. Vor dem Gebr<strong>au</strong>ch<br />
• WARNUNG : Das Kind sollte lediglich mit einem leichten<br />
Rundrücken in der Trage sitzen.<br />
• WARNUNG : Ein bequemer Tragekomfort des Kindes ist<br />
äußerst wichtig. Das Wetter und die Temperatur können sich<br />
schneller <strong>au</strong>f das Kind als <strong>au</strong>f den Träger <strong>au</strong>swirken.<br />
• WARNUNG : Da das Tragen in der Babytrage für das Kind<br />
ermüdend sein kann, empfiehlt es sich, häufige P<strong>au</strong>sen<br />
einzulegen und die Trageposition des Kindes zu überprüfen.<br />
• WARNUNG : Diese Babytrage ist für Kinder ab der Geburt<br />
(mindestens 3.5 kg) bis zu 18 kg geeignet.<br />
• Bleiben Sie während des Tragens <strong>au</strong>fmerksam: achten Sie <strong>au</strong>f<br />
das Verhalten des Kindes, um <strong>au</strong>f dessen Bedürfnisse<br />
eingehen zu können oder notwendige Anpassungen der<br />
Babytrage zur optimalen Positionierung des Babys<br />
vorzunehmen.<br />
• Lösen Sie niemals den Hüftgurt so<strong>la</strong>nge sich Ihr Baby noch<br />
in der Babytrage befindet.<br />
• Vergewissern Sie sich stets, dass die Haltegurte während<br />
des Tragens immer festgezogen sind.<br />
• Zögern Sie nicht, eine erfahrene Person, die Ihnen nützliche<br />
Handgriffe zeigen kann, um Hilfe zu bitten.<br />
• Für jede Trageposition ist es erforderlich, zunächst den Hüftgurt zu befestigen (a).<br />
• Positionieren Sie die Schnalle des Hüftgurtes (a) vor Ihren B<strong>au</strong>ch (Abbildung 1).<br />
• Führen Sie das männliche Schnallenstück des Hüftgurtes (b) unter die e<strong>la</strong>stische Sicherheitsschnalle (Abbildung 2). Fügen Sie<br />
diese dann in das weibliche Schnallenstück des Hüftgurtes (c) ), bis Sie ein „Klick“-Geräusch hören. (Abbildungen 3 und 4).<br />
• Fahren Sie fort mit der Einstellung der Riemen entsprechend Ihrer Größe und verst<strong>au</strong>en Sie die überstehenden Enden in dem<br />
dafür vorgesehenen E<strong>la</strong>stikband (Figure 5).<br />
• Drehen Sie nun den Hüftgurt (a), sodass sich das Stoffpaneel (d)je nach der gewünschten Position vor Ihrem B<strong>au</strong>ch oder <strong>au</strong>f<br />
Ihrer Hüfte befindet. (Abbildungen 6 und 7).<br />
ACHTUNG ! : Achten Sie dar<strong>au</strong>f, dass Sie die Schnalle des Hüftgurtes (a)schließen, bevor Sie Ihr Baby in der Babytrage<br />
positionieren. Öffnen Sie niemals die Schnalle des Hüftgurtes (a) so<strong>la</strong>nge Sich Ihr Baby noch in der Babytrage befindet.<br />
Um die Schnalle des Hüftgurtes zu öffnen, drücken Sie gleichzeitig mit Ihrer anderen Hand <strong>au</strong>f die sich dar<strong>au</strong>f befindende Sicherung.<br />
(Abbildung 8).<br />
PHYSIOLOGISCHE BABYTRAGE • Benutzungsanleitung 21
2. Einstellung der Tragegurte (h)<br />
• Stellen Sie vor der ersten Verwendung die Länge der Riemen und des Hüftgurtes (a) entsprechend Ihrer Größe ein, indem Sie<br />
diese festziehen. Verst<strong>au</strong>en Sie die überstehenden Enden der Riemen in den E<strong>la</strong>stikbändern, die sich an den Enden dieser befinden<br />
(Abbildungen 9,10 und 11).<br />
3. Einstellung des Rückengurtes (i)<br />
• Stellen Sie den Rückengurt (i) <strong>au</strong>f die gewünschte Höhe des Rückens ein und stellen Sie sicher, dass Sie diesen <strong>au</strong>f der<br />
gewünschten Höhe zwischen den entsprechenden Druckknöpfen befestigen (Abbildung 12).<br />
4. Verlängerung der Babytrage per Reißverschluss (f)<br />
• Um Ihr Baby <strong>au</strong>frecht zu halten, können Sie das Stoffpaneel verlängern (d).). Öffnen Sie den Reißverschluss, der sich <strong>au</strong>f dem<br />
Stoffpaneel befindet (d) (Abbildung 13).<br />
• Um das Stoffpaneel zu verkleinern (d), schließen Sie den Reißverschluss (f).<br />
22<br />
B. B<strong>au</strong>chtrage mit sitzverkleinerer (e) (von 3.5 kg bis ca. 6 kg)<br />
Es ist dringend erforderlich, dass der Kopf von Kleinkindern von der Geburt an bis zu 4 Monaten gestützt wird. Achten Sie dar<strong>au</strong>f, dass sich<br />
das Gesicht des Babys nahe des ihrigen befindet. Ziehen Sie den Hüftgurt (a) um Ihre Hüfte herum straff, sodass der Gurt gut positioniert<br />
und bequem ist.<br />
WARNUNG ! : Lassen Sie den Hüftgurt stets geschlossen. Der Sitzverkleinerer (d) ist nicht dar<strong>au</strong>f <strong>au</strong>sgelegt, das Gewicht Ihres<br />
Babys ohne den Hüftgurt (a) ) zu tragen.<br />
WARNUNG ! : Achten Sie dar<strong>au</strong>f, Ihr Kind während jeglicher Handhabung der Babytrage zusätzlich zu stützen.<br />
• Schließen Sie den Hüftgurt (a).Erweitern Sie das Stoffpaneel (d) der Babytrage <strong>au</strong>f einer sicheren Oberfläche (Abbildung 14).<br />
• Legen Sie Ihr Baby <strong>au</strong>f die Innenseite des Stoffpaneels (d).<br />
• Achten Sie dar<strong>au</strong>f, dass sich der Hals des Babys unterhalb des oberen Endes des Stoffpaneels (d) befindet. Wenn erforderlich,<br />
öffnen Sie die Verlängerung der Babytrage per Reißverschluss (f) (Abbildung 13).<br />
• Schließen Sie die Druckknöpfe des Sitzverkleinerers (d)), während sich Ihr Baby in diesem befindet (Abbildung 15).<br />
• Richten Sie Ihr Kind mitsamt des Stoffpaneels (d) ) <strong>au</strong>f sich (Abbildung 16).<br />
• Schlüpfen Sie nun mit der einen Hand in den ersten Tragegurt (h)), während Sie Ihr Baby mit der anderen Hand stützen<br />
(Abbildungen 17 und 18). Stützen Sie dann Ihr Baby mit der anderen Hand und schlüpfen Sie mit der zweiten Hand in den<br />
zweiten Tragegurt (h).<br />
• Ziehen Sie Ihr Baby an sich und positionieren Sie es so, dass sich dessen Beine <strong>au</strong>f beiden Seiten Ihres B<strong>au</strong>ches befinden. Erfassen<br />
Sie die Schnalle des Rückengurtes mit beiden Händen (i) und befestigen Sie diese (Abbildungen 19 und 20).<br />
• Die Beine Ihres Babys müssen sich um Ihren B<strong>au</strong>ch herum befinden und sein Gesäß muss sich <strong>au</strong>f Höhe des B<strong>au</strong>chnabels<br />
und unterhalb seiner Knie befinden (M-Position/ Anhock-Spreiz-Haltung).<br />
WARNUNG ! : Achten Sie dar<strong>au</strong>f, dass Ihr Baby seine Beine nicht anspannt/streckt und <strong>au</strong>f den Hüftgurt drückt (d).<br />
C. B<strong>au</strong>chtrage ohne sitzverkleinerer (e) (von 6 kg bis ca. 12 kg)<br />
• Schließen Sie den Hüftgurt (a). Lassen Sie das Stoffpaneel (d) or sich herunterhängen. Halten Sie Ihr Kind vor sich und<br />
positionieren Sie es so, dass sich seine Beine <strong>au</strong>f beiden Seiten Ihres B<strong>au</strong>ches befinden. Ziehen Sie mit einer Hand das<br />
Stoffpaneel (d) der Babytrage hoch und p<strong>la</strong>tzieren Sie es über den Rücken Ihres Babys. (Abbildungen 21 und 22).<br />
• Schlüpfen Sie nun mit der einen Hand in den ersten Tragegurt (h) ), während Sie Ihr Baby mit der anderen Hand stützen. Stützen<br />
Sie dann Ihr Baby mit der anderen Hand und schlüpfen Sie mit der zweiten Hand in den zweiten Tragegurt (h) (Abbildung 23).<br />
1. Nicht überkreuzte Tragegurte<br />
• Erfassen Sie die Schnalle des Rückengurtes mit beiden Händen (i) und befestigen Sie diese (Abbildung 24).Die Beine Ihres Babys<br />
müssen sich um Ihren B<strong>au</strong>ch herum befinden und sein Gesäß muss sich <strong>au</strong>f Höhe des B<strong>au</strong>chnabels und unterhalb seiner Knie<br />
befinden (M-Position/ Anhock-Spreiz-Haltung) (Abbildung 25).<br />
2. Überkreuzte Tragegurte<br />
• Lösen Sie die Schnallen des unteren Rückenbereichs (k) und überkreuzen Sie Ihre Tragegurte. Schließen Sie die Schnallen des<br />
unteren Rückenbereichs (k). Befestigen Sie die Schnalle des Rückengurtes (i) (Abbildung 26).<br />
PHYSIOLOGISCHE BABYTRAGE • Benutzungsanleitung
D. Hûfttrage (von 6 kg bis ca. 12 kg)<br />
• Lösen Sie die Schnallen des unteren Rückenbereichs (k) sowie die Schnallen der Seitengurte (g).<br />
• Schließen Sie den Hüftgurt (a). Lassen Sie das Stoffpaneel (d) vor sich herunterhängen. Positionieren Sie das Stoffpaneel (d)<br />
<strong>au</strong>f der gewünschten Hüfte (Abbildung 27).<br />
• Nehmen Sie Ihr Baby und positionieren Sie es <strong>au</strong>f Ihrer Hüfte. Ziehen Sie das Stoffpaneel (d) über seinen Rücken nach oben<br />
(Abbildung 28).<br />
• Erfassen Sie den Tragegurt <strong>au</strong>f der Seite Ihrer Hüfte. Führen Sie diesen dann unter Ihren Arm hindurch und dann zu Ihrem Rücken.<br />
Schließen Sie diesen dann an der seitlichen Schnalle <strong>au</strong>f der anderen Seite Ihrer Hüfte (Abbildungen 29-30).<br />
• Fahren Sie mit der Einstellung des Seitengurtes fort (g) wenn dies erforderlich ist (Abbildung 31).<br />
• Erfassen Sie den Gurt <strong>au</strong>f der anderen Seite Ihrer Hüfte. Führen Sie diesen dann über Ihre Schulter hin zu Ihrem Rücken<br />
(Abbildungen 32-33).<br />
• Schließen Sie diesen dann an der seitlichen Schnalle <strong>au</strong>f der Seite Ihrer Hüfte (Abbildung 34). Fahren Sie mit der Einstellung<br />
des Gurtes fort, wenn dies erforderlich ist (Abbildung 35).<br />
• Überprüfen Sie die richtige Positionierung des Kindes (Abbildung 36).<br />
E. Rückentrage (von 8 kg bis 20 kg)<br />
Diese Trageposition ist <strong>au</strong>sschließlich für ältere Kinder geeignet, die sich an Ihrem Rücken festhalten können, während Sie die<br />
Babytrage einstellen. Die Rückentrage empfiehlt sich lediglich für Kinder ab 10 Monaten.<br />
• Schließen Sie den Hüftgurt (a).<br />
• Lassen Sie das Stoffpaneel (d) vor sich herunterhängen.<br />
• Ziehen Sie Ihr Baby an sich und positionieren Sie es so, dass sich seine Beine <strong>au</strong>f beiden Seiten Ihres B<strong>au</strong>ches befinden. Ziehen<br />
Sie mit einer Hand das Stoffpaneel (d) der Babytrage hoch. P<strong>la</strong>tzieren Sie es über den Rücken Ihres Babys (Abbildung 37).<br />
• Schwenken Sie den Hüftgurt (d) <strong>au</strong>f die andere Seite Ihrer Hüfte, während Sie Ihr Baby mit der anderen Hand stützen. Achten<br />
Sie während dieser Vorgehensweise <strong>au</strong>f die Sicherheit Ihres Kindes (Abbildung 38).<br />
• Legen Sie den ersten Tragegurt an (h), was Ihnen ebenfalls dabei hilft, die Rotation des Hüftgurtes abzuschließen (d)<br />
(Abbildung 39).<br />
• Beugen Sie sich nach vorne und legen Sie dann den zweiten Tragegurt (h)an, während Sie Ihr Baby mit der freien Hand<br />
stützen (Abbildung 40).<br />
• Vergewissern Sie sich, dass Ihr Kind richtig positioniert ist.<br />
• Schließen und straffen Sie den Seitengurt (d) (Abbildungen 41-42). Dieser sollte sich <strong>au</strong>f Achselhöhe befinden.<br />
1. Verwendung des Anti-UV-Capes (m)<br />
F. Inbegriffenes Zubehör<br />
• Nachdem Sie Ihr Kind positioniert haben, bringen Sie das Anti-UV-Cape (m) an dem Stoffpaneel (d) (Abbildung 43).<br />
• Befestigen Sie die E<strong>la</strong>stikbänder der obigen Enden des Anti-UV-Capes (m) an den entsprechenden Knöpfen (Abbildung 44).<br />
Führen Sie dann das Anti-UV-Cape (m) um Ihre Taille (Abbildungen 45-46).<br />
2. Verwendung des integrierten Anti-UV-Überzugs (n)<br />
• Um mehr Schutz zu ermöglichen, können Sie den integrierten Anti-UV- Überzug (n).<br />
• Öffnen Sie den Verschluss am obigen Ende des Stoffpaneels (d) (Abbildungen 47-48).<br />
• Befestigen Sie die Verbindungen an den Knöpfen der Tragegurte (h) (Abbildung 49).<br />
Babytrage: 100% B<strong>au</strong>mwolle<br />
Anti-UV-Cape: 100% Polyester<br />
Hergestellt in China.<br />
Maschinenwäsche bei 30°.<br />
wInaj<br />
ZUSAMMENSETZUNG UND PFLEGEHINWEISE<br />
PHYSIOLOGISCHE BABYTRAGE • Benutzungsanleitung 23
NL<br />
Dank u voor het kiezen van de fysiologische draagzak van BABYMOOV.<br />
Deze draagzak voldoet aan de veiligheidsnormen van NF-EN 13209-2:2005 en de gemeenschappelijke<br />
richtlijnen van de erkende <strong>la</strong>boratoria.<br />
VOOR DE VEILIGHEID VAN UW BABY, LEES DEZE GEBRUIKSAANWIJZING ZORGVULDIG DOOR.<br />
BELANGRIJK: BEWAREN VOOR<br />
TOEKOMSTIG GEBRUIK.<br />
• WAARSCHUWING : Het evenwicht van de drager kan worden<br />
beïnvloedt door de beperkte bewegingsmogelijkheden van<br />
de drager en het kind.<br />
• WAARSCHUWING : De nodige voorzichtigheid dient te<br />
worden betracht bij het voorover leunen.<br />
• WAARSCHUWING : De draagzak is niet geschikt voor<br />
sportieve activiteiten.<br />
• WAARSCHUWING : Het gezicht en de neus van het kind niet<br />
bedekken: gevaar voor verstikking.<br />
• WAARSCHUWING : Zorg ervoor dat de buik van het kind<br />
• Controleer voor elk gebruik of alle sluitingen, banden en<br />
vergrendelingen in goede staat zijn.<br />
• Zorg ervoor dat uw baby vrij kan ademen.<br />
• Positie van de baby: uw baby moet in de « zit-/hurk- » positie<br />
worden gep<strong>la</strong>atst, met gebogen benen, waarbij de knieën<br />
hoger zitten dan de billen. Het moet steunen op zijn billen en<br />
NOOIT OP ZIJN KRUIS OF ZIJN VOETEN. Zorg er ook voor<br />
dat het hoofdje van de baby in het verlengde van de<br />
wervelkolom wordt gep<strong>la</strong>atst.<br />
• Bedek de uitstekende delen (voeten, hoofd) om deze tegen<br />
zon of kou te beschermen.<br />
1. De heupband aanbrengen en verstellen (a)<br />
WAARSCHUWINGEN<br />
VOORZORGSMAATREGELEN<br />
GEBRUIKSAANWIJZING<br />
A. Voor ingebruikname<br />
gestrekt is.<br />
• WAARSCHUWING : Het comfort van het kind staat voorop.<br />
In een draagzak kan het <strong>la</strong>st hebben van de draagduur en<br />
de warmte.<br />
• WAARSCHUWING : Een kind in een draagzak kan zich<br />
vermoeid voelen. Het is dan raadzaam om regelmatig even<br />
te stoppen en te controleren of het kind nog goed zit.<br />
• WAARSCHUWING: Deze draagzak is geschikt voor<br />
pasgeborenen (minimaal 3,5 kg) en voor kinderen tot 18 kg.<br />
• Blijf behoedzaam tijdens het dragen van de draagzak: let op<br />
het gedrag van het kind om in te kunnen springen op de<br />
behoeften van het kind of om daar waar nodig de draagzak<br />
te verstellen voor het behoud van de juiste positie van het kind.<br />
• De heupband mag nooit los gemaakt worden zo<strong>la</strong>ng de<br />
baby zich nog in de draagzak bevindt.<br />
• Controleer altijd of de banden nog voldoende strak zitten<br />
tijdens het dragen.<br />
• Aarzel niet om hulp te vragen van een deskundige op het<br />
gebied van draagzakken; zij zullen u veilige aanwijzingen<br />
geven.<br />
• Ongeacht de draagwijze, zal de heupband allereerst moeten worden aangebracht (a).<br />
• P<strong>la</strong>ats de gesp van de heupband (a) op uw buik (afbeelding 1).<br />
• P<strong>la</strong>ats het mannelijk deel van de heupband gespsluiting (b) onder de e<strong>la</strong>stische veiligheidsband (afbeelding 2).Steek hierin<br />
het vrouwelijke deel van de heupband gespsluiting (c) ) totdat u « klik » hoort (afbeeldingen 3 en 4). .<br />
• Verstel de heupband vervolgens op de maat van uw tailleomtrek en vouw het uiteinde onder de daarvoor bestemde e<strong>la</strong>stische<br />
band (afbeelding 5).<br />
• Draai de heupband (a) nu dusdanig dat de ruggesteun (d) zich ofwel voor u bevindt, dan wel op uw heup, afhankelijk van<br />
de door u gekozen draagwijze (afbeeldingen 6 en 7).<br />
LET OP ! : Zorg er altijd voor dat de gespsluiting van de heupband (a) goed vastzit voordat u overgaat tot het p<strong>la</strong>atsen van de<br />
baby. Zo<strong>la</strong>ng uw kind zich nog in de draagzak bevindt, mag u nooit de gespsluiting van de heupband openen (a).<br />
Voor het openen van de heupband gespsluiting, moet u met twee handen tegelijkertijd op de veiligheidsclip drukken (Figure<br />
8).<br />
24<br />
FYSIOLOGISCHE DRAAGZAK • Gebruiksaanwijzing
2. De schouderbanden verstellen (h)<br />
• Alvorens er over gegaan kan worden tot ingebruikname van de draagzak, zult u de lengte van de banden en de heupband<br />
(a) op uzelf moeten afstellen door deze te verschuiven. Vouw de uiteinden onderaan onder de daarvoor bestemde e<strong>la</strong>stische<br />
banden (afbeeldingen 9,10 en 11).<br />
3. De rugband verstellen (i)<br />
• P<strong>la</strong>ats de rugband (i) op de gewenste hoogte op de rug, en bevestig deze op de geselecteerde hoogte met behulp van de<br />
bijbehorende drukknopen (afbeelding 12).<br />
4. Het gebruik van de in hoogte verstelbare ruggesteun (f)<br />
• Om uw baby te ondersteunen, kunt u de ruggesteun verlengen (d)door deze in hoogte te verstellen met behulp van de<br />
ritssluiting aan de voorzijde (d) (afbeelding 13).<br />
• To shorten the back part (d), zip up the extender (f).<br />
B. Buikdrager met verstelbaar zitje (e) (voor 3,5 tot 6 kg)<br />
Het is be<strong>la</strong>ngrijk dat het hoofdje van pasgeborenen en baby’s tot 4 maanden rechtop wordt gehouden. Zorg ervoor dat het gezicht van de<br />
baby nabij het uwe is. Trek de heupband (a) strak ter hoogte van uw heupen zodat deze goed gepositioneerd is en de draagzak<br />
comfortabel aanvoelt.<br />
LET OP ! : Zorg ervoor dat de heupband te allen tijde goed vastzit. Het verstelbare zitje (d) is niet ontworpen om uw baby zonder<br />
heupband (a).<br />
LET OP ! : Zorg ervoor dat u uw kind tijdens alle handelingen rechtop in de draagzak houdt.<br />
• Gesp de heupband vast (a). Leg de ruggesteun (d) van de draagzak v<strong>la</strong>k op een vaste ondergrond (afbeelding 14).<br />
• Leg uw baby aan de binnenzijde van de ruggesteun (d).<br />
• Zorg ervoor dat de nek van de baby zich onder de bovenrand van de ruggesteun bevindt (d). Indien nodig, kunt u de<br />
ruggesteun in hoogte verstellen door de rits te openen (f) (afbeelding 13).<br />
• Bevestig het verstelbare zitje met drukknopen (d), doe dit terwijl uw baby hierin zit (afbeelding 15).<br />
• Til uw baby en de ruggesteun (d) naar u toe (afbeelding 16).<br />
• Terwijl u uw baby met één hand ondersteunt, schuift u een schouderband (h) over uw schouder met u andere hand<br />
(afbeeldingen 17 en 18). Vervolgens ondersteunt u uw baby met uw andere hand en schuift u de tweede schouderband om<br />
(h).<br />
• Houd uw baby dusdanig tegen u aan, dat de beentjes zich aan weerszijden van uw buik bevinden. Pak de rugband met twee<br />
handen vast (i) en bevestig deze (afbeeldingen 19 en 20).<br />
• De benen van uw baby moeten zich rond uw buik bevinden en zijn billen ter hoogte van de navel, <strong>la</strong>ger dan zijn knieën (Mpositie<br />
/kikkerpositie).<br />
LET OP ! : Zorg ervoor dat de benen van uw baby niet verstijven en dat deze niet op de heupband drukken (d).<br />
C. Buikdrager zonder verstelbaar zitje (e) (voor 6 tot 12 kg)<br />
• Gesp de heupband vast (a). Laat de ruggesteun (d) aan de voorzijde om<strong>la</strong>ag hangen. Draag uw baby dusdanig tegen u aan,<br />
dat de beentjes zich aan weerszijden van uw buik bevinden. Til met één hand de ruggesteun (d) van de draagzak omhoog<br />
en p<strong>la</strong>ats het tegen de rug van uw baby (afbeeldingen 21 en 22).<br />
• Terwijl u uw baby met één hand ondersteunt, schuift u een schouderband (h)over uw schouder met u andere hand. Vervolgens<br />
ondersteunt u uw baby met uw andere hand, en schuift u de tweede schouderband om (h) (afbeelding 23).<br />
1. Niet-gekruiste schouderbanden<br />
• Pak de rugband met twee handen vast (i) en bevestig deze (afbeelding 24). De benen van uw baby moeten zich rond uw<br />
buik bevinden en zijn billen ter hoogte van de navel, <strong>la</strong>ger dan zijn knieën (M-positie /kikkerpositie) (afbeelding 25).<br />
2. Gekruiste schouderbanden<br />
• Maak de gespen onderaan de schouderbanden los (k) en kruis de schouderbanden. Maak de gespen opnieuw onderaan<br />
de heupband vast (k). Bevestig de rugband (i) (afbeelding 26).<br />
FYSIOLOGISCHE DRAAGZAK • Gebruiksaanwijzing 25
26<br />
D. Heupdrager (voor 6 tot 12 kg)<br />
• Maak de gespen onderaan de schouderbanden los (k) evenals de gespen van de zijriemen (g).<br />
• Gesp de heupband vast (a). Laat de ruggesteun (d) aan de voorzijde om<strong>la</strong>ag hangen. P<strong>la</strong>ats de ruggesteun (d) op de<br />
gewenste heup (afbeelding 27).<br />
• Til uw kind op en p<strong>la</strong>ats hem op uw heup. Houdt de ruggesteun (d) tegen zijn rug (afbeelding 28).<br />
• Neem de schouderband die zich het dichtst bij uw heup bevindt. Steek deze onder uw arm door naar uw rug toe. Bevestig<br />
deze in de gespsluiting van de tegenoverliggende zijriem (afbeelding 31).<br />
• Indien nodig, verstel daarna de zijriem (g) (afbeelding 31).<br />
• Pak de schouderband van uw andere heup. P<strong>la</strong>ats deze over uw schouder naar uw rug toe (afbeeldingen 32-33).<br />
• Bevestig deze in de zijriem gespsluiting van uw heupdragende kant (afbeelding 34). Indien nodig, verstel daarna de zijriem<br />
(afbeelding 35).<br />
• Controleer of het kind in de goede positie zit (afbeelding 36).<br />
E. Rugdrager (voor 8 tot 20 kg)<br />
Deze draagwijze is uitsluitend voorbehouden voor oudere kinderen die in staat zijn om zich aan uw rug vast te houden terwijl<br />
u de draagzak versteld. Rugdragen is slechts mogelijk vanaf 10 maanden.<br />
• Gesp de heupband vast (a).<br />
• Laat de ruggesteun (d) aan de voorzijde om<strong>la</strong>ag hangen.<br />
• Draag uw baby dusdanig tegen u aan, dat de beentjes zich aan weerszijden van uw buik bevinden. Til met één hand de<br />
ruggesteun (d) van de draagzak omhoog en p<strong>la</strong>ats het tegen de rug van uw baby (afbeelding 37).<br />
• Terwijl u uw kind met één hand ondersteunt, draait u de heupband (d) over uw heup naar achteren. Zorg ervoor dat de veiligheid<br />
van uw kind voorop staat tijdens deze handeling (afbeelding 38).<br />
• Steek uw arm door de eerste schouderband (h) U zult hierdoor vernemen tot hoever u de heupband kunt draaien (d)<br />
(afbeelding 39).<br />
• Leun naar voren en steek uw andere arm door de tweede schouderband (h) terwijl u uw kind ondersteunt met uw vrije hand<br />
(afbeelding 40).<br />
• Controleer of het kind goed en veilig is gep<strong>la</strong>atst.<br />
• Bevestig de rugband met de drukknopen (d) (afbeeldingen 41-42). Deze dient ter hoogte van de oksels te worden gep<strong>la</strong>atst.<br />
1. Using the UV-protective cape (m)<br />
F. Inbegrepen accessoires<br />
• Nadat u uw kind goed en veilig in de draagzak heeft gep<strong>la</strong>atst, kunt u de Uv-bestendige cape (m) aan de ruggesteun<br />
bevestigen (d) (Figure 43).<br />
• Bevestig de e<strong>la</strong>stische bovenrand van de Uv-bestendige cape (m) met de daarvoor bestemde knopen (Figure 44). TWikkel<br />
de Uv-bestendige cape daarna om uw middel (m) (afbeeldingen 45-46).<br />
2. Het gebruik van de geïntegreerde Uv-bestendige kap (n)<br />
• Voor meer ondersteuning en bescherming, kunt u de geïntegreerde Uv-bestendige kap openvouwen (n).<br />
• Open het klittenband aan de bovenrand van de ruggesteun (d) (Fafbeeldingen 47-48).<br />
• Bevestig de koordjes aan de knopen op de schouderbanden (h) (afbeelding 49).<br />
Draagzak: 100% katoen<br />
Uv-bestendige cape: 100% polyester<br />
Vervaardigd in China.<br />
Wasbaar in de wasmachine op 30°C.<br />
wInaj<br />
SAMENSTELLING EN ONDERHOUD<br />
FYSIOLOGISCHE DRAAGZAK • Gebruiksaanwijzing
ES<br />
1. Insta<strong>la</strong>ción y ajuste del cinturón abdominal (a)<br />
MANUAL DE USO<br />
A. ANTES DE UTILIZAR<br />
• Para cualquiera de <strong>la</strong>s posiciones, es necesario comenzar por <strong>la</strong> insta<strong>la</strong>ción del cinturón abdominal (a).<br />
• Coloque <strong>la</strong> hebil<strong>la</strong> del cinturón abdominal (a) en su vientre (Figura 1).<br />
• Pase <strong>la</strong> hebil<strong>la</strong> macho del cinturón abdominal (b) por debajo de <strong>la</strong> banda elástica de seguridad (Figura 2). Introdúzca<strong>la</strong> en<br />
<strong>la</strong> hebil<strong>la</strong> hembra del cinturón abdominal (c) hasta oír un "clic" (Figuras 3 y 4).<br />
• Proceda al ajuste de <strong>la</strong> correa en función de su tamaño y repliegue <strong>la</strong> correa sobrante en el elástico previsto para ello (Figura<br />
5).<br />
• A continuación, gire el cinturón abdominal (a) de forma que <strong>la</strong> parte dorsal (d) quede de<strong>la</strong>nte de usted o en su cadera, en<br />
función de <strong>la</strong> posición elegida (Figuras 6 y 7).<br />
¡Atención! : Asegúrese siempre de haber cerrado <strong>la</strong> hebil<strong>la</strong> del cinturón abdominal (a) antes de insta<strong>la</strong>r al bebé. No abra nunca<br />
<strong>la</strong> hebil<strong>la</strong> del cinturón abdominal (a) con el niño aún en el portabebé.<br />
Para abrir <strong>la</strong> hebil<strong>la</strong> del cinturón abdominal, presione simultáneamente los dispositivos de seguridad con su segunda manO<br />
(Figura 8).<br />
2. Ajuste de los tirantes (h)<br />
Gracias por haber elegido el portabebé fisiológico BABYMOOV.<br />
Conforme a <strong>la</strong>s exigencias de seguridad de <strong>la</strong> norma NF-EN 13209-2: 2005 y el pliego de condiciones<br />
común de los <strong>la</strong>boratorios certificados.<br />
POR LA SEGURIDAD DE SU BEBÉ, POR FAVOR, LEA ATENTAMENTE ESTE MANUAL DE INSTRUCCIONES.<br />
¡IMPORTANTE! CONSÉRVESE PARA<br />
POSIBLES CONSULTAS EN EL FUTURO.<br />
• ADVERTENCIA : El equilibrio del portador puede verse<br />
afectado por cualquier movimiento que éste o el niño puedan<br />
hacer.<br />
• ADVERTENCIA : Tener mucho cuidado al inclinarse hacia<br />
de<strong>la</strong>nte.<br />
• ADVERTENCIA : El portabebé no está indicado para<br />
actividades deportivas.<br />
• ADVERTENCIA : No cubrir el rostro ni <strong>la</strong> nariz del niño: riesgo<br />
de asfixia.<br />
• Antes de cada uso, asegúrese de que los enganches, correas<br />
y ajustes estén en buen estado.<br />
• Compruebe que su bebé pueda respirar libremente.<br />
• Posición del bebé: el bebé debe estar en posición "sentado/de<br />
cuclil<strong>la</strong>s", con <strong>la</strong>s piernas flexionadas y <strong>la</strong>s rodil<strong>la</strong>s más elevadas<br />
que sus nalgas. Debe estar apoyado sobre sus nalgas y EN<br />
NINGÚN CASO SOBRE SU ENTREPIERNA NI SUS PIES.<br />
Asegúrese de que <strong>la</strong> cabeza del bebé esté colocada en el eje<br />
de su columna vertebral.<br />
• Cubra <strong>la</strong>s extremidades (pies, cabeza) para proteger<strong>la</strong>s del<br />
sol o del frío.<br />
ADVERTENCIAS<br />
PRECAUCIONES<br />
• ADVERTENCIA : El pectoral del niño no debe estar replegado.<br />
• ADVERTENCIA : El confort del niño es primordial. Puede verse<br />
afectado por el tiempo y <strong>la</strong> temperatura antes que el portador.<br />
• ADVERTENCIA : El niño puede sentirse fatigado en el<br />
portabebé; se recomienda realizar paradas frecuentes y<br />
comprobar <strong>la</strong> insta<strong>la</strong>ción del niño.<br />
• ADVERTENCIA : Este portabebé está destinado a niños desde<br />
el nacimiento (mínimo 3,5 kg) y hasta los 18 kg.<br />
• Durante el transporte, preste atención al comportamiento del<br />
niño para así poder responder a sus necesidades o realice<br />
los ajustes necesarios del portabebé para garantizar <strong>la</strong><br />
correcta posición del bebé.<br />
• No suelte nunca el cinturón ventral mientras que su bebé aún<br />
se encuentre en el portabebé.<br />
• Asegúrese siempre de que <strong>la</strong>s correas estén correctamente<br />
tensadas durante el transporte.<br />
• En caso de dudas, pida ayuda a un profesional.<br />
• Antes de utilizar por primera vez, deslice <strong>la</strong>s correas y el cinturón abdominal (a) para ajustar su longitud a su tamaño.<br />
Repliegue <strong>la</strong>s correas sobrantes en los elásticos situados en los extremos (Figuras 9, 10 y 11).<br />
PORTABEBÉ FISIOLÓGICO • Manual de uso 27
3. Ajuste de <strong>la</strong> correa dorsal (i)<br />
• Ajuste <strong>la</strong> correa dorsal (i) a <strong>la</strong> altura deseada en <strong>la</strong> espalda, bloqueándo<strong>la</strong> entre los botones a presión correspondientes en<br />
función de <strong>la</strong> altura elegida (Figura 12).<br />
4. Utilización de <strong>la</strong> extensión del portabebé con cremallera (f)<br />
• Para mantener a su bebé, puede ampliar <strong>la</strong> parte dorsal (d). Abra <strong>la</strong> cremallera ubicada en <strong>la</strong> parte dorsal (d) (Figura 13).<br />
• Para reducir <strong>la</strong> parte dorsal (d), vuelva a situar <strong>la</strong> cremallera en el cierre de <strong>la</strong> extensión (f).<br />
28<br />
B. TRANSPORTE FRONTAL CON REDUCTOR (e) (de 3,5 kg a 6 kg aprox.)<br />
La cabeza de los bebés desde el nacimiento a los 4 meses debe ser sujetada por el portador. El rostro del bebé debe quedar a <strong>la</strong> altura del<br />
suyo. Ajuste el cinturón abdominal (a)en torno a sus caderas con el fin de que quede bien posicionado y de forma confortable.<br />
¡Atención! : Asegúrese siempre de que está bien cerrado. El reductor (d) no ha sido diseñado para sujetar a su bebé<br />
independientemente del cinturón abdominal (a).<br />
¡Atención! : Sujete a su bebé durante cualquier manipu<strong>la</strong>ción que realice en el portabebé.<br />
• Abroche el cinturón abdominal (a). Extienda <strong>la</strong> parte dorsal (d) del portabebé sobre una superficie segura (Figura 14).<br />
• Coloque a su bebé en el interior de <strong>la</strong> parte dorsal (d).<br />
• El cuello del bebé debe encontrarse debajo del borde alto de <strong>la</strong> parte dorsal (d). Si fuese necesario, abra <strong>la</strong> extensión del portabebé<br />
con cremallera (f) (Figura 13).<br />
• Cierre los botones de presión del reductor (d) con el bebé en el interior de éste (Figura 15).<br />
• Levante al bebé con <strong>la</strong> parte dorsal (d) hacia usted (Figura 16).<br />
• Sujetando al bebé con una mano, póngase un tirante (h) con su mano libre (Figuras 17 y 18). A continuación, sujete al bebé<br />
con <strong>la</strong> otra mano y póngase el segundo tirante (h).<br />
• Coloque al bebé contra usted de forma que sus piernas queden a ambos <strong>la</strong>dos de su vientre. Agarre con sus dos manos <strong>la</strong><br />
hebil<strong>la</strong> de <strong>la</strong> correa dorsal (i) ) y abróche<strong>la</strong> (Figuras 19 y 20).<br />
• El bebé debe tener <strong>la</strong>s piernas en torno a su vientre y sus nalgas deben estar a <strong>la</strong> altura del ombligo, más bajas que sus rodil<strong>la</strong>s<br />
(cuclil<strong>la</strong>s/posición rana).<br />
¡Atención! : Asegúrese de que su bebé no estire <strong>la</strong>s piernas y se apoye sobre el cinturón abdominal (d).<br />
C. TRANSPORTE FRONTAL SIN REDUCTOR (e) (de 6 kg a 12 kg aprox.)<br />
• Abroche el cinturón abdominal (a). Deje caer <strong>la</strong> parte dorsal (d) hacia de<strong>la</strong>nte. Coloque al bebé contra usted de forma que<br />
sus piernas queden a ambos <strong>la</strong>dos de su vientre. Levante con una mano <strong>la</strong> parte dorsal (d) del portabebé y colóque<strong>la</strong><br />
pegada a <strong>la</strong> espalda del bebé. (Figuras 21 y 22).<br />
• Sujetando al bebé con una mano, póngase un tirante (h) con su mano libre. A continuación, sujete al bebé con <strong>la</strong> otra mano<br />
y póngase el segundo tirante (h) (Figura 23).<br />
1. Tirantes no cruzados<br />
• Agarre con sus dos manos <strong>la</strong> hebil<strong>la</strong> de <strong>la</strong> correa dorsal (i) y abróche<strong>la</strong> (Figura 24). El bebé debe tener <strong>la</strong>s piernas en torno<br />
a su vientre y sus nalgas deben estar a <strong>la</strong> altura del ombligo, más bajas que sus rodil<strong>la</strong>s (cuclil<strong>la</strong>s/posición rana)<br />
(Figura 25).<br />
2. Tirantes cruzados<br />
• Desabroche <strong>la</strong>s hebil<strong>la</strong>s de <strong>la</strong> parte inferior de <strong>la</strong> espalda (k) y cruce los tirantes. Vuelva a abrochar <strong>la</strong>s hebil<strong>la</strong>s de <strong>la</strong> parte<br />
inferior de <strong>la</strong> espalda (k). Abroche <strong>la</strong> hebil<strong>la</strong> de <strong>la</strong> correa dorsal (i) (Figura 26).<br />
D. TRANSPORTE EN LA CADERA (de 6 kg a 12 kg aprox.)<br />
• Desabroche <strong>la</strong>s hebil<strong>la</strong>s de <strong>la</strong> parte inferior de <strong>la</strong> espalda (k) y <strong>la</strong>s hebil<strong>la</strong>s de <strong>la</strong>s correas <strong>la</strong>terales (g).<br />
• Abroche el cinturón abdominal (a). Deje caer <strong>la</strong> parte dorsal (d) hacia de<strong>la</strong>nte. Coloque <strong>la</strong> parte dorsal (d) en una de <strong>la</strong>s dos<br />
caderas (Figura 27).<br />
• Coja al bebé e colóquelo sobre su cadera. Extienda <strong>la</strong> parte dorsal (d) sobre <strong>la</strong> espalda del bebé (Figura 28).<br />
• Agarre el tirante correspondiente al <strong>la</strong>do de su cadera. Páselo bajo su brazo y luego por <strong>la</strong> espalda. Abróchelo a <strong>la</strong> hebil<strong>la</strong><br />
situada en <strong>la</strong>do opuesto a su cadera (Figuras 29 y 30).<br />
PORTABEBÉ FISIOLÓGICO • Manual de uso
• Ajuste <strong>la</strong> correa <strong>la</strong>teral (g) en caso necesario (Figura 31).<br />
• Agarre el tirante del <strong>la</strong>do opuesto a <strong>la</strong> cadera donde va el bebé. Páselo por encima de su hombro y por <strong>la</strong> espalda (Figuras<br />
32 y 33).<br />
• Abróchelo a <strong>la</strong> hebil<strong>la</strong> <strong>la</strong>teral del <strong>la</strong>do correspondiente a <strong>la</strong> cadera donde va el bebé (Figura 34). Ajuste <strong>la</strong> correa en caso<br />
necesario (Figura 35).<br />
• Compruebe que el niño esté correctamente insta<strong>la</strong>do (Figura 36).<br />
E. TRANSPORTE EN LA ESPALDA (de 8 kg a 20 kg)<br />
Este modo de transporte está exclusivamente reservado a niños de más edad capaces de agarrarse a su espalda mientras<br />
que usted ajusta el portabebé. Posibilidad de transporte dorsal únicamente a partir de los 10 meses.<br />
• Abroche el cinturón abdominal (a).<br />
• Deje caer <strong>la</strong> parte dorsal (d) hacia de<strong>la</strong>nte.<br />
• Coloque al bebé contra usted de forma que sus piernas queden a ambos <strong>la</strong>dos de su vientre. Levante con una mano <strong>la</strong> parte<br />
dorsal (d) del portabebé. Colóque<strong>la</strong> contra <strong>la</strong> espalda del bebé (Figura 37).<br />
• Mientras sujeta al bebé, gire el cinturón abdominal (d) hasta su cadera. Preste atención a <strong>la</strong> seguridad del niño durante esta<br />
manipu<strong>la</strong>ción (Figura 38).<br />
• Póngase el primer tirante (h)) lo que le ayudará a terminar <strong>la</strong> rotación del cinturón abdominal (d) (Figura 39).<br />
• Inclínese hacia de<strong>la</strong>nte y póngase el segundo tirante (h) sujetando al niño con su mano libre (Figura 40).<br />
• Asegúrese de <strong>la</strong> correcta posición del niño.<br />
• Abroche y ajuste <strong>la</strong> correa dorsal (d) (Figuras 41 y42). Debe encontrarse a <strong>la</strong> altura de <strong>la</strong>s axi<strong>la</strong>s.<br />
1. Utilización del manto anti-UV (m)<br />
F. ACCESORIOS INCLUIDOS<br />
• Antes de insta<strong>la</strong>r al niño, coloque el manto anti-UV (m) sobre <strong>la</strong> parte dorsal (d) (Figura 43).<br />
• Fije los elásticos del borde superior del manto anti-UV (m) a los botones correspondientes (Figura 44). A continuación, anude<br />
el manto anti-UV (m) en torno a su cintura (Figuras 45 y 46).<br />
2. Utilización de <strong>la</strong> capucha integrada anti-UV (n)<br />
• Para una mayor sujeción y protección, puede desplegar <strong>la</strong> capucha anti-UV integrada (n).<br />
• Abra el velcro del borde superior de <strong>la</strong> parte dorsal (d) (Figuras 47 y 48).<br />
• Abroche <strong>la</strong>s ataduras a los botones situados en los tirantes (h) (Figura 49).<br />
Portabebé: 100% algodón<br />
Manto anti-UV: 100% poliéster<br />
Fabricado en China.<br />
Lavado a máquina a 30°.<br />
wInaj<br />
COMPOSICIÓN Y MANTENIMIENTO<br />
PORTABEBÉ FISIOLÓGICO • Manual de uso 29
PT<br />
INSTRUÇÕES DE UTILIZAÇÃO<br />
A. ANTES DE UTILIZAR<br />
1. Insta<strong>la</strong>ção e regu<strong>la</strong>ção do cinto do abdómen (a)<br />
• Para qualquer tipo de posicionamento, é necessário começar pe<strong>la</strong> insta<strong>la</strong>ção do cinto do abdómen (a).<br />
• Posicione a five<strong>la</strong> do cinto do abdómen (a) sobre o seu ventre (Figura 1).<br />
• Passe a five<strong>la</strong> “macho” do cinto do abdómen (b) sob a fita elástica de segurança (Figura 2). Insira a five<strong>la</strong> “macho” na five<strong>la</strong><br />
“fêmea” do cinto do abdómen (c) até ouvir um estalido “clic” (Figuras 3 e 4). .<br />
• Proceda à regu<strong>la</strong>ção da alça em função da sua altura e dobre a parte restante no elástico previsto para o efeito (Figura 5).<br />
• Arranje o cinto do abdómen (a) de forma a posicionar a secção dorsal (d) à sua frente ou sobre a sua anca, em função da<br />
posição escolhida (Figuras 6 e 7).<br />
Atenção! : Nunca se esqueça de fechar a five<strong>la</strong> do cinto do abdómen (a) antes de insta<strong>la</strong>r o bebé. Nunca abra a five<strong>la</strong> do cinto<br />
do abdómen (a) enquanto o bebé se mantiver no porta-bebé.<br />
Para abrir a five<strong>la</strong> do cinto do abdómen, pressione simultaneamente o fecho de segurança da five<strong>la</strong> com a outra mão (Figura<br />
8).<br />
2. Regu<strong>la</strong>ção das correias (h)<br />
Obrigado por ter escolhido o porta-bebé fisiológico BABYMOOV.<br />
Em conformidade com as regras de segurança estabelecidas pe<strong>la</strong> norma NF-EN 13209-2: 2005 e<br />
o caderno de encargos comum dos <strong>la</strong>boratórios participantes.<br />
PARA A SEGURANÇA DO SEU BEBÉ, LEIA ATENTAMENTE ESTE MANUAL DE INSTRUÇÕES.<br />
IMPORTANTE! A CONSERVAR PARA<br />
CONSULTA FUTURA.<br />
• AVISO : O equilíbrio pode ser afetado por qualquer<br />
movimento que a criança possa efetuar.<br />
• AVISO : Não inclinar para a frente sem prec<strong>au</strong>ção.<br />
• AVISO : O porta-bebé não está adaptado para atividades<br />
desportivas.<br />
• AVISO : Não cobrir o rosto e o nariz da criança: risco de<br />
asfixia.<br />
• AVISO : A criança não deve ficar dobrada sobre o peito.<br />
• Antes de cada utilização, certifique-se de que todas as<br />
presilhas, correias e regu<strong>la</strong>ções se encontram em bom<br />
estado.<br />
• Certifique-se de que o bebé pode respirar livremente.<br />
• Posição do bebé: o bebé deve estar na posição<br />
“sentado/agachado”, com as pernas fletidas e os joelhos<br />
mais altos do que as nádegas. O bebé deve apoiar-se estar<br />
apoiado sobre as nádegas e NUNCA SOBRE A ZONA<br />
ENTREPERNAS OU SOBRE OS PÉS. Certifique-se também de<br />
que a posição da cabeça do bebé fica alinhada com a coluna<br />
vertebral.<br />
• Cobrir as extremidades (pés, cabeça) para proteger do sol<br />
ou do frio.<br />
AVISOS<br />
PRECAUÇÕES<br />
• AVISO : O conforto da criança é fundamental. E<strong>la</strong> pode ser<br />
submetida ao tempo e à temperatura antes do transportador.<br />
• AVISO : A criança no porta-bebé pode sentir-se fatigada, pelo<br />
que é aconselhável fazer paragens frequentes e verificar a<br />
insta<strong>la</strong>ção da criança.<br />
• AVISO: Este porta-bebé é destinado a crianças, desde o<br />
nascimento (mínimo de 3,5 kg) e até 18 kg.<br />
• Durante o transporte, permanecer vigi<strong>la</strong>nte: esteja atento<br />
ao comportamento da criança para responder às<br />
necessidades ou proceder aos ajustamentos necessários<br />
no porta-bebé para o bom posicionamento do bebé.<br />
• Nunca desaperte o cinto do ventre enquanto o bebé se<br />
mantiver no porta-bebé.<br />
• Certifique-se de que as correias estão sempre bem apertadas<br />
durante o transporte.<br />
• Não hesite em solicitar ajuda de pessoas com formação no<br />
transporte para obter informações sobre os procedimentos<br />
adequados.<br />
• Antes de utilizar pe<strong>la</strong> primeira vez, regule o comprimento das alças e do cinto do abdómen (a) ) para a sua altura, fazendoas<br />
deslizar. Dobre a parte restante das alças nos elásticos correspondentes (Figuras 9,10 e 11).<br />
30<br />
PORTA-BEBÉ FISIOLÓGICO • Instruções de utilização
3. Regu<strong>la</strong>ção da correia dorsal (i)<br />
• Regule a correia dorsal (i) para o nível pretendido nas costas, tendo o cuidado de a bloquear à altura pretendida nas mo<strong>la</strong>s<br />
de pressão correspondentes (Figura 12).<br />
4. Utilização da extensão do porta-bebé com fecho de correr (f)<br />
• Para segurar o bebé, pode alongar a secção dorsal (d). Abra o fecho de correr na secção dorsal (d) (Figura 13).<br />
• Para reduzir a secção dorsal (d), volte a colocar o fecho de correr no ponto de fecho da extensão (f).<br />
B. TRANSPORTE ENCOSTADO A SI COM REDUTOR (e) (de 3,5 Kg a 6 Kg, aproxim.)<br />
É necessário que os bebés até aos 4 meses segurem a cabeça, com uma postura firme. Certifique-se de que o rosto do bebé fique junto<br />
ao seu. Aperte o cinto do abdómen (a) em redor das suas ancas, para que o cinto fique bem posicionado e de forma confortável.<br />
Atenção! : Mantenha o cinto sempre bem fechado. O redutor (d) ) não foi concebido para segurar o seu bebé sem a utilização<br />
do cinto do abdómen (a).<br />
Atenção! : Segure bem o seu bebé durante todos os movimentos com o porta-bebé.<br />
• Aperte a five<strong>la</strong> do cinto do abdómen (a). EEstenda a secção dorsal (d) do porta-bebé numa superfície firme (Figura 14).<br />
• Deite o bebé no interior da secção dorsal (d).<br />
• Certifique-se de que o pescoço do bebé fica abaixo do rebordo superior da secção dorsal (d). Se necessário, abra a extensão<br />
do porta-bebé com fecho de correr (f) (Figure 13).<br />
• Aperte as mo<strong>la</strong>s de pressão do redutor (d), com o bebé no interior (Figura 15).<br />
• Levante o bebé com a secção dorsal (d) virada para si (Figura 16).<br />
• Sempre segurando o bebé com uma mão, passe uma correia (h) com a outra mão (Figuras 17 e 18). Mantendo o bebé seguro<br />
com a mão, passe a segunda correia (h).<br />
• Segure o bebé contra si, de forma a que as pernas fiquem afastadas e em redor do seu ventre. Com as 2 mãos, segure na<br />
five<strong>la</strong> da correia dorsal (i) e aperte-a (Figuras 19 e 20).<br />
• O bebé deve ter as duas pernas em redor do seu ventre e as nádegas devem ficar à altura do umbigo, mais baixas do que<br />
os joelhos (posição M/rã).<br />
Atenção! : Certifique-se de que o bebé não estica e enrijece as pernas e que não pressiona o cinto do abdómen (d).<br />
C. TRANSPORTE ENCOSTADO A SI SEM REDUTOR (e) (de 6 Kg a 12 Kg, aproxim.)<br />
• Aperte a five<strong>la</strong> do cinto do abdómen (a). Deixe cair a secção dorsal (d) para a frente. Transporte a criança contra si, de forma<br />
a que as pernas fiquem afastadas e em redor do seu ventre. Com uma mão, levante a secção dorsal (d) do porta-bebé e<br />
posicione-a contra as costas do bebé (Figuras 21 e 22).<br />
• Sempre segurando o bebé com uma mão, passe uma correia (h) com a outra mão. Mantendo o bebé seguro com a mão,<br />
passe a segunda correia (h) (Figura 23).<br />
1. Correias não cruzadas<br />
• Com as 2 mãos, segure na five<strong>la</strong> da correia dorsal (i) e aperte-a (Figura 24). O bebé deve ter as duas pernas em redor do<br />
seu ventre e as nádegas devem ficar à altura do umbigo, mais baixas do que os joelhos (posição M/rã) (Figura 25).<br />
2. Correias cruzadas<br />
• Desaperte as five<strong>la</strong>s ao fundo das costas (k) e cruze as correias. Volte a apertar as five<strong>la</strong>s ao fundo das costas (k). Aperte a<br />
five<strong>la</strong> da correia dorsal (i) (Figura 26).<br />
D. TRANSPORTE SOBRE A ANCA (de 6 Kg a 12 Kg, aproxim.)<br />
• Desaperte as five<strong>la</strong>s no fundo das costas (k) a as five<strong>la</strong>s das correias <strong>la</strong>terais (g).<br />
• Aperte a five<strong>la</strong> do cinto do abdómen (a). Deixe cair a secção dorsal (d) para a frente. Coloque a secção dorsal (d) sobre a<br />
anca, no <strong>la</strong>do que pretender (Figura 27).<br />
• Segure na criança e posicione-a sobre a sua anca. Estenda a secção dorsal (d) sobre as costas (Figura 28).<br />
• Segure a correia ao <strong>la</strong>do da sua anca. Passe-a sob os seus braços e depois pe<strong>la</strong>s costas. Aperte-a na five<strong>la</strong> <strong>la</strong>teral oposta<br />
à sua anca (Figuras 29 e 30).<br />
PORTA-BEBÉ FISIOLÓGICO • Instruções de utilização 31
• Se necessário, proceda à regu<strong>la</strong>ção da correia <strong>la</strong>teral (g) (Figura 31).<br />
• Segure a correia oposta à sua anca. Passe-a sobre o ombro e pe<strong>la</strong>s costas (Figuras 32 e 33).<br />
• Aperte a correia na five<strong>la</strong> <strong>la</strong>teral do mesmo <strong>la</strong>do da sua anca (Figura 34). Se necessário, proceda à regu<strong>la</strong>ção da correia<br />
(Figura 35).<br />
• Verifique se a criança fica bem insta<strong>la</strong>da (Figura 36).<br />
32<br />
E. TRANSPORTE ÀS COSTAS (de 8 Kg a 20 Kg)<br />
Este modo de transporte está exclusivamente reservado para as crianças mais velhas, com capacidade para se segurarem<br />
nas suas costas durante a regu<strong>la</strong>ção do porta-bebé. Possibilidade de transportar às costas apenas a partir dos 10 meses de<br />
idade.<br />
• Aperte a five<strong>la</strong> do cinto do abdómen (a).<br />
• Deixe cair a secção dorsal (d) para a sua frente.<br />
• Transporte a criança contra si, de forma a que as pernas fiquem afastadas e em redor do seu ventre. Com uma mão, levante<br />
a secção dorsal (d) do porta-bebé. Posicione-a contra as costas do bebé (Figura 37).<br />
• Sempre segurando a criança, passe o cinto do abdómen (d) em redor da sua anca. Garanta a segurança da criança durante<br />
esta tarefa (Figura 38).<br />
• Passe a primeira correia (h), que vai ajudar a realizar a rotação do cinto do abdómen (d) (Figura 39).<br />
• Dobre-se para a frente e passe a segunda correia (h), sempre segurando a criança com a mão livre (Figura 40).<br />
• Certifique-se de que a criança fica bem posicionada.<br />
• Feche a five<strong>la</strong> e aperte a correia dorsal (d) (Figuras 41 e 42). A correia deve ficar à altura das axi<strong>la</strong>s.<br />
1. Utilização da capa anti-UV (m)<br />
F. ACESSÓRIOS INCLUÍDOS<br />
• Depois de insta<strong>la</strong>r a criança, coloque a capa anti-UV (m) sobre a secção dorsal (d) (Figura 43).<br />
• Fixe os elásticos no rebordo superior da capa anti-UV (m) nas bases correspondentes (Figura 44). Aperte depois a capa anti-<br />
UV (m), a toda a sua altura (Figuras 45 e 46).<br />
2. Utilização do capucho integrado anti-UV (n)<br />
• Para maior cobertura e proteção, pode abrir o capucho anti-UV integrado (n).<br />
• Abra a fita de velcro no rebordo superior da secção dorsal (d) (Figuras 47 e 48).<br />
• Prenda os atilhos nas bases situadas nas correias (h) (Figura 49).<br />
Porta-bebé: 100% algodão<br />
Capa anti-UV: 100% poliéster<br />
Fabricado na China.<br />
Lavagem na máquina a 30° C.<br />
wInaj<br />
COMPOSIÇÃO E LIMPEZA<br />
PORTA-BEBÉ FISIOLÓGICO • Instruções de utilização
IT<br />
ISTRUZIONI PER L'USO<br />
A. PRIMA DELL’UTILIZZO<br />
1. Instal<strong>la</strong>zione e rego<strong>la</strong>zione del<strong>la</strong> cintura addominale (a)<br />
• Per qualsiasi posizione è necessario iniziare dall’instal<strong>la</strong>zione del<strong>la</strong> cintura addominale (a).<br />
• Posizionare <strong>la</strong> fibbia del<strong>la</strong> cintura addominale (a) sul ventre (Figura 1).<br />
• Far passare <strong>la</strong> fibbia maschio del<strong>la</strong> cintura addominale (b) sotto <strong>la</strong> fascia e<strong>la</strong>stica di sicurezza (Figura 2). Inserir<strong>la</strong> nel<strong>la</strong> fibbia<br />
femmina del<strong>la</strong> cintura addominale (c) fino a quando si udirà un “clic”. (Figure 3 e 4). .<br />
• Procedere al<strong>la</strong> rego<strong>la</strong>zione del<strong>la</strong> correggia in funzione del<strong>la</strong> taglia e ripiegare l’eccedenza all’interno dell’apposito e<strong>la</strong>stico (Figura 5).<br />
• Girare quindi <strong>la</strong> cintura addominale (a) in modo tale da posizionare <strong>la</strong> parte dorsale (d) davanti a voi oppure sull’anca, a seconda<br />
del<strong>la</strong> posizione scelta. (Figure 6 e 7).<br />
Attenzione! : Verificate sempre di bloccare <strong>la</strong> fibbia del<strong>la</strong> cintura addominale (a) prima di inserire il bambino nel marsupio.<br />
Non aprite mai <strong>la</strong> fibbia del<strong>la</strong> cintura addominale (a) quando il bambino si trova ancora nel marsupio.<br />
Per aprire <strong>la</strong> fibbia del<strong>la</strong> cintura addominale, premete contemporaneamente <strong>la</strong> sicurezza situata sul<strong>la</strong> medesima con l'altra mano<br />
(Figura 8).<br />
2. Rego<strong>la</strong>zione delle bretelle (h)<br />
Grazie per aver scelto il porta-bebè fisiologico BABYMOOV.<br />
Conforme alle norme di sicurezza NF-EN 13209-2: 2005 e al capito<strong>la</strong>to tecnico comune<br />
dei <strong>la</strong>boratori <strong>au</strong>torizzati.<br />
PER LA SICUREZZA DEL VOSTRO BEBÈ SI PREGA DI LEGGERE ATTENTAMENTE<br />
IL PRESENTE MANUALE DI ISTRUZIONI.<br />
IMPORTANTE! DA CONSERVERE PER<br />
EVENTUALI ULTERIORI CONSULTAZIONI.<br />
• AVVERTENZE : L’equilibrio del<strong>la</strong> persona può essere<br />
compromesso da qualsivoglia eventuale movimento del<strong>la</strong><br />
medesima e del bambino.<br />
• AVVERTENZE : Sporgersi in avanti con <strong>la</strong> massima<br />
prec<strong>au</strong>zione.<br />
• AVVERTENZE : Il marsupio porta-bebè non è adatto alle<br />
attività sportive.<br />
• AVVERTENZE : Non coprire il viso e il naso del bambino:<br />
rischio di soffocamento.<br />
• Prima di ciascun utilizzo, assicurarsi che attacchi, cinghie e<br />
rego<strong>la</strong>zioni siano in perfette condizioni.<br />
• Control<strong>la</strong>re che il bambino riesca a respirare liberamente.<br />
• Posizione del bebè: Il bebè deve essere in posizione<br />
"seduta/accovacciata", con le gambe flesse e le ginocchia<br />
più alte rispetto alle anche. Deve poggiare sulle anche e MAI<br />
SU CAVALLO O PIEDI. Prestate attenzione a che <strong>la</strong> testa del<br />
bebè si trovi in asse rispetto al<strong>la</strong> colonna vertebrale.<br />
• Coprire le estremità (piedi, testa) per proteggerle dal sole o<br />
dal freddo.<br />
AVVERTENZE<br />
PRECAUZIONI<br />
• AVVERTENZE : Il bambino non deve essere ripiegato sul<br />
proprio petto.<br />
• AVVERTENZE : lIl comfort del bambino è fondamentale.<br />
Potrebbe subire le condizioni meteo e <strong>la</strong> temperatura prima<br />
di chi lo trasporta.<br />
• AVVERTENZE : Il bambino potrebbe affaticarsi quando viene<br />
trasportato nel marsupio. Si consiglia quindi di fare fermate<br />
frequenti e di verificare <strong>la</strong> sistemazione del piccolo.<br />
• AVVERTENZE : Questo marsupio è ideato per i bambini dal<strong>la</strong><br />
nascita (minimo 3.5 kg) e fino ai 18 kg.<br />
• Mentre indossate il marsupio, prestate attenzione: al<br />
comportamento del bambino al fine di essere in grado di<br />
rispondere alle sue esigenze o di rego<strong>la</strong>re opportunamente<br />
il marsupio per mantenere <strong>la</strong> corretta posizione del piccolo.<br />
• A non staccare mai <strong>la</strong> cintura addominale quando il piccolo<br />
si trova ancora all'interno del marsupio.<br />
• Assicuratevi che le cinghie siano ben in tensione mentre<br />
indossate il marsupio.<br />
• Non esitate a chiedere aiuto a una persona esperta<br />
nell’utilizzo del marsupio che possa aiutarvi ad acquisire <strong>la</strong><br />
giusta padronanza nei gesti.<br />
• Prima del primo utilizzo, rego<strong>la</strong>re <strong>la</strong> lunghezza delle corregge e del<strong>la</strong> cintura addominale (a) facendole scorrere in base al<strong>la</strong><br />
vostra taglia. Ripiegate l’eccesso delle corregge all’interno degli appositi e<strong>la</strong>stici (Figure 9,10 e 11).<br />
MARSUPIO PORTA BEBÈ FISIOLOGICO • Istruzioni per l’uso 33
3. Rego<strong>la</strong>zione del<strong>la</strong> cinghia dorsale (i)<br />
• Rego<strong>la</strong>te <strong>la</strong> cinghia dorsale (i) all’altezza desiderata sul<strong>la</strong> schiena, avendo cura di bloccar<strong>la</strong> all'altezza scelta tra le re<strong>la</strong>tive clip<br />
(Figura 12).<br />
4. Utilizzo dell’estensione del porta-bebè con cerniera (f)<br />
• Per tenere il bambino, potete estendere <strong>la</strong> parte dorsale (d). Aprite <strong>la</strong> cerniera posizionata sul<strong>la</strong> parte dorsale (d) (Figura 13).<br />
• Per ridurre <strong>la</strong> parte dorsale (d), riposizionate <strong>la</strong> cerniera sul<strong>la</strong> chiusura dell’estensione (f).<br />
34<br />
B. UTILIZZO FRONTE MAMMA CON RIDUTTORE (e) (da 3.5 Kg a 6 Kg circa)<br />
Per i neonati dal<strong>la</strong> nascita ai 4 mesi è necessario sostenere <strong>la</strong> testa. Control<strong>la</strong>te che il viso del bambino sia ben visibile.<br />
Chiudete <strong>la</strong> cintura addominale (a) stringendo<strong>la</strong> attorno alle anche in modo tale che sia correttamente e comodamente posizionata.<br />
Attenzione! : Tenete<strong>la</strong> sempre ben chiusa. Il riduttore (d) ) non è ideato per tenere il bebè indipendentemente dal<strong>la</strong> cintura<br />
addominale (a).<br />
Attenzione! : Fate attenzione a tenere sempre ben saldo il vostro bambino durante qualsiasi manipo<strong>la</strong>zione nel marsupio.<br />
• Al<strong>la</strong>cciate <strong>la</strong> fibbia del<strong>la</strong> cintura addominale (a). Estendete <strong>la</strong> parte dorsale (d) du porte-bébé sur une surface sure (Figura<br />
14).<br />
• Stendete il bambino all’interno del<strong>la</strong> parte dorsale (d).<br />
• Verificate che il collo del bambino si trovi al di sotto del bordo superiore del<strong>la</strong> parte dorsale (d). Se necessario, aprite l’estensione<br />
del porta-bebè con cerniera (f) (Figura 13).<br />
• Chiudete le clip del riduttore (d) con il bambino al suo interno (Figura 15).<br />
• Sollevate il bambino con <strong>la</strong> parte dorsale (d) rivolta verso di voi (Figura 16).<br />
• Tenendo il bambino con una mano, infi<strong>la</strong>te una bretel<strong>la</strong> (h) avvalendovi del<strong>la</strong> mano libera (Figure 17 e 18). Quindi tenete il bambino<br />
con l’altra mano e infi<strong>la</strong>te <strong>la</strong> seconda bretel<strong>la</strong> (h).<br />
• Tenete il bambino appoggiato contro di voi in modo tale che le sue gambe si trovino una da una parte e una dall’altra rispetto<br />
al vostro addome. Afferrate con 2 mani <strong>la</strong> fibbia del<strong>la</strong> cinghia dorsale (i) e fermate<strong>la</strong> (Figure 19 e 20).<br />
• Il bebè deve avere le gambe attorno al vostro addome e le sue anche devono essere all'altezza dell'ombelico, più basse rispetto<br />
alle ginocchia (posizione M/ranocchio).<br />
Attenzione! : Verificate che il bambino non raddrizzi le gambe e non spinga sul<strong>la</strong> cintura addominale (d).<br />
C. UTILIZZO FRONTE MAMMA SENZA RIDUTTORE (e) (da 6 Kg a 12 Kg circa)<br />
• Al<strong>la</strong>cciate <strong>la</strong> fibbia del<strong>la</strong> cintura addominale (a). Lasciate penzo<strong>la</strong>re <strong>la</strong> parte dorsale (d) in avanti. Appoggiate il bambino contro<br />
di voi in modo tale che le sue gambe si trovino una da una parte e una dall’altra rispetto al vostro addome. Sollevate con una<br />
mano <strong>la</strong> parte dorsale (d) del marsupio e posizionate<strong>la</strong> contro <strong>la</strong> schiena del bambino (Figure 21 e 22).<br />
• Tenendo il bambino con una mano, infi<strong>la</strong>te una bretel<strong>la</strong> (h) avvalendovi del<strong>la</strong> mano libera. Quindi tenete il bambino con<br />
l’altra mano e infi<strong>la</strong>te <strong>la</strong> seconda bretel<strong>la</strong> (h) (Figura 23).<br />
1. Bretelle non incrociate<br />
• Afferrate con 2 mani <strong>la</strong> fibbia del<strong>la</strong> cinghia dorsale (i) e fermate<strong>la</strong> (Figura 24). Il bebè deve avere le gambe attorno al vostro<br />
addome e le sue anche devono essere all'altezza dell'ombelico, più basse rispetto alle ginocchia (posizione M/ranocchio)<br />
(Figura 25).<br />
2. Bretelle incrociate<br />
• Staccate le fibbie dal<strong>la</strong> parte inferiore del<strong>la</strong> schiena (k) e incrociate le bretelle. Rial<strong>la</strong>cciate le fibbie dal<strong>la</strong> parte inferiore del<strong>la</strong><br />
schiena (k). Al<strong>la</strong>cciate <strong>la</strong> fibbia del<strong>la</strong> cinghia dorsale (i) (Figura 26).<br />
D. UTILIZZO SULLE ANCHE (da 6 Kg a 12 Kg circa)<br />
• Staccate le fibbie dal<strong>la</strong> parte inferiore del<strong>la</strong> schiena (k) e le fibbie delle cinghie <strong>la</strong>terali (g).<br />
• Al<strong>la</strong>cciate <strong>la</strong> fibbia del<strong>la</strong> cintura addominale (a). Lasciate penzo<strong>la</strong>re <strong>la</strong> parte dorsale (d) in avanti. Posizionate <strong>la</strong> parte dorsale<br />
(d) sull’anca che preferite (Figura 27).<br />
• Prendete il bambino e sistematelo sul<strong>la</strong> vostra anca. Estendete <strong>la</strong> parte dorsale (d) sul<strong>la</strong> sua schiena (Figura 28).<br />
MARSUPIO PORTA BEBÈ FISIOLOGICO • Istruzioni per l’uso
• Afferrate <strong>la</strong> bretel<strong>la</strong> dal<strong>la</strong> parte dell'anca. Fate<strong>la</strong> passare sotto il braccio quindi sul<strong>la</strong> schiena. Al<strong>la</strong>cciate<strong>la</strong> sul<strong>la</strong> fibbia <strong>la</strong>terale<br />
opposta all’anca (Figure 29 e 30).<br />
• Procedete a rego<strong>la</strong>re <strong>la</strong> fibbia <strong>la</strong>terale (g) se necessario (Figura 31).<br />
• Afferrate <strong>la</strong> bretel<strong>la</strong> opposta dell'anca. Fate<strong>la</strong> passare sopra <strong>la</strong> spal<strong>la</strong> e quindi sul<strong>la</strong> schiena (Figure 32 e 33).<br />
• Al<strong>la</strong>cciate<strong>la</strong> al<strong>la</strong> fibbia <strong>la</strong>terale sullo stesso <strong>la</strong>to dell’anca (Figura 34). Procedete a rego<strong>la</strong>re <strong>la</strong> fibbia se necessario<br />
(Figura 35).<br />
• Verificate che il bambino sia correttamente posizionato (Figura 36).<br />
E. UTILIZZO SULLA SCHIENA (da 8 Kg a 20 Kg circa)<br />
Questa modalità è riservata ai bambini più grandi in grado di tenersi stretti al<strong>la</strong> vostra schiena mentre rego<strong>la</strong>te il marsupio.<br />
È possibile indossare il marsupio sul<strong>la</strong> schiena soltanto a partire dei 10 mesi.<br />
• Al<strong>la</strong>cciate <strong>la</strong> fibbia del<strong>la</strong> cintura addominale (a).<br />
• Lasciate penzo<strong>la</strong>re <strong>la</strong> parte dorsale (d) in avanti.<br />
• Appoggiate il bambino contro di voi in modo tale che le sue gambe si trovino una da una parte e una dall’altra rispetto al vostro<br />
addome. Sollevate con una mano <strong>la</strong> parte dorsale (d) del marsupio. Posizionate<strong>la</strong> contro <strong>la</strong> schiena del bambino (Figura 37).<br />
• Tenendo stretto il bambino, fate girare <strong>la</strong> cintura addominale (d) aattorno all’anca. Assicuratevi che il bambino sia sicuro prima<br />
di procedere a questa operazione (Figura 38).<br />
• Infi<strong>la</strong>te <strong>la</strong> prima bretel<strong>la</strong> (h) che vi aiuterà a concludere <strong>la</strong> rotazione del<strong>la</strong> cintura addominale (d) (Figura 39).<br />
• Sporgetevi in avanti, quindi infi<strong>la</strong>te <strong>la</strong> seconda bretel<strong>la</strong> (h) tenendo il bambino con <strong>la</strong> mano libera (Figura 40).<br />
• Verificate che il bambino sia correttamente posizionato.<br />
• Al<strong>la</strong>cciate <strong>la</strong> fibbia del<strong>la</strong> cinghia dorsale (d) (Figure 41 e 42). Deve essere all’altezza delle ascell.<br />
1. Utilizzo del<strong>la</strong> mantellina anti-uv (m)<br />
F. ACCESSORI PREVISTI<br />
• Dopo aver inserito il bambino nel marsupio, posizionate <strong>la</strong> mantellina anti-uv (m) sul<strong>la</strong> parte dorsale (d) (Figura 43).<br />
• Fissate gli e<strong>la</strong>stici sul bordo superiore del<strong>la</strong> mantellina anti-uv (m) ai re<strong>la</strong>tivi bottoni (Figura 44). Al<strong>la</strong>cciatevi quindi <strong>la</strong> mantellina<br />
anti-uv (m) in vita (Figure 45 e 46).<br />
2. Utilizzo del cappuccio integrato anti-uv (n)<br />
• Per una maggiore protezione potete aprire il cappuccio anti-uv integrato (n).<br />
• Aprite lo scratch sul<strong>la</strong> parte superiore del<strong>la</strong> parte dorsale (d) (Figure 47 e 48).<br />
• Al<strong>la</strong>cciate i <strong>la</strong>cci ai bottoni situati sulle bretelle (h) (Figura 49).<br />
Marsupio Porta Bebè: 100% cotone<br />
Mantellina anti-uv: 100% poliestere<br />
Prodotto in Cina.<br />
Lavabile in <strong>la</strong>vatrice a 30°.<br />
wInaj<br />
COMPOSIZIONE E MANUTENZIONE<br />
MARSUPIO PORTA BEBÈ FISIOLOGICO • Istruzioni per l’uso 35
CZ<br />
1. Insta<strong>la</strong>ce a nastavení břišního pásu (a)<br />
NÁVOD K POUŽITÍ<br />
A. PŘED POUŽITÍM<br />
• Pro tento typ pozice je třeba začít insta<strong>la</strong>cí břišního pásu (a).<br />
• Umístěte přezku břišního pásu (a) na břicho (Obrázek 1).<br />
• Prostrčte levou přezku břišního pásu (b) pod e<strong>la</strong>stickým bezpečnostním popruhem (Obrázek 2). Vložte do pravé přezky<br />
břišního pásu (c) tak, abyste slyšeli zak<strong>la</strong>pnutí (Obrázky 3 a 4). .<br />
• Nastavte řemen podle vaší výšky a nadbytečné množství složte do gumičky určené k tomuto účelu (Obrázek 5).<br />
• Otočte nyní břišní pás (a) tak, abyste umístili zádovou část (d) před sebe, nebo na bok, dle zvolené pozice (Obrázky 6 a 7).<br />
Pozor! : Dbejte na to, abyste vždy zavřeli břišní pás (a) dříve, než umístíte do nosítka dítě. Nikdy neotevírejte přezku břišního pásu<br />
(a), pokud je dítě ještě v nosítku.<br />
Pro otevření přezky břišního pásu stiskněte zároveň druhou rukou bezpečnostní pojistku umístěnou na samotném pásu (Obrázek 8).<br />
2. Nastavení popruhů (h)<br />
• Před prvním použitím nastavte délku řemenů a břišního pásu (a) na vaši výšku pouhým posunutím. Složte přebytečný řemen<br />
do gumiček, které se nacházejí na jeho koncích (Obrázky 9,10 a 11).<br />
3. Nastavení zádového pásu (i)<br />
Děkujeme, že jste si vybrali fyziologické nosítko BABYMOOV.<br />
Splňuje bezpečnostní podmínky dle referenciálu NF-EN 13209-2 : 2005 a zadávací dokumentace<br />
společné pro certifikované <strong>la</strong>boratoře.<br />
Z DŮVODU BEZPEČNOSTI VAŠEHO DÍTĚTE SI PŘEČTĚTE PEČLIVĚ TENTO NÁVOD K POUŽITÍ.<br />
DŮLEŽITÉ! USCHOVEJTE SI JEJ PRO<br />
POZDĚJŠÍ POUŽITÍ.<br />
• UPOZORNĚNÍ : Rovnováha osoby může být narušena<br />
jakýmkoliv jejím pohybem nebo pohybem dítěte.<br />
• UPOZORNĚNÍ : Předklánějte se pouze s největší opatrností.<br />
• UPOZORNĚNÍ : Nosítko není vhodné pro sportovní aktivity.<br />
• UPOZORNĚNÍ : Nezakrývejte dítěti obličej a nos: riziko<br />
udušení.<br />
• UPOZORNĚNÍ : Dítě nesmí být ohnuté v ob<strong>la</strong>sti hrudníku.<br />
• Před každým použitím se ujistěte, že všechny úchyty, popruhy<br />
a nastavení jsou v dobrém stavu.<br />
• Dbejte na to, aby dítě mohlo dobře dýchat.<br />
• Pozice dítěte: Vaše dítě musí být v pozici "vsedě/v podřepu",<br />
nohy pokrčené, kolena výše než hýždě. Musí se opírat o hýždě<br />
a NIKDY O MEZINOŽÍ NEBO NOHY. Dbejte na to, aby h<strong>la</strong>vička<br />
dítěte by<strong>la</strong> v ose páteře.<br />
• Přikryjte koncové části tě<strong>la</strong> (nohy, h<strong>la</strong>va) kvůli ochraně před<br />
sluncem nebo zimou.<br />
UPOZORNĚNÍ<br />
UPOZORNĚNÍ<br />
• UPOZORNĚNÍ : Zásadní je pohodlí dítěte Nepříjemnosti<br />
spojené s časem a teplotou může pociťovat dříve než osoba,<br />
která jej nese.<br />
• UPOZORNĚNÍ : Dítě se v nosítku může cítit unavené,<br />
doporučuje se dě<strong>la</strong>t časté p<strong>au</strong>zy a pravidelně kontrolovat<br />
pozici dítěte.<br />
• UPOZORNĚNÍ : Toto nosítko je určeno dětem od narození<br />
(minim. 3,5 kg) do hmotnosti 18 kg.<br />
• Během nošení buďte obezřetní: dávejte pozor na chování<br />
dítěte, abyste dokázali reagovat na jeho potřeby nebo upravili<br />
nosítko tak, aby dítě bylo umístěno ve správné pozici.<br />
• Nikdy neodepínejte břišní pás, pokud se dítě nachází ještě<br />
uvnitř nosítka.<br />
• Ujistěte se, že popruhy jsou během nošení dítěte správně<br />
napnuté.<br />
• Neváhejte požádat o pomoc kvalifikovanou osobu, která vám<br />
poskytne potřebné rady ohledně bezpečnosti.<br />
• Nastavte zádový pás (i) na požadovanou úroveň na zádech, dejte pozor, abyste jej zablokovali ve zvolené výšce mezi<br />
odpovídajícími patentkami (Obrázek 12 ).<br />
36<br />
FYZIOLOGICKÉ DĚTSKÉ NOSÍTKO • Návod k použití
4. Používání rozšíření nosítka na zip (f)<br />
• Pro upevnění vašeho dítěte můžete zádovou část (d). roztáhnout. Rozepněte zip umístěný na zádové části (d) (Obrázek 13).<br />
• Pro zmenšení zádové části (d) zapněte zip rozšíření (f).<br />
B. NOŠENÍ NA BŘÍŠE S REDUKTOREM (e) (od 3,5 kg do cca 6 kg)<br />
Je třeba, aby novorozenci a děti do 4 měsíců měli podepřenou h<strong>la</strong>vičku. Dbejte na to, aby obličej dítěte byl na dosah vašeho obličeje. Upevněte<br />
břišní pás (a) okolo boků tak, aby byl pás dobře a pohodlně umístěný.<br />
Pozor! : Pás musí být stále dobře zapnutý. Reduktor (d) ) není vytvořen tak, aby byl schopný dítě udržet nezávisle na břišním pásu<br />
(a).<br />
Pozor! : Dbejte na to, aby dítě během všech manipu<strong>la</strong>cí bylo dobře umístěné v nosítku.<br />
• Zapněte břišní pás (a). Rozložte zádovou část (d) nosítka na bezpečném povrchu (Obrázek 14).<br />
• Položte dítě do zádové části (d).<br />
• Dejte pozor, aby se krk dítěte nacházel pod horním okrajem zádové části (d). Pokud je třeba, rozepněte rozšíření nosítka (f)<br />
(Obrázek 13).<br />
• Zacvakněte patentky reduktoru (d), dítě se nachází uvnitř (Obrázek 15).<br />
• Zvedněte dítě se zádovou částí (d) směrem k sobě (Obrázek 16).<br />
• Dítě jednou rukou přidržujte a volnou rukou protáhněte popruh (h) (Obrázek 17 a 18). Poté dítě přidržujte druhou rukou a<br />
protáhněte druhý popruh (h).<br />
• Dítě držte na sobě tak, aby svýma nožičkama obepínalo z obou stran vaše břicho. Chytněte oběma rukama přezku zádového<br />
pásu (i) a zapněte ji (Obrázky 19 a 20).<br />
• Vaše dítě musí mít nožičky okolo vašeho břicha a hýždě v úrovni vašeho pupku, níže než kolena (pozice M / žába).<br />
Pozor! : Dejte pozor, aby dítě nezatínalo nohy a net<strong>la</strong>čilo na břišní pás (d).<br />
C. NOŠENÍ NA BŘÍŠE BEZ REDUKTORU (e) (od 6 kg do cca 12 kg)<br />
• Zapněte břišní pás (a). Nechte zádovou část (d) viset dopředu. Dítě držte na sobě tak, aby svýma nožičkama obepínalo z<br />
obou stran vaše břicho. Jednou rukou zvedněte zádovou část (d) nosítka a umístěte ji na záda dítěte (Obrázky 21 a 22).<br />
• Dítě jednou rukou přidržujte a volnou rukou protáhněte popruh (h) Poté dítě přidržujte druhou rukou a protáhněte druhý popruh<br />
(h) (Obrázek 23).<br />
1. Nepřekřížené popruhy<br />
• Chytněte oběma rukama přezku zádového pásu (i) a připoutejte ji (Obrázek 24). Vaše dítě musí mít nožičky okolo vašeho břicha<br />
a hýždě v úrovni vašeho pupku, níže než kolena (pozice M / žába) (Obrázek 25).<br />
2. Překřížené popruhy<br />
• Rozepněte přezku na spodní části zad (k) a překřižte popruhy. Zapněte znovu přezky ve spodní části zad (k). Zapněte přezku<br />
zádového pásu (i) (Obrázek 26).<br />
D. NOŠENÍ NA BOKU (od 6 kg do cca 12 kg)<br />
• Rozepněte přezku ve spodní části zad (k) a přezky postranních pásů (g).<br />
• Zapněte břišní pás (a). Nechte zádovou část (d) viset dopředu. Umístěte zádovou část (d) na vámi zvolený bok (Obrázek 27).<br />
• Vezměte dítě a umístěte jej na bok. Položte zádovou část (d) na záda dítěte (Obrázek 28).<br />
• TUchopte popruh po straně boku. Prostrčte jej pod rukou a poté na záda. Zapněte do postranní přezky umístěné na opačném<br />
boku (Obrázek 29-30).<br />
• Nastavte postranní popruh (g), pokud je třeba (Obrázek 31).<br />
• Uchopte popruh na opačném boku. Prostrčte jej nad ramenem a na záda (Obrázek 32-33).<br />
• Zapněte jej do postranní přezky na boku s dítětem (Obrázek 34). Nastavte postranní popruh, pokud je třeba (Obrázek 35).<br />
• Zkontrolujte správné umístění dítěte (Obrázek 36).<br />
FYZIOLOGICKÉ DĚTSKÉ NOSÍTKO • Návod k použití 37
38<br />
E. NOŠENÍ NA ZÁDECH (od 8 kg do 20 kg)<br />
Tento způsob nošení je vyhrazen pouze pro starší děti, které jsou schopné se vás držet za záda při nastavování nosítka. Na<br />
zádech můžete nosit pouze děti starší 10 měsíců.<br />
• Zapněte břišní pás (a).<br />
• Nechte zádovou část (d) viset před sebou.<br />
• Dítě držte na sobě tak, aby svýma nožičkama obepínalo z obou stran vaše břicho. Jednou rukou zvedněte zádovou část (d) nosítka.<br />
Umístěte ji na záda dítěte (Obrázek 37).<br />
• Dítě přidržujte a obtočte břišní pás (d) okolo vašeho boku. Ujistěte se, že během této manipu<strong>la</strong>ce je vaše dítě v bezpečí<br />
(Obrázek 38).<br />
• Protáhněte první popruh (h) ), který vám pomůže dokončit rotaci břišního pásu (d) (Obrázek 39).<br />
• Předkloňte se a protáhněte druhý popruh (h) dítě neustále přidržujte volnou rukou (Obrázek 40).<br />
• Ujistěte se, že je dítě ve správné pozici.<br />
• Zapněte a utáhněte zádový popruh (d) (Obrázky 41 a 42). Musí být ve výšce podpaží.<br />
1. Používání ochrany proti uv záření (m)<br />
F. PŘÍSLUŠENSTVÍ<br />
• Jakmile dítě umístíte do nosítka, přehoďte přes zádovou část (m) ochranu proti uv záření (d) (Figure 43).<br />
• Upevněte gumičky na horním okraji ochrany proti uv záření (m) a příslušné knoflíky (Obrázek 44). Poté si ochranu proti uv záření<br />
zavažte okolo pasu (m) (Obrázky 45 a 46).<br />
2. Používání kapuce proti uv záření (n)<br />
• Pro lepší držení a větší ochranu můžete rozbalit integrovanou kapuci proti uv záření (n).<br />
• Rozepněte scratch na horní straně zádové části (d) (Obrázky 47 a 48).<br />
• Zapněte poutka na knoflíky umístěné na popruzích (h) (Obrázek 49).<br />
Nosítko: 100% bavlna<br />
Kapuce proti uv záření: 100% polyester<br />
Vyrobeno v Číně.<br />
Praní v pračce na 30°.<br />
wInaj<br />
SLOŽENÍ A ÚDRŽBA<br />
FYZIOLOGICKÉ DĚTSKÉ NOSÍTKO • Návod k použití
Bon de garantie à vie<br />
(à renvoyer dans les 15 jours suivant l’achat)<br />
❐ Oui, je souhaite garantir à vie mon produit <strong>Babymoov</strong> et je vous joins une copie de<br />
mon ticket de caisse (OBLIGATOIRE). Sans ce<strong>la</strong>, nous ne pourrons garantir à vie<br />
votre achat.<br />
❐ Oui, je souhaite recevoir <strong>la</strong> Moovletter, lettre d’in<strong>format</strong>ion électronique sur les<br />
nouve<strong>au</strong>tés et <strong>la</strong> société <strong>Babymoov</strong>. Merci de bien remplir votre adresse e-mail.<br />
Nom des parents : . . . . . . . . . . . . . . . . . . . . . . . . . . . . . . . . . . . . . . . . . . . . . . . . . . . . . . . . . . . . . . . . . . . . . . .<br />
Prénoms des parents : . . . . . . . . . . . . . . . . . . . . . . . . . . . . . . . . . . . . . . . . . . . . . . . . . . . . . . . . . . . . . . . . . . . .<br />
Adresse : . . . . . . . . . . . . . . . . . . . . . . . . . . . . . . . . . . . . . . . . . . . . . . . . . . . . . . . . . . . . . . . . . . . . . . . . . . . . . .<br />
. . . . . . . . . . . . . . . . . . . . . . . . . . . . . . . . . . . . . . . . . . . . . . . . . . . . . . . . . . . . . . . . . . . . . . . . . . . . . . . . . . . . . .<br />
Code Postal / Ville : . . . . . . . . . . . . . . . . . . . . . . . . . . . . . . . . . . . . . . . . . . . . . . . . . . . . . . . . . . . . . . . . . . . . . .<br />
N° de téléphone : . . . . . . . . . . . . . . . . . . . . . . . . . . . . . . . . . . . . . . . . . . . . . . . . . . . . . . . . . . . . . . . . . . . . . . . .<br />
E-mail : . . . . . . . . . . . . . . . . . . . . . . . . . . . . . . . . . . . . . . . . . . . . . . . . . . . . . . . . . . . . . . . . . . . . . . . . . . . . . . . .<br />
Prénoms de vos enfants : . . . . . . . . . . . . . . . . . . . . . . . . . . . . . . . . . . . . . . . . . . . . . . . . . . . . . . . . . . . . . . . . .<br />
Dates de naissance : . . . . . . . . . . . . . . . . . . . . . . . . . . . . . . . . . . . . . . . . . . . . . . . . . . . . . . . . . . . . . . . . . . . . .<br />
Nom du produit acheté : . . . . . . . . . . . . . . . . . . . . . . . . . . . . . . . . . . . . . . . . . . . . . . . . . . . . . . . . . . . . . . . . . .<br />
Référence : . . . . . . . . . . . . . . . . . . . . . . . . . . . . . . . . . . . . . . . . . . . . . . . . . . . . . . . . . . . . . . . . . . . . . . . . . . . . .<br />
N° de code barre (obligatoire) : . . . . . . . . . . . . . . . . . . . . . . . . . . . . . . . . . . . . . . . . . . . . . . . . . . . . . . . . . . . . .<br />
Date de l’achat : . . . . . . . . . . . . . . . . . . . . . . . . . . . . . . . . . . . . . . . . . . . . . . . . . . . . . . . . . . . . . . . . . . . . . . . .<br />
Lieu de l’achat : . . . . . . . . . . . . . . . . . . . . . . . . . . . . . . . . . . . . . . . . . . . . . . . . . . . . . . . . . . . . . . . . . . . . . . . . .<br />
Votre opinion sur <strong>la</strong> qualité du produit : M<strong>au</strong>vaise 1 2 3 4 5 très bonne<br />
Combien de produits <strong>Babymoov</strong> avez-vous déjà acheté ?<br />
1 2 3 4 5 6 7 8 <strong>au</strong>tre : . . . . . . . . . . . . . . . . . . . . . . . . . . . . . . . . . . . . . . . . . . . . . . . . . . . . . . . . . . . . . . . . .<br />
Avez-vous des commentaires sur ce produit ?<br />
. . . . . . . . . . . . . . . . . . . . . . . . . . . . . . . . . . . . . . . . . . . . . . . . . . . . . . . . . . . .<br />
. . . . . . . . . . . . . . . . . . . . . . . . . . . . . . . . . . . . . . . . . . . . . . . . . . . . . . . . . . . .<br />
Avez-vous une idée d’un produit génial<br />
à créer pour bébé ?<br />
. . . . . . . . . . . . . . . . . . . . . . . . . . . . . . . . . . . . . . . . . . . . . . . . . . . . .<br />
. . . . . . . . . . . . . . . . . . . . . . . . . . . . . . . . . . . . . . . . . . . . . . . . . . . . .<br />
. . . . . . . . . . . . . . . . . . . . . . . . . . . . . . . . . . . . . . . . . . . . . . . . . . . . .<br />
* Garantie à vie. Cette garantie est soumise à<br />
conditions. Va<strong>la</strong>ble en France. Liste des <strong>au</strong>tres<br />
pays concernés, activation et renseignements<br />
en ligne à l'adresse suivante :<br />
www.service-babymoov.com<br />
* sous réserve d’une utilisation conforme à <strong>la</strong> <strong>notice</strong>. La garantie à vie ne couvre pas les détériorations dues à une utilisation anormale, le textile, les consommables (sucettes,<br />
ampoules…), <strong>la</strong> sérigraphie, l’usure normale de certains éléments comme le p<strong>la</strong>stique, le rou<strong>la</strong>nt...<br />
• Nous vous rappelons que vous disposez d'un droit d'accès, de modification, de rectification et de suppression des données qui vous concernent (art. 34 de <strong>la</strong> loi "In<strong>format</strong>ique<br />
et Libertés" du 6 janvier 1978). Pour exercer ce droit, adressez-vous à <strong>Babymoov</strong> - Parc Industriel des Gravanches - 16, rue Jacqueline Auriol - 63051 Clermont-Ferrand cedex 2.<br />
• Les in<strong>format</strong>ions qui vous concernent sont destinées à <strong>Babymoov</strong>. Nous pouvons être amenés à les transmettre à des tiers (partenaires commerci<strong>au</strong>x, etc).<br />
Le souhaitez-vous ? Oui ❒ Non ❒<br />
Photographies et illustrations non contractuelles A057211-Manual-Artwork-01