Epson Stylus® NX230 - Start Here
Epson Stylus® NX230 - Start Here
Epson Stylus® NX230 - Start Here

You also want an ePaper? Increase the reach of your titles
YUMPU automatically turns print PDFs into web optimized ePapers that Google loves.
®<br />
<strong>Epson</strong> Stylus<br />
TM/MC<br />
Small-in-One<br />
<strong>NX230</strong><br />
<strong>Start</strong> <strong>Here</strong><br />
Point de départ<br />
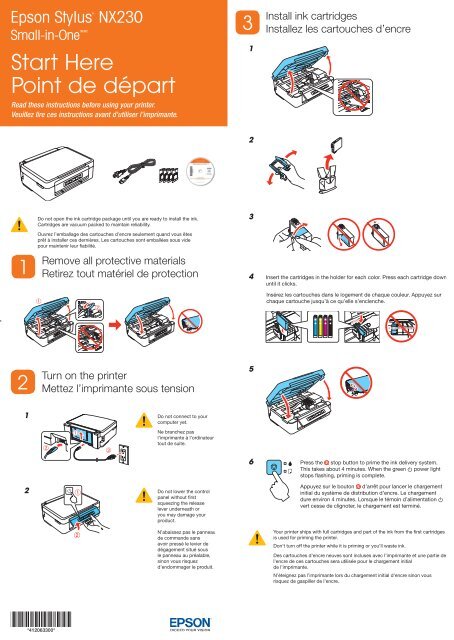
Read these instructions before using your printer.<br />
Veuillez lire ces instructions avant d’utiliser l’imprimante.<br />
1<br />
2<br />
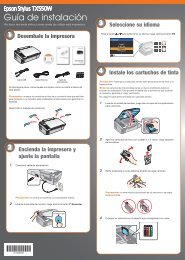
Do not open the ink cartridge package until you are ready to install the ink.<br />
Cartridges are vacuum packed to maintain reliability.<br />
Ouvrez l’emballage des cartouches d’encre seulement quand vous êtes<br />
prêt à installer ces dernières. Les cartouches sont emballées sous vide<br />
pour maintenir leur fiabilité.<br />
Remove all protective materials<br />
Retirez tout matériel de protection<br />
Turn on the printer<br />
Mettez l’imprimante sous tension<br />
1 Do not connect to your<br />
computer yet.<br />
Ne branchez pas<br />
l’imprimante à l’ordinateur<br />
tout de suite.<br />
2 Do not lower the control<br />
panel without fi rst<br />
squeezing the release<br />
lever underneath or<br />
you may damage your<br />
product.<br />
*412063300*<br />
*412063300*<br />
N’abaissez pas le panneau<br />
de commande sans<br />
avoir pressé le levier de<br />
dégagement situé sous<br />
le panneau au préalable,<br />
sinon vous risquez<br />
d’endommager le produit.<br />
3<br />
1<br />
2<br />
3<br />
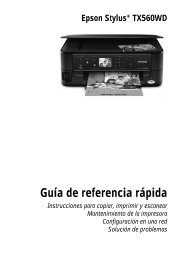
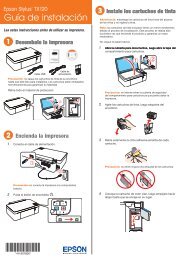
Install ink cartridges<br />
Installez les cartouches d’encre<br />
4 Insert the cartridges in the holder for each color. Press each cartridge down<br />
until it clicks.<br />
5<br />
Insérez les cartouches dans le logement de chaque couleur. Appuyez sur<br />
chaque cartouche jusqu’à ce qu’elle s’enclenche.<br />
6 Press the stop button to prime the ink delivery system.<br />
This takes about 4 minutes. When the green power light<br />
stops fl ashing, priming is complete.<br />
Appuyez sur le bouton d’arrêt pour lancer le chargement<br />
initial du système de distribution d’encre. Le chargement<br />
dure environ 4 minutes. Lorsque le témoin d’alimentation<br />
vert cesse de clignoter, le chargement est terminé.<br />
Your printer ships with full cartridges and part of the ink from the first cartridges<br />
is used for priming the printer.<br />
Don’t turn off the printer while it is priming or you’ll waste ink.<br />
Des cartouches d’encre neuves sont incluses avec l’imprimante et une partie de<br />
l’encre de ces cartouches sera utilisée pour le chargement initial<br />
de l’imprimante.<br />
N’éteignez pas l’imprimante lors du chargement initial d’encre sinon vous<br />
risquez de gaspiller de l’encre.
4<br />
1<br />
2<br />
3<br />
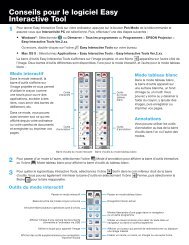
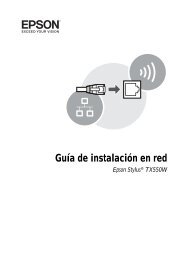
Load paper<br />
Chargez le papier<br />
4 Load paper with the<br />
printable side face up.<br />
5<br />
5<br />
Chargez le papier avec la<br />
face d’impression vers le<br />
haut.<br />
Don’t load the paper sideways; always load it<br />
short edge fi rst.<br />
Ne chargez pas le papier sur sa largeur;<br />
chargez-le toujours avec le côté court en<br />
premier.<br />
Choose your connection<br />
Choisissez votre connexion<br />
You can connect your printer to your existing wireless network or directly to<br />
your computer using a USB cable (not included). See below for details on each<br />
connection method.<br />
Vous pouvez relier l’imprimante au réseau sans fi l existant ou directement à<br />
votre ordinateur en utilisant un câble USB (non inclus). Voyez ci-dessous pour<br />
obtenir des détails sur chaque méthode de connexion.<br />
Wireless Connection<br />
You must install the software on every computer from which you want to print.<br />
For the fi rst installation, we recommend using a USB cable (not included) to<br />
simplify wireless setup. After the printer is connected to the network, you will be<br />
prompted to remove the cable.<br />
Make sure you know your network name (SSID) and network password:<br />
Network name ______________________________________________________<br />
Network password __________________________________________________<br />
If you don’t have this information, contact the person who set up your network.<br />
6<br />
Direct USB Connection<br />
Make sure you have a USB cable. Do not connect the printer to your computer<br />
until you’re instructed to do so.<br />
Connexion sans fi l<br />
Vous devez installer le logiciel sur chaque ordinateur à partir duquel vous<br />
souhaitez imprimer. Lors de la première installation, nous vous recommandons<br />
d’utiliser un câble USB (non inclus) afi n de simplifi er la confi guration sans fi l.<br />
Après que l’imprimante soit connectée au réseau, vous serez invité à retirer le<br />
câble.<br />
Assurez-vous de connaître l’identifi ant réseau (SSID) et le mot de passe réseau :<br />
Nom du réseau ______________________________________________________<br />
Mot de passe du réseau ______________________________________________<br />
Si vous n’avez pas cette information, communiquez avec la personne qui a<br />
confi guré votre réseau.<br />
Connexion USB directe<br />
Assurez-vous d’avoir un câble USB à portée de main. Ne branchez pas<br />
l’imprimante à votre ordinateur avant d’avoir reçu une directive à cet effet.<br />
Install software<br />
Installez le logiciel<br />
Make sure the printer is NOT<br />
CONNECTED to your computer.<br />
Assurez-vous que l’imprimante N’EST<br />
PAS BRANCHÉE à votre ordinateur.<br />
1 In Windows ® , if you see a Found New Hardware<br />
screen, click Cancel and disconnect the USB<br />
cable.<br />
2 Windows<br />
Mac OS ®<br />
Sous Windows ® , si une fenêtre Nouveau matériel<br />
détecté s’affi che, cliquez Annuler et débranchez<br />
le câble USB.<br />
3 When you’re done, remove the CD. You’re ready to copy, print, and scan!<br />
See the back of this sheet or your User’s Guide.<br />
Quand vous avez terminé, retirez le CD. Vous êtes prêt à copier, à<br />
imprimer et à numériser! Consultez le verso de cette affi che ou le Guide de<br />
l’utilisateur.
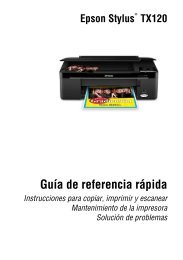
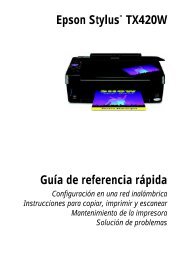
Copying and scanning<br />
Copie et numérisation<br />
1 2<br />
Power<br />
Mise sous et hors tension<br />
Printing from a computer<br />
1 Open your document or photo.<br />
2 Select the print option in your application.<br />
3 Select your <strong>Epson</strong> printer.<br />
4 In Windows, select Preferences or Properties.<br />
5 Choose your printer settings. (In Windows, click OK when you’re done.)<br />
6 Click OK or Print to start printing.<br />
Need paper and ink?<br />
Achat de papier et d’encre<br />
Use <strong>Epson</strong> premium papers with DURABrite ® Ultra Ink for<br />
professional results. You can purchase them from <strong>Epson</strong><br />
Supplies Central ® at www.epson.com/ink3 (U.S. sales) or<br />
www.epson.ca (Canadian sales). You can also purchase<br />
supplies from an <strong>Epson</strong> authorized reseller. To fi nd the nearest<br />
one, call 800-GO-EPSON (800-463-7766).<br />
Utilisez les papiers de haute qualité <strong>Epson</strong> avec l’encre<br />
DURABrite ® Ultra pour obtenir des résultats à l’allure<br />
professionnelle. Vous pouvez acheter le papier et l’encre au<br />
<strong>Epson</strong> Supplies Central ® à www.epson.ca. Vous pouvez<br />
aussi acheter vos fournitures auprès d’un détaillant <strong>Epson</strong><br />
autorisé. Composez le 1 800 463-7766 pour obtenir les<br />
coordonnées d’un détaillant près de chez vous.<br />
<strong>Epson</strong>, <strong>Epson</strong> Stylus, and <strong>Epson</strong> Supplies Central are registered trademarks and <strong>Epson</strong> Exceed Your<br />
Vision is a registered logomark of Seiko <strong>Epson</strong> Corporation. Designed for Excellence and Small-in-<br />
One are trademarks and DuraBrite is a registered trademark of <strong>Epson</strong> America, Inc.<br />
General Notice: Other product names used herein are for identifi cation purposes only and may be<br />
trademarks of their respective owners. <strong>Epson</strong> disclaims any and all rights in those marks.<br />
This information is subject to change without notice.<br />
© 2011 <strong>Epson</strong> America, Inc. 3/11<br />
Network status sheet<br />
Feuille d’état réseau<br />
B & W copy<br />
Copie N et B<br />
Stop<br />
Arrêt<br />
Color copy<br />
Copie couleur<br />
3<br />
Press the button (for a black-and-white copy) or the button (for a color<br />
copy) to start copying.<br />
Press the and buttons simultaneously to scan your original and save it as a<br />
PDF on your computer.<br />
Press the or button for 3 seconds to copy in draft mode.<br />
While pressing the or button, press the button within 3 seconds to make<br />
20 copies.<br />
Appuyez sur le bouton (pour une copie en noir et blanc) ou sur le bouton<br />
(pour une copie en couleur) pour lancer la copie.<br />
Appuyez simultanément sur les boutons et pour numériser l’original et<br />
le sauvegarder comme fi chier PDF sur votre ordinateur.<br />
Appuyez sur le bouton<br />
brouillon.<br />
ou durant 3 secondes pour copier en mode<br />
Appuyez sur le bouton ou , maintenez-le enfoncé et appuyez sur le bouton<br />
moins de 3 secondes après pour faire 20 copies.<br />
Impression depuis un ordinateur<br />
1 Ouvrez un document ou une photo.<br />
2 Sélectionnez l’option d’impression dans votre application.<br />
3 Sélectionnez votre imprimante <strong>Epson</strong>.<br />
4 Sous Windows, sélectionnez Préférences ou Propriétés.<br />
5 Choisissez les paramètres d’impression. (Sous Windows, cliquez sur OK<br />
quand vous avez terminé).<br />
6 Cliquez sur OK ou Imprimer pour lancer l’impression.<br />
Premium Presentation Paper Matte/Papier pour présentation haute qualité Mat<br />
Heavyweight, non-glare card stock for school and business projects plus photos.<br />
Papier épais et non éblouissant pour l’école et le bureau, plus les photos.<br />
Color/Couleur<br />
Moderate-capacity (For lighter use)<br />
Rendement modéré (pour usage plus léger)<br />
Standard-capacity<br />
Rendement standard<br />
Black/Noir 124 125<br />
Cyan 124 125<br />
Magenta 124 125<br />
Yellow/Jaune 124 125<br />
<strong>Epson</strong>, <strong>Epson</strong> Stylus et <strong>Epson</strong> Supplies Central sont des marques déposées et <strong>Epson</strong> Exceed Your Vision est<br />
un logotype déposé de Seiko <strong>Epson</strong> Corporation. Designed for Excellence et Small-in-One sont des marques<br />
de commerce et DURABrite est une marque déposée d’<strong>Epson</strong> America, Inc.<br />
Avis général : Les autres noms de produit fi gurant dans le présent document ne sont cités qu’à titre d’identifi cation et<br />
peuvent être des marques de commerce de leurs propriétaires respectifs. <strong>Epson</strong> renonce à tous les droits associés à<br />
ces marques.<br />
L’information contenue dans le présent document peut être modifi ée sans préavis.<br />
Printed in XXXXXX / Pays d’impression : XXXXXX CPD-34144
Troubleshooting<br />
Network setup and printing problems<br />
If you’re connecting the printer via Wi-Fi Protected Setup (WPS), make sure you<br />
press the Wi-Fi button on the printer within 2 minutes of pressing the WPS button<br />
on your router. The Wi-Fi button on the printer must be pressed for 3 seconds.<br />
Try connecting to the router or access point with your computer or another device<br />
to confi rm that it is working correctly.<br />
Press the button to print a network status sheet. Verify that the network<br />
settings are correct and check the signal strength. If it’s poor, try moving the<br />
printer closer to your router or access point. Avoid placing the printer next to a<br />
microwave oven, 2.4 GHz cordless phone, or large metal objects such as a fi ling<br />
cabinet.<br />
If your router or access point doesn’t broadcast its network name (SSID), manually<br />
enter the name. If your router or access point has wireless security enabled, you’ll<br />
also need to know what kind of security it’s using and make sure you enter the<br />
WEP key or WPA passphrase correctly.<br />
When using TCP/IP, make sure the product’s IP address is set correctly for your<br />
network. If your network does not assign IP addresses using DHCP, you need to<br />
set the IP address manually.<br />
Disable the fi rewall temporarily to see if that may be causing the issue. Contact<br />
your fi rewall manufacturer for assistance.<br />
Error Indicators/Indicateurs d’erreur<br />
If you see one of the error indicators below, follow the steps here to proceed:<br />
Si l’un des indicateurs d’erreur ci-dessous s’affi che, suivez les étapes présentées :<br />
Flashing/Clignotant On/Allumé<br />
Paper is jammed. Remove jammed paper<br />
from the sheet feeder, load paper correctly,<br />
then press a copy button to resume printing.<br />
Le papier est coincé. Retirez le papier coincé<br />
dans le chargeur feuille à feuille, chargez<br />
le papier correctement et appuyez sur un<br />
bouton de copie pour reprendre l’impression.<br />
Printer error. Turn the printer off, check<br />
inside for jammed paper or foreign objects,<br />
then turn the printer back on. If the error<br />
does not clear, contact <strong>Epson</strong>.<br />
Erreur d’imprimante. Mettez l’imprimante<br />
hors tension, vérifi ez s’il y a un bourrage<br />
papier ou si des objets sont coincés dans<br />
l’imprimante et ensuite, mettez-la sous<br />
tension de nouveau. Si l’erreur n’est pas<br />
éliminée, communiquez avec <strong>Epson</strong>.<br />
User’s Guide<br />
Click the icon on your desktop (or in the Applications/<strong>Epson</strong><br />
Software/Guide folder on Macintosh) to access the online<br />
User’s Guide, software downloads, <strong>Epson</strong> Supplies Central ® ,<br />
and more (requires an internet connection). If you don’t have<br />
a User’s Guide icon, you can install it from the CD or go to<br />
the <strong>Epson</strong> website, as described below.<br />
<strong>Epson</strong> technical support<br />
Visit epson.com/support or epson.ca/support to download<br />
drivers, view manuals, get FAQs, or e-mail <strong>Epson</strong>.<br />
You may also speak with a support specialist by calling<br />
(562) 276-4382 (US), 6 AM to 8 PM, Pacifi c Time, Monday<br />
through Friday and 7 AM to 4 PM, Saturday, or (905) 709-3839<br />
(Canada), 6 AM to 8 PM, Pacifi c Time, Monday through Friday.<br />
Paper is out, or multiple pages have fed into<br />
the sheet feeder. Load paper correctly, then<br />
press a copy button to resume printing.<br />
Aucun papier n’est chargé ou plusieurs<br />
feuilles de papier ont été alimentées dans<br />
le chargeur feuille à feuille. Chargez le<br />
papier correctement et ensuite, appuyez<br />
sur un bouton de copie pour reprendre<br />
l’impression.<br />
The ink pads are near the end of their<br />
service life. Contact <strong>Epson</strong>. (To resume<br />
printing, press a copy button.)<br />
Les tampons encreurs sont presque en fi n<br />
de durée utile. Communiquez avec <strong>Epson</strong>.<br />
(Pour reprendre l’impression, appuyez sur un<br />
bouton de copie.)<br />
An ink cartridge is running low on ink.<br />
From your computer, you can check which<br />
cartridge is low and replace it.<br />
Le niveau de l’une des cartouches d’encre<br />
est faible. Depuis votre ordinateur, vous<br />
pouvez vérifi er de quelle cartouche il s’agit<br />
et vous pouvez ensuite la remplacer.<br />
Wi-Fi connection error. Press the Wi-Fi<br />
button on the printer to clear the error and<br />
try again.<br />
Erreur de connexion Wi-Fi. Appuyez sur le<br />
bouton Wi-Fi de l’imprimante pour effacer<br />
l’erreur et essayez de nouveau.<br />
Any questions? Avez-vous des questions?<br />
<strong>Epson</strong> Connect<br />
Dépannage<br />
Confi guration du réseau et problèmes d’impression<br />
Si vous reliez l’imprimante au moyen du protocole Wi-Fi Protected Setup (WPS),<br />
assurez-vous d’appuyer sur le bouton Wi-Fi de l’imprimante moins de deux<br />
minutes après avoir appuyé sur le bouton WPS du routeur. Vous devez appuyer<br />
sur le bouton Wi-Fi sur l’imprimante pendant 3 secondes.<br />
Tentez de connecter votre ordinateur ou un autre appareil à votre routeur ou point<br />
d’accès sans fi l pour confi rmer qu’il fonctionne correctement.<br />
Appuyez sur le bouton pour imprimer une feuille d’état réseau. Vérifi ez si les<br />
paramètres de réseau sont corrects et vérifi ez la portée du signal. Si le signal est<br />
faible, déplacez le produit pour le rapprocher du routeur ou du point d’accès sans<br />
fi l. Évitez de placer le produit près d’un four micro-ondes, d’un téléphone sans fi l<br />
2,4 GHz ou d’objets métalliques de grande taille, comme un classeur.<br />
Si votre routeur ou point d’accès sans fi l ne diffuse pas son nom de réseau (SSID),<br />
saisissez manuellement le nom de réseau. Si la sécurité sans fi l a été activée sur<br />
votre routeur sans fi l ou point d’accès, vous devez connaître le type de sécurité<br />
utilisé et vous assurer de saisir correctement la clé WEP ou la phrase passe WPA.<br />
Lorsque vous utilisez le protocole TCP/IP, assurez-vous que l’adresse IP du<br />
produit est réglée correctement pour votre réseau. Si votre réseau n’attribue pas<br />
les adresses IP au moyen du protocole DHCP, vous devrez défi nir l’adresse IP<br />
manuellement.<br />
Désactivez temporairement le pare-feu afi n de déterminer s’il est la cause du<br />
problème. Communiquez avec le fabricant du pare-feu pour obtenir de l’aide.<br />
Guide de l’utilisateur<br />
Cliquez sur l’icône sur votre bureau (ou accédez à<br />
Applications/<strong>Epson</strong> Software/Guide sous Macintosh)<br />
pour accéder au Guide de l’utilisateur en ligne, aux<br />
téléchargements de logiciels, à <strong>Epson</strong> Supplies Central ®<br />
et plus encore (requiert une connexion Internet). Si vous<br />
n’avez pas d’icône pour le Guide de l’utilisateur, vous<br />
pouvez l’installer à partir du CD ou aller sur le site Web<br />
d’<strong>Epson</strong>, tel que décrit ci-dessous.<br />
Soutien technique <strong>Epson</strong><br />
Visitez epson.ca/support pour télécharger les pilotes en<br />
français, voir les manuels, consulter la FAQ et envoyer un<br />
courriel à <strong>Epson</strong> (site disponible en anglais seulement).<br />
Vous pouvez aussi parler à un spécialiste du soutien en<br />
composant le 905 709-3839, de 6 h à 20 h, heure du<br />
Pacifi que, du lundi au vendredi.<br />
Get instant, wireless printing of photos and attachments right from smartphones, iPads, tablets, and other popular mobile devices.<br />
See www.epson.com/connect for details.<br />
An ink cartridge is expended or not installed<br />
correctly. Replace or reinstall the ink<br />
cartridge.<br />
L’une des cartouches d’encre est vide ou<br />
n’est pas installée correctement. Replacez<br />
ou réinstallez la cartouche d’encre.<br />
Vous pouvez bénéfi cier de l’impression sans fi l et instantanée de photos ou pièces jointes à partir de téléphones intelligents, iPads, tablettes et autres dispositifs<br />
mobiles populaires. Consultez le site Web www.epson.com/connect pour obtenir plus d’informations (site disponible en anglais seulement).