NDX900 Controller - Traktor LE 2 Software Setup - v1.1 - Numark
NDX900 Controller - Traktor LE 2 Software Setup - v1.1 - Numark
NDX900 Controller - Traktor LE 2 Software Setup - v1.1 - Numark

You also want an ePaper? Increase the reach of your titles
YUMPU automatically turns print PDFs into web optimized ePapers that Google loves.
and TRAKTOR <strong>LE</strong> 2 <strong>Setup</strong> Guide<br />
QUICKSTART GUIDE<br />
ENGLISH ( 2 – 4 )<br />
GUÍA DE INICIO RÁPIDO<br />
ESPAÑOL ( 5 – 7 )<br />
GUIDE D'UTILISATION RAPIDE<br />
FRANÇAIS ( 8– 10 )<br />
GUIDA RAPIDA<br />
ITALIANO ( 9 – 13 )<br />
KURZAN<strong>LE</strong>ITUNG<br />
DEUTSCH ( 14 – 16 )
<strong>NDX900</strong> AND TRAKTOR <strong>LE</strong> 2 SETUP<br />
1. DRIVER INSTALLATION (WINDOWS USERS)<br />
1. Insert the included software installation disc into your computer's DVD-ROM drive.<br />
2. Navigate to the ASIO4ALL directory and find the ASIO4ALL.exe file.<br />
3. Follow the on-screen prompts to install the included low latency ASIO4ALL driver.<br />
2. SOFTWARE INSTALLATION (TRAKTOR <strong>LE</strong>2)<br />
1. Insert the included TRAKTOR <strong>LE</strong> 2 software installation disc into your computer's DVD-ROM drive.<br />
Windows: Double-click "My Computer" then double-click the disc. Once the disc's contents are shown, doubleclick<br />
the TRAKTOR <strong>LE</strong> 2 installer file (.exe).<br />
Mac: Double-click the disc. Once the disc's contents are shown, double-click the TRAKTOR <strong>LE</strong> 2 installer file<br />
(.dmg).<br />
2. Follow the on-screen instructions to install the software.<br />
Note: TRAKTOR <strong>LE</strong> 2's install "wizard" may ask you to install a hardware driver. Click "Next" or "Continue" to<br />
skip past these screens.<br />
3. Connect your <strong>NDX900</strong> to your computer. (If you are using Windows, you may see several dialog boxes in the<br />
corner of your screen indicating it is "recognizing" the hardware for the first time. Wait a minute until this is<br />
complete.)<br />
4. Open TRAKTOR <strong>LE</strong> 2. In the window that appears, click the "Activate" button to register the software. The Native<br />
Instruments Service Center will launch. (You will need to be connected to the internet to access the Service<br />
Center to register your software.)<br />
5. In the Service Center login window, click "Create new User Account" (if you do not already have one) and follow<br />
the on-screen instructions to complete your registration. (You will need the serial number on the included DVD<br />
sleeve to do this.)<br />
Note: For additional assistance and information, you can find TRAKTOR <strong>LE</strong> 2's manual by going to the software's<br />
"Help" menu.<br />
3. <strong>NDX900</strong> SETUP<br />
1. Connect the <strong>NDX900</strong> <strong>Controller</strong> to a rear USB Port on your computer. Power on the <strong>NDX900</strong> <strong>Controller</strong>.<br />
2. Press SOURCE.<br />
3. Rotate the PARAMETER knob until the screen reads USB-MIDI.<br />
4. Press the PARAMETER knob (like a button) to confirm your selection.<br />
5. To set the <strong>NDX900</strong> to be the default playback device:<br />
Windows XP: Go to the Windows Control Panel Sounds and Audio Devices Audio tab and for the default<br />
Playback device select ‘USB Audio Codec’. Tick the box for ‘Use only default devices’.<br />
Windows Vista: Go to Start Control Panel Sound (in Classic View). Then, click on the Playback tab and<br />
highlight ‘Speakers- USB Audio Codec’. Click Apply to accept the settings.<br />
Windows 7: Go to the Windows Control Panel Sound and for the Playback tab select ‘Speakers- USB Audio<br />
Codec’.<br />
Mac OSX: See the AGGREGATE DEVICES section.<br />
6. Set <strong>NDX900</strong> as your default playback device. Follow the same steps above if you have a second <strong>NDX900</strong><br />
controller.<br />
AGGREGATE DEVICES (MAC)<br />
1. Click on the Mac desktop so that Finder is displayed in the upper-left of the screen.<br />
2. Select the Go menu from the top of the screen and choose Utilities.<br />
3. In the window that opens, double click Audio MIDI <strong>Setup</strong>.<br />
4. Once the Audio MIDI <strong>Setup</strong> utility is open, select the Audio tab and at the top of the screen; select the Audio<br />
menu and choose Open Aggregate Device Editor.<br />
5. In the window that opens, click the + button.<br />
6. Under Structure should be listed four USB Audio Codec devices. If using two <strong>NDX900</strong>s, they will be listed as<br />
each having 2 inputs and each with two 2 outputs. Place a check next to each of the four USB Audio Codec<br />
devices that are listed. This will merge all four USB Audio Codec devices into one device, allowing TRAKTOR<br />
<strong>LE</strong>2 to access all of the inputs and outputs at once.<br />
7. Click Done.<br />
2
4. TRAKTOR <strong>LE</strong> 2 SETUP TRAKTOR <strong>LE</strong> 2 <strong>Setup</strong> Wizard<br />
1. With the <strong>NDX900</strong> connected to the computer through USB, launch TRAKTOR <strong>LE</strong> 2.<br />
2. Next, in TRAKTOR <strong>LE</strong> 2, go to Help > Start <strong>Setup</strong> Wizard.<br />
3. In the window that opens, click Next to get to the <strong>Traktor</strong> <strong>LE</strong>2 <strong>Controller</strong> Selection.<br />
4. Next to Are you using an external controller? select Yes, then click Next.<br />
5. Set manufacturer to <strong>Numark</strong>. If are using two <strong>NDX900</strong> <strong>Controller</strong>s, set model to <strong>NDX900</strong> <strong>LE</strong> Dual Deck.<br />
If you are using a single <strong>NDX900</strong>, set model to ‘<strong>NDX900</strong> <strong>LE</strong> Single Deck’ and click Next.<br />
6. In the Mixer <strong>Setup</strong> page next to Are you using an external mixer? Select No.<br />
7. Click Next and review the settings you have chosen.<br />
8. Click Finish.<br />
TRAKTOR <strong>LE</strong> 2 Audio <strong>Setup</strong> (PC)<br />
1. Go into the Preferences menu in TRAKTOR <strong>LE</strong> 2 to configure the Audio <strong>Setup</strong>.<br />
2. Go to File > Preferences.<br />
3. In the Audio Device area if you are on a Windows platform, make sure that ASIO4ALL is selected. Click on the<br />
Settings button to open the ASIO4ALL dialog box. Make sure the status under USB Audio Device is ‘active’<br />
(highlighted in blue) and then close out of the box. This will allow audio output from TRAKTOR <strong>LE</strong> 2 to be sent<br />
through the USB connection to the <strong>NDX900</strong> and output through its USB Audio RCA output.<br />
4. To set up your audio input and output configuration click on Output Routing on the left-hand side of the<br />
preferences window<br />
5. Under Mixing Mode, choose External.<br />
6. Under Output Deck A, choose USB Audio Codec 1 for ‘L’ and USB Audio Codec 2 for ‘R’.<br />
7. Under Output Deck B, choose USB Audio Codec 1 for ‘L’ and USB Audio Codec 2 for ‘R’.<br />
If using 2 <strong>NDX900</strong> decks:<br />
• Under Output Deck A, choose USB Audio Codec 1 for ‘L’ and USB Audio Codec 1 for ‘R’.<br />
• Under Output Deck B, choose USB Audio Codec 2 for ‘L’ and USB Audio Codec 2 for ‘R’.<br />
TRAKTOR <strong>LE</strong> 2’s Audio <strong>Setup</strong> (Mac)<br />
1. Click the TRAKTOR <strong>LE</strong> 2 menu in the upper-left of the screen, and select Preferences.<br />
2. On the left-hand side of the window that opens, click the + next to Audio <strong>Setup</strong>.<br />
3. Next, under Audio <strong>Setup</strong> on the left, click Soundcard.<br />
4. On the right-hand side of window, next to Audio Device, select Aggregate Device.<br />
5. On the left-hand side of the TRAKTOR preferences window, under Audio <strong>Setup</strong> on the left, click Output Routing.<br />
6. On the right-hand side of window, next to Mixer Mode, select External.<br />
7. Next to Out Channel A, for Left, select Aggregate Device Out 1. For Right, select Aggregate Device Out 2.<br />
8. Next to Out Channel B, for Left, select Aggregate Device Out 1. For Right, select Aggregate Device Out 2.<br />
If using 2 <strong>NDX900</strong>s, for the Left, select Aggregate Device Out 3. For Right, select Aggregate Device Out 4.<br />
TRAKTOR <strong>LE</strong> 2 <strong>Controller</strong> Manager <strong>Setup</strong><br />
If you are using a single <strong>NDX900</strong>:<br />
<strong>Setup</strong> your <strong>NDX900</strong> to control a Deck in TRAKTOR <strong>LE</strong> 2:<br />
1. Click on <strong>Controller</strong> Manager on the left-hand side of the Preferences window.<br />
2. Next to Device, select <strong>NDX900</strong> Single Deck Controls.<br />
3. Under In-Port, select <strong>Numark</strong> <strong>NDX900</strong>.<br />
4. Under Out-Port, select <strong>Numark</strong> <strong>NDX900</strong>.<br />
5. Next to Device Target, select Focus.<br />
6. The <strong>NDX900</strong> will control whichever deck is focused (selected) on the TRAKTOR <strong>LE</strong> 2 main screen.<br />
7. To change which deck is focused, you can either click the RECALL button in the upper-right corner of the <strong>NDX900</strong><br />
hardware, use your keyboard or mouse to select deck A or B from within the TRAKTOR <strong>LE</strong> 2 software.<br />
8. Click Close.<br />
If you are using two <strong>NDX900</strong> units:<br />
1. Click on <strong>Controller</strong> Manager on the left-hand side of the preferences window.<br />
2. Next to Device, select <strong>NDX900</strong> Deck A Controls (whichever deck you connected to the computer first will<br />
become ‘Deck A’.)<br />
3. Under In-Port, select <strong>Numark</strong> <strong>NDX900</strong>.<br />
4. Under Out-Port, select <strong>Numark</strong> <strong>NDX900</strong>.<br />
5. Next to Device, select <strong>NDX900</strong> Deck B Controls.<br />
6. Under In-Port, select <strong>Numark</strong> NDX 900 #2.<br />
7. Under Out-Port select NDX 900 #2.<br />
8. Click Close.<br />
3
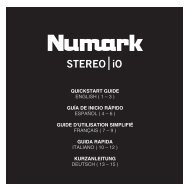
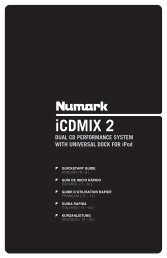
CONTROL MAP<br />
1. EJECT<br />
2. USB MASTER<br />
3. SOURCE<br />
4. TRACK KNOB<br />
5. BACK<br />
6. PLAY<br />
7. PAUSE<br />
8. CUE<br />
9. JOG WHEEL<br />
10. SCRATCH<br />
11. SEARCH<br />
12. STOP / START TIME<br />
13. TAP<br />
14. PITCH / KEYLOCK<br />
15. PITCH FADER<br />
16. PITCH BEND<br />
17. B<strong>LE</strong>EP / REVERSE SWITCH<br />
18. LOOP IN / OUT / RELOOP<br />
19. TRIGGER BUTTONS<br />
20. SHIFT<br />
21. REC<br />
22. (BUTTON) MODE<br />
23. FX<br />
24. FX SE<strong>LE</strong>CT<br />
25. WET / DRY FADER<br />
26. PARAMETER<br />
27. PROG (Program)<br />
28. TIME<br />
29. RECALL / STORE<br />
30. (PLAY) MODE<br />
31. LCD DISPLAY<br />
2 3<br />
5<br />
31<br />
26 27<br />
30<br />
28 29<br />
25<br />
17<br />
10<br />
12<br />
1<br />
24<br />
23<br />
4<br />
13<br />
8<br />
9<br />
20<br />
7<br />
11<br />
6<br />
4<br />
18<br />
21 22 19<br />
15<br />
14<br />
16
CONFIGURACIÓN DE <strong>NDX900</strong> Y TRAKTOR <strong>LE</strong> 2<br />
1. INSTALACIÓN DE LOS DRIVERS (USUARIOS DE WINDOWS)<br />
1. Inserte el disco de instalación del software incluido en el lector de DVD-ROM de la computadora.<br />
2. Navegue al directorio ASIO4ALL y localice el archivo ASIO4ALL.exe.<br />
3. Siga las indicaciones de la pantalla para instalar el driver ASIO4ALL de baja latencia incluido.<br />
2. INSTALACIÓN DEL SOFTWARE (TRAKTOR <strong>LE</strong>2)<br />
1. Inserte el disco de instalación de TRAKTOR <strong>LE</strong> 2 incluido en el lector de DVD-ROM de la computadora.<br />
Windows: Haga doble clic en "My Computer" (Mi PC) y luego doble clic en el disco. Una vez que se muestre el<br />
contenido del disco, haga doble clic en el archivo instalador de TRAKTOR <strong>LE</strong> 2 (.exe).<br />
Mac: Haga doble clic en el disco. Una vez que se muestre el contenido del mismo, haga doble clic en el archivo<br />
instalador de TRAKTOR <strong>LE</strong> 2 (.dmg).<br />
2. Siga las instrucciones de la pantalla para instalar el software.<br />
Nota: El "asistente" de instalación de TRAKTOR <strong>LE</strong> 2 puede solicitarle instalar un driver de hardware. Haga clic<br />
en "Next" (Siguiente) o "Continue" (Continuar) para saltear estas pantallas.<br />
3. Conecte el <strong>NDX900</strong> a su computadora. (Si usa Windows, puede ver varios cuadros de diálogo en la esquina de la<br />
pantalla, que le indican que está "reconociendo" el hardware por primera vez. Espere un minuto hasta que<br />
termine.)<br />
4. Abra TRAKTOR <strong>LE</strong> 2. En la ventana que aparece, haga clic en el botón "Activate" (Activar) para registrar el<br />
software. Se abre Service Center (Centro de Servicios) de Native Instruments. (Debe estar conectado a Internet<br />
para acceder al Centro de Servicios a fin de registrar su software.)<br />
5. En la ventana de inicio de sesión de Service Center, haga clic en "Create new User Account" (Crear cuenta de<br />
usuario nuevo) (si no tiene ya una) y siga las instrucciones de la pantalla para terminar el registro. (Para hacerlo,<br />
necesita el número de serie que figura en la funda del DVD incluido.)<br />
Nota: Para obtener asistencia e información adicionales, puede encontrar el manual de TRAKTOR <strong>LE</strong> 2 yendo al<br />
menú "Help" (Ayuda) del software.<br />
3. CONFIGURACIÓN DE <strong>NDX900</strong><br />
1. Conecte el controlador <strong>NDX900</strong> a un puerto USB trasero de la computadora. Encienda el controlador <strong>NDX900</strong>.<br />
2. Pulse SOURCE (Fuente).<br />
3. Gire la perilla PARAMETER (Parámetro) hasta que aparezca en la pantalla USB-MIDI.<br />
4. Pulse la perilla PARAMETER (como si fuera un botón) para confirmar su selección.<br />
5. Para configurar el <strong>NDX900</strong> como dispositivo de reproducción predeterminado:<br />
Windows XP: Vaya a la pestaña del Control Panel (Panel de control) de Windows Sounds and Audio Devices<br />
(Dispositivos de sonido y audio) Audio y seleccione ‘USB Audio Codec’ (Códec de audio USB) como dispositivo de<br />
reproducción predeterminado. Marque la casilla "Use only default devices" (Usar sólo los dispositivos<br />
predeterminados).<br />
Windows Vista: Vaya a Start Control Panel Sound (Inicio > Panel de control > Sonido) (en la vista clásica).<br />
Luego, haga clic en la pestaña Playback (Reproducción) y resalte ‘Speakers- USB Audio Codec’ (Altavoces - Códec<br />
de audio USB). Haga clic en Apply (Aplicar) para aceptar los valores de configuración.<br />
Windows 7: Vaya a Control Panel (Panel de control) de Windows Sound (Sonido) y seleccione en la pestaña<br />
Playback (Reproducción) ‘Speakers- USB Audio Codec’ (Altavoces - Códec de audio USB).<br />
Mac OSX: Consulte la sección DISPOSITIVOS AGREGADOS.<br />
6. Configure <strong>NDX900</strong> como dispositivo de reproducción predeterminado. Siga los mismos pasos arriba indicados si<br />
tiene un segundo controlador <strong>NDX900</strong>.<br />
DISPOSITIVOS AGREGADOS (MAC)<br />
1. Haga clic en el escritorio de Mac de modo que aparezca Finder (Buscador) en la parte superior izquierda de la<br />
pantalla.<br />
2. Seleccione el menú Go (Ir) en la parte superior de la pantalla y elija Utilities(Utilidades).<br />
3. En la ventana que se abre, haga doble clic en Audio MIDI <strong>Setup</strong> (Configuración MIDI de audio).<br />
4. Una vez abierta la utilidad Audio MIDI <strong>Setup</strong>, seleccione la pestaña Audio y, en la parte superior de la pantalla,<br />
seleccione el menú Audio y elija Open Aggregate Device Editor(Abrir editor de dispositivos agregados).<br />
5. En la ventana que se abre, haga clic en el botón +.<br />
6. Bajo Structure (Estructura) debe aparecer una lista de cuatro dispositivos USB Audio Codec. Si utiliza dos<br />
<strong>NDX900</strong>, están en la lista como con 2 entradas y 2 salidas cada uno. Coloque la marca de selección en cada<br />
uno de los cuatro dispositivos USB Audio Codec de la lista. De esta forma se combinan los cuatro dispositivos<br />
USB Audio Codec en uno, permitiendo que TRAKTOR <strong>LE</strong>2 acceda a todas las entradas y salidas al mismo<br />
tiempo.<br />
7. Haga clic en Save (Guardar).<br />
5
4. CONFIGURACIÓN DE TRAKTOR <strong>LE</strong> 2 Asistente de configuración de TRAKTOR <strong>LE</strong> 2<br />
1. Con el <strong>NDX900</strong> conectado a la computadora por USB, abra TRAKTOR <strong>LE</strong> 2.<br />
2. A continuación, en TRAKTOR <strong>LE</strong> 2, vaya a Help > Start <strong>Setup</strong> Wizard (Ayuda > Abrir asistente de<br />
configuración).<br />
3. En la ventana que aparece, haga clic en Next (Siguiente) para abrir <strong>Traktor</strong> <strong>LE</strong>2 <strong>Controller</strong> Selection (Selección<br />
de controladores de <strong>Traktor</strong> <strong>LE</strong>2).<br />
4. Junto a Are you using an external controller? (¿Está usando un controlador externo) seleccione Yes(Sí) y<br />
luego haga clic en Next.<br />
5. Configure manufacturer (Fabricante) como <strong>Numark</strong>. Si utiliza dos controladores <strong>NDX900</strong>, configure model<br />
(modelo) como <strong>NDX900</strong> <strong>LE</strong> Dual Deck. Si utiliza un solo <strong>NDX900</strong>, configure model como ‘<strong>NDX900</strong> <strong>LE</strong> Single<br />
Deck y haga clic en Next.<br />
6. En la página Mixer <strong>Setup</strong> (Configuración del mezclador) junto a Are you using an external mixer? (¿Utiliza un<br />
mezclador externo?) seleccione No.<br />
7. Haga clic en Next y revise los valores de parámetros que eligió.<br />
8. Haga clic en Finish (Terminar).<br />
Configuración de audio de TRAKTOR <strong>LE</strong> 2 (PC)<br />
1. Vaya al menú Preferences (Preferencias) de TRAKTOR <strong>LE</strong> 2 para configurar Audio <strong>Setup</strong> (Configuración de<br />
audio).<br />
2. Vaya a File (Archivo) > Preferences.<br />
3. En el área Audio Device (Dispositivo de audio) si está en una plataforma Windows, asegúrese de que esté<br />
seleccionado ASIO4ALL. Haga clic en el botón Settings (Configuración) para abrir el cuadro de diálogo<br />
ASIO4ALL. Asegúrese de que el estado en USB Audio Device es ‘activo (resaltado en azul) y luego salga del<br />
cuadro de diálogo. De esta forma permite que la salida de audio de TRAKTOR <strong>LE</strong> 2 se envíe por la conexión USB<br />
al <strong>NDX900</strong> y salga por su salida USB Audio RCA.<br />
4. Para configurar su entrada y salida de audio, haga clic en Output Routing (Enrutamiento de salida) en el lado<br />
izquierdo de la ventana de preferencias<br />
5. En Mixing Mode (Modo de mezcla), elija External (Externa).<br />
6. En Output Deck A (Bandeja de salida A), elija USB Audio Codec 1 for ‘L’ and USB Audio Codec 2 for ‘R’<br />
(Códec de audio USB 1 para el lado izquierdo y Códec de audio USB 2 para el lado derecho).<br />
7. En Output Deck B (Bandeja de salida B), elija USB Audio Codec 1 for ‘L’ and USB Audio Codec 2 for ‘R’<br />
(Códec de audio USB 1 para el lado izquierdo y Códec de audio USB 2 para el lado derecho).<br />
Si utiliza 2 bandejas <strong>NDX900</strong>:<br />
• En Output Deck A (Bandeja de salida A), elija USB Audio Codec 1 for ‘L’ and USB Audio Codec 1 for ‘R’<br />
(Códec de audio USB 1 para el lado izquierdo y Códec de audio USB 1 para el lado derecho).<br />
• En Output Deck B (Bandeja de salida B), elija USB Audio Codec 2 for ‘L’ and USB Audio Codec 2 for ‘R’<br />
(Códec de audio USB 2 para el lado izquierdo y Códec de audio USB 2 para el lado derecho).<br />
Configuración de audio de TRAKTOR <strong>LE</strong> 2 (Mac)<br />
1. Haga clic en el menú TRAKTOR <strong>LE</strong> 2 de la parte superior izquierda de la pantalla y seleccione Preferences<br />
(Preferencias).<br />
2. En el lado izquierdo de la ventana que se abre, haga clic en el + que está junto a Audio <strong>Setup</strong> (Configuración de<br />
audio).<br />
3. A continuación, en Audio <strong>Setup</strong> a la izquierda, haga clic en Soundcard (Tarjeta de sonido).<br />
4. En el lado derecho de la ventana, junto a Audio Device (Dispositivo de audio), seleccione Aggregate Device<br />
(Dispositivo agregado).<br />
5. En el lado izquierdo de la ventana de preferencias de TRAKTOR, en Audio <strong>Setup</strong> a la izquierda, haga clic en<br />
Output Routing (Enrutamiento de salida).<br />
6. En el lado derecho de la ventana, junto a Mixer Mode (Modo de mezclador), seleccione External (Externo).<br />
7. Junto a Out Channel A (Canal de salida A), para Left (Lado izquierdo), seleccione Aggregate Device Out 1<br />
(Salida de dispositivo agregado 1). Para Right (Lado derecho), seleccione Aggregate Device Out 2.<br />
8. Junto a Out Channel B (Canal de salida B), para Left (Lado izquierdo), seleccione Aggregate Device Out 1<br />
(Salida de dispositivo agregado 1). Para Right (Lado derecho), seleccione Aggregate Device Out 2.<br />
Si utiliza 2 <strong>NDX900</strong>, para Left, seleccione Aggregate Device Out 3. Para Right, seleccione Aggregate Device<br />
Out 4.<br />
6
Configuración del <strong>Controller</strong> Manager en TRAKTOR <strong>LE</strong> 2<br />
Si utiliza un solo <strong>NDX900</strong>:<br />
Configure su <strong>NDX900</strong> para controlar una bandeja en TRAKTOR <strong>LE</strong> 2:<br />
1. Haga clic en <strong>Controller</strong> Manager (Administrador del controlador) en el lado izquierdo de la ventana Preferences.<br />
2. Junto a Device (Dispositivo), seleccione <strong>NDX900</strong> Single Deck Controls (Controles de una sola bandeja de<br />
<strong>NDX900</strong>).<br />
3. En In-Port (Puerto de entrada), seleccione <strong>Numark</strong> <strong>NDX900</strong>.<br />
4. En Out-Port (Puerto de salida), seleccione <strong>Numark</strong> <strong>NDX900</strong>.<br />
5. Junto a Device Target (Dispositivo destinatario), seleccione Focus (Enfoque).<br />
6. El <strong>NDX900</strong> controla la bandeja que está enfocada (seleccionada) en la bandeja principal de TRAKTOR <strong>LE</strong> 2.<br />
7. Para cambiar la bandeja enfocada, puede hacer clic en el botón RECALL (Recuperar) de la esquina superior<br />
derecha del hardware del <strong>NDX900</strong> o use su teclado o mouse para seleccionar bandeja A o B dentro del software<br />
TRAKTOR <strong>LE</strong> 2.<br />
8. Haga clic en Close (Cerrar).<br />
Si utiliza dos unidades <strong>NDX900</strong>:<br />
1. Haga clic en <strong>Controller</strong> Manager (Administrador del controlador) en el lado izquierdo de la ventana de<br />
preferencias.<br />
2. Junto a Device, seleccione <strong>NDX900</strong> Deck A Controls (Controles de la bandeja A de <strong>NDX900</strong>) (la bandeja que<br />
haya conectado primero a la computadora es la ‘Bandeja A.)<br />
3. En In-Port (Puerto de entrada), seleccione <strong>Numark</strong> <strong>NDX900</strong>.<br />
4. En Out-Port (Puerto de salida), seleccione <strong>Numark</strong> <strong>NDX900</strong>.<br />
5. Junto a Device (Dispositivo), seleccione <strong>NDX900</strong> Deck B Controls (Controles de la bandeja B de <strong>NDX900</strong>).<br />
6. En In-Port (Puerto de entrada), seleccione <strong>Numark</strong> <strong>NDX900</strong> #2.<br />
7. En Out-Port (Puerto de salida) seleccione NDX 900 #2.<br />
8. Haga clic en Close (Cerrar).<br />
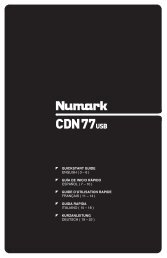
MAPA DEL CONTROL<br />
1. EXPULSAR<br />
2. MASTER DE USB<br />
3. FUENTE<br />
4. PERILLA DE PISTA<br />
5. RETROCEDER<br />
6. REPRODUCIR<br />
7. PAUSA<br />
8. CUE<br />
9. RUEDA DE AVANCE <strong>LE</strong>NTO<br />
10. RAYADO<br />
11. BÚSQUEDA<br />
12. TIEMPO DE PARADA / INICIO<br />
13. TAP (GOLPE)<br />
14. PITCH / BLOQUEO DE TONALIDAD<br />
15. FADER DE PITCH<br />
16. INF<strong>LE</strong>XIÓN DE PITCH<br />
17. CONMUTADOR DE B<strong>LE</strong>EP / REVERSA<br />
18. ENTRADA / SALIDA / REPETICIÓN DEL<br />
LOOP<br />
19. BOTONES DE DISPARO<br />
20. FUNCIONES SECUNDARIAS<br />
21. GRABAR<br />
22. MODO (BOTÓN)<br />
23. EFECTOS<br />
24. SE<strong>LE</strong>CCIÓN DE EFECTO<br />
25. FADER DE SONIDO CON EFECTOS /<br />
SONIDO ORIGINAL<br />
26. PARÁMETRO<br />
27. PROGRAMA<br />
28. TIEMPO<br />
29. RECUPERAR / ALMACENAR<br />
30. MODO (REPRODUCCIÓN)<br />
31. PANTALLA LCD<br />
2 3<br />
5<br />
31<br />
26 27<br />
30<br />
28 29<br />
25<br />
17<br />
10<br />
12<br />
1<br />
24<br />
23<br />
7<br />
13<br />
8<br />
9<br />
20<br />
7<br />
11<br />
6<br />
4<br />
18<br />
21 22 19<br />
15<br />
14<br />
16
INSTALLATION DU <strong>NDX900</strong> ET DU TRAKTOR <strong>LE</strong> 2<br />
INSTALLATION DES PILOTES (UTILISATEURS WINDOWS)<br />
1. Insérez le disque du logiciel dans le lecteur DVD-ROM de votre ordinateur.<br />
2. Parcourez le répertoire ASIO4ALL et recherchez le fichier ASIO4ALL.exe.<br />
3. Suivez les instructions à l’écran pour installer le pilote ASIO4ALL à faible latence.<br />
INSTALLATION DU LOGICIEL TRAKTOR <strong>LE</strong>2<br />
1. Insérez le disque TRAKTOR <strong>LE</strong> 2 dans le lecteur DVD-ROM de votre ordinateur.<br />
Windows : Double-cliquez sur « Poste de travail », puis double-cliquez sur disque. Une fois le contenu du DVD-<br />
ROM affiché, double-cliquez sur le fichier d'installation du TRAKTOR <strong>LE</strong> 2 (.exe).<br />
Mac : Double-cliquez le disque. Une fois le contenu du DVD-ROM affiché, double-cliquez sur le fichier<br />
d'installation du TRAKTOR <strong>LE</strong> 2 (.dmg).<br />
2. Suivez les instructions à l’écran pour installer le logiciel.<br />
Remarque : Il se peut que l'assistant d’installation du TRAKTOR <strong>LE</strong> 2 vous demande de faire l’installation du<br />
pilote matériel. Cliquez sur « Next » ou sur « Continue » afin de sauter cette étape.<br />
3. Branchez le <strong>NDX900</strong> à votre ordinateur. Sous Windows, il se peut que quelques boîtes de dialogue s'affichent<br />
indiquant que l’ordinateur recherche le nouveau matériel. Veuillez attendre environ une minute qu’il ait terminé.<br />
4. Lancez TRAKTOR <strong>LE</strong> 2. Dans la fenêtre qui s’affiche, cliquez sur « Activate » afin de procéder à l'inscription du<br />
logiciel. L’assistant Native Instruments Service Center devrait s’ouvrir. Vous devez être connecté à l’Internet pour<br />
accéder au Centre de service afin de procéder à l'inscription du logiciel.<br />
5. Dans la fenêtre de connexion du centre de service, cliquez sur « Create new User Account » (si vous n’en avez<br />
pas déjà un), et suivez les instructions à l’écran afin de compléter l’inscription. Vous devez avoir en main le<br />
numéro de série du logiciel qui se trouve sur la pochette du DVD.<br />
Remarque : Pour plus d'assistance et d'information, consultez le guide d'utilisation du TRAKTOR <strong>LE</strong> 2 en cliquant<br />
sur le menu « Help ».<br />
CONFIGURATION DU <strong>NDX900</strong><br />
1. Branchez le contrôleur <strong>NDX900</strong> sur un des ports USB de votre ordinateur. Mettez le <strong>NDX900</strong> en marche.<br />
2. Appuyez sur SOURCE.<br />
3. Tournez le bouton PARAMETER jusqu’à ce USB-MIDI s’affiche.<br />
4. Appuyez sur le bouton PARAMETER afin de confirmer la sélection.<br />
5. Pour configurer le <strong>NDX900</strong> comme appareil de lecture par défaut :<br />
Windows XP : Cliquez sur Panneau de configuration Sons et périphériques audio l’onglet « Audio », puis sous<br />
« Lecture audio », sélectionnez « USB Audio codec » comme l’appareil par défaut. Cochez la case « Use only<br />
default devices ».<br />
Windows Vista : Cliquez sur Démarrer Panneau de configuration Son (en mode Classique). Cliquez sur l’onglet<br />
Lecture et sélectionnez « Haut-parleurs - USB audio codec ». Cliquez sur Appliquer afin de confirmer les<br />
modifications.<br />
Windows 7 : Cliquez sur Panneau de configuration Sons puis sur l’onglet Lecture sélectionnez « Haut-parleurs<br />
- USB audio codec ».<br />
Mac OSX : Consultez la section PÉRIPHÉRIQUES AGRÉGÉS.<br />
6. Configurez le <strong>NDX900</strong> comme l’appareil de lecture par défaut. Suivez les mêmes étapes que celle ci-dessus si<br />
vous avez un deuxième contrôleur <strong>NDX900</strong>.<br />
PÉRIPHÉRIQUES AGRÉGÉS (MAC)<br />
1. Cliquez sur le bureau Mac afin de faire apparaître le Finder dans le coin supérieur gauche de l’écran.<br />
2. Cliquez sur le menu Aller dans le haut de l’écran et sélectionnez Utilitaires.<br />
3. Double-cliquez sur Configuration audio et MIDI dans la fenêtre qui apparaît.<br />
4. À partir de l’utilitaire de configuration audio et MIDI, cliquez sur l’onglet Audio dans le haut de l’écran et<br />
sélectionnez « Ouvrir l’éditeur de périphérique agrégé ».<br />
5. Cliquez le bouton + dans la fenêtre qui apparaît.<br />
6. Sous Structure, il devrait y avoir quatre périphériques USB Audio Codec. Si vous utilisez deux <strong>NDX900</strong>, ils<br />
apparaîtront avec chacun 2 entrées et deux sorties. Cochez les quatre périphériques USB Audio Codec listés.<br />
Ceci permet de fusionner les quatre périphériques USB Audio Codec en un périphérique, permettant au<br />
TRAKTOR <strong>LE</strong> 2 d’accéder à toutes les entrées et sorties en même temps.<br />
7. Cliquez sur Terminer.<br />
8
CONFIGURATION DU TRAKTOR <strong>LE</strong> 2<br />
1. Sur le <strong>NDX900</strong> qui est branché à l’ordinateur via la connexion USB, lancez TRAKTOR <strong>LE</strong> 2.<br />
2. À partir du TRAKTOR <strong>LE</strong> 2, cliquez sur Help > Start <strong>Setup</strong> Wizard.<br />
3. Cliquez sur Next dans la fenêtre qui apparaît afin d’accéder à <strong>Traktor</strong> <strong>LE</strong>2 <strong>Controller</strong> Selection.<br />
4. À côté du champ Are you using an external controller?, sélectionnez Yes, puis cliquez sur Next.<br />
5. Réglez le champ Manufacturer à <strong>Numark</strong>. Si vous utilisez deux contrôleurs <strong>NDX900</strong>, réglez le champ Model à<br />
<strong>NDX900</strong> <strong>LE</strong> Dual Deck. Si vous n’utilisez qu’un contrôleur <strong>NDX900</strong>, réglez-le à <strong>NDX900</strong> <strong>LE</strong> Single Deck, puis<br />
cliquez sur Next.<br />
6. Dans la fenêtre de configuration de la console de mixage à côté du champ Are you using an external mixer?,<br />
sélectionnez No.<br />
7. Cliquez sur Next et vérifiez les réglages choisis.<br />
8. Cliquez sur Finish.<br />
Configuration audio du TRAKTOR <strong>LE</strong> 2 (PC)<br />
1. Accédez au menu des préférences du TRAKTOR <strong>LE</strong> 2 afin de faire la configuration audio.<br />
2. Cliquez sur File > Preferences.<br />
3. Dans la section Audio Device sous les plateformes Windows, veuillez vous assurer que ASIO4ALL est<br />
sélectionné. Cliquez sur le bouton Settings afin d’ouvrir la boîte de dialogue ASIO4ALL. Veuillez vous assurer que<br />
USB Audio Device a été activé (surbrillance bleue), puis fermez la fenêtre. Ceci permettra à la sortie audio du<br />
TRAKTOR <strong>LE</strong> 2 sera routée via la connexion USB au <strong>NDX900</strong> et via sa sortie audio RCA USB.<br />
4. Pour configurer l’entrée et la sortie audio, cliquez sur Output Routing sur le côté gauche de la fenêtre des<br />
préférences.<br />
5. Sous Mixing Mode, sélectionnez External.<br />
6. Sous Output Deck A, sélectionnez USB Audio Codec 1 for ‘L’ and USB Audio Codec 2 for ‘R’.<br />
7. Sous Output Deck B, sélectionnez USB Audio Codec 1 for ‘L’ and USB Audio Codec 2 for ‘R’.<br />
Si vous utilisez deux contrôleurs <strong>NDX900</strong> :<br />
Sous Output Deck A, sélectionnez USB Audio Codec 1 for ‘L’ and USB Audio Codec 1 for ‘R’.<br />
Sous Output Deck B, sélectionnez USB Audio Codec 2 for ‘L’ and USB Audio Codec 2 for ‘R’.<br />
Configuration audio du TRAKTOR <strong>LE</strong> 2’s (Mac)<br />
1. Cliquez sur le menu TRAKTOR <strong>LE</strong> 2 dans le coin supérieur gauche de l’écran et sélectionnez Preferences.<br />
2. Cliquez sur le bouton + à côté de Audio <strong>Setup</strong> à gauche de la fenêtre qui s’ouvre.<br />
3. À gauche, sous Audio <strong>Setup</strong>, cliquez sur Soundcard.<br />
4. À droite de la fenêtre, dans le champ Audio Device, sélectionnez Aggregate Device.<br />
5. À partir de la fenêtre des préférences TRAKTOR <strong>LE</strong> 2, à gauche, sous Audio <strong>Setup</strong>, cliquez sur Output Routing.<br />
6. À droite de la fenêtre, dans le champ Mixer Mode, sélectionnez External.<br />
7. Dans le champ Out Channel A, pour Left, sélectionnez Aggregate Device Out 1. Pour Right, sélectionnez<br />
Aggregate Device Out 2.<br />
8. Dans le champ Out Channel B, pour Left, sélectionnez Aggregate Device Out 1. Pour Right, sélectionnez<br />
Aggregate Device Out 2. Si vous utilisez deux contrôleurs <strong>NDX900</strong>, pour Left, sélectionnez Aggregate Device<br />
Out 3. Pour Right, sélectionnez Aggregate Device Out 4.<br />
Configuration du contrôleur TRAKTOR <strong>LE</strong> 2<br />
Si vous n’utilisez qu’un contrôleur <strong>NDX900</strong> :<br />
Configuration du <strong>NDX900</strong> comme contrôleur d’un module du TRAKTOR <strong>LE</strong> 2 :<br />
1. Cliquez sur <strong>Controller</strong> Manager à gauche dans la fenêtre Preferences.<br />
2. Dans le champ Device, sélectionnez <strong>NDX900</strong> Single Deck Controls.<br />
3. Sous In-Port, sélectionnez <strong>Numark</strong> <strong>NDX900</strong>.<br />
4. Sous Out-Port, sélectionnez <strong>Numark</strong> <strong>NDX900</strong>.<br />
5. Dans le champ Device Target, sélectionnez Focus.<br />
6. Le <strong>NDX900</strong> commandera le module sélectionné (focused) dans la fenêtre principale du TRAKTOR <strong>LE</strong> 2.<br />
7. Pour changer le module sélectionné, vous pouvez cliquer sur le bouton RECALL dans le coin supérieur droit du<br />
HDX900, ou encore, utiliser le clavier ou la souris afin de sélectionner le module A ou B à partir du logiciel<br />
TRAKTOR <strong>LE</strong> 2.<br />
8. Cliquez sur Close.<br />
Si vous utilisez deux contrôleurs <strong>NDX900</strong>:<br />
1. Cliquez sur <strong>Controller</strong> Manager à gauche dans la fenêtre Preferences.<br />
2. Dans le champ Device, sélectionnez <strong>NDX900</strong> Deck A Controls (le module que vous avez branché à l’ordinateur<br />
en premier devient le module A).<br />
3. Sous In-Port, sélectionnez <strong>Numark</strong> <strong>NDX900</strong>.<br />
4. Sous Out-Port, sélectionnez <strong>Numark</strong> <strong>NDX900</strong>.<br />
5. Dans le champ Device, sélectionnez <strong>NDX900</strong> Deck B Controls.<br />
6. Sous In-Port, sélectionnez <strong>Numark</strong> NDX 900 #2.<br />
7. Sous Out-Port, sélectionnez NDX 900 #2.<br />
8. Cliquez sur Close.<br />
9
BOUTONS DE COMMANDE<br />
1. TOUCHE D’ÉJECTION<br />
2. PORT USB PRINCIPAL<br />
3. SOURCE<br />
4. BOUTON PISTE<br />
5. RETOUR<br />
6. <strong>LE</strong>CTURE<br />
7. PAUSE<br />
8. RECHERCHE<br />
9. MO<strong>LE</strong>TTE<br />
10. SCRATCH<br />
11. RECHERCHE<br />
12. HEURE D’ARRÊT/DÉPART<br />
13. TAP<br />
14. TONALITÉ/VERROUILLAGE<br />
15. ATTÉNUATEUR DE TONALITÉ<br />
16. MODIFICATION TEMPORAIRE DE LA<br />
TONALITÉ ET DE LA VITESSE<br />
17. <strong>LE</strong>CTURE INVERSÉE<br />
18. ENTRÉE/SORTIE DE<br />
BOUC<strong>LE</strong>/REBOUCLAGE<br />
19. TOUCHES D’ACTIVATION<br />
20. TOUCHE SHIFT/AUTRES FONCTIONS<br />
21. ENREGISTREMENT<br />
22. MODE<br />
23. EFFETS<br />
24. SÉ<strong>LE</strong>CTEUR D’EFFET<br />
25. POTENTIOMÈTRE DU SIGNAL<br />
TRAITÉ/NON TRAITÉ<br />
26. PARAMÈTRE<br />
27. PROGRAMME<br />
28. DURÉE<br />
29. RAPPEL/SAUVEGARDE<br />
30. MODE (DE <strong>LE</strong>CTURE)<br />
31. ÉCRAN À CRISTAUX LIQUIDES<br />
2 3<br />
5<br />
31<br />
26 27<br />
30<br />
28 29<br />
25<br />
17<br />
10<br />
12<br />
1<br />
24<br />
23<br />
10<br />
13<br />
8<br />
9<br />
20<br />
7<br />
11<br />
6<br />
4<br />
18<br />
21 22 19<br />
15<br />
14<br />
16
SETUP DI <strong>NDX900</strong> E TRAKTOR <strong>LE</strong> 2<br />
1. INSTALLAZIONE DEI DRIVER (UTENTI WINDOWS)<br />
1. Inserire il disco recante il software d'installazione in dotazione nel drive DVD-ROM del computer.<br />
2. Navigare fino alla cartella ASIO4ALL e individuare il file ASIO4ALL.exe.<br />
3. Seguire le istruzioni su schermo per installare i driver ASIO4ALL a bassa latenza in dotazione.<br />
2. INSTALLAZIONE DEL SOFTWARE (TRAKTOR <strong>LE</strong>2)<br />
1. Inserire il disco recante il software d'installazione del TRAKTOR <strong>LE</strong> 2 in dotazione nel drive DVD-ROM del<br />
computer.<br />
Windows: fare doppio clic su "Computer" quindi fare doppio clic sul disco. Non appena compaiono i contenuti del<br />
disco, fare doppio clic sul file di installazione del TRAKTOR <strong>LE</strong> 2 (.exe).<br />
Mac: fare doppio clic sul disco. Non appena compaiono i contenuti del disco, fare doppio clic sul file di<br />
installazione del TRAKTOR <strong>LE</strong> 2 (.dmg).<br />
2. Seguire le istruzioni su schermo per installare il software.<br />
Nota bene: la procedura guidata di installazione del TRAKTOR <strong>LE</strong> 2 potrebbe chiedere di installare un driver<br />
hardware. Cliccare su "Next" o su "Continue" per saltare queste schermate.<br />
3. Collegare l'<strong>NDX900</strong> al computer. (Se si utilizza Windows, possono comparire diverse finestre di dialogo<br />
nell'angolo dello schermo, a indicare che sta "riconoscendo" l'hardware per la prima volta. Attendere un minuto<br />
fino a che questa operazione non sia completata.)<br />
4. Aprire il TRAKTOR <strong>LE</strong> 2. Nella finestra che compare, cliccare il tasto "Activate" (attiva) per registrare il software.<br />
Verrà lanciato il centro servizi Native Instruments. (Sarà necessario essere collegati a Internet per accedere al<br />
centro servizi per registrare il software.)<br />
5. Nella finestra di login del centro servizi, fare clic su "Create new User Account" (crea nuovo account utente) (se<br />
non se ne possiede ancora uno) e seguire le istruzioni che compaiono su schermo per completare la<br />
registrazione. (Per farlo, occorrerà il numero di serie presente sulla custodia del DVD in dotazione.)<br />
Nota bene: per ulteriore assistenza e maggiori informazioni, è possibile trovare il manuale del TRAKTOR <strong>LE</strong> 2<br />
recandosi nel menu "Help" del software.<br />
3. SETUP DELL'<strong>NDX900</strong><br />
1. Collegare il controller <strong>NDX900</strong> ad una porta USB del computer. Accendere il <strong>Controller</strong> <strong>NDX900</strong>.<br />
2. Premere SOURCE.<br />
3. Ruotare la manopola PARAMETER fino a quando sullo schermo non compare USB-MIDI.<br />
4. Premere la manopola PARAMETER (come se fosse un pulsante) per confermare la scelta.<br />
5. Per configurare l'<strong>NDX900</strong> come dispositivo di riproduzione predefinito:<br />
Windows XP: recarsi sul Pannello di controllo di Windows Suoni e periferiche audio scheda Audio e come<br />
dispositivo di riproduzione predefinito selezionare ‘USB Audio Codec’. Spuntare la casella per ‘Utilizzare unicamente<br />
dispositivi predefiniti’.<br />
Windows Vista: recarsi su Start Pannello di controllo Audio (in visualizzazione Classica). Quindi, cliccare<br />
sulla linguetta Registrazione ed evidenziare l’ingresso ‘Casse - (USB Audio Codec)’. Infine, cliccare su Applica per<br />
accettare le impostazioni.<br />
Windows 7: recarsi su Pannello di controllo Audio e nella scheda riproduzione selezionare ‘Speakers - USB Audio<br />
Codec’.<br />
Mac OSX: si veda il paragrafo DISPOSITIVI AGGREGATI.<br />
6. Impostare l'<strong>NDX900</strong> come dispositivo di riproduzione predefinito. Seguire le stesse fasi di cui sopra se si dispone<br />
di un secondo controller <strong>NDX900</strong>.<br />
DISPOSITIVI AGGREGATI (MAC)<br />
1. Cliccare sul desktop del Mac in modo che il Finder sia visualizzato nella parte superiore sinistra dello schermo.<br />
2. Selezionare il menu Go nella parte superiore dello schermo e scegliere Utilities.<br />
3. Nella finestra che si apre, fare doppio clic su Audio MIDI <strong>Setup</strong>.<br />
4. Una volta aperta l'utility Audio MIDI <strong>Setup</strong>, selezionare la scheda Audio in cima allo schermo; selezionare il<br />
menu Audio e scegliere Open Aggregate Device Editor.<br />
5. Nella finestra che si apre, cliccare il tasto + .<br />
6. Sotto Structure dovrebbero essere elencati quattro dispositivi USB Audio Codec. Se si utilizzano due <strong>NDX900</strong>s,<br />
ciascuno di essi sarà elencato come avente 2 ingressi e 2 uscite. Collocare un segno di spunta accanto a<br />
ciascuno dei quattro dispositivi USB Audio Codec elencati. In questo modo si fonderanno tutti e quattro i<br />
dispositivi USB Audio Codec in un solo dispositivo, consentendo al TRAKTOR <strong>LE</strong>2 di accedere a tutti gli ingressi<br />
e le uscite in una volta sola.<br />
7. Cliccare su "Done" (fatto).<br />
11
4. SETUP DEL TRAKTOR <strong>LE</strong> 2 Procedura guidata di configurazione del TRAKTOR <strong>LE</strong> 2<br />
1. Dopo aver collegato l'<strong>NDX900</strong> al computer tramite USB, lanciare il TRAKTOR <strong>LE</strong> 2.<br />
2. Quindi, in TRAKTOR <strong>LE</strong> 2, recarsi su Help > Start <strong>Setup</strong> Wizard.<br />
3. Nella finestra che si apre, cliccare su Next per arrivare a <strong>Traktor</strong> <strong>LE</strong>2 <strong>Controller</strong> Selection.<br />
4. Di fianco a Are you using an external controller? (si utilizza un controller esterno?) selezionare Yes (Sì),<br />
quindi cliccare su Next (avanti).<br />
5. Impostare il manufacturer (produttore) su <strong>Numark</strong>. Se si utilizzano due controller <strong>NDX900</strong>, impostare il model<br />
(modello) su <strong>NDX900</strong> <strong>LE</strong> Dual Deck.<br />
Se si utilizza un solo <strong>NDX900</strong>, impostare model (modello) su ‘<strong>NDX900</strong> <strong>LE</strong> Single Deck’ e cliccare su Next.<br />
6. Nella pagina di configurazione del mixer (Mixer <strong>Setup</strong>) di fianco ad Are you using an external mixer?<br />
selezionare No.<br />
7. Cliccare su Next e rivedere le configurazioni prescelte.<br />
8. Cliccare su "Finish" (finito).<br />
<strong>Setup</strong> dell'audio del TRAKTOR <strong>LE</strong> 2 (PC)<br />
1. Recarsi nel menu Preferences (opzioni) in TRAKTOR <strong>LE</strong> 2 per configurare Audio <strong>Setup</strong>.<br />
2. Recarsi su File > Preferences.<br />
3. Nell'area Audio Device area se ci si trova su piattaforma Windows assicurarsi che ASIO4ALL sia selezionato.<br />
Cliccare sul pulsante Settings per aprire la finestra di dialogo ASIO4ALL. Assicurarsi che lo status sotto a USB<br />
Audio Device (dispositivo audio USB) sia ‘attivo’ (evidenziato in blu) e chiudere la casella. In questo modo l'uscita<br />
audio del TRAKTOR <strong>LE</strong> 2 potrà essere inviata attraverso il collegamento USB all'<strong>NDX900</strong> e trasmessa tramite<br />
l'uscita audio RCA USB.<br />
4. Per impostare la configurazione di ingressi e uscite audio cliccare su Output Routing sul lato sinistro della<br />
finestra "preferences" (opzioni)<br />
5. Sotto Mixing Mode (modalità di mixaggio), scegliere External (esterna).<br />
6. Sotto Output Deck A, scegliere USB Audio Codec 1 per ‘L’ e USB Audio Codec 2 per ‘R’.<br />
7. Sotto Output Deck B, scegliere USB Audio Codec 1 per ‘L’ e USB Audio Codec 2 per ‘R’.<br />
Se si utilizzano 2 deck <strong>NDX900</strong>:<br />
• Sotto Output Deck A, scegliere USB Audio Codec 1 per ‘L’ e USB Audio Codec 1 per ‘R’.<br />
• Sotto Output Deck B, scegliere USB Audio Codec 2 per ‘L’ e USB Audio Codec 2 per ‘R’.<br />
<strong>Setup</strong> dell'audio del TRAKTOR <strong>LE</strong> 2 (Mac)<br />
1. Cliccare sul menu TRAKTOR <strong>LE</strong> 2 nella parte superiore sinistra dello schermo e selezionare Preferences<br />
(opzioni).<br />
2. Sul lato sinistro della finestra che si apre, cliccare il + di fianco ad Audio <strong>Setup</strong>.<br />
3. Quindi, sotto Audio <strong>Setup</strong> sulla sinistra, cliccare su Soundcard (scheda audio).<br />
4. Sul lato destro della finestra, di fianco ad Audio Device, selezionare Aggregate Device.<br />
5. Sul lato sinistro della finestra "preferences" del TRAKTOR, sotto ad Audio <strong>Setup</strong> cliccare su Output Routing<br />
(convogliamento uscita).<br />
6. Sul lato destro della finestra, di fianco a Mixer Mode (modalità mixer), selezionare External (esterna).<br />
7. Di fianco ad Out Channel A, per Left (sinistra), selezionare Aggregate Device Out 1. Per Right (destra),<br />
selezionare Aggregate Device Out 2.<br />
8. Di fianco ad Out Channel B, per Left (sinistra), selezionare Aggregate Device Out 1. Per Right (destra),<br />
selezionare Aggregate Device Out 2.<br />
Se si utilizzano 2 <strong>NDX900</strong>s, per Left (sinistra), selezionare Aggregate Device Out 3. Per Right (destra),<br />
selezionare Aggregate Device Out 4.<br />
Configurazione del manager del controller TRAKTOR <strong>LE</strong> 2<br />
Se si utilizza un singolo <strong>NDX900</strong>:<br />
Configurare l'<strong>NDX900</strong> per il controllo di un Deck in TRAKTOR <strong>LE</strong> 2:<br />
1. Cliccare su <strong>Controller</strong> Manager sul lato sinistro della finestra Preferences (opzioni).<br />
2. Di fianco a Device, selezionare <strong>NDX900</strong> Single Deck Controls.<br />
3. Sotto In-Port (porta di ingresso), selezionare <strong>Numark</strong> <strong>NDX900</strong>.<br />
4. Sotto Out-Port (porta di uscita), selezionare <strong>Numark</strong> <strong>NDX900</strong>.<br />
5. Di fianco a Device Target, selezionare Focus.<br />
6. L'<strong>NDX900</strong> controllerà qualsiasi deck venga messo in evidenza (selezionato) sulla schermata principale del<br />
TRAKTOR <strong>LE</strong> 2.<br />
7. Per cambiare il deck in evidenza si può cliccare il tasto RECALL nell'angolo superiore destro dell'hardware<br />
<strong>NDX900</strong>, oppure utilizzare la tastiera o il mouse per selezionare il deck A o B dal software TRAKTOR <strong>LE</strong> 2.<br />
8. Cliccare su "Close" (chiudi).<br />
12
Se si utilizzano due <strong>NDX900</strong>:<br />
1. Cliccare su <strong>Controller</strong> Manager sul lato sinistro della finestra "Preferences" (opzioni).<br />
2. Di fianco a Device, selezionare <strong>NDX900</strong> Deck A Controls (qualsiasi deck venga collegato al computer per primo<br />
diventerà il ‘Deck A’.)<br />
3. Sotto In-Port (porta di ingresso), selezionare <strong>Numark</strong> <strong>NDX900</strong>.<br />
4. Sotto Out-Port (porta di uscita), selezionare <strong>Numark</strong> <strong>NDX900</strong>.<br />
5. Di fianco a Device, selezionare <strong>NDX900</strong> Deck B Controls.<br />
6. Sotto In-Port (porta di ingresso), selezionare <strong>Numark</strong> NDX 900 #2.<br />
7. Sotto Out-Port (porta di uscita), selezionare NDX 900 #2.<br />
8. Cliccare su "Close" (chiudi).<br />
MAPPA DEI COMANDI<br />
1. EJECT (espulsione)<br />
2. USB MASTER<br />
3. SOURCE (fonte)<br />
4. TRACK KNOB (manopola)<br />
5. BACK (indietro)<br />
6. PLAY<br />
7. PAUSE (pausa)<br />
8. CUE<br />
9. ROTELLA JOG WHEEL<br />
10. SCRATCH<br />
11. SEARCH (cerca)<br />
12. STOP / START TIME (tempo di<br />
interruzione / inizio)<br />
13. TAP<br />
14. PITCH / KEYLOCK (pitch / blocco<br />
tonalità)<br />
15. FADER DEL PITCH<br />
16. BEND DEL PITCH<br />
17. INTERRUTTORE B<strong>LE</strong>EP / REVERSE<br />
18. LOOP IN / OUT / RELOOP<br />
19. TASTI TRIGGER<br />
20. SHIFT<br />
21. REC (registra)<br />
22. TASTO MODE (MODALITÀ)<br />
23. FX<br />
24. FX SE<strong>LE</strong>CT<br />
25. FADER WET / DRY<br />
26. PARAMETRO<br />
27. PROG (Programma)<br />
28. TIME (tempo)<br />
29. RECALL / STORE (richiama /<br />
memorizza)<br />
30. MODALITÀ DI RIPRODUZIONE (PLAY)<br />
31. DISPLAY LCD<br />
2 3<br />
5<br />
31<br />
26 27<br />
30<br />
28 29<br />
25<br />
17<br />
10<br />
12<br />
1<br />
24<br />
23<br />
13<br />
13<br />
8<br />
9<br />
20<br />
7<br />
11<br />
6<br />
4<br />
18<br />
21 22 19<br />
15<br />
14<br />
16
SETUP von <strong>NDX900</strong> UND TRAKTOR <strong>LE</strong> 2<br />
1. TREIBER-INSTALLATION (FÜR WINDOWS)<br />
1. Legen Sie die mitgelieferte <strong>Software</strong>-Installations-Disk in das DVD-Laufwerk Ihres Computers ein.<br />
2. Navigieren Sie zum Verzeichnis ASIO4ALL und suchen Sie die Datei ASIO4ALL.exe.<br />
3. Befolgen Sie die Anweisungen auf dem Bildschirm, um den mitgelieferten ASIO4ALL-Treiber für eine geringe<br />
Latenz zu installieren.<br />
2. SOFTWARE-INSTALLATION (TRAKTOR <strong>LE</strong>2)<br />
1. Legen Sie die mitgelieferte TRAKTOR <strong>LE</strong> 2 <strong>Software</strong>-Installations-Disk in das DVD-Laufwerk Ihres Computers ein.<br />
Windows: Doppelklicken Sie auf "Arbeitsplatz" und anschließend auf die Disk. Sobald der Inhalt der Disc<br />
angezeigt wird, doppelklicken Sie auf die TRAKTOR <strong>LE</strong> 2 Installationsdatei (.exe).<br />
Mac: Doppelklicken Sie auf die Disk. Sobald der Inhalt der Disk angezeigt wird, doppelklicken Sie auf die<br />
TRAKTOR <strong>LE</strong> 2 Installationsdatei (.dmg).<br />
2. Befolgen Sie die Anweisungen auf dem Bildschirm, um die <strong>Software</strong> zu installieren.<br />
Hinweis: Der TRAKTOR <strong>LE</strong> 2 Assistent könnte Sie auffordern, einen Hardware-Treiber zu installieren. Klicken Sie<br />
auf "Weiter" oder "Fortfahren“, um diese Anzeigen zu überspringen.<br />
3. Verbinden Sie Ihren <strong>NDX900</strong> mit Ihrem Computer. (Wenn Sie Windows verwenden, kann es sein, dass Sie<br />
mehrere Dialogfelder in der Bildschirmecke sehen, die angeben, dass die Hardware zum ersten Mal "erkannt"<br />
wurde. Warten Sie eine Minute, bis dieser Vorgang abgeschlossen ist.)<br />
4. Öffnen Sie TRAKTOR <strong>LE</strong> 2. Im nun angezeigten Fenster klicken Sie auf die Schaltfläche "Aktivieren", um die<br />
<strong>Software</strong> zu registrieren. Das Native Instruments Service Center wird gestartet. (Sie müssen mit dem Internet<br />
verbunden sein, um Ihre <strong>Software</strong> im Service Center registrieren zu können.)<br />
5. Im Login-Fenster des Service Centers, klicken Sie auf "Neues Benutzerkonto anlegen" (falls Sie nicht schon<br />
über eines verfügen) und folgen den Anweisungen am Bildschirm, um Ihre Registrierung abzuschließen. (Dazu<br />
benötigen Sie die Seriennummer auf der mitgelieferten DVD-Hülle.)<br />
Hinweis: Weitere Hilfe und Informationen finden Sie im TRAKTOR <strong>LE</strong> 2 Handbuch. Gehen Sie dazu in Ihrer<br />
<strong>Software</strong> in das Menü "Hilfe".<br />
3. <strong>NDX900</strong> SETUP<br />
1. Verbinden Sie den <strong>NDX900</strong>-<strong>Controller</strong> mit einem USB-Port an der Rückseite Ihres Computers. Schalten Sie den<br />
<strong>NDX900</strong>-<strong>Controller</strong> ein.<br />
2. Drücken Sie QUEL<strong>LE</strong>.<br />
3. Drehen Sie den PARAMETER-Regler bis der Bildschirm USB-MIDI anzeigt.<br />
4. Drücken Sie den PARAMETER-Regler (wie einen Knopf), um Ihre Auswahl zu bestätigen.<br />
5. So konfigurieren Sie den <strong>NDX900</strong> als Standard-Wiedergabegerät:<br />
Windows XP: Öffnen Sie die Windows-Systemsteuerung Sounds und Audiogeräte Registerkarte Audio und<br />
wählen Sie als Standard-Wiedergabegerät "USB Audio Codec". Aktivieren Sie das Kontrollkästchen für "Nur<br />
bevorzugte Geräte verwenden".<br />
Windows Vista: Wählen Sie Start Systemsteuerung Sound (in der klassischen Ansicht). Gehen Sie dann auf<br />
die Registerkarte Wiedergabe und markieren "Lautsprecher-USB Audio Codec". Klicken Sie auf Anwenden, um die<br />
Einstellungen anzuwenden.<br />
Windows 7: Öffnen Sie die Windows-Systemsteuerung Sounds und wählen bei der Registerkarte Wiedergabe<br />
"Lautsprecher- USB Audio Codec".<br />
Mac OSX: Siehe Abschnitt AGGREGATE DEVICES (Geräte-Editor).<br />
6. Konfigurieren Sie <strong>NDX900</strong> als Standard-Wiedergabegerät. Befolgen Sie die oben genannten Schritte, wenn<br />
Sie einen weiteren <strong>NDX900</strong>-<strong>Controller</strong> haben.<br />
AGGREGATE DEVICES (MAC)<br />
1. Klicken Sie auf den Mac-Desktop, so dass Finder in der oberen linken Bildschirmhälfte erscheint.<br />
2. Wählen Sie das Go-Menü aus der oberen Bildschirmhälfte und wählen Sie Dienstprogramme.<br />
3. In dem sich öffnenden Fenster doppelklicken Sie auf Audio-MIDI-<strong>Setup</strong>.<br />
4. Sobald das Dienstprogramm Audio-MIDI-<strong>Setup</strong> geöffnet ist, wählen Sie die Registerkarte Audio am oberen<br />
Bildschirmrand aus, wählen das Audio-Menü und Aggregate Device Editor öffnen.<br />
5. In dem sich öffnenden Fenster klicken Sie auf die Schaltfläche +.<br />
6. Unter Struktur sollten vier USB Audio Codec-Geräte aufgelistet werden. Wenn Sie zwei <strong>NDX900</strong>s verwenden,<br />
werden diese mit jeweils 2 Eingängen und jeweils 2 Ausgängen angeführt. Setzen Sie ein Häkchen neben jedes<br />
der vier aufgelisteten USB Audio Codec-Geräte. Dies wird alle vier USB Audio Codec-Geräte in einem Gerät<br />
zusammenfassen und ermöglicht TRAKTOR <strong>LE</strong>2 auf alle Ein- und Ausgänge gleichzeitig zuzugreifen.<br />
7. Klicken Sie auf Fertig.<br />
14
4. TRAKTOR <strong>LE</strong> 2 SETUP TRAKTOR <strong>LE</strong> 2 <strong>Setup</strong>-Assistent<br />
1. Schließen Sie <strong>NDX900</strong> über USB an den Computer an und starten TRAKTOR <strong>LE</strong> 2.<br />
2. Navigieren Sie in TRAKTOR <strong>LE</strong> 2 zu Hilfe > Assistent starten.<br />
3. Im sich öffnenden Fenster klicken Sie auf Weiter, um zur Auswahl des <strong>Traktor</strong> <strong>LE</strong>2 <strong>Controller</strong>s zu gelangen.<br />
4. Neben "Verwenden Sie einen externen <strong>Controller</strong>?" wählen Sie "Ja" und klicken dann auf Weiter.<br />
5. Stellen Sie <strong>Numark</strong> als Hersteller ein. Wenn Sie zwei <strong>NDX900</strong>-<strong>Controller</strong> verwenden, stellen Sie als Modell<br />
<strong>NDX900</strong> <strong>LE</strong> Dual Deck ein. Wenn Sie mit einem einzigen <strong>NDX900</strong> arbeiten, stellen sie als Modell "<strong>NDX900</strong> <strong>LE</strong><br />
Single Deck" ein und klicken auf Weiter.<br />
6. Auf der <strong>Setup</strong>-Seite des Mixers neben "Verwenden Sie einen externen Mixer? " Wählen Sie "Nein".<br />
7. Klicken Sie auf Weiter und überprüfen die Einstellungen, die Sie gewählt haben.<br />
8. Klicken Sie auf Fertigstellen.<br />
TRAKTOR <strong>LE</strong> 2 Audio-<strong>Setup</strong> (PC)<br />
1. Gehen Sie in das Menü Einstellungen in TRAKTOR <strong>LE</strong> 2, um das Audio-<strong>Setup</strong> zu konfigurieren.<br />
2. Wählen Sie Datei > Einstellungen.<br />
3. Wenn Sie auf einer Windows-Plattform arbeiten, stellen Sie sicher, dass im Bereich Audio-Gerät ASIO4ALL<br />
ausgewählt ist. Klicken Sie auf die Schaltfläche Einstellungen, um das Dialogfeld ASIO4ALL zu öffnen. Achten Sie<br />
darauf, dass der Status unter USB Audio-Gerät "aktiv" ist (blau markiert) und schließen Sie dieses Fenster<br />
danach. So kann die Audio-Ausgabe von TRAKTOR <strong>LE</strong> 2 über die USB-Verbindung zum <strong>NDX900</strong> gesendet und<br />
über den USB-Audio-Cinch-Ausgang ausgegeben werden.<br />
4. Um Ihren Audioeingang und -ausgang zu konfigurieren, klicken Sie auf Ausgangs-Routing auf der linken Seite<br />
des Fensters Einstellungen<br />
5. Unter Mixing-Modus wählen Sie Extern.<br />
6. Unter Ausgabe-Deck A wählen Sie USB Audio Codec 1 für 'L' und USB Audio Codec 2 für 'R'.<br />
7. Unter Ausgabe-Deck B wählen Sie USB Audio Codec 1 für 'L' und USB Audio Codec 2 für 'R'.<br />
Bei der Verwendung von 2 <strong>NDX900</strong> Decks:<br />
• Unter Ausgabe-Deck A wählen Sie USB Audio Codec 1 für 'L' und USB Audio Codec 1 für 'R'.<br />
• Unter Ausgabe-Deck B wählen Sie USB Audio Codec 2 für 'L' und USB Audio Codec 2 für 'R'.<br />
TRAKTOR <strong>LE</strong> 2 Audio-<strong>Setup</strong> (Mac)<br />
1. Klicken Sie auf das Menü TRAKTOR <strong>LE</strong> 2 im oberen linken Bildschirmbereich und wählen Einstellungen.<br />
2. Auf der linken Seite des Fensters, das nun geöffnet wird, klicken Sie auf das + neben Audio-<strong>Setup</strong>.<br />
3. Dann klicken Sie auf Soundkarte unter Audio-<strong>Setup</strong> auf der linken Seite.<br />
4. Auf der rechten Seite des Fensters, neben Audio-Gerät wählen Sie Aggregate Device.<br />
5. Auf der linken Seite des Fensters Einstellungen für TRAKTOR klicken Sie auf Ausgangs-Routing unter Audio-<br />
<strong>Setup</strong> auf der linken Seite.<br />
6. Auf der rechten Seite des Fensters, neben Mixer-Modus, wählen Sie Extern.<br />
7. Neben Ausgabekanal A für Links wählen Sie Aggregate Device Out 1. Für Rechts wählen Sie Aggregate<br />
Device Out 2.<br />
8. Neben Ausgabekanal B für Links wählen Sie Aggregate Device Out 1. Für Rechts wählen Sie Aggregate<br />
Device Out 2.<br />
Falls Sie 2 <strong>NDX900</strong> verwenden, wählen Sie für Links Aggregate Device Out 3. Für Rechts wählen Sie<br />
Aggregate Device Out 4.<br />
<strong>Setup</strong> für TRAKTOR <strong>LE</strong> 2 <strong>Controller</strong> Manager<br />
Wenn Sie einen einzigen <strong>NDX900</strong> verwenden:<br />
Richten Sie Ihren <strong>NDX900</strong> ein, um ein Deck in TRAKTOR <strong>LE</strong> 2 zu steuern:<br />
1. Klicken Sie auf <strong>Controller</strong> Manager auf der linken Seite des Fensters Einstellungen.<br />
2. Neben Gerät wählen Sie <strong>NDX900</strong> Single Deck Controls.<br />
3. Unter In-Port wählen Sie <strong>Numark</strong> <strong>NDX900</strong>.<br />
4. Unter Out-Port wählen Sie <strong>Numark</strong> <strong>NDX900</strong>.<br />
5. Neben Geräteziel wählen Sie Fokus.<br />
6. Der <strong>NDX900</strong> wird nun jenes Deck steuern, das am Hauptbildschirm des TRAKTOR <strong>LE</strong> 2 im Fokus liegt<br />
(ausgewähltes Deck).<br />
7. Um zu ändern, welches Deck im Fokus liegt, können Sie entweder die Taste AUFRUFEN in der oberen rechten<br />
Ecke der <strong>NDX900</strong> Hardware oder Ihre Tastatur oder Maus verwenden, um Deck A oder B innerhalb der<br />
TRAKTOR <strong>LE</strong> 2 <strong>Software</strong> auszuwählen.<br />
8. Klicken Sie Schließen.<br />
15
Wenn Sie zwei <strong>NDX900</strong> Einheiten verwenden:<br />
1. Klicken Sie auf <strong>Controller</strong> Manager auf der linken Seite des Fensters Einstellungen.<br />
2. Neben Gerät wählen Sie <strong>NDX900</strong> Deck A Controls (das Deck, das Sie zuerst an den Computer angeschlossen<br />
haben, wird zu "Deck A".)<br />
3. Unter In-Port wählen Sie <strong>Numark</strong> <strong>NDX900</strong>.<br />
4. Unter Out-Port wählen Sie <strong>Numark</strong> <strong>NDX900</strong>.<br />
5. Neben Gerät wählen Sie <strong>NDX900</strong> Deck B Controls.<br />
6. Unter In-Port wählen Sie <strong>Numark</strong> NDX 900 #2.<br />
7. Unter Out-Port wählen Sie NDX 900 #2.<br />
8. Klicken Sie Schließen.<br />
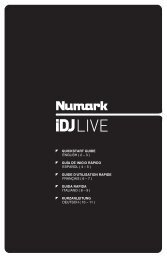
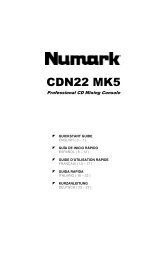
STEUERE<strong>LE</strong>MENTE<br />
1. AUSWERFEN<br />
2. USB MASTER<br />
3. QUEL<strong>LE</strong><br />
4. TRACK-REG<strong>LE</strong>R<br />
5. ZURÜCK<br />
6. WIEDERGABE<br />
7. PAUSE<br />
8. CUE<br />
9. JOGWHEEL<br />
10. SCRATCH<br />
11. SUCHEN<br />
12. STOPP- / START-ZEIT<br />
13. TAP<br />
14. PITCH / KEYLOCK<br />
15. PITCH-FADER<br />
16. PITCH-BEND<br />
17. B<strong>LE</strong>EP/RÜCKWÄRTS<br />
18. LOOP IN / OUT / RELOOP<br />
19. TRIGGER-TASTEN<br />
20. SHIFT<br />
21. REC<br />
22. (BUTTON) MODUS<br />
23. FX<br />
24. FX AUSWÄH<strong>LE</strong>N<br />
25. WET / DRY FADER<br />
26. PARAMETER<br />
27. PROG (Programm)<br />
28. ZEIT<br />
29. AUFRUFEN / SPEICHERN<br />
30. (WIEDERGABE) MODUS<br />
31. LCD-DISPLAY<br />
2 3<br />
5<br />
31<br />
26 27<br />
30<br />
28 29<br />
25<br />
17<br />
10<br />
12<br />
1<br />
24<br />
23<br />
MANUAL VERSION 1.1<br />
16<br />
13<br />
8<br />
9<br />
20<br />
7<br />
11<br />
6<br />
4<br />
18<br />
21 22 19<br />
15<br />
14<br />
16