Bedienungsanleitung Operating Instructions Mode d'emploi ... - Siku
Bedienungsanleitung Operating Instructions Mode d'emploi ... - Siku
Bedienungsanleitung Operating Instructions Mode d'emploi ... - Siku

You also want an ePaper? Increase the reach of your titles
YUMPU automatically turns print PDFs into web optimized ePapers that Google loves.
inter ference, the systems must now be started separately<br />
and one after another. At the beginning all remote-control<br />
modules and all models must be<br />
switched off. Player 1 now switches his/her models<br />
on and, after that, the remote-control module. If<br />
player 1’s corres ponding A and B level LEDs light up,<br />
the system is ready for operation. Only then can<br />
player 2 start the same procedure. When the level<br />
LEDs light up there too, player 3 and then player 4<br />
can start.<br />
Smooth operation can only be ensured if<br />
this rule is complied with always.<br />
c) Adding more models<br />
With the SIKUCONTROL32 radio system you can<br />
control an almost unlimited number of different<br />
models. If you started your system with one or two<br />
models and would like to add another model after<br />
some time, your remote-control module has to find<br />
and store this model.<br />
Leave the remote control and the models you have<br />
operated up to now switched on. If you now switch<br />
the power switch on the storage battery on the<br />
model to be added from OFF to ON, the light on the<br />
model will flash quickly. This is a sign that the model is<br />
ready to connect to the remote-control module. To<br />
connect this model now to the remote-control<br />
module, press the SCAN key. Once the connection<br />
has been established, this model will be assigned to<br />
the corresponding LEVEL and is immediately avail -<br />
able. During the SCAN the corresponding level key<br />
light goes out and it lights up again when a connection<br />
has been established. The model stored up to<br />
now on this level is not lost but is held in the<br />
background. By pressing the corresponding level key,<br />
you can now switch between the two models on one<br />
level.<br />
Example: If the model to be added is another<br />
trailer, the remote-control module stores the trailer<br />
under level B once the model has been switched on<br />
and the SCAN key has been pressed. During the<br />
SCAN the level B key light that had been on up to<br />
then goes out.<br />
Once a connection has been established between<br />
the trailer and the remote-control module, the level<br />
B-key lights up again. The new model is stored<br />
automatically by the system so that you can operate<br />
this new model immediately. This means if you now<br />
operate the “outriggers" function, for example, you<br />
will automatically activate the last model that was<br />
added. If you now wish to switch back and forth<br />
between these two (or even several of these) trailers<br />
in the same level, please press the level B key, once<br />
for each model. Each time this key is pressed, the<br />
respective next model is actuated.<br />
d) Deleting a model from memory<br />
Switching off the remote-control module deletes the<br />
stored models from the module’s internal memory.<br />
Restarting the system as described under instructions<br />
a) or b) will add the models again however.<br />
If a model is turned off by means of the power<br />
switch on the battery, it will be automatically<br />
deleted from the list of active<br />
models in the remote-control module<br />
and can then be added<br />
16<br />
again to any remote-control module. If the model is<br />
switched off by mistake or if the batteries have to be<br />
changed, the model can be integrated into the module<br />
again after switching on and following the procedure<br />
described in the<br />
c) instructions.<br />
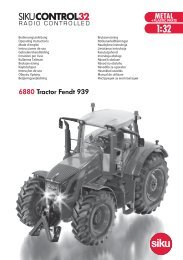
The remote-control module<br />
This SIKUCONTROL32 model can only be operated<br />
with the SIKU radio remote-control module (art. no.<br />
6708). This module works with 2.4 GHz radio technology,<br />
which in accordance with the level of knowledge<br />
today is not harmful to health if used in the manner<br />
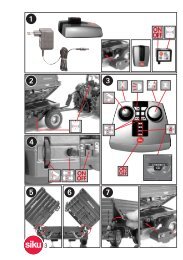
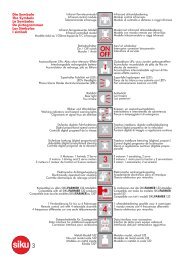
intended. The assignment of the keys for this<br />
model is shown on page 13.<br />
The batteries (4 x type AA) required for operating<br />
the remote control module are not included in the<br />
scope of supply. Pay attention to the markings regarding<br />
the arrangement and position of the batteries in<br />
the battery chamber. The device should be used in<br />
dry rooms and protected against dirt – in particular<br />
dust and humidity. If cleaning if necessary, use a dry<br />
cloth.<br />
Contacts in the remote control module must not<br />
be short-circuited.<br />
Note on batteries<br />
(remote-control module)<br />
The remote-control module may only be operated<br />
with type AA batteries. Please check batteries<br />
regularly for leakage. Take drained batteries out of<br />
the remote-control module. Do not attempt to charge<br />
non-rechargeable batteries. Batteries that are<br />
recharge able must be taken out of the remotecontrol<br />
module before they are recharged.<br />
Rechargeable batteries may only be recharged<br />
under the supervision of adults.<br />
Insert batteries with correct polarity. Do not use<br />
different battery types together or mix new and old<br />
batteries.<br />
The contacts of the storage battery or batteries<br />
must not be short-circuited. Please do not dispose<br />
of used batteries with household waste.<br />
The remote control module’s transmission power may<br />
be lower if rechargeable batteries are used.<br />
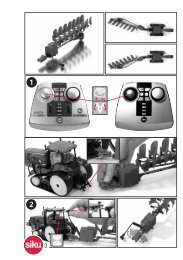
Tipping function of the trailer<br />
Activate the tipping function on the remote control<br />
module by operating the dial switch on the right.<br />
Pushing the dial switch upwards causes the trough<br />
to be lifted. Pushing the dial switch downwards<br />
causes the trough to be lowered.