

ION TTUSB05XL Quickstart Guide - v2.1 - ION Audio
ION TTUSB05XL Quickstart Guide - v2.1 - ION Audio
ION TTUSB05XL Quickstart Guide - v2.1 - ION Audio

Create successful ePaper yourself
Turn your PDF publications into a flip-book with our unique Google optimized e-Paper software.
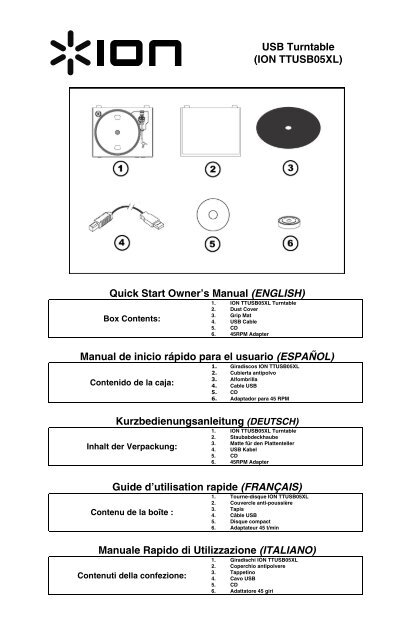
USB Turntable<br />
(<strong>ION</strong> <strong>TTUSB05XL</strong>)<br />
Quick Start Owner’s Manual (ENGLISH)<br />
Box Contents:<br />
1. <strong>ION</strong> <strong>TTUSB05XL</strong> Turntable<br />
2. Dust Cover<br />
3. Grip Mat<br />
4. USB Cable<br />
5. CD<br />
6. 45RPM Adapter<br />
Manual de inicio rápido para el usuario (ESPAÑOL)<br />
Contenido de la caja:<br />
1. Giradiscos <strong>ION</strong> <strong>TTUSB05XL</strong><br />
2. Cubierta antipolvo<br />
3. Alfombrilla<br />
4. Cable USB<br />
5. CD<br />
6. Adaptador para 45 RPM<br />
Kurzbedienungsanleitung (DEUTSCH)<br />
Inhalt der Verpackung:<br />
1. <strong>ION</strong> <strong>TTUSB05XL</strong> Turntable<br />
2. Staubabdeckhaube<br />
3. Matte für den Plattenteller<br />
4. USB Kabel<br />
5. CD<br />
6. 45RPM Adapter<br />
<strong>Guide</strong> d’utilisation rapide (FRANÇAIS)<br />
Contenu de la boîte :<br />
1. Tourne-disque <strong>ION</strong> <strong>TTUSB05XL</strong><br />
2. Couvercle anti-poussière<br />
3. Tapis<br />
4. Câble USB<br />
5. Disque compact<br />
6. Adaptateur 45 t/min<br />
Manuale Rapido di Utilizzazione (ITALIANO)<br />
Contenuti della confezione:<br />
1. Giradischi <strong>ION</strong> <strong>TTUSB05XL</strong><br />
2. Coperchio antipolvere<br />
3. Tappetino<br />
4. Cavo USB<br />
5. CD<br />
6. Adattatore 45 giri
(ENGLISH) QUICK START GUIDE<br />
o Make sure all items listed on the front of this guide are included in the box.<br />
o READ SAFETY INSTRUCT<strong>ION</strong> BOOKLET BEFORE USING THE PRODUCT<br />
o Go to http://www.ion-audio.com for product registration.<br />
INTRODUCT<strong>ION</strong><br />
The USB turntable connects directly to your computer to turn your treasured vinyl recordings into digital music. We<br />
have included two software packages to aid you in converting your vinyl recordings:<br />
EZ Vinyl/Tape Converter (PC only) is the quickest and easiest way to turn your recordings into digital media.<br />
EZ Vinyl/Tape Converter conveniently saves your recordings in your iTunes library. Novice users may find this<br />
application preferable. We have included a handy <strong>Quickstart</strong> <strong>Guide</strong> with step-by-step instructions on software<br />
installation and operation.<br />
EZ <strong>Audio</strong> Converter (Mac only) is a basic converter application for Mac OS X and is ideal for novice users.<br />
Please refer to the included Software <strong>Quickstart</strong> <strong>Guide</strong> for step-by-step instructions on software installation and<br />
operation.<br />
To install the software: simply insert the included CD into your computer and follow the on-screen instructions. After<br />
you finish converting your vinyl, you can then burn to CD or load onto portable media devices.<br />
* iTunes and iPod are trademarks of Apple, Inc., registered in the U.S.A. and other countries.<br />
GENERAL CONTROLS<br />
1. Power Cable: This power cable should be<br />
plugged into a wall receptacle AFTER all audio<br />
connections are made.<br />
2. RCA <strong>Audio</strong> Output Cables: These cables should<br />
be plugged into a CD or Auxiliary LINE input. This<br />
output should be connected to your receiver, home<br />
stereo, or other speaker system.<br />
IMPORTANT WARNING: The RCA cables are<br />
LINE level. Please only connect these cables<br />
to LINE level inputs. You may damage your<br />
receiver if you plug in a LINE level into a<br />
PHONO input.<br />
3. USB <strong>Audio</strong> Output: Use the included USB Cable<br />
to connect your turntable to your computer. For<br />
transferring your vinyl records to your computer,<br />
we have provided two different software packages<br />
on the included CD.<br />
4. 1/8” Stereo Line Input: Connect Tape Players,<br />
Reel to Reel, or any other audio source here. This<br />
signal is sent to the computer through the USB.<br />
Make sure that your phono cartridge is<br />
installed while using this input for maximum<br />
sound quality. Also make sure that your RCA<br />
jacks are either plugged into an input device or not<br />
in contact with metal.<br />
Note: The 1/8" audio input is not routed to the<br />
turntable's RCA output jacks, only to your<br />
computer via USB.<br />
5. Tonearm: The tonearm can be raised and lowered<br />
by hand, or by pressing the Raise/Lower button.<br />
6. Platter: Put the record you would like to play on<br />
this platter.<br />
7. 45 RPM Adapter Holder: Holds the included 45<br />
RPM adapter. When not using the adapter, please<br />
place it in this holder.<br />
8. Raise/Lower Button: Press this button in to raise<br />
the tonearm. To lower the tonearm, press this<br />
button so it is in the out position.<br />
9. Stop: Press this button to stop playback. When<br />
this button is pressed, the tonearm will return back<br />
to its original resting position.<br />
10. Speed 33/45 RPM: This button controls the<br />
playback speed of the record. Depending on what<br />
kind of record you are playing, you will need to<br />
adjust the speed to match the speed of the record (or else the music might sound too slow or too fast).
ATTACHING THE DRIVE BELT<br />
The <strong>ION</strong> <strong>TTUSB05XL</strong><br />
platter is driven by a<br />
rubber drive belt attached<br />
to the turntable motor. In<br />
some rare cases, this belt<br />
may slip off, causing the<br />
turntable platter to stop<br />
spinning. If the turntable<br />
does not begin spinning<br />
when you lower the tonearm, the most likely cause is the belt. Please follow the instructions below in order<br />
to properly re-attach the belt to the motor and the platter.<br />
1. Begin by removing the clip which secures the platter to the center spindle. After you have removed the<br />
clip, remove the platter.<br />
2. Turn the platter upside down. Place the rubber drive belt around the inner bottom ring of the turntable<br />
platter, making sure that the rubber belt is not twisted.<br />
3. Place the platter back onto the center spindle and rotate it so that you can see the motor spindle<br />
through the hole on the platter. Now reach into the hole, pull the rubber drive belt off the inner ring and<br />
install it over the motor spindle, as shown in the illustration. Be careful not to twist the belt during this<br />
step.<br />
4. Lastly, replace the clip onto the center spindle to secure the platter<br />
IMPORTANT<br />
Make sure that the rubber grip mat is always placed on top of the platter while using the turntable. Failure to<br />
use the grip mat may cause damage to your media as well as damage to the turntable.<br />
Remove the plastic cartridge cover (needle cover) before operating the turntable.<br />
BEFORE RETURNING THE PRODUCT, please contact <strong>ION</strong> <strong>Audio</strong> or your retailer for technical<br />
support. Contact information can be found in the Safety Instruction Booklet included with this<br />
product.<br />
1
(ESPAÑOL) MANUAL DE COMIENZO RÁPIDO DEL LECTOR<br />
1. Asegúrese de que todos los artículos incluidos al inicio de este manual están incluidos en la caja.<br />
2. LEA LAS INSTRUCC<strong>ION</strong>ES DEL FOLLETO DE SEGURIDAD ANTES DE UTILIZAR EL PRODUCTO.<br />
3. Visite http://www.ion-audio.com para registrar el producto.<br />
INTRODUCCIÓN<br />
El giradiscos USB se conecta directamente a su computadora para convertir sus valiosos vinilos en música digital.<br />
Hemos incluido dos paquetes de software para ayudarle a convertir sus grabaciones de vinilo:<br />
EZ Vinyl/Tape Converter (PC solamente) es la forma más rápida y fácil de convertir las grabaciones en<br />
medios digitales. Este software guarda convenientemente sus grabaciones en la biblioteca de iTunes. Es<br />
posible que los usuarios novicios prefieran esta aplicación. Incluidos una práctica Guía de inicio rápido con<br />
instrucciones paso a paso sobre la instalación y la operación del software.<br />
EZ <strong>Audio</strong> Converter (Mac únicamente) es una aplicación de convertidor básica para Mac OS X, ideal para<br />
usuarios novicios. Consulte en la Guía de inicio rápido del software incluida las instrucciones detalladas sobre<br />
la instalación y la operación del software.<br />
Para instalar el software: inserte simplemente el CD incluido en la computadora y siga las instrucciones de la<br />
pantalla. Después de terminar de convertir su vinilo, puede quemarlo en CD o cargarlo en dispositivos de medios<br />
portátiles.<br />
* iTunes e iPod son marcas registradas de Apple, Inc., registradas en EE.UU. y otros países.<br />
CONTROLES GENERALES<br />
1. Cable de alimentación: Este cable de alimentación se<br />
debe enchufar a un tomacorriente en la pared DESPUÉS<br />
que se hagan todas las conexiones de audio.<br />
2. Cables RCA de salida de audio: Estos cables se deben<br />
enchufar a una entrada de CD o de LÍNEA auxiliar Esta<br />
salida se debe conectar a su receptor, estéreo hogareño u<br />
otro sistema de altavoces.<br />
ADVERTENCIA IMPORTANTE: Los cables RCA son<br />
para nivel de LÍNEA. Conecte estos cables sólo a las<br />
entradas de nivel de línea (LINE). Puede dañar el<br />
receptor si enchufa un nivel de línea en una entrada<br />
fonográfica.<br />
3. Salida de audio USB: Use el cable USB incluido para<br />
conectar su giradiscos a su computadora. Para transferir<br />
sus discos de vinilo a la computadora, proporcionamos dos<br />
paquetes de software diferentes en el CD incluido.<br />
4. Entrada de línea estéreo de 1/8”: Puede conectar aquí<br />
reproductores de casetes y cintas o cualquier otra fuente<br />
de audio. Esta señal se envía a la computadora por el USB.<br />
Asegúrese de que su cápsula fonográfica esté instalada<br />
cuando usa esta entrada, para lograr la máxima calidad del<br />
sonido. Asegúrese también de que sus jacks RCA estén<br />
enchufados a un dispositivo de entrada o que no estén en<br />
contacto con partes metálicas. Nota: La entrada de audio<br />
de 1/8" no se encamina a los conectores de salida RCA<br />
del giradiscos, sino sólo a su computadora mediante USB<br />
5. Brazo de lectura: El brazo de lectura se puede subir y<br />
bajar a mano o presionando el botón Subir/Bajar.<br />
6. Plato: Coloque en este plato la grabación que desea<br />
reproducir.<br />
7. Soporte del adaptador para 45 rpm: Puede colocar aquí<br />
el adaptador para 45 cuando no lo usa.<br />
8. Botón Subir/Bajar: Presione este botón hacia adentro<br />
para subir el brazo de lectura. Para bajarlo, presione este<br />
botón de modo que quede en posición hacia afuera.<br />
9. Parar: Pulse este botón para detener la reproducción.<br />
Cuando se pulsa este botón, el brazo de lectura vuelve a<br />
su posición de reposo original.<br />
10. Velocidad 33/45 RPM: Este botón controla la velocidad de<br />
reproducción de la grabación. Según el tipo de grabación<br />
que reproduzca, necesitará ajustar la velocidad para<br />
hacerla coincidir con la velocidad del disco (de lo contrario,<br />
la música puede sonar demasiado lenta o demasiado rápida).<br />
2
CÓMO COLOCAR LA CORREA DE TRANSMISIÓN<br />
El plato <strong>ION</strong> <strong>TTUSB05XL</strong> es impulsado por una correa de transmisión de goma conectada al motor de giradiscos.<br />
En algunos casos poco frecuentes, esta correa puede patinar, haciendo que el plato del giradiscos deje de girar. SI<br />
el giradiscos no comienza a girar cuando usted baja el brazo, la causa más probable es la correa.<br />
1. Comience por desmontar la grapa que asegura el plato al eje central. Después de desmontarla, retire el plato.<br />
2. Coloque el plato boca abajo. Instale la correa de transmisión de goma alrededor del aro inferior interno del<br />
plato, asegurándose de que no quede retorcida.<br />
3. Coloque el plato nuevamente en el eje central y gírelo de modo que pueda ver el eje del motor a través del<br />
orificio del plato. Acceda al orificio, tire de la correa para extraerla del aro interno e instálela sobre el eje del<br />
motor, como se muestra en la ilustración. Tenga cuidado de no retorcer la correa durante este paso.<br />
4. Finalmente, vuelva a instalar la grapa en el eje central para sujetar el plato.<br />
3
(DEUTSCH) Schneller Start<br />
1. Versichern Sie sich, daß alle im Anfang dieser Anleitung aufgeführten Teile in der Schachtel enthalten sind.<br />
2. LESEN SIE DIE SICHERHEITSBROSCHÜRE BEVOR SIE DAS GERÄT BENUTZEN<br />
3. Um das Produkt zu registrieren, besuchen Sie bitte http://www.ion-audio.com.<br />
EINFÜHRUNG<br />
Der USB Turntable wird direkt mit dem Computer verbunden, um Ihre wertvollen Vinylaufnahmen in digitale Musik<br />
umzuwandeln. Um Ihnen bei der Konvertierung zu helfen, liegen dem Gerät zwei Softwareprogramme bei:<br />
EZ Vinyl/Tape Converter (nur PC) ist der schnellste und einfachste Weg zur Digitalisierung Ihrer<br />
Schallplatten. EZ Vinyl/Tape Converter speichert Ihre Aufnahmen direkt in Ihrer iTunes Bibliothek. Anwender,<br />
die zum ersten Mal Musik auf dem Computer aufnehmen, werden dieses Programm als völlig ausreichend für<br />
ihre Zwecke empfinden. In einer übersichtlichen Schritt-für-Schritt Kurzanleitung erfahren Sie alles über die<br />
Installation und die Verwendung des Programms.<br />
EZ <strong>Audio</strong> Converter (nur für Mac) ist ein grundlegendes Converter-Programm für Mac OS X und ideal für<br />
Neueinsteiger. Softwareinstallation und Betrieb sind Schritt für Schritt in der beigefügten Software-<br />
Kurzanleitung erklärt.<br />
Zur Softwareinstallation legen Sie einfach die mitgelieferte CD in das CD-ROM Laufwerk Ihres Computers und folgen<br />
den Anweisungen im Bildschirm des Computers. Nach der Aufnahme Ihrer Schallplatten können Sie Ihre Titel auf<br />
CD brennen oder sie auf portable Musik-Player laden.<br />
* iTunes und iPod sind geschützte Warenzeichen von Apple, Inc., registriert in den U.S.A. und anderen Ländern.<br />
BEDIENELEMENTE<br />
1. Netzkabel: Das Netzkabel sollten Sie erst an einer<br />
Steckdose anschließen, NACHDEM Sie alle<br />
<strong>Audio</strong>verbindungen hergestellt haben.<br />
2. RCA <strong>Audio</strong>ausgangskabel: Die Kabel schließen Sie an<br />
einen CD- oder Aux LINE-Eingang an, den Sie an Ihrem<br />
Receiver, HiFi-System oder anderem Verstärkersystem<br />
finden.<br />
WICHTIGER HINWEIS: Die RCA Kabel führen einen<br />
LINE Pegel. Schließen Sie diese Kabel nur an LINE-<br />
Pegel Eingänge an. Wenn Sie einen Linepegel an<br />
PHONO-Eingänge anschließen, könnten Sie Ihren<br />
Receiver beschädigen.<br />
3. USB <strong>Audio</strong>ausgang: Verwenden Sie das beiliegende<br />
USB-Kabel, um Ihren Turntable an den Computer<br />
anzuschließen. Zur Übertragung der Vinylschallplatten auf<br />
Ihren Computer finden Sie zwei verschiedene Programme<br />
auf der beiliegenden CD.<br />
4. Line in <strong>Audio</strong>-Eingang: Über diesen Line In Eingang (3,5<br />
mm Stereo Miniklinke) können externe Geräte (z.B. ein<br />
Kassettendeck) angeschlossen werden, und deren<br />
<strong>Audio</strong>signale ebenfalls über den USB <strong>Audio</strong>ausgang des<br />
<strong>ION</strong> <strong>TTUSB05XL</strong> an den Computer geführt werden<br />
5. Tonarm: Der Tonarm lässt sich entweder mit der Hand<br />
oder mit dem Raise/Lower Taster anheben und absenken.<br />
6. Plattenteller: Legen Sie hier die Schallplatte, die Sie<br />
abspielen möchten, auf.<br />
7. 45 RPM Adapterhalter: Legen Sie den 45 RPM Adapter<br />
hier ab, wenn Sie ihn nicht benötigen.<br />
8. Raise/Lower Taster: Drücken Sie diesen Taster, um den<br />
Tonarm anzuheben. Um den Tonarm abzusenken,<br />
drücken Sie den Button so, dass er heraussteht.<br />
9. Stop: Mit diesem Taster beenden Sie die Wiedergabe.<br />
Dabei kehrt der Tonarm in seine Position auf der<br />
Tonarmablage zurück.<br />
10. Speed 33/45 RPM: Mit diesem Taster definieren Sie die<br />
Geschwindigkeit, mit der die Schallplatte abgespielt wird.<br />
Je nach aufgelegter Platte, müssen Sie die<br />
Abspielgeschwindigkeit ändern, damit die Musik nicht zu<br />
langsam oder zu schnell klingt.<br />
4
ANBRINGUNG DES ANTRIEBSRIEMENS<br />
Der <strong>ION</strong> <strong>TTUSB05XL</strong> Plattenteller wird über einen Gummiriemen angetrieben, der am Motor des Plattenspielers<br />
angebracht ist. In seltenen Fällen kann der Riemen abrutschen, so dass der Plattenteller sich nicht mehr dreht. Wenn<br />
der Plattenspieler sich beim Herunterlassen des Tonarms nicht dreht, ist der wahrscheinlichste Grund hierfür der<br />
Antriebsriemen. Führen Sie bitte die folgenden Schritte aus, um den Riemen wieder ordnungsgemäß an Motor und<br />
Plattenteller zu befestigen.<br />
1. Entfernen Sie zuerst den Clip, mit dem der Plattenteller auf der Zentralnabe arretiert ist. Nehmen Sie<br />
anschließend den Plattenteller ab.<br />
2. Drehen Sie den Plattenteller um. Legen Sie den Antriebsriemen um den inneren unteren Ring des<br />
Plattentellers und vergewissern Sie sich, dass der Gummiring nicht verdreht ist.<br />
3. Legen Sie den Plattenteller wieder auf die Zentralnabe und drehen Sie ihn, bis Sie durch das Loch im<br />
Plattenteller die Motorennabe sehen können. Greifen Sie nun in das Loch, ziehen Sie den Antriebsriemen<br />
vom inneren Ring ab und schieben Sie ihn wie abgebildet über die Motornabe. Achten Sie bei diesem Schritt<br />
darauf, den Riemen nicht zu verdrehen.<br />
4. Befestigen Sie zuletzt den Clip wieder auf der Zentralnabe, um den Plattenteller zu arretieren.<br />
5
(FRANÇAIS) GUIDE D’INSTALLAT<strong>ION</strong> RAPIDE<br />
1. Vous assurer que tous les articles énumérés au début de ce guide sont inclus dans la boîte.<br />
2. LIRE LE LIVRET D’INSTRUCT<strong>ION</strong> DE SÉCURITÉ AVANT DE FAIRE USAGE DU PRODUIT.<br />
3. Allez à http://www.ion-audio.com pour enregistrer le produit.<br />
INTRODUCT<strong>ION</strong><br />
Le tourne-disque USB se branche directement à un ordinateur afin de transférer vos précieux vinyles au format<br />
numérique. Nous avons inclus deux logiciels afin de vous aider à convertir votre musique :<br />
Le EZ Vinyl/Tape Converter (PC seulement) est la façon la plus rapide et la plus simple de convertir vos<br />
enregistrements au média numérique. Le EZ Vinyl/Tape Converter permet également de sauvegarder vos<br />
enregistrements dans votre bibliothèque iTunes. L'utilisat/Tapeeur débutant préférera peut-être cette<br />
application pour sa simplicité d'utilisation. Nous avons inclus un guide d'utilisation simplifié avec des<br />
instructions détaillées sur l'installation et le fonctionnement du logiciel.<br />
Le EZ <strong>Audio</strong> Converter (Mac seulement) est un logiciel de conversion pour Mac OS X idéal pour l’utilisateur<br />
débutant. Veuillez consulter le guide de démarrage rapide du logiciel pour les instructions étape par étape sur<br />
l’installation et l’utilisation.<br />
Installation du logiciel : Insérez simplement le CD dans le lecteur de votre ordinateur et suivez les instructions à<br />
l'écran. Lorsque vous avez terminé la conversion du vinyle, vous le pouvez graver sur un CD ou le télécharger sur<br />
des lecteurs multimédia portables.<br />
* ® iTunes et iPod sont des maques de commerce enregistrées de Apple, Inc., enregistrées aux États-Unis et dans d’autres pays.<br />
COMMANDES PRINCIPALES<br />
1. Câble d’alimentation : Ce câble d’alimentation doit être<br />
branché dans la prise murale APRÈS avoir effectué tous<br />
les autres branchements.<br />
2. Câbles de sortie RCA stéréo : Ces câbles doivent être<br />
branchés dans l’entrée CD ou ligne stéréo auxiliaire.<br />
Cette sortie doit être branchée à votre récepteur, chaînes<br />
stéréo ou autre système de sonorisation.<br />
MISE EN GARDE : Les câbles RCA sont à niveau<br />
ligne (LINE). Veuillez brancher ces câbles<br />
uniquement à des entrées à niveau ligne (LINE) .<br />
Vous pourriez endommager votre récepteur si vous<br />
branchiez un câble niveau ligne (LINE) dans une<br />
entrée PHONO.<br />
3. Sortie audio USB : Branchez la table tournante à votre<br />
ordinateur en utilisant le câble USB fourni. Pour<br />
transférer vos disques vinyle sur votre ordinateur, nous<br />
vous avons fourni deux progiciels différents sur le CD.<br />
4. Entrée niveau ligne de 1/8 po : Il est possible de<br />
brancher un lecteur de cassettes, un magnétophone à<br />
bobines ou tout autre source audio à cette prise. Le<br />
signal est acheminé à l’ordinateur par le câble USB. Pour<br />
une qualité sonore optimale, assurez vous que la<br />
cartouche phono est bien installée. Assurez vous<br />
également que les câbles RCA sont branchés dans un<br />
appareil source, ou qu’ils ne sont pas en contact avec du<br />
métal. Remarque : L'entrée audio de 1/8 po n’est pas<br />
routée aux sorties RCA du tourne-disque, mais à votre<br />
ordinateur par le biais du câble USB<br />
5. Bras de lecture : Le bras de lecture peut être relevé ou<br />
abaissé à la main ou à l’aide du bouton de levier<br />
(Raise/Lower).<br />
6. Plateau : Placez le disque que vous désirez écouter sur<br />
ce plateau.<br />
7. Support pour adaptateur 45 RPM: Vous pouvez placer<br />
l’adaptateur 45 lorsqu’il n’est pas utilisé.<br />
8. Bouton de levier (Raise/Lower) : Enfoncez ce bouton<br />
pour relever le bras de lecture. Appuyez de nouveau sur<br />
ce bouton afin qu’il ne soit plus enfoncé.<br />
9. Touche d’arrêt (STOP) : Appuyez sur ce bouton pour<br />
interrompre la lecture. Lorsque ce bouton est enfoncé, le<br />
bras de lecture reprendre sa place sur le support.<br />
10. Vitesse de lecture 33/45 t/min : Cette touche permet de modifier la vitesse de lecture. Vous devez ajuster la vitesse<br />
de lecture du tourne-disque en fonction du type de disque que vous désirez écouter, sinon la musique pourrait être trop<br />
rapide ou trop lente.<br />
6
FIXAT<strong>ION</strong> DE LA COURROIE<br />
Le plateau du <strong>ION</strong> <strong>TTUSB05XL</strong> est entraîné par une à courroie de caoutchouc fixée au moteur du tourne-disque.<br />
Dans certains cas, cette courroie peut glisser et arrêter le plateau du tourne-disque de tourner. Si le tourne-disque ne<br />
commence pas à tourner lorsque vous abaissez le bras de lecture, la courroie en est probablement la cause. Veuillez<br />
suivre les instructions ci-dessous afin de réinstaller correctement la courroie au moteur et au plateau.<br />
1. Commencez par retirer la bague qui fixe le plateau à l'axe central. Après avoir retiré le clip, retirez le<br />
plateau.<br />
2. Tournez le plateau à l'envers. Placez la courroie en caoutchouc autour de l'anneau intérieur inférieur du<br />
plateau en vous assurant que la courroie n'est pas torsadée.<br />
3. Replacez le plateau sur l'axe central et tournez-le pour que vous puissiez voir l'axe du moteur à travers le<br />
trou du plateau. Attrapez la courroie en caoutchouc à travers le trou et retirez-le de l'anneau intérieur<br />
inférieur et installez-le sur l'axe du moteur, tel qu'illustré. Faites attention de ne pas torsader la courroie lors<br />
de cette étape.<br />
4. Puis replacez le clip sur l'axe central afin de fixer le plateau.<br />
7
(ITALIANO) MONTAGGIO RAPIDO<br />
1. Verificate che tutti gli elementi elencati sul frontespizio di questo manuale siano inclusi nella confezione.<br />
2. PRIMA DI UTILIZZARE IL PRODOTTO LEGGETE IL LIBRETTO DELLE ISTRUZ<strong>ION</strong>I DI SICUREZZA.<br />
3. Andate sul sito http://www.ion-audio.com per la registrazione del prodotto.<br />
INTRODUZ<strong>ION</strong>E<br />
Il giradischi USB si collega direttamente al computer per trasformare i tuoi preziosi dischi in vinile in musica digitale.<br />
Per aiutarvi nella conversione dei dischi in vinile, abbiamo incluso due pacchetti software:<br />
EZ Vinyl/Tape Converter (PC soltanto) è il modo più facile e veloce di trasformare i tuoi dischi in media<br />
digitali. EZ Vinyl/Tape Converter salva comodamente le tue registrazioni nella libreria iTunes. Questa è<br />
probabilmente l’applicazione preferibile per gli utenti alle prime armi. Abbiamo allegato una comoda Guida<br />
Rapida con istruzioni passo passo circa l’installazione e l’uso del software.<br />
EZ <strong>Audio</strong> Converter (solo Mac) è un applicativo base di conversione per Mac OS X ed è l’ideale per utenti<br />
principianti. Fate riferimento alla comoda Guida Rapida allegata, recante le istruzioni passo passo circa<br />
l’installazione e l’uso del software.<br />
Per installare il software: inserire nel computer il CD in dotazione e seguire le istruzioni da schermo. Una volta<br />
terminato di convertire il vinile, lo si può masterizzare su un CD o caricare su dispositivi media portatili.<br />
* iTunes e iPod sono marchi di fabbrica di Apple, Inc., registrati negli Stati Uniti e in altri paesi.<br />
COMANDI GENERALI<br />
1. Cavo di alimentazione: il cavo di alimentazione va<br />
inserito in una presa a muro DOPO aver effettuato<br />
tutte le connessioni audio.<br />
2. Cavi di uscita RCA audio: questi cavi vanno inseriti<br />
in un ingresso CD o LINEA ausiliario. Questa uscita<br />
va collegata ad un ricevitore, home stereo, o ad altro<br />
sistema di altoparlanti.<br />
AVVERTENZA IMPORTANTE: i cavi RCA sono a<br />
livello di LINEA. Collegare questi cavi<br />
unicamente a ingressi a livello di LINEA.<br />
Collegando un ingresso a livello di LINEA ad un<br />
ingresso PHONO si rischia di danneggiare il<br />
ricevitore.<br />
3. Uscita USB <strong>Audio</strong>: servirsi del cavo USB in<br />
dotazione per collegare il giradischi al computer.<br />
Per trasferire i dischi in vinile al computer, sono stati<br />
forniti due diversi pacchetti software nel CD in<br />
dotazione.<br />
4. Ingresso stereo di linea da 1/8”: collegare lettori di<br />
nastri, dispositivi da bobina a bobina o qualsiasi altra<br />
sorgente audio a questo livello. Questo segnale è<br />
inviato al computer tramite la porta USB.<br />
Assicurarsi che la cartuccia phono sia installata<br />
al momento di utilizzare questo ingresso, per<br />
garantire la massima qualità sonora. Assicurarsi<br />
inoltre che i jack RCA siano inseriti in un dispositivo<br />
d´ingresso oppure non in contatto con superfici<br />
metalliche. Nota: l´ingresso audio da 1/8" non è<br />
convogliato ai jack di uscita RCA del giradischi,<br />
bensí solo al computer tramite USB<br />
5. Braccio: il braccio può essere alzato e abbassato<br />
manualmente oppure premendo il tasto Raise/Lower<br />
(Alza/Abbassa).<br />
6. Piatto: porre qui il disco che si desidera riprodurre .<br />
7. Supporto per l’adattatore 45 giri: posizionare qui<br />
l’adattatore 45 giri quando non è in uso.<br />
8. Tasto Raise/Lower (Alza/Abbassa): premere<br />
questo tasto per alzare il braccio. Per abbassare il<br />
braccio, premere il tasto in modo da portarlo su out.<br />
9. Stop: premere questo tasto per interrompere la<br />
riproduzione. Premendo questo tasto, il braccio<br />
tornerà nella sua posizione originale di riposo.<br />
10. Velocità 33/45 giri: questo tasto controlla la velocità<br />
di riproduzione del disco. A seconda del tipo di disco che si sta riproducendo, sarà necessario impostare la velocità in<br />
modo tale che corrisponda a quella del disco (in caso contrario, la musica potrebbe suonare troppo lenta o troppo<br />
veloce).<br />
8
COLLEGAMENTO DELLA CINGHIA DI TRASMISS<strong>ION</strong>E<br />
Il piatto dell’<strong>ION</strong> <strong>TTUSB05XL</strong> è guidato da una cinghia di trasmissione in gomma collegata al motore del giradischi. In<br />
alcuni rari casi, la cinghia potrebbe scivolare fuori dal suo alloggiamento: in questo caso, il piatto del giradischi smette<br />
di girare. Se il giradischi non inizia a girare quando si abbassa il braccio, la causa più probabile è la cinghia. Seguire<br />
le istruzioni di cui sotto per ricollegare correttamente la cinghia al motore e al piatto.<br />
1. Iniziare rimuovendo la clip che fissa il piatto all’asse centrale. Dopo aver rimosso la clip, rimuovere il piatto.<br />
2. Voltare il piatto. Porre la cinghia in gomma attorno all’anello interno inferiore del piatto del giradischi,<br />
assicurandosi che non sia torta.<br />
3. Riposizionare il piatto sull’asse centrale e farlo ruotare in modo che si veda l’asse motore attraverso il foro<br />
sul piatto stesso. Ora, attraverso il foro, tirare la cinghia di trasmissione in gomma dall’anello interno e<br />
installarla sull’asse motore, come mostrato nell’illustrazione. Fare attenzione a non torcere la cinghia<br />
durante questa fase.<br />
4. Infine, riposizionare la clip sull’asse centrale per fissare il piatto.<br />
9
Manual Version: 2.1<br />
Computer Requirements:<br />
Part List:<br />
Specifications (<strong>ION</strong> <strong>TTUSB05XL</strong>)<br />
PC<br />
· Windows 98SE, 2000, ME, XP, Vista<br />
· 500 MHz Pentium class processor or better<br />
· QuickTime 7.1.6 or later<br />
· 256MB RAM (minimum)<br />
· 250MB available Hard Drive space (minimum)<br />
· One available USB1.1 port or higher<br />
· CD-ROM drive or better<br />
· Windows-compatible sound card<br />
Mac<br />
· OS X 10.3.9 or later or OS X 10.4.7 or later<br />
· 500MHz G3 processor or better<br />
· QuickTime 6.5.2 or later<br />
· 256MB RAM (minimum)<br />
· 250MB available Hard Drive space (minimum)<br />
· One available USB1.1 port or higher<br />
· CD-ROM drive or better<br />
· Mac-compatible sound card<br />
o <strong>ION</strong> <strong>TTUSB05XL</strong> Turntable<br />
o Grip mat<br />
o RCA Cable connected<br />
o Drive belt attached to platter<br />
o USB Cable Included<br />
o 45 RPM Adapter Included<br />
o Software CD (MAC/PC)<br />
o Quick Start <strong>Guide</strong><br />
Turntable Weight: 5.3 lbs<br />
Product Dimensions: 13-3/8” x 16-1/2” x 4-5/6”<br />
Motor: Belt Drive<br />
Speed: 33 1/3 RPM or 45 RPM operation<br />
Outputs: RCA (LINE), USB <strong>Audio</strong>.<br />
Inputs: 1/8” stereo (LINE)<br />
<strong>ION</strong> <strong>Audio</strong>, LLC<br />
Tel: (U.S.) 401.658.3743<br />
Email: support@ion-audio.com<br />
10
![EZ VHS Converter Software Manual [v1.0] - ION Audio](https://img.yumpu.com/6120537/1/184x260/ez-vhs-converter-software-manual-v10-ion-audio.jpg?quality=85)