Manual de instrucciones - Triton Tools
Manual de instrucciones - Triton Tools
Manual de instrucciones - Triton Tools

You also want an ePaper? Increase the reach of your titles
YUMPU automatically turns print PDFs into web optimized ePapers that Google loves.
SAW OPERATION<br />
Warnings:<br />
• Avoid free-hand cutting. It is much safer<br />
and more accurate to cut with the saw gui<strong>de</strong>d<br />
by the parallel cutting gui<strong>de</strong> or a clamped on<br />
batten. If cutting free-hand, always mark a<br />
straight cutting line and keep the saw from<br />
wan<strong>de</strong>ring away from it.<br />
• Never perform any cuts on a workpiece held<br />
in the hand. Make sure the workpiece cannot<br />
move during the cut, using clamps wherever<br />
possible.<br />
• Large panels and long pieces must be well<br />
supported close to both si<strong>de</strong>s of the cut to<br />
avoid pinching and kickback. Ensure the<br />
saw is positioned with the wi<strong>de</strong>r part of the<br />
baseplate resting on the larger piece, or on the<br />
piece with the best support.<br />
• Prevent kickback by ensuring that you<br />
move the saw in a straight line. Ensure that<br />
your bla<strong>de</strong> is in good or<strong>de</strong>r and that the cut<br />
does not close in on the bla<strong>de</strong>. (Use a small<br />
wedge or 3mm spacer in the cut to prevent<br />
it closing if you’re cutting difficult material).<br />
Release the trigger if the saw gives any sign<br />
of stalling but do not remove the saw until the<br />
bla<strong>de</strong><br />
stops spinning.<br />
CUTTING<br />
1. Rest the front of the baseplate on the<br />
workpiece with your pencil mark aligned with<br />
the sighting <strong>de</strong>vice. Ensure the bla<strong>de</strong> is not<br />
touching the workpiece.<br />
2. Hold the saw firmly with both hands and<br />
engage the trigger. When the saw motor<br />
reaches full rotational speed, gui<strong>de</strong> the<br />
saw smoothly along the cut line.<br />
3. Maintain a consistent feed rate - too fast may<br />
put excessive strain on the motor, while too<br />
slow may burnish your workpiece. Avoid any<br />
sud<strong>de</strong>n movements of the saw.<br />
4. After completing your cut, release the trigger<br />
switch and allow the bla<strong>de</strong> to come to a<br />
complete stop. Do not remove the saw from the<br />
workpiece while the bla<strong>de</strong><br />
is moving.<br />
Cutting veneered board<br />
When cutting veneered board or wood less than<br />
20mm thick, set the bla<strong>de</strong> to protru<strong>de</strong> 5-10mm<br />
through the work and cut with the good face<br />
down. This will reduce splintering on the good<br />
face of your workpiece. When cutting thicker<br />
wood, set the bla<strong>de</strong> to maximum <strong>de</strong>pth to reduce<br />
kickback.<br />
Making a Pocket cut<br />
1. Adjust the <strong>de</strong>pth of cut as required.<br />
2. Adjust the bevel setting to 0˚.<br />
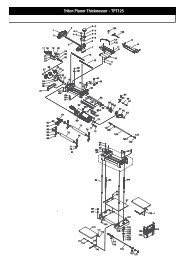
3. Raise the bla<strong>de</strong> guard lever (12) to expose<br />
the saw bla<strong>de</strong>, firmly rest the front of the<br />
base flat against the work piece with the rear<br />
handle raised so the bla<strong>de</strong> does not touch the<br />
workpiece.<br />
4. With the bla<strong>de</strong> just clearing the workpiece, start<br />
the saw and wait<br />
for it to reach full speed (approximately<br />
2 seconds).<br />
5. Slowly plunge the bla<strong>de</strong> into the workpiece,<br />
using the front of the saw baseplate as a pivot<br />
point.<br />
As soon as the<br />
bla<strong>de</strong> starts cutting the material, release<br />
the lower bla<strong>de</strong> guard lever.<br />
6. Commence cutting in a<br />
forward direction to the<br />
end of the cut.<br />
7. After completing your<br />
cut, release the trigger<br />
switch and allow the<br />
bla<strong>de</strong> to come to a<br />
complete stop.<br />
Do not remove the saw from<br />
the workpiece while the bla<strong>de</strong><br />
is moving.<br />
If the corners of your pocket cut are<br />
not completely cut through, use a<br />
jigsaw or hand saw to finish the corners.<br />
This saw will fit comfortably into most<br />
saw benches.<br />
Saw Operation 11<br />
GB