Manual de instrucciones - Triton Tools
Manual de instrucciones - Triton Tools
Manual de instrucciones - Triton Tools

You also want an ePaper? Increase the reach of your titles
YUMPU automatically turns print PDFs into web optimized ePapers that Google loves.
185mm (7 ¼”)<br />
Circular Saw<br />
OPERATING & SAFETY INSTRUCTIONS<br />
Cirkelzaag<br />
BEDIENINGS- EN VEILIGHEIDSINSTRUCTIES<br />
Scie Circulaire<br />
INSTRUCTIONS D’UTILISATION ET CONSIGNES DE<br />
SECURITE<br />
TA184CSL<br />
www.tritontools.com<br />
Kreissäge<br />
BEDIENUNGS- & SICHERHEITSANWEISUNG<br />
Sega Circolare<br />
ISTRUZIONI PER L’USO E LA SICUREZZA<br />
Sierra Circular<br />
INSTRUCCIONES DE FUNCIONAMIENTO<br />
Y SEGURIDAD<br />
Contents<br />
1
GB<br />
Thank you for purchasing this <strong>Triton</strong> tool. These instructions contain information necessary<br />
for safe and effective operation of this product.<br />
This product has a number of unique features, even if you are familiar with circular saws,<br />
please read this manual to make sure you get the full benefit of all its unique <strong>de</strong>sign.<br />
Keep this manual close to hand and ensure all users of this tool have read and fully un<strong>de</strong>rstand them.<br />
Specifications 2<br />
Features 3<br />
General Safety Rules 4<br />
Symbols 8<br />
Functions 9<br />
Saw Operation 11<br />
Saw Bench Mounting 12<br />
Replacing the Saw Bla<strong>de</strong> 12<br />
Service & Maintenance 13<br />
Troubleshooting 14<br />
Warranty 15<br />
2<br />
CONTENTS<br />
SPECIFICATIONS<br />
TECHNICAL DATA<br />
Part no: TA184CSL<br />
Voltage: 230 - 240V ~ 50Hz<br />
Input power: 1800W<br />
No load speed: 5,000min -1<br />
Bla<strong>de</strong> size: 185mm (7¼")<br />
Bla<strong>de</strong> arbor: 20mm<br />
Bevel adjustment: 0˚ – 45˚<br />
Cut <strong>de</strong>pth: 90˚ – 60mm<br />
45˚ – 40mm<br />
Insulation class: Double insulated<br />
Net weight: 5.1kg<br />
Laser: Class 2<br />
Wave length: 650nm<br />
Output power: ≤1mw<br />
Sound pressure level: 98.1dB(A)<br />
Sound power level: 109.1 dB(A)<br />
Typical weighted vibration: 2.969m/s 2<br />
Protect your hearing<br />
Always use proper hearing protection when tool noise exceeds 80dB.<br />
Contents / Specifications
FEATURES<br />
6<br />
15<br />
16<br />
12<br />
19<br />
14<br />
13<br />
20<br />
21<br />
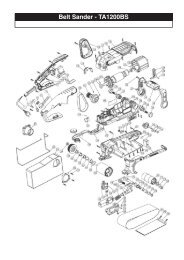
1. Laser sight on/off button<br />
2. Laser sight aperture<br />
3. Trigger switch<br />
4. Bla<strong>de</strong> sighting notch<br />
5. Motor housing<br />
6. Main handle<br />
7. Front handle<br />
8. Bevel adjustment lever<br />
9. Bevel scale<br />
10. Parallel gui<strong>de</strong> locking knob<br />
11. Parallel cutting gui<strong>de</strong><br />
12. Bla<strong>de</strong> guard lever<br />
13. Retracting bla<strong>de</strong> guard<br />
14. Baseplate<br />
15. Upper bla<strong>de</strong> guard<br />
16. Dust extraction chute<br />
17. Depth locking lever<br />
18. Cut <strong>de</strong>pth scale<br />
19. Bla<strong>de</strong><br />
20. Pin wrench<br />
21. Hex key<br />
1<br />
7<br />
2<br />
5<br />
9<br />
10<br />
8<br />
11<br />
4<br />
Features<br />
3<br />
18<br />
17<br />
3<br />
GB
GB<br />
Read and un<strong>de</strong>rstand all instructions.<br />
Failure to follow all instructions listed below,<br />
may result in electric shock, fire and/or serious<br />
personal injury.<br />
The term “power tool” in all of the warnings listed<br />
below refers to your mains-operated (cor<strong>de</strong>d)<br />
power tool or battery operated (cordless) power<br />
tool.<br />
WORK AREA<br />
• Keep your work area clean and well lit.<br />
Cluttered benches and dark areas invite<br />
acci<strong>de</strong>nts.<br />
• Do not operate power tools in an<br />
environment where explosive or corrosive<br />
gases could be present. Power tools create<br />
sparks which may ignite fumes. Avoid areas<br />
where there<br />
is excessive dampness or humidity.<br />
• Keep children, bystan<strong>de</strong>rs and visitors away<br />
while operating the power tool. Distractions<br />
can cause<br />
you to lose control.<br />
• Always set up or fix the tool in a<br />
stable position.<br />
ELECTRICAL SAFETY<br />
• Power tool plugs must match the outlet.<br />
Never modify the plug in any way. Do not use<br />
any adaptor plugs with earthed (groun<strong>de</strong>d)<br />
power tools. Unmodified plugs and matching<br />
outlets will reduce risk of electric shock.<br />
• Avoid body contact with earthed<br />
or groun<strong>de</strong>d surfaces such as pipes,<br />
radiators, ranges and refrigerators. There is<br />
an increased risk of electric shock if your body<br />
is earthed<br />
or groun<strong>de</strong>d.<br />
• Do not expose power tools to rain<br />
or wet conditions. Water entering a power tool<br />
will increase the risk of electric shock.<br />
• Do not abuse the cord. Never use the cord for<br />
carrying, pulling or unplugging the power tool.<br />
Keep cord away from heat, oil, sharp edges<br />
or moving parts. Damaged or entangled cords<br />
increase the risk of electric shock.<br />
4<br />
GENERAL SAFETY RULES<br />
General Safety Rules<br />
• When operating a power tool outdoors, use<br />
an extension cord suitable for outdoor use.<br />
Use of a cord suitable for outdoor use reduces<br />
the risk of electric shock.<br />
• Never yank the cord to disconnect if from<br />
socket. Keep the cord away from heat and<br />
sharp edges.<br />
PERSONAL SAFETY<br />
• Stay alert, watch what you are doing, and<br />
use common sense when operating a power<br />
tool. Do not use tool while tired or un<strong>de</strong>r the<br />
influence of drugs, alcohol, or medication. A<br />
moment of inattention while operating power<br />
tools may result in serious personal injury.<br />
• Use safety equipment. Always wear eye<br />
protection. Safety equipment such as dust<br />
mask, non-skid safety shoes, hard hat,<br />
or hearing protection used for appropriate<br />
conditions will reduce personal injuries.<br />
• Dress properly. Do not wear loose clothing<br />
or jewellery. Tie back long hair. Keep your hair,<br />
clothing, and gloves away from moving parts.<br />
Loose clothes, jewellery, or long hair can be<br />
caught in moving parts.<br />
• Avoid acci<strong>de</strong>ntal starting. Ensure the switch<br />
is in the off-position before plugging in.<br />
Carrying power tools with your finger on the<br />
switch or plugging in power tools that have the<br />
switch on invites acci<strong>de</strong>nts.<br />
• Remove adjusting keys or wrenches before<br />
turning the tool on. A wrench or a key that is<br />
left attached to a rotating part of the tool may<br />
result in injury.<br />
• Accessories and metal parts can become<br />
very hot.
POWER TOOL USE AND CARE<br />
• Use clamps or other practical way to secure<br />
and support the work to a stable platform.<br />
Holding the work by hand or against your body<br />
is unstable and may lead to loss of control.<br />
• Do not force the tool. Use the correct tool for<br />
your application. The correct tool will do the<br />
job better and safer at the rate for which it is<br />
<strong>de</strong>signed.<br />
• Do not use the tool if switch does not turn<br />
it on or off. Any tool that cannot be controlled<br />
with the switch is dangerous and must be<br />
repaired. If there appears to be a problem refer<br />
to the “Trouble-shooting” and if necessary<br />
contact a repair centre.<br />
• Disconnect the plug from power before<br />
making any adjustments, changing<br />
accessories, or storing the tool. Such<br />
preventative measures reduce the risk of<br />
acci<strong>de</strong>ntal starting.<br />
• Store tool in a dry location, out of reach of<br />
children and untrained persons. This tool is<br />
dangerous in the hands of untrained users.<br />
• Maintain tools with care. Keep cutting tools<br />
sharp and clean. Properly maintained tools,<br />
with sharp cutting edges are less likely to bind<br />
and are easier to control.<br />
• Check for misalignment (ie. excessive<br />
vibration), binding of moving parts, or any<br />
damage that may affect the tools operation.<br />
If damaged have the tool serviced before using.<br />
Many acci<strong>de</strong>nts are caused by<br />
poorly maintained tools.<br />
• Never start the tool while the bla<strong>de</strong> is<br />
touching the workpiece.<br />
• Avoid acci<strong>de</strong>ntal starting. Ensure the switch<br />
is in the off-position before plugging in.<br />
Carrying power tools with your finger on the<br />
switch or plugging in power tools that have the<br />
switch on invites acci<strong>de</strong>nts.<br />
• Remove adjusting keys or wrenches before<br />
turning the tool on. A wrench or a key that is<br />
left attached to a rotating part of the tool may<br />
result in injury.<br />
• Accessories and metal parts can become<br />
very hot.<br />
ADDITIONAL SAFETY<br />
WARNINGS FOR LASER LIGHTS<br />
The laser light/laser radiation used in this<br />
product is Class 2 with maximum 1mW<br />
and 650nm wavelengths. These lasers do<br />
not normally present an optical hazard,<br />
although staring at the beam may cause<br />
flash blindness.<br />
Do not stare directly at the laser beam.<br />
A hazard may exist if you <strong>de</strong>liberately stare<br />
into the beam. Please observe all safety rules as<br />
follows:<br />
• The laser shall be used and maintained in<br />
accordance with<br />
the manufacturer’s instructions.<br />
• Never aim the beam at any<br />
person or an object other than<br />
the work piece.<br />
• The laser beam shall not be <strong>de</strong>liberately<br />
aimed at personnel and shall be prevented<br />
from being directed towards the eye of a<br />
person for longer than 0.25s.<br />
• Always ensure the laser beam is aimed<br />
at a sturdy work piece without reflective<br />
surfaces, ie.<br />
wood or rough coated surfaces<br />
are acceptable. Bright shiny reflective<br />
sheet steel or the like is not suitable for laser<br />
use as the reflective surface could direct the<br />
beam back at the operator.<br />
• Do not change the laser light assembly with<br />
a different type. Repairs must only be carried<br />
out by the laser manufacturer or an authorised<br />
agent.<br />
Use of controls or adjustments or performance<br />
of procedures other than those specified<br />
herein may result in hazardous radiation<br />
exposure.<br />
Please refer to the relevant European standard<br />
EN60825-1 : 1994 + A2: 2001 + A1 : 2002 for<br />
General Safety Rules 5<br />
GB
GB<br />
6<br />
more information on lasers.<br />
ADDITIONAL SAFETY WARNINGS FOR<br />
CIRCULAR SAWS<br />
• Keep hands away from cutting area and<br />
the bla<strong>de</strong>. Keep your second hand on auxiliary<br />
handle, or motor housing. If both hands are<br />
holding the saw, they cannot be cut by the<br />
bla<strong>de</strong>.<br />
• Never reach beneath the workpiece. The<br />
guard cannot protect you from the bla<strong>de</strong><br />
below the workpiece.<br />
• Adjust the cutting <strong>de</strong>pth to the thickness<br />
of the workpiece. Less than a full tooth of<br />
the bla<strong>de</strong> teeth should be visible below the<br />
workpiece.<br />
• Never hold piece being cut in your<br />
hands or across your leg. Secure the<br />
workpiece to a stable platform. It is important<br />
to support the work properly to minimize body<br />
exposure, bla<strong>de</strong> binding, or loss of control.<br />
• Hold power tool by insulated gripping<br />
surfaces when performing an operation<br />
where the cutting tool may contact hid<strong>de</strong>n<br />
wiring or its own cord. Contact with a “live”<br />
wire will also make exposed metal parts of the<br />
power tool “live” and shock the operator.<br />
• When ripping always use a rip fence<br />
straight edge gui<strong>de</strong> or saw bench. This<br />
improves the accuracy of cut and reduces the<br />
chance of bla<strong>de</strong> binding.<br />
• Always use bla<strong>de</strong>s with correct size and<br />
shape (diamond versus round) of arbor<br />
holes. Bla<strong>de</strong>s that do not match the mounting<br />
hardware of the saw will run eccentrically,<br />
causing loss of control.<br />
• Never use damaged or incorrect bla<strong>de</strong><br />
washers or bolt. The bla<strong>de</strong> washers and bolt<br />
were specifically <strong>de</strong>signed for your saw, for<br />
optimum performance and safety of operation.<br />
General Safety Rules<br />
CAUSES AND OPERATOR PREVENTION OF<br />
KICKBACK<br />
• Kickback is a sud<strong>de</strong>n reaction to a<br />
pinched, bound or misaligned saw<br />
bla<strong>de</strong>, causing an uncontrolled saw<br />
to lift up and out of the workpiece toward<br />
the operator;<br />
• When the bla<strong>de</strong> is pinched or bound tightly<br />
by the kerf closing down, the bla<strong>de</strong> stalls<br />
and the motor reaction drives the unit<br />
rapidly back toward the operator;<br />
• If the bla<strong>de</strong> becomes twisted or misaligned<br />
in the cut, the teeth at the back edge of the<br />
bla<strong>de</strong> can dig into the top surface of the<br />
wood causing the bla<strong>de</strong> to climb out of<br />
the kerf and jump back toward<br />
the operator.<br />
Kickback is the result of saw misuse and/or<br />
incorrect operating procedures or conditions and<br />
can be avoi<strong>de</strong>d by taking proper precautions as<br />
given below.<br />
1. Maintain a firm grip with both hands on<br />
the saw and position your arms to resist<br />
kickback forces. Position your body to<br />
either si<strong>de</strong> of the bla<strong>de</strong>, but not in line with<br />
the bla<strong>de</strong>. Kickback could cause the saw<br />
to jump backwards, but kickback forces<br />
can be controlled by the operator, if proper<br />
precautions are taken.<br />
2. When bla<strong>de</strong> is binding, or when interrupting<br />
a cut for any reason, release the trigger and<br />
hold the saw motionless in the material until<br />
the bla<strong>de</strong> comes to a complete stop. Never<br />
attempt to remove the saw from the work or pull<br />
the saw backward while the bla<strong>de</strong> is in motion<br />
or kickback may occur. Investigate and take<br />
corrective actions to eliminate the cause of bla<strong>de</strong><br />
binding.<br />
3. When restarting a saw in the workpiece,<br />
centre the saw bla<strong>de</strong> in the kerf and check<br />
that the teeth are not engaged into the<br />
material.<br />
If the saw bla<strong>de</strong> is binding, it may walk up or<br />
kickback from the workpiece as the saw is<br />
restarted.<br />
4. Support large panels to minimise the risk<br />
of bla<strong>de</strong> pinching and kickback. Large<br />
panels tend to sag un<strong>de</strong>r their own weight.
Supports must be placed un<strong>de</strong>r the panel on<br />
both si<strong>de</strong>s, near the line of cut and near the<br />
edge of the panel.<br />
5. Do not use dull or damaged bla<strong>de</strong>s.<br />
Unsharpened or improperly set<br />
bla<strong>de</strong>s produce a narrow kerf which<br />
causes excessive friction, bla<strong>de</strong> binding<br />
and kickback.<br />
6. Bla<strong>de</strong> <strong>de</strong>pth and bevel adjusting locking<br />
levers must be tight and secure before<br />
making cut. If bla<strong>de</strong> adjustment shifts while<br />
cutting, it may cause binding and kickback.<br />
7. Use extra caution when making a “plunge<br />
cut” into existing walls or other blind<br />
areas. The protruding bla<strong>de</strong> may cut objects<br />
that can cause kickback.<br />
Ensure that the retracting bla<strong>de</strong> guard is<br />
functioning correctly:<br />
• Check retracting guard for proper closing<br />
before each use. Do not operate the saw<br />
if retracting guard does not move freely<br />
and close instantly. Never clamp or tie the<br />
retracting guard into the open position. If saw<br />
is acci<strong>de</strong>ntally dropped, retracting guard may<br />
be bent. Raise the retracting guard with the<br />
retracting handle and make sure it moves<br />
freely and does not touch the bla<strong>de</strong> or any<br />
other part, in all angles and <strong>de</strong>pths of cut.<br />
• Check the operation of the retracting<br />
guard spring. If the guard and the spring are<br />
not operating properly, they must be serviced<br />
before use. Retracting guard may operate<br />
sluggishly due to damaged parts, gummy<br />
<strong>de</strong>posits, or a build-up of <strong>de</strong>bris.<br />
• Retracting guard should be retracted<br />
manually only for special cuts such as<br />
“plunge cuts” and “compound cuts.”<br />
Raise retracting guard by retracting handle<br />
and as soon as bla<strong>de</strong> enters the material,<br />
the retracting guard must be released. For<br />
all other sawing, the retracting guard should<br />
operate automatically.<br />
• Always observe that the retracting guard<br />
is covering the bla<strong>de</strong> before placing saw<br />
down on bench or floor. An unprotected,<br />
coasting bla<strong>de</strong> will cause<br />
the saw to walk backwards, cutting whatever<br />
is in its path. Be aware of the<br />
time it takes for the bla<strong>de</strong> to stop after switch<br />
is released.<br />
General Safety Rules 7<br />
GB
GB<br />
8<br />
SYMBOLS<br />
ENVIRONMENTAL PROTECTION<br />
Waste electrical products should not be<br />
disposed of with household waste. Please<br />
recycle where facilities exist. Check<br />
with your local authority or retailer for recycling<br />
advice.<br />
Always wear ear, eye and respiratory<br />
protection.<br />
Conforms to relevant legislation<br />
and safety standards.<br />
Symbols<br />
LASER LIGHT<br />
LASER RADIATION<br />
Do not stare into beam.<br />
Class 2 laser product.<br />
Wave length: 650nm<br />
Output power: 1mw<br />
AS/NZS 2211.1:2004<br />
Instruction warning.<br />
Instruction note.<br />
Laser<br />
Double insulated for additional<br />
protection.
FUNCTIONS<br />
CUT DEPTH ADJUSTMENT<br />
Ensure the tool is disconnected from power.<br />
1. Loosen the <strong>de</strong>pth adjustment lever<br />
(17) and pivot the saw body away<br />
from the baseplate.<br />
2. Adjust the saw until the <strong>de</strong>sired <strong>de</strong>pth<br />
is achieved, according to the cut <strong>de</strong>pth scale<br />
(18).<br />
The <strong>de</strong>pth scale should only be used<br />
as a reference. If an accurate <strong>de</strong>pth is<br />
required, perform several test cuts until the<br />
<strong>de</strong>sired <strong>de</strong>pth is achieved.<br />
3. Push down on the lever to lock, but do not overtighten.<br />
For best cutting results the bla<strong>de</strong><br />
should extend no more than one tooth<br />
<strong>de</strong>pth beyond the thickness of the material<br />
being cut.<br />
• The height lever can be repositioned, if the<br />
mechanism is a bit firm or loose, with the lever<br />
raised.<br />
To re-position the lever, prise off the circlip<br />
securing the lever with a bla<strong>de</strong> screwdriver.<br />
Remove the lever from the hex nut and relocate<br />
it clockwise (if too firm) or anti-clockwise (if too<br />
loose) one position then refit.<br />
Replace the circlip and re-check the locking<br />
position of the lever.<br />
SETTING BEVEL ANGLES<br />
Bevel angles can be set anywhere within<br />
the range 0˚ to 45˚.<br />
Do not attempt to bevel the saw if<br />
mounted in a saw table.<br />
1. Ensure the tool is disconnected<br />
from power.<br />
2. Loosen the bevel adjustment lever (8) at the<br />
front of the saw.<br />
3. Angle the saw body to the <strong>de</strong>sired <strong>de</strong>gree<br />
setting, as marked on the bevel scale (9).<br />
The bevel scale should only be used<br />
as a reference. If an accurate angle is<br />
required, perform several test cuts until the<br />
<strong>de</strong>sired bevel is achieved.<br />
4. Re-tighten the bevel adjustment lever.<br />
POWER SWITCH<br />
Ensure that both hands are firmly on the hand<br />
grips of the tool before switching on.<br />
• Pull the trigger switch (3) “ON”.<br />
There will be some initial resistance<br />
when pulling the trigger on - this is<br />
a safety mechanism, to prevent acci<strong>de</strong>ntal<br />
starting of the saw.<br />
• Releasing the trigger will switch the<br />
tool “OFF”.<br />
Do not engage the bla<strong>de</strong> with your workpiece<br />
until it is spinning at full speed - likewise avoid<br />
switching off the tool until the cut is complete.<br />
Functions<br />
9<br />
GB
GB<br />
PARALLEL CUTTING GUIDE<br />
• The cutting gui<strong>de</strong> (11) can be used on<br />
the left or the right of the bla<strong>de</strong>.<br />
• Using the gui<strong>de</strong> provi<strong>de</strong>s accurate cuts without<br />
the need to work free-hand following pencil<br />
lines.<br />
1. With the thumb screw on<br />
the baseplate loosened<br />
sli<strong>de</strong> the gui<strong>de</strong> (11) into<br />
the mounting slots on the<br />
baseplate, from either<br />
the left or right hand<br />
si<strong>de</strong>.<br />
2. Sli<strong>de</strong> it along until the<br />
required cut<br />
width is reached.<br />
3. Tighten the thumb screw to lock it<br />
into position.<br />
SIGHTING THE CUT LINE<br />
The sighting indicators (4) in front of the saw<br />
bla<strong>de</strong> provi<strong>de</strong> guidance when cutting along a<br />
pencil line.<br />
For 90˚ cuts use the right hand indicator (when<br />
viewed from the operators perspective) and the<br />
left hand indicator<br />
for 45˚ cuts.<br />
10<br />
Functions<br />
LASER SIGHTING<br />
Warnings:<br />
• Do not stare directly at the laser beam.<br />
• Never aim the beam at any person or<br />
an object other than the work piece.<br />
• Do not <strong>de</strong>liberately aim the beam at personnel<br />
and ensure that it is not directed towards the<br />
eye of a person<br />
or longer than 0.25s.<br />
• Always ensure the laser beam is aimed at a<br />
sturdy work piece without reflective surfaces.<br />
ie. wood or rough coated surfaces are<br />
acceptable. Bright shiny reflective sheet steel<br />
or the like is not suitable for laser use as the<br />
reflective surface could direct the beam back at<br />
the operator.<br />
• Only turn laser beam on when the tool<br />
is on the workpiece.<br />
1. Rest the front edge of the saw baseplate on the<br />
workpiece. Ensure the bla<strong>de</strong> is not touching<br />
your work.<br />
2. Switch on the laser using the laser sight on/off<br />
button (1).<br />
The laser will not operate if the tool<br />
is not plugged in and switched on at the<br />
mains.<br />
3. Line up the beam with your pencil line.<br />
4. Commence the cut.<br />
5. Switch off the laser.
SAW OPERATION<br />
Warnings:<br />
• Avoid free-hand cutting. It is much safer<br />
and more accurate to cut with the saw gui<strong>de</strong>d<br />
by the parallel cutting gui<strong>de</strong> or a clamped on<br />
batten. If cutting free-hand, always mark a<br />
straight cutting line and keep the saw from<br />
wan<strong>de</strong>ring away from it.<br />
• Never perform any cuts on a workpiece held<br />
in the hand. Make sure the workpiece cannot<br />
move during the cut, using clamps wherever<br />
possible.<br />
• Large panels and long pieces must be well<br />
supported close to both si<strong>de</strong>s of the cut to<br />
avoid pinching and kickback. Ensure the<br />
saw is positioned with the wi<strong>de</strong>r part of the<br />
baseplate resting on the larger piece, or on the<br />
piece with the best support.<br />
• Prevent kickback by ensuring that you<br />
move the saw in a straight line. Ensure that<br />
your bla<strong>de</strong> is in good or<strong>de</strong>r and that the cut<br />
does not close in on the bla<strong>de</strong>. (Use a small<br />
wedge or 3mm spacer in the cut to prevent<br />
it closing if you’re cutting difficult material).<br />
Release the trigger if the saw gives any sign<br />
of stalling but do not remove the saw until the<br />
bla<strong>de</strong><br />
stops spinning.<br />
CUTTING<br />
1. Rest the front of the baseplate on the<br />
workpiece with your pencil mark aligned with<br />
the sighting <strong>de</strong>vice. Ensure the bla<strong>de</strong> is not<br />
touching the workpiece.<br />
2. Hold the saw firmly with both hands and<br />
engage the trigger. When the saw motor<br />
reaches full rotational speed, gui<strong>de</strong> the<br />
saw smoothly along the cut line.<br />
3. Maintain a consistent feed rate - too fast may<br />
put excessive strain on the motor, while too<br />
slow may burnish your workpiece. Avoid any<br />
sud<strong>de</strong>n movements of the saw.<br />
4. After completing your cut, release the trigger<br />
switch and allow the bla<strong>de</strong> to come to a<br />
complete stop. Do not remove the saw from the<br />
workpiece while the bla<strong>de</strong><br />
is moving.<br />
Cutting veneered board<br />
When cutting veneered board or wood less than<br />
20mm thick, set the bla<strong>de</strong> to protru<strong>de</strong> 5-10mm<br />
through the work and cut with the good face<br />
down. This will reduce splintering on the good<br />
face of your workpiece. When cutting thicker<br />
wood, set the bla<strong>de</strong> to maximum <strong>de</strong>pth to reduce<br />
kickback.<br />
Making a Pocket cut<br />
1. Adjust the <strong>de</strong>pth of cut as required.<br />
2. Adjust the bevel setting to 0˚.<br />
3. Raise the bla<strong>de</strong> guard lever (12) to expose<br />
the saw bla<strong>de</strong>, firmly rest the front of the<br />
base flat against the work piece with the rear<br />
handle raised so the bla<strong>de</strong> does not touch the<br />
workpiece.<br />
4. With the bla<strong>de</strong> just clearing the workpiece, start<br />
the saw and wait<br />
for it to reach full speed (approximately<br />
2 seconds).<br />
5. Slowly plunge the bla<strong>de</strong> into the workpiece,<br />
using the front of the saw baseplate as a pivot<br />
point.<br />
As soon as the<br />
bla<strong>de</strong> starts cutting the material, release<br />
the lower bla<strong>de</strong> guard lever.<br />
6. Commence cutting in a<br />
forward direction to the<br />
end of the cut.<br />
7. After completing your<br />
cut, release the trigger<br />
switch and allow the<br />
bla<strong>de</strong> to come to a<br />
complete stop.<br />
Do not remove the saw from<br />
the workpiece while the bla<strong>de</strong><br />
is moving.<br />
If the corners of your pocket cut are<br />
not completely cut through, use a<br />
jigsaw or hand saw to finish the corners.<br />
This saw will fit comfortably into most<br />
saw benches.<br />
Saw Operation 11<br />
GB
GB<br />
• Check that the saw bench is equipped with<br />
appropriate bla<strong>de</strong> guarding and ensure that<br />
they are properly adjusted and functioning<br />
correctly before operating.<br />
• Ensure the saw is mounted securely<br />
to the bench. Refer to the<br />
manufacturers instruction manual<br />
for mounting instructions.<br />
• Run saw up to ensure it is running smoothly<br />
before attempting any cutting.<br />
12<br />
SAW BENCH MOUNTING<br />
REPLACING THE SAW BLADE<br />
Only use 185mm (71⁄4”) bla<strong>de</strong>s, with a kerf<br />
between 2.2 & 3.5mm, <strong>de</strong>signed for circular saws<br />
with a no-load speed rating of at least 5000rpm.<br />
Never fit high speed steel bla<strong>de</strong>s or abrasive<br />
discs. Fitting of other purpose or different sized<br />
bla<strong>de</strong>s will void the warranty.<br />
• Do not fit inferior bla<strong>de</strong>s. Regularly check<br />
the bla<strong>de</strong> is flat, sharp and free of cracks or<br />
<strong>de</strong>fects.<br />
1. Ensure the saw is disconnected from power.<br />
2. Place the supplied pin wrench (20) insi<strong>de</strong> the<br />
two holes located on the<br />
outer bla<strong>de</strong> flange. Insert<br />
hex key (21) into the hole<br />
in the bla<strong>de</strong> bolt.<br />
Whilst tightly holding<br />
pin wrench turn hex key<br />
in the direction of the<br />
bla<strong>de</strong>s rotation (anticlockwise).<br />
When the<br />
bla<strong>de</strong> bolt is free from<br />
the arbor hole remove<br />
the bolt and bla<strong>de</strong> flange.<br />
Replacing the Saw Bla<strong>de</strong><br />
• Check that your saw bench is fitted with an<br />
anti-kickback <strong>de</strong>vice.<br />
• Make sure a suitable safety on/off switch is<br />
fitted to the saw bench. The saw switch may<br />
then be locked on using a spring clamp, cable<br />
tie or similar and then plugged into the safety<br />
socket on the<br />
saw bench. This clamp MUST be taken<br />
off when the saw is removed from the<br />
saw bench.<br />
• Using all safety equipment make a test cut in<br />
an off cut piece of material making sure all<br />
guarding is set up correctly before continuing<br />
with your bench sawing.<br />
3. Hold the retracting bla<strong>de</strong> guard (14) fully back,<br />
carefully sli<strong>de</strong> the bla<strong>de</strong> through the baseplate<br />
and position it onto the inner washer on<br />
the shaft, as the bla<strong>de</strong> teeth are very sharp<br />
protective gloves are required. The graphics<br />
should face out and the arrow on the bla<strong>de</strong><br />
should point in the same direction as the arrow<br />
in the guard.<br />
4. Fit the bla<strong>de</strong> taking care<br />
to locate it correctly onto<br />
the inner flange. Refit<br />
the outer bla<strong>de</strong> flange<br />
than lightly screw the<br />
bla<strong>de</strong> bolt through the<br />
outer bla<strong>de</strong> flange.<br />
Double check the bla<strong>de</strong><br />
seats flush between the inner and outer flanges<br />
than tighten firmly with pin wrench and hex<br />
key.
SERVICE & MAINTENANCE<br />
• Any damage to the saw should be repaired and<br />
carefully inspected before use, by qualified<br />
repair personnel. Service or maintenance<br />
performed by unqualified personnel could result<br />
in a risk of injury.<br />
• Servicing should only be carried out by<br />
authorised <strong>Triton</strong> Repair Centres using original<br />
<strong>Triton</strong> replacement parts. Follow instructions<br />
carefully and refer to “Trouble-shooting” for<br />
problem i<strong>de</strong>ntification and advice. Use of<br />
unauthorised or faulty parts may<br />
create a risk of electric shock or injury.<br />
• <strong>Triton</strong> Manufacturing & Design Co. will not be<br />
responsible for any damage or injury caused<br />
by unauthorised repair of the saw or by<br />
mishandling of the tool.<br />
• Regularly check that the saw arbor, arbor<br />
washers and bore reducing spacer are clean,<br />
and free of built-up gum <strong>de</strong>posits<br />
or caked-on saw dust.<br />
Check that the faces of the arbor<br />
washers are smooth and free from<br />
burrs. Check that the bla<strong>de</strong> retaining<br />
bolt is correctly tightened.<br />
• Check the operation of the retracting guard.<br />
It must close quickly and without scraping<br />
anywhere. Remove the bla<strong>de</strong> and clean<br />
accumulated saw dust or wood slivers from the<br />
guard area.<br />
• The saw ventilation slots should be kept clean<br />
and clear of any foreign matter. Use a lightly<br />
dampened cloth to wipe the saw clean - do not<br />
use solvents.<br />
BLADE MAINTENANCE<br />
• Regularly check that the bla<strong>de</strong> is free from a<br />
build up of gum resins or saw dust. If necessary<br />
clean with a solvent such as WD40, RP7 or<br />
mineral turpentine.<br />
• Regularly check the saw bla<strong>de</strong> for flatness.<br />
Use of the saw with a buckled bla<strong>de</strong> places<br />
excessive load on the motor and gearbox<br />
assembly, and may affect your warranty rights.<br />
• The tungsten carbi<strong>de</strong> teeth should be checked<br />
regularly for sharpness and tooth breakages,<br />
and repaired or re-sharpened as required.<br />
POWER CORD MAINTENANCE<br />
If the supply cord needs replacing, the task must<br />
be carried out by the manufacturer,<br />
the manufacturer’s agent, or an authorised<br />
service centre in or<strong>de</strong>r to avoid a<br />
safety hazard.<br />
Service & Maintenance 13<br />
GB
GB<br />
TROUBLESHOOTING<br />
The following chart contains information <strong>de</strong>signed to assist in diagnosing and resolving<br />
saw problems.<br />
SYMPTOM POSSIBLE CAUSE REMEDY<br />
Saw will not operate • No supply of power • Check that power is available at source<br />
• Brushes worn or sticking • Disconnect power, open brush caps and<br />
ensure brushes move freely in the hol<strong>de</strong>rs.<br />
Check whether the brushes require replacing<br />
as outlined above.<br />
• Trigger is faulty • Contact Service Centre**<br />
• Motor components open or short<br />
circuited<br />
• Contact Sevice Centre**<br />
Saw runs slowly • Blunt or damaged bla<strong>de</strong> • Re-sharpen or replace bla<strong>de</strong><br />
• Motor is overloa<strong>de</strong>d • Reduce pushing force on saw. Ensure the<br />
cut isn’t closing and pinching the bla<strong>de</strong>.<br />
Makes an unusual sound • Mechanical obstruction • Contact Service Centre**<br />
Motor runs but bla<strong>de</strong> won’t<br />
spin<br />
Heavy sparking occurs insi<strong>de</strong><br />
motor housing<br />
Retractable guard will not<br />
close or is slow to close<br />
Saw <strong>de</strong>pth adjustment not<br />
holding<br />
If a problem cannot be resolved using the above advice do not tamper<br />
with the saw - visit www.tritontools.com to find your nearest <strong>Triton</strong> office<br />
for assistance.<br />
** Visit www.tritontools.com to find your nearest authorised service centre.<br />
14 Troubleshooting<br />
• Armature has shorted sections • Contact Service Centre**<br />
• Bla<strong>de</strong> retaining nut is loose, or<br />
reducing spacer incorrectly fitted.<br />
• Tighten bla<strong>de</strong> retaining nut. Ensure the<br />
arbor reducing spacer and flange<br />
washers are correctly fitted.<br />
• Broken gear shaft or teeth • Contact Service Centre**<br />
• Brushes not moving freely • Disconnect power, remove brushes, clean<br />
or replace.<br />
• Armature short circuited or open<br />
circuited<br />
• Contact Service Centre**<br />
• Commutator surface not clean • Contact Service Centre**<br />
• Return spring <strong>de</strong>tached or broken • Re-attach or replace spring (use only<br />
genuine <strong>Triton</strong> replacement parts).<br />
• Guard is bent. • Straighten it or contact Service Centre**.<br />
• Mechanism fouled by sawdust. • Clean and lightly lube fouled<br />
mechanism.<br />
• Depth locking lever requires<br />
repositioning.<br />
• Reposition the <strong>de</strong>pth adjustment lever as<br />
shown on page 9.
WARRANTY<br />
To register your warranty visit our web site at www.<br />
tritontools.com* and enter your <strong>de</strong>tails.<br />
Your <strong>de</strong>tails will be inclu<strong>de</strong>d on our mailing list<br />
(unless indicated otherwise) for information on<br />
future releases. Details provi<strong>de</strong>d will not<br />
be ma<strong>de</strong> available to any third party.<br />
PURCHASE RECORD<br />
Date of Purchase: ___ / ___ / ____<br />
Mo<strong>de</strong>l: TA184CSL<br />
Serial Number: __________________<br />
(Located on motor label)<br />
Retain your receipt as proof of purchase<br />
<strong>Triton</strong> Manufacturing & Design Co.<br />
warrants to the purchaser of this product<br />
that if any part proves to be <strong>de</strong>fective<br />
due to faulty materials or workmanship<br />
within 12 MONTHS from the date of<br />
original purchase, <strong>Triton</strong> will repair, or at<br />
its discretion replace, the faulty part free<br />
of charge.<br />
This warranty does not apply to<br />
commercial use nor does it extend to<br />
normal wear and tear or damage as a<br />
result of acci<strong>de</strong>nt, abuse or misuse.<br />
*Register online within 30 days.<br />
Terms & conditions apply.<br />
This does not affect your statutory rights.<br />
Warranty<br />
15<br />
GB
NL<br />
Hartelijk dank voor <strong>de</strong> aanschaf van dit elektrische <strong>Triton</strong>-gereedschap. Deze instructies bevatten informatie<br />
die u nodig hebt voor een veilige en doeltreffen<strong>de</strong> bediening van dit product. Deze zaag heeft een aantal<br />
unieke eigenschappen. Lees daarom <strong>de</strong>ze handleiding altijd door, ook als u al bekend bent met cirkelzagen,<br />
zodat u alle voor<strong>de</strong>len van dit unieke ontwerp kunt benutten.<br />
Houd <strong>de</strong>ze handleiding bij <strong>de</strong> hand en zorg ervoor dat alle gebruikers van dit gereedschap <strong>de</strong> handleiding<br />
hebben gelezen en volledig hebben begrepen.<br />
INHOUD<br />
Specificaties 16<br />
On<strong>de</strong>r<strong>de</strong>len 17<br />
Algemene veiligheidsregels 18<br />
Symbolen 22<br />
Functies 23<br />
Bediening van <strong>de</strong> zaag 25<br />
Monteren op een zaagbank 26<br />
Het zaagblad vervangen 26<br />
Service en on<strong>de</strong>rhoud 27<br />
Problemen oplossen 28<br />
Garantie 29<br />
SPECIFICATIES<br />
TECHNISCHE GEGEVENS<br />
On<strong>de</strong>r<strong>de</strong>elnummer: TA184CSL<br />
Voltage: 230 - 240 V ~ 50 Hz<br />
Ingangsstroom: 1800 W<br />
Snelheid zon<strong>de</strong>r belasting: 5.000 min -1<br />
Formaat zaagblad: 185 mm (7 1 /4”)<br />
Spil zaagblad: 20 mm<br />
Aanpassing afschuining: 0° – 45°<br />
Zaagdiepte: 90° – 60 mm 45° – 40 mm<br />
Isolatieklasse: Dubbel geïsoleerd<br />
Netto gewicht: 5,1 kg<br />
Laser: Klasse 2 Golflengte: 650 nm Uitgangsstroom: ≤1 mw<br />
Trillingsmeetwaar<strong>de</strong>: 98.8dB(A)<br />
Geluidsdruk: 109.8 dB(A)<br />
Geluidsvermogen: 1.693m/s 2<br />
Draag gehoorbescherming<br />
Draag altijd <strong>de</strong>gelijke gehoorbescherming bij geluidsniveaus van meer dan 80 dB.<br />
16<br />
Inhoud Specificaties
ONDERDELEN<br />
6<br />
15<br />
16<br />
12<br />
19<br />
14<br />
13<br />
20<br />
21<br />
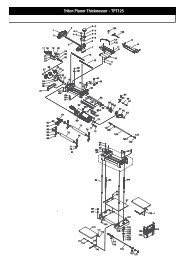
1. Aan-/uitknop laservizier<br />
2. Opening laservizier<br />
3. Trekkerschakelaar<br />
4. Viseerinkeping zaagblad<br />
5. Motorbehuizing<br />
6. Hoofdhen<strong>de</strong>l<br />
7. Voorhen<strong>de</strong>l<br />
8. Hen<strong>de</strong>l afschuiningsinstelling<br />
9. Afschuiningsschaal<br />
10. Vergren<strong>de</strong>lingsknop parallelle gelei<strong>de</strong>r<br />
11. Parallelle zaaggelei<strong>de</strong>r<br />
12. Zaagkaphen<strong>de</strong>l<br />
13. Terugtrekken<strong>de</strong> zaagkap<br />
14. Basisplaat<br />
15. Bovenste zaagkap<br />
16. Stofafvoerkoker<br />
17. Vergren<strong>de</strong>lingsknop diepte<br />
18. Zaagdiepteschaal<br />
19. Zaagblad<br />
20. Stiftsleutel<br />
21. Zeshoekige sleutel<br />
1<br />
7<br />
2<br />
5<br />
9<br />
10<br />
8<br />
11<br />
4<br />
On<strong>de</strong>r<strong>de</strong>len<br />
3<br />
18<br />
17<br />
17<br />
NL
NL<br />
ALGEMENE VEILIGHEIDSREGELS<br />
ALGEMENE VEILIGHEIDSREGELS<br />
U dient alle instructies te lezen en te<br />
begrijpen. Het niet opvolgen van alle<br />
instructies die hieron<strong>de</strong>r vermeld staan, kan<br />
resulteren in een elektrische schok, brand en/of<br />
ernstig persoonlijk letsel.<br />
De term “elektrisch gereedschap” in alle<br />
hieron<strong>de</strong>r vermel<strong>de</strong> waarschuwingen heeft<br />
betrekking op uw op <strong>de</strong> stroom aangesloten<br />
(met een snoer) elektrische gereedschap of uw<br />
met een accu (snoerloos) bedien<strong>de</strong> elektrische<br />
gereedschap.<br />
WERKGEBIED<br />
• Houd het werkgebied schoon en zorg voor<br />
een goe<strong>de</strong> verlichting. Rommelige en donkere<br />
ruimtes hebben vaak ongelukken tot gevolg.<br />
• Werk niet met elektrisch gereedschap in<br />
een omgeving waar explosieve of corrosieve<br />
gassen aanwezig kunnen zijn. Elektrisch<br />
gereedschap veroorzaakt vonken die dampen<br />
kunnen doen ontbran<strong>de</strong>n. Vermijd plaatsen<br />
met een hoge vochtigheidsgraad of veel vocht.<br />
• Houd kin<strong>de</strong>ren, omstan<strong>de</strong>rs en bezoekers<br />
uit <strong>de</strong> buurt wanneer u het elektrische<br />
gereedschap bedient. Door afleiding kunt u <strong>de</strong><br />
controle over het gereedschap verliezen.<br />
• Stel het gereedschap altijd op in een stabiele<br />
positie.<br />
VEILIGHEID MET BETREKKING TOT<br />
ELEKTRICITEIT<br />
• De stekkers van het elektrische gereedschap<br />
moeten passen bij het stopcontact. U mag op<br />
geen enkele manier <strong>de</strong> stekker aanpassen.<br />
Gebruik geen adapterstekkers bij geaard<br />
elektrisch gereedschap. Het gebruikmaken<br />
van ongewijzig<strong>de</strong> stekkers en bijpassen<strong>de</strong><br />
stopcontacten vermin<strong>de</strong>rt het risico op een<br />
elektrische schok.<br />
• Vermijd lichamelijk contact met geaar<strong>de</strong><br />
oppervlakken zoals pijpen, radiatoren,<br />
fornuizen en koelkasten. Het risico op een<br />
elektrische schok neemt toe als uw lichaam<br />
geaard wordt.<br />
• Laat uw elektrisch gereedschap niet nat<br />
18<br />
Algemene Veiligheidsregels<br />
wor<strong>de</strong>n. Wanneer elektrisch gereedschap nat<br />
wordt, neemt het risico op een elektrische<br />
schok toe.<br />
• Beschadig het snoer niet. Gebruik het<br />
snoer nooit om te dragen, te trekken of om<br />
<strong>de</strong> stekker uit het stopcontact te trekken.<br />
Houd het snoer verwij<strong>de</strong>rd van hitte, olie,<br />
scherpe ran<strong>de</strong>n of bewegen<strong>de</strong> <strong>de</strong>len. Door<br />
beschadig<strong>de</strong> of in <strong>de</strong> knoop geraakte snoeren<br />
neemt het risico op een elektrische schok toe.<br />
• Wanneer u elektrisch gereedschap buiten<br />
gebruikt, maak dan gebruik van een<br />
verlengsnoer dat geschikt is voor gebruik<br />
buitenshuis. Het gebruik van een snoer<br />
dat geschikt is voor gebruik buitenshuis<br />
vermin<strong>de</strong>rt het risico op een elektrische<br />
schok.<br />
• Trek nooit aan het snoer om het uit het<br />
stopcontact te trekken. Houd het snoer<br />
verwij<strong>de</strong>rd van hitte en scherpe ran<strong>de</strong>n.<br />
PERSOONLIJKE VEILIGHEID<br />
• Blijf alert, houd uw aandacht gericht op wat<br />
u aan het doen bent en gebruik uw gezon<strong>de</strong><br />
verstand wanneer u elektrisch gereedschap<br />
bedient. Gebruik het gereedschap niet<br />
wanneer u vermoeid bent of on<strong>de</strong>r invloed<br />
van drugs, alcohol of medicijnen. Eén moment<br />
van onoplettendheid tij<strong>de</strong>ns het bedienen van<br />
elektrisch gereedschap kan lei<strong>de</strong>n tot ernstig<br />
persoonlijk letsel.<br />
• Maak gebruik van veiligheidsmateriaal. Draag<br />
altijd oogbescherming. Veiligheidsmateriaal<br />
dat on<strong>de</strong>r <strong>de</strong> juiste omstandighe<strong>de</strong>n<br />
gebruikt wordt, zoals een stofmasker, nietslippend<br />
veiligheidsschoeisel, een helm of<br />
gehoorbescherming, vermin<strong>de</strong>rt persoonlijk<br />
letsel.<br />
• Draag geschikte kleding. Draag geen<br />
loshangen<strong>de</strong> kleding of siera<strong>de</strong>n. Bind lang<br />
haar vast naar achteren. Houd uw haar,<br />
kleding en handschoenen weg van bewegen<strong>de</strong><br />
<strong>de</strong>len. Loshangen<strong>de</strong> kleding, siera<strong>de</strong>n of<br />
lang haar kunnen in bewegen<strong>de</strong> <strong>de</strong>len<br />
terechtkomen.<br />
• Zorg ervoor dat het apparaat niet per ongeluk<br />
wordt gestart. Kijk of <strong>de</strong> schakelaar in <strong>de</strong>
uit-stand staat voordat u <strong>de</strong> stekker in het<br />
stopcontact steekt. Het dragen van elektrisch<br />
gereedschap met uw vinger op <strong>de</strong> schakelaar<br />
of het aansluiten op <strong>de</strong> stroom van elektrisch<br />
gereedschap met <strong>de</strong> schakelaar ingeschakeld<br />
kan tot ongelukken lei<strong>de</strong>n.<br />
• Verwij<strong>de</strong>r stel- of moersleutels voordat u<br />
het gereedschap inschakelt. Een moer- of<br />
stelsleutel die zich op een draaiend on<strong>de</strong>r<strong>de</strong>el<br />
van het gereedschap bevindt, kan lei<strong>de</strong>n tot<br />
letsel.<br />
• On<strong>de</strong>r<strong>de</strong>len en metalen <strong>de</strong>len kunnen erg heet<br />
wor<strong>de</strong>n.<br />
GEBRUIK EN VERZORGING VAN ELEKTRISCH<br />
GEREEDSCHAP<br />
• Gebruik klemmen of iets an<strong>de</strong>rs dat geschikt<br />
is om het werk op een stabiel platform te<br />
bevestigen en te on<strong>de</strong>rsteunen. Het werk in<br />
<strong>de</strong> hand of tegen uw lichaam hou<strong>de</strong>n is niet<br />
stabiel en kan lei<strong>de</strong>n tot verlies van controle.<br />
• Forceer het gereedschap niet. Gebruik<br />
elektrisch gereedschap dat geschikt is voor<br />
het werk dat u uit wilt voeren. Geschikt<br />
elektrisch gereedschap werkt beter en veiliger<br />
op een passen<strong>de</strong> snelheid.<br />
• Gebruik het gereedschap niet als <strong>de</strong><br />
schakelaar het apparaat niet in- en<br />
uitschakelt. Elk gereedschap dat niet bediend<br />
kan wor<strong>de</strong>n met <strong>de</strong> schakelaar is gevaarlijk en<br />
moet gerepareerd wor<strong>de</strong>n. Als u een probleem<br />
<strong>de</strong>nkt te hebben, raadpleeg dan <strong>de</strong> paragraaf<br />
“Problemen oplossen” en neem zo nodig<br />
contact op met een reparatiecentrum.<br />
• Haal <strong>de</strong> stekker uit het stopcontact voordat u<br />
instellingen aanpast, accessoires veran<strong>de</strong>rt<br />
of het gereedschap opbergt. Dergelijke<br />
voorzorgsmaatregelen vermin<strong>de</strong>ren het risico<br />
dat u het gereedschap per ongeluk start.<br />
• Berg het gereedschap op in een droge<br />
omgeving, buiten bereik van kin<strong>de</strong>ren en<br />
onervaren personen. Dit gereedschap is<br />
gevaarlijk in <strong>de</strong> han<strong>de</strong>n van onervaren<br />
gebruikers.<br />
• On<strong>de</strong>rhoud gereedschap zorgvuldig. Houd<br />
zaagwerktuigen scherp en schoon. Goed<br />
on<strong>de</strong>rhou<strong>de</strong>n zaagwerktuigen met scherp<br />
snij<strong>de</strong>n<strong>de</strong> zaagbla<strong>de</strong>n slaan min<strong>de</strong>r snel vast<br />
en zijn gemakkelijker te bedienen.<br />
• Controleer op foutieve uitlijning (sterke<br />
vibraties), het vastslaan van bewegen<strong>de</strong><br />
<strong>de</strong>len of elke an<strong>de</strong>re afwijking die <strong>de</strong><br />
werking van het elektrische gereedschap zou<br />
kunnen beïnvloe<strong>de</strong>n. Indien het gereedschap<br />
beschadigd is, dient het voor u het gebruikt<br />
een on<strong>de</strong>rhoudsbeurt krijgen. Veel ongelukken<br />
wor<strong>de</strong>n veroorzaakt door slecht on<strong>de</strong>rhou<strong>de</strong>n<br />
elektrisch gereedschap.<br />
• Start het gereedschap nooit terwijl het<br />
zaagblad het werkstuk raakt.<br />
• Zorg ervoor dat het apparaat niet per ongeluk<br />
wordt gestart. Kijk of <strong>de</strong> schakelaar in <strong>de</strong><br />
uit-stand staat voordat u <strong>de</strong> stekker in het<br />
stopcontact steekt. Het dragen van elektrisch<br />
gereedschap met uw vinger op <strong>de</strong> schakelaar<br />
of het aansluiten op <strong>de</strong> stroom van elektrisch<br />
gereedschap met <strong>de</strong> schakelaar ingeschakeld<br />
kan tot ongelukken lei<strong>de</strong>n.<br />
• Verwij<strong>de</strong>r stel- of moersleutels voordat u<br />
het gereedschap inschakelt. Een moer- of<br />
stelsleutel die zich op een draaiend on<strong>de</strong>r<strong>de</strong>el<br />
van het gereedschap bevindt, kan lei<strong>de</strong>n tot<br />
letsel.<br />
• On<strong>de</strong>r<strong>de</strong>len en metalen <strong>de</strong>len kunnen erg heet<br />
wor<strong>de</strong>n.<br />
AANVULLENDE<br />
VEILIGHEIDSWAARSCHUWINGEN VOOR<br />
LASERLICHT<br />
Het laserlicht / <strong>de</strong> laserstraling die wordt<br />
gebruikt in dit product is van klasse 2, met<br />
maximaal 1 mW en 650 nm golflengte. Deze<br />
lasers vormen normaalgesproken geen<br />
optisch gevaar, hoewel het kijken naar <strong>de</strong><br />
straal plotseling opkomen<strong>de</strong> blindheid kan<br />
veroorzaken.<br />
Kijk niet rechtstreeks naar <strong>de</strong> laserstraal. Het<br />
kan gevaarlijk zijn als u opzettelijk in <strong>de</strong> straal<br />
kijkt. Neem alle hierna volgen<strong>de</strong> veiligheidsregels<br />
in acht:<br />
• De laser moet wor<strong>de</strong>n gebruikt en<br />
on<strong>de</strong>rhou<strong>de</strong>n in overeenstemming met <strong>de</strong><br />
instructies van <strong>de</strong> fabrikant.<br />
• Richt <strong>de</strong> straal nooit op een persoon of op een<br />
object an<strong>de</strong>rs dan het werkstuk.<br />
• De laserstraal mag niet opzettelijk op<br />
personeel wor<strong>de</strong>n gericht en mag niet langer<br />
Algemene Veiligheidsregels<br />
19<br />
NL
NL<br />
dan 0,25 sec. op het oog van een persoon<br />
wor<strong>de</strong>n gericht.<br />
• Zorg er altijd voor dat <strong>de</strong> laserstraal gericht<br />
wordt op een stevig werkstuk zon<strong>de</strong>r<br />
reflecteren<strong>de</strong> oppervlakken. Hout of ruwe<br />
oppervlakken zijn bijvoorbeeld geschikt.<br />
Hel<strong>de</strong>r glanzend, reflecterend plaatstaal of iets<br />
<strong>de</strong>rgelijks is niet geschikt voor het gebruik van<br />
laser, omdat het reflecteren<strong>de</strong> oppervlak <strong>de</strong><br />
straal terug kan richten naar <strong>de</strong>gene die het<br />
gereedschap bedient.<br />
• Vervang <strong>de</strong> laserlichtconstructie niet door een<br />
an<strong>de</strong>r type. Reparaties mogen alleen wor<strong>de</strong>n<br />
uitgevoerd door <strong>de</strong> laserfabrikant of een<br />
bevoeg<strong>de</strong> tussenpersoon.<br />
Het gebruik van bedieningsinrichtingen of<br />
het doen van aanpassingen of het uitvoeren<br />
van procedures an<strong>de</strong>rs dan <strong>de</strong> hierin<br />
gespecificeer<strong>de</strong>, kan lei<strong>de</strong>n tot blootstelling aan<br />
gevaarlijke straling.<br />
Raadpleeg <strong>de</strong> relevante Europese standaard<br />
EN60825-1 : 1994 + A2: 2001 + A1 : 2002 voor<br />
meer informatie betreffen<strong>de</strong> lasers.<br />
AANVULLENDE<br />
VEILIGHEIDSWAARSCHUWINGEN VOOR<br />
CIRKELZAGEN<br />
• Houd uw han<strong>de</strong>n weg van het zaaggebied en<br />
het zaagblad. Houd uw twee<strong>de</strong> hand op <strong>de</strong><br />
hulphen<strong>de</strong>l of op <strong>de</strong> motorbehuizing. Als bei<strong>de</strong><br />
han<strong>de</strong>n <strong>de</strong> zaag vasthou<strong>de</strong>n, kunnen ze niet<br />
door het zaagblad geraakt wor<strong>de</strong>n.<br />
• Reik nooit on<strong>de</strong>r het werkstuk. De zaagkap<br />
kan u niet beschermen tegen het zaagblad<br />
on<strong>de</strong>r het werkstuk.<br />
• Pas <strong>de</strong> zaagdiepte aan bij <strong>de</strong> dikte van het<br />
werkstuk. Er dient min<strong>de</strong>r dan een volledige<br />
tand van <strong>de</strong> zaagbladtan<strong>de</strong>n zichtbaar te zijn<br />
on<strong>de</strong>r het werkstuk.<br />
• Houd het <strong>de</strong>el dat gezaagd wordt nooit vast in<br />
uw han<strong>de</strong>n of over uw been. Zet het werkstuk<br />
vast op een stabiel platform. Het is belangrijk<br />
het werk goed te on<strong>de</strong>rsteunen zodat <strong>de</strong> kans<br />
op blootstelling van het lichaam, het vastslaan<br />
van het zaagblad of verlies van controle over<br />
het apparaat geminimaliseerd wordt.<br />
• Pak het elektrische gereedschap vast bij <strong>de</strong><br />
geïsoleer<strong>de</strong> greepoppervlakken wanneer<br />
20<br />
Algemene Veiligheidsregels<br />
u werkzaamhe<strong>de</strong>n uitvoert waarbij het<br />
zaagapparaat in contact kan komen met<br />
verborgen bedrading of met het eigen snoer.<br />
Contact met een draad on<strong>de</strong>r stroom zet<br />
ook <strong>de</strong> blootliggen<strong>de</strong> metalen <strong>de</strong>len van<br />
het elektrische gereedschap on<strong>de</strong>r stroom,<br />
wat leidt tot een schok voor <strong>de</strong>gene die het<br />
apparaat bedient.<br />
• Wanneer u schulpt, moet u altijd een<br />
langsgelei<strong>de</strong>r met rechte rand gebruiken<br />
of een zaagbank. Dit zorgt voor een<br />
nauwkeuriger zaagrand en vermin<strong>de</strong>rt <strong>de</strong> kans<br />
dat het zaagblad vastslaat.<br />
• Gebruik altijd zaagbla<strong>de</strong>n van het juiste<br />
formaat en <strong>de</strong> juiste vorm (diamant vs. rond)<br />
spilgaten. Zaagbla<strong>de</strong>n die niet passen bij <strong>de</strong><br />
on<strong>de</strong>r<strong>de</strong>len van <strong>de</strong> zaag lopen excentrisch,<br />
waardoor u <strong>de</strong> controle over het zagen<br />
verliest.<br />
• Gebruik nooit beschadig<strong>de</strong> of niet passen<strong>de</strong><br />
sluitringen of bouten voor het zaagblad.<br />
De sluitringen en bout wer<strong>de</strong>n speciaal<br />
ontworpen voor uw zaag, voor <strong>de</strong> beste<br />
prestaties en een veilige bediening.
OORZAKEN EN VOORKOMING VAN<br />
TERUGSLAG DOOR DEGENE DIE HET<br />
GEREEDSCHAP BEDIENT<br />
• Terugslag is een plotselinge reactie op een<br />
klemmend, vastgeslagen of foutief uitgelijnd<br />
zaagblad, waardoor een ongecontroleer<strong>de</strong><br />
zaag omhoogschiet uit het werkstuk richting<br />
<strong>de</strong>gene die het gereedschap bedient;<br />
• Wanneer het zaagblad klemt of vastslaat in <strong>de</strong><br />
aflopen<strong>de</strong> zaagsne<strong>de</strong>, dan komt het zaagblad<br />
tot stilstand; door <strong>de</strong> reactie van <strong>de</strong> motor<br />
wordt het apparaat snel richting <strong>de</strong>gene die<br />
het gereedschap bedient geduwd;<br />
• Als het zaagblad verdraaid wordt of foutief<br />
wordt uitgelijnd bij het zagen, dan kunnen <strong>de</strong><br />
tan<strong>de</strong>n aan <strong>de</strong> achterrand van het zaagblad<br />
zich in <strong>de</strong> bovenkant van het hout graven,<br />
waardoor het zaagblad uit <strong>de</strong> zaagsne<strong>de</strong><br />
klimt en terugspringt richting <strong>de</strong>gene die het<br />
gereedschap bedient.<br />
Terugslag is het resultaat van het verkeerd<br />
gebruiken van <strong>de</strong> zaag en/of onjuiste<br />
bedieningsprocedures of werkomstandighe<strong>de</strong>n,<br />
en kan voorkomen wor<strong>de</strong>n door het nemen van<br />
<strong>de</strong> juiste voorzorgsmaatregelen, die hieron<strong>de</strong>r<br />
beschreven staan.<br />
1. Houd <strong>de</strong> zaag met bei<strong>de</strong> han<strong>de</strong>n stevig vast en<br />
plaats uw armen zo dat u <strong>de</strong> terugslagkracht<br />
kan weerstaan. Plaats uw lichaam aan één<br />
van bei<strong>de</strong> kanten van het zaagblad, maar<br />
niet op <strong>de</strong> lijn van het zaagblad. Door een<br />
terugslag kan <strong>de</strong> zaag naar achteren springen,<br />
maar terugslagkrachten kunnen beheerst<br />
wor<strong>de</strong>n door <strong>de</strong>gene die het gereedschap<br />
bedient als <strong>de</strong> juiste voorzorgsmaatregelen<br />
wor<strong>de</strong>n genomen.<br />
2. Als het zaagblad vastslaat, of als het zagen<br />
om een of an<strong>de</strong>re re<strong>de</strong>n on<strong>de</strong>rbroken wordt,<br />
laat u <strong>de</strong> trekker los en houdt u <strong>de</strong> zaag<br />
bewegingloos in het materiaal tot het zaagblad<br />
volledig is gestopt. Probeer nooit <strong>de</strong> zaag uit<br />
het werk te verwij<strong>de</strong>ren of <strong>de</strong> zaag achteruit te<br />
trekken als het zaagblad nog beweegt, omdat<br />
er dan een terugslag kan komen. On<strong>de</strong>rzoek<br />
waarom het blad is vastgeslagen en neem<br />
maatregelen om te voorkomen dat dit opnieuw<br />
gebeurt.<br />
3. Wanneer u opnieuw begint te zagen in het<br />
werkstuk, centreer het zaagblad dan in <strong>de</strong><br />
zaagsne<strong>de</strong> en controleer of <strong>de</strong> tan<strong>de</strong>n niet<br />
in het materiaal vastzitten. Als het zaagblad<br />
vastslaat, kan het oplopen of terugslaan vanaf<br />
het werkstuk wanneer <strong>de</strong> zaag opnieuw wordt<br />
gestart.<br />
4. On<strong>de</strong>rsteun grote panelen, om het risico<br />
dat het zaagblad klemt en terugslaat te<br />
minimaliseren. Grote panelen hebben <strong>de</strong><br />
neiging door te buigen on<strong>de</strong>r hun eigen<br />
gewicht. U dient aan bei<strong>de</strong> kanten steunen te<br />
plaatsen on<strong>de</strong>r het paneel, vlakbij <strong>de</strong> zaaglijn<br />
en vlakbij <strong>de</strong> rand van het paneel.<br />
5. Gebruik geen botte of beschadig<strong>de</strong><br />
zaagbla<strong>de</strong>n. Botte of niet juist geplaatste<br />
zaagbla<strong>de</strong>n produceren een smalle zaagsne<strong>de</strong><br />
wat excessief veel frictie, vastslaan van het<br />
zaagblad en terugslag veroorzaakt.<br />
6. De vergren<strong>de</strong>lingshen<strong>de</strong>ls voor <strong>de</strong> instelling<br />
van diepte en afschuining van het zaagblad<br />
moeten stevig vastzitten voordat u begint te<br />
zagen. Als <strong>de</strong> zaagbladinstelling tij<strong>de</strong>ns het<br />
zagen veran<strong>de</strong>rt, kan dit lei<strong>de</strong>n tot vastslaan<br />
of tot een terugslag.<br />
7. Wees extra voorzichtig als u zaagt zon<strong>de</strong>r<br />
voor te boren in bestaan<strong>de</strong> muren of an<strong>de</strong>re<br />
blin<strong>de</strong> oppervlakken. Het vooruitsteken<strong>de</strong><br />
zaagblad kan objecten raken die een terugslag<br />
veroorzaken.<br />
Zorg ervoor dat <strong>de</strong> terugtrekken<strong>de</strong> zaagkap goed<br />
functioneert:<br />
• Controleer voor ie<strong>de</strong>r gebruik of <strong>de</strong><br />
terugtrekken<strong>de</strong> zaagkap goed sluit. Gebruik<br />
<strong>de</strong> zaag niet als <strong>de</strong> terugtrekken<strong>de</strong> zaagkap<br />
niet vrijelijk beweegt en onmid<strong>de</strong>llijk sluit.<br />
Klem of bind <strong>de</strong> terugtrekken<strong>de</strong> zaagkap nooit<br />
vast in <strong>de</strong> open stand. Als <strong>de</strong> zaag onverhoopt<br />
mocht vallen, dan kan <strong>de</strong> terugtrekken<strong>de</strong><br />
zaagkap verbogen zijn. Doe <strong>de</strong> terugtrekken<strong>de</strong><br />
zaagkap omhoog met <strong>de</strong> terugtrekhen<strong>de</strong>l en<br />
controleer of hij vrijelijk beweegt en nergens<br />
het zaagblad of een an<strong>de</strong>r on<strong>de</strong>r<strong>de</strong>el raakt, in<br />
alle hoeken en dieptes van <strong>de</strong> zaagsne<strong>de</strong>.<br />
• Controleer <strong>de</strong> werking van <strong>de</strong> veer van <strong>de</strong><br />
terugtrekken<strong>de</strong> zaagkap. Als <strong>de</strong> zaagkap en<br />
<strong>de</strong> veer niet goed werken, moeten ze voor<br />
gebruik een on<strong>de</strong>rhoudsbeurt krijgen. De<br />
terugtrekken<strong>de</strong> zaagkap kan traag werken<br />
Algemene Veiligheidsregels<br />
21<br />
NL
NL<br />
door beschadig<strong>de</strong> on<strong>de</strong>r<strong>de</strong>len, kleverige<br />
aanslag, of opgehoopt vuil.<br />
• De terugtrekken<strong>de</strong> zaagkap dient alleen<br />
handmatig te wor<strong>de</strong>n teruggetrokken<br />
voor speciale zaagsne<strong>de</strong>s, zoals zagen<br />
in plaatmaterieel zon<strong>de</strong>r voorgeboor<strong>de</strong><br />
gaten en samengestel<strong>de</strong> zaagsne<strong>de</strong>s.<br />
Doe <strong>de</strong> terugtrekken<strong>de</strong> zaagkap omhoog<br />
door <strong>de</strong> hen<strong>de</strong>l terug te trekken. Zodra het<br />
zaagblad het materiaal binnengaat, moet <strong>de</strong><br />
terugtrekken<strong>de</strong> zaagkap losgelaten wor<strong>de</strong>n.<br />
Voor alle an<strong>de</strong>re soorten zaagwerkzaamhe<strong>de</strong>n<br />
hoort <strong>de</strong> terugtrekken<strong>de</strong> zaagkap automatisch<br />
te werken.<br />
• Let er altijd op dat <strong>de</strong> terugtrekken<strong>de</strong> zaagkap<br />
het zaagblad be<strong>de</strong>kt voordat u <strong>de</strong> zaag op <strong>de</strong><br />
werkbank of vloer plaatst. Een onbeschermd,<br />
SYMBOLEN<br />
BESCHERMING VAN HET MILIEU<br />
Elektrische producten mogen niet wor<strong>de</strong>n<br />
afgevoerd met het normale huisvuil.<br />
Indien <strong>de</strong> mogelijkheid bestaat, dient u<br />
het product te recyclen. Vraag <strong>de</strong> plaatselijke<br />
autoriteiten of winkelier om advies betreffen<strong>de</strong><br />
recyclen.<br />
22<br />
Draag altijd oor-, oog- en<br />
luchtwegenbescherming.<br />
Voldoet aan <strong>de</strong> relevante wetgeving en<br />
veiligheidsstandaards<br />
Dubbel geïsoleerd.<br />
Symbolen<br />
LASER LIGHT<br />
LASER RADIATION<br />
Do not stare into beam.<br />
Class 2 laser product.<br />
Wave length: 650nm<br />
Output power: 1mw<br />
AS/NZS 2211.1:2004<br />
freewheelend zaagblad leidt ertoe dat <strong>de</strong> zaag<br />
achteruit loopt en alles op zijn pad doorzaagt.<br />
U dient zich ervan bewust te zijn dat het enige<br />
tijd duurt voordat het zaagblad is gestopt<br />
nadat <strong>de</strong> schakelaar is losgelaten.<br />
Instructie waarschuwing.<br />
Instructie let op.<br />
Laser
FUNCTIES<br />
ZAAGDIEPTE<br />
Zorg ervoor dat <strong>de</strong> zaag niet met <strong>de</strong> stroom is<br />
verbon<strong>de</strong>n.<br />
1. Zet <strong>de</strong> hen<strong>de</strong>l voor <strong>de</strong> diepte-instelling (17)<br />
los en draai het zaaglichaam weg van <strong>de</strong><br />
basisplaat.<br />
2. Stel <strong>de</strong> zaag in op <strong>de</strong> gewenste diepte,<br />
overeenkomstig <strong>de</strong> zaagdiepteschaal (18).<br />
De diepteschaal moet alleen als<br />
referentie gebruikt wor<strong>de</strong>n. Als er een<br />
nauwkeurige diepte nodig is, maak dan een<br />
aantal testsne<strong>de</strong>s tot <strong>de</strong> gewenste diepte<br />
bereikt is.<br />
3. Duw <strong>de</strong> hen<strong>de</strong>l omlaag om hem vast te zetten,<br />
maar doe dit niet te strak.<br />
Voor het beste zaagresultaat dient het<br />
zaagblad niet meer dan <strong>de</strong> diepte van<br />
één tand uit te steken buiten <strong>de</strong> dikte<br />
van het te zagen materiaal.<br />
• De hoogtehen<strong>de</strong>l kan opnieuw wor<strong>de</strong>n<br />
ingesteld als het mechanisme te strak of te los<br />
zit, met <strong>de</strong> hen<strong>de</strong>l omhoog.<br />
Om <strong>de</strong> hen<strong>de</strong>l opnieuw in te stellen, verwij<strong>de</strong>rt<br />
u <strong>de</strong> klemring waar <strong>de</strong> hen<strong>de</strong>l mee vastzit met<br />
een schroevendraaier. Neem <strong>de</strong> hen<strong>de</strong>l van<br />
<strong>de</strong> zeshoekige moer en draai hem één positie<br />
naar rechts (indien te strak) of naar links<br />
(indien te los), plaats hem vervolgens weer<br />
terug.<br />
Plaats <strong>de</strong> klemring terug en controleer <strong>de</strong><br />
vergren<strong>de</strong>lingspositie van <strong>de</strong> hen<strong>de</strong>l opnieuw.<br />
HET INSTELLEN VAN AFSCHUININGSHOEKEN<br />
Afschuiningshoeken kunnen wor<strong>de</strong>n ingesteld<br />
tussen 0° en 45°.<br />
Probeer <strong>de</strong> zaag niet schuin te plaatsen als <strong>de</strong>ze<br />
in een zaagtafel is gemonteerd.<br />
1. Zorg ervoor dat <strong>de</strong> zaag niet met <strong>de</strong><br />
stroom is verbon<strong>de</strong>n.<br />
2. Maak <strong>de</strong> hen<strong>de</strong>l afschuiningsinstelling (8) aan<br />
<strong>de</strong> voorkant van <strong>de</strong> zaag los.<br />
3. Draai het zaaglichaam naar <strong>de</strong> gewenste<br />
hoek, zoals is aangegeven op <strong>de</strong><br />
afschuiningsschaal (9).<br />
De afschuiningsschaal moet alleen als referentie<br />
gebruikt wor<strong>de</strong>n. Als er een nauwkeurige hoek<br />
nodig is, maak dan een aantal testsne<strong>de</strong>s tot<br />
<strong>de</strong> gewenste hoek bereikt is.<br />
4. Zet <strong>de</strong> hen<strong>de</strong>l afschuiningsinstelling<br />
weer vast.<br />
STROOMSCHAKELAAR<br />
Zorg ervoor dat uw bei<strong>de</strong> han<strong>de</strong>n stevig op<br />
<strong>de</strong> handgrepen van het<br />
gereedschap liggen<br />
voordat u dit inschakelt.<br />
• Trek <strong>de</strong><br />
trekkerschakelaar (3)<br />
“AAN”.<br />
U voelt eerst enige<br />
weerstand wanneer u<br />
aan <strong>de</strong> trekker trekt - dit is een<br />
Functies<br />
23<br />
NL
NL<br />
veiligheidsmechanisme, om te voorkomen dat<br />
u <strong>de</strong> zaag per ongeluk start.<br />
• Door <strong>de</strong> trekker los te laten schakelt het<br />
gereedschap “UIT”.<br />
Zet het zaagblad niet in uw werkstuk voordat<br />
het op volle snelheid draait - schakel het<br />
gereedschap bovendien pas uit wanneer <strong>de</strong><br />
zaagsne<strong>de</strong> voltooid is.<br />
PARALLELLE ZAAGGELEIDER<br />
• De zaaggelei<strong>de</strong>r (11) kan wor<strong>de</strong>n gebruikt aan<br />
<strong>de</strong> linker- of <strong>de</strong> rechterkant van het zaagblad.<br />
• Met <strong>de</strong> langsgelei<strong>de</strong>r kunt u nauwkeurig zagen<br />
zon<strong>de</strong>r dat u uit <strong>de</strong> vrije hand moet werken<br />
langs potloodlijnen.<br />
1. Zet <strong>de</strong> duimschroef op <strong>de</strong> basisplaat los en<br />
schuif <strong>de</strong> gelei<strong>de</strong>r (11)<br />
in <strong>de</strong> openingen op <strong>de</strong><br />
basisplaat, vanaf <strong>de</strong><br />
linker- of rechterkant.<br />
2. Schuif hem door tot <strong>de</strong><br />
gewenste zaagbreedte is<br />
bereikt.<br />
3. Zet <strong>de</strong> duimschroef vast om hem op zijn<br />
plaats te vergren<strong>de</strong>len.<br />
DE ZAAGLIJN VISEREN<br />
De viseerindicatoren (4) aan <strong>de</strong> voorkant van<br />
het zaagblad zorgen voor<br />
geleiding wanneer u langs<br />
een potloodlijn zaagt.<br />
Voor zaagsne<strong>de</strong>s van<br />
90° gebruikt u <strong>de</strong> rechter<br />
indicator (gezien vanuit het<br />
perspectief van <strong>de</strong>gene die<br />
het gereedschap bedient)<br />
en voor zaagsne<strong>de</strong>s van<br />
45° <strong>de</strong> linker indicator.<br />
LASERVISEREN<br />
Waarschuwingen:<br />
24<br />
Functies<br />
• Kijk niet rechtstreeks in <strong>de</strong> laserstraal.<br />
• Richt <strong>de</strong> straal nooit op een persoon of<br />
op een object an<strong>de</strong>rs dan het werkstuk.<br />
• Richt <strong>de</strong> straal niet opzettelijk op personeel en<br />
zorg ervoor dat hij niet langer dan 0,25 sec. op<br />
het oog van een persoon wordt gericht.<br />
• Zorg er altijd voor dat <strong>de</strong> laserstraal gericht<br />
wordt op een stevig werkstuk zon<strong>de</strong>r<br />
reflecteren<strong>de</strong> oppervlakken. Hout of ruwe<br />
oppervlakken zijn bijvoorbeeld geschikt.<br />
Hel<strong>de</strong>r glanzend, reflecterend plaatstaal of iets<br />
<strong>de</strong>rgelijks is niet geschikt voor het gebruik van<br />
laser, omdat het reflecteren<strong>de</strong> oppervlak <strong>de</strong><br />
straal terug kan richten naar <strong>de</strong>gene die het<br />
gereedschap bedient.<br />
• Zet <strong>de</strong> laserstraal alleen aan als het<br />
gereedschap op het werkstuk staat.<br />
1. Laat <strong>de</strong> voorrand van <strong>de</strong> basisplaat op het<br />
werkstuk steunen. Zorg ervoor dat het blad<br />
uw werk niet raakt.<br />
2. Schakel <strong>de</strong> laser in met <strong>de</strong> aan-/uitknop van<br />
het laservizier (1).<br />
De laser werkt niet als het gereedschap niet op<br />
<strong>de</strong> stroom is aangesloten of niet is aangezet.<br />
3. Breng <strong>de</strong> straal in lijn met uw potloodlijn.<br />
4. Begin te zagen.<br />
5. Schakel <strong>de</strong> laser uit.
BEDIENING VAN DE ZAAG<br />
Waarschuwingen:<br />
• Vermijd het om uit <strong>de</strong> vrije hand te zagen. U<br />
zaagt veel veiliger en nauwkeuriger wanneer<br />
<strong>de</strong> zaag wordt geleid door <strong>de</strong> parallelle<br />
zaaggelei<strong>de</strong>r of een opgeklem<strong>de</strong> lat. Als u uit<br />
<strong>de</strong> vrije hand zaagt, markeer dan altijd een<br />
rechte zaaglijn en zorg ervoor dat <strong>de</strong> zaag op<br />
<strong>de</strong>ze lijn blijft.<br />
• Zaag nooit op een werkstuk dat u in uw hand<br />
houdt. Zorg ervoor dat het werkstuk niet kan<br />
bewegen tij<strong>de</strong>ns het zagen, en maak zoveel<br />
mogelijk gebruik van klemmen.<br />
• Grote panelen en lange stukken moeten<br />
goed on<strong>de</strong>rsteund wor<strong>de</strong>n, vlak langs bei<strong>de</strong><br />
zij<strong>de</strong>n van <strong>de</strong> zaagsne<strong>de</strong> om vastklemming en<br />
terugslag te voorkomen. Zorg ervoor dat <strong>de</strong><br />
zaag zo geplaatst is dat het breedste <strong>de</strong>el van<br />
<strong>de</strong> basisplaat rust op het grootste <strong>de</strong>el, of op<br />
het <strong>de</strong>el dat het beste on<strong>de</strong>rsteund wordt.<br />
• Voorkom terugslag door ervoor te zorgen dat<br />
u <strong>de</strong> zaag in een rechte lijn beweegt. Zorg<br />
ervoor dat het zaagblad in goe<strong>de</strong> conditie is en<br />
dat <strong>de</strong> zaagsne<strong>de</strong> het zaagblad niet omsluit.<br />
(Gebruik een kleine wig of een tussenstuk<br />
van 3 mm in <strong>de</strong> zaagsne<strong>de</strong> om omsluiting te<br />
voorkomen als u moeilijk materiaal zaagt).<br />
Laat <strong>de</strong> trekker los als <strong>de</strong> zaag dreigt vast te<br />
lopen maar haal <strong>de</strong> zaag niet weg voordat het<br />
zaagblad gestopt is met draaien.<br />
ZAGEN<br />
1. Laat <strong>de</strong> voorkant van <strong>de</strong> basisplaat op het<br />
werkstukrusten, waarbij uw potloodmarkering<br />
op één lijn ligt met <strong>de</strong> viseer<strong>de</strong>r. Zorg ervoor<br />
dat het zaagblad het werkstuk niet raakt.<br />
2. Houd <strong>de</strong> zaag stevig vast met bei<strong>de</strong> han<strong>de</strong>n<br />
en zet <strong>de</strong> trekker aan. Wanneer <strong>de</strong> zaagmotor<br />
op volle rotatiesnelheid is, geleidt u <strong>de</strong> zaag<br />
gelijkmatig langs <strong>de</strong> zaaglijn.<br />
3. Zorg voor een gelijkmatige doorvoersnelheid<br />
- te snel kan teveel spanning op <strong>de</strong> motor<br />
zetten, terwijl te langzaam uw werkstuk<br />
bruin kan laten wor<strong>de</strong>n. Vermijd plotselinge<br />
bewegingen van <strong>de</strong> zaag.<br />
4. Nadat u uw zaagsne<strong>de</strong> hebt voltooid, laat u <strong>de</strong><br />
trekkerschakelaar los en laat u het zaagblad<br />
volledig tot stilstand komen. Haal <strong>de</strong> zaag<br />
niet uit het werkstuk terwijl het zaagblad nog<br />
beweegt.<br />
Het zagen van fineer<br />
Wanneer u fineer of hout zaagt van min<strong>de</strong>r dan<br />
20 mm dik, stel het zaagblad dan zo in dat het<br />
5 - 10 mm uitsteekt door het werk en zaag het<br />
met <strong>de</strong> goe<strong>de</strong> kant naar bene<strong>de</strong>n. Zo vermin<strong>de</strong>rt<br />
u het splinteren aan <strong>de</strong> goe<strong>de</strong> kant van uw<br />
werkstuk. Wanneer u dikker hout zaagt, stel het<br />
blad dan in op <strong>de</strong> maximale diepte om <strong>de</strong> kans<br />
op terugslag te vermin<strong>de</strong>ren.<br />
Gaten uitzagen<br />
1. Stel <strong>de</strong> zaagsne<strong>de</strong> op <strong>de</strong> gewenste diepte in.<br />
2. Stel <strong>de</strong> afschuiningsinstelling in op 0°.<br />
3. Til <strong>de</strong> zaagkaphen<strong>de</strong>l (12) op om het zaagblad<br />
bloot te leggen, laat <strong>de</strong> voorkant van <strong>de</strong> basis<br />
stevig plat tegen het werkstuk rusten waarbij<br />
<strong>de</strong> achterhen<strong>de</strong>l wordt opgetild, zodat het blad<br />
het werkstuk niet raakt.<br />
4. Met het zaagblad vlak boven het werkstuk<br />
start u <strong>de</strong> zaag en wacht u tot <strong>de</strong>ze zijn<br />
volledige snelheid heeft bereikt (ongeveer 2<br />
secon<strong>de</strong>n).<br />
5. Laat het zaagblad langzaam in het werkstuk<br />
zakken, waarbij u <strong>de</strong> voorkant van <strong>de</strong><br />
basisplaat van <strong>de</strong> zaag gebruikt als draaipunt.<br />
Zodra het zaagblad het materiaal begint te<br />
zagen, laat u <strong>de</strong> on<strong>de</strong>rste zaagkaphen<strong>de</strong>l los.<br />
6. Begin te zagen in voorwaartse richting tot het<br />
ein<strong>de</strong> van <strong>de</strong> zaagsne<strong>de</strong>.<br />
7. Nadat u uw zaagsne<strong>de</strong> hebt voltooid, laat u <strong>de</strong><br />
trekkerschakelaar los en laat u het zaagblad<br />
volledig tot stilstand komen.<br />
Haal <strong>de</strong> zaag niet uit het werkstuk terwijl het<br />
zaagblad nog beweegt.<br />
Bediening van <strong>de</strong> zaag<br />
25<br />
NL
NL<br />
Als <strong>de</strong> hoeken van het gat nog niet volledig zijn<br />
doorgezaagd, gebruik dan een <strong>de</strong>coupeerzaag<br />
of handzaag om <strong>de</strong> hoeken te voltooien.<br />
MONTEREN OP EEN ZAAGBANK<br />
MONTEREN OP EEN ZAAGBANK<br />
Deze zaag past goed in <strong>de</strong> meeste zaagbanken.<br />
• Controleer of <strong>de</strong> zaagbank voorzien is van <strong>de</strong><br />
juiste zaagkappen en zorg ervoor dat <strong>de</strong>ze<br />
goed zijn ingesteld en correct functioneren<br />
voordat u start.<br />
• Zorg ervoor dat <strong>de</strong> zaag stevig op <strong>de</strong> zaagbank<br />
is gemonteerd. Raadpleeg <strong>de</strong> handleiding van<br />
<strong>de</strong> fabrikant voor instructies betreffen<strong>de</strong> <strong>de</strong><br />
montage.<br />
• Laat <strong>de</strong> zaag draaien voordat u begint te<br />
zagen om er zeker van te<br />
zijn dat hij goed loopt.<br />
• Controleer of uw<br />
zaagbank is voorzien<br />
van een anti-<br />
HET ZAAGBLAD VERVANGEN<br />
Gebruik alleen zaagbla<strong>de</strong>n van 185 mm (71/4”),<br />
met een zaagsne<strong>de</strong> tussen 2,2 en 3,5 mm,<br />
bestemd voor cirkelzagen met een snelheid<br />
zon<strong>de</strong>r belasting van minstens 5000 tpm.<br />
Monteer nooit stalen hoge-snelheidsbla<strong>de</strong>n<br />
of slijpschijven. Het monteren van bla<strong>de</strong>n die<br />
bestemd zijn voor een an<strong>de</strong>r doel of van bla<strong>de</strong>n<br />
met een an<strong>de</strong>re maat kan <strong>de</strong> garantie ongeldig<br />
maken.<br />
• Monteer geen bla<strong>de</strong>n van slechte kwaliteit.<br />
Controleer regelmatig of het zaagblad<br />
vlak en scherp is en geen barstjes of<br />
onvolkomenhe<strong>de</strong>n vertoont.<br />
1. Zorg ervoor dat <strong>de</strong> zaag niet met <strong>de</strong> stroom is<br />
verbon<strong>de</strong>n.<br />
2. Plaats <strong>de</strong><br />
meegelever<strong>de</strong><br />
stiftsleutel (20)<br />
in <strong>de</strong> twee gaten<br />
op <strong>de</strong> buitenste<br />
26<br />
Monteren Op Een Zaagbank Het Zaagblad Vervangen<br />
terugslagsysteem.<br />
• Kijk na of er een geschikte aan-/uitschakelaar<br />
is gemonteerd op <strong>de</strong> zaagbank. De<br />
zaagschakelaar kan dan vergren<strong>de</strong>ld wor<strong>de</strong>n<br />
met een veerklem, een band of iets <strong>de</strong>rgelijks.<br />
Vervolgens kan hij met het veiligheidscontact<br />
op <strong>de</strong> zaagbank verbon<strong>de</strong>n wor<strong>de</strong>n. Deze klem<br />
MOET verwij<strong>de</strong>rd wor<strong>de</strong>n wanneer <strong>de</strong> zaag<br />
van <strong>de</strong> zaagbank wordt gehaald.<br />
• Gebruik alle veiligheidsvoorzieningen en maak<br />
een testzaagsne<strong>de</strong> in een afgezaagd stuk van<br />
het materiaal, waarbij u erop let of alle kappen<br />
goed staan voordat u ver<strong>de</strong>r werkt met <strong>de</strong><br />
zaagbank.<br />
zaagbladkraag. Zet<br />
<strong>de</strong> zeshoekige sleutel<br />
(21) in het gat in <strong>de</strong><br />
zaagbladbout.<br />
Terwijl u <strong>de</strong> stiftsleutel<br />
stevig vast houdt, draait<br />
u <strong>de</strong> zeshoekige sleutel<br />
in <strong>de</strong> richting van <strong>de</strong><br />
rotatie van het zaagblad (linksom). Wanneer<br />
<strong>de</strong> zaagbladbout vrij komt van het spilgat<br />
verwij<strong>de</strong>rt u <strong>de</strong> bout en <strong>de</strong> bladkraag.<br />
3. Houd <strong>de</strong> terugtrekken<strong>de</strong> zaagkap (14)<br />
helemaal naar achteren, schuif het blad<br />
voorzichtig door <strong>de</strong> basisplaat en plaats het<br />
op <strong>de</strong> binnenste sluitring op <strong>de</strong> spil. Draag<br />
beschermen<strong>de</strong> handschoenen, omdat <strong>de</strong><br />
tan<strong>de</strong>n van het zaagblad erg scherp zijn. Het<br />
opschrift moet aan <strong>de</strong> buitenkant zitten en <strong>de</strong><br />
pijl op het zaagblad moet in <strong>de</strong>zelf<strong>de</strong> richting<br />
wijzen als <strong>de</strong> pijl op <strong>de</strong> zaagkap.
4. Monteer het zaagblad, en zorg ervoor dat u<br />
het correct op <strong>de</strong> binnenste kraag plaatst. Zet<br />
<strong>de</strong> buitenste bladkraag weer terug en schroef<br />
<strong>de</strong> zaagbladbout licht<br />
aan door <strong>de</strong> buitenste<br />
bladkraag.<br />
Controleer nogmaals of<br />
het blad gelijk zit tussen<br />
<strong>de</strong> binnenste en buitenste<br />
SERVICE EN ONDERHOUD<br />
• Elke beschadiging aan <strong>de</strong> zaag dient<br />
voor gebruik gerepareerd en zorgvuldig<br />
geïnspecteerd te wor<strong>de</strong>n door gekwalificeer<strong>de</strong><br />
monteurs. Service of on<strong>de</strong>rhoud door<br />
onbevoeg<strong>de</strong>n kan lei<strong>de</strong>n tot letsel.<br />
• On<strong>de</strong>rhoud dient alleen uitgevoerd te wor<strong>de</strong>n<br />
door bevoeg<strong>de</strong> <strong>Triton</strong>-reparatiecentra, met<br />
gebruikmaking van originele vervangen<strong>de</strong><br />
on<strong>de</strong>r<strong>de</strong>len van <strong>Triton</strong>. Volg <strong>de</strong> instructies<br />
zorgvuldig op en raadpleeg <strong>de</strong> paragraaf<br />
“Problemen oplossen” om problemen te<br />
herkennen en voor advies. Het gebruik van<br />
niet goedgekeur<strong>de</strong> of verkeer<strong>de</strong> on<strong>de</strong>r<strong>de</strong>len<br />
kan lei<strong>de</strong>n tot een elektrische schok of letsel.<br />
• <strong>Triton</strong> Manufacturing & Design Co. is niet<br />
verantwoor<strong>de</strong>lijk voor eventuele scha<strong>de</strong> of<br />
eventueel letsel veroorzaakt door onbevoeg<strong>de</strong><br />
reparatie van <strong>de</strong> zaag of door verkeerd gebruik<br />
van het gereedschap.<br />
• Controleer regelmatig of <strong>de</strong> zaagspil, <strong>de</strong><br />
spilsluitringen en het boorgat-verkleinen<strong>de</strong><br />
tussenstuk schoon zijn en niet vervuild<br />
zijn door opgebouw<strong>de</strong> kleverige aanslag of<br />
aangekoekt zaagstof.<br />
Controleer of <strong>de</strong> oppervlakken van <strong>de</strong><br />
spilsluitringen glad zijn en zon<strong>de</strong>r braampjes.<br />
Controleer of <strong>de</strong> borgpen van het zaagblad<br />
nog goed vastzit.<br />
• Controleer <strong>de</strong> werking van <strong>de</strong> veer van <strong>de</strong><br />
terugtrekken<strong>de</strong> zaagkap. Deze moet snel<br />
sluiten, zon<strong>de</strong>r ergens langs te schrapen.<br />
Verwij<strong>de</strong>r het zaagblad en maak het gebied<br />
van <strong>de</strong> zaagkap schoon door opgehoopt<br />
kraag en zet het dan stevig vast met <strong>de</strong><br />
stiftsleutel en <strong>de</strong> zeshoekige sleutel.<br />
zaagstof of houtsplinters te verwij<strong>de</strong>ren.<br />
• De zaagventilatiesleuven moeten wor<strong>de</strong>n<br />
schoongehou<strong>de</strong>n. Gebruik een vochtige doek<br />
om <strong>de</strong> zaag schoon te vegen - gebruik geen<br />
oplosmid<strong>de</strong>len.<br />
ONDERHOUD ZAAGBLAD<br />
• Controleer regelmatig of er geen opgehoopte<br />
kleverige hars of zaagstof op het zaagblad<br />
aanwezig is. Maak indien nodig het blad<br />
schoon met een oplosmid<strong>de</strong>l, bijv. WD40, RP7<br />
of minerale terpentijn.<br />
• Controleer regelmatig of het zaagblad nog<br />
vlak is. Indien u <strong>de</strong> zaag gebruikt met een<br />
kromgetrokken zaagblad, dan belast dit <strong>de</strong><br />
motor en <strong>de</strong> tandwielkast enorm. Dit kan<br />
tevens invloed hebben op uw garantierechten.<br />
• De hardmetalen tan<strong>de</strong>n dienen regelmatig<br />
te wor<strong>de</strong>n gecontroleerd op scherpte en<br />
tandbreuk, en indien nodig te wor<strong>de</strong>n<br />
gerepareerd of opnieuw geslepen.<br />
ONDERHOUD SNOER<br />
Als het snoer vervangen moet wor<strong>de</strong>n, moet<br />
dit wor<strong>de</strong>n gedaan door <strong>de</strong> fabrikant, <strong>de</strong><br />
tussenpersoon van <strong>de</strong> fabrikant of een bevoegd<br />
servicecentrum, zodat er geen veiligheidsrisico<br />
ontstaat.<br />
Service en on<strong>de</strong>rhoud<br />
27<br />
NL
NL<br />
De volgen<strong>de</strong> tabel bevat informatie om u te helpen zaagproblemen te herkennen en op te lossen.<br />
28<br />
PROBLEMEN OPLOSSEN<br />
VERSCHIJNSEL MOGELIJKE<br />
OORZAAK<br />
OPLOSSING<br />
De zaag werkt niet Er is geen stroom Controleer of <strong>de</strong> stroom is uitgevallen<br />
Borstels zijn versleten of zitten vast Haal <strong>de</strong> zaag van <strong>de</strong> stroom, open <strong>de</strong><br />
borstelkappen en zorg ervoor dat <strong>de</strong> borstels<br />
vrijelijk kunnen bewegen in <strong>de</strong> hou<strong>de</strong>rs.¬<br />
Controleer of <strong>de</strong> borstels vervangen moeten<br />
wor<strong>de</strong>n zoals hierboven beschreven staat.<br />
De trekker is <strong>de</strong>fect Het Centrum van <strong>de</strong> Contactdienst**<br />
On<strong>de</strong>r<strong>de</strong>len van <strong>de</strong> motor zijn<br />
kortgesloten of hebben een open<br />
circuit<br />
Het Centrum van <strong>de</strong> Contactdienst**<br />
De zaag loopt langzaam Bot of beschadigd zaagblad Slijp of vervang het zaagblad<br />
De zaag maakt een vreemd<br />
geluid<br />
De motor loopt, maar het<br />
zaagblad draait niet<br />
Veel vonken in <strong>de</strong> motorbehuizing<br />
Intrekbare zaagkap sluit niet,<br />
of sluit langzaam<br />
Instelling zaagdiepte wordt<br />
niet vastgehou<strong>de</strong>n<br />
Problemen Oplossen<br />
De motor is overbelast Oefen min<strong>de</strong>r druk uit op <strong>de</strong> zaag. Zorg<br />
ervoor dat <strong>de</strong> zaagsne<strong>de</strong> het zaagblad niet<br />
omsluit en vastklemt.<br />
Mechanische obstructie Het Centrum van <strong>de</strong> Contactdienst**<br />
Anker heeft kortgesloten secties Het Centrum van <strong>de</strong> Contactdienst**<br />
De borgmoer van het zaagblad zit<br />
los, of het verkleinen<strong>de</strong> tussenstuk<br />
is niet correct gemonteerd.<br />
Zet <strong>de</strong> borgmoer van het zaagblad vast. Zorg<br />
ervoor dat het spil-verkleinen<strong>de</strong> tussenstuk<br />
en <strong>de</strong> kraagsluitringen correct gemonteerd<br />
zijn.<br />
Gebroken tandwielas of tan<strong>de</strong>n Het Centrum van <strong>de</strong> Contactdienst**<br />
De borstels kunnen niet vrijelijk<br />
bewegen<br />
Anker heeft kortsluiting of open<br />
circuit<br />
Oppervlak stroomwisselaar niet<br />
schoon<br />
Terughaalveer losgeschoten of<br />
gebroken<br />
Haal het gereedschap van <strong>de</strong> stroom, verwij<strong>de</strong>r<br />
<strong>de</strong> borstels, reinig of vervang <strong>de</strong>ze.<br />
Het Centrum van <strong>de</strong> Contactdienst**<br />
Het Centrum van <strong>de</strong> Contactdienst**<br />
Zet <strong>de</strong> veer weer vast of vervang hem (gebruik<br />
alleen echte vervangen<strong>de</strong> on<strong>de</strong>r<strong>de</strong>len<br />
van <strong>Triton</strong>).<br />
Zaagkap is verbogen. Maak het of Contact het Centrum van <strong>de</strong><br />
Dienst Recht**<br />
Mechanisme vervuild door<br />
zaagstof.<br />
Vergren<strong>de</strong>lingsknop diepte moet<br />
opnieuw wor<strong>de</strong>n ingesteld.<br />
Reinig het vervuil<strong>de</strong> mechanisme en smeer<br />
het licht.<br />
Stel <strong>de</strong> instellingshen<strong>de</strong>l diepte in zoals<br />
beschreven op pagina 23.
Als een probleem niet opgelost kan wor<strong>de</strong>n aan <strong>de</strong> hand van bovenstaan<strong>de</strong> adviezen, ga dan niet zelf<br />
aan <strong>de</strong> slag met <strong>de</strong> zaag - Bezoek www.tritontools.com um uw dichtstbijzijn<strong>de</strong> kantoor te vin<strong>de</strong>n<br />
voor assistentie.<br />
** Bezoek www.tritontools.com om uw meest dichtbijgelegen erkend <strong>de</strong> dienstcentrum te<br />
vin<strong>de</strong>n.<br />
GARANTIE<br />
Om uw garantie te registreren, gaat u naar onze<br />
website op www.tritontools.com* en voert u uw<br />
gegevens in.<br />
Uw gegevens wor<strong>de</strong>n opgeslagen in onze mailinglist<br />
(tenzij u an<strong>de</strong>rs aangeeft) voor informatie over<br />
nieuwe producten. De ingevul<strong>de</strong> gegevens wor<strong>de</strong>n<br />
aan geen enkele an<strong>de</strong>re partij beschikbaar gesteld.<br />
AANKOOPGEGEVENS<br />
Datum van aankoop: ___ / ___ / ____<br />
Mo<strong>de</strong>l: TA184CSL<br />
Serienummer: __________________<br />
(te vin<strong>de</strong>n op motorlabel)<br />
Bewaar uw aankoopbon als aankoopbewijs<br />
<strong>Triton</strong> Manufacturing & Design Co.<br />
garan<strong>de</strong>ert <strong>de</strong> koper van dit product dat<br />
indien een on<strong>de</strong>r<strong>de</strong>el <strong>de</strong>fect is vanwege<br />
fouten in materiaal of uitvoering binnen<br />
12 MAANDEN na <strong>de</strong> datum van <strong>de</strong><br />
oorspronkelijke aankoop, <strong>Triton</strong> het<br />
<strong>de</strong>fecte on<strong>de</strong>r<strong>de</strong>el gratis repareert of,<br />
naar eigen inzicht, vervangt.<br />
Deze garantie heeft geen betrekking<br />
op commercieel gebruik en strekt zich<br />
niet uit tot normale slijtage of scha<strong>de</strong><br />
ten gevolge van een ongeluk, verkeerd<br />
gebruik of misbruik.<br />
*Registreer online binnen 30 dagen.<br />
Algemene voorwaar<strong>de</strong>n van toepassing.<br />
Dit heeft geen invloed op uw statutaire<br />
rechten<br />
Garantie<br />
29<br />
NL
F<br />
Nous vous remercions d’avoir choisi cet outil <strong>Triton</strong>. Ces instructions contiennent <strong>de</strong>s informations<br />
nécessaires pour une utilisation sûre et rentable <strong>de</strong> ce produit. Cette scie comporte un certain nombre <strong>de</strong><br />
caractéristiques spéciales. Même si vous avez déjà utilisé <strong>de</strong>s scies circulaires, veuillez lire ce manuel pour<br />
véritablement mettre à profit les caractéristiques <strong>de</strong> conception <strong>de</strong> ce produit.<br />
Conservez ce manuel à portée <strong>de</strong> main et assurez-vous que tous les utilisateurs l’ont lu et<br />
parfaitement compris.<br />
TABLE DES MATIERES<br />
Spécifications 30<br />
Composants 31<br />
Consignes générales <strong>de</strong> sécurité 32<br />
Symboles 36<br />
Fonctions 37<br />
Utilisation <strong>de</strong> la scie 39<br />
Montage sur banc <strong>de</strong> la scie 40<br />
Remplacement <strong>de</strong> la lame 40<br />
Entretien et réparation 41<br />
Dépannage 42<br />
Garantie 43<br />
SPECIFICATIONS<br />
CARACTERISTIQUES TECHNIQUES<br />
N° <strong>de</strong> réf. : TA184CSL<br />
Tension : 230 - 240 V ~ 50 Hz<br />
Puissance d’entrée : 1800 W<br />
Vitesse sans charge : 5 000 min -1<br />
Taille <strong>de</strong> lame : 185 mm (7 1 /4”)<br />
Arbre <strong>de</strong> lame : 20 mm<br />
Réglage du biseau <strong>de</strong> lame : 0° – 45°<br />
Profon<strong>de</strong>ur <strong>de</strong> coupe : 90° – 60 mm 45° – 40 mm<br />
Classe d’isolation : Double isolation<br />
Poids net : 5,1 kg<br />
Laser : Classe 2,<br />
Longueur d’on<strong>de</strong> : 650 nm<br />
Puissance <strong>de</strong> sortie :
COMPOSANTS<br />
6<br />
15<br />
16<br />
12<br />
19<br />
14<br />
13<br />
20<br />
21<br />
1. Interrupteur marche/arrêt du laser<br />
2. Ouverture <strong>de</strong> viseur laser<br />
3. Interrupteur type gâchette<br />
4. Cran <strong>de</strong> visée <strong>de</strong> lame<br />
5. Carter <strong>de</strong> moteur<br />
6. Poignée principale<br />
7. Poignée avant<br />
8. Levier <strong>de</strong> réglage <strong>de</strong> biseau<br />
9. Echelle <strong>de</strong> biseau<br />
10. Bouton <strong>de</strong> verrouillage du gui<strong>de</strong> parallèle<br />
11. Gui<strong>de</strong> <strong>de</strong> coupe parallèle<br />
12. Levier <strong>de</strong> carter <strong>de</strong> lame<br />
13. Carter <strong>de</strong> lame rétractable<br />
14. Semelle<br />
15. Carter <strong>de</strong> lame supérieur<br />
16. Orifice d’extraction <strong>de</strong>s poussières<br />
17. Levier <strong>de</strong> verrouillage <strong>de</strong> biseau<br />
18. Echelle <strong>de</strong> profon<strong>de</strong>ur<br />
19. Lame<br />
20. Clé à ergot<br />
21. Clé à six pans<br />
1<br />
7<br />
2<br />
5<br />
9<br />
10<br />
8<br />
11<br />
4<br />
Composants<br />
3<br />
18<br />
17<br />
31<br />
F
F<br />
CONSIGNES DE SECURITE<br />
CONSIGNES DE SECURITE GENERALES<br />
Il est important <strong>de</strong> lire et comprendre toutes les<br />
instructions. Ne pas suivre les instructions<br />
contenues dans ce manuel peut donner<br />
lieu à un choc électrique, un incendie et/ou<br />
<strong>de</strong> graves blessures corporelles.<br />
Le terme “outil électrique” utilisé dans les<br />
avertissements fait référence à votre outil<br />
électrique alimenté par le secteur (avec cordon<br />
d’alimentation) ou votre outil fonctionnant sur<br />
batterie (sans cordon d’alimentation).<br />
ZONE DE TRAVAIL<br />
• La zone <strong>de</strong> travail doit être propre et bien<br />
éclairée. Les bancs encombrés et les zones<br />
sombres sont propices aux acci<strong>de</strong>nts.<br />
• N’utilisez pas les outils électriques dans<br />
une atmosphère explosive ou en présence<br />
<strong>de</strong> gaz corrosifs. Les outils électriques<br />
produisent <strong>de</strong>s étincelles qui peuvent<br />
enflammer les fumées. Evitez les endroits<br />
excessivement humi<strong>de</strong>s.<br />
• Gar<strong>de</strong>z les enfants et autres personnes<br />
présentes à l’écart pendant l’utilisation<br />
<strong>de</strong> l’outil. Les distractions peuvent vous faire<br />
perdre le contrôle <strong>de</strong> l’outil.<br />
• Posez ou fixez toujours l’outil <strong>de</strong> façon<br />
qu’il soit stable.<br />
SECURITE ELECTRIQUE<br />
• Les fiches <strong>de</strong>s outils électriques doivent<br />
être adaptées à la prise. Ne modifiez<br />
jamais la fiche <strong>de</strong> quelque façon que ce soit.<br />
N’utilisez pas d’adaptateurs avec <strong>de</strong>s outils<br />
lis à la terre. Des fiches non modifiées et <strong>de</strong>s<br />
prises adaptées réduiront le risque <strong>de</strong> choc<br />
électrique.<br />
• Evitez tout contact du corps avec <strong>de</strong>s<br />
surfaces reliées à la terre telles que les<br />
tuyaux, les radiateurs, les cuisinières et<br />
les réfrigérateurs. Il existe un risque accru<br />
<strong>de</strong> choc électrique si votre corps est relié à la<br />
terre.<br />
• N’exposez pas les outils à la pluie ou à<br />
l’humidité. La pénétration d’eau à l’intérieur<br />
d’un outil augmente le risque <strong>de</strong> choc<br />
32<br />
Consignes <strong>de</strong> sécurité<br />
électrique.<br />
• Ne maltraitez pas le cordon d’alimentation.<br />
N’utilisez jamais le cordon pour porter, tirer<br />
ou débrancher l’outil. Maintenez le cordon à<br />
l’écart <strong>de</strong> la chaleur, <strong>de</strong>s lubrifiants, <strong>de</strong>s arêtes<br />
vives ou <strong>de</strong>s pièces mobiles. Les cordons<br />
endommagés ou emmêlés augmentent le<br />
risque <strong>de</strong> choc électrique.<br />
• Pour utiliser l’outil à l’extérieur, utilisez<br />
une rallonge adaptée à l’utilisation en<br />
extérieur. L’utilisation d’un cordon adapté<br />
à l’utilisation en extérieur réduit le risque <strong>de</strong><br />
choc électrique.<br />
• Ne tirez jamais sur le cordon<br />
d’alimentation pour le débrancher <strong>de</strong> la<br />
prise. Gar<strong>de</strong>z le cordon à l’écart <strong>de</strong> la chaleur<br />
et <strong>de</strong>s arêtes vives.<br />
SECURITE DES PERSONNES<br />
• Restez vigilant, regar<strong>de</strong>z ce que vous<br />
êtes en train <strong>de</strong> faire et faites preuve <strong>de</strong><br />
bon sens dans votre utilisation <strong>de</strong> l’outil.<br />
N’utilisez pas l’outil en état <strong>de</strong> fatigue ou<br />
sous l’emprise <strong>de</strong> drogues, d’alcool ou <strong>de</strong><br />
médicaments. Un moment d’inattention<br />
pendant l’utilisation d’un outil électrique peut<br />
entraîner <strong>de</strong>s blessures corporelles graves.<br />
• Utilisez un équipement <strong>de</strong> sécurité.<br />
Portez toujours une protection oculaire.<br />
Les équipements <strong>de</strong> sécurité tels que les<br />
masques antipoussières, les chaussures<br />
<strong>de</strong> sécurité antidérapantes, les casques ou<br />
les protecteurs d’oreilles utilisés pour les<br />
conditions appropriées réduisent les blessures<br />
corporelles.<br />
• Portez une tenue appropriée. Ne portez pas<br />
<strong>de</strong> vêtements amples ni <strong>de</strong> bijoux. Attachez<br />
les cheveux longs. Gar<strong>de</strong>z les cheveux, les<br />
vêtements et les gants à l’écart <strong>de</strong>s pièces en<br />
mouvement. Les vêtements amples, les bijoux<br />
ou les cheveux longs peuvent se prendre dans<br />
<strong>de</strong>s pièces en mouvement.<br />
• Evitez les démarrages acci<strong>de</strong>ntels. Vérifiez<br />
que l’interrupteur est position “Arrêt”<br />
avant <strong>de</strong> brancher l’outil. Un acci<strong>de</strong>nt est<br />
possible si vous transportez un outil électrique<br />
avec le doigt sur l’interrupteur ou si vous le
anchez quand l’interrupteur est position<br />
“Marche”.<br />
• Retirez toute clé <strong>de</strong> réglage avant <strong>de</strong><br />
mettre l’outil en marche. Une clé laissée<br />
sur une pièce rotative peut entraîner <strong>de</strong>s<br />
blessures corporelles.<br />
• Les accessoires et les pièces métalliques<br />
peuvent <strong>de</strong>venir très chauds.<br />
Consignes générales <strong>de</strong> sécurité<br />
UTILISATION ET ENTRETIEN DE L’OUTIL<br />
ELECTRIQUE<br />
• Utilisez <strong>de</strong>s fixations soli<strong>de</strong>s pour<br />
maintenir et supporter la pièce sur une<br />
plate-forme stable. Les pièces maintenues<br />
à la main ou contre le corps sont instables et<br />
peuvent faire perdre le contrôle <strong>de</strong> l’outil.<br />
• Ne forcez pas sur l’outil. Utilisez l’outil<br />
correspondant à l’application prévue.<br />
Un outil adéquat donnera <strong>de</strong> meilleurs<br />
résultats à moindres risques à la vitesse <strong>de</strong><br />
fonctionnement pour laquelle il a été conçu.<br />
• N’utilisez pas l’outil si l’interrupteur ne<br />
permet pas <strong>de</strong> le mettre en marche et <strong>de</strong><br />
l’arrêter. Tout outil qui ne répond pas à la<br />
comman<strong>de</strong> <strong>de</strong> l’interrupteur est dangereux<br />
et doit être réparé. En cas <strong>de</strong> problème,<br />
reportez-vous à la section “Dépannage” et, si<br />
nécessaire, contactez un centre <strong>de</strong> réparation.<br />
• Débranchez l’outil du secteur avant tout<br />
réglage, changement d’accessoire ou<br />
avant <strong>de</strong> ranger l’outil. De telles mesures<br />
<strong>de</strong> sécurité préventives réduisent le risque <strong>de</strong><br />
démarrage acci<strong>de</strong>ntel <strong>de</strong> l’outil.<br />
• Rangez l’outil dans un endroit sec, hors<br />
<strong>de</strong> la portée <strong>de</strong>s enfants et <strong>de</strong>s personnes<br />
inexpérimentées. Cet outil est dangereux<br />
entre les mains <strong>de</strong>s utilisateurs novices.<br />
• Entretenez soigneusement les outils. Les<br />
outils <strong>de</strong> coupe doivent rester propres et<br />
tranchants. Correctement entretenus, les<br />
outils dotés d’un bord tranchant ont moins<br />
tendance à se coincer et sont plus faciles à<br />
contrôler.<br />
• Vérifiez l’alignement <strong>de</strong> l’outil (en cas <strong>de</strong><br />
vibrations excessives par exemple) et le<br />
bon glissement <strong>de</strong>s pièces mobiles, ainsi<br />
que l’absence <strong>de</strong> dommage susceptible<br />
d’affecter le bon fonctionnement <strong>de</strong> l’outil.<br />
S’il est endommagé, faites réparer l’outil avant<br />
<strong>de</strong> l’utiliser. De nombreux acci<strong>de</strong>nts sont<br />
causés par <strong>de</strong>s outils mal entretenus.<br />
• Ne mettez jamais l’outil en marche lorsque<br />
la lame touche la pièce.<br />
• Evitez les démarrages acci<strong>de</strong>ntels. Vérifiez<br />
que l’interrupteur est position “Arrêt” avant<br />
<strong>de</strong> brancher l’outil. Un acci<strong>de</strong>nt est possible<br />
si vous transportez un outil électrique avec le<br />
doigt sur l’interrupteur ou si vous le branchez<br />
quand l’interrupteur est position “Marche”.<br />
• Retirez toute clé <strong>de</strong> réglage avant <strong>de</strong><br />
mettre l’outil en marche. Une clé laissée<br />
sur une pièce rotative peut entraîner <strong>de</strong>s<br />
blessures corporelles.<br />
• Les accessoires et les pièces métalliques<br />
peuvent <strong>de</strong>venir très chauds.<br />
CONSIGNES DE SECURITE SUPPLEMENTAIRES<br />
CONCERNANT LE LASER<br />
La lumière/le rayonnement laser utilisés dans<br />
ce produit est <strong>de</strong> Classe 2 avec une puissance<br />
maximale <strong>de</strong> 1 mW et une longueur d’on<strong>de</strong> <strong>de</strong><br />
650 nm. Ces lasers ne présentent généralement<br />
pas <strong>de</strong> risques optiques, mais le fait <strong>de</strong><br />
regar<strong>de</strong>r fixement le faisceau peut provoquer un<br />
aveuglement par l’éclair.<br />
Ne regar<strong>de</strong>z pas fixement le faisceau laser. Il<br />
est dangereux <strong>de</strong> fixer délibérément le faisceau.<br />
Observez toutes les règles <strong>de</strong> sécurité ci-après :<br />
• Le laser doit être utilisé et entretenu<br />
conformément aux instructions du<br />
fabricant.<br />
• Ne dirigez jamais le faisceau vers <strong>de</strong>s<br />
personnes ou vers un objet autre que la<br />
pièce.<br />
• Le faisceau laser ne doit jamais être dirigé<br />
délibérément vers <strong>de</strong>s personnes et ne doit<br />
en aucun cas être projeté vers les yeux<br />
pendant plus <strong>de</strong> 0,25 s.<br />
• Veillez toujours à diriger le faisceau laser<br />
vers une pièce robuste ne comportant<br />
aucune surface réfléchissante, telle<br />
qu’une surface en bois ou à revêtement<br />
grossier. Les tôles d’acier clair, brillantes et<br />
réfléchissantes et les surfaces similaires ne<br />
conviennent pas à une utilisation au laser<br />
Consignes <strong>de</strong> sécurité<br />
33<br />
F
F<br />
car le faisceau pourrait être renvoyé vers<br />
l’utilisateur.<br />
• Ne remplacez jamais les pièces du<br />
laser par <strong>de</strong>s pièces <strong>de</strong> type différent.<br />
Les réparations doivent être confiées au<br />
fabricant du laser ou à agent agréé.<br />
L’utilisation <strong>de</strong> comman<strong>de</strong>s, <strong>de</strong> réglages, ou<br />
l’exécution <strong>de</strong> procédures autres que celles<br />
spécifiées dans le présent document peuvent<br />
être à l’origine d’une irradiation dangereuse.<br />
Veuillez vous reporter à la norme européenne<br />
appropriée EN60825-1 : 1994 + A2: 2001 + A1<br />
: 2002 pour <strong>de</strong> plus amples informations sur les<br />
lasers.<br />
34<br />
Consignes <strong>de</strong> sécurité<br />
CONSIGNES DE SECURITE SUPPLEMENTAIRES<br />
POUR LES SCIES CIRCULAIRES<br />
• N’approchez pas les mains <strong>de</strong> la zone <strong>de</strong><br />
coupe et <strong>de</strong> la lame. Gar<strong>de</strong>z l’autre main<br />
sur la poignée auxiliaire ou sur le boîtier du<br />
moteur. Si les <strong>de</strong>ux mains tiennent la scie,<br />
elles ne pourront pas être coupées par la<br />
lame.<br />
• Ne passez jamais les mains sous la pièce.<br />
Le carter ne permet pas <strong>de</strong> vous protéger <strong>de</strong><br />
la lame sous la pièce.<br />
• Réglez la profon<strong>de</strong>ur <strong>de</strong> coupe en fonction<br />
<strong>de</strong> l’épaisseur <strong>de</strong> la pièce. Vous <strong>de</strong>vriez<br />
voir moins d’une <strong>de</strong>nt complète <strong>de</strong> la lame en<br />
<strong>de</strong>ssous <strong>de</strong> la pièce.<br />
• Ne tenez jamais la pièce que vous coupez<br />
avec les mains ou entre les jambes. Fixez<br />
la pièce sur une plate-forme stable. Il est<br />
important <strong>de</strong> fixer la pièce correctement<br />
afin <strong>de</strong> minimiser les risques <strong>de</strong> blessures<br />
corporelles, <strong>de</strong> blocage <strong>de</strong> la lame ou <strong>de</strong> perte<br />
<strong>de</strong> contrôle.<br />
• Tenez l’outil par les parties isolées prévues<br />
à cet effet pour les opérations au cours<br />
<strong>de</strong>squelles il risque <strong>de</strong> toucher <strong>de</strong>s câbles<br />
électriques cachés ou sont propre câble <strong>de</strong><br />
l’alimentation. Tout contact avec un fil “sous<br />
tension” met également “sous tension” les<br />
parties métalliques exposées <strong>de</strong> l’outil et peut<br />
causer un choc électrique pour l’utilisateur.<br />
• Pour les coupes longitudinales, utilisez<br />
toujours un gui<strong>de</strong> longitudinal ou un banc<br />
<strong>de</strong> scie. Cela augmente la précision <strong>de</strong> la<br />
coupe et réduit le risque <strong>de</strong> blocage <strong>de</strong> la<br />
lame.<br />
• Utilisez toujours <strong>de</strong>s lames avec un moyeu<br />
<strong>de</strong> taille et <strong>de</strong> forme appropriées (en<br />
diamant ou circulaire). Les lames dont les<br />
moyeux ne correspon<strong>de</strong>nt pas au dispositif<br />
<strong>de</strong> montage <strong>de</strong> la scie ne tourneront pas<br />
correctement et entraîneront la perte <strong>de</strong><br />
contrôle <strong>de</strong> l’outil.<br />
• N’utilisez jamais <strong>de</strong> ron<strong>de</strong>lles ou <strong>de</strong><br />
boulons <strong>de</strong> lame endommagés ou non<br />
adaptés. Les ron<strong>de</strong>lles et les boulons <strong>de</strong> lame<br />
sont spécialement conçus la scie pour garantir<br />
votre sécurité et assurer <strong>de</strong>s performances<br />
optimales.
CAUSES DE RECUL ET MESURES<br />
PREVENTIVES<br />
• Le recul est une réaction soudaine causée<br />
par le blocage ou le coincement <strong>de</strong> lame<br />
qui est alors déviée et se soulève <strong>de</strong><br />
manière incontrôlée hors <strong>de</strong> la pièce, en<br />
direction <strong>de</strong> l’utilisateur.<br />
• Lorsque la lame est fortement pincée ou<br />
coincée par la fermeture du trait <strong>de</strong> scie,<br />
elle se bloque et le mouvement du moteur<br />
provoque le recul rapi<strong>de</strong> <strong>de</strong> la scie en<br />
direction <strong>de</strong> l’utilisateur.<br />
• Si la lame se tord ou est mal alignée<br />
pendant la coupe, les <strong>de</strong>nts du bord arrière<br />
peuvent creuser la surface du bois et la<br />
faire remonter hors du trait et la projeter<br />
en direction <strong>de</strong> l’utilisateur.<br />
Le recul résulte d’une utilisation incorrecte<br />
<strong>de</strong> la scie et/ou <strong>de</strong> mauvaises conditions ou<br />
procédures d’utilisation. Ce phénomène peut<br />
être évité en prenant les précautions suivantes :<br />
1. Tenez fermement la scie à <strong>de</strong>ux mains et<br />
positionnez vos bras <strong>de</strong> façon à résister à<br />
la force <strong>de</strong> recul. Placez-vous d’un côté ou<br />
<strong>de</strong> l’autre <strong>de</strong> la lame mais pas dans l’axe. Le<br />
recul pourrait faire sauter la scie en arrière.<br />
Il est cependant possible <strong>de</strong> contrôler cette<br />
force <strong>de</strong> recul en prenant les précautions<br />
appropriées.<br />
2. Si la lame se coince ou pour interrompre la<br />
coupe, relâchez la gâchette et maintenez<br />
la scie immobile dans la pièce jusqu’à<br />
l’arrêt complet <strong>de</strong> la lame. Ne tentez jamais<br />
<strong>de</strong> sortir la scie <strong>de</strong> la pièce ou <strong>de</strong> la tirer en<br />
arrière tant que la lame est en mouvement<br />
afin d’éviter tout risque <strong>de</strong> recul. Recherchez<br />
la cause du blocage <strong>de</strong> la lame et prenez les<br />
mesures nécessaires pour y remédier.<br />
3. Lors du redémarrage <strong>de</strong> la scie dans la<br />
pièce, centrez la lame dans le trait et<br />
vérifier que les <strong>de</strong>nts <strong>de</strong> la lame ne sont<br />
pas engagées dans le matériau. Si la lame<br />
se bloque, elle peut remonter ou subir un recul<br />
au redémarrage <strong>de</strong> la scie.<br />
4. Supportez les panneaux <strong>de</strong> gran<strong>de</strong> taille<br />
pour réduire les risques <strong>de</strong> blocage <strong>de</strong> la<br />
lame et <strong>de</strong> recul. Les panneaux <strong>de</strong> gran<strong>de</strong><br />
taille ont tendance à plier sous leur propre<br />
poids. Les supports doivent être placés sous<br />
le panneau, <strong>de</strong> chaque côté, près <strong>de</strong> la ligne<br />
<strong>de</strong> coupe et près du bord du panneau.<br />
5. N’utilisez pas <strong>de</strong> lames émoussées ou<br />
endommagées. Les lames non aiguisées ou<br />
mal réglées produisent un trait étroit qui peut<br />
provoquer <strong>de</strong>s frictions excessives, le blocage<br />
<strong>de</strong> la lame et le recul <strong>de</strong> la scie.<br />
6. Les leviers <strong>de</strong> verrouillage <strong>de</strong> profon<strong>de</strong>ur<br />
et <strong>de</strong> biseau doivent être correctement<br />
serrés avant toute découpe. La modification<br />
du réglage <strong>de</strong> la lame pendant la coupe peut<br />
entraîner le blocage <strong>de</strong> la lame ou le recul <strong>de</strong><br />
la scie.<br />
7. Redoublez <strong>de</strong> pru<strong>de</strong>nce lors <strong>de</strong> la<br />
réalisation d’une “coupe en plongée”<br />
dans <strong>de</strong>s murs existants ou autres zones<br />
aveugles. La lame peut sectionner <strong>de</strong>s objets<br />
et provoquer le recul <strong>de</strong> l’outil.<br />
Vérifiez que le carter <strong>de</strong> lame rétractable<br />
fonctionne correctement :<br />
• Vérifiez que le carter rétractable se ferme<br />
correctement avant chaque utilisation.<br />
N’utilisez pas la scie si le carter rétractable<br />
ne bouge pas librement et ne se ferme pas<br />
instantanément. Ne serrez et n’attachez<br />
jamais le carter rétractable en position<br />
ouverte. En cas <strong>de</strong> chute acci<strong>de</strong>ntelle <strong>de</strong><br />
la scie, le carter rétractable peut être plié.<br />
Relevez le carter à l’ai<strong>de</strong> <strong>de</strong> la poignée<br />
rétractable et vérifiez qu’il bouge librement<br />
et ne touche pas la lame ni aucune autre<br />
pièce, dans tous les angles et pour toutes les<br />
profon<strong>de</strong>urs <strong>de</strong> coupe.<br />
• Vérifiez le fonctionnement du ressort du<br />
carter rétractable. Si le carter et le ressort<br />
ne fonctionnent pas correctement, faites<br />
les réparer avant utilisation. Des pièces<br />
endommagées, <strong>de</strong>s dépôts <strong>de</strong> résine ou<br />
l’accumulation <strong>de</strong> débris peuvent affecter le<br />
bon fonctionnement du carter rétractable.<br />
Consignes <strong>de</strong> sécurité<br />
35<br />
F
F<br />
• Le carter ne doit être rétracté<br />
manuellement que pour <strong>de</strong>s coupes<br />
spéciales comme les “coupes en plongée”<br />
et les “coupes combinées”. Relevez le<br />
carter en rétractant le levier et relâchez-le dès<br />
que la lame pénètre dans le matériau. Pour<br />
les autres coupes, le carter rétractable <strong>de</strong>vrait<br />
fonctionner automatiquement.<br />
• Vérifiez toujours que le carter rétractable<br />
couvre la lame avant <strong>de</strong> poser la scie sur<br />
le plan <strong>de</strong> travail ou sur le sol. Si la lame<br />
n’est pas protégée et n’a pas fini <strong>de</strong> tourner,<br />
la scie sera entraînée vers l’arrière et coupera<br />
ce qui se trouve sur son passage. Laissez à la<br />
lame le temps <strong>de</strong> s’arrêter après avoir relâché<br />
l’interrupteur.<br />
SYMBOLES<br />
PROTECTION DE L’ENVIRONNEMENT<br />
Les déchets <strong>de</strong> produits électriques ne<br />
doivent pas être mis au rebut avec les<br />
ordures ménagères. Veuillez les recycler<br />
dans les centres existants. Consultez les<br />
autorités locales ou votre reven<strong>de</strong>ur sur la façon<br />
<strong>de</strong> recycler.<br />
36<br />
Portez toujours <strong>de</strong>s équipements <strong>de</strong><br />
protection <strong>de</strong>s yeux, <strong>de</strong>s oreilles et<br />
respiratoires<br />
Conforme à la réglementation et aux<br />
normes <strong>de</strong> sécurité pertinentes<br />
Symboles<br />
LASER LIGHT<br />
LASER RADIATION<br />
Do not stare into beam.<br />
Class 2 laser product.<br />
Wave length: 650nm<br />
Output power: 1mw<br />
AS/NZS 2211.1:2004<br />
Mise en gar<strong>de</strong>.<br />
Instruction.<br />
Laser<br />
Double isolation.
FONCTIONS<br />
REGLAGE DE LA PROFONDEUR<br />
DE COUPE<br />
Vérifiez que l’outil est hors tension avant<br />
d’effectuer un réglage.<br />
1. Desserrez le levier <strong>de</strong> réglage <strong>de</strong> profon<strong>de</strong>ur<br />
(17) et faites pivoter le corps <strong>de</strong> la scie à<br />
l’opposé <strong>de</strong> la semelle.<br />
2. Réglez la scie à l’ai<strong>de</strong> <strong>de</strong> l’échelle <strong>de</strong><br />
profon<strong>de</strong>ur (18) jusqu’à ce que la profon<strong>de</strong>ur<br />
<strong>de</strong> coupe voulue soit atteinte.<br />
L’échelle <strong>de</strong> profon<strong>de</strong>ur doit être utilisée<br />
uniquement comme référence. Si une<br />
profon<strong>de</strong>ur précise est requise, effectuez<br />
plusieurs coupes d’essai jusqu’à obtention <strong>de</strong> la<br />
profon<strong>de</strong>ur voulue.<br />
3. Appuyez sur le levier pour le verrouiller, mais<br />
sans le serrer excessivement.<br />
Pour obtenir <strong>de</strong>s résultats optimaux, la<br />
lame ne doit pas dépasser au-<strong>de</strong>là <strong>de</strong><br />
l’épaisseur <strong>de</strong> la pièce que vous coupez.<br />
• Le levier <strong>de</strong> profon<strong>de</strong>ur peut être repositionné,<br />
si le mécanisme est un peu dur ou lâche, en<br />
relevant le levier.<br />
Pour repositionner le levier, libérez le circlip <strong>de</strong><br />
fixation à l’ai<strong>de</strong> d’un tournevis. Dégagez le levier<br />
<strong>de</strong> l’écrou hexagonal et tournez-le dans le sens<br />
<strong>de</strong>s aiguilles d’une montre (s’il est trop dur) ou<br />
dans le sens inverse <strong>de</strong>s aiguilles d’une montre<br />
(s’il est trop lâche), puis remettez-le en place.<br />
Replacez le circlip et vérifiez à nouveau la<br />
position <strong>de</strong> verrouillage du levier.<br />
REGLAGES DES ANGLES DE BISEAU<br />
L’angle du biseau peut être réglé <strong>de</strong> 0° à 45°.<br />
Ne tentez pas <strong>de</strong> régler le biseau si la scie<br />
est montée sur une table <strong>de</strong> sciage.<br />
1. Vérifiez que l’outil est hors tension avant<br />
d’effectuer un réglage.<br />
2. Desserrez le levier <strong>de</strong> réglage du biseau (8) à<br />
l’avant <strong>de</strong> la scie.<br />
3. Inclinez la scie à l’angle voulu, comme indiqué<br />
sur l’échelle <strong>de</strong> biseau (9).<br />
L’échelle <strong>de</strong> biseau doit être utilisée uniquement<br />
comme référence. Si un angle précis est requis,<br />
effectuez plusieurs coupes d’essai jusqu’à<br />
obtention du biseau voulu.<br />
4. Resserrez le levier <strong>de</strong> réglage <strong>de</strong><br />
biseau.<br />
INTERRUPTEUR MARCHE/<br />
ARRET<br />
Saisissez fermement les<br />
poignées <strong>de</strong> la scie avant<br />
<strong>de</strong> la mettre sous tension.<br />
• Tirez la gâchette (3) en position “Marche”.<br />
Vous sentirez une certaine résistance au départ<br />
causée par le mécanisme <strong>de</strong> sécurité qui sert à<br />
empêcher tout démarrage acci<strong>de</strong>ntel <strong>de</strong> la scie.<br />
• La scie s’arrête quand vous relâchez la<br />
gâchette.<br />
Atten<strong>de</strong>z toujours que la lame atteigne sa<br />
vitesse maximale avant <strong>de</strong> l’engager dans la<br />
pièce. De même, évitez d’arrêter la scie<br />
avant d’avoir terminé la coupe.<br />
Fonctions<br />
37<br />
F
F<br />
UTILISATION DU GUIDE PARALLELE<br />
• Le gui<strong>de</strong> parallèle (11) peut être utilisé du côté<br />
droit ou gauche <strong>de</strong> la lame.<br />
• Le gui<strong>de</strong> permet d’obtenir <strong>de</strong>s coupes précises<br />
sans <strong>de</strong>voir suivre <strong>de</strong> lignes <strong>de</strong> coupe à main<br />
levée.<br />
1. Desserrez la vis à oreilles sur la semelle et<br />
glissez le gui<strong>de</strong> (11)<br />
dans l’encoche <strong>de</strong><br />
montage <strong>de</strong> la semelle,<br />
soit par la gauche soit<br />
par la droite.<br />
2. Faites-le coulisser<br />
jusqu’à atteindre la<br />
largeur <strong>de</strong> coupe voulue.<br />
3. Serrez la vis à oreille pour le bloquer en<br />
position.<br />
MARQUAGE DE LA LIGNE DE COUPE<br />
Les crans <strong>de</strong> visée (4) <strong>de</strong>vant la lame servent<br />
<strong>de</strong> gui<strong>de</strong> <strong>de</strong> coupe le long d’une ligne tracée au<br />
crayon.<br />
Utilisez le cran <strong>de</strong> droite (vu <strong>de</strong> la position <strong>de</strong><br />
l’utilisateur) pour les coupes à 90° et le cran <strong>de</strong><br />
gauche pour les coupes à 45°.<br />
38<br />
Fonctions<br />
UTILISATION DU LASER<br />
AVERTISSEMENTS :<br />
• Ne regar<strong>de</strong>z pas fixement le faisceau laser.<br />
• Ne dirigez jamais le faisceau vers <strong>de</strong>s<br />
personnes ou vers un objet autre que la pièce<br />
à couper.<br />
• Ne dirigez jamais le faisceau laser<br />
délibérément vers <strong>de</strong>s personnes et ne le<br />
projetez pas vers les yeux pendant plus <strong>de</strong><br />
0,25.<br />
• Veillez toujours à diriger le faisceau laser vers<br />
une pièce robuste ne comportant aucune<br />
surface réfléchissante, telle qu’une surface<br />
en bois ou à revêtement grossier. Les tôles<br />
d’acier clair, brillantes et réfléchissantes et les<br />
surfaces similaires ne conviennent pas à une<br />
utilisation au laser car le faisceau pourrait être<br />
renvoyé vers l’utilisateur.<br />
• N’allumez le faisceau laser que lorsque l’outil<br />
se trouve sur la pièce.<br />
1. Posez le bord avant <strong>de</strong> la semelle <strong>de</strong> la scie<br />
sur la pièce. La lame ne doit pas être en<br />
contact avec la pièce.<br />
2. Allumez le faisceau laser à l’ai<strong>de</strong> du bouton<br />
marche/arrêt du laser (1).<br />
Le laser ne fonctionnera pas si la scie n’est<br />
branchée et mise sous tension.<br />
3. Alignez le faisceau sur la ligne <strong>de</strong> coupe<br />
tracée sur la pièce.<br />
4. Commencez la coupe.<br />
5. Eteignez le laser.
UTILISATION DE LA SCIE<br />
AVERTISSEMENTS :<br />
• Evitez <strong>de</strong> travailler à main levée. Il est<br />
beaucoup plus sûr et plus précis <strong>de</strong> couper<br />
en s’aidant du gui<strong>de</strong> parallèle ou d’une règle<br />
amovible. Si vous coupez à main levée,<br />
tracez toujours une ligne <strong>de</strong> coupe droite et<br />
maintenez la scie <strong>de</strong>ssus.<br />
• Ne coupez jamais une pièce que vous<br />
tenez à la main. Veillez à immobiliser la pièce<br />
pendant la coupe en utilisant <strong>de</strong>s serre-joints<br />
autant que possible.<br />
• Les panneaux <strong>de</strong> gran<strong>de</strong> taille et les<br />
longues pièces doivent être correctement<br />
supportés <strong>de</strong> chaque côté <strong>de</strong> la coupe<br />
pour éviter tout pincement <strong>de</strong> la lame et<br />
phénomène <strong>de</strong> recul. Positionnez la scie en<br />
posant la partie la plus large <strong>de</strong> la semelle sur<br />
la pièce la plus gran<strong>de</strong> ou la mieux supportée.<br />
• Pour éviter le recul, veillez à déplacer la<br />
scie en ligne droite. Vérifiez que la lame est<br />
en bon état et que le trait ne se ferme pas sur<br />
la lame. (Placez un petit coin ou une entretoise<br />
<strong>de</strong> 3 mm dans le trait <strong>de</strong> coupe pour<br />
l’empêcher <strong>de</strong> se fermer lorsque vous coupez<br />
un matériau difficile). Relâchez la gâchette si<br />
la scie semble se coincer mais atten<strong>de</strong>z l’arrêt<br />
complet <strong>de</strong> la lame avant <strong>de</strong> la sortir du trait.<br />
PROCEDURE DE COUPE<br />
1. Posez l’avant <strong>de</strong> la semelle sur la pièce et<br />
alignez la ligne <strong>de</strong> coupe avec le viseur. La<br />
lame ne doit pas être en contact avec la pièce.<br />
2. Tenez fermement la scie <strong>de</strong>s <strong>de</strong>ux mains et<br />
appuyez sur la gâchette. Lorsque le moteur<br />
<strong>de</strong> la scie atteint son régime maximal, gui<strong>de</strong>z<br />
la scie régulièrement le long <strong>de</strong> la ligne <strong>de</strong><br />
coupe.<br />
3. Maintenez une vitesse d’avance régulière ;<br />
une avance trop rapi<strong>de</strong> risque <strong>de</strong> faire forcer<br />
le moteur et une avance trop lente risque<br />
<strong>de</strong> lisser la pièce. Evitez les mouvements<br />
brusques <strong>de</strong> la scie.<br />
4. Une fois la coupe terminée, relâchez la<br />
gâchette et atten<strong>de</strong>z l’arrêt complet <strong>de</strong> la<br />
lame. Ne retirez pas la lame <strong>de</strong> la pièce tant<br />
qu’elle continue <strong>de</strong> tourner.<br />
Coupe <strong>de</strong> panneau plaqué<br />
Pour couper <strong>de</strong>s panneaux plaqués ou du bois<br />
<strong>de</strong> moins <strong>de</strong> 20 mm d’épaisseur, réglez la lame<br />
<strong>de</strong> façon qu’elle dépasse <strong>de</strong> 5 à 10 mm à travers<br />
la pièce posée sur son bon côté. Cela réduira<br />
l’éclatement du bon côté <strong>de</strong> la pièce. Pour<br />
couper du bois plus épais, réglez la lame à la<br />
profon<strong>de</strong>ur maximale pour réduire le recul <strong>de</strong><br />
l’outil.<br />
Coupe en plongée<br />
1. Réglez la coupe à la profon<strong>de</strong>ur requise.<br />
2. Réglez l’angle <strong>de</strong> biseau à 0°.<br />
3. Relevez le levier du carter <strong>de</strong> lame (12) pour<br />
exposer la lame <strong>de</strong> la scie et maintenez la<br />
base <strong>de</strong> l’outil fermement à plat contre la<br />
pièce, en relevant la poignée arrière pour que<br />
la lame ne touche pas la pièce.<br />
4. Lorsque la lame se trouve au-<strong>de</strong>ssus <strong>de</strong> la<br />
pièce, démarrez la scie et atten<strong>de</strong>z qu’elle<br />
atteigne sa vitesse maximale (2 secon<strong>de</strong>s<br />
environ).<br />
5. Abaissez lentement la lame sur la pièce<br />
en utilisant l’avant <strong>de</strong> la semelle <strong>de</strong> la scie<br />
comme pivot.<br />
Dès que la lame pénètre dans la pièce, relâchez<br />
le levier du carter <strong>de</strong> lame inférieur.<br />
6. Commencez la coupe vers l’avant et<br />
poursuivez jusqu’au bout.<br />
7. Une fois la coupe terminée, relâchez la<br />
gâchette et atten<strong>de</strong>z<br />
l’arrêt complet <strong>de</strong><br />
la lame.<br />
Ne retirez pas<br />
la scie <strong>de</strong> la pièce tant<br />
que la lame est en<br />
mouvement.<br />
Si les angles <strong>de</strong> la<br />
coupe en plongée ne sont pas complètement<br />
découpés, terminez-les à la scie sauteuse ou<br />
à la scie à main.<br />
Cette scie se monte facilement sur la<br />
plupart <strong>de</strong>s bancs <strong>de</strong> travail.<br />
• Vérifiez que le banc est équipé du<br />
carter <strong>de</strong> lame approprié et qu’il est<br />
réglé et fonctionne correctement avant<br />
utilisation.<br />
Utilisation <strong>de</strong> la scie<br />
39<br />
F
F<br />
MONTAGE SUR BANC DE LA SCIE<br />
• Vérifiez que la scie est soli<strong>de</strong>ment fixée au<br />
banc. Reportez-vous au manuel d’utilisation<br />
du fabricant pour les instructions <strong>de</strong> montage.<br />
• Mettez la scie en marche pour vérifier<br />
quelle fonctionne sans problème avant<br />
d’entreprendre la moindre coupe.<br />
REMPLACEMENT DE LA LAME<br />
Utilisez uniquement <strong>de</strong>s lames <strong>de</strong> 185 mm, avec<br />
un trait <strong>de</strong> 2,2 à 3,5 mm, conçues pour les scies<br />
circulaires développant une vitesse à vi<strong>de</strong> d’au<br />
moins 5000 tr/min. Ne montez jamais <strong>de</strong> lames<br />
en acier haute vitesse ni <strong>de</strong> disques abrasifs.<br />
Le montage <strong>de</strong> lames <strong>de</strong> taille ou <strong>de</strong> fonction<br />
différente annulera la garantie.<br />
• Ne montez pas <strong>de</strong> lames <strong>de</strong> mauvaise qualité.<br />
Vérifiez régulièrement que la lame est plate,<br />
aiguisée et exempte <strong>de</strong> fissures ou <strong>de</strong> défauts.<br />
1. Vérifiez que la scie est hors tension.<br />
2. Placez la clé à ergot fournie avec la scie<br />
(20) dans les <strong>de</strong>ux trous situés sur la bri<strong>de</strong><br />
extérieure <strong>de</strong> la lame.<br />
Insérez la clé à six pans<br />
(21) dans le trou du<br />
boulon <strong>de</strong> la lame.<br />
Tout en maintenant la clé<br />
à ergot, tournez la clé à<br />
six pans dans le sens <strong>de</strong><br />
rotation <strong>de</strong> la lame (sens<br />
inverse <strong>de</strong>s aiguilles<br />
d’une montre). Lorsque<br />
le boulon <strong>de</strong> lame est<br />
dégagé du moyeu, retirez<br />
le boulon et la bri<strong>de</strong> <strong>de</strong> la<br />
lame.<br />
40<br />
Montage sur banc <strong>de</strong> la scie/remplacement <strong>de</strong> la lame<br />
• Vérifiez que le banc est équipé d’un dispositif<br />
anti-recul.<br />
• Vérifiez que le banc est équipé d’un interrupteur<br />
marche/arrêt <strong>de</strong> sécurité approprié.<br />
L’interrupteur <strong>de</strong> la scie peut alors être<br />
verrouillé en position <strong>de</strong> marche à l’ai<strong>de</strong> d’une<br />
pince à ressort, d’un serre-câble ou d’une<br />
fixation similaire, puis être branché dans la<br />
prise <strong>de</strong> sécurité du banc. Cette fixation DOIT<br />
OBLIGATOIREMENT être retirée quand la scie<br />
est déposée du banc.<br />
• A l’ai<strong>de</strong> <strong>de</strong> l’ensemble <strong>de</strong> l’équipement <strong>de</strong><br />
sécurité, effectuez une coupe d’essai sur<br />
un échantillon pour vérifier que toutes les<br />
protections sont correctement réglées avant <strong>de</strong><br />
poursuivre la coupe au banc.<br />
3. Retenez le carter <strong>de</strong> lame rétractable (14)<br />
complètement en arrière, glissez la lame avec<br />
précaution à travers la semelle et positionnezla<br />
sur la ron<strong>de</strong>lle intérieure <strong>de</strong> l’arbre.<br />
Portez toujours <strong>de</strong>s gants <strong>de</strong> protection<br />
pour manipuler la lame car ses <strong>de</strong>nts sont<br />
extrêmement coupantes. Les <strong>de</strong>ssins doivent<br />
se trouver à l’extérieur et la flèche <strong>de</strong> la lame<br />
doit pointer dans la même direction sur celle<br />
du carter.<br />
4. Montez la lame en prenant soin <strong>de</strong> la placer<br />
correctement sur la bri<strong>de</strong> intérieure. Remontez<br />
la bri<strong>de</strong> extérieure, puis visser légèrement le<br />
boulon <strong>de</strong> lame dans la bri<strong>de</strong> extérieure.<br />
Vérifiez que la lame<br />
affleure entre les<br />
bri<strong>de</strong>s intérieure<br />
et extérieure puis<br />
serrez fermement<br />
avec la clé à ergot et<br />
la clé à six pans.<br />
• Toute scie endommagée doit être réparée et<br />
soigneusement contrôlée avant l’utilisation<br />
par un réparateur qualifié. Les opérations<br />
d’entretien ou les réparations réalisées par du<br />
personnel non qualifié peut entraîner un risque<br />
<strong>de</strong> blessures.
ENTRETIEN ET REPARATION<br />
• L’entretien doit être effectué uniquement<br />
par un Centre <strong>de</strong> réparation <strong>Triton</strong> autorisé<br />
utilisant <strong>de</strong>s pièces <strong>de</strong> rechange <strong>Triton</strong><br />
d’origine. Suivez scrupuleusement les<br />
instructions et reportez-vous à la section<br />
“Dépannage” pour i<strong>de</strong>ntifier les problèmes<br />
et savoir comment y remédier. L’utilisation<br />
<strong>de</strong> pièces non agréées ou défectueuses peut<br />
créer un risque <strong>de</strong> choc électrique ou <strong>de</strong><br />
blessure.<br />
• <strong>Triton</strong> Manufacturing & Design Co. décline<br />
toute responsabilité en cas <strong>de</strong> dommage<br />
ou blessure causé(e) par la réparation non<br />
autorisée <strong>de</strong> la scie ou l’utilisation abusive <strong>de</strong><br />
l’outil.<br />
• Vérifiez régulièrement que l’arbre <strong>de</strong> lame, les<br />
ron<strong>de</strong>lles <strong>de</strong> l’arbre et l’entretoise <strong>de</strong> réduction<br />
<strong>de</strong> l’alésage sont propres et exempts <strong>de</strong><br />
dépôts <strong>de</strong> résine ou <strong>de</strong> sciure agglomérée.<br />
Vérifiez que les faces <strong>de</strong>s ron<strong>de</strong>lles <strong>de</strong> l’arbre<br />
sont lisses et exemptes <strong>de</strong> bavures. Vérifiez<br />
que le boulon <strong>de</strong> fixation <strong>de</strong> la lame est serré<br />
au couple correct.<br />
• Vérifiez le fonctionnement du carter<br />
rétractable. Il doit se fermer rapi<strong>de</strong>ment sans<br />
frotter contre quoi que ce soit. Retirez la lame<br />
et enlevez la sciure ou les copeaux accumulés<br />
à l’emplacement du carter.<br />
• Les fentes <strong>de</strong> ventilation doivent rester<br />
propres et exemptes <strong>de</strong> corps étrangers.<br />
Nettoyez la scie avec un chiffon légèrement<br />
humi<strong>de</strong> - n’utilisez pas <strong>de</strong> solvants.<br />
ENTRETIEN DE LA LAME<br />
• Vérifiez régulièrement qu’il n’y a pas <strong>de</strong> résine<br />
ni <strong>de</strong> sciure accumulée sur la lame. Le cas<br />
échéant, nettoyez-la avec un solvant tel du<br />
WD40, du RP7 ou <strong>de</strong> la térébenthine minérale.<br />
• Vérifiez régulièrement que la lame est plate.<br />
Utiliser la scie lorsque la lame est déformée<br />
soumet le moteur et la boîte d’engrenages à<br />
une charge excessive, ce qui peut affecter<br />
votre garantie.<br />
• Vérifiez régulièrement l’état <strong>de</strong>s <strong>de</strong>nts en<br />
carbure <strong>de</strong> tungstène, et réparez ou aiguisezles<br />
si nécessaire.<br />
ENTRETIEN DU CORDON D’ALIMENTATION<br />
S’il est nécessaire <strong>de</strong> remplacer le cordon<br />
d’alimentation, cette tâche doit être réalisée<br />
par le fabricant, un <strong>de</strong>s ses agents ou un centre<br />
<strong>de</strong> réparation agréé afin d’éviter tout risque<br />
d’acci<strong>de</strong>nt.<br />
Entretien et reparation<br />
41<br />
F
F<br />
DEPANNAGE<br />
Les informations du tableau suivant vous ai<strong>de</strong>ront à diagnostiquer et résoudre les problèmes<br />
éventuellement rencontrés.<br />
SYMPTOME POSSIBLE CAUSE SOLUTION<br />
La scie ne fonctionne pas • Elle n’est pas sous tension • Vérifiez que l’alimentation est disponible à<br />
la source<br />
42<br />
Depannage<br />
• Les balais sont usés ou se<br />
coincent<br />
• Débranchez la scie, ouvrez les chapeaux<br />
<strong>de</strong>s balais et vérifiez que les balais bougent<br />
librement dans leurs supports. Vérifiez si<br />
les balais doivent être remplacés comme<br />
indiqué plus haut.<br />
• La gâchette est défectueuse • Centre <strong>de</strong> Service <strong>de</strong> Contact**<br />
• Circuit ouvert ou court-circuit <strong>de</strong>s<br />
composants du moteur.<br />
• Centre <strong>de</strong> Service <strong>de</strong> Contact**<br />
La scie fonctionne au ralenti • La lame est émoussée ou<br />
endommagée<br />
• Réaffûtez ou remplacez la lame<br />
• Le moteur est surchargé • Réduisez la force <strong>de</strong> poussée sur la scie.<br />
Vérifiez que le trait ne se referme pas et ne<br />
coince pas la lame.<br />
Bruits anormaux • Obstruction mécanique • Centre <strong>de</strong> Service <strong>de</strong> Contact**<br />
Le moteur fonctionne mais la<br />
lame ne tourne pas<br />
Importante formation<br />
d’étincelles dans le boîtier du<br />
moteur<br />
Le carter rétractable ne se<br />
ferme pas ou se ferme trop<br />
lentement<br />
Le réglage <strong>de</strong> profon<strong>de</strong>ur <strong>de</strong> la<br />
lame n’est pas maintenu<br />
• Des sections <strong>de</strong> l’induit sont en<br />
court-circuit<br />
• L’écrou <strong>de</strong> fixation <strong>de</strong> la lame<br />
est <strong>de</strong>sserré ou l’entretoise <strong>de</strong><br />
réduction n’est pas montée correctement.<br />
• Centre <strong>de</strong> Service <strong>de</strong> Contact**<br />
• Serrez l’écrou <strong>de</strong> fixation <strong>de</strong> la lame.<br />
Vérifiez que l’entretoise <strong>de</strong> réduction et les<br />
ron<strong>de</strong>lles sont montées correctement.<br />
• Arbre <strong>de</strong> pignon ou <strong>de</strong>nts cassés • Centre <strong>de</strong> Service <strong>de</strong> Contact**<br />
• Les balais ne bougent pas librement<br />
• Circuit ouvert ou court-circuit <strong>de</strong><br />
l’induit<br />
• La surface du collecteur est<br />
encrassée<br />
• Le ressort <strong>de</strong> rappel est détaché<br />
ou cassé<br />
• Mettez la scie hors tension, enlevez les<br />
balais ; nettoyez ou remplacez-les.<br />
• Centre <strong>de</strong> Service <strong>de</strong> Contact**<br />
• Centre <strong>de</strong> Service <strong>de</strong> Contact**<br />
• Rattachez ou remplacez le ressort (utilisez<br />
uniquement un ressort <strong>de</strong> rechange <strong>Triton</strong><br />
d’origine).<br />
• Le carter est déformé. • Redressez-le ou Entrez en Contact Avec le<br />
Centre <strong>de</strong> Service**<br />
• De la sciure encrasse le mécanisme.<br />
• Le levier <strong>de</strong> verrouillage <strong>de</strong> profon<strong>de</strong>ur<br />
doit être repositionné.<br />
• Nettoyez et lubrifiez légèrement le mécanisme.<br />
• Repositionnez le levier <strong>de</strong> réglage <strong>de</strong><br />
profon<strong>de</strong>ur comme expliqué page 37.
Si les conseils ci-<strong>de</strong>ssus ne permettent pas <strong>de</strong> résoudre un problème, ne maltraitez pas la<br />
scie. - Pour trouver le bureau le plus proche <strong>de</strong> chez vous, visitez : www.tritontools.com<br />
** Visitez www.tritontools.com pour trouver votre centre <strong>de</strong> service autorisé plus proche.<br />
GARANTIE<br />
Pour enregistrer votre garantie, visitez notre site<br />
internet à www.triton.com.au* et entrez vos détails.<br />
Nous ajouterons vos détails à notre liste d’abonnés<br />
(sauf indication contraire) afin <strong>de</strong> vous tenir<br />
informés <strong>de</strong> nos nouveautés. Les détails fournis ne<br />
seront communiqués à aucune tierce partie.<br />
INFORMATIONS D’ACHAT<br />
Date d’achat : ___ / ___ / ____<br />
Modèle : TA184CSL<br />
Numéro <strong>de</strong> série : __________________<br />
(indiqué sur la plaque du moteur)<br />
Conservez votre reçu, il vous servira <strong>de</strong> preuve<br />
d’achat.<br />
<strong>Triton</strong> Manufacturing & Design Co.<br />
garantit à l’acheteur <strong>de</strong> ce produit<br />
que toute pièce présentant un vice<br />
<strong>de</strong> matériau ou <strong>de</strong> fabrication dans<br />
les 12 MOIS suivants la date d’achat<br />
d’origine, sera réparée ou remplacée, à<br />
sa discrétion.<br />
Cette garantie ne s’applique pas à<br />
l’usage commercial et ne couvre pas<br />
l’usure normale ni les dommages<br />
consécutifs à un acci<strong>de</strong>nt, une utilisation<br />
incorrecte ou abusive.<br />
* Enregistrement sur le site dans les<br />
30 jours.<br />
Acceptation <strong>de</strong>s conditions.<br />
Cela n’affecte pas vos droits légaux.<br />
Garantie<br />
43<br />
F
D<br />
Wir bedanken uns dafür, dass Sie dieses <strong>Triton</strong>-Werkzeug gekauft haben. Diese Anweisung enthält wichtige<br />
Information für <strong>de</strong>n sicheren und effektiven Betrieb dieses Produkts.<br />
Die Säge weist eine Reihe beson<strong>de</strong>rer Merkmale auf und wir möchten Sie bitten, dass Sie dieses Handbuch<br />
durchlesen, auch wenn Sie bereits mit <strong>de</strong>r Verwendung von Kreissägen vertraut sind, damit Sie alle Vorteile<br />
<strong>de</strong>s einzigartigen Designs nutzen können. Bewahren Sie das Handbuch griffbereit auf und sorgen Sie dafür,<br />
dass alle Benutzer <strong>de</strong>s Werkzeugs die Anweisung gelesen und verstan<strong>de</strong>n haben.<br />
INHALT<br />
Spezifikationen 44<br />
Produktbeschreibung 45<br />
Allgemeine Sicherheitsanweisungen 46<br />
Symbole 51<br />
Funktionen 52<br />
Betrieb 54<br />
Verwendung mit einer Sägebank 55<br />
Austausch <strong>de</strong>s Sägeblatts 55<br />
Service & Wartung 56<br />
Fehlersuche 57<br />
Garantie 58<br />
SPEZIFIKATIONEN<br />
TECHNISCHE DATEN<br />
Mo<strong>de</strong>ll-Nr.: TA184CSL<br />
Spannung: 230 –240V ~ 50Hz<br />
Leistung: 1800 W<br />
Leerlaufgeschwindigkeit: 5.000 min -1<br />
Sägeblattgröße: 185 mm<br />
Blattdorn: 20 mm<br />
Schrägeinstellung: 0° bis 45°<br />
Schnitttiefe: 90° – 60 mm, 45° - 40 mm<br />
Isolierung: Doppelt isoliert<br />
Nettogewicht: 5,1 kg<br />
Laser: Klasse 2<br />
Wellenlänge: 650 nm<br />
Leistung:
PRODUKTBESCHREIBUNG<br />
6<br />
15<br />
16<br />
12<br />
19<br />
14<br />
13<br />
20<br />
21<br />
1. Laservisier-Ein-/Ausschalter<br />
2. Laservisierblen<strong>de</strong><br />
3. Auslöser<br />
4. Sägeblattsichtkerbe<br />
5. Motorgehäuse<br />
6. Hauptgriff<br />
7. Vor<strong>de</strong>rer Griff<br />
8. Schrägeinstellungshebel<br />
9. Schrägskala<br />
10. Parallelführungssperre<br />
11. Parallelführung<br />
2<br />
5<br />
9<br />
10<br />
8<br />
11<br />
12. Sägeblattschutzhebel<br />
13. Rückziehbare Sägeblattschutzvorrichtung<br />
14. Grundplatte<br />
15. Obere Sägeblattschutzvorrichtung<br />
16. Staubabzug<br />
17. Tiefeneinstellungsverriegelung<br />
18. Schnitttiefenskala<br />
19. Sägeblatt<br />
20. Stiftschlüssel<br />
21. Sechskantschlüssel<br />
1<br />
7<br />
4<br />
Produktbeschreibung<br />
3<br />
18<br />
17<br />
45<br />
D
D<br />
ALLGEMEINE SICHERHEITSVORSCHRIFTEN<br />
Alle Anweisungen lesen. Nichtbeachtung<br />
<strong>de</strong>r nachfolgen<strong>de</strong>n Anweisungen<br />
kann Stromschlag, Brand und/o<strong>de</strong>r schwere<br />
Verletzung verursachen.<br />
Der Begriff „Elektrowerkzeug“ in <strong>de</strong>n<br />
nachfolgen<strong>de</strong>n Warnhinweisen bezieht<br />
sich sowohl auf Ihr netzbetriebenes<br />
Elektrowerkzeug (mit Netzkabel) als auch auf<br />
das batteriebetriebene Elektrowerkzeug (ohne<br />
Netzkabel).<br />
ARBEITSBEREICH<br />
• Den Arbeitsbereich sauber und gut<br />
beleuchtet halten. Unor<strong>de</strong>ntliche und dunkle<br />
Bereiche stellen eine Unfallgefahr dar.<br />
• Elektrowerkzeuge nicht in einer<br />
Atmosphäre verwen<strong>de</strong>n, wo explosive o<strong>de</strong>r<br />
korrosive Gase vorhan<strong>de</strong>n sein könnten.<br />
Elektrowerkzeuge erzeugen Funken, die<br />
Dämpfe entzün<strong>de</strong>n können. Bereiche mit<br />
übermäßiger Feuchtigkeit vermei<strong>de</strong>n.<br />
• Während Arbeiten mit einem<br />
Elektrowerkzeuge Kin<strong>de</strong>r und Umstehen<strong>de</strong><br />
fernhalten. Ablenkungen können dazu führen,<br />
dass Sie die Kontrolle verlieren.<br />
• Das Werkzeug immer in einer stabilen<br />
Position einstellen o<strong>de</strong>r anbringen.<br />
ELEKTRISCHE SICHERHEIT<br />
• Die Stecker am Elektrowerkzeug<br />
müssen in die Steckdose passen. Den<br />
Stecker nie modifizieren. Mit geer<strong>de</strong>ten<br />
Elektrowerkzeugen nie Zwischenstecker<br />
verwen<strong>de</strong>n. Durch nicht modifizierte Stecker<br />
und dazu passen<strong>de</strong> Steckdosen wird das<br />
Stromschlagrisiko reduziert.<br />
• Körperkontakt mit geer<strong>de</strong>ten Oberflächen,<br />
wie Rohre, Heizkörper, Her<strong>de</strong> und<br />
Kühlschränke, vermei<strong>de</strong>n. Wenn Ihr Körper<br />
geer<strong>de</strong>t ist, dann besteht ein größeres<br />
Stromschlagrisiko.<br />
• Elektrowerkzeuge nicht Regen o<strong>de</strong>r<br />
nassen Bedingungen aussetzen. Wenn<br />
Wasser in ein Elektrowerkzeug eindringt, dann<br />
erhöht sich das Stromschlagrisiko.<br />
• Das Kabel nicht misshan<strong>de</strong>ln. Das Kabel<br />
46<br />
Allgemeine sicherheitsvorschriften<br />
nie zum Tragen, Ziehen o<strong>de</strong>r Herausziehen<br />
<strong>de</strong>s Steckers verwen<strong>de</strong>n. Das Kabel von<br />
Hitze, Öl, scharfen Gegenstän<strong>de</strong>n o<strong>de</strong>r<br />
beweglichen Teilen fernhalten. Beschädigte<br />
o<strong>de</strong>r verwickelte Kabel erhöhen das<br />
Stromschlagrisiko.<br />
• Bei Arbeiten mit einem Elektrowerkzeug<br />
im Freien ein für draußen geeignetes<br />
Verlängerungskabel verwen<strong>de</strong>n. Durch<br />
Verwendung eines für draußen geeigneten<br />
Kabels wird das Stromschlagrisiko reduziert.<br />
• Den Stecker nie durch Ziehen am Kabel<br />
aus <strong>de</strong>r Steckdose ziehen. Das Kabel vor<br />
Hitze und scharfen Kanten schützen.<br />
PERSÖNLICHE SICHERHEIT<br />
• Seien Sie wachsam, konzentriert<br />
und lassen Sie Ihren gesun<strong>de</strong>n<br />
Menschenverstand walten, wenn Sie<br />
mit einem Elektrowerkzeug arbeiten.<br />
Verwen<strong>de</strong>n Sie keine Elektrowerkzeuge,<br />
wenn Sie mü<strong>de</strong> sind o<strong>de</strong>r unter <strong>de</strong>m Einfluss<br />
von Drogen, Alkohol o<strong>de</strong>r Medikamenten<br />
stehen. Ein Augenblick <strong>de</strong>r Unachtsamkeit<br />
beim Betrieb von Elektrowerkzeugen kann zu<br />
schwerer Personenverletzung führen.<br />
• Verwen<strong>de</strong>n Sie Schutzausrüstung.<br />
Tragen Sie immer Augenschutz.<br />
Sicherheitsausrüstung, wie z.B.<br />
Staubmaske, rutschfeste Sicherheitsschuhe,<br />
Schutzhelm o<strong>de</strong>r Ohrenschutz für die<br />
jeweiligen Gegebenheiten reduziert<br />
Personenverletzungen.<br />
• Tragen Sie geeignete Kleidung. Tragen Sie<br />
keine lose Kleidung o<strong>de</strong>r Schmuck. Bin<strong>de</strong>n<br />
Sie lange Haare zusammen. Halten Sie Haare,<br />
Kleidung und Handschuhe von beweglichen<br />
Teilen fern. Lose Kleidung, Schmuck und<br />
lange Haare können sich in beweglichen Teilen<br />
verfangen.<br />
• Vermei<strong>de</strong>n Sie versehentliches Starten.<br />
Stellen Sie vor Einstecken <strong>de</strong>s Steckers,<br />
dass <strong>de</strong>r Schalter in <strong>de</strong>r Aus-Position ist.<br />
Das Tragen von Elektrowerkzeugen mit <strong>de</strong>m<br />
Finger auf <strong>de</strong>m Schalter o<strong>de</strong>r Netzanschluss<br />
bei eingeschaltetem Werkzeug stellen eine<br />
Unfallgefahr dar.
• Vor Einschalten <strong>de</strong>s Elektrowerkzeugs alle<br />
Einstellschlüssel o<strong>de</strong>r Schraubschlüssel<br />
entfernen. Wenn ein Schraubschlüssel o<strong>de</strong>r<br />
Schlüssel an einem rotieren<strong>de</strong>n Teil <strong>de</strong>s<br />
Elektrowerkzeugs bleibt, dann kann dies zu<br />
Personenverletzung führen.<br />
• Zubehör und Metallteile können sehr heiß<br />
wer<strong>de</strong>n.<br />
VERWENDUNG UND PFLEGE VON<br />
ELEKTROWERKZEUGEN<br />
• Verwen<strong>de</strong>n Sie Klemmeno<strong>de</strong>r an<strong>de</strong>re<br />
praktische Maßnahmen zur Absicherung<br />
und Unterstützung <strong>de</strong>s Werkstücks auf<br />
einer stabilen Unterlage. Wenn Sie das<br />
Werkstück mit <strong>de</strong>r o<strong>de</strong>r gegen <strong>de</strong>n Körper<br />
halten, dann ist dies nicht stabil und kann zu<br />
Kontrollverlust führen.<br />
• Überbeanspruchen Sie das<br />
Elektrowerkzeug nicht. Verwen<strong>de</strong>n<br />
Sie das richtige Elektrowerkzeug für<br />
<strong>de</strong>n Verwendungszweck. Das richtige<br />
Elektrowerkzeug erledigt die Aufgabe<br />
besser und sicherer, wenn es <strong>de</strong>signgemäß<br />
verwen<strong>de</strong>t wird.<br />
• Das Elektrowerkzeug nicht verwen<strong>de</strong>n,<br />
wenn es sich nicht mit <strong>de</strong>m Schalter<br />
ein- und ausschalten lässt. Ein<br />
Elektrowerkzeug, das nicht mit <strong>de</strong>m<br />
Schalter kontrolliert wer<strong>de</strong>n kann, ist<br />
gefährlich und muss repariert wer<strong>de</strong>n. Im<br />
Falle eines Problems verweisen wir auf <strong>de</strong>n<br />
Abschnitt “Fehlersuche” o<strong>de</strong>r kontaktieren sie<br />
bei Bedarf ein Reparaturcenter.<br />
• Vor <strong>de</strong>r Vornahme von Einstellungen,<br />
Austausch von Zubehör o<strong>de</strong>r Aufbewahren<br />
von Elektrowerkzeugen <strong>de</strong>n Stecker<br />
aus <strong>de</strong>r Netzteckdose ziehen. Diese<br />
vorsorglichen Maßnahmen reduzieren das<br />
Risiko eines versehentlichen Einschaltens <strong>de</strong>s<br />
Elektrowerkzeugs.<br />
• Unbenutzte Elektrowerkzeuge außer<br />
Reichweite von Kin<strong>de</strong>rn und nicht<br />
geschulten Personen aufbewahren.<br />
Dieses Elektrowerkzeug ist in <strong>de</strong>n Hän<strong>de</strong>n<br />
ungeschulter Verwen<strong>de</strong>r gefährlich.<br />
• Elektrowerkzeuge gut instandhalten.<br />
Schneidwerkzeuge scharf und sauber<br />
halten. Ordnungsgemäß instandgehaltene<br />
Schneidwerkzeuge mit scharfen Schnittkanten<br />
verklemmen sich weniger wahrscheinlich und<br />
lassen sich besser kontrollieren.<br />
Auf Fehlausrichtung (d.h. übermäßiges<br />
Vibrieren) o<strong>de</strong>r Verklemmen von<br />
beweglichen Teilen prüfen, kaputte Teile<br />
und an<strong>de</strong>re Zustän<strong>de</strong>, die <strong>de</strong>n Betrieb <strong>de</strong>s<br />
Elektrowerkzeugs beeinträchtigen, prüfen.<br />
Bei Beschädigung das Elektrowerkzeug vor<br />
<strong>de</strong>m Gebrauch reparieren lassen. Viele Unfälle<br />
wer<strong>de</strong>n durch unzulänglich instandgehaltene<br />
Elektrowerkzeuge verursacht.<br />
• Das Werkzeug nie einschalten, während<br />
das Sägeblatt das Werkstück berührt.<br />
• Vermei<strong>de</strong>n Sie versehentliches Starten.<br />
Stellen Sie vor Einstecken <strong>de</strong>s Steckers,<br />
dass <strong>de</strong>r Schalter in <strong>de</strong>r Aus-Position ist.<br />
Das Tragen von Elektrowerkzeugen mit <strong>de</strong>m<br />
Finger auf <strong>de</strong>m Schalter o<strong>de</strong>r Netzanschluss<br />
bei eingeschaltetem Werkzeug stellen eine<br />
Unfallgefahr dar.<br />
• Vor Einschalten <strong>de</strong>s Elektrowerkzeugs alle<br />
Einstellschlüssel o<strong>de</strong>r Schraubschlüssel<br />
entfernen. Wenn ein Schraubschlüssel o<strong>de</strong>r<br />
Schlüssel an einem rotieren<strong>de</strong>n Teil <strong>de</strong>s<br />
Elektrowerkzeugs bleibt, dann kann dies zu<br />
Personenverletzung führen.<br />
• Zubehör und Metallteile können sehr heiß<br />
wer<strong>de</strong>n.<br />
ZUSÄTZLICHE SICHERHEITSWARNHINWEISE<br />
FÜR LASERLAMPEN<br />
Die bei diesem Produkt verwen<strong>de</strong>te Laserlampe/<br />
Laserstrahlung ist Klasse 2 mit maximalen<br />
Wellenlängen von 1 mW und 650 nm. Die Laser<br />
stellen im Normalfall keine optische Gefahr dar,<br />
obwohl ein Starren in <strong>de</strong>n Strahl Verblitzung<br />
verursachen kann.<br />
Nicht direkt in <strong>de</strong>n Laserstrahl starren. Es<br />
könnte gefährlich sein, wenn Sie bewusst<br />
in <strong>de</strong>n Strahl starren. Bitte die folgen<strong>de</strong>n<br />
Sicherheitsregelungen beachten:<br />
• Der Laser soll entsprechend <strong>de</strong>r<br />
Herstelleranweisung verwen<strong>de</strong>t und<br />
gewartet wer<strong>de</strong>n.<br />
• Den Strahl niemals auf eine Person<br />
o<strong>de</strong>r einen an<strong>de</strong>ren Gegenstand als das<br />
Werkstück richten.<br />
Allgemeine sicherheitsvorschriften<br />
47<br />
D
D<br />
• Der Laserstrahl sollte niemals auf Personal<br />
gerichtet wer<strong>de</strong>n und es soll vermie<strong>de</strong>n<br />
wer<strong>de</strong>n, dass er länger als 0,25 Sek. auf<br />
das Auge einer Person gerichtet wird.<br />
• Immer sicherstellen, dass <strong>de</strong>r Laserstrahl<br />
auf ein robustes Werkstück ohne reflexive<br />
Oberfläche gerichtet wird, d.h. Holz<br />
o<strong>de</strong>r raue Oberflächen sind akzeptabel.<br />
Glänzen<strong>de</strong>r, reflexiver Stahl o<strong>de</strong>r ähnliches<br />
Material eignet sich nicht, da die reflexive<br />
Oberfläche <strong>de</strong>n Strahl auf <strong>de</strong>n Bediener<br />
zurück lenken könnte.<br />
• Die Laserlampeneinheit nicht durch eine<br />
einer an<strong>de</strong>ren Art ersetzen. Reparaturen<br />
dürfen nur vom Laserhersteller o<strong>de</strong>r einem<br />
befugten Vertreter vorgenommen wer<strong>de</strong>n.<br />
48<br />
Allgemeine sicherheitsvorschriften<br />
An<strong>de</strong>re Steuerung o<strong>de</strong>r Einstellungen o<strong>de</strong>r<br />
Verfahren als die in diesem Handbuch<br />
spezifizierten können zu gefährlicher<br />
Strahlenaussetzung führen.<br />
Für weitere Information über Laser möchten<br />
wir Sie auf die relevante europäische Norm<br />
EN60825-1 : 1994 + A2: 2001 + A1 : 2002<br />
verweisen.<br />
ZUSÄTZLICHE SICHERHEITSWARNHINWEISE<br />
FÜR KREISSÄGEN<br />
• Die Hän<strong>de</strong> vom Sägebereich und <strong>de</strong>m<br />
Sägeblatt fernhalten. Lassen Sie die<br />
zweite Hand auf <strong>de</strong>m Hilfsgriff o<strong>de</strong>r <strong>de</strong>m<br />
Motorgehäuse. Wenn bei<strong>de</strong> Hän<strong>de</strong> die Säge<br />
halten, dann können sie nicht vom Sägeblatt<br />
geschnitten wer<strong>de</strong>n.<br />
• Niemals unter das Werkstück greifen. Die<br />
Schutzvorrichtung kann Sie nicht vor <strong>de</strong>m<br />
Sägeblatt unter <strong>de</strong>m Werkstück schützen.<br />
• Die Schnitttiefe auf die Dicke <strong>de</strong>s<br />
Werkstücks einstellen. Unter <strong>de</strong>m<br />
Werkstück sollte weniger als ein ganzer<br />
Blattzahn sichtbar sein.<br />
• Niemals ein Werkstück, das gesägt wird,<br />
in <strong>de</strong>n Hän<strong>de</strong>n halten o<strong>de</strong>r über Ihr Bein<br />
legen. Das Werkstück auf einer stabilen<br />
Unterlage absichern. Es ist wichtig, dass<br />
das Werkstück richtig abgesichert wird,<br />
um Aussetzen <strong>de</strong>s Körpers, Festfahren<br />
<strong>de</strong>s Sägeblatts o<strong>de</strong>r Kontrollverlust auf ein<br />
Minimum zu reduzieren.<br />
• Das Elektrowerkzeug an <strong>de</strong>n isolierten<br />
Griffflächen halten, wenn beim Arbeiten<br />
die Möglichkeit besteht, dass das<br />
Werkzeug versteckte Drähte o<strong>de</strong>r sein<br />
eigenes Kabel kontaktieren könnte.<br />
Kontakt mit einem stromführen<strong>de</strong>n Draht führt<br />
dazu, dass freiliegen<strong>de</strong> Metallteile ebenfalls<br />
unter Strom stehen und <strong>de</strong>m Bediener einen<br />
Stromschlag versetzen.<br />
• Beim Aufreißen immer einen<br />
Parallelanschlag, eine gera<strong>de</strong> Kante o<strong>de</strong>r<br />
eine Sägebank verwen<strong>de</strong>n. Hierdurch<br />
wird genauer gesägt und es ist weniger
wahrscheinlich, dass das Sägeblatt sich<br />
festfährt.<br />
• Immer Sägeblätter mit <strong>de</strong>r korrekten<br />
Größe und Form <strong>de</strong>r Blattdornlöcher (Raute<br />
o<strong>de</strong>r rund) verwen<strong>de</strong>n. Sägeblätter, die<br />
nicht auf <strong>de</strong>n Aufsatz <strong>de</strong>r Säge passen, laufen<br />
exzentrisch, was zu Kontrollverlust führt.<br />
• Niemals beschädigte o<strong>de</strong>r inkorrekte<br />
Sägeblattunterlegscheiben o<strong>de</strong>r –bolzen<br />
verwen<strong>de</strong>n. Sägeblattunterlegscheiben<br />
und -bolzen wur<strong>de</strong>n spezifisch für Ihre Säge<br />
entwickelt, um optimale Leistung und sicheren<br />
Betrieb zu liefern.<br />
URSACHEN VON RÜCKSCHLAG UND<br />
MASSNAHMEN ZUR VERMEIDUNG SEITENS<br />
DES BEDIENERS<br />
• Rückschlag ist eine plötzliche Reaktion<br />
auf ein verklemmtes, festgefahrenes o<strong>de</strong>r<br />
fehlausgerichtetes Sägeblatt und führt<br />
dazu, dass eine nicht kontrollierte Säge<br />
aus <strong>de</strong>m Werkstück nach oben und in<br />
Richtung Bediener gehoben wird.<br />
• Wenn sich das Sägeblatt verklemmt<br />
o<strong>de</strong>r durch Schließen <strong>de</strong>s Sägespalts<br />
festgehalten wird, dann kommt es zum<br />
Stillstand und das Werkzeug wird durch<br />
die Reaktion <strong>de</strong>s Motors plötzlich zurück<br />
in Richtung Bediener getrieben.<br />
• Wenn sich das Sägeblatt verdreht o<strong>de</strong>r<br />
sich im Sägespalt fehlausrichtet, dann<br />
können sich die Zähne am hinteren<br />
Blatten<strong>de</strong> in das Holz eingraben, wodurch<br />
verursacht wird, dass das Sägeblatt aus<br />
<strong>de</strong>m Spalt herauskommt und plötzlich<br />
rückwärts auf <strong>de</strong>n Bediener zugeht.<br />
Rückschlag resultiert aus Missbrauch <strong>de</strong>r Säge/<br />
inkorrektem Betrieb o<strong>de</strong>r Bedingungen und kann<br />
durch die nachfolgen<strong>de</strong>n Vorsichtsmaßnahmen<br />
vermie<strong>de</strong>n wer<strong>de</strong>n.<br />
1. Die Säge mit bei<strong>de</strong>n Hän<strong>de</strong>n gut festhalten<br />
und die Arme so positionieren, dass sie<br />
<strong>de</strong>n Rückschlagkräften wi<strong>de</strong>rstehen<br />
können. Bringen Sie <strong>de</strong>n Körper auf <strong>de</strong>r Seite<br />
<strong>de</strong>r Säge, jedoch nicht auf einer Linie mit<br />
<strong>de</strong>m Sägeblatt in Position. Rückschlag kann<br />
dazu führen, dass die Säge zurückschnellt,<br />
aber die Rückschlagkräfte können kontrolliert<br />
wer<strong>de</strong>n, wenn die entsprechen<strong>de</strong>n<br />
Vorsichtsmaßnahmen getroffen wer<strong>de</strong>n.<br />
2. Wenn sich das Sägeblatt festfährt o<strong>de</strong>r<br />
<strong>de</strong>r Sägevorgang aus irgendwelchen<br />
Grün<strong>de</strong>n unterbrochen wird, <strong>de</strong>n Auslöser<br />
loslassen und die Säge völlig ruhig halten,<br />
bis das Sägeblatt völlig stillsteht. Niemals<br />
versuchen, die Säge aus <strong>de</strong>m Werkstück<br />
zu nehmen o<strong>de</strong>r die Säge nach hinten zu<br />
ziehen, während sich das Blatt noch bewegt,<br />
da es sonst zu Rückschlag kommen kann.<br />
Den Vorfall untersuchen und korrektive<br />
Maßnahmen treffen, um die Ursache <strong>de</strong>s<br />
Festfahrens <strong>de</strong>s Sägeblatts zu eliminieren.<br />
3. Beim Wie<strong>de</strong>reinschalten einer Säge<br />
in einem Werkstück das Sägeblatt in<br />
<strong>de</strong>r Mitte <strong>de</strong>s Spalts positionieren und<br />
prüfen, dass die Zähne nicht in das<br />
Material eingreifen. Wenn das Sägeblatt<br />
im Material festgefahren ist, dann kann<br />
es sich hocharbeiten o<strong>de</strong>r vom Werkstück<br />
zurückschlagen, wenn die Säge eingeschaltet<br />
wird.<br />
4. Große Platten abstützen, um Festfahren<br />
o<strong>de</strong>r Rückschlag <strong>de</strong>s Sägeblatts zu<br />
vermei<strong>de</strong>n. Große Platten biegen sich<br />
gewöhnlich unter ihrem Eigengewicht. Die<br />
Stützen müssen auf bei<strong>de</strong>n Seiten unter die<br />
Platte in Nähe <strong>de</strong>r Schnittlinie und in Nähe <strong>de</strong>r<br />
Plattenkante positioniert wer<strong>de</strong>n.<br />
5. Keine stumpfen o<strong>de</strong>r beschädigten<br />
Sägeblätter verwen<strong>de</strong>n. Nicht scharfe o<strong>de</strong>r<br />
nicht richtig eingesetzte Sägeblätter liefern<br />
einen engen Sägespalt, <strong>de</strong>r übermäßige<br />
Reibung, Festfahren und Rückschlag<br />
verursachen kann.<br />
6. Vor <strong>de</strong>m Sägen müssen die<br />
Tiefeneinstellungs- und<br />
Schrägverriegelungshebel fest angezogen<br />
und abgesichert sein. Wenn sich die<br />
Sägeblatteinstellung während <strong>de</strong>s Sägens<br />
verschiebt, dann kann sich das Blatt<br />
festfahren und es kann zu Rückschlag<br />
kommen.<br />
7. Bei “Einschnei<strong>de</strong>n” in Wän<strong>de</strong> o<strong>de</strong>r<br />
Blindbereiche beson<strong>de</strong>rs vorsichtig<br />
sein. Das hervorstehen<strong>de</strong> Sägeblatt kann<br />
auf Gegenstän<strong>de</strong> treffen, die Rückschlag<br />
Allgemeine sicherheitsvorschriften<br />
49<br />
D
D<br />
verursachen.<br />
Sicherstellen, dass die zurückziehbare<br />
Schutzvorrichtung korrekt funktioniert:<br />
• Vor je<strong>de</strong>m Gebrauch die zurückziehbare<br />
Schutzvorrichtung auf richtiges Schließen<br />
prüfen. Die Säge nicht verwen<strong>de</strong>n, wenn die<br />
zurückziehbare Schutzvorrichtung nicht frei<br />
beweglich ist und sich nicht sofort schließt.<br />
Die zurückziehbare Schutzvorrichtung nie<br />
in <strong>de</strong>r geöffneten Position festklemmen<br />
o<strong>de</strong>r -bin<strong>de</strong>n. Wenn die Säge versehentlich<br />
fallen gelassen wird, dann kann sich<br />
die Schutzvorrichtung verbiegen. Die<br />
zurückziehbare Schutzvorrichtung mit <strong>de</strong>m<br />
Rückziehgriff anheben und sicherstellen, dass<br />
sie sich frei bewegt und bei allen Schrägo<strong>de</strong>r<br />
Tiefeneinstellungen nicht das Blatt o<strong>de</strong>r<br />
an<strong>de</strong>re Teile berührt.<br />
50<br />
Allgemeine sicherheitsvorschriften<br />
• Die Operation <strong>de</strong>r Fe<strong>de</strong>r <strong>de</strong>r<br />
zurückziehbaren Schutzvorrichtung<br />
prüfen. Wenn Schutzvorrichtung und Fe<strong>de</strong>r<br />
nicht richtig funktionieren, dann müssen<br />
sie vor <strong>de</strong>m Gebrauch gewartet wer<strong>de</strong>n.<br />
Zurückziehbare Schutzvorrichtungen können<br />
aufgrund beschädigter Teile, klebriger<br />
Anlagerungen o<strong>de</strong>r angesammeltem Sägemehl<br />
langsam funktionieren.<br />
• Die zurückziehbare Schutzvorrichtung<br />
sollte nur für “Einschnitte” o<strong>de</strong>r<br />
“Schrägeinschnitte” manuell<br />
zurückgezogen wer<strong>de</strong>n. Die zurückziehbare<br />
Schutzvorrichtung mit <strong>de</strong>m Rückziehgriff<br />
zurückziehen, sobald das Sägeblatt in das<br />
Material einschnei<strong>de</strong>t, wonach sie losgelassen<br />
wer<strong>de</strong>n muss. Für alle an<strong>de</strong>ren Sägearbeiten<br />
sollte die zurückziehbare Schutzvorrichtung<br />
automatisch operieren.<br />
• Bevor die Säge auf <strong>de</strong>r Werkbank<br />
o<strong>de</strong>r <strong>de</strong>m Bo<strong>de</strong>n abgelegt wird, immer<br />
darauf achten, dass die zurückziehbare<br />
Schutzvorrichtung das Sägeblatt be<strong>de</strong>ckt.<br />
Ein ungeschütztes leer laufen<strong>de</strong>s Sägeblatt<br />
verursacht, dass die Säge nach rückwärts<br />
arbeitet und alles, was im Weg ist, durchsägt.<br />
Darauf achten, dass es einige Zeit dauert, bis<br />
das Sägeblatt nach Freigabe <strong>de</strong>r Taste stoppt.
SYMBOLE<br />
UMWELTSCHUTZ<br />
Elektroprodukte sollten nicht mit <strong>de</strong>m<br />
Haushaltsmüll entsorgt wer<strong>de</strong>n. Bitte,<br />
recyceln, wo die Möglichkeit besteht.<br />
Lassen Sie sich von Ihrer örtlichen Behör<strong>de</strong> o<strong>de</strong>r<br />
<strong>de</strong>m Händler hinsichtlich <strong>de</strong>s Recycelns beraten.<br />
Immer Ohren-, Augen- und Atemschutz tragen.<br />
Erfüllt die relevanten Gesetze und<br />
Sicherheitsnormen.<br />
Anweisung - Warnhinweis<br />
LASER LIGHT<br />
LASER RADIATION<br />
Do not stare into beam.<br />
Class 2 laser product.<br />
Wave length: 650nm<br />
Output power: 1mw<br />
AS/NZS 2211.1:2004<br />
Anweisung - Hinweis.<br />
Laser<br />
Doppelt isoliert.<br />
Symbole<br />
51<br />
D
D<br />
FUNKTIONEN<br />
EINSTELLUNGEN<br />
EINSTELLEN DER SCHNITTTIEFE<br />
Sicherstellen, dass das Werkzeug von <strong>de</strong>r<br />
Stromzufuhr getrennt ist.<br />
1. Den Hebel <strong>de</strong>r Tiefeneinstellungsverriegelung<br />
(17) lösen und die Säge von <strong>de</strong>r Grundplatte<br />
wegdrehen.<br />
2. Die Säge einstellen, bis gemäß <strong>de</strong>r<br />
Schnitttiefenskala (18) die gewünschte Tiefe<br />
erreicht ist. Die Skala sollte lediglich zur<br />
Bezugnahme verwen<strong>de</strong>t wer<strong>de</strong>n. Wenn eine<br />
genaue Tiefe erfor<strong>de</strong>rlich ist, mehrere<br />
Teststücke sägen, bis die gewünschte<br />
Tiefe erzielt ist.<br />
3. Den Hebel zur Sperrung hinunter drücken,<br />
jedoch nicht zu fest anziehen.<br />
Für die besten Ergebnisse sollte das<br />
Sägeblatt nicht mehr als eine Zahntiefe<br />
aus <strong>de</strong>r Dicke <strong>de</strong>s zu sägen<strong>de</strong>n Materials<br />
herausragen.<br />
• Der Höhenhebel kann neu positioniert wer<strong>de</strong>n,<br />
wenn <strong>de</strong>r Mechanismus bei angehobenem<br />
Hebel etwas fest o<strong>de</strong>r locker ist.<br />
Zur Neupositionierung <strong>de</strong>s Hebels <strong>de</strong>n<br />
Sicherungsclip <strong>de</strong>s Hebel mit einer<br />
Schraubenzieherklinge entfernen.<br />
Den Hebel aus <strong>de</strong>r Sechskantmutter schrauben<br />
52<br />
und im Uhrzeigersinn (wenn zu fest) o<strong>de</strong>r gegen<br />
<strong>de</strong>n Uhrzeigersinn (wenn zu locker) um eine<br />
Position versetzen und dann wie<strong>de</strong>r einsetzen.<br />
Den Sicherungsclip wie<strong>de</strong>r anbringen und<br />
Sperrposition <strong>de</strong>s Hebels prüfen.<br />
Funktionen<br />
EINSTELLEN DES SCHRÄGWINKELS<br />
Schrägwinkel können beliebig innerhalb <strong>de</strong>s<br />
Bereichs 0° bis 45° eingestellt wer<strong>de</strong>n.<br />
Nicht versuchen, die Säge schräg zu stellen, wenn<br />
sie auf einem Sägetisch montiert ist.<br />
1. Sicherstellen, dass das Werkzeug von<br />
<strong>de</strong>r Stromzufuhr getrennt ist.<br />
2. Den Schrägeinstellhebel (8) vorn an <strong>de</strong>r<br />
säge lockern.<br />
3. Die Sägeentsprechend <strong>de</strong>r Markierung<br />
auf <strong>de</strong>r Schrägskala (9) in die gewünschte<br />
Winkelstellung drehen.<br />
Die Schrägskala sollte lediglich zur Bezugnahme<br />
verwen<strong>de</strong>t wer<strong>de</strong>n. Wenn ein genauer<br />
Winkel erfor<strong>de</strong>rlich ist, mehrere<br />
Teststücke sägen, bis <strong>de</strong>r gewünschte<br />
Winkel erzielt ist.<br />
4. Den Schrägeinstellhebel wie<strong>de</strong>r festziehen.<br />
STROMSCHALTER<br />
Die Säge gut mit bei<strong>de</strong>n<br />
Hän<strong>de</strong>n an <strong>de</strong>n Griffen<br />
festhalten, bevor das<br />
Werkzeug eingeschaltet wird.<br />
• Den Auslöser (3) auf “ON” (Ein) ziehen.<br />
Zu Beginn wird beim Ziehen <strong>de</strong>s Auslösers ein<br />
gewisser Wi<strong>de</strong>rstand verspürt – dies ist ein<br />
Sicherheitsmechanismus zur Verhin<strong>de</strong>rung<br />
eines versehentlichen Startens <strong>de</strong>r Säge.
• Durch Loslassen <strong>de</strong>s Auslösers schaltet sich<br />
die Säge auf “OFF” (Aus).<br />
Das sägeballt erst in das Werkstück führen,<br />
wenn es volle Geschwindigkeit erreicht hat –<br />
und ein Ausschalten <strong>de</strong>r Säge vermei<strong>de</strong>n, bevor<br />
<strong>de</strong>r Sägevorgang been<strong>de</strong>t ist.<br />
PARALLELFÜHRUNG<br />
• Die Parallelführung (11) kann links o<strong>de</strong>r rechts<br />
von <strong>de</strong>r Klinge verwen<strong>de</strong>t wer<strong>de</strong>n.<br />
• Durch Verwendung <strong>de</strong>s Parallelanschlags<br />
kann genau gesägt wer<strong>de</strong>n, ohne dass man<br />
frei Hand einer Bleistiftlinie folgen muss.<br />
1. Den Parallelanschlag (11) bei gelockerter<br />
Daumenschraube an <strong>de</strong>r Grundplatte in<br />
die Montagelöcher an <strong>de</strong>r Grundplatte (8)<br />
entwe<strong>de</strong>r von rechts<br />
o<strong>de</strong>r links einsetzen .<br />
2. Schieben, bis<br />
die gewünschte<br />
Schnittbreite erzielt ist.<br />
3. Die Daumenschraube<br />
zur Absicherung festziehen.<br />
SICHTEN DER SCHNITTLINIE<br />
Die Sichtkerben (4) vor <strong>de</strong>m Sägeblatt helfen<br />
beim Sägen entlang einer Bleistiftlinie.<br />
Mit Blick aus <strong>de</strong>r Bedienerperspektive die rechte<br />
Kerbe für 90° Schnitte und die linke für 45°<br />
Schnitte verwen<strong>de</strong>n.<br />
VERWENDEN DES LASERSYSTEMS<br />
Warnhinweis<br />
• Nicht direkt in <strong>de</strong>n Laserstrahl starren.<br />
• Den Strahl niemals auf eine Person o<strong>de</strong>r einen<br />
an<strong>de</strong>ren Gegenstand als das Werkstück<br />
richten.<br />
• Der Laserstrahl sollte niemals<br />
auf Personal gerichtet wer<strong>de</strong>n und es soll<br />
vermie<strong>de</strong>n wer<strong>de</strong>n, dass er länger als 0,25<br />
Sek. auf das Auge einer Person gerichtet wird.<br />
• Immer sicherstellen, dass <strong>de</strong>r Laserstrahl<br />
auf ein robustes Werkstück ohne reflexive<br />
Oberfläche gerichtet wird, d.h. Holz o<strong>de</strong>r raue<br />
Oberflächen sind akzeptabel. Glänzen<strong>de</strong>r,<br />
reflexiver Stahl o<strong>de</strong>r ähnliches Material eignet<br />
sich nicht, da die reflexive Oberfläche <strong>de</strong>n<br />
Strahl auf <strong>de</strong>n Bediener zurück lenken könnte.<br />
• Den Laserstrahl nur dann einschalten, wenn<br />
das Werkzeug auf <strong>de</strong>m Werkstück ist.<br />
1. Die Vor<strong>de</strong>rkante <strong>de</strong>r Sägegrundplatte auf das<br />
Werkstück geben. Sicherstellen, dass das<br />
Sägeblatt das Werkstück nicht berührt.<br />
2. Den Laserstrahl durch Drücken <strong>de</strong>s Ein-/<br />
Ausschalters (1) <strong>de</strong>s Laservisiers einschalten.<br />
Der Laser operiert nicht, wenn die Säge nicht an<br />
<strong>de</strong>n Netzstrom angeschlossen ist.<br />
3. Die Laserlinie mit <strong>de</strong>r Bleistiftlinie auf eine<br />
Linie bringen.<br />
4. Mit <strong>de</strong>m Sägen beginnen.<br />
5. Den Laser ausschalten.<br />
Warnhinweise:<br />
• Sägen frei Hand vermei<strong>de</strong>n. Es ist viele<br />
sicherer und genauer, wenn die Säge<br />
durch die Parallelführung o<strong>de</strong>r eine<br />
festgeklemmte Latte geführt wird.<br />
Bei Sägern frei Hand immer eine gera<strong>de</strong><br />
Schnittlinie aufzeichnen und verhin<strong>de</strong>rn, dass<br />
die Säge von dieser<br />
abweicht.<br />
• Niemals ein in <strong>de</strong>r<br />
Hand gehaltenes<br />
Werkstück sägen.<br />
Sicherstellen, dass<br />
Funktionen<br />
53<br />
D
D<br />
BETRIEB DER SÄGE<br />
sich das Werkstück während <strong>de</strong>s Sägens<br />
nicht verschieben kann, und bei Bedarf<br />
Klemmen verwen<strong>de</strong>n.<br />
• Große Platten o<strong>de</strong>r lange Stücke müssen<br />
auf bei<strong>de</strong>n Seiten gut abgestützt sein, um<br />
Festfahren <strong>de</strong>s Sägeblatts und Rückschlag<br />
zu vermei<strong>de</strong>n. Sicherstellen, dass die Säge<br />
so positioniert wird, dass <strong>de</strong>r breitere Teil <strong>de</strong>r<br />
Grundplatte auf <strong>de</strong>m größeren Stück o<strong>de</strong>r <strong>de</strong>m<br />
mit <strong>de</strong>r besten Abstützung ruht.<br />
• Rückschlag verhin<strong>de</strong>rn, in<strong>de</strong>m dafür<br />
gesorgt wird, dass die Säge auf einer<br />
gera<strong>de</strong>n Linie sägt. Sicherstellen, dass<br />
das Sägeblatt in gutem Zustand ist und <strong>de</strong>r<br />
Einschnitt sich nicht um das Blatt schließt.<br />
(Beim Sägen von schwierigem Material einen<br />
kleinen Keil o<strong>de</strong>r ein 3 mm Abstandstück<br />
im Schnitt verwen<strong>de</strong>n, um ein Schließen zu<br />
verhin<strong>de</strong>rn). Wenn es scheint, dass die Säge<br />
zum Stillstand kommt, <strong>de</strong>n Auslöser loslassen,<br />
aber die Säge erst dann entfernen, wenn sich<br />
das Sägeblatt nicht mehr dreht.<br />
SÄGEN<br />
1. Das vor<strong>de</strong>re Teil <strong>de</strong>r Grundplatte auf das<br />
Werkstück geben, wobei Ihre Bleistiftlinie<br />
auf die korrekte Visierkerbe ausgerichtet<br />
ist. Sicherstellen, dass das Sägeblatt das<br />
Werkstück nicht berührt.<br />
2. Die Säge gut mit bei<strong>de</strong>n Hän<strong>de</strong>n festhalten<br />
und <strong>de</strong>n Auslöser betätigen. Wenn <strong>de</strong>r<br />
Sägemotor volle Geschwindigkeit erreicht,<br />
die Säge gera<strong>de</strong> an <strong>de</strong>r Schnittlinie entlang<br />
führen.<br />
3. Eine konsistente Geschwindigkeit einhalten<br />
– zu schnell überbeansprucht <strong>de</strong>n Motor,<br />
während zu langsam das Werkstück glatt<br />
schleifen könnte. Plötzliche Bewegungen mit<br />
<strong>de</strong>r Säge vermei<strong>de</strong>n.<br />
4. Nach <strong>de</strong>m Sägen <strong>de</strong>n Auslöser loslassen und<br />
warten, bis das Sägeblatt völlig zum Stillstand<br />
kommt. Die Säge nicht aus <strong>de</strong>m Werkstück<br />
nehmen, während das Blatt sich noch dreht.<br />
Sägen von Furnierplatte<br />
Bei Sägen von Furnierplatten mit einer Dicke<br />
unter 20 mm das Sägeblatt so einstellen, dass<br />
es 5 – 10 mm durch das Werkstück herausragt,<br />
54<br />
Betrieb <strong>de</strong>r säge<br />
wobei die Oberseite <strong>de</strong>r Platte nach unten zeigt.<br />
Hierdurch wird Splittern reduziert. Beim Sägen<br />
von dickerem Holz, das Blatt auf maximale Tiefe<br />
einstellen, um Rückschlag<br />
zu reduzieren.<br />
Schrägeinschnitt<br />
1. Die Schnitttiefe wie gewünscht einstellen.<br />
2. Die Schrägstellung auf 0° einstellen.<br />
3. Den sägeblattschutzhebel (12) anheben, um<br />
das Sägeblatt freizulegen, die Vor<strong>de</strong>rseite<br />
<strong>de</strong>r Grundplatte gut gegen das Werkstück<br />
anlegen, wobei <strong>de</strong>r hintere Griff angehoben<br />
ist, damit das Blatt das Werkstück nicht<br />
berührt.<br />
4. Während das Sägeblatt gera<strong>de</strong> eben vom<br />
Werkstück ist, die Säge einschalten und<br />
warten, bis sie volle Geschwindigkeit erreicht<br />
(ca. 2 Sekun<strong>de</strong>n).<br />
5. Das Sägeblatt langsam in das Werkstück<br />
einführen, hierbei die Vor<strong>de</strong>rseite <strong>de</strong>r<br />
Grundplatte als Drehpunkt nutzen.<br />
Sobald das Blatt das Material sägt, <strong>de</strong>n unteren<br />
Sägeblattschutzhebel loslassen.<br />
6. In Vorwärtsrichtung bis zum Schnitten<strong>de</strong><br />
sägen.<br />
7. Nach <strong>de</strong>m Sägen <strong>de</strong>n Auslöser loslassen und<br />
warten, bis das Sägeblatt völlig zum Stillstand<br />
kommt.<br />
Die Säge nicht aus <strong>de</strong>m Werkstück nehmen,<br />
während das Blatt sich noch dreht.<br />
Wenn die Ecken <strong>de</strong>s Einschnitts nicht ganz<br />
durchgesägt sind, dies mit einer Stich- o<strong>de</strong>r<br />
Handsäge korrigieren.
VERWENDUNG MIT EINER SÄGEBANK<br />
Diese Säge passt problemlos auf die meisten<br />
Sägebänke.<br />
• Prüfen, dass die Sägebank mit <strong>de</strong>r<br />
entsprechen<strong>de</strong>n Sägeblattschutzvorrichtung<br />
ausgerüstet ist, und vor <strong>de</strong>m Betrieb<br />
sicherstellen, dass diese richtig eingestellt<br />
sind und korrekt funktionieren.<br />
• Sicherstellen, dass die Säge sicher auf <strong>de</strong>r<br />
Bank befestigt ist. Zur Befestigung verweisen<br />
wir auf die Herstelleranweisung.<br />
• Die Säge kurz laufen lassen, um vor <strong>de</strong>m<br />
Sägen sicherzustellen,<br />
dass sie richtig läuft.<br />
AUSTAUSCH DES SÄGEBLATTS<br />
Nur 185 mm (7 1/4”) Sägeblätter mit einer<br />
Sägeschlitzbreite von zwischen 2,2 & 3,5<br />
mm mit einer lastfreien Nennleistung von<br />
min<strong>de</strong>stens 5000 U/min. verwen<strong>de</strong>n. Niemals<br />
Hochgeschwindigkeits-Stahlblätter o<strong>de</strong>r<br />
Schleifscheiben verwen<strong>de</strong>n. Durch Anbringen<br />
von Blättern für an<strong>de</strong>re Zwecke o<strong>de</strong>r von<br />
Sägeblättern an<strong>de</strong>rer Größe könnte die Garantie<br />
verfallen.<br />
• Keine min<strong>de</strong>rwertigen Sägeblätter verwen<strong>de</strong>n.<br />
Regelmäßig prüfen, dass das Sägeblatt flach,<br />
scharf und frei von Rissen o<strong>de</strong>r Defekten ist.<br />
1. Sicherstellen, dass die Säge von <strong>de</strong>r<br />
Stromzufuhr getrennt ist.<br />
• Prüfen, dass die Sägebank Rückschlagschutz<br />
hat.<br />
• Sicherstellen, dass ein geeigneter Sicherheits-<br />
Ein-/Ausschalter an <strong>de</strong>r Sägebank vorhan<strong>de</strong>n<br />
ist. Der Sägeschalter kann dann mit einer<br />
Fe<strong>de</strong>rklemme, Kabelklemme o<strong>de</strong>r ähnlichen<br />
auf Ein gehalten wer<strong>de</strong>n und dann an<br />
die Sicherheitsbuchse an <strong>de</strong>r Sägebank<br />
angeschlossen wer<strong>de</strong>n. Die Klemme MUSS<br />
abgenommen wer<strong>de</strong>n, wenn die Säge von <strong>de</strong>r<br />
Sägebank genommen wird.<br />
• Unter Verwendung aller<br />
Sicherheitseinrichtungen in einem<br />
Abfallstück einen Testschnitt vornehmen und<br />
sicherstellen, dass alle Schutzvorrichtungen<br />
korrekt eingestellt sind, bevor Sie<br />
weitersägen.<br />
2. Den mitgelieferten<br />
Stiftschlüssel<br />
(20) in die bei<strong>de</strong>n<br />
Löcher am äußeren<br />
Sägeblattflansch<br />
geben. Den<br />
Sechskantschlüssel<br />
(21) in das Loch<br />
<strong>de</strong>s Blattbolzens<br />
einführen. Während<br />
<strong>de</strong>r Stiftschlüssel gut<br />
festgehalten wird, <strong>de</strong>n<br />
Sechskantschlüssel in<br />
Blattrotationrichtung<br />
drehen (gegen <strong>de</strong>n Uhrzeigersinn). Wenn <strong>de</strong>r<br />
Blattbolzen aus <strong>de</strong>m Dornloch entfernt wur<strong>de</strong>,<br />
Bolzen und Blattflansch entfernen.<br />
Verwendung mit einer sägebank/Austausch <strong>de</strong>s sägeblatts<br />
55<br />
D
D<br />
3. Die rückziehbare Sägeblattschutzvorrichtung<br />
(14) ganz zurückhalten und das Sägeblatt<br />
vorsichtig durch die Grundplatte und auf<br />
<strong>de</strong>r inneren Unterlegscheibe auf <strong>de</strong>r Welle<br />
in Position bringen. Da die Blattzähne sehr<br />
scharf sind, sind hierfür Schutzhandschuhe<br />
notwendig. Die Aufschrift sollte nach außen<br />
zeigen und <strong>de</strong>r Pfeil auf <strong>de</strong>m Sägeblatt sollte<br />
in die selbe Richtung wie <strong>de</strong>r Pfeil auf <strong>de</strong>r<br />
Schutzvorrichtung zeigen.<br />
SERVICE & WARTUNG<br />
• Alle Schä<strong>de</strong>n an <strong>de</strong>r Säge sollten vor <strong>de</strong>m<br />
Gebrauch von einem Reparaturfachmann<br />
repariert und sorgfältig geprüft wer<strong>de</strong>n.<br />
Service- o<strong>de</strong>r Wartungsarbeiten, die von einer<br />
nicht qualifizierten Person vorgenommen<br />
wer<strong>de</strong>n, könnten zu Verletzung führen.<br />
• Servicearbeiten sollten von einem<br />
autorisierten <strong>Triton</strong> Repair Center unter<br />
Verwendung von <strong>Triton</strong>-Originalersatzteilen<br />
ausgeführt wer<strong>de</strong>n. Die Anweisung sorgfältig<br />
befolgen und zur I<strong>de</strong>ntifikation von Problemen<br />
und Beraten die “Fehlersuche” heranziehen.<br />
Die Verwendung von nicht autorisierten<br />
o<strong>de</strong>r <strong>de</strong>fekten Teilen kann Stromstoß o<strong>de</strong>r<br />
Verletzung verursachen.<br />
• <strong>Triton</strong> Manufacturing & Design Co. haftet<br />
nicht für Schä<strong>de</strong>n o<strong>de</strong>r Verletzungen, die<br />
durch unbefugte Reparatur <strong>de</strong>r Säge o<strong>de</strong>r<br />
Misshandlung <strong>de</strong>s Werkzeugs verursacht<br />
wer<strong>de</strong>n.<br />
• Regelmäßig prüfen, dass <strong>de</strong>r Sägedorn, die<br />
Unterlegscheiben <strong>de</strong>s Sägedorns und die<br />
Bohrung sauber und frei von angesammeltem<br />
Harz o<strong>de</strong>r verfestigtem Sägemehl sind.<br />
Prüfen, dass die Flächen <strong>de</strong>r<br />
Dornunterlegscheiben glatt und frei von<br />
Gratungen sind. Prüfen, dass <strong>de</strong>r Haltebolzen<br />
<strong>de</strong>s Sägeblatts korrekt festgezogen ist.<br />
• Die Operation <strong>de</strong>r rückziehbaren<br />
Schutzvorrichtung prüfen. Sie muss sich<br />
schnell und ohne Schleifen schließen. Das<br />
56<br />
Service & wartung<br />
4. Das Blatt einlegen<br />
und darauf achten,<br />
dass es korrekt auf<br />
<strong>de</strong>m Innenflansch<br />
aufliegt. Den äußeren<br />
Blattflansch wie<strong>de</strong>r<br />
anbringen und dann<br />
<strong>de</strong>n Blattbolzen leicht durch <strong>de</strong>n äußeren<br />
Blattflansch aufschrauben.<br />
Sicherstellen, dass das Sägeblatt bündig<br />
zwischen <strong>de</strong>n inneren und äußeren Flanschen<br />
in Position ist und dann mit <strong>de</strong>m Stift- und<br />
Sechskantschlüssel gut festziehen.<br />
Sägeblatt entfernen und angesammeltes<br />
Sägemehl o<strong>de</strong>r Holzspäne aus <strong>de</strong>m Bereich<br />
<strong>de</strong>r Schutzvorrichtung entfernen.<br />
• Die Entlüftungsschlitze <strong>de</strong>r Säge sollten<br />
sauber und frei von Fremdastoffen gehalten<br />
wer<strong>de</strong>n. Die Säge mit einem leicht feuchten<br />
Tuch sauber wischen – keine Lösungsmittel<br />
verwen<strong>de</strong>n.<br />
INSTANDHALTUNG DES SÄGEBLATTS<br />
• Regelmäßig prüfen, dass das Sägeblatt frei<br />
von Harz- o<strong>de</strong>r Sägemehlanlagerungen ist.<br />
Bei Bedarf mit einem Lösungsmittel wie z.B.<br />
WD40, RP7 o<strong>de</strong>r Leichtbenzin reinigen.<br />
• Das Sägeblatt regelmäßig auf Flachheit prüfen.<br />
Verwen<strong>de</strong>n <strong>de</strong>r Säge mit einem verbogenen<br />
Blatt belastet <strong>de</strong>n Motor und <strong>de</strong>m Getriebe<br />
übermäßig und könnte Ihre Garantierechte<br />
beeinträchtigen.<br />
• Die Wolframkarbidzähne sollten regelmäßig<br />
auf Schärfe und zerbrochene Zähnen geprüft<br />
und nach Bedarf repariert o<strong>de</strong>r geschliffen<br />
wer<strong>de</strong>n.
INSTANDHALTUNG DES STROMKABELS<br />
Wenn das Stromkabel erneuert wer<strong>de</strong>n muss,<br />
dann muss dies vom Hersteller o<strong>de</strong>r einem<br />
Vertreter <strong>de</strong>ssen o<strong>de</strong>r einem autorisierten<br />
FEHLERSUCHE<br />
Servicecenter vorgenommen wer<strong>de</strong>n, damit die<br />
Sicherheit nicht gefähr<strong>de</strong>t wird.<br />
Die folgen<strong>de</strong> Tabelle enthält Information, die Ihnen bei <strong>de</strong>r Diagnose und Behebung von Problemen mit<br />
<strong>de</strong>r Säge helfen soll.<br />
SYMPTOM MÖGLICHE URSACHE MASSNAHME<br />
Säge funktioniert nicht • Stromkabel nicht<br />
angeschlossen<br />
• Sicherstellen, dass das Kabel an <strong>de</strong>n<br />
Netzstrom angeschlossen ist<br />
• Bürsten abgenutzt o<strong>de</strong>r haften • Vom Netzstrom trennen, die Bürstenkappen<br />
öffnen und sicherstellen, dass sich die Bürsten<br />
ungehin<strong>de</strong>rt in <strong>de</strong>n Haltern bewegen. Prüfen,<br />
ob die Bürsten entsprechend <strong>de</strong>r Angaben im<br />
Abschnitt zur Wartung ausgewechselt wer<strong>de</strong>n<br />
müssen.<br />
• Auslöser <strong>de</strong>fekt • Kontakt-Service-Mitte**<br />
• Motor- komponenten offen o<strong>de</strong>r<br />
kurzge-schlossen<br />
• Kontakt-Service-Mitte**<br />
Säge läuft langsam • Stumpfes o<strong>de</strong>r beschädigtes Blatt • Sägeblatt schleifen o<strong>de</strong>r austauschen<br />
• Motor-überlast • Die Säge nicht so stark schieben. Sicherstellen,<br />
dass <strong>de</strong>r Einschnitt sich nicht<br />
schließt und das Sägeblatt einklemmt.<br />
Ungewöhnliches Geräusch • Mechanische Behin<strong>de</strong>rung • Kontakt-Service-Mitte**<br />
Motor läuft, aber Blatt dreht<br />
sich nicht<br />
Schwere Funkenbildung im<br />
Motorgehäuse<br />
Rückziehbare Schutzvorrichtung<br />
schließt nicht o<strong>de</strong>r<br />
schließt sich langsam<br />
• Armatur hat Kurzschluss-bereiche • Kontakt-Service-Mitte**<br />
• Blattsicherungsmutter ist lose<br />
o<strong>de</strong>r das reduzierabstandstück<br />
sitzt nicht richtig.<br />
• Blattsicherungsmutter festziehen. Sicherstellen,<br />
dass Dornabstandstücke und<br />
Flanschscheiben richtig einliegen.<br />
• Kaputte Getriebewelle o<strong>de</strong>r -zähne • Kontakt-Service-Mitte**<br />
• Bürsten bewegen sich nicht<br />
ungehin<strong>de</strong>rt<br />
• Vom Netzstrom trennen, Bürsten herausnehmen<br />
und reinigen o<strong>de</strong>r austauschen<br />
• Armatur offen o<strong>de</strong>r kurzgeschlossen<br />
• Kontakt-Service-Mitte**<br />
• Kommutator-fläche nicht sauber • Kontakt-Service-Mitte**<br />
• Rückführfe<strong>de</strong>r lose o<strong>de</strong>r kaputt • Fe<strong>de</strong>r wie<strong>de</strong>r anbringen o<strong>de</strong>r austauschen<br />
(nur echte <strong>Triton</strong>-Ersatzteile verwen<strong>de</strong>n).<br />
• Schutzvor-richtung verbogen. • Richten Sie es gera<strong>de</strong> o<strong>de</strong>r treten Sie<br />
mit Service-Mitte in Verbindung**<br />
• Mechanismus mit Sägemehl<br />
verstopft.<br />
SYMPTOM MÖGLICHE URSACHE MASSNAHME<br />
Sägentiefeneinstellung bleibt<br />
nicht in Position<br />
• Tiefeneinstellungshebel muss<br />
festgezogen wer<strong>de</strong>n<br />
• Säubern und <strong>de</strong>n verstopften Mechanismus<br />
leicht schmieren.<br />
• Den Tiefeneinstellungshebel wie auf Seite<br />
52 beschrieben positionieren<br />
Service & wartung<br />
57<br />
D
D<br />
Wenn das Problem durch die obigen Ratschläge nicht behoben wer<strong>de</strong>n kann, nicht versuchen,<br />
die Säge zu reparieren, - Wenn Sie Hilfe benötigen, dann besuchen Sie bitte www.tritontools.<br />
com o<strong>de</strong>r kontaktieren Sie Ihre nächste Geschäftsstelle.<br />
** Besuchen Sie www.tritontools.com, um Ihre nächste autorisierte<br />
Mitte zu fin<strong>de</strong>n.<br />
Service-<br />
GARANTIE<br />
Zur Registration Ihrer Garantie besuchen Sie bitte<br />
unsere Website www.tritontools.com* und geben<br />
Sie dort Ihre Details ein.<br />
Diese wer<strong>de</strong>n dann in unserer Postversandliste<br />
aufgenommen (wenn nicht an<strong>de</strong>rs angegeben),<br />
damit wir Sie über zukünftige Neueinführungen<br />
informieren. Ihre Details wer<strong>de</strong>n keinen dritten<br />
Parteien zugänglich gemacht.<br />
KAUFINFORMATION<br />
Datum <strong>de</strong>s Kaufs: ___ / ___ / ____<br />
Mo<strong>de</strong>ll: TA184CSL<br />
Seriennummer: __________________<br />
(Auf <strong>de</strong>m Motortypenschild)<br />
Behalten Sie Ihren Beleg als Kaufnachweis.<br />
58<br />
Garantie<br />
<strong>Triton</strong> Manufacturing & Design Co.<br />
garantiert <strong>de</strong>m Käufer dieses Produkts,<br />
dass <strong>Triton</strong>, wenn sich Teile innerhalb<br />
von 12 MONATEN ab Datum <strong>de</strong>s<br />
Originalkaufs aufgrund <strong>de</strong>fekter<br />
Materialien o<strong>de</strong>r unzulänglicher<br />
Arbeitsausführung als <strong>de</strong>fekt erweisen,<br />
das <strong>de</strong>fekte Teil nach eigenem Ermessen<br />
entwe<strong>de</strong>r reparieren o<strong>de</strong>r ersetzen wird.<br />
Diese Garantie erstreckt sich nicht auf<br />
kommerzielle Verwendung o<strong>de</strong>r normalen<br />
Verschleiss o<strong>de</strong>r Schä<strong>de</strong>n infolge von<br />
Unfall, Missbrauch o<strong>de</strong>runsachgemäßem<br />
Gebrauch.<br />
* Registrieren Sie sich online innerhalb<br />
von 30 Tagen<br />
Bedingungen gelten<br />
Ihre gesetzlich festgelegten Rechte<br />
wer<strong>de</strong>n hierdurch nicht beeinträchtigt.
59<br />
D
I<br />
Grazie per aver acquistato questo utensile <strong>Triton</strong>. Queste istruzioni contengono informazioni utili per il<br />
funzionamento sicuro ed affidabile <strong>de</strong>l prodotto. La sega circolare <strong>Triton</strong> TA184CSL è dotata di soluzioni<br />
tecnologiche esclusive che potrebbero essere una novità anche per coloro che hanno una buona<br />
conoscenza <strong>de</strong>lle seghe circolari. Per essere sicuri di utilizzare al meglio il potenziale <strong>de</strong>ll’utensile si<br />
raccomanda pertanto di leggere a fondo questo manuale.<br />
Conservare il manuale in modo che sia sempre a portata di mano e accertarsi che l’operatore<br />
<strong>de</strong>ll’elettroutensile lo abbia letto e capito a pieno.<br />
INDICE<br />
Caratteristiche tecniche 60<br />
Componenti 61<br />
Norme Generali di sicurezza 62<br />
Simboli 67<br />
Funzioni 67<br />
Funzionamento Della Sega 69<br />
Montaggio su banco da lavoro 70<br />
Sostituzione Della Lama 71<br />
Assistenza E Manutenzione 72<br />
Risoluzione <strong>de</strong>i problemi 73<br />
Garanzia 74<br />
CARATTERISTICHE TECNICHE<br />
DATI TECNICI<br />
Mo<strong>de</strong>llo: TA184CSL<br />
Tensione: 230-240V ~ 50Hz<br />
Potenza: 1800W<br />
Velocità a vuoto: 5.000min-1 Diametro lama 185mm<br />
Diametro albero sega 20mm<br />
Regolazione inclinazione: 0° – 45°<br />
Profondità di taglio: 90°: 60mm<br />
45°: 40mm<br />
Classe Isolamento: Con doppio isolamento<br />
Peso netto: 5,1kg<br />
Laser: Classe 2<br />
Lunghezza d’onda: 650nm<br />
Potenza d’uscita:
COMPONENTI<br />
1<br />
6<br />
15<br />
7<br />
16<br />
2<br />
12<br />
5<br />
9<br />
10<br />
19 8<br />
14<br />
11<br />
13<br />
4<br />
20<br />
21<br />
1. Interruttore <strong>de</strong>l marcatore laser<br />
2. Illuminatore laser<br />
3. Pulsante di accensione<br />
4. Tacca di riferimento<br />
5. Alloggiamento motore<br />
6. Impugnatura principale<br />
7. Impugnatura anteriore<br />
8. Leva di regolazione inclinazione<br />
9. Scala inclinazione<br />
10. Manopola di blocco guida parallela<br />
11. Guida parallela<br />
12. Leva <strong>de</strong>lla protezione <strong>de</strong>lla lama<br />
13. Protezione retrattile <strong>de</strong>lla lama<br />
14. Piastra base<br />
15. Protezione superiore <strong>de</strong>lla lama<br />
16. Bocchetta di aspirazione<br />
17. Leva di blocco <strong>de</strong>lla profondità<br />
18. Scala <strong>de</strong>lla profondità di taglio<br />
19. Lama<br />
20. Chiave a pioli<br />
21. Chiave a testa esagonale<br />
3<br />
18<br />
17<br />
Componenti<br />
61<br />
I
I<br />
NORME GENERALI DI SICUREZZA<br />
NORME GENERALI DI SICUREZZA<br />
Leggere e assimilare a pieno tutte le<br />
istruzioni. La non osservanza <strong>de</strong>lle<br />
seguenti istruzioni può causare scosse<br />
elettriche, incendi e/o lesioni gravi alle persone.<br />
Il termine “elettroutensile” nelle seguenti<br />
avvertenze si riferisce sia agli utensili<br />
alimentati con corrente di rete (dotati di cavo<br />
di alimentazione) che ai dispositivi a batteria<br />
(cordless).<br />
AREA DI LAVORO<br />
• Mantenere l’area di lavoro pulita e<br />
a<strong>de</strong>guatamente illuminata. Gli inci<strong>de</strong>nti<br />
sono più comuni nelle aree poco illuminate e<br />
disordinate.<br />
• Non usare gli elettroutensili in ambienti<br />
in cui potrebbero essere presenti gas<br />
corrosivi o esplosivi. Gli elettroutensili<br />
producono scintille che potrebbero accen<strong>de</strong>re<br />
i fumi. Evitare gli ambienti con eccessiva<br />
umidità.<br />
• Tenere altre persone, e soprattutto i<br />
bambini, a distanza di sicurezza quando<br />
si utilizza un elettroutensile. Un attimo<br />
di distrazione è sufficiente a far per<strong>de</strong>re il<br />
controllo <strong>de</strong>ll’utensile all’operatore.<br />
• Preparare e fissare l’utensile mantenendo<br />
sempre l’equilibrio ottimale.<br />
SICUREZZA ELETTRICA<br />
• Le spine <strong>de</strong>lle macchine utensili <strong>de</strong>vono<br />
essere compatibili con le prese di<br />
corrente. Non modificare in alcun modo la<br />
spina <strong>de</strong>ll’elettroutensile. Non usare adattatori<br />
con gli elettroutensili dotati di collegamento<br />
di messa a terra (isolati). L’uso <strong>de</strong>lle spine<br />
originali non modificate e <strong>de</strong>lle prese<br />
corrispon<strong>de</strong>nti ridurrà il rischio di scosse<br />
elettriche.<br />
• Evitare il contatto <strong>de</strong>l corpo con le<br />
superfici collegate a massa come i tubi, i<br />
radiatori, le cucine e i frigoriferi. Il rischio di<br />
scosse elettriche è maggiore quando il proprio<br />
corpo è collegato a massa.<br />
• Non esporre gli elettroutensili alla pioggia<br />
62<br />
Norme generali di sicurezza<br />
e non lasciarli in ambienti umidi o bagnati.<br />
L’ingresso <strong>de</strong>ll’acqua in una macchina utensile<br />
aumenta il rischio di scosse elettriche.<br />
• Non usare il cavo in modo improprio.<br />
Non afferrare mai il cavo per trasportare o<br />
tirare l’utensile o per staccarlo dalla presa<br />
di corrente. Tenere il cavo lontano da fondi<br />
di calore, olio, benzina e sostanze affini,<br />
bordi appuntiti o parti in movimento. I cavi<br />
danneggiati o attorcigliati aumentano il rischio<br />
di scosse elettriche.<br />
• Quando si usa un elettroutensile<br />
all’esterno, usare cavi di prolunga<br />
omologati per l’uso in ambienti esterni. Un<br />
cavo idoneo all’uso in ambienti esterni riduce<br />
il rischio di scosse elettriche.<br />
• Non tirare mai il cavo per scollegarlo dalla<br />
presa di corrente. Tenere il cavo lontano da<br />
fonti di calore e da bordi appuntiti.<br />
SICUREZZA PERSONALE<br />
• Quando si usa un elettroutensile lavorare<br />
sempre con la massima attenzione e<br />
concentrazione, lasciandosi guidare<br />
dal buon senso. Non usare mai un<br />
elettroutensile quando si è stanchi o sotto<br />
l’effetto di medicinali e/o sostanze alcoliche o<br />
stupefacenti. Quando si usa un elettroutensile<br />
un attimo di distrazione è sufficiente a<br />
causare gravi lesioni alle persone.<br />
• Usare dispositivi per la protezione<br />
personale. Indossare sempre protezioni<br />
per gli occhi. I dispositivi per la sicurezza<br />
personale, come le mascherine antipolvere,<br />
le calzature di sicurezza antiscivolo, il casco<br />
e le cuffie, se usati in maniera appropriata,<br />
riducono i rischi di lesioni alle persone.<br />
• Indossare indumenti adatti. Non indossare<br />
indumenti troppo larghi o gioielli.<br />
Raccogliere i capelli lunghi. Tenere i capelli,<br />
gli indumenti e i guanti lontano dalle parti in<br />
movimento. Gli indumenti larghi, i gioielli e i<br />
capelli lunghi potrebbero rimanere impigliati<br />
tra le parti in movimento.<br />
• Evitare l’avviamento acci<strong>de</strong>ntale <strong>de</strong>lla<br />
macchina. Accertarsi che l’interruttore sia<br />
spento prima di collegare la macchina alla
presa di corrente. Quando si trasportano<br />
gli elettroutensili con il dito sull’interruttore<br />
di accensione o quando si collegano alla rete<br />
dispositivi che hanno l’interruttore in posizione<br />
ON (e cioè accesi) il rischio di causare<br />
inci<strong>de</strong>nti è maggiore.<br />
• Rimuovere tutte le chiavi di regolazione<br />
e le chiavi inglesi prima di accen<strong>de</strong>re<br />
l’elettroutensile. Una chiave inglese o una<br />
chiave di regolazione collegata a una parte<br />
in movimento <strong>de</strong>ll’elettroutensile potrebbe<br />
causare lesioni alle persone.<br />
• Gli accessori e le parti metalliche<br />
potrebbero diventare molto cal<strong>de</strong>.<br />
CURA DELL’ELETTROUTENSILE<br />
• Fissare il pezzo da lavorare con <strong>de</strong>i<br />
morsetti o con qualsiasi altro metodo di<br />
fissaggio che serva ad evitare che il pezzo<br />
si possa spostare o ca<strong>de</strong>re. Non sostenere<br />
mai il pezzo da lavorare con le mani o contro<br />
il proprio corpo. Tali metodi non garantiscono<br />
un’a<strong>de</strong>guata stabilità e rappresentano un<br />
grave rischio per l’incolumità <strong>de</strong>ll’operatore.<br />
• Non forzare l’elettroutensile. Usare<br />
sempre l’elettroutensile corretto per il lavoro<br />
da eseguire. L’elettroutensile corretto sarà<br />
in grado di svolgere il lavoro in modo più<br />
efficiente e sicuro perché è stato progettato<br />
appositamente per tale applicazione.<br />
• Non usare l’elettroutensile se l’interruttore<br />
di accensione non si accen<strong>de</strong> e si spegne.<br />
Gli elettroutensili con un interruttore di<br />
accensione difettoso sono pericolosi e <strong>de</strong>vono<br />
essere riparati immediatamente. In caso di<br />
problemi consultare la sezione “Risoluzione<br />
<strong>de</strong>i problemi” e se necessario contattare un<br />
Centro di assistenza autorizzato.<br />
• Staccare sempre la spina dalla presa di<br />
corrente prima di effettuare regolazioni,<br />
di collegare e scollegare accessori e di<br />
rimettere a posto l’elettroutensile dopo<br />
l’uso. Queste misure preventive ridurranno<br />
significativamente il rischio di inci<strong>de</strong>nti.<br />
• Conservare l’elettroutensile in luogo<br />
asciutto, fuori dalla portata <strong>de</strong>i bambini e<br />
di persone non a<strong>de</strong>guatamente ad<strong>de</strong>strate.<br />
Questo elettroutensile può diventare<br />
estremamente pericoloso nelle mani di<br />
persone non ad<strong>de</strong>strate.<br />
• Mantenere gli elettroutensili in buone<br />
condizioni operative.<br />
• Mantenere le lame e pulite e affilate. Gli<br />
utensili tenuti in buone condizioni operative<br />
e con le lame affilate sono meno soggette a<br />
bloccarsi e più facili da controllare.<br />
Controllare che le parti in movimento siano<br />
allineate (assenza di eccessive vibrazioni)<br />
e che si possano muovere liberamente.<br />
Controllare inoltre che tutti i componenti<br />
siano privi di guasti e difetti che potrebbero<br />
ridurre la funzionalità <strong>de</strong>l dispositivo.<br />
Non usare un elettroutensile danneggiato e<br />
rivolgersi a un centro di assistenza autorizzato<br />
per la riparazione. Le cattive condizioni <strong>de</strong>gli<br />
elettroutensili sono responsabili di un gran<br />
numero di inci<strong>de</strong>nti.<br />
• Non avviare l’elettroutensile con la lama a<br />
contatto con il pezzo da lavorare.<br />
• Evitare l’avviamento acci<strong>de</strong>ntale <strong>de</strong>lla<br />
macchina. Accertarsi che l’interruttore sia<br />
spento prima di collegare la macchina alla<br />
presa di corrente. Quando si trasportano gli<br />
elettroutensili con il dito sull’interruttore di<br />
accensione o quando si collegano alla rete<br />
dispositivi che hanno l’interruttore in posizione<br />
ON (e cioè accesi) il rischio di causare<br />
inci<strong>de</strong>nti è maggiore.<br />
• Rimuovere tutte le chiavi di regolazione<br />
e le chiavi inglesi prima di accen<strong>de</strong>re<br />
l’elettroutensile. Una chiave inglese o una<br />
chiave di regolazione collegata a una parte<br />
in movimento <strong>de</strong>ll’elettroutensile potrebbe<br />
causare lesioni alle persone.<br />
• Gli accessori e le parti metalliche<br />
potrebbero diventare molto cal<strong>de</strong>.<br />
AVVERTENZE DI SICUREZZA SPECIFICHE PER<br />
I DISPOSITIVI LASER.<br />
Il sistema laser usato in questo prodotto<br />
è un dispositivo laser di Classe 2 con una<br />
lunghezza d’onda di 650nm e 1mW di potenza.<br />
I dispositivi laser di questa classe normalmente<br />
non presentano pericoli per gli occhi. Tuttavia,<br />
fissare lo sguardo sul fascio laser può causare<br />
un disturbo transitorio da abbagliamento.<br />
Si raccomanda di evitare di fissare direttamente<br />
Norme generali di sicurezza<br />
63<br />
I
I<br />
il fascio laser per evitare l’abbagliamento. Si<br />
raccomanda inoltre di osservare sempre tutte le<br />
seguenti norme di sicurezza:<br />
• Il dispositivo laser <strong>de</strong>ve essere utilizzato e<br />
mantenuto come previsto nelle istruzioni<br />
<strong>de</strong>l costruttore.<br />
• Non dirigere mai il fascio laser verso le<br />
persone o su altri oggetti a parte il pezzo<br />
da lavorare.<br />
• Non dirigere il fascio laser <strong>de</strong>liberatamente<br />
verso altre persone e soprattutto verso<br />
gli occhi di altre persone per più di 0,25<br />
secondi.<br />
• Accertarsi sempre che il fascio laser sia<br />
diretto su un pezzo da lavorare solido e privo<br />
di superfici riflettenti, come ad esempio<br />
un pezzo di legno o altre superfici con un<br />
rivestimento non liscio. L’uso <strong>de</strong>l laser non è<br />
consigliabile con le lastre di acciaio riflettente,<br />
brillante o a specchio, o con altri materiali<br />
con caratteristiche simili perché le superfici<br />
riflettenti potrebbero ridirigere il fascio laser<br />
sull’operatore.<br />
• Non sostituire l’illuminatore laser con un<br />
dispositivo di tipo diverso. Le riparazioni<br />
<strong>de</strong>vono essere effettuate solamente dal<br />
costruttore <strong>de</strong>l dispositivo laser o da un centro<br />
di assistenza autorizzato.<br />
L’uso di comandi e l’effettuazione di regolazioni<br />
o procedure che non corrispondono a quelle<br />
specificate nel presente manuale rappresentano<br />
un rischio di esposizione a radiazioni pericolose.<br />
Per ulteriori informazioni fare riferimento<br />
alle normative nazionali italiane in materia di<br />
dispositivi laser.<br />
Per ulteriori informazioni sui dispositivi laser fare<br />
riferimento alle normative europee EN60825-1 :<br />
1994 + A2: 2001 + A1 : 2002.<br />
AVVERTENZE DI SICUREZZA SPECIFICHE PER<br />
LE SEGHE ELETTRICHE.<br />
• Tenere sempre le mani lontane dall’area<br />
di taglio e dalla lama. Tenere l’altra<br />
mano sull’impugnatura secondaria o<br />
sull’alloggiamento <strong>de</strong>l motore. Se entrambe le<br />
mani sono impegnate a sostenere la sega non<br />
possono entrare a contatto con la lama.<br />
64<br />
Norme generali di sicurezza<br />
• Non porre mai le mani o altre parti <strong>de</strong>l<br />
corpo al di sotto <strong>de</strong>l pezzo da lavorare. La<br />
protezione retrattile <strong>de</strong>lla lama si ritira e non<br />
offre alcuna protezione dalla parte <strong>de</strong>lla lama<br />
che si trova sotto il pezzo da lavorare.<br />
• Regolare la profondità di taglio in base allo<br />
spessore <strong>de</strong>l pezzo. Sotto il pezzo dovrebbe<br />
essere visibile poco meno di un <strong>de</strong>nte <strong>de</strong>lla<br />
lama.<br />
• Non tenere mai il pezzo da tagliare con<br />
la mano o tra le gambe. Fissare il pezzo<br />
da lavorare su una piattaforma stabile. È<br />
importante sostenere a<strong>de</strong>guatamente il pezzo<br />
da lavorare per non esporre l’operatore a rischi<br />
superflui. Se la lama si inceppa si rischia di<br />
per<strong>de</strong>re il controllo <strong>de</strong>ll’elettroutensile.<br />
• Afferrare l’elettroutensile per le<br />
impugnature isolate quando si eseguono<br />
operazioni che prevedono il rischio di un<br />
contatto con fili elettrici nascosti o con<br />
il cavo di alimentazione <strong>de</strong>l dispositivo.<br />
Il contatto con un filo elettrico “sotto<br />
tensione” mette “sotto tensione” anche le<br />
parti metalliche esposte <strong>de</strong>ll’utensile e può<br />
provocare scosse elettriche per l’operatore.<br />
• Quando si sega in lungo, utilizzare sempre<br />
una guida parallela, un battente o un banco<br />
per sega. In questo modo si ottiene un taglio<br />
più preciso e si riduce il rischio che la lama<br />
rimanga incastrata.<br />
• Usare sempre lame <strong>de</strong>lle dimensioni e <strong>de</strong>l<br />
formato (diamantate o circolari) corretto<br />
per il foro <strong>de</strong>ll’albero. Le lame che non<br />
corrispondono al dispositivo di fissaggio <strong>de</strong>lla<br />
sega produrranno un movimento eccentrico,<br />
e possono causare la perdita <strong>de</strong>l controllo<br />
<strong>de</strong>ll’elettroutensile.<br />
• Non usare mai flange o bulloni danneggiati<br />
o inadatti per bloccare le lame. Le flange<br />
e i bulloni forniti in dotazione sono stati<br />
appositamente progettati per garantire la<br />
massima sicurezza e le prestazioni ottimali<br />
<strong>de</strong>lla sega circolare.<br />
CAUSA DEI CONTRACCOLPI E ISTRUZIONI PER<br />
L’OPERATORE SU COME EVITARLI<br />
• Un contraccolpo è la reazione improvvisa<br />
che si verifica quando una lama incastrata,<br />
bloccata o disallineata viene spinta
violentemente al di fuori <strong>de</strong>l sito di taglio.<br />
Il movimento prodotto è imprevedibile e<br />
all’indietro e rappresenta un grave rischio<br />
per l’incolumità <strong>de</strong>ll’operatore.<br />
• Quando è incastrata o quando il<br />
solco di taglio si chiu<strong>de</strong> e genera un<br />
attrito eccessivo, la lama si blocca e<br />
la forza generata dal motore spinge<br />
l’elettroutensile violentemente all’indietro<br />
in direzione <strong>de</strong>ll’operatore.<br />
• Se la lama è storta o non è allineata con la<br />
linea di taglio, i <strong>de</strong>nti <strong>de</strong>lla lama possono<br />
entrare in contatto con il legno nella parte<br />
posteriore <strong>de</strong>lla linea di taglio sollevando<br />
violentemente la lama dalla linea di taglio<br />
e facendola rimbalzare all’indietro verso<br />
l’operatore.<br />
I contraccolpi sono il risultato <strong>de</strong>l cattivo uso e/o<br />
<strong>de</strong>lla cattiva applicazione <strong>de</strong>lle procedure o <strong>de</strong>lle<br />
condizioni d’utilizzo, e possono essere evitati<br />
osservando le precauzioni indicate sotto.<br />
1. Afferrare saldamente la sega con<br />
entrambe le mani e posizionare le braccia<br />
in modo da essere pronti ad assorbire<br />
la forza di un eventuale contraccolpo.<br />
Posizionare il corpo lateralmente rispetto<br />
alla linea di taglio e non direttamente dietro<br />
la lama. I contraccolpi possono spingere<br />
violentemente l’elettroutensile all’indietro, ma<br />
se si prendono le dovute precauzioni, la forza<br />
generata può essere controllata dall’operatore.<br />
2. Se si avverte un attrito eccessivo sulla<br />
lama o se si <strong>de</strong>ve interrompere il taglio<br />
per qualsiasi ragione, rilasciare il pulsante<br />
di accensione e tenere ferma la sega<br />
nel materiale fino a quando si arresta<br />
completamente. Per evitare i contraccolpi<br />
evitare di rimuovere la lama dal pezzo o<br />
di tirarla all’indietro quando è ancora in<br />
movimento. Esaminare il problema e adottare<br />
misure a<strong>de</strong>guate per eliminare la causa<br />
<strong>de</strong>ll’attrito o <strong>de</strong>ll’inceppamento.<br />
3. Per ripren<strong>de</strong>re il taglio inserire la lama nel<br />
pezzo e allineare la sega con la linea di<br />
taglio facendo attenzione che i <strong>de</strong>nti <strong>de</strong>lla<br />
sega non siano a contatto con il materiale.<br />
Quando si preme il pulsante di accensione, se<br />
la lama è già a contatto con il legno prima di<br />
aver raggiunto la massima velocità, la sega<br />
potrebbe essere spinta verso l’alto o produrre<br />
un contraccolpo.<br />
4. Supportare i pannelli di grandi dimensioni<br />
per minimizzare il rischio che la lama<br />
rimanga incastrata e i contraccolpi. I<br />
pannelli di grandi dimensioni tendono ad<br />
affossarsi sotto il proprio peso. Pertanto è<br />
necessario supportare a<strong>de</strong>guatamente la<br />
lastra da entrambi i lati, sia in prossimità <strong>de</strong>lla<br />
linea di taglio che ai bordi <strong>de</strong>lla lastra.<br />
5. Non utilizzare lame danneggiate o non<br />
affilate. Le lame non correttamente installate<br />
o affilate producono un solco di taglio più<br />
stretto e quindi un attrito eccessivo che<br />
può causare il bloccaggio <strong>de</strong>lla lama e i<br />
contraccolpi.<br />
6. Le leve di regolazione <strong>de</strong>lla profondità e<br />
<strong>de</strong>ll’inclinazione <strong>de</strong>lla lama <strong>de</strong>vono essere<br />
strette saldamente prima <strong>de</strong>l taglio. Se la<br />
regolazione <strong>de</strong>lla lama non è ben stretta e si<br />
sposta durante il taglio, la lama si potrebbe<br />
inceppare e provocare un contraccolpo.<br />
7. Occorre osservare la massima attenzione<br />
quando si eseguono tagli ad affondamento<br />
su pareti o altre superfici nascoste. Infatti<br />
la lama potrebbe entrare a contatto con<br />
corpi estranei che potrebbero causare un<br />
contraccolpo.<br />
Accertarsi che la protezione retrattile <strong>de</strong>lla lama<br />
funzioni correttamente:<br />
• Prima <strong>de</strong>ll’uso <strong>de</strong>ll’elettroutensile<br />
controllare sempre che la protezione<br />
retrattile si chiuda correttamente. Non<br />
usare la sega se la protezione retrattile<br />
non si sposta liberamente e non si chiu<strong>de</strong><br />
istantaneamente. Non bloccare o legare<br />
la protezione retrattile per tenerla sempre<br />
aperta. Se la sega dovesse ca<strong>de</strong>re, la<br />
protezione retrattile si potrebbe piegare.<br />
Sollevare la levetta <strong>de</strong>lla protezione retrattile<br />
e controllare che si muova liberamente e che<br />
non tocchi la lama o altre parti <strong>de</strong>lla sega, con<br />
qualsiasi angolazione e profondità di taglio.<br />
• Controllare il funzionamento <strong>de</strong>lla molla<br />
di richiamo <strong>de</strong>lla protezione retrattile.<br />
Se la protezione e la molla non funzionano<br />
correttamente, <strong>de</strong>vono essere riparate prima<br />
<strong>de</strong>ll’uso. Il funzionamento <strong>de</strong>lla molla di<br />
Norme generali di sicurezza<br />
65<br />
I
I<br />
richiamo <strong>de</strong>lla protezione retrattile potrebbe<br />
essere rallentato a causa di parti danneggiate<br />
o dall’accumulo di <strong>de</strong>positi gommosi o residui<br />
di lavorazione.<br />
• La protezione retrattile <strong>de</strong>lla lama può<br />
essere tirata all’indietro manualmente<br />
solo in particolari situazioni e applicazioni<br />
di taglio, come ad esempio i tagli ad<br />
affondamento o i tagli composti. In questi<br />
casi, sollevare la leva <strong>de</strong>lla protezione retrattile<br />
e rilasciarla quando la lama è entrata nel<br />
materiale. In qualsiasi altro caso la protezione<br />
retrattile <strong>de</strong>ve funzionare automaticamente.<br />
• Controllare sempre visivamente che la<br />
protezione retrattile copra la lama prima<br />
di posare la sega sul banco da lavoro o sul<br />
pavimento. Quando la lama non è protetta<br />
ed è ancora in funzione, la sega potrebbe<br />
essere spostata all’indietro e potrebbe tagliare<br />
qualsiasi corpo od oggetto che si trova sul suo<br />
percorso. Tenere a mente il tempo necessario<br />
alla lama per fermarsi dopo che l’interruttore è<br />
stato rilasciato.<br />
66<br />
Norme generali di sicurezza
SIMBOLI<br />
PROTEZIONE AMBIENTALE<br />
Il simbolo <strong>de</strong>l cestino barrato indica<br />
che il prodotto, una volta diventato<br />
inservibile, non <strong>de</strong>ve essere gettato tra<br />
i rifiuti domestici ma conferito ad un centro di<br />
raccolta differenziata per apparecchi elettrici<br />
ed elettronici oppure riconsegnato al rivenditore<br />
al momento <strong>de</strong>ll’acquisto di apparecchio<br />
sostitutivo.<br />
Indossare sempre protezioni per gli<br />
occhi e per le vie respiratorie.<br />
Il prodotto è conforme alle vigenti<br />
normative e norme di sicurezza<br />
applicabili<br />
FUNZIONI<br />
REGOLAZIONE DELLA PROFONDITÀ DI TAGLIO<br />
Accertarsi che l’utensile sia scollegato dalla rete<br />
elettrica.<br />
1. Allentare la leva di regolazione <strong>de</strong>lla profondità<br />
(17) e sollevare il corpo <strong>de</strong>lla sega dalla<br />
piastra base.<br />
2. Regolare la sega fino ad ottenere la profondità<br />
<strong>de</strong>si<strong>de</strong>rata, osservando la scala <strong>de</strong>lla<br />
profondità di taglio (18).<br />
La scala <strong>de</strong>lla profondità dovrebbe essere<br />
usata solo come riferimento. Per ottenere<br />
una profondità più accurata eseguire <strong>de</strong>i<br />
tagli di prova fino a quando la profondità non sarà<br />
corretta.<br />
3. Spingere la leva verso il basso per bloccare,<br />
ma non stringere troppo.<br />
LASER LIGHT<br />
LASER RADIATION<br />
Do not stare into beam.<br />
Class 2 laser product.<br />
Wave length: 650nm<br />
Output power: 1mw<br />
AS/NZS 2211.1:2004<br />
Con doppio isolamento<br />
Avvertenza nelle istruzioni.<br />
Nota nelle istruzioni.<br />
Laser<br />
Per un taglio ottimale sotto il pezzo<br />
dovrebbe essere visibile non più di un<br />
<strong>de</strong>nte <strong>de</strong>lla lama.<br />
• La leva <strong>de</strong>ll’altezza può essere riposizionata,<br />
se il meccanismo è troppo duro o troppo<br />
morbido, con la leva sollevata.<br />
Per cambiare la posizione <strong>de</strong>lla levetta, far leva<br />
e sollevare l’anello elastico <strong>de</strong>lla leva con un<br />
cacciavite piatto. Rimuovere la levetta dal dado<br />
esagonale e riposizionarla di una posizione in<br />
senso orario (se troppo dura) o in senso antiorario<br />
(se troppo lenta). Rimontare la levetta.<br />
Rimontare l’anello elastico e controllare se la<br />
posizione di bloccaggio <strong>de</strong>lla leva è soddisfacente.<br />
Simboli Funzion<br />
67<br />
I
I<br />
IMPOSTAZIONE DELL’ANGOLO DI<br />
INCLINAZIONE<br />
La sega circolare è in grado di effettuare tagli<br />
inclinati con un’angolazione da 0° a 45°.<br />
68<br />
Non cercare di inclinare la sega quando è<br />
montata su un banco per sega.<br />
1. Accertarsi che l’utensile sia scollegato dalla<br />
rete elettrica.<br />
2. Allentare la leva di regolazione inclinazione (8)<br />
nella parte anteriore <strong>de</strong>lla sega.<br />
3. Inclinare la sega fino ad ottenere<br />
l’angolazione <strong>de</strong>si<strong>de</strong>rata, osservando la scala<br />
<strong>de</strong>ll’inclinazione di taglio (9).<br />
La scala <strong>de</strong>ll’inclinazione dovrebbe essere<br />
usata solo come riferimento. Per<br />
ottenere un’inclinazione più accurata<br />
eseguire <strong>de</strong>i tagli di prova fino a<br />
quando l’inclinazione non sarà quella corretta.<br />
4. Bloccare la leva di<br />
regolazione inclinazione.<br />
INTERRUTTORE DI<br />
ACCENSIONE<br />
Afferrare saldamente le<br />
impugnature <strong>de</strong>ll’utensile<br />
con entrambe le mani prima di accen<strong>de</strong>re la sega.<br />
• Premere il pulsante di accensione (3) per<br />
accen<strong>de</strong>re il dispositivo (posizione “ON”).<br />
Inizialmente, quando si preme il pulsante di<br />
accensione si avverte una certa resistenza.<br />
Questo è normale ed è dovuto ad un<br />
meccanismo di sicurezza che evita l’avvio<br />
acci<strong>de</strong>ntale <strong>de</strong>lla sega.<br />
• Per spegnere la sega (posizione<br />
“OFF”) basta rilasciare l’interruttore.<br />
Non avvicinare la lama al pezzo da lavorare<br />
fino a quando l’utensile non raggiunge la<br />
massima velocità e, allo stesso modo, non<br />
rilasciare l’interruttore fino a quando il taglio<br />
non sarà completo.<br />
Funzion<br />
GUIDA PARALLELA<br />
• La guida parallela (11) può essere collegata<br />
e usata sia alla sinistra che alla <strong>de</strong>stra <strong>de</strong>lla<br />
lama.<br />
• L’uso <strong>de</strong>lla guida consente di effettuare tagli<br />
precisi senza seguire a occhio e a mano libera<br />
le linee tracciate a matita.<br />
1. Dopo aver allentato la manopola sulla piastra<br />
base infilare la guida (11) nell’alloggiamento<br />
sulla piastra base di <strong>de</strong>stra o di sinistra.<br />
2. Infilare la guida fino a raggiungere la<br />
larghezza di taglio richiesta.<br />
3. Stringere la manopola per fissare la guida in<br />
posizione.<br />
TACCA DI RIFERIMENTO<br />
DELLA LINEA DI TAGLIO<br />
I riferimenti <strong>de</strong>lla linea<br />
di taglio (4) posizionati<br />
davanti alla lama<br />
consentono di posizionare<br />
accuratamente la lama su una linea tracciata a<br />
matita.<br />
La tacca di riferimento a <strong>de</strong>stra (vista dalla<br />
posizione <strong>de</strong>ll’operatore) è utilizzata per i tagli a<br />
90° mentre la tacca a sinistra è usata per i tagli<br />
a 45°.
MARCATORE LASER<br />
Avvertenze:<br />
• Non rivolgere lo sguardo direttamente al<br />
fascio laser.<br />
• Non dirigere mai il fascio laser verso le<br />
persone o su altri oggetti a parte il pezzo da<br />
lavorare.<br />
• Non dirigere il fascio laser <strong>de</strong>liberatamente<br />
verso altre persone facendo attenzione<br />
soprattutto che non sia rivolto verso gli occhi<br />
di una persona per più di 0,25 secondi.<br />
• Accertarsi sempre che il fascio laser sia<br />
diretto su un pezzo da lavorare solido e privo<br />
di superfici riflettenti, come ad esempio<br />
un pezzo di legno o altre superfici con un<br />
rivestimento non liscio. L’uso <strong>de</strong>l laser non è<br />
consigliabile con le lastre di acciaio riflettente,<br />
brillante o a specchio, o con altri materiali<br />
con caratteristiche simili perché le superfici<br />
riflettenti potrebbero ridirigere il fascio laser<br />
sull’operatore.<br />
FUNZIONAMENTO DELLA SEGA<br />
Avvertenze:<br />
• Evitare se possibile i tagli a mano libera. I tagli<br />
con la sega appoggiata su un battente fissato<br />
lateralmente o con la guida parallela sono<br />
molto più precisi. Per tagliare a mano libera<br />
tracciare sempre una linea di taglio dritta e<br />
non lasciare che la sega si allontani da tale<br />
linea.<br />
• Non tagliare mai pezzi tenuti semplicemente<br />
con la mano. Accertarsi che il pezzo da<br />
lavorare non si possa spostare durante il<br />
taglio. Se necessario fissarlo con <strong>de</strong>i morsetti.<br />
• Le lastre di grandi dimensioni e i pezzi<br />
particolarmente lunghi <strong>de</strong>vono essere ben<br />
sostenuti da entrambe le parti <strong>de</strong>lla linea di<br />
taglio per evitare strozzamenti e contraccolpi.<br />
Accertarsi che la sega sia posizionata con la<br />
parte più ampia <strong>de</strong>lla piastra base appoggiata<br />
sul lato più largo <strong>de</strong>l pezzo, o sul lato che<br />
garantisce il supporto migliore.<br />
• Accen<strong>de</strong>re il fascio laser solo quando l’utensile<br />
è sul pezzo da lavorare.<br />
1. Appoggiare il bordo anteriore <strong>de</strong>lla piastra<br />
base <strong>de</strong>lla sega sul pezzo da lavorare.<br />
Accertarsi che la lama non tocchi il pezzo da<br />
lavorare.<br />
2. Accen<strong>de</strong>re il fascio laser premendo l’apposito<br />
interruttore di accensione (1).<br />
Il fascio laser non funziona se l’elettroutensile<br />
non è collegato alla rete elettrica.<br />
3. Allineare il fascio laser con la riga tracciata a<br />
matita.<br />
4. Iniziare a tagliare.<br />
5. Spegnere il laser.<br />
• Per evitare i contraccolpi accertarsi che la<br />
sega si sposti su una linea retta. Accertarsi<br />
che la lama sia in buone condizioni e che<br />
il solco <strong>de</strong>l taglio non si chiuda sulla lama.<br />
Quando si tagliano materiali difficili da gestire<br />
usare un piccolo spessore o un distanziatore<br />
da 3mm per evitare che il solco di taglio si<br />
richiuda. Rilasciare il pulsante di accensione<br />
se la sega da segni di stallo, senza peraltro<br />
rimuovere la sega dal pezzo fino a quando la<br />
lama non avrà smesso di girare.<br />
TAGLIO<br />
1. Appoggiare la parte anteriore <strong>de</strong>lla piastra<br />
base sul pezzo da lavorare con la tracciatura<br />
a matita allineata sulla corretta tacca di<br />
riferimento <strong>de</strong>lla linea di taglio. Accertarsi che<br />
la lama non tocchi il pezzo da lavorare.<br />
2. Tenere la sega saldamente con entrambe le<br />
mani e premere l’interruttore di accensione.<br />
Quando il motore <strong>de</strong>lla sega raggiunge la<br />
massima velocità di rotazione spingere la sega<br />
Funzionamento Della Sega<br />
69<br />
I
I<br />
lungo la linea di taglio.<br />
3. Spingere la sega con un movimento costante.<br />
Un movimento troppo rapido potrebbe<br />
affaticare eccessivamente il motore, mentre<br />
un movimento troppo lento potrebbe brunire il<br />
pezzo da lavorare. Evitare qualsiasi movimento<br />
improvviso <strong>de</strong>lla sega.<br />
4. Quando il taglio sarà stato completato<br />
rilasciare il pulsante di accensione e atten<strong>de</strong>re<br />
fino a quando la lama si sarà fermata<br />
completamente. Non staccare la sega dal<br />
pezzo da lavorare con la lama ancora in<br />
movimento.<br />
Taglio di laminati<br />
Quando si tagliano pannelli impiallacciati o legno<br />
di spessore inferiore a 20mm impostare la lama<br />
in modo che protruda di 5-10mm attraverso<br />
il pezzo e tagliare con la parte “buona” <strong>de</strong>l<br />
pezzo rivolta verso il basso. In questo modo<br />
si ridurranno al minimo le schegge sulla<br />
parte “buona” <strong>de</strong>l pezzo. Per tagliare legno<br />
di spessore maggiore impostare la lama alla<br />
massima profondità per ridurre la possibilità di<br />
contraccolpi.<br />
Tagli “ a tasca” o ad affondamento<br />
1. Regolare la profondità <strong>de</strong>l taglio richiesta.<br />
2. Regolare l’inclinazione su 0°.<br />
MONTAGGIO SU BANCO DA LAVORO<br />
Questa sega potrà essere installata facilmente nella<br />
maggior parte <strong>de</strong>i banchi per sega.<br />
• Controllare che il banco utilizzato sia dotato<br />
di a<strong>de</strong>guate protezioni per la lama e che siano<br />
regolate e che funzionino correttamente prima<br />
di iniziare.<br />
• Accertarsi che la sega sia montata<br />
saldamente nel banco. Fare riferimento al<br />
manuale di istruzioni <strong>de</strong>l relativo banco per le<br />
70<br />
Montaggio Su Banco Da Lavoro<br />
3. Sollevare la leva <strong>de</strong>lla protezione <strong>de</strong>lla<br />
lama (12) per esporre la lama. Appoggiare<br />
saldamente la parte frontale <strong>de</strong>lla piastra<br />
base sul pezzo da lavorare con l’impugnatura<br />
posteriore sollevata in modo che la lama non<br />
tocchi il pezzo da lavorare.<br />
4. Con la lama NON a contatto con il pezzo da<br />
lavorare premere il pulsante di accensione e<br />
atten<strong>de</strong>re fino a quando la sega raggiunge la<br />
massima velocità (circa 2 secondi).<br />
5. Spingere con cautela la lama nel pezzo da<br />
lavorare utilizzando la parte anteriore <strong>de</strong>lla<br />
piastra base come perno d’appoggio.<br />
Rilasciare la protezione retrattile subito dopo che<br />
la lama entra nel materiale.<br />
6. Iniziare il taglio<br />
dirigendo la<br />
lama in avanti senza<br />
oltrepassare la linea di<br />
<strong>de</strong>marcazione <strong>de</strong>l taglio.<br />
7. Quando il taglio sarà<br />
stato completato<br />
rilasciare il pulsante di accensione e atten<strong>de</strong>re<br />
fino a quando la lama si sarà fermata<br />
completamente.<br />
Non staccare la sega dal pezzo da lavorare<br />
con la lama ancora in movimento.<br />
Se gli angoli <strong>de</strong>l taglio a tasca non sono<br />
tagliati completamente usare una sega<br />
manuale o un seghetto alternativo per<br />
completare il taglio.<br />
istruzioni di installazione.<br />
• Verificare il corretto<br />
funzionamento <strong>de</strong>lla<br />
sega prima di iniziare il<br />
taglio.<br />
• Controllare che il banco<br />
per sega sia dotato<br />
di dispositivi anticontraccolpo.
• Accertarsi che il banco per sega sia dotato<br />
di un a<strong>de</strong>guato dispositivo di spegnimento<br />
di sicurezza. L’interruttore <strong>de</strong>lla sega potrà<br />
essere bloccato in posizione “ON” (acceso)<br />
con un morsetto a molla, una fascetta per cavi<br />
o dispositivo simile, prima di inserire la spina<br />
nella presa di sicurezza <strong>de</strong>l banco per sega.<br />
Tale morsetto o dispositivo DOVRÀ essere<br />
rimosso quando si estrae la sega dal banco.<br />
SOSTITUZIONE DELLA LAMA<br />
Usare esclusivamente lame da 185mm con<br />
solco di taglio compreso tra 2,2mm e 3,5mm,<br />
progettate esclusivamente per l’utilizzo nelle<br />
seghe circolari con una velocità nominale a<br />
vuoto di almeno 5000 giri/min. Non installare<br />
lame in acciaio ad alta velocità o dischi abrasivi.<br />
L’installazione di lame o dischi intesi per altri<br />
scopi o di dimensioni o formato diverso ren<strong>de</strong>rà<br />
nulla la garanzia.<br />
• Utilizzare esclusivamente lame di qualità pari<br />
o superiore alla lama in dotazione. Controllare<br />
sempre che la lama sia piatta, affilata e libera<br />
da incrinature e difetti.<br />
1. Accertarsi che la sega sia scollegata dalla rete<br />
elettrica.<br />
2. Porre la chiave a pioli (20) fornita in dotazione<br />
nei due fori posizionati<br />
sulla flangia esterna<br />
<strong>de</strong>lla lama. Inserire<br />
la chiave a testa<br />
esagonale (21) nel foro<br />
nel bullone di fissaggio<br />
<strong>de</strong>lla lama.<br />
Tenendo saldamente<br />
la chiave a pioli<br />
girare la chiave a<br />
testa esagonale nella<br />
direzione di rotazione<br />
<strong>de</strong>lla lama (in senso<br />
antiorario). Dopo<br />
aver estratto il dado<br />
di fissaggio <strong>de</strong>lla lama dal foro <strong>de</strong>ll’alberino<br />
estrarre anche la flangia.<br />
• Con tutti i dispositivi di sicurezza installati, fare<br />
una prova di taglio su un pezzo di materiale di<br />
scarto per accertarsi che tutte le protezioni siano<br />
installate correttamente prima di proce<strong>de</strong>re al<br />
taglio sul banco.<br />
3. Tenendo la protezione retrattile <strong>de</strong>lla lama<br />
(14) completamente all’indietro, inserire con<br />
cautela la lama nel foro nella piastra base e<br />
posizionarla sulla rosetta interna <strong>de</strong>ll’alberino.<br />
I <strong>de</strong>nti <strong>de</strong>lla lama sono estremamente aguzzi<br />
e pertanto si raccomanda l’uso di guanti<br />
protettivi. Le scritte sulla lama dovranno<br />
essere rivolte all’esterno e la direzione <strong>de</strong>lla<br />
freccia sulla lama dovrà corrispon<strong>de</strong>re alla<br />
direzione di quella sulla protezione.<br />
4. Montare la lama avendo cura di posizionarla<br />
correttamente sulla<br />
flangia interna.<br />
Rimontare la flangia<br />
esterna <strong>de</strong>lla lama e<br />
riavvitare leggermente il<br />
dado di fissaggio <strong>de</strong>lla<br />
lama sulla flangia<br />
esterna <strong>de</strong>lla lama.<br />
Controllare che la lama sia alloggiata<br />
correttamente nella sua se<strong>de</strong> tra le ron<strong>de</strong>lle<br />
interna ed esterna e stringere saldamente<br />
il dado con la chiave a testa esagonale e la<br />
chiave a pioli.<br />
Sostituzione Della Lama<br />
71<br />
I
I<br />
ASSISTENZA E MANUTENZIONE<br />
• Se la sega è danneggiata dovrà essere<br />
riparata e ispezionata con cura prima <strong>de</strong>ll’uso<br />
da personale qualificato. Le operazioni di<br />
manutenzione e riparazione eseguite da<br />
personale non qualificato rappresentano un<br />
rischio di inci<strong>de</strong>nti e di lesioni alle persone.<br />
• Le operazioni di manutenzione dovranno<br />
essere portate a termine esclusivamente da<br />
un Centro di assistenza <strong>Triton</strong> autorizzato con<br />
parti di ricambio <strong>Triton</strong> originali. Seguire con<br />
cura le istruzioni e fare riferimento alla sezione<br />
“Risoluzione <strong>de</strong>i problemi” per la diagnostica<br />
e la risoluzione <strong>de</strong>i più comuni problemi.<br />
L’uso di pezzi non autorizzati o difettosi può<br />
rappresentare un rischio di scosse elettriche e<br />
di lesioni alle persone.<br />
• <strong>Triton</strong> Manufacturing & Design Co. <strong>de</strong>clina<br />
ogni responsabilità per danni o lesioni<br />
provocati da una riparazione ina<strong>de</strong>guata <strong>de</strong>lla<br />
sega effettuata da personale non autorizzato o<br />
dall’uso improprio <strong>de</strong>ll’elettroutensile.<br />
• Controllare regolarmente che l’alberino<br />
<strong>de</strong>lla sega e le relative flange, ron<strong>de</strong>lle e<br />
distanziatori siano puliti e privi di <strong>de</strong>positi<br />
di gomma, di trucioli o di polvere di legno<br />
indurita.<br />
Controllare che tutte le superfici <strong>de</strong>lle flange e<br />
<strong>de</strong>lle ron<strong>de</strong>lle <strong>de</strong>ll’alberino siano lisce e prive di<br />
sbavature. Controllare che il bullone di fissaggio<br />
<strong>de</strong>lla lama sia a<strong>de</strong>guatamente stretto.<br />
72<br />
Assistenza e manutenzione<br />
• Controllare il funzionamento <strong>de</strong>lla protezione<br />
retrattile. La protezione <strong>de</strong>ve richiu<strong>de</strong>rsi<br />
rapidamente e senza alcun contatto con altre<br />
superfici. Rimuovere la lama e pulire la polvere<br />
e i trucioli di legno accumulati nell’area <strong>de</strong>lla<br />
protezione.<br />
• Accertarsi che i fori di ventilazione <strong>de</strong>lla sega<br />
siano puliti e liberi da ostruzioni. Usare un<br />
panno leggermente inumidito per pulire la<br />
sega. Non usare sostanze che contengono<br />
solventi.<br />
MANUTENZIONE DELLA LAMA<br />
• Controllare regolarmente che la lama sia libera<br />
da <strong>de</strong>positi di resine gommose o trucioli e<br />
polveri di legno. Se necessario pulire con un<br />
solvente come WD40, CRC, RP7 o acqua ragia<br />
minerale.<br />
• Controllare regolarmente la planarità <strong>de</strong>lla<br />
lama <strong>de</strong>lla sega. L’uso <strong>de</strong>lla sega con una lama<br />
<strong>de</strong>centrata aumenta eccessivamente il carico<br />
sul motore e la frizione <strong>de</strong>ll’elettroutensile e<br />
potrebbe invalidare la garanzia.<br />
• I <strong>de</strong>nti in carburo di tungsteno <strong>de</strong>vono essere<br />
controllati regolarmente e <strong>de</strong>vono essere<br />
mantenuti affilati e privi di usura o difetti. Se<br />
necessario riparare o riaffilare.<br />
MANUTENZIONE DEL CAVO DI<br />
ALIMENTAZIONE<br />
Se fosse necessario sostituire il cavo di<br />
alimentazione, per evitare un rischio per<br />
la sicurezza <strong>de</strong>lle persone si raccomanda<br />
di rivolgersi al costruttore o a un centro di<br />
assistenza autorizzato.
RISOLUZIONE DEI PROBLEMI<br />
La tabella qui sotto contiene informazioni che possono facilitare la diagnosi e la risoluzione <strong>de</strong>i<br />
problemi.saw problems.<br />
SINTOMO CAUSA POSSIBILE RIMEDIO<br />
La sega non funziona Non arriva corrente Controllare la fonte di alimentazione<br />
Spazzole usurate Scollegare la corrente elettrica, aprire i cappucci<br />
<strong>de</strong>i portaspazzola e accertarsi che le<br />
spazzole si muovano liberamente. Controllare<br />
se le spazzole richiedono la sostituzione<br />
come indicato in prece<strong>de</strong>nza..<br />
L’interruttore di accensione è<br />
difettoso<br />
Centro di Servizio <strong>de</strong>l Contatto**<br />
Componenti <strong>de</strong>l motore in cortocircuito<br />
o il circuito resta aperto<br />
Centro di Servizio <strong>de</strong>l Contatto**<br />
La sega è troppo lenta Lama smussata o danneggiata Affilare o sostituire la lama<br />
Il motore è sovraccarico Ridurre la spinta esercitata sulla sega. Accertarsi<br />
che il solco <strong>de</strong>l taglio non si chiuda<br />
quando si esercita un’eccessiva pressione<br />
sulla lama.<br />
La sega emette rumori anomali Ostruzione meccanica Centro di Servizio <strong>de</strong>l Contatto**<br />
Il motore entra in funzione ma<br />
la lama non gira<br />
Formazione eccessiva di<br />
scintille nel vano motore<br />
La protezione retrattile non si<br />
chiu<strong>de</strong> per niente o si chiu<strong>de</strong><br />
lentamente<br />
La sega non mantiene la<br />
regolazione <strong>de</strong>lla profondità<br />
di taglio<br />
Parti <strong>de</strong>ll’armatura in cortocircuito Centro di Servizio <strong>de</strong>l Contatto**<br />
Il dado di fissaggio <strong>de</strong>lla lama è<br />
lento, o la flangia o il distanziatore<br />
sono stati montati in modo errato.<br />
Alberino o <strong>de</strong>nti <strong>de</strong>gli ingranaggi<br />
difettosi<br />
Le spazzole non si muovono<br />
liberamente<br />
Armatura in cortocircuito o il circuito<br />
resta aperto<br />
La superficie <strong>de</strong>l commutatore non<br />
è pulita<br />
Molla di richiamo staccata o<br />
difettosa<br />
Stringere il dado di fissaggio <strong>de</strong>lla lama.<br />
Accertarsi che il distanziatore e le ron<strong>de</strong>lle<br />
<strong>de</strong>lla flangia <strong>de</strong>ll’alberino siano montati correttamente<br />
Centro di Servizio <strong>de</strong>l Contatto**<br />
Scollegare la corrente di rete, rimuovere le<br />
spazzole, pulire o sostituire<br />
Centro di Servizio <strong>de</strong>l Contatto**<br />
Centro di Servizio <strong>de</strong>l Contatto**<br />
Ricollegare o sostituire la molla (usare solo<br />
pezzi di ricambio originali <strong>Triton</strong>)<br />
La protezione è piegata Raddrizzilo o Metta in Contatto con il Centro<br />
di Servizio**<br />
Meccanismo bloccato dalla polvere<br />
e dai trucioli di legno.<br />
La leva di blocco <strong>de</strong>lla profondità di<br />
taglio <strong>de</strong>ve essere riposizionata.<br />
Pulire e lubrificare leggermente il meccanismo<br />
inceppato<br />
Riposizionare la leva di regolazione <strong>de</strong>lla<br />
profondità come <strong>de</strong>scritto a pagina 67<br />
Risoluzione <strong>de</strong>i problemi<br />
73<br />
I
I<br />
Se i suggerimenti di cui sopra non risolvono il problema non manomettere la sega, - Per<br />
l’indirizzo e altre informazioni sul più vicino Centro di assistenza Autorizzato visitare il sito web<br />
www.tritontools.com.<br />
** Visiti www.tritontools.com per trovare il vostro centro di servizio autorizzato più vicino.<br />
Per la registrazione <strong>de</strong>lla garanzia visitare il sito<br />
web www.tritontools.com* e inserire i propri<br />
<strong>de</strong>ttagli.<br />
A meno che il proprietario non abbia specificato<br />
diversamente, i suoi <strong>de</strong>ttagli saranno inclusi nella<br />
lista di distribuzione che sarà utilizzata per inviare<br />
regolarmente informazioni sulle novità <strong>Triton</strong>. I dati<br />
personali raccolti saranno trattati con la massima<br />
riservatezza e non saranno rilasciati a<br />
terze parti.<br />
INFORMAZIONI SULL’ACQUISTO<br />
Data di acquisto: ___ / ___ / ____<br />
Mo<strong>de</strong>llo N.: TA184CSL<br />
Numero di serie: __________________<br />
74<br />
GARANZIA<br />
(dati sull’etichetta <strong>de</strong>l motore)<br />
Conservare lo scontrino come prova<br />
<strong>de</strong>ll’acquisto<br />
Garanzia<br />
<strong>Triton</strong> Manufacturing & Design<br />
Co. garantisce al proprietario di<br />
questo prodotto che se dovessero<br />
essere riscontrati difetti di materiali<br />
o lavorazione entro 12 MESI dalla<br />
data <strong>de</strong>ll’acquisto originale, effettuerà<br />
gratuitamente la riparazione o, a<br />
propria discrezione, la sostituzione <strong>de</strong>i<br />
componenti difettosi.<br />
Questa garanzia non è applicabile per<br />
l’uso commerciale <strong>de</strong>ll’utensile ed esclu<strong>de</strong><br />
la normale usura o i danni causati<br />
all’utensile da inci<strong>de</strong>nti, uso improprio,<br />
abusi o alterazioni.<br />
*Registrati on-line entro 30 giorni.<br />
Condizioni di applicazione.<br />
Questa garanzia non pregiudica in alcun<br />
modo i diritti <strong>de</strong>l consumatore stabiliti<br />
dalla legge.
Gracias por comprar esta herramienta eléctrica <strong>Triton</strong>. Estas <strong>instrucciones</strong> contienen la información<br />
necesaria para un funcionamiento seguro y eficaz <strong>de</strong> este producto. Esta sierra incluye varias características<br />
únicas. Incluso si está familiarizado con las sierras circulares, lea este manual para asegurarse <strong>de</strong> obtener<br />
todas las ventajas <strong>de</strong> su diseño exclusivo.<br />
Conserve este manual a mano y asegúrese <strong>de</strong> que todos los usuarios <strong>de</strong> esta herramienta lo han leído y<br />
entendido totalmente.<br />
ÍNDICE<br />
Especificaciones 75<br />
Características 76<br />
Normas generales <strong>de</strong> seguridad 77<br />
Símbolos 81<br />
Funciones 82<br />
Funcionamiento <strong>de</strong> la sierra 84<br />
Montaje <strong>de</strong>l banco <strong>de</strong> aserrado 85<br />
Sustitución <strong>de</strong> la hoja <strong>de</strong> la sierra 86<br />
Servicio y Mantenimiento 87<br />
Localización y solución <strong>de</strong> problemas 88<br />
Garantía 89<br />
ESPECIFICACIONES<br />
No <strong>de</strong> pieza: TA184CSL<br />
Voltaje: 230 - 240V ~ 50Hz<br />
Potencia <strong>de</strong> entrada: 1.800 W<br />
Velocidad sin carga: 5.000 min -1<br />
Tamaño <strong>de</strong> la hoja: 185 mm (7 1 /4”)<br />
Eje <strong>de</strong> la hoja: 20 mm<br />
Ajuste <strong>de</strong>l bisel: 0° – 45°<br />
Profundidad <strong>de</strong> corte: 90° – 60 mm 45° – 40 mm<br />
Clase <strong>de</strong> aislamiento: Doble aislamiento<br />
Peso neto: 5,1 kg<br />
Láser: Clase 2 Longitud <strong>de</strong> onda: 650 mm<br />
Potencia <strong>de</strong> salida: ≤1mw<br />
Vibración pon<strong>de</strong>rada: 98.8dB(A)<br />
Presión acústica: 109.8 dB(A)<br />
Potencia acústica: 1.693m/s2 Protéjase los oídos<br />
Utilice siempre protección auditiva a<strong>de</strong>cuada cuando el ruido <strong>de</strong> la herramienta exceda los 80dB.<br />
Índice<br />
75<br />
E
E<br />
CARACTERÍSTICAS<br />
6<br />
15<br />
16<br />
12<br />
19<br />
14<br />
13<br />
20<br />
21<br />
1. Botón <strong>de</strong> encendido/apagado <strong>de</strong>l<br />
visor <strong>de</strong>l láser<br />
2. Apertura <strong>de</strong>l visor <strong>de</strong>l láser<br />
3. Interruptor <strong>de</strong> gatillo<br />
4. Muesca <strong>de</strong> visión <strong>de</strong> la hoja<br />
5. Alojamiento <strong>de</strong>l motor<br />
6. Asa principal<br />
7. Asa <strong>de</strong>lantera<br />
8. Palanca <strong>de</strong> ajuste <strong>de</strong>l bisel<br />
9. Escala <strong>de</strong>l bisel<br />
10. Mando <strong>de</strong> bloqueo <strong>de</strong> la guía paralela<br />
76<br />
Características<br />
2<br />
5<br />
9<br />
10<br />
8<br />
11<br />
11. Guía <strong>de</strong> corte paralelo<br />
12. Palanca <strong>de</strong> la protección <strong>de</strong> la hoja<br />
13. Retracción <strong>de</strong> la protección <strong>de</strong> la hoja<br />
14. Placa <strong>de</strong> base<br />
15. Protección superior <strong>de</strong> la hoja<br />
16. Rampa <strong>de</strong> extracción <strong>de</strong>l polvo<br />
17. Palanca <strong>de</strong> bloqueo <strong>de</strong> la profundidad<br />
18. Escala <strong>de</strong> profundidad <strong>de</strong>l corte<br />
19. Hoja<br />
20. Llave <strong>de</strong> dientes<br />
21. Llave hexagonal<br />
1<br />
7<br />
4<br />
3<br />
18<br />
17
INSTRUCCIONES DE SEGURIDAD<br />
NORMAS GENERALES DE SEGURIDAD<br />
Lea y entienda todas las <strong>instrucciones</strong>. La falta<br />
<strong>de</strong> seguimiento <strong>de</strong> todas las <strong>instrucciones</strong><br />
listadas a continuación pue<strong>de</strong> provocar<br />
<strong>de</strong>scargas eléctricas, incendios y/o lesiones<br />
personales graves.<br />
El término “herramienta eléctrica” en todas<br />
las advertencias listadas a continuación se<br />
refiere a su herramienta accionada por la red<br />
eléctrica (con cable <strong>de</strong> alimentación) o a su<br />
herramienta accionada por batería (sin cable <strong>de</strong><br />
alimentación).<br />
ZONA DE TRABAJO<br />
• Mantenga la zona <strong>de</strong> trabajo limpia y bien<br />
iluminada. Los bancos atestados y las zonas<br />
oscuras son una posible fuente <strong>de</strong> acci<strong>de</strong>ntes.<br />
• No haga funcionar herramientas eléctricas<br />
en un ambiente en el cual pueda<br />
haber presencia <strong>de</strong> gases explosivos o<br />
corrosivos. Las herramientas eléctricas<br />
provocan chispas que pue<strong>de</strong>n incendiar<br />
los humos. Evite zonas en las cuales haya<br />
excesivos vapores o humedad.<br />
• Mantenga a los niños, personas <strong>de</strong>l entorno<br />
y visitantes alejados mientras esté en<br />
funcionamiento una herramienta eléctrica. Las<br />
distracciones pue<strong>de</strong>n provocar que pierda el<br />
control.<br />
• Instale o fije siempre la herramienta en<br />
posición estable.<br />
SEGURIDAD ELÉCTRICA<br />
• Los enchufes <strong>de</strong> la herramienta eléctrica<br />
<strong>de</strong>ben coincidir con la toma eléctrica. No <strong>de</strong>be<br />
modificarse nunca el enchufe <strong>de</strong> ninguna<br />
manera. No utilice ningún enchufe adaptador<br />
con herramientas eléctricas puestas a<br />
tierra (con toma <strong>de</strong> tierra). Los enchufes<br />
no modificados y las tomas coinci<strong>de</strong>ntes<br />
reducirán el riesgo <strong>de</strong> <strong>de</strong>scarga eléctrica.<br />
• Evite el contacto corporal con superficies<br />
puestas tierra tales como tuberías, radiadores,<br />
estufas y refrigeradores. El riesgo <strong>de</strong> <strong>de</strong>scarga<br />
eléctrica se incrementa si su cuerpo está<br />
puesto a tierra.<br />
• No exponga las herramientas eléctricas a<br />
condiciones <strong>de</strong> lluvia o humedad. El agua<br />
que se haya introducido en una herramienta<br />
eléctrica aumentará el riesgo <strong>de</strong> <strong>de</strong>scarga<br />
eléctrica.<br />
• No maltrate el cable <strong>de</strong> alimentación. No<br />
utilice nunca el cable <strong>de</strong> alimentación<br />
para transportar, estirar o <strong>de</strong>senchufar la<br />
herramienta eléctrica. Mantenga el cable <strong>de</strong><br />
alimentación alejado <strong>de</strong> calor, aceite, bor<strong>de</strong>s<br />
afilados o piezas móviles. Los cables <strong>de</strong><br />
alimentación dañados o enredados aumentan<br />
el riesgo <strong>de</strong> <strong>de</strong>scarga eléctrica.<br />
• Cuando utilice una herramienta eléctrica<br />
en el exterior, utilice un alargador <strong>de</strong> cable<br />
<strong>de</strong> alimentación para uso en exteriores. La<br />
utilización un cable <strong>de</strong> alimentación a<strong>de</strong>cuado<br />
para exteriores reduce el riesgo <strong>de</strong> <strong>de</strong>scarga<br />
eléctrica.<br />
• No dé nunca un tirón al cable para<br />
<strong>de</strong>sconectarlo <strong>de</strong> la toma. Mantenga el<br />
cable <strong>de</strong> alimentación alejado <strong>de</strong>l calor y <strong>de</strong><br />
bor<strong>de</strong>s afilados.<br />
SEGURIDAD DEL PERSONAL<br />
• Manténgase alerta, vigile lo que está<br />
haciendo y utilice el sentido común al utilizar<br />
una herramienta eléctrica. No utilice una<br />
herramienta cuando esté cansado o bajo la<br />
influencia <strong>de</strong> drogas, alcohol o medicación.<br />
Un momento <strong>de</strong> distracción al utilizar<br />
herramientas eléctricas pue<strong>de</strong> provocar<br />
graves lesiones personales.<br />
• Utilice equipo <strong>de</strong> seguridad. Lleve siempre<br />
protección ocular. Los equipos <strong>de</strong> seguridad<br />
tales como máscara anti-polvo, zapatos<br />
anti<strong>de</strong>slizantes <strong>de</strong> seguridad, casco o<br />
protección auditiva utilizados para las<br />
condiciones a<strong>de</strong>cuadas reducirán las lesiones<br />
personales.<br />
• Vista a<strong>de</strong>cuadamente. No vista con ropas<br />
sueltas o joyas. Ate el cabello largo.<br />
Instrucciones <strong>de</strong> seguridad<br />
77<br />
E
E<br />
Mantenga el pelo, la ropa y los guantes<br />
alejados <strong>de</strong> las piezas móviles. Las ropas<br />
sueltas, las joyas o el cabello largo pue<strong>de</strong>n<br />
quedar atrapados en las piezas móviles.<br />
• Evite el arranque acci<strong>de</strong>ntal. Asegúrese<br />
<strong>de</strong> que el interruptor está en la posición<br />
‘off’ antes <strong>de</strong> enchufarla. Transportar las<br />
herramientas con el <strong>de</strong>do en el interruptor o<br />
enchufarlas con el interruptor activado pue<strong>de</strong><br />
provocar un acci<strong>de</strong>nte.<br />
• Retire las llaves <strong>de</strong> ajuste o las llaves<br />
inglesas antes <strong>de</strong> conectar la herramienta<br />
eléctrica. Una llave inglesa o <strong>de</strong> tuercas<br />
que se <strong>de</strong>je sujeta a una pieza giratoria <strong>de</strong> la<br />
herramienta pue<strong>de</strong> provocar lesiones.<br />
• Los accesorios y las piezas metálicas<br />
pue<strong>de</strong>n calentarse mucho.<br />
UTILIZACIÓN Y CUIDADO DE LA<br />
HERRAMIENTA ELÉCTRICA<br />
• Utilice bridas u otra forma práctica <strong>de</strong><br />
asegurar y apoyar la pieza <strong>de</strong> trabajo en<br />
una plataforma estable. Sujetar la pieza<br />
<strong>de</strong> trabajo con la mano o contra el cuerpo<br />
es inestable y pue<strong>de</strong> provocar la pérdida <strong>de</strong><br />
control.<br />
• No fuerce la herramienta. Utilice la<br />
herramienta a<strong>de</strong>cuada para su aplicación. La<br />
herramienta correcta realizará el trabajo <strong>de</strong><br />
forma más rápida y segura a la velocidad para<br />
la cual se ha diseñado.<br />
• No utilice la herramienta si el interruptor<br />
no la encien<strong>de</strong> o no la apaga. Cualquier<br />
herramienta que no pueda ser controlada con<br />
el interruptor es peligrosa y <strong>de</strong>be repararse.<br />
Si parece haber un problema remítase a<br />
“Localización y solución <strong>de</strong> problemas” y si es<br />
necesario, póngase en contacto con un centro<br />
<strong>de</strong> reparación.<br />
• Desconecte el enchufe <strong>de</strong> la alimentación<br />
antes <strong>de</strong> realizar cualquier ajuste, <strong>de</strong><br />
cambiar accesorios o <strong>de</strong> almacenar la<br />
herramienta. Estas medidas preventivas<br />
reducen el riesgo <strong>de</strong> arranque acci<strong>de</strong>ntal.<br />
• Almacene la herramienta en un lugar<br />
seco, fuera <strong>de</strong>l alcance <strong>de</strong> los niños y <strong>de</strong><br />
personas no formadas. Esta herramienta es<br />
peligrosa en manos <strong>de</strong> usuarios no formados.<br />
78<br />
Instrucciones <strong>de</strong> seguridad<br />
• Mantenga las herramientas con cuidado.<br />
Mantenga las herramientas <strong>de</strong> corte<br />
afiladas y limpias. Si están a<strong>de</strong>cuadamente<br />
mantenidas, es menos probable que las<br />
herramientas <strong>de</strong> corte con bor<strong>de</strong>s <strong>de</strong> corte<br />
afilados se doblen y serán más fáciles <strong>de</strong><br />
controlar.<br />
• Compruebe la mala alineación (es <strong>de</strong>cir,<br />
exceso <strong>de</strong> vibración), el combado <strong>de</strong><br />
piezas móviles o cualquier daño que<br />
pueda afectar al funcionamiento <strong>de</strong> las<br />
herramientas. Si hay algún daño, haga<br />
reparar la herramienta antes <strong>de</strong> utilizarla.<br />
Muchos acci<strong>de</strong>ntes son causados por<br />
herramientas mal mantenidas.<br />
• No ponga nunca en marcha la herramienta<br />
mientras la hoja esté tocando la pieza <strong>de</strong><br />
trabajo.<br />
• Evite el arranque acci<strong>de</strong>ntal. Asegúrese<br />
<strong>de</strong> que el interruptor está en la posición<br />
‘off’ antes <strong>de</strong> enchufarla. Transportar las<br />
herramientas con el <strong>de</strong>do en el interruptor o<br />
enchufarlas con el interruptor activado pue<strong>de</strong><br />
provocar un acci<strong>de</strong>nte.<br />
• Retire las llaves <strong>de</strong> ajuste o las llaves<br />
inglesas antes <strong>de</strong> conectar la herramienta<br />
eléctrica. Una llave inglesa o <strong>de</strong> tuercas<br />
que se <strong>de</strong>je sujeta a una pieza giratoria <strong>de</strong> la<br />
herramienta pue<strong>de</strong> provocar lesiones.<br />
• Los accesorios y las piezas metálicas<br />
pue<strong>de</strong> calentarse mucho.
ADVERTENCIAS DE SEGURIDAD ADICIONALES<br />
PARA LUCES LÁSER<br />
La luz/radiación láser utilizada en este producto<br />
es <strong>de</strong> Clase 2 con longitu<strong>de</strong>s <strong>de</strong> onda máximas<br />
<strong>de</strong> 1 mW y 650 nm. Normalmente, estos láseres<br />
no representan un peligro óptico, aunque fijar la<br />
vista en el haz pue<strong>de</strong> causar <strong>de</strong>slumbramiento.<br />
No fije la vista directamente en el haz <strong>de</strong>l láser.<br />
Pue<strong>de</strong> existir peligro si fija la vista<br />
directamente en el haz. Observe todas<br />
las normas <strong>de</strong> seguridad siguientes:<br />
• El láser <strong>de</strong>be utilizarse y mantenerse<br />
<strong>de</strong> acuerdo con las <strong>instrucciones</strong> <strong>de</strong>l<br />
fabricante.<br />
• No dirija nunca el haz hacia una persona u<br />
objeto distintos <strong>de</strong> la pieza <strong>de</strong> trabajo.<br />
• El haz <strong>de</strong>l láser no <strong>de</strong>be dirigirse<br />
<strong>de</strong>liberadamente hacia las personas y <strong>de</strong>be<br />
evitarse dirigirlo hacia los ojos <strong>de</strong> una persona<br />
durante más <strong>de</strong> 0,25 seg.<br />
• Asegúrese siempre que el haz <strong>de</strong>l láser<br />
sea dirigido hacia una pieza <strong>de</strong> trabajo<br />
sólida sin superficies reflectantes, es<br />
<strong>de</strong>cir, son aceptables ma<strong>de</strong>ra y superficies<br />
<strong>de</strong> revestimiento rugoso. Las láminas <strong>de</strong><br />
acero <strong>de</strong> reflexión luminosa o los materiales<br />
similares no son a<strong>de</strong>cuados para su utilización<br />
con láser ya que la superficie reflectante<br />
pue<strong>de</strong> redirigir el haz hacia el operador.<br />
• No cambie el conjunto <strong>de</strong> la luz láser por un<br />
tipo diferente. Las reparaciones sólo <strong>de</strong>ben<br />
ser realizadas por el fabricante <strong>de</strong>l láser o un<br />
agente autorizado.<br />
La utilización <strong>de</strong> controles o ajustes o la<br />
realización <strong>de</strong> procedimientos diferentes <strong>de</strong><br />
los aquí especificados pue<strong>de</strong>n provocar una<br />
exposición peligrosa a la radiación.<br />
Remítase a la norma europea correspondiente<br />
EN60825-1: 1994 + A2: 2001 + A1: 2002 para<br />
más información sobre láseres.<br />
ADVERTENCIAS DE SEGURIDAD ADICIONALES<br />
PARA SIERRAS CIRCULARES<br />
• Mantenga las manos alejadas <strong>de</strong> la zona <strong>de</strong><br />
corte y <strong>de</strong> la hoja. Mantenga su otra mano<br />
sobre el asa auxiliar, o sobre la cubierta <strong>de</strong>l<br />
motor. Si ambas manos están sujetando la<br />
sierra, no pue<strong>de</strong>n ser cortadas por la hoja.<br />
• No se ponga nunca <strong>de</strong>bajo <strong>de</strong> la pieza <strong>de</strong><br />
trabajo. La protección no pue<strong>de</strong> protegerle <strong>de</strong><br />
la hoja por <strong>de</strong>bajo <strong>de</strong> la pieza <strong>de</strong> trabajo.<br />
• Ajuste la profundidad <strong>de</strong> corte al espesor <strong>de</strong><br />
la pieza <strong>de</strong> trabajo. Debe ser visible menos <strong>de</strong><br />
un diente entero <strong>de</strong> los dientes <strong>de</strong> la hoja por<br />
<strong>de</strong>bajo <strong>de</strong> la pieza <strong>de</strong> trabajo.<br />
• No sujete nunca la pieza a cortar con las<br />
manos o entre las piernas. Asegure la<br />
pieza <strong>de</strong> trabajo en una plataforma estable.<br />
Es importante apoyar el trabajo <strong>de</strong> forma<br />
a<strong>de</strong>cuada para minimizar la exposición <strong>de</strong>l<br />
cuerpo, el curvado <strong>de</strong> la hoja o la pérdida <strong>de</strong><br />
control.<br />
• Sujete la herramienta eléctrica por las<br />
superficies <strong>de</strong> agarre aisladas al realizar una<br />
operación en la cual la herramienta <strong>de</strong> corte<br />
pueda contactar con cableado oculto o con su<br />
propio cable <strong>de</strong> alimentación. El contacto con<br />
un cable “activo” hará que las piezas <strong>de</strong> metal<br />
expuestas <strong>de</strong> la herramienta eléctrica también<br />
se “activen” y provocarán una <strong>de</strong>scarga al<br />
operador.<br />
• Cuando corte al hilo utilice siempre una guía<br />
<strong>de</strong> corte, una guía <strong>de</strong> bor<strong>de</strong>s o un banco <strong>de</strong><br />
aserrado. Esto mejora la precisión <strong>de</strong>l corte y<br />
reduce la posibilidad <strong>de</strong> que la hoja se curve.<br />
• Utilice siempre hojas con el tamaño y la forma<br />
correctas (en rombo frente a redonda) <strong>de</strong> los<br />
agujeros <strong>de</strong>l eje. Las hojas que no coincidan<br />
con el hardware <strong>de</strong> montaje <strong>de</strong> la sierra<br />
funcionarán <strong>de</strong> forma excéntrica, provocando<br />
una pérdida <strong>de</strong> control.<br />
Instrucciones <strong>de</strong> seguridad<br />
79<br />
E
E<br />
• No utilice nunca aran<strong>de</strong>las o pernos <strong>de</strong><br />
hoja dañados o incorrectos. Las aran<strong>de</strong>las<br />
y los pernos <strong>de</strong> la hoja se han diseñado<br />
específicamente para su sierra, para obtener<br />
el máximo rendimiento y la máxima seguridad<br />
<strong>de</strong> funcionamiento.<br />
CAUSAS DEL RETROCESO Y SU PREVENCIÓN<br />
POR PARTE DEL OPERADOR<br />
• El retroceso es una reacción brusca <strong>de</strong>bida<br />
a una hoja <strong>de</strong> sierra pellizcada, trabada o<br />
mal alineada, provocando que la sierra se<br />
levante y salte <strong>de</strong> la pieza <strong>de</strong> trabajo hacia el<br />
operador.<br />
• Cuando la hoja está pellizcada o fuertemente<br />
trabada por el cierre <strong>de</strong> la entalladura, la<br />
hoja se atasca y la reacción <strong>de</strong>l motor lleva la<br />
unidad rápidamente hacia atrás en dirección<br />
al operador.<br />
• Si la hoja queda retorcida o mal alineada en el<br />
corte, los dientes <strong>de</strong>l bor<strong>de</strong> trasero <strong>de</strong> la hoja<br />
pue<strong>de</strong>n clavarse en la superficie superior <strong>de</strong><br />
la ma<strong>de</strong>ra provocando que la hoja salga <strong>de</strong> la<br />
entalladura y salte hacia atrás en dirección al<br />
operador.<br />
El retroceso es el resultado <strong>de</strong> una mala<br />
utilización <strong>de</strong> la sierra y/o procedimientos o<br />
condiciones <strong>de</strong> funcionamiento incorrectas<br />
y pue<strong>de</strong> evitarse tomando las precauciones<br />
a<strong>de</strong>cuadas que se proporcionan a continuación.<br />
1. Mantenga un agarre firme con ambas<br />
manos sobre la sierra y coloque los brazos<br />
para resistir la fuerza <strong>de</strong>l retroceso.<br />
Coloque el cuerpo a uno u otro lado <strong>de</strong> la<br />
hoja, pero no en línea con la hoja. El retroceso<br />
pue<strong>de</strong> provocar que la sierra salte hacia<br />
atrás, pero la fuerza <strong>de</strong>l retroceso pue<strong>de</strong> ser<br />
controlada por el operador si se toman las<br />
precauciones a<strong>de</strong>cuadas.<br />
2. Cuando la hoja se curve, o al interrumpir<br />
un corte por algún motivo, suelte el<br />
gatillo y mantenga la sierra inmóvil en<br />
el material hasta que la hoja llegue a la<br />
parada completa. No intente nunca retirar<br />
la sierra <strong>de</strong>l trabajo ni tire <strong>de</strong> la sierra hacia<br />
atrás mientras la hoja está en movimiento ya<br />
que podría producirse un retroceso. Investigue<br />
y tome acciones correctivas para eliminar la<br />
causa <strong>de</strong> la curvatura <strong>de</strong> la hoja.<br />
80<br />
Instrucciones <strong>de</strong> seguridad<br />
3. Cuando vuelva a poner en marcha una<br />
sierra en la pieza <strong>de</strong> trabajo, centre la hoja<br />
<strong>de</strong> la sierra en la entalladura y compruebe<br />
que los dientes no estén clavados en el<br />
material. Si la hoja <strong>de</strong> la sierra está curvada,<br />
pue<strong>de</strong> levantarse o retroce<strong>de</strong>r <strong>de</strong>s<strong>de</strong> la pieza<br />
<strong>de</strong> trabajo al volver a poner en marcha la<br />
sierra.<br />
4. Apoye los paneles gran<strong>de</strong>s para minimizar<br />
el riesgo <strong>de</strong> pellizco <strong>de</strong> la hoja y <strong>de</strong><br />
retroceso. Los paneles gran<strong>de</strong>s tien<strong>de</strong>n<br />
a combarse bajo su propio peso. Deben<br />
colocarse apoyos bajo el panel a ambos lados,<br />
cerca <strong>de</strong> la línea <strong>de</strong> corte y cerca <strong>de</strong>l bor<strong>de</strong><br />
<strong>de</strong>l panel.<br />
5. No utilice hojas romas o dañadas. Las<br />
hojas sin filo o ina<strong>de</strong>cuadamente ajustadas<br />
producen una entalladura estrecha que causa<br />
una fricción excesiva, la curvatura <strong>de</strong> la hoja y<br />
su retroceso.<br />
6. Las palancas <strong>de</strong> ajuste <strong>de</strong> la profundidad<br />
<strong>de</strong> corte y <strong>de</strong>l bisel <strong>de</strong>ben estar apretadas<br />
y aseguradas antes <strong>de</strong> realizar el corte.<br />
Si los ajustes <strong>de</strong> la hoja cambian durante el<br />
corte, pue<strong>de</strong> producirse curvatura y retroceso.<br />
7. Tenga un cuidado extra al realizar un<br />
“corte por penetración” en pare<strong>de</strong>s<br />
existentes u otras áreas ciegas. La hija<br />
sobresaliente podría cortar objetos que<br />
pue<strong>de</strong>n provocar retroceso.<br />
Asegúrese <strong>de</strong> que la protección retráctil <strong>de</strong> la<br />
hoja funciona a<strong>de</strong>cuadamente.<br />
• Compruebe que la protección retráctil<br />
está correctamente cerrada antes <strong>de</strong><br />
cada utilización. No accione la sierra si la<br />
protección retráctil no se mueve libremente y<br />
no se cierra instantáneamente. No sujete ni<br />
ate la protección retráctil en posición abierta.<br />
Si la sierra cae acci<strong>de</strong>ntalmente, la protección<br />
retráctil pue<strong>de</strong> estar curvada. Levante la<br />
protección retráctil con el asa retráctil y<br />
asegúrese <strong>de</strong> que se mueve libremente y no<br />
toca la hoja o cualquier otra pieza, en todos<br />
los ángulos y profundida<strong>de</strong>s <strong>de</strong> corte.<br />
• Compruebe el funcionamiento <strong>de</strong>l muelle<br />
<strong>de</strong> la protección retráctil. Si la protección y<br />
el muelle no funcionan a<strong>de</strong>cuadamente, <strong>de</strong>ben<br />
repararse antes <strong>de</strong> la utilización. La protección
etráctil pue<strong>de</strong> funcionar lentamente <strong>de</strong>bido<br />
a piezas dañadas, <strong>de</strong>pósitos resinosos o<br />
acumulación <strong>de</strong> restos.<br />
• La protección sólo <strong>de</strong>be retraerse<br />
manualmente en caso <strong>de</strong> cortes especiales<br />
tales como “cortes por penetración” y<br />
“cortes compuestos”. Levante la protección<br />
retráctil retrayendo el asa y en cuanto la<br />
hoja penetre en el material, <strong>de</strong>be soltar la<br />
protección retráctil. Para todos los otros<br />
aserrados, la protección retráctil <strong>de</strong> funcionar<br />
automáticamente.<br />
• Compruebe siempre que la protección<br />
retráctil está cubriendo la hoja antes<br />
<strong>de</strong> colocar la sierra boca abajo sobre el<br />
banco o el suelo. Una hoja <strong>de</strong>slizante sin<br />
protección provocará que la sierra vaya hacia<br />
atrás, cortando cualquier cosa que esté en<br />
SÍMBOLOS<br />
PROTECCIÓN MEDIOAMBIENTAL<br />
El <strong>de</strong>secho <strong>de</strong> los productos eléctricos<br />
no <strong>de</strong>be eliminarse con la basura<br />
casera. Recíclelos cuando existan las<br />
instalaciones. Consulte con las autorida<strong>de</strong>s<br />
locales o su <strong>de</strong>tallista para obtener consejos<br />
sobre reciclado.<br />
Lleve siempre protección auditiva,<br />
ocular y respiratoria.<br />
Conforme a las normas <strong>de</strong> seguridad y a<br />
la legislación correspondientes<br />
Doble aislamiento.<br />
LASER LIGHT<br />
LASER RADIATION<br />
Do not stare into beam.<br />
Class 2 laser product.<br />
Wave length: 650nm<br />
Output power: 1mw<br />
AS/NZS 2211.1:2004<br />
su camino. Tenga en cuenta el tiempo que<br />
tarda la hoja en pararse <strong>de</strong>spués <strong>de</strong> soltar el<br />
interruptor.<br />
Advertencia sobre <strong>instrucciones</strong>.<br />
Nota sobre <strong>instrucciones</strong>.<br />
Láser<br />
Símbolos<br />
81<br />
E
E<br />
FUNCIONES<br />
AJUSTE DE LA PROFUNDIDAD DE CORTE<br />
Asegúrese <strong>de</strong> que la herramienta está<br />
<strong>de</strong>sconectada <strong>de</strong> la alimentación.<br />
1. Afloje la palanca <strong>de</strong> ajuste <strong>de</strong> profundidad (17)<br />
y pivote el cuerpo <strong>de</strong> la sierra alejándolo <strong>de</strong> la<br />
placa <strong>de</strong> base.<br />
2. Ajuste la sierra hasta conseguir la profundidad<br />
<strong>de</strong>seada, <strong>de</strong> acuerdo con la escala <strong>de</strong><br />
profundidad <strong>de</strong> corte (18).<br />
La escala <strong>de</strong> profundidad sólo <strong>de</strong>be utilizarse<br />
como referencia. Si se necesita una<br />
profundidad precisa, realice varios cortes<br />
<strong>de</strong> prueba hasta conseguir la profundidad<br />
<strong>de</strong>seada.<br />
3. Empuje hacia abajo la palanca para<br />
bloquearla, pero no apriete en exceso.<br />
Para unos mejores resultados <strong>de</strong> corte, la hoja<br />
<strong>de</strong>be exten<strong>de</strong>rse no más <strong>de</strong> un diente<br />
<strong>de</strong> profundidad más allá <strong>de</strong>l espesor <strong>de</strong>l<br />
material que se está cortando.<br />
• La palanca <strong>de</strong> altura pue<strong>de</strong> volver a situarse,<br />
si el mecanismo está un poco fuerte o flojo,<br />
con la palanca levantada.<br />
Para volver a situar la palanca, fuerce el<br />
resorte circular que sujeta la palanca con un<br />
<strong>de</strong>stornillador plano. Retire la palanca <strong>de</strong> la tuerca<br />
hexagonal y vuelva situar la misma en sentido<br />
horario (si está <strong>de</strong>masiado fuerte) o en sentido<br />
antihorario (si está <strong>de</strong>masiado floja) una posición<br />
82<br />
Funciones<br />
y vuelva a montar.<br />
Vuelva a colocar el resorte circular y vuelva a<br />
comprobar la posición <strong>de</strong> bloqueo <strong>de</strong> la palanca.<br />
AJUSTE DE LOS ÁNGULOS DEL BISEL<br />
Los ángulos <strong>de</strong>l bisel pue<strong>de</strong>n ajustarse <strong>de</strong><br />
cualquier forma en el rango <strong>de</strong> 0° a 45°.<br />
No intente biselar la sierra si está montada en un<br />
banco <strong>de</strong> aserrado.<br />
1. Asegúrese <strong>de</strong> que la herramienta está<br />
<strong>de</strong>sconectada <strong>de</strong> la alimentación.<br />
2. Afloje la palanca <strong>de</strong> ajuste <strong>de</strong>l bisel (8)<br />
en la parte <strong>de</strong>lantera <strong>de</strong> la sierra.<br />
3. Sitúe el cuerpo <strong>de</strong> la sierra en el ajuste <strong>de</strong><br />
ángulo <strong>de</strong>seado, tal y como está marcado en<br />
la escala <strong>de</strong>l bisel (9).<br />
La escala <strong>de</strong>l bisel sólo <strong>de</strong>be utilizarse como<br />
referencia. Si se necesita un ángulo preciso,<br />
realice varios cortes <strong>de</strong> prueba hasta conseguir el<br />
bisel <strong>de</strong>seado.<br />
4. Vuelva a apretar la palanca <strong>de</strong> ajuste<br />
<strong>de</strong>l bisel.
INTERRUPTOR DE ENCENDIDO<br />
Asegúrese <strong>de</strong> que ambas manos agarran<br />
firmemente las asas <strong>de</strong> la herramienta entes <strong>de</strong><br />
conectarla<br />
• Tire <strong>de</strong>l interruptor <strong>de</strong> gatillo (3) hasta “ON”.<br />
Habrá algo <strong>de</strong> resistencia inicial al tirar <strong>de</strong>l<br />
gatillo, se trata <strong>de</strong> un mecanismo<br />
<strong>de</strong> seguridad para evitar el arranque<br />
acci<strong>de</strong>ntal <strong>de</strong> la sierra.<br />
• Al soltar el gatillo se conmutará la herramienta<br />
a “OFF”.<br />
No engrane la hoja en la pieza <strong>de</strong> trabajo<br />
hasta que esté girando a máxima velocidad<br />
- a<strong>de</strong>más, evite <strong>de</strong>sconectar la herramienta<br />
hasta que el corte se haya completado.<br />
GUÍA DE CORTE PARALELO<br />
• La guía <strong>de</strong> corte (11) pue<strong>de</strong> utilizarse a la<br />
izquierda o a la <strong>de</strong>recha <strong>de</strong> hoja.<br />
• La utilización <strong>de</strong> la guía proporciona cortes<br />
precisos sin la necesidad <strong>de</strong> trabajar sin<br />
manos siguiendo líneas a lápiz.<br />
1. Con el tornillo <strong>de</strong> palometa <strong>de</strong> la placa <strong>de</strong> base<br />
aflojado <strong>de</strong>slice la guía (11) en las ranuras <strong>de</strong><br />
montaje <strong>de</strong> la placa<br />
<strong>de</strong> base <strong>de</strong>s<strong>de</strong> el lado<br />
izquierdo o <strong>de</strong>recho.<br />
2. Deslícela hasta<br />
alcanzar la anchura <strong>de</strong><br />
corte requerida.<br />
3. Apriete el tornillo<br />
<strong>de</strong> palometa para<br />
bloquearlo en posición.<br />
OBSERVACIÓN DE LA LÍNEA DE CORTE<br />
Los indicadores <strong>de</strong> visión (4) <strong>de</strong> la parte <strong>de</strong>lantera<br />
<strong>de</strong> la hoja <strong>de</strong> la sierra proporcionan una guía al<br />
cortar a lo largo <strong>de</strong> una línea a lápiz.<br />
Para cortes a 90° utilice el indicador <strong>de</strong>l lado<br />
<strong>de</strong>recho (mirando <strong>de</strong>s<strong>de</strong> la perspectiva <strong>de</strong>l<br />
operador) y el indicador <strong>de</strong>l lado izquierdo para<br />
cortes a 45°.<br />
VISIÓN DE LÁSER<br />
Advertencias:<br />
• No fije la vista directamente en el haz <strong>de</strong>l<br />
láser.<br />
• No dirija nunca el haz hacia una persona u<br />
objeto distintos <strong>de</strong> la pieza <strong>de</strong> trabajo.<br />
• No dirija <strong>de</strong>liberadamente el haz hacia las<br />
personas y asegúrese <strong>de</strong> que no se dirige<br />
hacia los ojos <strong>de</strong> una persona o durante más<br />
<strong>de</strong> 0,25 seg.<br />
• Asegúrese siempre que el haz <strong>de</strong>l láser<br />
sea dirigido hacia una pieza <strong>de</strong> trabajo<br />
sólida sin superficies reflectantes, es <strong>de</strong>cir,<br />
son aceptables ma<strong>de</strong>ra y superficies <strong>de</strong><br />
revestimiento rugoso. Las láminas <strong>de</strong> acero <strong>de</strong><br />
reflexión luminosa o los materiales similares<br />
no son a<strong>de</strong>cuados para su utilización con láser<br />
ya que la superficie reflectante pue<strong>de</strong> redirigir<br />
el haz hacia el operador.<br />
• Conecte el haz <strong>de</strong>l láser sólo cuando la<br />
herramienta esté en la pieza <strong>de</strong> trabajo.<br />
1. Repose el bor<strong>de</strong> <strong>de</strong>lantero <strong>de</strong> la placa <strong>de</strong> base<br />
<strong>de</strong> la sierra en la pieza<br />
<strong>de</strong> trabajo. Asegúrese<br />
<strong>de</strong> que la hoja no está<br />
tocando su pieza <strong>de</strong><br />
trabajo.<br />
2. Conecte el láser<br />
Funciones<br />
83<br />
E
E<br />
utilizando el botón <strong>de</strong><br />
encendido/apagado <strong>de</strong>l<br />
visor <strong>de</strong>l láser (1).<br />
FUNCIONAMIENTO DE LA SIERRA<br />
Advertencias:<br />
• Evite el corte sin manos. Es mucho más<br />
seguro y más preciso cortar con la sierra<br />
guiada por la guía <strong>de</strong> corte paralela o un listón<br />
sujeto. Si corta con manos libres, marque<br />
siempre una línea <strong>de</strong> corte recta y evite que la<br />
sierra <strong>de</strong> aleje <strong>de</strong> la misma.<br />
• No realice nunca cortes en una pieza <strong>de</strong><br />
trabajo sujeta con la mano. Asegúrese <strong>de</strong><br />
que la pieza <strong>de</strong> trabajo no pueda moverse<br />
durante el corte, utilizando bridas siempre que<br />
sea posible.<br />
• Los paneles gran<strong>de</strong>s y las piezas largas<br />
<strong>de</strong>ben estar bien apoyados cerca <strong>de</strong><br />
ambos lados <strong>de</strong>l corte para evitar pellizcos<br />
y retroceso. Asegúrese <strong>de</strong> que la sierra está<br />
situada con la parte más ancha <strong>de</strong> la placa <strong>de</strong><br />
base asentada sobre la pieza más gran<strong>de</strong> o en<br />
la pieza con el mejor apoyo.<br />
• Evite el retroceso asegurándose <strong>de</strong> mover<br />
la sierra en línea recta. Asegúrese <strong>de</strong> que<br />
la hoja está en buen estado y que el corte<br />
no se cierra sobre la hoja. (Utilice una cuña<br />
pequeña o un espaciador <strong>de</strong> 3 mm en el corte<br />
para evitar que se cierre si está cortando un<br />
material difícil.). Suelte el gatillo si la sierra<br />
muestra alguna señal <strong>de</strong> atasco pero no retire<br />
la sierra hasta que la hoja haya <strong>de</strong>jado <strong>de</strong><br />
girar.<br />
84 Funcionamiento De La Sierra<br />
El láser no funcionará si la herramienta no<br />
está enchufada y conectada a la red.<br />
3. Alinee el haz con su línea a lápiz.<br />
4. Comience el corte.<br />
5. Apague el láser.<br />
CORTE<br />
1. Asiente la parte <strong>de</strong>lantera <strong>de</strong> la placa <strong>de</strong><br />
base sobre la pieza <strong>de</strong> trabajo con la marca<br />
a lápiz alineada con el dispositivo <strong>de</strong> visión.<br />
Asegúrese <strong>de</strong> que la hoja no está tocando la<br />
pieza <strong>de</strong> trabajo.<br />
2. Sujete la sierra firmemente con ambas manos<br />
y apriete el gatillo. Cuando el motor <strong>de</strong> la<br />
sierra alcance la velocidad giratoria máxima,<br />
guíe suavemente la sierra a lo largo <strong>de</strong> la línea<br />
<strong>de</strong> corte.<br />
3. Mantenga una velocidad <strong>de</strong> alimentación<br />
consistente - si es <strong>de</strong>masiado rápida pue<strong>de</strong><br />
provocar un esfuerzo excesivo <strong>de</strong>l motor,<br />
mientras que si es <strong>de</strong>masiado lenta pue<strong>de</strong><br />
bruñir la pieza <strong>de</strong> trabajo. Evite movimientos<br />
bruscos <strong>de</strong> la sierra.<br />
4. Después <strong>de</strong> completar el corte, suelte el<br />
interruptor <strong>de</strong> gatillo y <strong>de</strong>je que la hoja se<br />
pare completamente. No retire la sierra <strong>de</strong><br />
la pieza <strong>de</strong> trabajo mientras la hoja está en<br />
movimiento.<br />
Corte <strong>de</strong> tablero <strong>de</strong> ma<strong>de</strong>ra chapada<br />
Cuando corte ma<strong>de</strong>ra chapada o ma<strong>de</strong>ra <strong>de</strong><br />
menos <strong>de</strong> 20 mm <strong>de</strong> grosor, ajuste la hoja para<br />
que sobresalga 5-10 mm a través <strong>de</strong>l la pieza <strong>de</strong><br />
trabajo y corte con la cara buena hacia abajo.<br />
Esto reducirá el astillamiento en la cara buena<br />
<strong>de</strong> la pieza <strong>de</strong> trabajo. Cuando corte ma<strong>de</strong>ra más<br />
gruesa, ajuste la hoja a la profundidad máxima<br />
para reducir el retroceso.
Realización <strong>de</strong> un corte <strong>de</strong> alvéolo<br />
1. Ajuste la profundidad <strong>de</strong> corte según sea<br />
necesario.<br />
2. Ajuste el reglaje <strong>de</strong>l bisel en 0°.<br />
3. Levante la palanca <strong>de</strong> la protección <strong>de</strong> la hoja<br />
(12) para exponer la hoja <strong>de</strong> la sierra, asiente<br />
firmemente la parte <strong>de</strong>lantera <strong>de</strong> la base plana<br />
contra la pieza <strong>de</strong> trabajo con el asa trasera<br />
levantada <strong>de</strong> forma que la hoja no toque la<br />
pieza <strong>de</strong> trabajo.<br />
4. Con la hoja apenas separada <strong>de</strong> la pieza<br />
<strong>de</strong> trabajo, ponga en marcha la sierra y<br />
espere que alcance la velocidad máxima<br />
(aproximadamente 2 segundos).<br />
5. Hunda lentamente la hoja en la pieza <strong>de</strong><br />
trabajo, utilizando el frontal <strong>de</strong> la placa <strong>de</strong><br />
base <strong>de</strong> la sierra como punto <strong>de</strong> pivote.<br />
MONTAJE EN BANCO DE ASERRADO<br />
Esta sierra se adapta cómodamente a la mayoría<br />
<strong>de</strong> bancos <strong>de</strong> aserrado.<br />
• Compruebe que el banco <strong>de</strong> aserrado<br />
está equipado con la protección <strong>de</strong> hoja<br />
a<strong>de</strong>cuada y asegúrese <strong>de</strong> que está ajustada<br />
a<strong>de</strong>cuadamente y que funciona correctamente<br />
antes <strong>de</strong> la puesta en marcha.<br />
• Asegúrese <strong>de</strong> que la sierra está montada con<br />
seguridad en el banco. Remítase al manual<br />
<strong>de</strong> <strong>instrucciones</strong> <strong>de</strong>l fabricante para las<br />
<strong>instrucciones</strong> <strong>de</strong> montaje.<br />
• Haga funcionar la sierra hacia arriba para<br />
asegurarse <strong>de</strong> que<br />
funciona con suavidad<br />
antes <strong>de</strong> intentar<br />
cortar.<br />
• Compruebe que el<br />
banco <strong>de</strong> aserrado<br />
En cuanto la<br />
hoja comience a<br />
cortar el material,<br />
suelte la palanca <strong>de</strong> la<br />
protección inferior <strong>de</strong><br />
la hoja.<br />
6. Comience a cortar<br />
en dirección hacia<br />
<strong>de</strong>lante hasta el extremo <strong>de</strong>l corte.<br />
7. Después <strong>de</strong> completar el corte, suelte el<br />
interruptor <strong>de</strong> gatillo y <strong>de</strong>je que la hoja<br />
se pare completamente.<br />
No retire la sierra <strong>de</strong> la pieza <strong>de</strong> trabajo<br />
mientras la hoja está en movimiento.<br />
Si las esquinas <strong>de</strong> su corte <strong>de</strong> alvéolo<br />
no están completamente recortadas, utilice<br />
una sierra <strong>de</strong> vaivén o una sierra manual para<br />
conseguir el acabado <strong>de</strong> las esquinas.<br />
tiene montado un dispositivo anti-retroceso.<br />
• Asegúrese <strong>de</strong> que el banco <strong>de</strong> aserrado tiene<br />
montado un interruptor <strong>de</strong> encendido/apagado<br />
<strong>de</strong> seguridad a<strong>de</strong>cuado. El interruptor <strong>de</strong> la<br />
sierra pue<strong>de</strong> bloquearse entonces utilizando<br />
una brida <strong>de</strong> muelle, un sujetacables o algo<br />
similar y <strong>de</strong>spués enchufarse en la toma <strong>de</strong><br />
seguridad <strong>de</strong>l banco <strong>de</strong> aserrado. Esta brida<br />
DEBE retirarse cuando la sierra se haya<br />
retirado <strong>de</strong>l banco <strong>de</strong> aserrado.<br />
• Utilizando todo el equipo <strong>de</strong> seguridad realice<br />
un corte <strong>de</strong> prueba en una pieza <strong>de</strong> <strong>de</strong>secho<br />
<strong>de</strong>l material asegurándose <strong>de</strong> que todas las<br />
protecciones están montadas correctamente<br />
antes <strong>de</strong> continuar con el corte en el banco.<br />
Montaje En Banco De Aserrado<br />
85<br />
E
E<br />
SUSTITUCIÓN DE LA HOJA DE LA SIERRA<br />
Utilice sólo hojas <strong>de</strong> 185 mm (7 1/4”), con una<br />
entalladura <strong>de</strong> entre 2,2 y 3,5 mm, diseñada<br />
para sierras circulares con una velocidad sin<br />
carga <strong>de</strong> por lo menos 5.000 rpm. No monte<br />
nunca hojas <strong>de</strong> acero <strong>de</strong> alta velocidad o discos<br />
abrasivos. El montaje <strong>de</strong> hojas para otro fin o <strong>de</strong><br />
tamaño diferente anulará la garantía.<br />
• No monte hojas <strong>de</strong> calidad inferior. Compruebe<br />
regularmente que la hoja está plana, afilada y<br />
libre <strong>de</strong> fisuras o <strong>de</strong>fectos.<br />
1. Asegúrese <strong>de</strong> que la sierra está <strong>de</strong>sconectada<br />
<strong>de</strong> la alimentación.<br />
2. Coloque la llave <strong>de</strong> dientes suministrada<br />
(20) en los dos agujeros situados en la<br />
brida externa <strong>de</strong> la<br />
hoja. Inserte la llave<br />
hexagonal (21) en<br />
el agujero <strong>de</strong>l perno<br />
<strong>de</strong> la hoja. Mientras<br />
sujeta fuertemente la<br />
llave <strong>de</strong> dientes gire la<br />
llave hexagonal en la<br />
dirección <strong>de</strong> la rotación<br />
<strong>de</strong> las hojas (sentido<br />
antihorario). Cuando el<br />
perno <strong>de</strong> la hoja esté<br />
fuera <strong>de</strong>l agujero <strong>de</strong>l<br />
árbol, retire el perno y<br />
la brida <strong>de</strong> la hoja.<br />
3. Mantenga la protección retráctil <strong>de</strong> la<br />
hoja (14) totalmente hacia atrás, <strong>de</strong>slice<br />
cuidadosamente la hoja a través <strong>de</strong> la placa <strong>de</strong><br />
86 Sustitución De La Hoja De La Sierra<br />
base y colóquela sobre la aran<strong>de</strong>la interna <strong>de</strong>l<br />
eje, teniendo en cuenta que son necesarios<br />
guantes <strong>de</strong> protección ya que los dientes <strong>de</strong> la<br />
hoja están muy afilados. Los gráficos <strong>de</strong>ben<br />
estar con la cara hacia fuera y la flecha <strong>de</strong> la<br />
hoja <strong>de</strong>be apuntar en la misma dirección que<br />
la flecha en la protección.<br />
4. Monte la hoja teniendo cuidado <strong>de</strong> situarla<br />
correctamente sobre la brida interna. Vuelva a<br />
montar la brida externa <strong>de</strong> la hoja y <strong>de</strong>spués<br />
atornille ligeramente el perno <strong>de</strong> la hoja<br />
a través <strong>de</strong> la brida<br />
externa <strong>de</strong> la hoja.<br />
Compruebe que la hoja<br />
se asienta a ras entre la<br />
brida interna y la externa y<br />
apriete firmemente con la<br />
llave <strong>de</strong> dientes y la llave<br />
hexagonal.
SERVICIO Y MANTENIMIENTO<br />
• Cualquier daño en la sierra <strong>de</strong>be ser reparado<br />
e inspeccionado cuidadosamente antes <strong>de</strong><br />
la utilización por personal <strong>de</strong> reparación<br />
cualificado. El servicio o mantenimiento<br />
realizado por personal no cualificado pue<strong>de</strong><br />
provocar un riesgo <strong>de</strong> lesión.<br />
• El servicio sólo <strong>de</strong>be ser realizado por<br />
Centros <strong>de</strong> Reparación <strong>Triton</strong> autorizados<br />
que utilicen piezas <strong>de</strong> recambio originales<br />
<strong>Triton</strong>. Siga cuidadosamente las <strong>instrucciones</strong><br />
y remítase a “Localización y solución <strong>de</strong><br />
problemas” para i<strong>de</strong>ntificar los problemas y<br />
para recibir consejo. La utilización <strong>de</strong> piezas<br />
no autorizadas o <strong>de</strong>fectuosas pue<strong>de</strong> crear un<br />
riesgo <strong>de</strong> <strong>de</strong>scarga eléctrica o <strong>de</strong> lesión.<br />
• <strong>Triton</strong> Manufacturing & Design Co. no será<br />
responsable <strong>de</strong> ningún daño o lesión causado<br />
por reparaciones no autorizadas <strong>de</strong> la sierra o<br />
por una mala manipulación <strong>de</strong> la herramienta.<br />
• Compruebe regularmente que el eje <strong>de</strong> la<br />
sierra, las aran<strong>de</strong>las <strong>de</strong>l eje y el espaciador <strong>de</strong><br />
reducción <strong>de</strong>l diámetro interior están limpios y<br />
libres <strong>de</strong> <strong>de</strong>pósitos <strong>de</strong> resina acumulada o <strong>de</strong><br />
serrín endurecido.<br />
Compruebe que las caras <strong>de</strong> la aran<strong>de</strong>la <strong>de</strong>l eje<br />
están suaves y libres <strong>de</strong> rebabas. Compruebe<br />
que el perno <strong>de</strong> sujeción <strong>de</strong> la cuchilla está<br />
correctamente apretado.<br />
• Compruebe el funcionamiento <strong>de</strong>l muelle<br />
<strong>de</strong> la protección retráctil. Debe cerrarse<br />
rápidamente y sin rozar en ningún sitio. Retire<br />
la hoja y limpie el serrín acumulado o las<br />
esquirlas <strong>de</strong> ma<strong>de</strong>ra <strong>de</strong>l área <strong>de</strong> la protección.<br />
• Las ranuras <strong>de</strong> ventilación <strong>de</strong> la sierra <strong>de</strong>ben<br />
mantenerse limpias y libres <strong>de</strong> materias<br />
extrañas. Utilice un trapo ligeramente<br />
hume<strong>de</strong>cido para limpiar la sierra - no utilice<br />
disolventes.<br />
MANTENIMIENTO DE LA HOJA<br />
• Compruebe regularmente que la hoja está<br />
libre <strong>de</strong> acumulaciones <strong>de</strong> resinas o <strong>de</strong> serrín.<br />
Si es necesario, limpie con un disolvente tal<br />
como WD40, RP7 o trementina mineral.<br />
• Compruebe regularmente la planicidad <strong>de</strong> la<br />
hoja <strong>de</strong> la sierra. La utilización <strong>de</strong> la sierra con<br />
una hoja combada supone <strong>de</strong>masiada carga<br />
para el conjunto <strong>de</strong>l motor y <strong>de</strong> la caja <strong>de</strong><br />
engranajes y pue<strong>de</strong> afectar a sus <strong>de</strong>rechos <strong>de</strong><br />
garantía.<br />
• Debe comprobar regularmente los dientes <strong>de</strong><br />
carburo <strong>de</strong> tungsteno respecto a su afilado y<br />
a roturas <strong>de</strong> dientes, y repararlos o afilarlos<br />
según sea necesario.<br />
MANTENIMIENTO DEL CABLE DE<br />
ALIMENTACIÓN<br />
Si el cable <strong>de</strong> alimentación necesita sustitución,<br />
la tarea <strong>de</strong>be ser realizada por el fabricante, el<br />
agente <strong>de</strong>l fabricante o un centro <strong>de</strong> servicio<br />
autorizado para evitar poner en riego la<br />
seguridad.<br />
Servicio Y Mantenimiento<br />
87<br />
E
E<br />
LOCALIZACIÓN Y SOLUCIÓN DE PROBLEMAS<br />
La siguiente tabla contiene información diseñada para ayudar a diagnosticar y resolver problemas <strong>de</strong><br />
la sierra.<br />
SÍNTOMA POSIBLE CAUSA SOLUCIÓN<br />
La sierra no funciona No hay alimentación eléctrica Compruebe hay energía disponible en la<br />
fuente<br />
Cepillos gastados o pegajosos Desconecte la alimentación, abra las tapas<br />
<strong>de</strong>l cepillo y asegúrese <strong>de</strong> que se mueve<br />
libremente en los soportes. Compruebe si<br />
los cepillos necesitan sustitución como se<br />
<strong>de</strong>staca anteriormente.<br />
Gatillo <strong>de</strong>fectuoso Centro <strong>de</strong> Servicio <strong>de</strong>l Contacto**<br />
Componentes <strong>de</strong>l motor en circuito<br />
abierto o en cortocircuito<br />
Centro <strong>de</strong> Servicio <strong>de</strong>l Contacto**<br />
La sierra funciona lentamente Hoja roma o dañada Vuelva a afilar o sustituya la hoja<br />
El motor está sobrecargado Reduzca la fuerza <strong>de</strong> empuje sobre la sierra.<br />
Asegúrese <strong>de</strong> que el corte no se está cerrando<br />
y pellizcando la hoja.<br />
Se oye un ruido inusual Obstrucción mecánica Centro <strong>de</strong> Servicio <strong>de</strong>l Contacto**<br />
El motor funciona pero la hoja<br />
no gira<br />
Se producen muchas chispas<br />
<strong>de</strong>ntro <strong>de</strong>l alojamiento <strong>de</strong>l<br />
motor<br />
La protección retráctil no se<br />
cierra o lo hace lentamente<br />
No se mantiene el ajuste <strong>de</strong><br />
profundidad <strong>de</strong> la sierra<br />
88 Localización Y Solución De Problemas<br />
La armadura tiene secciones en<br />
cortocircuito<br />
La tuerca <strong>de</strong> fijación <strong>de</strong> la hoja<br />
está floja, o espaciador reductor<br />
montado incorrectamente<br />
Centro <strong>de</strong> Servicio <strong>de</strong>l Contacto**<br />
Apriete la tuerca <strong>de</strong> fijación <strong>de</strong> la hoja.<br />
Asegúrese <strong>de</strong> que el espaciador <strong>de</strong> reducción<br />
<strong>de</strong>l eje y las aran<strong>de</strong>las <strong>de</strong> la brida están<br />
montados correctamente.<br />
Eje o dientes <strong>de</strong>l engranaje rotos Centro <strong>de</strong> Servicio <strong>de</strong>l Contacto**<br />
Los cepillos no se mueven libremente<br />
Armadura en corto circuito o en<br />
circuito abierto<br />
Desconecte la alimentación, retire los cepillos,<br />
límpielos o sustitúyalos<br />
Centro <strong>de</strong> Servicio <strong>de</strong>l Contacto**<br />
Superficie <strong>de</strong>l conmutador sucia Centro <strong>de</strong> Servicio <strong>de</strong>l Contacto**<br />
Muelle <strong>de</strong> retorno suelto o roto Vuelva a sujetar o sustituya el muelle (utilice<br />
sólo piezas <strong>de</strong> recambio genuinas <strong>de</strong> <strong>Triton</strong>)<br />
La protección está curvada En<strong>de</strong>récelo o Entre en Contacto con el Centro<br />
<strong>de</strong> Servicio**<br />
Mecanismo atascado por serrín Limpie y lubrique ligeramente el mecanismo<br />
atascado<br />
La palanca <strong>de</strong> profundidad requiere<br />
recolocación<br />
Recoloque la palanca <strong>de</strong> ajuste <strong>de</strong> profundidad<br />
como se <strong>de</strong>scribe en la página 82.
Si un problema no pue<strong>de</strong> resolverse utilizando los consejos anteriores, no manipule<br />
in<strong>de</strong>bidamente la sierra - Visite www.tritontools.com para encontrar la oficina más cercana y<br />
obtener asistencia.<br />
** Visite www.tritontools.com para encontrar su centro <strong>de</strong> servicio autorizado más cercano.<br />
GARANTÍA<br />
Para registrar su garantía visite nuestro sitio web<br />
en www.tritontools.com* e introduzca sus datos.<br />
Estos datos serán incluidos en nuestra lista <strong>de</strong><br />
correo (salvo indicación contraria) para recibir<br />
información sobre futuras ediciones. Los datos<br />
aportados no estarán a disposición <strong>de</strong> ningún<br />
tercero.<br />
REGISTRO DE COMPRA<br />
Fecha <strong>de</strong> compra: ___ / ___ / ____<br />
Mo<strong>de</strong>lo: TA184CSL<br />
Número <strong>de</strong> serie: __________________<br />
(situado en la etiqueta <strong>de</strong>l motor)<br />
Conserve su recibo como prueba <strong>de</strong> compra<br />
<strong>Triton</strong> Manufacturing & Design Co.<br />
garantiza al comprador <strong>de</strong> este<br />
producto que si alguna pieza resulta ser<br />
<strong>de</strong>fectuosa a causa <strong>de</strong> materiales o <strong>de</strong><br />
mano <strong>de</strong> obra <strong>de</strong>fectuosos <strong>de</strong>ntro <strong>de</strong><br />
los 12 MESES a partir <strong>de</strong> la fecha <strong>de</strong> la<br />
compra original, <strong>Triton</strong> reparará, o a su<br />
discreción, sustituirá la pieza <strong>de</strong>fectuosa<br />
sin cargo.<br />
Esta garantía no se aplica al uso<br />
comercial ni se amplia al <strong>de</strong>sgaste<br />
normal o a los daños resultantes <strong>de</strong> un<br />
acci<strong>de</strong>nte, <strong>de</strong> un abuso o <strong>de</strong> una mala<br />
utilización.<br />
*Regístrese online <strong>de</strong>ntro <strong>de</strong> 30 días.<br />
Sujeta a términos y condiciones.<br />
Esto no afecta sus <strong>de</strong>rechos legales.<br />
Garantía 89<br />
E
DECLARATION OF CONFORMITY<br />
The Un<strong>de</strong>rsigned: Mr Philip Ellis as authorized by: TRITON Declare that:<br />
PRODUCT CODE: TA184CSL DESCRIPTION: Circular Saw 230V - 50HZ 2300W<br />
Electric power: 2300W<br />
CONFORMS TO THE FOLLOWING DIRECTIVES: • Directive 2004/108/EC Electro Magnetic Compatability • Directive 2006/95/EC Low Voltage<br />
Directive • Directive 98/37/EC Machinery Directive<br />
THE TECHNICAL DOCUMENTATION IS KEPT BY TRITON<br />
NOTIFIED BODY: TUV SÜD<br />
PLACE OF DECLARATION: Jinhua, Zhejiang<br />
EG-VERKLARING VAN OVEREENSTEMMING<br />
De On<strong>de</strong>rgeteken<strong>de</strong>: Mr Philip Ellis Gemachtigd door: TRITON Declare that:<br />
TYPE/ SERIENR: TA184CSL NAAM/MODEL: Cirkelzaag 230V - 50HZ 2300W<br />
Stroom: 2300W<br />
VOLDOET AAN DE VEREISTEN VAN DE RICHTLIJN: • Directive 2004/108/EC Electro Magnetic Compatability • Directive 2006/95/EC Low Voltage<br />
Directive • Directive 98/37/EC Machinery Directive<br />
DE TECHNISCHE DOCUMENTATIE WORDT BEWAARD DOOR TRITON<br />
KEURINGSINSTANTIE: TUV SÜD<br />
PLAATS VAN AFGIFTE: Jinhua, Zhejiang<br />
DÉCLARATION DE CONFORMITÉ CE<br />
Le soussigné: Mr Philip Ellis autorisé par: TRITON Declare that:<br />
TYPE/SÉRIE NO: TA184CSL NOM/MODèLE: Scie Circulaire 230V - 50HZ 2300W<br />
Courant électrique: 2300W<br />
SE CONFORME AUx DIRECTIVES SUIVANTES: • Directive 2004/108/EC Electro Magnetic Compatability • Directive 2006/95/EC Low Voltage<br />
Directive • Directive 98/37/EC Machinery Directive<br />
LA DOCUMENTATION TECHNIQUE EST ENREGISTRÉE PAR TRITON<br />
ORGANISMES NOTIFIÉS: TUV SÜD<br />
ENDROIT DE LA DÉCLARATION: Jinhua, Zhejiang<br />
KONFORMITÄTSERKLÄRUNG<br />
Name <strong>de</strong>s Unterzeichners: Mr Philip Ellis Bevollmächtiger: TRITON Declare that:<br />
BAUART./ SERIENNUMMER: TA184CSL NAME/ DER GERÄTETYP: Kreissäge 230V - 50HZ 2300W<br />
Elektrischer Strom: 2300W<br />
PASST SICH AN DIE FOLGENDEN RICHTLINIEN AN: • Directive 2004/108/EC Electro Magnetic Compatability • Directive 2006/95/EC Low<br />
Voltage Directive • Directive 98/37/EC Machinery Directive<br />
TECHN. UNTERLAGEN HINTERLEGT BEI TRITON<br />
BENNANTE STELLE: TUV SÜD<br />
ORT: Jinhua, Zhejiang<br />
EC DECHIARAZIONE DI CONFIRMITÁ<br />
Il sottoscritto: Mr Philip Ellis Come autorizzato di: TRITON Declare that:<br />
TIPO/ NUMERO DI SERIE: TA184CSL NOME/ MODELLO: Sega Circolare 230V - 50HZ 2300W<br />
Energia elettrica: 2300W<br />
SI CONFORMA ALL’ INDIRIZZAMENTO: • Directive 2004/108/EC Electro Magnetic Compatability • Directive 2006/95/EC Low Voltage Directive<br />
• Directive 98/37/EC Machinery Directive<br />
IL DOCUMENTAZIONE TECNICO É MANTENUTO DI TRITON<br />
CORPO INFORMATO: TUV SÜD<br />
POSTO DI DICHIARAZIONE: Jinhua, Zhejiang<br />
DECLARACIÓN “CE” DE CONFORMIDAD<br />
El abajo firmante: Mr Philip Ellis Autorizad por: TRITON Declare that:<br />
TIPO Y NO SERIE: TA184CSL MODELO/NOMBRE: Sierra Circular 230V - 50HZ 2300W<br />
Energía eléctrica: 2300W<br />
SE HALLA EN CONFORMIDAD CON LA DIRECTIVA: • Directive 2004/108/EC Electro Magnetic Compatability • Directive 2006/95/EC Low Voltage<br />
Directive • Directive 98/37/EC Machinery Directive<br />
LA DOCUMENTACIÓN TÉCNICA SE GUARDA POR TRITON<br />
ORGANISMO NOTIFICADO: TUV SÜD<br />
LUGAR DE DECLARACIÓN: Jinhua, Zhejiang<br />
Date: 30/6/09<br />
Signed by:<br />
Mr Philip Ellis<br />
Director