SAFEFIX plus TT 9 - 18 kg - Britax Römer
SAFEFIX plus TT 9 - 18 kg - Britax Römer
SAFEFIX plus TT 9 - 18 kg - Britax Römer
You also want an ePaper? Increase the reach of your titles
YUMPU automatically turns print PDFs into web optimized ePapers that Google loves.
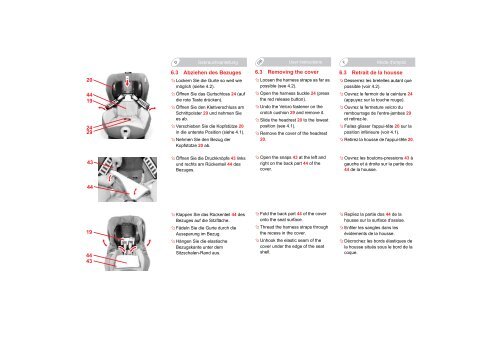
6.3 Abziehen des Bezuges<br />
� Lockern Sie die Gurte so weit wie<br />
möglich (siehe 4.2).<br />
� Öffnen Sie das Gurtschloss 24 (auf<br />
die rote Taste drücken).<br />
� Öffnen Sie den Klettverschluss am<br />
Schrittpolster 29 und nehmen Sie<br />
es ab.<br />
� Verschieben Sie die Kopfstütze 20<br />
in die unterste Position (siehe 4.1).<br />
� Nehmen Sie den Bezug der<br />
Kopfstütze 20 ab.<br />
� Öffnen Sie die Druckknöpfe 43 links<br />
und rechts am Rückenteil 44 des<br />
Bezuges.<br />
� Klappen Sie das Rückenteil 44 des<br />
Bezuges auf die Sitzfläche.<br />
� Fädeln Sie die Gurte durch die<br />
Aussparung im Bezug.<br />
� Hängen Sie die elastische<br />
Bezugskante unter dem<br />
Sitzschalen-Rand aus.<br />
6.3 Removing the cover<br />
� Loosen the harness straps as far as<br />
possible (see 4.2).<br />
� Open the harness buckle 24 (press<br />
the red release button).<br />
� Undo the Velcro fastener on the<br />
crotch cushion 29 and remove it.<br />
� Slide the headrest 20 to the lowest<br />
position (see 4.1).<br />
� Remove the cover of the headrest<br />
20.<br />
� Open the snaps 43 at the left and<br />
right on the back part 44 of the<br />
cover.<br />
� Fold the back part 44 of the cover<br />
onto the seat surface.<br />
� Thread the harness straps through<br />
the recess in the cover.<br />
� Unhook the elastic seam of the<br />
cover under the edge of the seat<br />
shell.<br />
6.3 Retrait de la housse<br />
� Desserrez les bretelles autant que<br />
possible (voir 4.2).<br />
� Ouvrez le fermoir de la ceinture 24<br />
(appuyez sur la touche rouge).<br />
� Ouvrez la fermeture velcro du<br />
rembourrage de l'entre-jambes 29<br />
et retirez-le.<br />
� Faites glisser l'appui-tête 20 sur la<br />
position inférieure (voir 4.1).<br />
� Retirez la housse de l'appui-tête 20.<br />
� Ouvrez les boutons-pressions 43 à<br />
gauche et à droite sur la partie dos<br />
44 de la housse.<br />
� Repliez la partie dos 44 de la<br />
housse sur la surface d'assise.<br />
� Enfiler les sangles dans les<br />
évidements de la housse.<br />
� Décrochez les bords élastiques de<br />
la housse situés sous le bord de la<br />
coque.


