MANUALE MULTIFLEXI INVERTER.pmd - KlimaShop!
MANUALE MULTIFLEXI INVERTER.pmd - KlimaShop!
MANUALE MULTIFLEXI INVERTER.pmd - KlimaShop!

Create successful ePaper yourself
Turn your PDF publications into a flip-book with our unique Google optimized e-Paper software.
38<br />
2<br />
I<br />
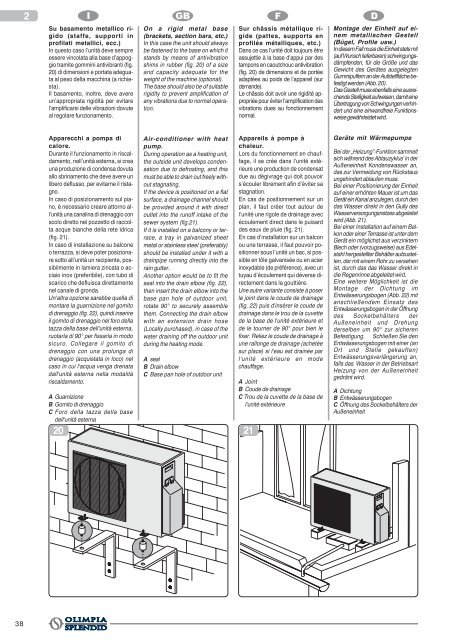
Su basamento metallico rigido<br />
(staffe, supporti in<br />
profilati metallici, ecc.)<br />
In questo caso l’unità deve sempre<br />
essere vincolata alla base d’appoggio<br />
tramite gommini antivibranti (fig.<br />
20) di dimensioni e portata adeguata<br />
al peso della macchina (a richiesta).<br />
Il basamento, inoltre, deve avere<br />
un’appropriata rigidità per evitare<br />
l’amplificarsi delle vibrazioni dovute<br />
al regolare funzionamento.<br />
Apparecchi a pompa di<br />
calore.<br />
Durante il funzionamento in riscaldamento,<br />
nell’unità esterna, si crea<br />
una produzione di condensa dovuta<br />
allo sbrinamento che deve avere un<br />
libero deflusso, per evitarne il ristagno.<br />
In caso di posizionamento sul piano,<br />
è necessario creare attorno all’unità<br />
una canalina di drenaggio con<br />
scolo diretto nel pozzetto di raccolta<br />
acque bianche della rete idrica<br />
(fig. 21).<br />
In caso di installazione su balcone<br />
o terrazza, si deve poter posizionare<br />
sotto all’unità un recipiente, possibilmente<br />
in lamiera zincata o acciaio<br />
inox (preferibile), con tubo di<br />
scarico che defluisca direttamente<br />
nel canale di gronda.<br />
Un'altra opzione sarebbe quella di<br />
montare la guarnizione nel gomito<br />
di drenaggio (fig. 22), quindi inserire<br />
il gomito di drenaggio nel foro della<br />
tazza della base dell'unità esterna,<br />
ruotarla di 90° per fissarla in modo<br />
sicuro. Collegare il gomito di<br />
drenaggio con una prolunga di<br />
drenaggio (acquistata in loco) nel<br />
caso in cui l'acqua venga drenata<br />
dall'unità esterna nella modalità<br />
riscaldamento.<br />
A Guarnizione<br />
B Gomito di drenaggio<br />
C Foro della tazza della base<br />
dell'unità esterna<br />
GB F D<br />
On a rigid metal base<br />
(brackets, section bars, etc.)<br />
In this case the unit should always<br />
be fastened to the base on which it<br />
stands by means of antivibration<br />
shims in rubber (fig. 20) of a size<br />
and capacity adequate for the<br />
weight of the machine (optional).<br />
The base should also be of suitable<br />
rigidity to prevent amplification of<br />
any vibrations due to normal operation.<br />
Air-conditioner with heat<br />
pump.<br />
During operation as a heating unit,<br />
the outside unit develops condensation<br />
due to defrosting, and this<br />
must be able to drain out freely without<br />
stagnating.<br />
If the device is positioned on a flat<br />
surface, a drainage channel should<br />
be provided around it with direct<br />
outlet into the runoff intake of the<br />
sewer system (fig.21).<br />
If it is installed on a balcony or terrace,<br />
a tray in galvanized sheet<br />
metal or stainless steel (preferably)<br />
should be installed under it with a<br />
drainpipe running directly into the<br />
rain gutter.<br />
Another option would be to fit the<br />
seal into the drain elbow (fig. 22),<br />
then insert the drain elbow into the<br />
base pan hole of outdoor unit,<br />
rotate 90° to securely assemble<br />
them. Connecting the drain elbow<br />
with an extension drain hose<br />
(Locally purchased), in case of the<br />
water draining off the outdoor unit<br />
during the heating mode.<br />
A seal<br />
B Drain elbow<br />
C Base pan hole of outdoor unit<br />
20 21<br />
Sur châssis métallique rigide<br />
(pattes, supports en<br />
profilés métalliques, etc.)<br />
Dans ce cas l’unité doit toujours être<br />
assujettie à la base d’appui par des<br />
tampons en caoutchouc antivibration<br />
(fig. 20) de dimensions et de portée<br />
adaptées au poids de l’appareil (sur<br />
demande).<br />
Le châssis doit avoir une rigidité appropriée<br />
pour éviter l’amplification des<br />
vibrations dues au fonctionnement<br />
normal.<br />
Appareils à pompe à<br />
chaleur.<br />
Lors du fonctionnement en chauffage,<br />
il se crée dans l’unité extérieure<br />
une production de condensat<br />
due au dégivrage qui doit pouvoir<br />
s’écouler librement afin d’éviter sa<br />
stagnation.<br />
En cas de positionnement sur un<br />
plan, il faut créer tout autour de<br />
l’unité une rigole de drainage avec<br />
écoulement direct dans le puisard<br />
des eaux de pluie (fig. 21).<br />
En cas d’installation sur un balcon<br />
ou une terrasse, il faut pouvoir positionner<br />
sous l’unité un bac, si possible<br />
en tôle galvanisée ou en acier<br />
inoxydable (de préférence), avec un<br />
tuyau d’écoulement qui déverse directement<br />
dans la gouttière.<br />
Une autre variante consiste à poser<br />
le joint dans le coude de drainage<br />
(fig. 22) puis d'insérer le coude de<br />
drainage dans le trou de la cuvette<br />
de la base de l'unité extérieure et<br />
de le tourner de 90° pour bien le<br />
fixer. Reliez le coude de drainage à<br />
une rallonge de drainage (achetée<br />
sur place) si l'eau est drainée par<br />
l'unité extérieure en mode<br />
chauffage.<br />
A Joint<br />
B Coude de drainage<br />
C Trou de la cuvette de la base de<br />
l'unité extérieure<br />
Montage der Einheit auf einem<br />
metallischen Gestell<br />
(Bügel, Profile usw.)<br />
In diesem Fall muss die Einheit stets mit<br />
(auf Wunsch lieferbaren) schwingungsdämpfenden,<br />
für die Größe und das<br />
Gewicht des Gerätes ausgelegten<br />
Gummipuffern an der Aufstellfläche befestigt<br />
werden (Abb. 20).<br />
Das Gestell muss ebenfalls eine ausreichende<br />
Steifigkeit aufweisen, damit eine<br />
Übertragung von Schwingungen verhindert<br />
und eine einwandfreie Funktionsweise<br />
gewährleistet wird.<br />
Geräte mit Wärmepumpe<br />
Bei der „Heizung”-Funktion sammelt<br />
sich während des Abtauzyklus’ in der<br />
Außeneinheit Kondenswasser an,<br />
das zur Vermeidung von Rückstaus<br />
ungehindert ablaufen muss.<br />
Bei einer Positionierung der Einheit<br />
auf einer erhöhten Mauer ist um das<br />
Gerät ein Kanal anzulegen, durch den<br />
das Wasser direkt in den Gully des<br />
Wasserversorgungsnetzes abgeleitet<br />
wird (Abb. 21).<br />
Bei einer Installation auf einem Balkon<br />
oder einer Terrasse ist unter dem<br />
Gerät ein möglichst aus verzinktem<br />
Blech oder (vorzugsweise) aus Edelstahl<br />
hergestellter Behälter aufzustellen,<br />
der mit einem Rohr zu versehen<br />
ist, durch das das Wasser direkt in<br />
die Regenrinne abgeleitet wird.<br />
Eine weitere Möglichkeit ist die<br />
Montage der Dichtung im<br />
Entwässerungsbogen (Abb. 22) mit<br />
anschließendem Einsatz des<br />
Entwässerungsbogen in der Öffnung<br />
des Sockelbehälters der<br />
Außeneinheit und Drehung<br />
derselben um 90° zur sicheren<br />
Befestigung. Schließen Sie den<br />
Entwässerungsbogen mit einer (an<br />
Ort und Stelle gekauften)<br />
Entwässerungsverlängerung an,<br />
falls das Wasser in der Betriebsart<br />
Heizung von der Außeneinheit<br />
gedränt wird.<br />
A Dichtung<br />
B Entwässerungsbogen<br />
C Öffnung des Sockelbehälters der<br />
Außeneinheit