Certain® Screw Removal Tool Kit (ISRT10) - BIOMET 3i
Certain® Screw Removal Tool Kit (ISRT10) - BIOMET 3i
Certain® Screw Removal Tool Kit (ISRT10) - BIOMET 3i

You also want an ePaper? Increase the reach of your titles
YUMPU automatically turns print PDFs into web optimized ePapers that Google loves.
Certain ® <strong>Screw</strong> <strong>Removal</strong> <strong>Tool</strong> <strong>Kit</strong> (<strong>ISRT10</strong>)Instructions for Use<strong>Kit</strong> strumento di rimozione per viti Certain ® (<strong>ISRT10</strong>)Istruzioni per l’uso<strong>Kit</strong> de ferramentas para remoção de parafusos Certain ® (<strong>ISRT10</strong>)Instruções de uso<strong>Kit</strong> de retrait de vis cassées Certain ® (<strong>ISRT10</strong>)Mode d’emploiCertain ® -Schraubenentfernungs-Werkzeugset (<strong>ISRT10</strong>)Gebrauchsanleitung<strong>Kit</strong> de herramientas de extracción de tornillos Certain ® (<strong>ISRT10</strong>)Instrucciones de uso
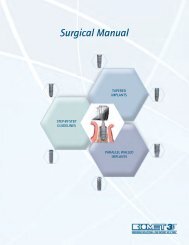
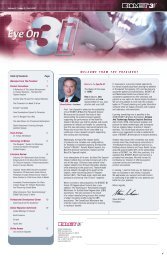
enIndications:In the unlikely event of screw fracture, the Certain ® <strong>Screw</strong> <strong>Removal</strong> <strong>Tool</strong> <strong>Kit</strong> (<strong>ISRT10</strong>) facilitatesthe removal of a broken screw from the internal threads of the OSSEOTITE ® Certain Implant.Contraindications:The Certain <strong>Screw</strong> <strong>Removal</strong> <strong>Tool</strong> <strong>Kit</strong> is not to be used to remove screws from an External HexImplant.Warnings:The Certain <strong>Screw</strong> <strong>Removal</strong> <strong>Tool</strong> <strong>Kit</strong> and its components are intended to be used only with<strong>BIOMET</strong> <strong>3i</strong> Certain Implant screws.Precautions:Slight to moderate pressure is to be applied when using the components.Reuse of <strong>BIOMET</strong> <strong>3i</strong> products that are labeled for single-use may result in product contamination,patient infection and/or failure of the device to perform as intended.Cleaning and Sterilization:Since the components of the Certain <strong>Screw</strong> <strong>Removal</strong> <strong>Tool</strong> <strong>Kit</strong> are reusable, these must be cleanedand sterilized prior to use. Refer to P-IFSCSS for complete information.Side Effects:When used according to these instructions, there are no known side effects.Caution:Federal law restricts this device to sale by or on the order of a licensed dentist.Components of the <strong>ISRT10</strong> are:ISRT01Certain HandTapISRT05Certain GuideHandleISRT06<strong>Screw</strong> <strong>Removal</strong><strong>Tool</strong>ISRT07Manual ReversingDrillIWSU30Certain Waxing<strong>Screw</strong>/Guide PinOSSEOTITE ®Certain ® ImplantIUNIHG <strong>Screw</strong>(Broken)ISRT05 Certain ® GuideHandleOSSEOTITE ® Certain ®ImplantIUNIHG <strong>Screw</strong> (Broken)ISRT05 Certain ® GuideHandleISRT07 ManualReversing DrillOSSEOTITE ® Certain ®ImplantIUNIHG <strong>Screw</strong> (Broken)Instructions:Step 1: Remove abutment and coronal endof broken screw from implant.Step 2: Align and insert the ISRT05 CertainGuide Handle into the broken screwsite. Seat the handle assembly fullyon the platform of the implant withthe hex aligned. Note: The ISRT05Guide Handle fits both standard and3.25mm(D) Certain Implants.Step 3: Insert the ISRT07 ManualReversing Drill into the ISRT05Guide Handle. Firmly seat the drillpoint(s) onto the surface of thebroken screw inside the implant.Slowly (with slight to moderatepressure on the screw) turn theISRT07 Manual Reversing Drill oneto two revolutions in the reversedirection (counter-clockwise). Donot continue to loosen the screwfrom the implant.
enISRT07 ManualReversing DrillISRT05 Certain ® GuideHandleIUNIHG <strong>Screw</strong> (Broken)Step 4: Remove the ISRT07 ManualReversing Drill and then removethe ISRT05 Guide Handle from theimplant.IWSU30 Certain ®Waxing <strong>Screw</strong>/Guide PinOSSEOTITE ® Certain ®ImplantStep 7: After the broken screw has beenremoved, insert the IWSU30 CertainWaxing <strong>Screw</strong>/Guide Pin to evaluatethe integrity of the internal threadsof the implant. If the IWSU30 doesnot rotate easily into the implant,proceed to Step 8. If the IWSU30rotates easily into the implant, youmay proceed in placement of thenew abutment.ISRT06 <strong>Screw</strong><strong>Removal</strong> <strong>Tool</strong>OSSEOTITE ® Certain ®ImplantIUNIHG <strong>Screw</strong> (Broken)Step 5: Insert the ISRT06 <strong>Screw</strong> <strong>Removal</strong><strong>Tool</strong> into the implant and seat thetool onto the top portion of thebroken screw. Press onto the screwwith slight to moderate pressure toengage/capture the screw. Rotatethe tool in the reverse direction(counter-clockwise) severalrotations. The screw should releasefrom the implant internal threads.ISRT01 Certain ®Hand TapOSSEOTITE ® Certain ®ImplantStep 8: If the IWSU30 did not rotateeasily into the internal threadsof the implant, insert the ISRT01Certain Hand Tap into the implant.Rotate the ISRT01 in a clockwisedirection to rethread the implant.Before replacing the abutment,checking the internal threads withthe IWSU30 Certain Waxing <strong>Screw</strong>/Guide Pin is recommended. Oncethe integrity of the implant threadshas been verified, the abutmentmay be replaced.ISRT06 <strong>Screw</strong><strong>Removal</strong> <strong>Tool</strong>IUNIHG <strong>Screw</strong> (Broken)OSSEOTITE ® Certain ®ImplantStep 6: Remove the ISRT06 <strong>Screw</strong><strong>Removal</strong> <strong>Tool</strong> from the implant.The fractured screw should remaincaptured in the ISRT06. The screwcan be removed by pulling it out ofthe tool tip. If the tool fails to catchthe screw, repeat steps 2 – 5 untilthe screw is extracted from theimplant.Batch codeCaution, consult accompanyingdocumentsConsult Instructions for UseCatalogue numberBy prescription only
Indicazioni:Nell’improbabile caso di rottura della vite, il <strong>Kit</strong> strumento di rimozione per viti Certain ® (<strong>ISRT10</strong>)agevola l’estrazione della vite rotta dalle filettature interne dell’impianto OSSEOTITE ® Certain.Controindicazioni:Il <strong>Kit</strong> strumento di rimozione per viti Certain non deve essere usato per estrarre viti da unimpianto con esagono esterno.Avvertenze:Il <strong>Kit</strong> strumento di rimozione per viti Certain e i suoi componenti sono previsti per essere utilizzatiesclusivamente con le viti per impianto Certain <strong>BIOMET</strong> <strong>3i</strong>.Precauzioni:Quando si utilizzano i componenti occorre applicare una pressione da lieve a moderata.Il riutilizzo dei prodotti <strong>BIOMET</strong> <strong>3i</strong> contrassegnati come monouso può causare la contaminazionedel prodotto, infezioni al paziente e/o un funzionamento del dispositivo diverso da quantoprevisto.Pulizia e sterilizzazione:Poiché i componenti del <strong>Kit</strong> strumento di rimozione per viti Certain sono riutilizzabili, devonoessere puliti e sterilizzati prima dell’uso. Per informazioni dettagliate, consultare P-IFSCSS.en itImpianto OSSEOTITE ®Certain ®Vite IUNIHG(rotta)Impugnatura dellaguida Certain ® ISRT05Impianto OSSEOTITE ®Vite IUNIHG (rotta)Istruzioni:Punto 1: Rimuovere dall’impianto il pilastroe l’estremità coronale della viterotta.Punto 2: Allineare e inserire l’impugnaturadella guida Certain ISRT05 nellaposizione della vite rotta. Inserirea fondo l’insieme dell’impugnaturasulla piattaforma dell’impiantocon l’esagono allineato. Nota -L’impugnatura della guida ISRT05è adatta agli impianti Certainstandard e da 3,25 mm (D).Certain ® Impugnatura dellaEffetti collaterali:Se il kit viene usato seguendo le presenti istruzioni, non vi sono effetti collaterali noti.Attenzione:Le leggi federali degli Stati Uniti limitano la vendita di questo prodotto ai soli odontoiatri oppuresu prescrizione medica.I componenti del kit <strong>ISRT10</strong> sono i seguenti:MaschiatoremanualeCertainISRT01Impugnaturadella guidaCertainISRT05Strumento dirimozioneper vitiISRT06Fresa di rimozionemanualeISRT07Vite perceratura/pernoguida CertainIWSU30guida Certain ® ISRT05Fresa di rimozionemanuale ISRT07Impianto OSSEOTITE ®Certain ®Vite IUNIHG (rotta)Punto 3: Inserire la fresa dirimozione manuale ISRT707nell’impugnatura della guidaISRT05. Inserire a fondo la puntadella fresa sulla superficie dellavite rotta all’interno dell’impianto.Lentamente ed esercitando sullavite una pressione da lieve amoderata, far ruotare la fresa dirimozione manuale ISRT07 di unoo due giri nel senso di rimozione(antiorario). Non continuare adallentare la vite dall’impianto.
en itFresa di rimozionemanuale ISRT07Impugnatura dellaguida Certain ® ISRT05Vite IUNIHG (rotta)Punto 4: Estrarre la fresa di rimozionemanuale ISRT07 e poi rimuoverel’impugnatura della guida ISRT05dall’impianto.Vite per ceratura/perno guidaCertain ® IWSU30Impianto OSSEOTITE ®Certain ®Punto 7: Una volta rimossa la vite rotta,inserire la vite per ceratura/pernoguida Certain IWSU30 per valutarel’integrità della filettatura internadell’impianto. Se lo strumentoIWSU30 non ruota agevolmentenell’impianto, procedere alpunto 8. Se lo strumento IWSU30ruota agevolmente nell’impianto, sipuò procedere al posizionamentodel nuovo pilastro.Strumento di rimozioneper viti ISRT06Impianto OSSEOTITE ®Certain ®Vite IUNIHG (rotta)Strumento di rimozioneper viti ISRT06Vite IUNIHG (rotta)Impianto OSSEOTITE ®Certain ®Punto 5: Inserire lo strumento di rimozioneper viti ISRT06 nell’impianto eposizionarlo sulla parte superioredella vite rotta. Premere sullavite con una pressione da lievea moderata per impegnarla/catturarla. Ruotare lo strumentonel senso di rimozione (antiorario).La vite dovrebbe staccarsi dallafilettatura interna dell’impianto.Punto 6: Estrarre lo strumento di rimozioneper viti ISRT06 dall’impianto.La vite rotta dovrebbe restareintrappolata nello strumentoISRT06. La vite può essererimossa estraendola dalla puntadello strumento. Se lo strumentonon riesce a catturare la vite,ripetere i punti da 2 a 5 fino adestrarre la vite dall’impianto.Codice del lottoMaschiatore manualeCertain ® ISRT01Impianto OSSEOTITE ®Certain ®Attenzione, consultare ladocumentazione allegataConsultare le istruzioni per l’usoPunto 8: Se lo strumento IWSU30 nonruota agevolmente nella filettaturainterna dell’impianto, inserirenell’impianto il maschiatoremanuale Certain ISRT01.Ruotare il maschiatore ISRT01in senso orario per ricreare lafilettatura dell’impianto. Primadi riposizionare il pilastro, siraccomanda di controllare lafilettatura interna con la vite perceratura/perno guida CertainIWSU30. Dopo aver verificatol’integrità della filettaturadell’impianto è possibileriposizionare il pilastro.Numero di catalogoSolo su prescrizione
Indicações:No caso improvável de fratura de parafusos, o kit de ferramentas para remoção de parafusosCertain ® (<strong>ISRT10</strong>) facilita a remoção de parafusos quebrados das roscas internas do implanteOSSEOTITE ® Certain.Contra-indicações:Não utilize o kit de ferramentas para remoção de parafusos Certain para remover parafusos deimplantes com hexágono externo.Advertências:O kit de ferramentas para remoção de parafusos Certain e seus componentes devem ser usadossomente com parafusos de implantes <strong>BIOMET</strong> <strong>3i</strong> Certain.en ptImplante OSSEOTITE ®Certain ®Parafuso IUNIHG(quebrado)Instruções:Etapa 1: Remova o abutment e aextremidade coronal do parafusoquebrado do implante.Precauções:É necessário aplicar pressão leve a moderada ao utilizar os componentes.A reutilização de produtos <strong>BIOMET</strong> <strong>3i</strong> rotulados como de uso único pode resultar em contaminaçãodo produto, infecção do paciente e/ou falha do dispositivo em realizar sua função como esperado.Limpeza e esterilização:Uma vez que os componentes do kit de ferramentas para remoção de parafusos Certain sãoreutilizáveis, os mesmos devem ser limpos e esterilizados antes de cada uso. Consulte P-IFSCSSpara obter informações completas.Efeitos colaterais:Quando usado de acordo com estas instruções, não há efeitos colaterais conhecidos.Cabo guia ISRT05Certain ®Implante OSSEOTITE ®Parafuso IUNIHG(quebrado)Etapa 2: Alinhe e insira o cabo guiaISRT05 Certain no local doparafuso quebrado. Assentetotalmente o conjunto do cabona plataforma do implante como hexágono alinhado. Nota: Ocabo guia ISRT05 se adapta aosimplantes Certain convencionais ede 3,25 mm (D).Certain ® Cabo guia ISRT05Atenção:As leis federais dos EUA restringem a venda deste dispositivo por ou a pedido de um dentistalicenciado.Os componentes da ferramenta <strong>ISRT10</strong> são:MachomanualISRT01CertainCabo guiaISRT05CertainFerramentapara remoçãode parafusosISRT06Broca reversívelmanualISRT07Pinoguia/parafusode enceramentoIWSU30CertainCertain ®Broca reversívelmanual ISRT07Implante OSSEOTITE ®Certain ®Parafuso IUNIHG(quebrado)Etapa 3: Insira a broca reversível manualISRT07 no cabo guia ISRT05.Assente com firmeza a(s) ponta(s)da broca na superfície do parafusoquebrado no interior do implante.Gire vagarosamente (com pressãoleve a moderada no parafuso) abroca reversível manual ISRT07uma ou duas voltas no sentidoinverso (anti-horário). Nãocontinue até o afrouxamento doparafuso do implante.
en ptBroca reversívelmanual ISRT07Cabo guia ISRT05Certain ®Parafuso IUNIHG(quebrado)Etapa 4: Remova a broca reversível manualISRT07 e, em seguida, remova ocabo guia ISRT05 do implante.Pino guia/parafuso deenceramento IWSU30Certain ®Implante OSSEOTITE ®Certain ®Etapa 7: Após a remoção do parafusoquebrado, insira o pino guia/parafuso de enceramento IWSU30Certain para avaliar a integridadedas roscas internas do implante.Caso a ferramenta IWSU30 nãogire com facilidade para dentro doimplante, vá para a etapa 8. Casoa ferramenta IWSU30 gire comfacilidade para dentro do implante,prossiga até a colocação do novoabutment.Ferramenta pararemoção de parafusosISRT06Implante OSSEOTITE ®Certain ®Parafuso IUNIHG(quebrado)Ferramenta pararemoção de parafusosISRT06Parafuso IUNIHG(quebrado)Implante OSSEOTITE ®Certain ®Etapa 5: Insira a ferramenta para remoçãode parafusos ISRT06 no implantee assente a ferramenta na porçãosuperior do parafuso quebrado.Aplique pressão leve a moderadano parafuso para engatar/capturaro mesmo. Gire a ferramenta nosentido inverso (anti-horário) porvárias voltas. O parafuso se soltarádas roscas internas do implante.Etapa 6: Remova a ferramenta pararemoção de parafusos ISRT06 doimplante. O parafuso fraturadopermanecerá capturado naferramenta ISRT06. Remova oparafuso puxando-o para forada ponta da ferramenta. Caso aferramenta não consiga capturar oparafuso, repita as etapas de 2 a 5até extrair o parafuso do implante.Código de sérieMacho manual ISRT01Certain ®Implante OSSEOTITE ®Certain ®Precaução, consulte os documentosanexosConsultar as instruções de usoEtapa 8: Caso a ferramenta IWSU30 nãotenha girado com facilidade paradentro das roscas internas doimplante, insira o macho manualISRT01 Certain no implante. Girea ferramenta ISRT01 no sentidohorário para rosquear novamenteo implante. Antes de recolocar oabutment, é recomendável verificaras roscas internas com o pinoguia/parafuso de enceramentoIWSU30 Certain. Depois deverificar a integridade das roscasdo implante, o abutment poderáser recolocado.Número de catálogoSomente sob prescrição médica
Indications :Dans l’hypothèse peu probable d’une fracture de vis, le kit de retrait de vis cassées Certain ®(<strong>ISRT10</strong>) facilite le retrait d’une vis cassée du filetage intérieur de l’implant OSSEOTITE ® Certain.Contre-indications :Le kit de retrait de vis cassées Certain ne doit pas être utilisé pour le retrait de vis d’un implantà Hexagone Externe.Avertissements :Le kit de retrait de vis cassées Certain et ses composants sont destinés à être utilisés uniquementavec les vis pour implants Certain <strong>BIOMET</strong> <strong>3i</strong>.Précautions :Appliquer une pression légère à modérée lors de l’utilisation de ces composants.Une réutilisation des produits <strong>BIOMET</strong> <strong>3i</strong> étiquetés comme étant à usage unique peut produireune contamination du produit, une infection chez le patient et/ou l’échec des performancesprévues du dispositif.Nettoyage et stérilisation :Comme les composants du kit de retrait de vis cassées Certain sont réutilisables, ils doivent êtrenettoyés et stérilisés avant l’emploi. Consulter P-IFSCSS pour des informations complètes.Effets secondaires :Lorsqu’il est utilisé conformément à ces instructions, il n’existe aucun effet secondaire connu.en frImplant OSSEOTITE ®Certain ®IUNIHG Vis(cassée)ISRT05 Poignée-guideCertain ®Implant OSSEOTITE ®IUNIHG Vis (cassée)Instructions :Étape 1 : Retirer de l’implant le pilier etl’extrémité coronaire de la viscassée.Étape 2 : Aligner et insérer la poignée-guideCertain ISRT05 dans le site dela vis cassée. Placer l’ensemblepoignée-guide entièrement surla plateforme de l’implant avecl’hexagone aligné. Remarque : Lapoignée-guide ISRT05 est adaptéeaux implants Certain standard etde 3,25 mm (D).Certain ® ISRT05 Poignée-guideAttention :Les lois fédérales en vigueur aux États-Unis n’autorisent la vente de ce dispositif que par ou surinstructions d’un dentiste homologué.Les composants du kit de retrait de vis cassées <strong>ISRT10</strong> sont les suivants :ISRT01TaraudmanuelCertainISRT05Poignée-guideCertainISRT06Outil de retraitde visISRT07Foret de démontemanuelIWSU30Vis delaboratoire/Tigeguide CertainCertain ®ISRT07 Foretde démonte manuelImplant OSSEOTITE ®Certain ®IUNIHG Vis (cassée)Étape 3 : Insérer le foret de démontemanuel ISRT07 dans la poignéeguideISRT05. Placer fermementla ou les pointes du foret surla surface de la vis cassée àl’intérieur de l’implant. Lentement(et en exerçant une pressionlégère à modérée sur la vis), faireun ou deux tours en sens inverse(sens anti-horaire) avec le foretde démonte manuel ISRT07. Nepas continuer à desserrer la vis del’implant.
en frISRT07 Foretde démonte manuelISRT05 Poignée-guideCertain ®IUNIHG Vis (cassée)Étape 4 : Retirer le foret de démontemanuel ISRT07, puis retirerla poignée-guide ISRT05 del’implant.IWSU30Vis de laboratoire/Tigeguide Certain ®Implant OSSEOTITE ®Certain ®Étape 7 : Une fois que la vis cassée aété retirée, insérer la vis delaboratoire/tige guide CertainIWSU30 pour évaluer l’intégritédu filetage intérieur de l’implant.Si la vis de laboratoire/tige guideIWSU30 ne tourne pas facilementdans l’implant, passer à l’étape 8.Si la vis de laboratoire/tige guideIWSU30 tourne facilement dansl’implant, procéder à la pose dunouveau pilier.ISRT06 Outilde retrait de visImplant OSSEOTITE ®Certain ®IUNIHG Vis (cassée)ISRT06 Outilde retrait de visIUNIHG Vis (cassée)Implant OSSEOTITE ®Certain ®Étape 5 : Insérer l’outil de retrait de visISRT06 dans l’implant, puis placerl’outil sur la partie supérieure dela vis cassée. Appuyer sur la visen exerçant une pression légère àmodérée pour engager/capturer lavis. Tourner l’outil en sens inverse(sens anti-horaire) en effectuantplusieurs rotations. La vis doit sedégager du filetage intérieur del’implant.Étape 6 : Retirer l’outil de retrait de visISRT06 de l’implant. La visfracturée doit rester capturée dansl’outil de retrait de vis ISRT06.Retirer la vis en tirant dessus pourl’extraire de l’extrémité de l’outil.Si l’outil ne retient pas la vis,répéter les étapes 2 à 5 jusqu’àce que la vis soit extraite del’implant.Numéro de lotAttention, consulter ladocumentation jointeISRT01 Taraud manuelCertain ®Implant OSSEOTITE ®Certain ®Consulter le mode d’emploiÉtape 8 : Si la vis de laboratoire/tigeguide IWSU30 ne tournaitpas facilement dans le filetageintérieur de l’implant, insérer letaraud manuel Certain ISRT01dans l’implant. Tourner le taraudmanuel ISRT01 dans le senshoraire pour rétablir le filetage del’implant. Avant de remplacer lepilier, il est conseillé de vérifierle filetage intérieur à l’aide dela vis de laboratoire/tige guideCertain IWSU30. Une fois quel’intégrité du filetage de l’implanta été vérifiée, le pilier peut êtreremplacé.Numéro de catalogueUniquement sur ordonnance
Indikationen:Im unwahrscheinlichen Fall eines Bruchs der Schraube erleichtert das Certain ® -Schraubenentfernungs-Werkzeugset (<strong>ISRT10</strong>) die Entfernung einer gebrochenen Schraube ausdem Innengewinde eines OSSEOTITE ® Certain-Implantats.Kontraindikationen:Das Certain-Schraubenentfernungs-Werkzeugset darf nicht zur Entfernung von Schrauben ausImplantaten mit Außensechskant verwendet werden.Warnhinweise:Das Certain-Schraubenentfernungs-Werkzeugset und seine Bestandteile sind nur zur Verwendungmit <strong>BIOMET</strong> <strong>3i</strong> Certain-Implantatschrauben vorgesehen.Vorsichtsmaßnahmen:Bei der Benutzung der Bestandteile ist leichter bis mäßiger Druck anzuwenden.Die Wiederverwendung von <strong>BIOMET</strong> <strong>3i</strong> Produkten, die als Produkte zum einmaligen Gebrauchgekennzeichnet sind, kann zu einer Kontamination des Produkts, zu einer Infektion des Patientenund/oder zum Verlust der vorgesehenen Funktion des Produkts führen.Reinigung und Sterilisation:Da die Bestandteile des Certain-Schraubenentfernungs-Werkzeugsets wiederverwendbar sind,müssen sie vor dem Gebrauch gereinigt und sterilisiert werden. Genaue Angaben finden sichim P-IFSCSS.Nebenwirkungen:Bei Verwendung gemäß dieser Gebrauchsanleitung sind keine Nebenwirkungen bekannt.Achtung:Nach den in den USA geltenden gesetzlichen Bestimmungen darf dieses Gerät nur durch einenZahnarzt oder auf zahnärztliche Anordnung verkauft werden.Die Bestandteile des <strong>ISRT10</strong> sind:ISRT01Certain-Hand-GewindeschneiderISRT05Certain-FührungsgriffISRT06SchraubenentfernungswerkzeugISRT07Hand-AusdrehbohrerIWSU30Certain-Aufwachsschraube/Führungsstiften deOSSEOTITE ®Certain ® -ImplantatIUNIHG Schraube(gebrochen)ISRT05 Certain ® -FührungsgriffOSSEOTITE ® Certain ® -ImplantatIUNIHG Schraube(gebrochen)ISRT05 Certain ® -FührungsgriffISRT07 Hand-AusdrehbohrerOSSEOTITE ® Certain ® -ImplantatIUNIHG Schraube(gebrochen)Anweisungen:Schritt 1: Abutment und koronales Ende dergebrochenen Schraube aus demImplantat entfernen.Schritt 2: Den Certain-Führungsgriff(ISRT05) auf die Positionder gebrochenen Schraubeausrichten und einführen. DenGriff vollständig auf die Plattformdes Implantats aufsetzen, wobeider Sechskant ausgerichtet seinmuss. Hinweis: Der Führungsgriff(ISRT05) passt sowohl aufStandard-Certain-Implantatewie auf Certain-Implantate mit3,25 mm Durchmesser.Schritt 3: Den Hand-Ausdrehbohrer (ISRT07)in den Führungsgriff (ISRT05)einsetzen. Die Spitze(n) desBohrers fest auf die Bruchstelleder Schraube im Implantatdrücken. Den Hand-Ausdrehbohrer(ISRT07) unter leichter bismäßiger Druckausübung auf dieSchraube langsam ein bis zweiUmdrehungen links herum (gegenden Uhrzeigersinn) drehen. DieSchraube nicht weiter aus demImplantat losdrehen.
en deISRT07 Hand-AusdrehbohrerISRT05 Certain ® -FührungsgriffIUNIHG Schraube(gebrochen)Schritt 4: Zuerst den Hand-Ausdrehbohrer(ISRT07) und dann denFührungsgriff (ISRT05) vomImplantat abnehmen.IWSU30 Certain ® -Aufwachsschraube/FührungsstiftOSSEOTITE ® Certain ® -ImplantatSchritt 7: Nach der Entfernung dergebrochenen Schraube dieCertain-Aufwachsschraube/Führungsstift (IWSU30)einsetzen, um das Innengewindedes Implantats auf seineUnversehrtheit zu prüfen. Wennsich die IWSU30 nicht mühelos indas Implantat eindrehen lässt, mitSchritt 8 fortfahren. Wenn sich dieIWSU30 mühelos in das Implantateindrehen lässt, mit der Insertiondes neuen Abutments fortfahren.ISRT06 SchraubenentfernungswerkzeugOSSEOTITE ® Certain ® -ImplantatIUNIHG Schraube(gebrochen)ISRT06 SchraubenentfernungswerkzeugIUNIHG Schraube(gebrochen)OSSEOTITE ® Certain ® -ImplantatSchritt 5: Das Schraubenentfernungswerkzeug(ISRT06) in dasImplantat einführen und aufdie Oberseite der gebrochenenSchraube aufsetzen. Das Werkzeugmit leichtem bis mäßigem Druckauf die Schraube drücken, umdiese zu erfassen. Das Werkzeugmehrere Umdrehungen linksherum (gegen den Uhrzeigersinn)drehen. Die Schraube sollte sichjetzt aus dem Innengewinde desImplantats lösen.Schritt 6: Das Schraubenentfernungswerkzeug(ISRT06) vomImplantat abnehmen. Diegebrochene Schraube sollte imISRT06 stecken bleiben. DieSchraube lässt sich nun aus derSpitze des Werkzeugs ziehen.Falls das Werkzeug die Schraubenicht erfasst, die Schritte2-5 solange wiederholen, bisdie Schraube aus dem Implantatextrahiert wird.ISRT01 Certain ® -Hand-GewindeschneiderOSSEOTITE ® Certain ® -ImplantatChargenbezeichnungVorsicht, Begleitunterlagen beachtenGebrauchsanleitung beachtenSchritt 8: Wenn sich die IWSU30 nichtmühelos in das Implantateindrehen ließ, den Certain-Hand-Gewindeschneider (ISRT01)in das Implantat einsetzen.Den ISRT01 im Uhrzeigersinndrehen, um das Gewinde imImplantat nachzuschneiden. Esempfiehlt sich eine Überprüfungdes Innengewindes mit derCertain-Aufwachsschraube/Führungsstift (IWSU30) vor demWiederaufsetzen des Abutments.Wenn die Unversehrtheit desImplantatgewindes bestätigtwurde, kann das Abutment wiederaufgesetzt werden.KatalognummerNur auf ärztliche Verschreibung
Indicaciones:En el caso improbable de fractura de un tornillo, el kit de herramientas de extracción de tornillosCertain ® (<strong>ISRT10</strong>) facilita la extracción de tornillos rotos de las roscas internas de implantesOSSEOTITE ® Certain.Contraindicaciones:El kit de herramientas de extracción de tornillos Certain no está indicado para extraer tornillos deimplantes de hexágono externo.Advertencias:El kit de herramientas de extracción de tornillos Certain y sus componentes están indicados parautilizarse solamente con tornillos de implantes <strong>BIOMET</strong> <strong>3i</strong> Certain.Precauciones:Al utilizar los componentes hay que aplicar una presión de ligera a moderada.La reutilización de productos <strong>BIOMET</strong> <strong>3i</strong> marcados para un solo uso puede provocar lacontaminación de los productos, infecciones en los pacientes y el funcionamiento incorrectodel dispositivo.Limpieza y esterilización:Al ser reutilizables, los componentes del kit de herramientas de extracción de tornillos Certaindeben limpiarse y esterilizarse antes de su uso. Para obtener información completa, consulteP-IFSCSS.en esImplante OSSEOTITE ®Certain ®Tornillo IUNIHG(roto)Mango de guía Certain ®ISRT05Implante OSSEOTITE ®Tornillo IUNIHG (roto)Instrucciones:Paso 1: Extraiga el pilar y el extremocoronal del tornillo roto delimplante.Paso 2: Alinee e introduzca el mango deguía Certain ISRT05 en el lugar deltornillo roto. Asiente por completoel conjunto del mango sobre laplataforma del implante con elhexágono alineado. Nota: El mangode guía ISRT05 se ajusta a losimplantes Certain tanto estándarcomo de 3,25 mm (D).Certain ® Mango de guía Certain ®Efectos secundarios:Cuando el producto se utiliza siguiendo estas instrucciones no se conocen efectos secundarios.Atención:La ley federal limita la venta de este dispositivo a dentistas autorizados o bajo prescripciónfacultativa.Los componentes del <strong>ISRT10</strong> son:ISRT01Teraja manualCertainISRT05Mango de guíaCertainISRT06Herramienta deextracción detornillosISRT07Fresa de inversiónmanualIWSU30Tornillo deencerado/pinguía CertainISRT05Fresa de inversiónmanual ISRT07Implante OSSEOTITE ®Certain ®Tornillo IUNIHG (roto)Paso 3: Inserte la fresa de inversiónmanual ISRT07 en el mango deguía ISRT05. Asiente firmementela(s) punta(s) de las fresas sobrela superficie del tornillo roto en elinterior del implante. Lentamente(aplicando una presión de ligera amoderada sobre el tornillo), gire lafresa de inversión manual ISRT07una o dos revoluciones en direccióninversa (en sentido contrario alde las agujas del reloj). No sigaaflojando el tornillo del implante.
en esFresa de inversiónmanual ISRT07Mango de guía Certain ®ISRT05Tornillo IUNIHG (roto)Paso 4: Extraiga la fresa de inversiónmanual ISRT07 y, a continuación,extraiga el mango de guía ISRT05del implante.Tornillo de encerado/pinguía Certain ® IWSU30Implante OSSEOTITE ®Certain ®Paso 7: Una vez extraído el tornillo roto,inserte el tornillo de encerado/pinguía Certain IWSU30 paracomprobar que las roscas internasdel implante están en buen estado.Si el IWSU30 no gira con facilidaden el implante, vaya al paso 8. Siel IWSU30 gira con facilidad en elimplante, puede proceder a colocarel pilar nuevo.Herramienta deextracción de tornillosISRT06Implante OSSEOTITE ®Certain ®Tornillo IUNIHG (roto)Paso 5: Introduzca la herramienta deextracción de tornillos ISRT06 enel implante y asiente la herramientasobre la parte superior del tornilloroto. Aplique una presión de ligeraa moderada sobre el tornillo paraprenderlo. Gire varias veces laherramienta en dirección inversa(en sentido contrario al de lasagujas del reloj). El tornillo deberásoltarse de las roscas internas delimplante.Terraja manual Certain ®ISRT01Implante OSSEOTITE ®Certain ®Paso 8: Si el IWSU30 no giró con facilidaden las roscas internas del implante,inserte la terraja manual CertainISRT01 en el implante. Gire laISRT01 en el sentido de las agujasdel reloj para volver a roscar elimplante. Antes de volver a colocarel pilar, se recomienda comprobarlas roscas internas con el tornillo deencerado/pin guía Certain IWSU30.Tras comprobar que las roscas delimplante están en buen estado,puede volverse a colocar el pilar.Herramienta deextracción de tornillosISRT06Tornillo IUNIHG (roto)Implante OSSEOTITE ®Certain ®Paso 6: Extraiga la herramienta deextracción de tornillos ISRT06 delimplante. El tornillo fracturadodeberá permanecer prendido en laISRT06. El tornillo puede extraersetirando de él hasta sacarlo dela punta de la herramienta. Si laherramienta no prende el tornillo,repita los pasos del 2 al 5 hastaextraer el tornillo del implante.Código de lotePrecaución, consulte losdocumentos adjuntosConsulte las instrucciones de usoNúmero de catálogoSólo con receta
For Technical Assistance Contact:Per assistenza tecnica rivolgersi a:Para assistência técnica, entre em contato com:Pour l’assistance technique, contacter :Bei technischen Fragen wenden Sie sich bitte an:Para obtener asistencia técnica, póngase en contacto con:<strong>BIOMET</strong> <strong>3i</strong>4555 Riverside DrivePalm Beach Gardens, FL 334101.800.342.5454Outside U.S. + 561.776.6700Fax: + 561.776.1272www.biomet<strong>3i</strong>.com<strong>BIOMET</strong> <strong>3i</strong> Dental Iberica S.L.WTC Almeda Park, Ed.1, Pl.1 aPl. de la Pau s/n,08940 – Cornella de Llobregat(Barcelona) SpainP-LBLCSRTPhone: + 34 934 705 500Rev. CFax: + 34 933 717 849 07/10