TERMÃMETRO DIGITAL - Ega Master
TERMÃMETRO DIGITAL - Ega Master
TERMÃMETRO DIGITAL - Ega Master

Create successful ePaper yourself
Turn your PDF publications into a flip-book with our unique Google optimized e-Paper software.
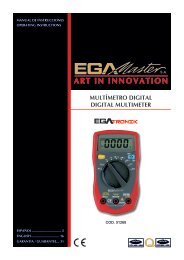
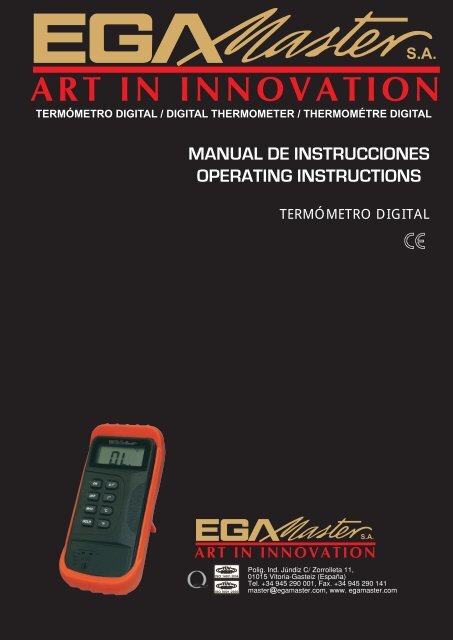
TERMÓMETRO <strong>DIGITAL</strong> / <strong>DIGITAL</strong> THERMOMETER / THERMOMÉTRE <strong>DIGITAL</strong>TERMÓMETRO <strong>DIGITAL</strong>
<strong>DIGITAL</strong> THERMOMETERPARTS OF THERMOMETER1. LCD Display2. ON/OFF Switch: The ON/OFF key turns the thermometer on or off.3. HOLD: Pressing the HOLD key selects DATA HOLD mode, and symbol isindicated on the display. Pressing the HOLD key again cancels HOLD mode. Causingthe thermometer to resume taking measurements.4. ºC: Pressing the ºC key select degrees Celsius (ºC) scales on the display.5. ºF: Pressing the ºF key select degrees Celsius (ºF) scales on the display.6. 0.1: Pressing the 1.0 key select 1 degrees resolution. Range from -50.0º to 199.9º.1.0: Pressing the 1.0 key select 1 degrees resolution. Range from -50ºC to 1300ºC or -58ºF to 1999ºF.7. Thermocouple input Connector.SPECIFICATIONSELECTRICALAmbient operating rangeStorage temperatureHumidity0 to 50ºC32 to 122ºF-40 to 60ºC-40 to 140ºF0% to 90% ( 0 to 35ºC)0% to 70% ( 35 to 50ºC)
Range-50 ºC – 1300ºC-58ºC – 1999ºFAccuracy± 0.3% (-50 – 1000ºC)± 0.5% (1000 – 1300ºC)± 0.3% (-58 – 1999ºC)GENERALBatteryBattery lifeOver battery indicationMeasurement rateDisplayStandard 9V battery200 hoursHighest digit of (1) or (-1) is display2.5 measurements per second31/2 digital liquid crystal display (LCD) withmaximum reading of 1999TEMPERATURE MEASUREMENT1. Turn on the thermometer.2. Plug the thermocouple into the thermocouple input connector.3. Set the thermometer to desired function (ºC or ºF scale & 0.1 or 1.0 range).4. Perform measurement by contacting the object being measured with the probe sensor.5. Read the temperature on the display.• Max mode:To select Max mode and press the MAX key. The thermometer then records and updatesthe maximum values for the input. The MAX symbol appears on the display. Pressing theMAX key again to exit the MAX recording mode.In the MAX mode, press HOLD key to stop the recording of reading, press HOLD again toresume recording.To avoid electrical shock, do not use this instrument when voltages exceeding 24V AC or60V DC are present. The probe tip is electrically connected to the output terminals.OPEN THERMOCOUPLES INDICATIONThe highest digit of (1) is displayed if any of the following conditions occurs:• If no thermocouple is plugged into the thermocouple input connector.• If the thermocouple connected to the unit is broken or open-circuited.
TERMÓMETRO <strong>DIGITAL</strong>PARTES DEL TERMÓMETRO1. Pantalla LCD2. Interruptor ON/OFF: para encender o apagar el termómetro.3. HOLD: Presionar el botón HOLD para seleccionar la función DATA HOLD. Elsímbolo aparecerá visualizado en pantalla. Pulsar HOLD otra vez paracancelarlo.4. ºC: Pulsar el botón ºC para seleccionar la escala Celsius (ºC) en la pantalla.5. ºF: Pulsar l botón ºF para seleccionar la escala Farenheit (ºF) en la pantalla.6. 0.1: Pulsar el botón 1.0 para seleccionar la resolución de los grados a 1. Rangodesde -50.0º a 199.9º.7. 1.0: Pulsar el botón 1.0 para seleccionar la resolución de los grados a 1. rangodesde -50ºC a 1300ºC o - 58ºF to 1999ºF.8. Conector de entrada termo-par.ESPECIFICACIONESELECTRICASTemperatura operativaTemperatura de almacenajeHumedad0 a 50ºC32 a 122ºF-40 a 60ºC-40 a 140ºF0% a 90% ( 0 a 35ºC)0% to 70% ( 35 to 50ºC)
Rango-50 ºC – 1300ºC-58ºC – 1999ºFPrecisión± 0.3% (-50 – 1000ºC)± 0.5% (1000 – 1300ºC)± 0.3% (-58 – 1999ºC)GENERALBateríaVida de la bateríaIndicador de sobrecargaTasa de medidaPantallaBatería estándar 9V200 horasDigito mas alto (1) o (-1) visualizado2.5medidas por segundo31/2 pantalla de líquido cristalino (LCD) conuna lectura máxima de 1999MEDIDA DE TEMPERATURA1. Encender el termómetro.2. Introducir el cable en el conector de entrada (7).3. Seleccionar la función deseada (escala ºC o ºF & rango 0.1 o 1.0).4. Interpretar la medida por contacto con el objeto y la sonda.5. Leer la temperatura en la pantalla.• Modo Max:Para seleccionar el modo Máx., pulsar el botón Máx. El termómetro medirá el máximo valorde entrada. El símbolo Máx. aparecerá visualizado en pantalla. Pulsar Máx. otra vez paraquitar dicho modo.En dicho modo, presionar el botón HOLD para parar el valor leído; presionar el botónHOLD otra vez para visualizar el valor leído anteriormente.Para evitar un shock eléctrico, no usar este instrumento cuando los voltajes exceden de24V AC o 60V DC. La punta de la sonda está eléctricamente conectada al terminal desalida.INDICADOR DE ENTRADA TERMO-PAREl digito más alto (1) está visualizado si alguna de las siguientes condiciones ocurre:• Si el termo-par esta enchufado al conector de entrada termo-par.• Si el termo-par conectado a la unidad está roto o el circuito está abierto.
SPAINCERTIFICADODEGARANTIA- ARTICULO:.....................................................................................................- Nº DE SERIE:..............................- DISTRIBUIDOR:..............................................................................................- PAIS:........................................... TELEFONO:......................................- FECHA DE VENTA:......................................- NOMBRE DEL COMPRADOR:.......................................................................- TELEFONO DEL COMPRADOR:...................................SELLO DEL DISTRIBUIDOREGA MASTER GARANTIZA AL COMPRADOR DE ESTA MAQUINA LA GARANTIA TOTAL(DURANTE 12 MESES), DE LAS PIEZAS CON DEFECTOS DE FABRICACION.ESTA GARANTIA NO CUBRE AQUELLAS PIEZAS QUE POR SU USO NORMAL TIENEN UN DESGASTE.PARA OBTENER LA VALIDEZ DE LA GARANTIA , ES ABSOLUTAMENTE IMPRESCINDIBLE QUE COMPLETE Y REMITA ESTE DOCUMENTOA EGA MASTER , DENTRO DE LOS SIETE DIAS A PARTIR DE LA FECHA DE COMPRA.(EJEMPLAR PARA EGA MASTER)............................................................................................................................................................................................................................................................................................................SPAINCERTIFICADODEGARANTIA- ARTICULO:.....................................................................................................- Nº DE SERIE:..............................- DISTRIBUIDOR:..............................................................................................- PAIS:........................................... TELEFONO:......................................- FECHA DE VENTA:......................................- NOMBRE DEL COMPRADOR:.......................................................................- TELEFONO DEL COMPRADOR:...................................SELLO DEL DISTRIBUIDOREGA MASTER GARANTIZA AL COMPRADOR DE ESTA MAQUINA LA GARANTIA TOTAL(DURANTE 12 MESES), DE LAS PIEZAS CON DEFECTOS DE FABRICACION.ESTA GARANTIA NO CUBRE AQUELLAS PIEZAS QUE POR SU USO NORMAL TIENEN UN DESGASTE.PARA OBTENER LA VALIDEZ DE LA GARANTIA , ES ABSOLUTAMENTE IMPRESCINDIBLE QUE COMPLETE Y REMITA ESTE DOCUMENTOA EGA MASTER , DENTRO DE LOS SIETE DIAS A PARTIR DE LA FECHA DE COMPRA.(EJEMPLAR PARA EL CLIENTE)
GUARANTEESPAINCERTIFICATE- ITEM:..............................................................................................................- SERIE Nº:..........................................- DISTRIBUTOR:...............................................................................................- COUNTRY:......................................... PHONE:.......................................- SALE DATE:.......................................- BUYER NAME:................................................................................................- BUYER PHONE:.................................DISTRIBUTOR STAMPEGA MASTER GUARANTEES TO THE BUYER OF THIS MACHINE THE TOTAL WARRANTY(DURING 12 MONTHS), OF THE PIECES WITH MANUFACTURING FAULTS.THIS GUARANTEE DOES NOT COVER THOSE PIECES WORN OUT DUE TO A NORMAL USE.IN ORDER TO OBTAIN THE VALIDITY OF THIS WARRANTY , IT IS ABSOLUTELY NECESSARY TO FULFILL THIS DOCUMENTAND RESEND IT TO EGA MASTER WITHIN 7 DAYS FROM SALE DATE.(COPY FOR EGA MASTER)............................................................................................................................................................................................................................................................................................................GUARANTEESPAINCERTIFICATE- ITEM:..............................................................................................................- SERIE Nº:..........................................- DISTRIBUTOR:...............................................................................................- COUNTRY:......................................... PHONE:.......................................- SALE DATE:.......................................- BUYER NAME:................................................................................................- BUYER PHONE:.................................DISTRIBUTOR STAMPEGA MASTER GUARANTEES TO THE BUYER OF THIS MACHINE THE TOTAL WARRANTY(DURING 12 MONTHS), OF THE PIECES WITH MANUFACTURING FAULTS.THIS GUARANTEE DOES NOT COVER THOSE PIECES WORN OUT DUE TO A NORMAL USE.IN ORDER TO OBTAIN THE VALIDITY OF THIS WARRANTY , IT IS ABSOLUTELY NECESSARY TO FULFILL THIS DOCUMENTAND RESEND IT TO EGA MASTER WITHIN 7 DAYS FROM SALE DATE.(COPY FOR THE CUSTOMER)