DN 200/10/5 - Lomax
DN 200/10/5 - Lomax
DN 200/10/5 - Lomax
- No tags were found...
Create successful ePaper yourself
Turn your PDF publications into a flip-book with our unique Google optimized e-Paper software.
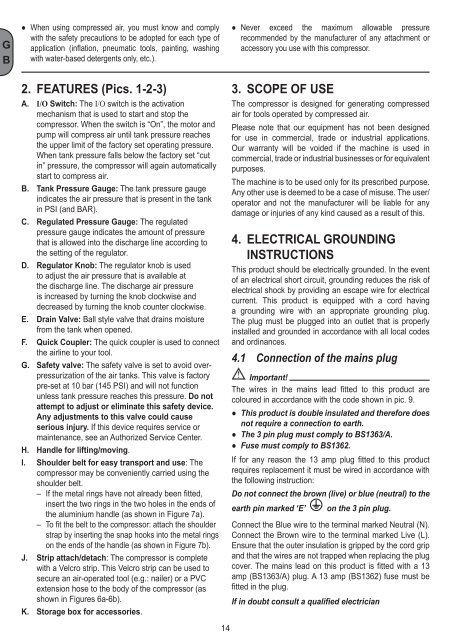
GB● When using compressed air, you must know and complywith the safety precautions to be adopted for each type ofapplication (inflation, pneumatic tools, painting, washingwith water-based detergents only, etc.).2. Features (Pics. 1-2-3)A. I/O Switch: The I/O switch is the activationmechanism that is used to start and stop thecompressor. When the switch is “On”, the motor andpump will compress air until tank pressure reachesthe upper limit of the factory set operating pressure.When tank pressure falls below the factory set “cutin” pressure, the compressor will again automaticallystart to compress air.B. Tank Pressure Gauge: The tank pressure gaugeindicates the air pressure that is present in the tankin PSI (and BAR).C. Regulated Pressure Gauge: The regulatedpressure gauge indicates the amount of pressurethat is allowed into the discharge line according tothe setting of the regulator.D. Regulator Knob: The regulator knob is usedto adjust the air pressure that is available atthe discharge line. The discharge air pressureis increased by turning the knob clockwise anddecreased by turning the knob counter clockwise.E. Drain Valve: Ball style valve that drains moisturefrom the tank when opened.F. Quick Coupler: The quick coupler is used to connectthe airline to your tool.G. Safety valve: The safety valve is set to avoid overpressurizationof the air tanks. This valve is factorypre-set at <strong>10</strong> bar (145 PSI) and will not functionunless tank pressure reaches this pressure. Do notattempt to adjust or eliminate this safety device.Any adjustments to this valve could causeserious injury. If this device requires service ormaintenance, see an Authorized Service Center.H. Handle for lifting/moving.I. Shoulder belt for easy transport and use: Thecompressor may be conveniently carried using theshoulder belt.– If the metal rings have not already been fitted,insert the two rings in the two holes in the ends ofthe aluminium handle (as shown in Figure 7a).– To fit the belt to the compressor: attach the shoulderstrap by inserting the snap hooks into the metal ringson the ends of the handle (as shown in Figure 7b).J. Strip attach/detach: The compressor is completewith a Velcro strip. This Velcro strip can be used tosecure an air-operated tool (e.g.: nailer) or a PVCextension hose to the body of the compressor (asshown in Figures 6a-6b).K. Storage box for accessories.● Never exceed the maximum allowable pressurerecommended by the manufacturer of any attachment oraccessory you use with this compressor.3. Scope of useThe compressor is designed for generating compressedair for tools operated by compressed air.Please note that our equipment has not been designedfor use in commercial, trade or industrial applications.Our warranty will be voided if the machine is used incommercial, trade or industrial businesses or for equivalentpurposes.The machine is to be used only for its prescribed purpose.Any other use is deemed to be a case of misuse. The user/operator and not the manufacturer will be liable for anydamage or injuries of any kind caused as a result of this.4. Electrical groundinginstructionsThis product should be electrically grounded. In the eventof an electrical short circuit, grounding reduces the risk ofelectrical shock by providing an escape wire for electricalcurrent. This product is equipped with a cord havinga grounding wire with an appropriate grounding plug.The plug must be plugged into an outlet that is properlyinstalled and grounded in accordance with all local codesand ordinances.4.1 Connection of the mains plugImportant!The wires in the mains lead fitted to this product arecoloured in accordance with the code shown in pic. 9.● This product is double insulated and therefore doesnot require a connection to earth.● The 3 pin plug must comply to BS1363/A.● Fuse must comply to BS1362.If for any reason the 13 amp plug fitted to this productrequires replacement it must be wired in accordance withthe following instruction:Do not connect the brown (live) or blue (neutral) to theearth pin marked ‘E’on the 3 pin plug.Connect the Blue wire to the terminal marked Neutral (N).Connect the Brown wire to the terminal marked Live (L).Ensure that the outer insulation is gripped by the cord gripand that the wires are not trapped when replacing the plugcover. The mains lead on this product is fitted with a 13amp (BS1363/A) plug. A 13 amp (BS1362) fuse must befitted in the plug.If in doubt consult a qualified electrician14


