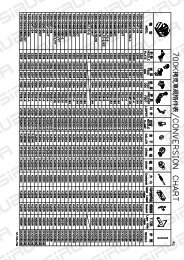
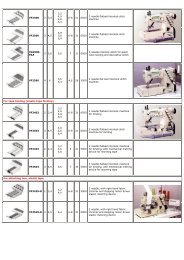
TYPES OF BAG CLOSURES / TIPOS DE CERRADO DE SACOSGB29905G Bag feed-in deviceThe spread paper, HDPE-foil or woven PP bag isfed into the sewing machine.Speed 11-23 m/min. at 50 Hz. Gear motor I =30:1.Depending on the length and filling height ofthe bag the seam can be adjusted to a depth of upto 120 mm from the top of the bag, standard setting30-40 mm. Suitable for sewing machines of stylesBC111P12-1M, -1A, -1B.BC191PT12-1M, -1A, -1B.G29905G, same as GB29905G, but short version.<strong>GBR29905</strong>G, same as GB29905G, but speed 9-16m/min. at 50 Hz.Gear motor I = 38:1.Suitable for sewing machines of stylesBC111P12 -1M, -1A, -1B, 80800R, RL, RLM.BC191PT12-1M, -1A, -1B.GR29905G, same as <strong>GBR29905</strong>G, but short version.93051FA, Bag-top fold-over device to fold the bagtop to the rear. Assembling to the bag feed-in devicesGB29905G and <strong>GBR29905</strong>G required.For all kinds of self-supporting bags.Performance test of bag material recommended.GB29910G Combined bag feed-in, trimming andtaping device with crepe tape folder. Width of tapenot adjustable. Folder available for 50, 55 and 60mm wide tapes. Please specify. Standard 50 mm.Speed 11-23 m/min. at 50 Hz. Gear motor I = 30:1.The paper or HDPE-foil bag top is trimmed approx.20 mm (max. 90 mm). Taped before sewing. Performancetest of bag material recommended.Suitable for sewing machines of styleBC111TA12-1M.G29910G, same as GB29910G, but short version.Suitable for sewing machines of styleBC111TA12-1M.GBR29910G, same as GB29910G, but speed 9-16m/min. at 50 Hz. Gear motor I = 38:1Suitable for sewing machines of stylesBC111TA12-1M, 80800UA, UAL, UALM.GR29910G, same as GBR29910G, but short version.GB29915G, Combined bag feed-in, trimming andfold-over device. Speed 11-23 m/min. at 50 Hz.Gear motor I = 30:1,Performance test of bag material recommended.The paper or HDPE-foil bag top is trimmed approx.20 mm (max. 50 mm), folded over to the rear byapprox. 30-40 mm and fed into the sewing machine.Suitable for sewing machines of stylesBC111P12-1M, -1A, -1B.GBR29915G, same as GB29915G, but speed 9-16m/min. at 50 Hz. Gear motor I = 38:1.Suitable for sewing machines of stylesBC111P12-1M, -1A, -1B, 80800R, RL, RLM.GBR29920G, Combined bag feed-in and trimmingdevice. Speed 9-16 m/min. at 50 Hz.Gear Motor I = 38:1. The paper or HDPE-foil bag topis trimmed approx. 20 mm (max. 90 mm).Taped after sewing.Performance test of bag material recommended.Suitable for sewing machine of stylesBC111KA12-1M, 80800TAL.GB29905G Alimentador de sacosEl saco de papel, folios de HDPE o polipropileno tejidoes introducido en la máquina de coser.Velocidad de 11-23 m/min. para 50 Hz. Piñón del motorI = 30:1. Dependiendo del largo y el peso del saco lleno,la costura puede ser ajustada a una profundidad dehasta 120 mm, con un ajuste estándar de 30 - 40 mm.Adecuado para las máquinas estilos BC111P12-1M, -1A, -1B, BC191PT12-1M, -1A, -1B.G29905G, igual a la GB29905G, pero en versión corta.<strong>GBR29905</strong>G, igual a la GB29905G, pero con una velocidadde 9-16 m/min. a 50 Hz.Piñón del motor I = 38:1.Adecuado para las máquinas estilosBC111P12-1M, -1A, -1B, 80800R, RL, RLM.BC191PT12-1M, -1A, -1B.GR29905G, igual a la <strong>GBR29905</strong>G, pero en versióncorta.93051FA, Con aditamento para doblar la parte superiordel saco hacia atrás. Solo funciona en conjunto con elalimentador de sacos modelos GB29905G y<strong>GBR29905</strong>G.Para todo tipo de sacos que se puedan mantener paradossobre si mismos. Se recomienda realizar un test delmaterial a usar.GB29910G Alimentador de sacos, cortador y pegadorde cintas combinado con un dobladillador. El ancho dela cinta no se puede ajustar, ya que el dobladillador soloestá disponible para cintas de 50, 55 y 60 mm. Favorespecificar el ancho. estándar 50 mm. Velocidad: 11-23m/min. a 50 Hz. Piñón del motor I = 30:1. El saco escortado aproximadamente a 20 mm (máx. a 90 mm). Lacinta es montada antes de pasar la costura. Se recomiendarealizar un test del material. Adecuado para lasmáquinas estilo BC111TA12-1M.G29910G, igual a la GB29910G, pero en versión corta.Adecuado para las máquinas estilo BC111TA12-1M.GBR29910G, igual a la GB29910G, pero con velocidadde 9-16 m/min. a 50 Hz. Piñón del motor I = 38:1.Adecuado para las máquinas estilos BC111TA12-1M,80800UA, UAL, UALM.GR29910G, igual a la GBR29910G, pero en versióncorta.GB29915G, Alimentador de sacos, cortador y dobladilladorsuperior combinado. Velocidad 11-23 m/min. a 50Hz. Piñón del motor I = 30:1.Se recomienda realizar un test del material. El saco escortado aproximadamente a 20 mm (máx. a 50 mm),doblado hacia atrás aproximadamente 30-40 mm y alimentadodentro del saco.Adecuado para las máquinas estilosBC111P12-1M, -1A, -1B.GBR29915G, igual a la GB29915G, pero con una velocidadde 9-16 m/min. a 50 Hz.Piñón del motor I = 38:1.Adecuado para las máquinas estilosBC111P12-1M, -1A, -1B, 80800R, RL, RLM.GBR29920G, Alimentador de sacos y cortador de cintascombinado. Velocidad de 9-16 m/min. a 50 Hz.Piñón del motor I = 38:1. El saco es cortado aproximadamentea 20 mm (máx. a 90 mm). La cinta es montadaantes de pasar la costura.Se recomienda realizar un test del material.Adecuado para las máquinas estilosBC111KA12-1M, 80800TAL.4
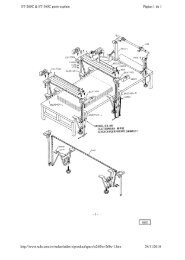
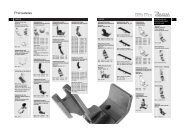
MAINTENANCEWhen sacking flour, salt, aggressive fertilizers, chemicals,etc. the feeding chains of the bag feed-in devicehave to be cleaned and lubricated daily to prevent corrosion.To clean and lubricate the feeding chains remove thelower cover plates (A, Fig. 1) which are fixed with 4screws each at the carrier plates (B, Fig. 1).The gears are lubricated once per month through thegrease nipple (A. Fig. 2). We recommend BP-Energrease or equivalent.ASSEMBLINGNOTE: Instructions stating direction or location, suchas right, left, front or rear of bag feed-in device, aregiven relative to operator’s position at the bag closingunit, unless otherwise noted.Mount the bag feed-in device (C, Fig. 1) with thebracket (D, Fig. 1) to the traverse (E, Fig. 1) on column.The carrier plates (B, Fig. 1) should be as closeas possible below the sewing machine (F, Fig. 1) withoutcontacting it. Fix this height setting between bagfeed-in device and bracket with supporting screw (G,Fig. 1). Tighten the two screws (H, Fig. 1). Align thebag feed-in device horizontally with the bracket relativeto the sewing machine. Rear chain should matchthe throat plate surface of the sewing machine, butwhen using GB29915, GBR29915 or 93051FA rearchain should be positioned in front of the throat platesurface depending on the thickness of the bag.Tighten the two screws (I, Fig. 1) and recheck theheight setting position of the bag feed-in device.Connect the plug of the bag feed-in device to the correspondingsocket on column switch box.MANTENIMIENTOCuando se ensaque harina, sal, fertilizantes, quimicos, etc., lascintas transportadoras del alimentador de sacos deben serlimpiadas y lubricadas diariamente para prevenir corrosión.Para limpiar y lubricar las cintas transortadoras quite las placasde cubierta inferiores (A, Fig. 1), fijadas con 4 tornillos cada unaa las placas corredizas (B, Fig. 1).Los piñones deben lubricarse una vez al mes a través del tuboroscado de unión (A, Fig. 2). Recomendamos el uso de BP-Energrease o su equivalente.MONTAJENOTA: Todas las indicaciones como derecho, izquierdo,adelante o atrás del alimentador de sacos, se refieren a laposicion del operario en frente de la máquina, a no ser que seindique lo contrario.Monte el alimentador de sacos (C, Fig. 1) con el soporte (D,Fig. 1) en el travesaño (E, Fig. 1) de la columna. Las placascorredizas (B, Fig. 1) deben quedar tan cerca como sea psoibledebajo de la máquina de coser (F, Fig. 1) pero sin tocarla.Asegure este ajuste entre el alimentador de sacos y el soportecon el tornillo de sujeción (G, Fig. 1). Apriete las tuercas (H,Fig. 1). Alinie el alimentador de sacos horizontalmente con elsoporte. La cadena posterior debe estar al nivel de la planchade aguja de la máquina de coser, pero cuando se usanGB29915, GBR29915 o 93051FA la cadena posterior debeestar posicionada en frente de la superficie de la plancha deaguja, dependiendo del grueso del saco. Apriete los tornillos (I,Fig. 1) y verifique la altura del alimentador de sacos.Conecte el enchufe del alimentador de sacos en el espaciocorrespondiente en la caja de interruptores de la columna.FIG. 1Short Version / Versión corta5