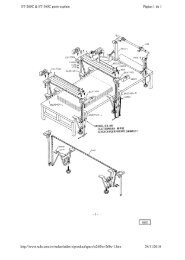
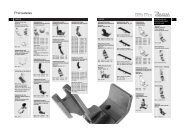
TIGHTENING AND ADJUSTING THE CHAINSSwitch off bag feed-in device at themain switch!Remove the two lower chain covers (A, Fig. 1). Mountthe two chains so, that the chain links are offset to eachother and the gaps between the chain links are positionedapprox. within the center of the chain links of theopposite chain (A, Fig. 4).After loosening the two nuts (B, Fig. 4) on the top ofcarrier plates and the nuts (L and R, Fig. 4) the chainscan be tightened with threaded bolts (D, Fig. 4). Caution,nuts (L, Fig. 4) have a left hand thread. the chainsshould be tightened just so, that they can be depressedmanually by 8 to 10 mm (5/16 to 25/64 in.) (see Fig.4A).NOTE: Do not over tighten chains. This may causechain breaking as well a damages on the carrier platesand the motor.The chain adjusters have to be mounted offset to eachother (see X, Fig. 4). Retighten nuts (B, L and R, Fig.4).The chain guides (G and H, Fig. 4A) are adjustable afterloosening screws (J, Fig. 4A) Set the two innerchain guides (G, Fig. 4A) parallel to each other and sothat the chains are not pushed away from the sprockets(E, Fig. 4A). The sprockets must engage fully betweenthe rolls of the chain links.APRETADO Y AJUSTE DE LAS CADENASApague el alimentador en el interruptorprincipal!Desmonte las dos cubiertas inferiores de las cadenas (A,Fig. 1). Monte las cadenas de manera tal que los dientesde la cadena queden uno frente al otro y las separacionesentre los dientes estén posicionadas aproximadamentedentro del centro de los dientes de la cadena opuesta (A,Fig. 4).Después de aflojar las dos tuerca (B, Fig. 4) en la partesuperior de la plancha transportadora y las tuercas (L y R,Fig. 4), las cadenas pueden ser apretadas con los pernosde ajuste (D, Fig. 4). Cuidado, las tuercas (L, Fig. 4) enroscana la izquierda. Las cadenas deben ser ajustadas demanera tal que al ser presionadas con la mano, se undirde 8 a 10 mm (Ver Fig. 4A).NOTA: No apriete demasiado las cadenas. Esto puedecausar rotura de la cadena y daños en las planchas transportadorasy el motor.Los ajustadores de las cadenas deben ser montados demanera tal que queden uno frente al otro (Ver X, Fig. 4).Apriete las tuercas (B, L y R, Fig. 4).Las guías de las cadenas (G y H, Fig. 4A) pueden serajustadas después de soltar los tornillos (J, Fig. 4A). Coloquelas dos guías internas de las cadenas (G, Fig. 4A) paralelamenteuna a la otra de manera que las cadenas nose salgan de los piñones (E, Fig. 4A). Los eslabones delas cadenas deben encajar perfectamente en los piñones.Set the two outer chain guides (H, Fig. 4A), withoutpresser, parallel and close to the chains. Retightenscrews (J, Fig. 4A) and mount the covers.Ajuste las guías de las cadenas externas (H, Fig. 4A) sinpresión, paralelas y cerca a las cadenas. Apriete los tornillos(J, Fig. 4A) y monte nuevamente las cubiertas.FIG. 4ADJUSTING THE CHAIN PRESSUREThe presser of the front roller chain can be adjustedwith stop screw and lock nut (K, Fig. 1). The stop screwis normally set so, that the chain in the front springloaded chain case just contacts the rear chain, withoutexerting any pressure on it. Depending on the type andthickness of the bag material, this setting sometimeshas to be changed slightly.FIG. 4AAJUSTE DE LA PRESION DE LA CADENALa presión de la cadena frontal puede ser ajustada con eltornillo tope y la contra tuerca (K, Fig. 1). El tornillo topenormalmente esta ajustado de manera tal que la cadenaen el resorte frontal de la caja toca la cadena posteriorligeramente, sin ejercer ninguna presión. Dependiendodel tipo y grosor del material del saco a cerrar, este ajustedebe cambiarse.8
ADJUSTING THE CHAIN PRESSURE (continued)In the sewing area of the sewing machine (K, Fig. 4A)the chains of the bag feed-in device should only guidethe bag, to avoid an interference of the intermittent feedof the sewing machine with the continuous feed ot thebag feed-in device. Therefore the chains open in thisarea by approx. 6 to 8 mm (15/64 to 5/16 in,) (see Fig.4A). If necessary, this opening can be enlarged or reducedslightly after loosening nuts (L, Fig. 4A) on thetop of the chain cases. Retighten nuts (L, Fig. 4A) onthe top of the chain cases. Retighten nuts (L, Fig. 4A).CAUTION! Do not pull the front chain case to the frontduring operation, because the chain may jump out ofthe sprocket.AJUSTE DE LA CADENA DE PRESION (Continuación)En el área de costura de la máquina de coser (K, Fig. 4A)las cadenas del alimentador de sacos solo deben guiar alsaco, para evitar cualquier interferencia de la alimentaciónintermitente de la máquina de coser con el alimentadorcontinuo del alimentador de sacos. Sin embargo, las cadenasabren en esta área aproximadamente 6 a 8 mm (verFig. 4A). De ser necesario, esta apertura puede alargarseo reducirse ligeramente después de aflojar las tuercas (L,Fig. 4A) en el tope de la caja de las cadenas. Apriete lastuercas (L, Fig. 4A) de nuevo.PRECAUCION! No hale el frente de la caja de las cadenasdurante operación, ya que éstas podrían salirse del piñón.ADJUSTING THE BAG-TOP FOLD-OVER DEVICEThe sword (1, page 18) and the deviating spiral (12,page 18) are adjustable forwards and backwards aswell as in the height. The back side of the sword ispositioned in front of the throat plate surface of thesewing machine depending on the thickness of thebag. The upper edge of the sword is set approx 20 mmabove the sewing needle. The end of the foldingsurface of the deviating spiral should match the throatplate surface and has to be positioned close to thesword with-out jamming the bag to be closed. Theguide (17, page 18) is used to control the height of thefolded edge of the bag top. Adjustments of the bag-topfold-over device depend on the bag material .ADJUSTING THE KNIVES AND TAPE FOLDER OFBAG FEED-IN DEVICE NOS. G29910, GR29910,GB29910, GBR29910 and GBR29920Switch off bag feed-in device at themain switch!The cutting height of the knives is adjustable from 50 to58 mm (1 31/32 to 2 9/32 in.), measured from the uppersurface of chain case (see Fig. 5). The standardsetting is 54 mm (2 1/8 in.).To replace the knives (A, B, Fig. 5), remove the chipchute, the left hand guard and the two guide rails (F,Fig. 5) which are fastened with four screws (E, Fig. 5).Turn the knives in a position where the screw (C, Fig.5) located in the hub of the lower knife (B, Fig. 5) is accessiblefrom the left. Loosen screw (C, Fig. 5) with thespecial screw driver No. 95620 and remove lower knife(B, Fig. 5), upper knife (A, Fig. 5) and spring (D, Fig. 5).NOTE: There is no screw in the hub of the upper knife(A, Fig. 5).When assembling, slip spring (D, Fig. 5) and upperknife (A, Fig. 5) on the front knife shaft. Turn the knifeto and fro, until the Woodruff key, cemented in the knifeshaft, engages with the key groove in the knife hub.Hold upper knife in position. Slip the lower knifeAJUSTE DEL DOBLADILLADOR SUPERIORLa espada (1, Página 18) y la espiral de desviación (12,Página 18) pueden ajustarse tanto hacia adelante o haciaatrás, como en su altura. La parte posterior de la espadase ajusta en frente de la superficie de la plancha de agujade la máquina de coser dependiendo del grosor del saco.La esquina superior de la espada esta ajustada aproximadamentea 20 mm sobre la aguja. El final de la superficiedel doblador de la espiral de desviación debe ajustarse lomas cerca posible a la espada sin que arrugue el saco acerrar. La guía (17, Página 18) se usa para controlar elpeso del borde doblado del tope del saco. Ajustes al dobladilladorsuperior dependen del material del saco.AJUSTE DE LAS CUCHILLAS Y EL ROLLO DE CINTADEL ALIMENTADOR DE SACOS Nº G29910, GR29910,GB29910, GBR29910 y GBR29920Apague el alimentador de sacos en elinterruptor principal.!La altura de corte de las cuchillas se puede ajustar de 50 a58 mm, medida desde la superficie superior de la caja delas cadenas (ver Fig. 5). El ajuste estándar es de 54 mm.Para cambiar las cuchillas (A, B, Fig. 5) retire el conductordel chip, el protector izquierdo y los dos rieles guía (F, Fig.5), que están atornillados con cuatro tornillos (E, Fig. 5).Mueva las cuchillas a una posición donde el tornillo (C,Fig. 5) localizado en el centro de la cuchilla inferior (B, Fig.5) sea accesible desde la izquierda. Suelte el tornillo (C,Fig. 5) con el destornillador especial parte Nº 95620 y retirela cuchilla inferior (B, Fig. 5), la cuchilla superior (A, Fig.5) y el resorte (D, Fig. 5).NOTA: La cuchilla superior no tiene un tornillo en su centro(A, Fig. 5).Para montar las cuchillas, deslice el resorte (D, Fig. 5) y lacuchilla superior (A, Fig. 5) en el eje de la cuchilla frontal.Muévala hacia delante y hacia atrás hasta que la cuña,cementada en el eje de la cuchilla, ajuste con el canal enel centro de la cuchilla. Mantenga la cuchilla en esta posicióny deslice la cuchilla inferior B, Fig. 5) en el eje de la9