CAPPA ASPIRANTE - Istruzioni per l'uso ... - Thermex
CAPPA ASPIRANTE - Istruzioni per l'uso ... - Thermex
CAPPA ASPIRANTE - Istruzioni per l'uso ... - Thermex

Create successful ePaper yourself
Turn your PDF publications into a flip-book with our unique Google optimized e-Paper software.
- 3 -
- 6 -
- 7 -
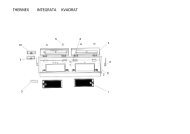
ITALIANOIGENERALITA’Leggere attentamente il contenuto del presente libretto inquanto fornisce importanti indicazioni riguardanti la sicurezzadi installazione, d’uso e di manutenzione. Conservare illibretto <strong>per</strong> ogni ulteriore consultazione. L’apparecchio è statoprogettato <strong>per</strong> uso in versione aspirante (evacuazione ariaall’esterno - Fig.1B), filtrante (riciclo aria all’interno - Fig.1A)o con motore esterno (Fig.1C).AVVERTENZE PER LA SICUREZZA1. Fare attenzione se funzionano contemporaneamente unacappa aspirante e un bruciatore o un focolare dipendentidall’aria dell’ambiente ed alimentati da un’energia diversada quella elettrica, in quanto la cappa aspirando toglieall’ambiente l’aria di cui il bruciatore o il focolare necessita<strong>per</strong> la combustione. La pressione negativa nel locale non devesu<strong>per</strong>are i 4 Pa (4x10⁻⁵ bar). Per un funzionamento sicuro,provvedere quindi ad un’opportuna ventilazione del locale.Per l’evacuazione esterna attenersi alle disposizioni vigentinel vostro paese.Prima di allacciare il modello alla rete elettrica:- Controllare la targa dati (posta all’interno dell’ ap<strong>per</strong>ecchio)<strong>per</strong> accettarsi che la tensione e potenza siano corrispondenti aquella della rete e la presa di collegamento sia idonea. In casodi dubbio interpellare un elettricista qualificato.- Se il cavo di alimentazione è danneggiato, esso deve esseresostituito da un cavo o un assieme speciali disponibile pressoil costruttore o il suo servizio assistenza tecnica.- Collegare il dispositivo all’alimentazione attraverso unaspina con fusibile 3A o ai due fili della bifase protetti da unfusibile 3A.2. Attenzione !In determinate circostanze gli elettrodomestici possonoessere <strong>per</strong>icolosi.A) Non cercare di controllare i filtri con la cappa infunzioneB) Non toccare le lampade e le zone adiacenti, durantee subito dopo l’uso prolungato dell’impianto diilluminazione.C) E’ vietato cuocere cibi alla fiamma sotto la cappaD) Evitare la fiamma libera, <strong>per</strong>ché dannosa <strong>per</strong> i filtri e<strong>per</strong>icolosa <strong>per</strong> gli incendiE) Controllare costantemente i cibi fritti <strong>per</strong> evitare chel’olio surriscaldato prenda fuocoF) Prima di effettuare qualsiasi manutenzione, disinserirela cappa dalla rete elettrica.G) Questo apparecchio non è destinato all’utilizzo da partedi bambini o <strong>per</strong>sone che necessitano di su<strong>per</strong>visione.H) Controllare che i bambini non giochino conl’apparecchio.I) Quando la cappa viene utilizzata contemporaneamentead apparecchi che bruciano gas o altri combustibili, illocale deve essere adeguatamente ventilato.L) Se le o<strong>per</strong>azioni di pulizia non vengono eseguite nelrispetto delle istruzioni, esiste il rischio che si sviluppiun incendio.Questo apparecchio è contrassegnato in conformità alla- 8 -Direttiva Europea 2002/96/EC, Waste Electrical and ElectronicEquipment (WEEE). Assicurandosi che questo prodotto siasmaltito in modo corretto, l’utente contribuisce a prevenire lepotenziali conseguenze negative <strong>per</strong> l’ambiente e la salute.Il simbolo sul prodotto o sulla documentazione diaccompagnamento indica che questo prodotto non deveessere trattato come rifiuto domestico ma deve essereconsegnato presso l’idoneo punto di raccolta <strong>per</strong> il riciclaggiodi apparecchiature elettriche ed elettroniche.Disfarsene seguendo le normative locali <strong>per</strong> lo smaltimentodei rifiuti. Per ulteriori informazioni sul trattamento, recu<strong>per</strong>oe riciclaggio di questo prodotto, contattare l’idoneo ufficiolocale, il servizio di raccolta dei rifiuti domestici o il negoziopresso il quale il prodotto è stato acquistato.ISTRUZIONI PER L’INSTALLAZIONELe o<strong>per</strong>azioni di montaggio e collegamento elettricodevono essere effettuate da <strong>per</strong>sonale specializzato.• Collegamento elettricoNota!Controllare la targa dati posta all’internodell’apparecchio:- Se sulla targa compare il simbolo ( ) significa chel’apparecchio non deve essere collegato a terra, eseguirequindi le istruzioni riguardanti la classe di isolamento II.- Se sulla targa NON compare il simbolo ( ) eseguire leistruzioni inerenti alla classe di isolamento I.Classe di isolamento II- L’apparecchio è costruito in classe II, <strong>per</strong>ciò nessun cavo deveessere collegato alla presa di terra.La spina deve essere facilmente accessibile dopo l’installazionedell’apparecchio.Nel caso in cui l’apparecchio sia provvisto di cavo senzaspina, <strong>per</strong> collegarlo alla rete elettrica è necessario interporretra l’apparecchio e la rete un interruttore onnipolare cona<strong>per</strong>tura minima tra i contatti 3 mm, dimensionato al caricoe rispondente alle norme vigenti.- L’allaccio alla rete elettrica deve essere eseguito comesegue:MARRONE = L lineaBLU = N neutroClasse di isolamento IAttenzione:Questo apparecchio è costruito in classe I, <strong>per</strong>ciò deve esserecollegato alla presa di terra.L’allaccio alla rete elettrica deve essere eseguito comesegue:MARRONE = L lineaBLU = N neutroGIALLO / VERDE = terraIl cavo neutro deve essere collegato al morsetto con il simboloN mentre il cavo GIALLO/VERDE, deve essere collegato almorsetto vicino al simbolo di terra .Attenzione:Nell’o<strong>per</strong>azione di collegamento elettrico assicurarsi che lapresa di corrente sia munita di collegamento di terra.
Dopo il montaggio della cappa d’aspirazione, fare attenzioneche la posizione della presa di alimentazione elettrica siafacilmente raggiungibile.Nel caso di collegamento diretto alla rete elettrica è necessariointerporre tra l’apparecchio e la rete un interruttore onnipolarecon a<strong>per</strong>tura minima tra i contatti 3 mm, dimensionato alcarico e rispondente alle norme vigenti.• Se il piano di cottura che si utilizza è elettrico, a gas o adinduzione, la distanza minima fra questo e la parte più bassadella cappa deve essere di almeno 65cm.Se dovesse essere usato un tubo di connessione compostodi due o più parti, la parte su<strong>per</strong>iore deve essere all’esternodi quella inferiore. Non collegare lo scarico della cappa ad uncondotto in cui circoli aria calda o utilizzato <strong>per</strong> evacuare fumidegli apparecchi alimentati da un’energia diversa da quellaelettrica. Prima di procedere alle o<strong>per</strong>azioni di montaggio,<strong>per</strong> una più facile manovrabilità dell’apparecchio disinserirei filtro/i antigrasso (Fig.2).Nel caso di montaggio dell’apparecchio in versione aspirantepredisporre il foro di evacuazione aria.• Si consiglia l’utilizzo di un tubo evacuazione aria con lo stessodiametro della bocca uscita aria. L’utilizzo di una riduzionepotrebbe diminuire le prestazioni del prodotto ed aumentarela rumorosità.• Per una migliore capacità di aspirazione, l’apparecchio èdotato di un’a<strong>per</strong>tura frontale.Questa può essere effettuata in maniera meccanica (tirandolo sportello verso l’esterno Fig.2A) o elettronica (disponibilesolo con i comandi indicati in Fig. 18) in base alla versione chesi possiede. L’a<strong>per</strong>tura elettronica avviene premendo il tasto“D“ (Fig. 18) <strong>per</strong> 4sec. circa.• Fissaggio a pareteTracciare il lato inferiore della cappa sul muro Fig.4A (tenendoconto della distanza minima dal piano di cottura).- Posizionare la dima di fissaggio sulla parete, facendoattenzione che la linea coincida con quella tracciata nelparagrafo precedente.- Segnare ed eseguire i fori di fissaggio (Fig.4B).- Fissare i 4 tasselli ad espansione e le 4 viti C senza avvitarlecompletamente. (Fig.4B).- Posizionare l’apparecchio al muro e fissarlo definitivamentetirando le 4 viti C e la vite centrale D (Fig. 5)- Per i vari montaggi utilizzare viti e tasselli ad espansioneidonei al tipo di muro (es. cemento armato, cartongesso,ecc).- Nel caso in cui le viti e i tasselli siano forniti in dotazione conil prodotto accertarsi che siano idonei <strong>per</strong> il tipo di parete incui deve essere fissata la cappa.• installazione <strong>per</strong> modelli senza camini decorativi:- Versione aspirante- Sganciare il cupolino M e togliere la griglia E (Fig. 6A).- Far passare il cavo di alimentazione sull’asola del cupolinoM indicata in Fig.6B- Prendere il passacavo H e posizionarlo trà il cavo dialimentezione e l’asola.- Attenzione: è possibile installare la cappa con l’uscitaaria posteriore, rimuovendo la staffa X con il motore eruotandola, come illustrato in Fig. 7Rimuovere anche la staffa fissaggio a muro Y e posizionarlacome indicato in Fig.7 utilizzando le stesse viti.- Collegare il tubo flessibile L (non fornito) alla cappa, in basealla scelta della posizione del foro uscita aria.Per l’uscita aria su<strong>per</strong>iore fare riferimento alla Fig. 8A, mentre<strong>per</strong> l’uscita aria posteriore fare riferimento alla Fig. 8B.- Fissare il cupolino M facendo attenzione che si agganci<strong>per</strong>fettamente ai <strong>per</strong>ni di fissaggio.- Versione filtrante- Sganciare il cupolino M e togliere la griglia E (Fig. 6A).- Far passare il cavo di alimentazione sull’asola del cupolinoM indicata in Fig.6B- Prendere il passacavo H e posizionarlo trà il cavo dialimentezione e l’asola.- Inserire i filtri al carbone all’interno della cappa.(Fig.3)- Fissare il cupolino M facendo attenzione che si agganci<strong>per</strong>fettamente ai <strong>per</strong>ni di fissaggio. (Fig.9).• installazione <strong>per</strong> modelli con camini decorativi:- Versione aspirante- Prima di installare i camini decorativi bisogna rimuovere ilcupolino M. (Fig. 6A)- Predisporre l’alimentazione elettrica entro l’ingombro delcamino decorativo.- Se il vostro apparecchio deve essere installato in versioneaspirante o in versione motore esterno, predisporre il foroevacuazione aria.- Regolare la larghezza della staffa di supporto del raccordosu<strong>per</strong>iore (Fig.11).- Successivamente fissarla al soffitto in modo che sia in assecon la vostra cappa tramite le viti A (Fig.11) e rispettando ladistanza dal soffitto indicata in Fig.10.- Collegare, mediante un tubo flessibile L, la flangia F al foroevacuazione aria (Fig.12).- Infilare il camino estetico su<strong>per</strong>iore all’interno del caminoestetico inferiore ed appoggiare sopra la scocca.(Fig.12)- Sfilare il camino su<strong>per</strong>iore fino alla staffa e fissarlo tramitele viti B (Fig. 13)- Versione filtranteAttenzione!- Per trasformare la cappa da versione <strong>ASPIRANTE</strong> a versioneFILTRANTE i filtri al carbone devono essere ordinati presso ilvostro rivenditore come accessorio.- I filtri devono essere applicati al gruppo aspirante postoall’interno della cappa centrandoli ad esso e ruotandoli di 90gradi fino allo scatto d’arresto (Fig.14).- Se nel nell’imballo trovate una staffa come quella indicata inFig.15 occorre fissarla alla cappa tramite le viti in dotazione.Il filtro rigenerabile deve essere inserito all’interno della staffainstallata precedentemente alla cappa, e fissato con le duestaffette. (Fig.15)• Optional- È possibile richiedere l’apparecchio con la funzione “luci dicortesia“. Se la versione in vostro possesso possiede questafunzione <strong>per</strong> attivarla occorre premere il tasto indicato inFig. 2B.ATTENZIONE: Se il vostro modello ha il comando indicatoin Fig. 18 e non l’a<strong>per</strong>tura elettronica è possibile attuare lafunzione “luce di cortesia“ premendo il tasto “D“ (Fig.18)<strong>per</strong> 4 secondi. Per disattivare le luci ripremere lo stesso tasto<strong>per</strong> 4secondi.- Per il modello con l’a<strong>per</strong>tura meccanica raffigurato in Fig. 2Bè possibile richiedere il Kit dell’apirazione <strong>per</strong>imetrale.- 9 -
USO E MANUTENZIONE• Si raccomanda di mettere in funzione l’apparecchio prima diprocedere alla cottura di un qualsiasi alimento. Si raccamandadi lasciar funzionare l’apparecchio <strong>per</strong> 15 minuti dopo averterminato la cottura dei cibi, <strong>per</strong> un’evacuazione completadell’aria viziata.Il buon funzionamento della cappa è condizionato da unacorretta e costante manutenzione; una particolare attenzionedeve essere data al filtro antigrasso e al filtro al carboneattivo.• Il filtro antigrasso ha il compito di trattenere le particellegrasse in sospensione nell’aria, <strong>per</strong>tanto è soggettoad intasarsi in tempi variabili relativamente all’usodell’apparecchio.- Per prevenire il <strong>per</strong>icolo di eventuali incendi, al massimoogni 2 mesi è necessario lavare i filtri antigrasso, <strong>per</strong> i quali èpossibile utilizzare anche la lavastoviglie.- Dopo alcuni lavaggi, si possono verificare delle alterazionidel colore. Questo fatto non dà diritto a reclamo <strong>per</strong>l’eventuale loro sostituzione.In caso di inadempienza delle istruzioni di sostituzione edi lavaggio si può verificare il rischio di incendio dei filtriantigrasso.• I filtri al carbone attivo servono <strong>per</strong> depurare l’aria cheviene rimessa nell’ambiente. I filtri non sono lavabili origenerabili e devono essere sostituiti ogni quattro mesi almassimo. La saturazione del carbone attivo dipende dall’usopiù o meno prolungato dell’apparecchio, dal tipo di cucinae dalla regolarità con cui viene effettuata la pulizia del filtroantigrasso• Pulire frequentemente tutti i depositi sul ventilatore esulle altre su<strong>per</strong>fici, usando un panno inumidito con alcooldenaturato o detersivi liquidi neutri non abrasivi.• L’ impianto di illuminazione è progettato <strong>per</strong> l’uso durante lacottura e non <strong>per</strong> l’uso prolungato di illuminazione generaledell’ambiente. L’uso prolungato dell’illuminazione diminuiscenotevolmete la durata media delle lampade.• Sostituzione delle lampade alogene (Fig.16).Per sostituire le lampade dicroiche, sconnettere la lampadaallentandola con cautela dal portalampade con l’aiuto diun piccolo cacciavite piatto o uno strumento equivalente.ATTENZIONE!Nel fare questa o<strong>per</strong>azione, fare attenzionea non graffiare la cappa.Sostituire con lampade dello stesso tipo.• Comandi (Fig.17):Tasto A = accende/spegne le luciTasto B = accende/spegne la cappa. L’apparecchio si accendealla 1° velocità. Se la cappa è accesa premere il tasto <strong>per</strong> 2sec. <strong>per</strong> spegnere. Se la cappa si trova alla 1° velocità non ènecessario tenere premuto il tasto <strong>per</strong> spegnere. Diminuiscela velocità del motore.Display C = indica la velocità del motore selezionata el’attivazione del timer.Tasto D = accende la cappa. Aumenta la velocità del motore.Premendo il tasto dalla 3° velocità si inserisce la funzioneintensiva <strong>per</strong> 10’, poi l’apparecchio ritorna a funzionare allavelocità di esercizio al momento dell’attivazione. Durantequesta funzione il display lampeggia.Tasto E = Il Timer temporizza le funzioni, al momentodell’attivazione, <strong>per</strong> 15 minuti dopo di che queste vengonospente. Il Timer si disattiva ripremendo il tasto E. Quando lafunzione Timer è attiva sul display deve lampeggiare il puntodecimale. Se è in funzione la velocità intensiva il Timer nonsi può attivare.- 10 -Premendo il tasto E <strong>per</strong> 2 secondi, quando l’apparecchio èspento, si attiva la funzione “clean air”. Questa accende ilmotore <strong>per</strong> 10 minuti ogni ora alla prima velocità. Duranteil funzionamento il display deve visualizzare un movimentorotatorio dei segmenti <strong>per</strong>iferici. Trascorso questo tempo ilmotore si spegne e il display deve visualizzare la lettera “C” fissafino a quando dopo altri 50 minuti il motore riparte <strong>per</strong> altri10 minuti e così via. Per ritornare al funzionamento normalepremere qualsiasi tasto tranne quello delle luci. Per disattivarela funzione premere il tasto E.• Saturazione filtri Antigrasso/Carbone attivo: Fig.14- Quando il display C lampeggia alternando la velocitàd’esercizio con la lettera F (es.1 e F) i filtri antigrasso devonoessere lavati.- Quando il display C lampeggia alternando la velocitàd’esercizio con la lettera A (es.1 e A) i filtri carbone devonoessere sostituiti.Una volta ricollocato il filtro pulito bisogna resettare lamemoria elettronica premendo il tasto A <strong>per</strong> circa 5 sec.fino a che termina di lampeggiare la segnalazione F o A deldisplay C.• Comandi (Fig.18A-18B):NOTA: Con questo comando è possibile controllarel’apparecchio anche con un telecomando da richiederecome accessorio.Tasto Power (A)= Il tasto di accensione/spegnimento accendee spegne l’intera cappa ( motore e luci ).Azionando il tasto il motore parte in 1°vel.Tasto Fan speed (B)= Dalla posizione OFF, premere una volta<strong>per</strong> la 1° velocità, due volte <strong>per</strong> la 2° velocità, tre volte <strong>per</strong> la3° velocità. Per inserire la velocità intensiva premere il tasto<strong>per</strong> 5 sec. in qualsiasi stato si trovi la cappa. Ad ogni velocitàsi accende solo ed esclusivamente il led indicante la velocitàimpostata. La velocità intensiva è indicata dal led della velocità3° che lampeggia. Durata della velocità intensiva 10 min.dopodiché la cappa torna all’ultima velocità impostata.Per togliere la velocità intensiva premere il tasto power ela cappa si spegne, oppure premere il tasto Fan speed e lavelocità torna a quella precedentemente impostata. Velocitàdella cappa con andamento ciclico.Tasto light (C)= I livelli delle luci sono tre: alto, medio,basso.Dalla posizione spento spingere una volta <strong>per</strong> il livello alto, duevolte <strong>per</strong> il livello medio, tre volte <strong>per</strong> il livello basso, quattrovolte <strong>per</strong> spegnere le luci.Il livello delle luci ha un andamento ciclico: alto ,medio,basso, spento.Tasto timer (D)= Con qualsiasi velocità inserita ( esclusa la vel.Intensiva ) premendo il tasto si attiva la funzione timer <strong>per</strong> 15min. Al termine del conteggio la cappa si spegne ( motore edeventuali luci accese ).Spia luci (E)= La spia luci si accende quando le luci sonoaccese a qualsiasi livelloSpia filtri (F)= Dopo 30 h di funzionamento il led della spiafiltri si accende senza lampeggiare e si devono lavare i filtriantigrasso. Reset della funzione avviene ( a cappa spenta )premendo il tasto Fan speed <strong>per</strong> 5 sec. Fatta questa o<strong>per</strong>azioneil led della segnalazione filtri si spegne e l’impostazione delle30 h riparte da zero.Dopo 120h il led lampeggia continuamente. Vuol dire chesi devono sostituire i filtri carbone ( se montati ). Reset dellafunzione avviene ( a cappa spenta ) premendo <strong>per</strong> 5 sec. il tastoFan speed . Fatta questa o<strong>per</strong>azione il led della segnalazione
si spegne e l’impostazione riparte da zero.Spia aria pulita ( 8)Con cappa spenta, premendo <strong>per</strong> 5 sec. il tasto Power ( 1 ),si attiva la funzione clean air. Questa accende il motore alla1^ vel <strong>per</strong> 10 min. ogni ora. La spia si accende e rimane fissae il led della 1^ si accende. Nei rimanenti 50 min. la spialampeggia. La funzione si disattiva premendo qualsiasi tastoa parte le luci.SI DECLINA OGNI RESPONSABILITA’ PER EVENTUALI DANNIPROVOCATI DALLA INOSSERVANZA DELLE SUDDETTEAVVERTENZE- 11 -
DEUTSCHDALLGEMEINESDiese Anleitung bitte aufmerksam durchlesen, da sie wichtigeSicherheitshinweise zur Installation, zum Gebrauch und zurWartung enthält. Die Anleitung für eventuelle zukünftigeKonsultationen aufbewahren. Das Gerät wurde zum Gebrauchin Aspirationsversion (Luftausscheidung nach außen -Abb.1B), Fitrationsversion (innerer Luftumlauf - Abb.1A) odermit äußerem Motor (Abb.1C) entworfen.SICHERHEITSHINWEISE1. Vorsicht ist geboten, wenn gleichzeitig eine Abzugshaubeund ein raumluftabhängiger Boiler oder ein offenes Feuerin Betrieb sind, die von einer anderen Energiequelle alsStrom versorgt werden, da die Küchenhaube die Raumluftabsaugt, die auch der Boiler oder das Feuer zur Verbrennungbenötigen. Der Unterdruck im Raum darf den Wert von 4 Pa(4x10⁻⁵ bar) nicht übersteigen. Um einen sicheren Betriebder Abzugshaube zu gewährleisten, ist daher immer aufeine ausreichende Belüftung des Raumes zu achten. Beider Ableitung der Luft nach aussen müssen die nationalenVorschriften eingehalten werden.Vor Anschluss des Modells an das Stromnetz :- kontrollieren Sie das Typenschild an der Geräteinnenseiteum sich zu vergewissern, ob Spannung und Stromstärke derdes Stromnetzes entsprechen und die Steckdose geeignet ist.Im Zweifelsfall wenden Sie sich bitte an einen qualifiziertenElektriker.- Sollte das Speisekabel beschädigt sein, ist es durch einanderes - beim Hersteller oder dessen Kundendiensterhältliches - Kabel oder mit einem speziellen Bausatz - zuersetzen.- Das Gerät muss mittels eines Steckers mit 3A-Sicherung oderüber die beiden Drähte des Zweiphasenanschlusses, die durcheine 3A-Sicherung geschützt sind, an die Stromversorgungangeschlossen werden.2. Achtung !Elektrogeräte können unter gewissen Umständengefährlich sein!A) Niemals die Filter kontrollieren, wenn dieDunstabzugshaube in Betrieb ist.B) Die Lampen und die umliegenden Bereiche nichtwährend oder nach längerer Benutzung des Lichtsberühren.C) Es ist verboten, Speisen unter der Dunstabzugshaubezu flambieren.D) Offene Flammen sind unbedingt zu vermeiden, dadiese die Filter beschädigen und einen Brand verursachenkönnen.E) Beim Frittieren sind die Speisen ständig zu kontrollieren,um eine Entzündung von überhitztem Öl zu verhindern.F) Vor jeglichen Wartungsarbeiten unbedingt denNetzstecker aus der Steckdose entfernen.G) Das Gerät sollte nicht von kleinen Kindern odergebrechlichen Personen ohne Beaufsichtigung benutztwerden.H) Kleine Kinder sollten beaufsichtigt werden, umsicherzugehen, dass sie nicht mit dem Gerät spielen.I) Der Raum muss über eine hinreichende Belüftung- 12 -verfügen, wenn die Dunstabzugshaube mit anderengas- oder brennstoffbetriebenen Geräten gleichzeitigverwendet wird.L) Es besteht Brandgefahr, wenn die Reinigung nichtentsprechend den Anleitungen durchgeführt wird.Dieses Gerät ist gemäß der EU-Richtlinie 2002/96/EC, WasteElectrical Electronic Equipment (WEEE) gekennzeichnet.Sorgen Sie bitte dafür, dass das Gerät korrekt entsorgt wird, derBenutzer trägt dazu bei, den potentiellen negativen Folgenfür Umwelt und Gesundheit vorzubeugen.Das auf dem Produkt oder auf den Begleitpapieren befindliche Symbol sagt aus, dass dieses Produkt nichtwie normaler Hausmüll behandelt werden darf, sonderndass es einer geeigneten Sammelstelle für das Recyclingder elektrischen und elektronischen Geräteteile zugeführtwerden muss. Entsorgen Sie bitte das Altgerät gemäß derlokalen Richtlinien. Für weitere Informationen hinsichtlichder Behandlung, der Wiederverwertung und des Recyclingdes Produkts wenden Sie sich bitte an die zuständige lokaleStelle, an die Sammelstelle für Hausmüll, oder an den Händler,bei dem Sie das Gerät erworben haben.INSTALLATIONSANLEITUNGMontage und Anschluss müssen von einem Fachmanndurchgeführt werden.• ElektroanschlussHinweis! Kontrollieren Sie das im Gerät angebrachteTypenschild:- Falls auf dem Typenschild das Symbol ( ) angeführtwird, bedeutet dies, dass das Gerät nicht geerdet werdenmuss; folgen Sie somit den Anweisungen zur IsolierklasseII. - Ist auf dem Typenschild NICHT das Symbol ( )angeführt, folgen Sie den Anweisungen zur IsolierklasseI.Isolierklasse IIDie Küchenhaube gehört zur Geräteklasse II, daher muss keineder Leitungen geerdet werden.Der Stecker muss nach der Montage des Geräts leichtzugänglich sein.Sollte das Gerät mit einem Kabel ohne Stecker ausgestattetsein, ist für den Anschluss an das Stromnetz ein allpoliger,der Last und den einschlägigen Vorschriften entsprechenderSchalter mit einer Kontaktmindestöffnung von 3 mm zwischenGerät und Stromnetz vorzusehen.Der Anschluss an das Stromnetz ist folgendermassendurchzuführen:BRAUN = L LeitungBLAU = Neutrale LinieIsolierklasse IAchtung:Bei dem Gerät handelt es sich um ein Gerät der Klasse I, undmuss demnach an einen Erdleiter angeschlossen werden.Der Elektroanschluss ist wie folgt vorzunehmen:BRAUN = L LeiterBLAU = N NullleiterGELB/GRÜN = Erdleiter
Das Nullleiterkabel muss an Klemme N angeschlossen werden,das GELB/GRÜNE Kabel dagegen an die neben dem Erdleiter-Symbol befindliche Klemme .Achtung:Stellen Sie beim elektrischen Anschluss bitte sicher, dass dieSteckdose über einen Erdanschluss verfügt.Achten Sie bitte darauf, dass die Steckdose nach installierterDunstabzugshaube leicht zugänglich ist.Im Falle eines Direktanschlusses an das Stromnetz musszwischen Gerät und Netzleitung ein allpoliger Schalter miteiner Kontaktweite von mindestens 3 mm, der der Belastungund den geltenden Richtlinien entspricht, installiertwerden.• Falls das benutzte Kochfeld ein Elektro-, Gas- oderInduktionsfeld ist, muss der Mindestabstand zwischendiesem und dem untersten Teil der Dunstabzugshaubemindestens 65 cm betragen.Falls ein Verbindungsrohr verwendet wird, das aus zweioder mehr Teilen zusammengesetzt ist, muss der obere Teilüber den unteren gestülpt werden. Auf keinen Fall darf dasAbluftrohr der Küchenhaube an ein Rohr angeschlossenwerden, in dem Warmluft zirkuliert oder das zur Entlüftungvon Geräten verwendet wird, die an eine andere Energiequelleals an Strom angeschlossen sind. Vor der Durchführung derMontagevorgänge, den/die Fettfilter entfernen, damit sichdas Gerät leichter handhaben läßt (Abb.2).Sollte das Gerät mit Abzugsvorrichtung montiert werden,bereiten Sie eine Luftabzugsöffnung vor.• Es empfiehlt sich der Einsatz eines Luftableitungsrohres,das denselben Durchmesser aufweist, wie der derLuftabzugsöffnung. Die Verwendung eines Reduzierstückskönnte die Leistungen des Erzeugnisses beeinträchtigenund das Betriebsgeräusch erhöhen.• Zur besseren Saugleistung ist das Gerät mit einer frontalenÖffnung ausgestattet.Je nach Modell funktioniert diese auf mechanische Weise,(die Klappe wird nach vorne gezogen, Abb.2A), oder aufelektronische Weise (nur mit den in Abb. 18 angegebenenSteuerungen verfügbar). Zur elektronischen Öffnung wirddie Taste “D“ (Abb. 18) etwa 4 Sek. gedrückt gehalten.• Befestigung an der wandZeichnen Sie den unteren Teil der Dunstabzugshaube ander Wand an (Abb.4A) (beachten Sie hierbei bitte denMindestabstand vom Kochfeld).- Positionieren Sie die Befestigungsschablone an derWand; achten Sie dabei darauf, dass die Linie mit der zuvorgezeichneten übereinstimmt (siehe vorheriger Abschnitt).- Markieren und bohren Sie die Befestigungslöcher. (Abb.4B).- Befestigen Sie die 4 Schrauben C ohne sie vollständiganzuziehen und die Spreizdübel (Abb. 4B).- Positionieren Sie das Gerät an der Wand und befestigen Sie esdefinitiv durch anziehen der 4 Schrauben C und der mittlerenSchraube D (Abb.5).- Verwenden Sie zur Geräteinstallation Schrauben und Dübel,die für die jeweilige Wandart geeignet sind (zum Beispiel:Betonwände, Wände aus Gipspappe usw.).- Sollten die Schrauben und Dübel als Geräteausstattungmitgeliefert werden, stellen Sie bitte sicher, dass diese fürdie Art der Wand, an die das Gerät montiert werden soll,geeignet sind.• Befestigung der teleskopischen, schmückendenAnschlusstücke- Abluft-version- Die Abdeckung M aushaken und das Gitter E herausnehmen(Abb. 6A).- Das Stromkabel durch den Schlitz in der Abdeckung M wiein Abb.6B gezeigt, führen- Nehmen Sie den Kabeldurchgang H und setzen Sie ihnzwischen das Versorgungskabel und dem Schlitz.- Achtung: die Dunstabzugshaube kann auch mit demLuftabzug nach hinten installiert werden. Hierzu wirdder Bügel X mit dem Motor abgenommen und sie wirdwie in Abb. 7 gezeigt gedreht.Nehmen Sie auch den Wandbefestigungsbügel Y ab undpositionieren Sie ihn unter Verwendung der gleichenSchrauben wie in Abb. 7 gezeigt.- Schließen sie das Flexrohr L (nicht mitgeliefert) an dieDunstabzugshaube an, je nach dem, wo der Luftabzuggewählt wurde.Für den Luftabzug oben siehe Abb. 8A, für den Luftabzughinten siehe Abb. 8B.- Die Abdeckung M befestigen und darauf achten, dass sierichtig in die Befestigungsstifte G eingehakt wird.- Umluft-version- Die Abdeckung M aushaken und das Gitter E herausnehmen(Abb. 6A).- Das Stromkabel durch den Schlitz in der Abdeckung M wiein Abb.6B gezeigt, führen- Nehmen Sie den Kabeldurchgang H und setzen Sie ihnzwischen das Versorgungskabel und dem Schlitz.- Setzen Sie die Aktivkohlefilter in das Gerät ein (Abb.3)- Die Abdeckung M befestigen und darauf achten, dass sierichtig in die Befestigungsstifte G eingehakt wird. (Abb.9)• Installation von modellen mit dekorkamin- Abluft-version- Vor der Installation der Dekorkamine muss die AbdeckungM abgenommen werden.- Legen Sie den Stromanschluss im Inneren desDekorkamins.- Falls Ihr Gerät in Aspirationsversion oder Version mit äußeremMotor zu installieren ist, das Luftaustrittsloch vorbereiten.- Regulieren Sie die Breite des Haltebügels des oberenAnschlusses (Abb. 11).- Befestigen Sie ihn dann mit Hilfe der Schrauben A(Abb.11)so an der Decke, dass er auf einer Achse mitder Dunstabzugshaube liegt; beachten Sie hierbei denangegebenen Abstand von der Decke (Abb. 10).- Verbinden Sie über ein Flex-Rohr L den Flansch F mit derLuftabzugsöffnung (Abb. 12).- Stecken Sie den oberen Kamin in den unteren und setzenSie das Gehäuse auf (Abb. 12).- Schieben Sie den oberen Kamin bis zum Haltebügel undbefestigen Sie ihn mit den Schrauben B (Abb. 13).- Umluft-versionAchtung!Möchten Sie das Gerät von ABLUFTVERSION aufUMLUFTVERSION umrüsten, sind Kohlefilter erforderlich,die Sie bei Ihrem Händler als Zubehörteil bestellen können.- Die Filter müssen am Ansaugaggregat angebracht werden,das sich im Innern der Haube befindet, wobei sie nach ihrausgerichtet werden und um 90 Grad bis zur Auslösung derS<strong>per</strong>rung gedreht werden müssen. (Abb.14).- 13 -
- Befindet sich in der Verpackung Ihrer Dunstabzugshaubeein wie auf Abb.15 veranschaulichter Bügel, muss dieser mitden mitgelieferten Schrauben an der Dunstabzugshaubebefestigt werden.Der regenerierbare Filter wird in den zuvor in dieDunstabzugshaube eingebauten Haltebügel eingesetzt undmit den beiden Schiebern befestigt. (Abb.15)• Extra- Das Gerät kann mit einer Zusatzbeleuchtung bestelltwerden. Wenn Ihr Modell über diese Funktion verfügt, dannwird diese über die in Abb. 2B gezeigte Taste aktiviert.ACHTUNG : Wenn Ihr Modell über die in Abb. 18 gezeigteSteuerung verfügt, nicht aber über die elektronische Öffnung,dann kann die Zusatzleuchte über die Taste “D“ (Abb.18), die4 Sekunden gedrückt gehalten wird, eingeschaltet werden.Zum Ausschalten der Zusatzleuchte drücken Sie die gleicheTaste erneut für 4 Sekunden.- Für das in Abb. 2B gezeigte Modell mit mechanischerÖffnung kann der Bausatz für die Randabsaugung bestelltwerden.BENUTZUNG UND WARTUNG• Es wird empfohlen, die Dunstabzugshaube schon vorKochbeginn der Speisen einzuschalten. Es wird weiterhinempfohlen, das Gerät nach Beendigung des Kochvorgangsnoch 15 Minuten weiterlaufen zu lassen, um den vollständigenAbzug der Kochdünste zu gewährleisten.Die Leistungsfähigkeit der Dunstabzugshaube hängtentscheidend von der Sorgfalt und Regelmäßigkeit derWartung ab, insbesondere die des Fettfilters und die desAktivkohlefilters.• Der Fettfilter hat die Aufgabe, die in den Kochdünstenenthaltenen Fettpartikel zurückzuhalten. Er ist demnach derVerschmutzung besonders ausgesetzt und sollte, je nachGebrauch und Kochgewohnheiten, in mehr oder wenigerlangen Zeitabschnitten gereinigt werden.- Um der Brandgefahr vorzubeugen, müssen maximal alle 2Monate die Fettfilter gewaschen werden. Das geht auch mitder Spülmaschine.- Nach einigen Waschgängen können Farbveränderungenauftreten. Hieraus resultiert jedoch kein Anspruch aufkostenlosen Ersatz derselben.Durch Nichteinhaltung der Vorgaben hinsichtlich desAustauschs und der Reinigung der Fettfilter kann Brandverursacht werden.• Die Aktivkohlefilter dienen dazu, die Luft zu reinigen,die wieder in den Raum zurückgeführt wird. Die Filter sindweder waschbar noch wiederverwertbar und müssenspätestens alle vier Monate ausgewechselt werden. DieSättigung der Aktivkohle hängt von der mehr oder minderlangen Benutzungsdauer der Dunstabzugshaube, von derArt der zubereiteten Speisen und von der mehr oder wenigerhäufigen Reinigung des Fettfilters ab.• Reinigen Sie die Haube innen und außen regelmäßigmit Spiritus oder einem neutralen Flüssigreiniger ohneScheuermittel.• Die Beleuchtung der Dunstabzugshaube ist dazu geplant,während des Kochvorgangs eingesetzt zu werden. Durcheinen verlängerten Einsatz der Beleuchtung wird diedurchschnittliche Lebensdauer der Leuchten erheblichgemindert.• Austausch der Halogenlampen (Abb. 16).Zum Ersatz der dichroitischen Lampen muss die Lampe- 14 -abgetrennt werden: Lösen Sie diese vorsichtig mithilfe einesflachen Schraubenziehers oder einem ähnlichen Instrumentvon der Lampenfassung.ACHTUNG! Achten Sie dabei darauf, nicht die Haube zuzerkratzen.Tauschen Sie die Lampe durch eine desselben Typs aus.• Bedienung: (Abb.17)Taste A = schaltet die Beleuchtung ein/aus.Taste B = schaltet die Haube ein/aus. Das Gerät schaltet sich inder ersten Saugstärke ein. Wenn die Haube eingeschaltet ist, dieTaste eine halbe Sekunde lang drücken, um sie abzuschalten.Ist die Haube in der ersten Saugstärke eingeschaltet, ist es zumAbschalten nicht erforderlich, die Taste zu drücken. Verringertdie Geschwindigkeit des Motors.Display C = zeigt die gewählte Motorgeschwindigkeit unddie Aktivierung der Timer-Funktion an.Taste D = schaltet die Haube ein. Erhöht die Geschwindigkeitdes Motors. Wenn man, während die Haube in Betrieb ist,auf die 3° Geschwindigkeit drückt, stellt sich für 10 Minutenautomatisch die “Intensiv-Stufe” ein, dann geht die Haubewieder auf die Geschwindigkeit zurück, welche vorher inBetrieb war. Während der Funktion “Intensiv-Stufe” leuchtetdas Display auf.Taste E = Der Timer steuert die Zeit der Funktionen. Abder Aktivierung der Taste bleiben diese für 15 Minuteneingeschaltet und werden dann ausgeschaltet. Der Timerkann durch erneuten Druck auf die Taste E deaktiviert werden.Bei aktivierter Timer-Funktion muss auf dem Display derDezimalpunkt auf Blinklicht geschaltet sein. Befindet sich dieDunstabzugshaube auf Intensivstufe, kann der Timer nichtaktiviert werden.Wird bei ausgeschaltetem Gerät die Taste E für 2 Sekundengedrückt, wird die Funktion “Clean Air” aktiviert. Diese bewirktdas Einschalten des Motors für 10 Minuten jede Stunde auf derersten Leistungsstufe. Während dieser Funktionsweise mussauf dem Display eine Rotationsbewegung der <strong>per</strong>ipherenSegmente angezeigt sein. Nach Ablauf dieser Zeit schaltetder Motor ab und auf dem Display muss die Fix-Anzeige desBuchstaben “C” ersichtlich sein, und zwar so lange, bis nachweiteren 50 Minuten der Motor erneut für 10 Minuten startet,und so weiter.• Sättigung der Fett- und Aktivkohlefilter- Blinkt das Display C bei Änderung der Betriebsgeschwindigkeitmit dem Buchstaben F (Bsp. 1 und F), müssen die Fettfiltergereinigt werden.- Blinkt das Display C bei Änderung der Betriebsgeschwindigkeitmit dem Buchstaben A (Bsp. 1 und A), müssen die Kohlefilterausgetauscht werden.Nachdem der gesäuberte Filter wieder eingesetzt wurde, mussder elektronische Speicher neu aktiviert werden, indem mandie Taste A für circa 5 Sek. gedrückt hält bis die BlinkanzeigeF oder A auf dem Display C erlischt.• Bedienung: (Abb.18A-18B)HINWEIS: Dieses Gerät kann auch mit einer Fernbedienunggesteuert werden, das Sie als Zubehörteil bestellen können.Taste Power (A)= Die Einschalt-/Ausschalttaste schaltetdie gesamte Dunstabzugshaube (Motor und Lichter) einund aus.Durch Betätigung der Taste läuft der Motor aufGeschwindigkeitsstufe 1 an.Taste Fan speed (B)= Aus der OFF-Position für die 1.Geschwindigkeitsstufe einmal drücken, für die 2. Stufe zweimal
und für die 3. Stufe dreimal. Um die Intensivgeschwindigkeiteinzufügen, die Taste 5 Sekunden drücken, unabhängig davon,in welchen Zustand sich die Dunstabzugshaube befindet. Beijeder Geschwindigkeit leuchtet ausschließlich die Led zureingestellten Geschwindigkeit auf. Die Intensivgeschwindigkeitwird von der aufleuchtenden Led der Geschwindigkeitsstufe3 angezeigt. Die Intensivgeschwindigkeit dauert 10 Min.,anschließend kehrt die Dunstabzugshaube zu der letzteneingestellten Geschwindigkeit zurück.Um die Intensivgeschwindigkeit auszuschalten, drückenSie die Taste Power (die Dunstabzugshaube schaltet sichaus); oder drücken Sie die Taste Fan speed, woraufhin dieGeschwindigkeit zu der zuvor eingestellten Stufe zurückkehrt.Geschwindigkeit der Dunstabzugshaube mit zyklischemVerlauf.Taste Light (C)= Die Lichtstufen sind drei: Hoch, mittel,niedrig.Aus ausgeschalteter Stellung den Schalter einmal für diehohe Lichtstufe drücken; zweimal für die mittlere Stufe,dreimal für die niedrige Stufe und viermal, um die Lichterauszuschalten.Die Lichtstufe hat einen zyklischen Verlauf: hoch, mittel,niedrig, ausgeschaltet.Timer Taste (D)= Mit jeder eingeschalteten Geschwindigkeit(ausgenommen Intensivgeschwindigkeit) wird bei Drücken derTaste die Timer-Funktion für 15 Min. aktiviert. Bei Beendigungdes Count-Downs schaltet sich die Dunstabzugshaube aus(Motor und eventuell eingeschaltete Lichter).Anzeigeleuchte Lichter (E)= Die Anzeigeleuchte Lichterleuchtet auf, wenn die Lichter, unabhängig von ihrerBeleuchtungsstärke, eingeschaltet sind.Anzeigeleuchte Filter (F)= Nach 30 Betriebsstundenleuchtet die Led der Anzeigeleuchte Filter auf (ohneBlinkmodus) und zeigt an, dass die Fettfilter gewaschenwerden müssen. Die Nullstellung der Funktion (beiausgeschalteter Dunstabzugshaube) erfolgt, indem die TasteFan speed 5 Sek. gedrückt wird. Daraufhin schaltet sich dieLed der Filteranzeige aus und die 30h-Einstellung beginnterneut bei Null.Nach 120h blinkt die Led im Dauermodus auf. Dies bedeutet,dass die Kohlefilter ausgetauscht werden müssen (fallseingebaut). Die Nullstellung der Funktion (bei ausgeschalteterDunstabzugshaube) erfolgt, indem die Taste Fan speed 5 Sek.gedrückt wird. Daraufhin schaltet sich die Led der Anzeige ausund die Einstellung beginnt erneut bei Null.Anzeigeleuchte saubere Luft ( 8)Bei ausgeschalteter Dunstabzugshaube 5 Sek. die Taste Power( 1 ) drücken, um die Funktion Clean air zu aktivieren. Dieseschaltet den Motor auf der 1. Geschwindigkeitsstufe für 10 Min.pro Stunde ein. Die Anzeigeleuchte leuchtet im Dauermodusauf, die Led der 1. Geschwindigkeitsstufe leuchtet kurz auf.In den verbleibenden 50 Min. blinkt die Anzeigeleuchte. DieFunktion kann durch Drücken einer beliebigen Taste (mitAusnahme der Lichter) deaktiviert werden.FÜR SCHÄDEN, DIE AUF DIE NICHTBEACHTUNG DER OBENGENANNTEN ANWEISUNGEN ZURUCKZUFÜHREN SIND,WIRD KEINERLEI VERANTWORTUNG ÜBERNOMMEN.- 15 -
ESPAÑOLEGENERALIDADESLea atentamente el contenido del presente libro deinstrucciones pues contiene indicaciones importantes parala seguridad en la instalación, el uso y el mantenimiento(Consérvelo para un posible consulta posterior). El aparato hasido diseñado para el uso en versión aspiradora (evacuaciónde aire hacia el exterior – Fig.1B), filtrante (reciclaje del aire enel interior – Fig.1A) o con motor exterior (Fig.1C).SUGERENCIAS PARA LA SEGURIDAD1.Preste atención si funcionan contemporáneamente unacampana aspirante y un quemador o una chimenea quetoman el aire del ambiente y están alimentados por energíaque no sea eléctrica, pues la campana aspirante toma delambiente el aire que el quemador o la chimenea necesitanpara la combustión. La presión negativa del local no debesu<strong>per</strong>ar los 4 Pa (4x10⁻⁵ bares). Para un funcionamientoseguro, realice primero una adecuada ventilación del local.Para la evacuación externa, aténgase a las disposicionesvigentes en su país.Antes de enchufar el modelo a la corriente eléctrica:- Controlar los datos de matrícula (que se encuentran enel interior del aparato) para constatar que la tensión y lapotencia correspondan a la de la red y el enchufe de conexiónsea idóneo. En caso de dudas, recurra a un electricistacalificado.- Si el cable de alimentación está dañado, se debe cambiar conun cable o conjunto especial de cables que puede suministrartanto el fabricante como el servicio de asistencia técnica.- Conecte el dispositivo a la red de alimentación a través de unenchufe con fusible 3A o a los dos cables de la línea bifásicaprotegidos por un fusible 3A.2. ¡Atención!En determinadas circunstancias los electrodomésticospueden ser peligrosos.A) No intente controlar los filtros cuando la campana estáen funcionamientoB) Durante el uso prolongado de la instalación deiluminación o inmediatamente después, no toque laslámparas ni las zonas adyacentes a ellas.C) Está prohibido cocinar a fuego directo debajo de lacampanaD) Evite dejar la llama libre porque puede dañar los filtrosy constituye un riesgo de incendioE) Controle constantemente los alimentos fritos para evitarque el aceite sobrecalentado se prenda fuegoF) Antes de efectuar cualquier o<strong>per</strong>ación de mantenimiento,desconecte la campana de la red eléctrica.G) Este aparato no debe ser utilizado por niños o <strong>per</strong>sonasque necesiten de su<strong>per</strong>visión.H) Controle que los niños no jueguen con el aparato.I) Cuando la campana se utiliza simultáneamente conaparatos que queman gas u otros combustibles, elambiente debe estar adecuadamente ventilado.L) Si las o<strong>per</strong>aciones de limpieza no se realizan respetandolas instrucciones, hay peligro de incendio.Este aparato está fabricado en conformidad con la Norma- 16 -Europea 2002/96/EC, Waste Electrical and ElectronicEquipment (WEEE). Controlando que este producto seaeliminado de modo correcto, el usuario contribuye a prevenirconsecuencias negativas para el ambiente y la salud.El símbolo en el producto o en la documentación adjunta,indica que este producto no debe ser tratado como residuodoméstico sino que debe ser entregado a un punto derecolección para reciclar aparatos eléctricos y electrónicos.Elimínelo siguiendo las normas locales para la eliminaciónde desechos.Para mayor información sobre el tratamiento, recu<strong>per</strong>ación oreciclaje de este producto, llame a la oficina local encargada, alservicio de recolección de desechos domésticos o al negocioen el cual ha comprado el producto.INSTRUCCIONES PARA LA INSTALACIÓNLas o<strong>per</strong>aciones de montaje y conexión eléctrica debenser efectuadas por <strong>per</strong>sonal especializado.• Instalación eléctricaImportante: Controle los datos de la placa que seencuentra en el interior del aparato:- Si en la placa se encuentra el símbolo ( ) significaque el aparato no debe ser conectado a tierra, por lotanto siga las instrucciones indicadas para la clase deaislamiento II.- Si en la placa NO se encuentra el símbolo ( ) siga lasinstrucciones correspondientes a la clase de aislamientoI.Clase de aislamiento IIEl aparato está construido en clase II, por lo tanto no se debee conectar ningún cable a la toma de tierra.El posición del enchufe debe ser de fácil acceso una vezinstalado el aparato.Si el aparato posee un cable sin enchufe, para conectarlo a lared eléctrica es necesario instalar entre el aparato y la red desuministro un interruptor omnipolar con una a<strong>per</strong>tura mínimade 3 mm entre los contactos y las dimensiones adecuadas parala carga, conforme con las normas vigentes.La conexión a la corriente eléctrica debe realizarse de lasiguiente manera:MARRÓN = L línea.AZUL = N neutro.Clase de aislamiento IAtención:Este aparato <strong>per</strong>tenece a la clase I, por lo tanto debeconectarse a la toma de tierra. La conexión a la red eléctricadebe efectuarse como sigue:MARRÓN = L líneaAZUL = N neutroAMARILLO / VERDE = tierraEl cable neutro debe conectarse al borne con el símbolo Nmientras que el cable AMARILLO /VERDE, debe conectarseal borne cerca del símbolo de tierra .Atención:Durante la conexión eléctrica, controle que el enchufe decorriente posea la conexión a tierra.
Después del montaje de la campana de aspiración, controleque la posición del enchufe de alimentación eléctrica seafácilmente accesible.Si se conecta directamente a la red eléctrica es necesariointerponer entre el aparato y la red un interruptor omnipolarcon una abertura mínima de 3 mm entre los contactos,dimensionado con respecto a la carga y que cumpla con lasnormas vigentes.• Si la placa de cocción que se utiliza es eléctrica, de gas o deinducción, la distancia mínima entre ésta y la parte más bajade la campana debe ser de por lo menos 65 cm.Si debe usarse un tubo de conexión compuesto de dos o máspartes, la parte su<strong>per</strong>ior debe estar fuera de la parte inferior.No conecte la descarga de la campana a un conducto en elque circúle airecaliente o que sea utilizado para evacuar loshumos de aparatos alimentados por una energía que nosea eléctrica.Antes de efectuar las o<strong>per</strong>aciones de montaje, para unamás fácil maniobrabilidad del aparato, extraer el/los filtro/santigrasa (Fig.2).En el caso de montaje del aparato en la versión aspirante,predisponer el orificio de evacuación aire.• Se aconseja el uso de un tubo de evacuación de aire con elmismo diámetro que la boca de salida de aire. El uso de unareducción podría disminuir las prestaciones del producto yaumentar el ruido.• Para obtener una mayor capacidad de aspiración, el aparatoposee una a<strong>per</strong>tura frontal.La a<strong>per</strong>tura se puede realizar de manera mecánica (tirandola puerta hacia afuera Fig.2A) o electrónica (disponible sólocon los mandos indicados en la Fig. 18) según la versión quese posea. La a<strong>per</strong>tura electrónica se produce al presionar elbotón “D” (Fig. 18) durante 4 seg. aproximadamente.• Fijación a la paredMarque la posición de la parte inferior de la campana en lapared Fig.4A (teniendo en cuenta la distancia mínima quedebe existir con la encimera) .- Coloque la plantilla de fijación en la pared, cuidando que lalínea coincida con la trazada en el párrafo anterior.- Marque la posición y luego realice los orificios de fijación(Fig. 4B).- Fije los 4 tornillos C y las espigas para pared (Fig.4B). Lostornillos no deben ser enroscados completamente.- Coloque el aparato contra la pared y fíjelo definitivamentecon los 4 tornillos C y el tornillo central D (Fig.5)- Per i vari montaggi utilizzare viti e tasselli ad es- En los distintos montajes utilice tornillos y espigas adecuadospara el tipo de pared (por ej. cemento armado, cartón deyeso, etc.).- Cuando los tornillos y las espigas se suministren con elproducto, controle que sean adecuados para el tipo de pareda la que se debe fijar la campana.• Instalación para modelos sin chimeneas decorativas- Versión extractora- Desenganche la cúpula M y quite la rejilla E (Fig. 6A).- Haga pasar el cable de alimentación por la ranura de lacúpula M como se india en la Fig.6B.- Coloque el pasahilos H entre el cable de alimentación yla ranura.- Atención: es posible instalar la campana con la salidade aire posterior quitando el soporte X con el motor yhaciéndolo girar, como se muestra en la Fig. 7Quite también la escuadra de fijación a la pared Y ycolóquela como se indica en la Fig.7 utilizando losmismos tornillos.- Conecte el tubo flexible L (no suministrado) a la campana,en base a la posición que se haya elegido del orificio desalida de aire.Si la salida de aire es su<strong>per</strong>ior, consulte la Fig. 8A, si esposterior, consulte la Fig. 8B.- Fije la cúpula M cuidando que se enganche <strong>per</strong>fectamenteen los <strong>per</strong>nos de fijación.• Versión filtrante- Desenganche la cúpula M y quite la rejilla E (Fig. 6A).- Haga pasar el cable de alimentación por la ranura de lacúpula M como se india en la Fig.6B.- Coloque el pasahilos H entre el cable de alimentación yla ranura.- Introduzca los filtros de carbón en el interior de la campana.(Fig.3)- Fije la cúpula M cuidando que se enganche <strong>per</strong>fectamenteen los <strong>per</strong>nos de fijación.• Instalación para modelos con chimeneas decorativas- Versión extractora- Antes de instalar las chimeneas estéticas es necesario quitarla cúpula M.- Coloque la alimentación eléctrica dentro de la unióndecorativa.- Si su aparato se debe instalar en versión aspiradora oen versión motor externo, predisponer el agujero para laevacuación de aire.- Regule el ancho de la abrazadera de sostén de la uniónsu<strong>per</strong>ior (Fig.11).- Posteriormente fíjela al techo para que quede alineada conla campana, utilizando los tornillos A (Fig.11) y respetandola distancia al techo indicada en la (Fig.10).- Conecte la brida F al orificio de evacuación de aire, utilizandoel tubo flexible L (Fig.12).- Introduzca la unión su<strong>per</strong>ior dentro de la chimenea inferiory apoye sobre el armazón (Fig.12).- Extraiga la chimenea su<strong>per</strong>ior hasta el marco y fíjela con lostornillos B (Fig.13).• Versión filtrante¡Atención!Para transformar la campana de la versión <strong>ASPIRANTE</strong> a laversión FILTRANTE, los filtros de carbón se deben ordenar alrevendedor como accesorio opcional.- Los filtros deben ser aplicados al grupo aspirante dentro dela campana, centrándolos y rotándolos 90 grados hasta eldisparo de dentención (Fig. 14).- Si en el embalaje encuentra un estribo como el indicado enlas Fig. 15, fíjelo a la campana con los tornillos suministradoscon la misma.El filtro regenerable se debe introducir en el interior de laestructura instalada antes de la campana y se debe fijar conlos dos pestillos correspondientes. (Fig.15)• Opcional- Es posible solicitar que el aparato tenga la función “lucesinteriores”. Si la versión que Ud. posee, incluye esta función,para activarla es necesario presionar el botón indicado en laFig. 2B.ATENCIÓN: Si su modelo posee el mando indicado en la Fig.18 y no la a<strong>per</strong>tura electrónica, es posible activar la función- 17 -
“luz interior” presionando el botón “D” (Fig.18) durante4 segundos. Para desactivar las luces vuelva a presionar elmismo botón durante 4 segundos.- Para el modelo con a<strong>per</strong>tura mecánica representado en laFig. 2B, es posible solicitar el Kit de aspiración <strong>per</strong>imétrica.USO Y MANTENIMIENTO• Se recomienda poner en funcionamiento el aparato antesde proceder a la cocción de un alimento cualquiera. Serecomienda también, dejar funcionar el aparato durante 15minutos después de haber finalizado la cocción para lograruna evacuación completa del aire viciado.El buen funcionamiento de la campana depende de larealización de un correcto y constante mantenimiento; se debeprestar una atención particular al filtro antigrasa y al filtro decarbón activo.• El filtro antigrasa cumple la función de retener las partículasde grasa en suspensión en el aire, por lo tanto, puede atascarseen distintos momentos que dependen del uso del aparato.- Para prevenir el peligro de incendios, es necesario lavar losfiltros antigrasa cada 2 meses como máximo, para lo cual esposible utilizar un lavavajillas.- Después de algunos lavados, se pueden verificar alteracionesdel color.Si esto sucede, no constituye motivo de reclamo para susustitución.Si no se cumplen las instrucciones de sustitución o de lavado,existe el riesgo de incendio de los filtros antigrasa.• Los filtros de carbón activo sirven para depurar el aire quese devuelve al ambiente.Los filtros no se pueden lavar o regenerar y deben ser sustituidoscada cuatro meses como máximo.La saturación del carbón activo depende del uso más o menosprolongado del aparato, del tipo de cocina y de la regularidadcon la que se realiza la limpieza del filtro antigrasa.• Limpie frecuentemente la campana, tanto por dentro comopor fuera, usando un paño bañado con alcohol de quemar odetergentes líquidos neutros no abrasivos.• La instalación de iluminación ha sido proyectada para serutilizada durante la cocción y no para su uso prolongado comoiluminación general del ambiente.El uso prolongado de la iluminación disminuye notablementela duración media de las lámparas.• Sustitución de las lámparas halógenas (Fig.16).Para sustituir las lámparas dicroicas, desconecte la lámparaaflojándola cuidadosamente del portalámpara con la ayudade un pequeño destornillador plano o una herramientaequivalente.¡ATENCIÓN! Al efectuar esta o<strong>per</strong>ación, tenga cuidado deno arañar la campana.Sustitúyalas por lámparas del mismo tipo.• Mandos: (Fig.17)Botón A = enciende\apaga las luces.Botón B = enciende\apaga la campana. El aparato pone enmarcha en la 1° velocidad. Si la campana está encendidaapriete el botón 2 segundos para apagar. Si la campana estáen la 1° velocidad no hay que apretar el botón para apagar.Disminuye la velocidad del motor.Display C = indica la velocidad del motor seleccionada y lapuesta en marcha del timer.Botón D = enciende la campana. Aumenta la velocidaddel motor. Pulsando el pulsador de la tercera velocidad seintroduce la función intensiva por 10 minutos, después el- 18 -aparado vuelve a funcionar a la velocidad de ejercicio almomento de la activación. Durante esta función el displayrelampagua.Botón E = El Timer temporiza las funciones, al momentode la activación, por 15 minutos después de que se hanapagado. El Timer se desactiva volviendo a oprimir el botónE. Cuando la función Timer está encendida, en el display deberelampaguear el punto decimal. No se puede activar si estáfuncionando la velocidad intensiva del Timer.Si oprime el botón E por un par de segundos, mientras elaparato está apagado, se activa la función “clean air”. Queenciende el motor en la primera velocidad a 10 minutos porcada hora. Durante el funcionamiento, se debe visualizar en eldisplay un movimiento giratorio de los segmentos <strong>per</strong>iféricos.Transcurrido dicho tiempo el motor se apaga, y se visualiza laletra “C” fija en el display, después de 50 minutos éste arrancade nuevo por otros 10 minutos y así sucesivamente. Pararegresar al funcionamiento normal apriete cualesquiera delos botones excepto el de la luz. Para desactivar la funciónoprima el botón E.• Saturación de los filtros antigrasa/carbón activoCuando el display C centellea alternando la velocidad defuncionamiento con la letra F (por ej.: 1 y F), deben lavarselos filtros antigrasa.- Cuando el display C centellea alternando la velocidad defuncionamiento con la letra A (por ej.: 1 y A), deben sustituirselos filtros de carbón.Después que ha vuelto a colocar el filtro limpio, debe resetearla memoria electrónica presionando el botón A durante 5 seg.aproximadamente hasta que deja de centellear la señalaciónF o A del display C.• Mandos: (Fig.18A-18B)NOTA: Con este mando es posible controlar el aparato tambiéncon un control remoto, que debe solicitar como accesorioopcional.Botón Power (A)= El botón de encendido / apagado enciendey apaga toda la campana (motor y luces).Utilizando el botón el motor arranca en 1ª velocidad.Botón Fan speed (B)= Desde la posición OFF, oprima una vezpara la 1ª velocidad, dos veces para la 2ª velocidad, tres vecespara la 3ª velocidad. Para activar la velocidad intensiva oprimael botón 5 segundos independientemente del estado en quese encuentre la campana. En cada velocidad se enciende sóloy exclusivamente el led que indica la velocidad configurada.La velocidad intensiva es indicada por el centelleo del ledde la 3ª velocidad. La velocidad intensiva dura 10 minutos,después de los cuales la campana regresa a la última velocidadconfigurada.Para desactivar la velocidad intensiva oprima el botón power(la campana se apaga), o el botón Fan speed (la velocidadregresa a la configurada anteriormente). Velocidad de lacampana con movimiento cíclico.Botón light (C)= Los niveles de las luces son tres: alto, medioy bajo.Desde la posición apagado, oprima una vez para el nivel alto,dos veces para el nivel medio, tres veces para el nivel bajo,cuatro veces para apagar las luces.El nivel de las luces es cíclico: alto, medio, bajo, apagado.Botón Timer (D)= Con cualquier velocidad configurada(excepto la velocidad Intensiva) oprimiendo el botón se activala función Timer por 15 minutos. Al término del conteo lacampana se apaga (motor y eventuales luces encendidas).Luz testigo luces (E) = Se enciende cuando las luces están
encendidas en cualquier nivel de intensidad.Luz testigo filtros (F)= Después de 30 hs. de funcionamiento,el led de la luz testigo filtros se enciende sin centellearindicando que se deben lavar los filtros antigrasa. La funciónse resetea con la campana apagada, oprimiendo 5 segundosel botón Fan speed. Finalizada esta o<strong>per</strong>ación, el led de laseñalación de filtros se apaga y la configuración de las 30 hs.recomienza desde cero.Después de 120 hs. el led centellea continuamente, lo cualquiere decir que se deben sustituir los filtros de carbón (siestuvieran colocados). La función se resetea con la campanaapagada, oprimiendo 5 segundos el botón Fan speed.Finalizada esta o<strong>per</strong>ación, el led de la señalación se apaga yla configuración recomienza desde cero.Luz testigo aire limpio (8)Con la campana apagada, oprimiendo 5 segundos el botónPower (1) se activa la Función Clean Air. Ésta enciende el motoren la 1ª velocidad 10 minutos por cada hora. La luz testigo seenciende en forma estable y se enciende también el led de la1ª velocidad. Durante los restantes 50 minutos la luz testigocentellea. La función se desactiva oprimiendo cualquier botónque no sea el de las luces.EL FABRICANTE NO SE HACE RESPONSABLE DE LOSDAÑOS PRODUCIDOS POR EL INCUMPLIMIENTO DE ESTASADVERTENCIAS.- 19 -
FRANÇAISFGÉNERALITÉSLire attentivement le contenu du mode d’emploi puisqu’ilfournit des indications importantes concernant la sécuritéd’installation, d’emploi et d’entretien. Le conserver pour d’ultérieures consultations. L’appareil a été conçu pour êtreutilisé dans le modèle aspirant (évacuation de l’air à l’extérieur– Fig.1B), filtrant (retour de l’air à l’intérieur – Fig.1A) ou dotéd’un moteur externe (Fig.1C).CONSEILS POUR LA SÉCURITÉ1. Attention, lorsque dans la même pièce vous utilisezsimultanément la hotte à évacuation avec un brûleur ou unecheminée alimentés par une énergie autre que l’électricité,vous pouvez créer un problème “d’inversion de flux”. Dansce cas la hotte aspire l’air nécessaire à leur combustion. Ladépression dans le local ne doit pas dépasser les 4 Pa (4x10⁻⁵bar). Pour un fonctionnement en toute sécurité, n’oubliez pasde prévoir une ventilation suffisante du local. Pour l’évacuationvers l’extérieur, veuillez vous référer aux dispositions envigueur dans votre pays.Avant de brancher la hotte au réseau de distributionélectrique:- lire les données reportées sur la plaquette d’identification(appliquée à l’intérieur de la hotte) pour vérifier si le voltageet la puissance correspondent à ceux du réseau. Contrôleraussi si la prise est adaptée. - En cas de doutes, contacter unélectricien qualifié.Si le câble d’alimentation est abîmé, il faut le remplacer parun autre câble ou par un ensemble, spécialement prévus, quevous pouvez commander au fabricant ou à un de ses servicesd’assistance technique.- Raccorder le dispositif au secteur à l’aide d’une prise avecfusible 3A ou aux deux fils du diphasé protégés par unfusible 3A.2. Attention !Dans certaines circonstances les électroménagers peuventêtre dangereux.A) N’essayez pas de contrôler l’état des filtres quand lahotte est en marche.B) Ne jamais toucher les lampes et les zones adjacentes,pendant et tout de suite après l’utilisation prolongée del’éclairage.C) Il est absolument interdit de flamber sous la hotte.D) Évitez de laisser des flammes libres, elles sontdangereuses pour les filtres et pour les risquesd’incendie.E) Surveillez constamment les fritures pour éviter quel’huile surchauffée prenne feu.F) Avant de procéder à toute opération d’entretien, coupezl’alimentation électrique de la hotte.G) Cet appareil ne peut pas être utilisé par des enfants oupar des <strong>per</strong>sonnes nécessitant une surveillance.H) Veillez à ce que les enfants ne jouent pas avecl’appareil.I) Lorsque la hotte est utilisée en présence d’appareilsutilisant du gaz ou d’autres combustibles, la pièce doitêtre correctement ventilée.L) Si le nettoyage n’est pas réalisé conformément aux- 20 -instructions, un incendie peut se déclarer.Cet appareil est marqué conformément à la Directiveeuropéenne 2002/96/CE sur les déchets d’équipementsélectriques et électroniques (DEEE). Assurez-vous quecet appareil soit mis au rebus selon la réglementation envigueur, vous éviterez ainsi des conséquences néfastes surl’environnement et la santé.Le symbole appliqué sur le produit ou sur la documentationjointe rappelle que cet appareil ne doit pas être traité commeun déchet domestique mais faire l’objet d’une collectesélective dans une déchetterie spécialisée dans le recyclagedes appareils électriques et électroniques. Conformez-vousaux réglementations locales sur la collecte et l’élimination desdéchets. Pour tout autre renseignement sur le traitement, larécupération et le recyclage de cet appareil, veuillez contacterle bureau concerné de votre ville, le service de collecte desdéchets domestiques ou le magasin où vous avez achetévotre appareil.INSTRUCTIONS POUR L’INSTALLATIONLe montage et le branchement électrique doivent êtreeffectués par un <strong>per</strong>sonnel spécialisé.• Connexion électriqueRemarque ! Consulter la plaque signalétique à l’intérieurde l’appareil :- le symbole ( ) y figure. Cela signifie que l’appareilne doit pas être relié à la terre. Respecter les conditionsapplicables pour les appareils de la classe d’isolation II.- Si le symbole ( ) NE FIGURE PAS sur la plaquesignalétique, suivre les consignes pour les appareils declasse I.Classe d’isolation IIL’appareil est construit en classe II, pour cela aucun cable nedoit être connecté avec la prise terre.La prise doit être accessible après l’installation de l’appareil.Si l’appareil est équipé d’un cordon dépourvu de fiche, uninterrupteur omnipolaire ayant une distance d’ouverturedes contacts d’au moins 3 mm, dimensionné à la charge etconforme aux réglementations applicables en la matière, doitêtre intercalé entre le secteur et l’appareil.La connection avec le réseau électrique doit être éxécutéecomme suit:MARRON = L ligneBLEU = N neutreClasse d’isolation IAttention :Cet appareil est fabriqué en classe I, il faut par conséquent leraccorder à une prise de terre.Procédez au raccordement électrique comme suit :MARRON = L ligneBLEU = N neutreJAUNE / VERT = terreLe câble neutre doit être raccordé à la borne portant lesymbole N tandis que le câble JAUNE/VERT, doit être raccordéà la borne près du symbole de terre .
Attention :Lors des opérations de raccordement électrique, assurez-vousque la prise de courant comporte bien une borne de mise àla terre. Une fois l’installation terminée, cette prise doit êtrefacilement accessible.Un interrupteur omnipolaire ayant une distance d’ouverturedes contacts d’au moins 3 mm, dimensionné à la charge etconforme aux réglementations applicables en la matière,doit être intercalé entre le secteur et l’appareil en cas deraccordement direct au secteur.• En cas de table de cuisson électrique, à gaz ou à induction, ilfaut prévoir une distance de sécurité d’au moins 65 cm entrecette dernière et le point le plus bas de la hotte.S’il doit être utilisé un tuyau de connection composé de deuxou plusieurs parties, la partie su<strong>per</strong>ieure doit être à l’exterieurde celle inférieure.Ne pas relier le tuyau d’échappement de la hotte à un conduitdans lequel circule de l’air chaud ou employé pour évacuerles fumées des appareils alimentés par une énergie differentede celle électrique.En vue d’une manœuvrabilité de l’appareil plus facile, avantd’exécuter les opérations de montage, déconnecter le filtre/les filtres anti-graisse (Fig.2).S’il s’agit d’une hotte aspirante, il faudra prévoir une ouverturepour l’évacuation de l’air.• Nous conseillons d’utiliser un tuyau d’évacuation de l’airde même diamètre que l’orifice de sortie de l’air. L’utilisationd’une réduction pourrait diminuer les <strong>per</strong>formances duproduit et augmenter le niveau sonore.• Pour une meilleure capacité d’aspiration, l’appareil estéquipé d’une ouverture frontale.L’ouverture peut être mécanique (en tirant le volet versl’extérieur Fig.2A) ou électronique (disponible uniquementavec les commandes illustrées Fig. 18) selon la versionpossédée. L’ouverture électronique a lieu par pression de latouche “D“ (Fig. 18) pendant environ 4 secondes.• Fixation muraleTracez une ligne sur le mur (Fig.4A) correspondant au côtéinférieur de la hotte (en respectant la distance de sécurité duplan de cuisson).- Positionnez le gabarit de <strong>per</strong>çage contre le mur, enveillant à ce que la ligne se su<strong>per</strong>pose bien à la ligne tracéeprécédemment sur le mur.- Repérez et <strong>per</strong>cez les trous de fixation (Fig.4B).- Fixez les 4 vis C sans serrer à fond et les chevilles expansives(Fig.4B).- Accrochez l’appareil au mur, puis fixez-le définitivement enserrant les 4 vis C et la vis centrale D (Fig.5).- Pour les opérations de montage, utilisez des vis et deschevilles adaptées à la nature du mur (béton armé par ex. ouplacoplâtre, etc.).- Si les vis et chevilles sont fournies avec l’appareil, assurezvousqu’elles soient bien adaptées à la nature du mur quisupportera la hotte.• Installation des modeles sans cheminees decoratives- Version a evacuation exterieureDécrochez le chapeau M et retirez la grille E (Fig. 6A).- Faites passer le câble d’alimentation par la fente du chapeauM voir Fig.6B- Prenez le passe-fil H et placez-le entre le câble d’alimentationet la fente.- Attention : il est possible d’installer la hotte avec sortied’air arrière, il suffit de retirer la bride X avec le moteur etde la tourner, comme illustré Fig. 7Retirez aussi la bride de fixation murale Y et positionnezlacomme illustré Fig.7 en réutilisant les mêmes vis.- raccordez le tuyau flexible L (non fourni) à la hotte, selon laposition du trou d’évacuation de l’air choisie.Pour la sortie d’air supérieure, consulter la Fig. 8A, tandisque pour la sortie d’air arrière consultez la Fig. 8B.- Fixez le chapeau M en veillant à ce qu’il s’accrocheparfaitement aux goujons de fixation.- Version recyclageDécrochez le chapeau M et retirez la grille E (Fig. 6A).- Faites passer le câble d’alimentation par la fente du chapeauM voir Fig.6B- Prenez le passe-fil H et placez-le entre le câble d’alimentationet la fente- Introduisez le filtre à charbon à l’intérieur de la hotte.(Fig.3)- Fixez le chapeau M en veillant à ce qu’il s’accrocheparfaitement aux goujons de fixation. (Fig.9).• Installation des modeles avec cheminees decoratives- Version a evacuation exterieure- Avant d’installer les cheminées décoratives, il faut retirer lechapeau M. (Fig. 6A)- Préparez l’alimentation électrique à l’intérieur de l’espaceprévu pour le raccord décoratif.- Si votre appareil doit être installé dans le modèle aspirantou doté d’un moteur externe, prévoir le trou de l’évacuationde l’air.- Réglez la largeur de l’étrier de support du raccord supérieur(Fig. 11).- Ensuite fixez-le au plafond, en position axiale par rapportà votre hotte, à l’aide des vis A (Fig.11) et en respectant ladistance à partir du plafond indiquée (Fig. 10).- A l’aide d’un tuyau flexible L raccordez la bride F au troud’évacuation de l’air (Fig. 12).- Glissez la cheminée supérieure à l’intérieur de la cheminéeinférieure et posez-la sur la hotte (Fig. 12).- Déboîtez la cheminée supérieure jusqu’à l’étrier et fixez-la àl’aide des vis B (Fig. 13).• Version recyclageAttention!Pour transformer la hotte de la version ASPIRATION en uneversion FILTRATION, demandez à votre revendeur de filtresà charbon.- Les filtres doivent être appliqués au groupe aspirant situé àl’intérieur de la hotte en les centrant par rapport au groupeaspirant et en les tournant de 90 degrés jusqu’au déclicd’arrêt. (Fig.14).- Si l’emballage contient une bride comme celle indiquéeFig.15, il faut la fixer à la hotte à l’aide des vis fournies.Le filtre régénérable doit être introduit à l’intérieur de la brideinstallée avant la hotte, et fixé à l’aide des deux supports.(Fig.15)• Option- L’appareil peut être commandé avec la fonction “éclairagede courtoisie“. Si votre version est équipée de cette fonction,appuyez sur la touche indiquée Fig. 2B pour l’activer.ATTENTION : Si votre modèle est équipé de la commandeindiquée Fig. 18 mais pas de l’ouverture électronique,la fonction “éclairage de courtoisie“ peut être activée en- 21 -
appuyant 4 secondes de suite sur la touche “D“ (Fig.18).Pour désactiver l’éclairage appuyez à nouveau sur la mêmetouche pendant 4 secondes.- Pour le modèle à ouverture mécanique illustré Fig. 2B vouspouvez commander le kit d’aspiration périphérique.les fonctions pendant 15 minutes, après quoi ces dernièress’éteignent. En pressant la touche E, le Minuteur se désactive.Quand la fonction Minuteur est active, le point décimal doitclignoter sur l’écran. Si la vitesse intensive est en fonction, leMinuteur ne peut être activé.EMPLOI ET ENTRETIEN• Il est conseillé de mettre en service la hotte quelques minutesavant de commencer à cuisiner. De même il est conseilléde l’arrêter 15 minutes après avoir terminé la cuisson pouréliminer au maximum les odeurs et évacuer l’air vicié.Le bon fonctionnement de la hotte est lié à la fréquence desopérations d’entretien et, plus particulièrement, à l’entretiendu filtre anti-graisse et du filtre à charbon actif.• Le filtre anti-graisse a pour rôle de retenir les particulesgrasses en suspension dans l’air. Il peut donc se boucherplus ou moins rapidement selon la fréquence d’utilisationde la hotte.- Pour prévenir tout risque d’incendie, il faut laver les filtresanti-graisse au moins tous les 2 mois, ces derniers son lavablesmême au lave-vaisselle.- Après plusieurs lavages, ils peuvent changer de couleur. Cecine donne pas droit à réclamation ni droit, par conséquent, àleur remplacement.Le non-respect des consignes de remplacement et de lavagepeut entraîner un risque d’incendie des filtres anti-graisse.• Les filtres à charbon actif servent à filtrer l’air qui estensuite renvoyé dans la pièce. Les filtres ne sont ni lavablesni régénérables, il faut par conséquent les changer au moinstous les quatre mois. La saturation du charbon actif dépendde l’utilisation plus ou moins prolongée de l’appareil, dutype de cuisine pratiquée et de la régularité du nettoyagedu filtre anti-graisse.• Nettoyez fréquemment la hotte, à l’intérieur et à l’extérieur, àl’aide d’un chiffon imbibé d’alcool dénaturé ou de détergentsliquides neutres non abrasifs.• N’utiliser l’éclairage de la hotte que pendant la cuisson, cedernier n’est en effet pas conçu pour un éclairage généralprolongé de la pièce. Une utilisation prolongée de l’éclairagediminue considérablement la durée de vie moyenne deslampes.• Remplacement des lampes halogènes (Fig. 16).Pour remplacer les ampoules dichroïques, débranchez lalampe en la détachant précautionneusement du supportà l’aide d’un petit tournevis plat ou d’un outil équivalent.ATTENTION ! Pendant cette opération, veiller à ne pasgriffer la hotte.Remplacez-les par des ampoules de même type.• Commandes: (Fig.17)Touche A = allume/éteint les lumières.Touche B = allume/éteint la hotte. l’appareil s’allume à la 1°vitesse. si la hotte est allumée, appuyer sur la touche pendant2 sec. pour éteindre. Si la hotte se trouve à la 1° vitesse, il n’estpas nécessaire de tenir la touche appuyée pour éteintre.Diminue la vitesse du moteur.Display C = indique la vitesse du moteur sélectionnée etl’activation du timer.Touche D = allume la hotte. Augmente la vitesse du moteur.En pressant la touche de la 3ème vitesse la fonction intensives’active pendant 10’, puis l’ap<strong>per</strong>eil recommance à fonctionnerà la vitesse d’exercice au moment de la première activation.Pendant cette fonction le display clignote.Touche E = au moment de l’activation le Minuteur temporise- 22 -En pressant la touche E pendant 2 secondes, quand l’appareilest éteint, la fonction “clean air” s’active. Cette dernière meten marche le moteur chaque heure pendant 10 minutes àla première vitesse. Durant le fonctionnement l’écran doitvisualiser un mouvement rotatif des segments périphériques.Après quoi le moteur s’éteint et l’écran doit visualiser la lettre“C” fixe, jusqu’à ce qu’après 50 autres minutes, le moteurreparte pendant 10 minutes supplémentaires et ainsi de suite.Pour retourner au fonctionnement normal presser n’importequelle touche sauf celle de l’éclairage. Pour désactiver lafonction presser la touche “E”.• Saturation filtres anti-gras/charbon actif- Quand l’afficheur C clignote et visualise alternativement lavitesse de fonctionnement et la lettre F (1 et F par ex.) il esttemps de laver les filtres anti-gras.- Quand l’écran C clignote et visualise alternativement lavitesse de fonctionnement et la lettre A (1 et A par ex.) il esttemps de changer les filtres à charbon actif.Après avoir remis le filtre propre à sa place, procéder à uneremise à zéro de la mémoire électronique en appuyant 5secondes de suite sur la touche A jusqu’à ce que F ou A cessede clignoter sur l’afficheur C.• Commandes: (Fig.18A-18B)NOTE : cette commande <strong>per</strong>met de contrôler l’appareil partélécommande, disponible à part comme accessoire.Touche d’allumage (A) = La touche d’allumage / extinctionsert à mettre en marche et à arrêter la hotte en entier (turbineet lumières).La touche <strong>per</strong>met de démarrer la turbine à la vitesse 1.Touche Vitesse ventilateur (B) = à partir de la position OFF,appuyez une fois pour accéder à la vitesse 1, deux fois pourla vitesse 2 et trois fois pour la vitesse 3. Pour activer la vitesseintense, appuyez sur la touche pendant 5 secondes quel quesoit le mode. A chaque vitesse correspond exclusivement letémoin indiquant la vitesse paramétrée. La vitesse intense estindiquée par le clignotement de la vitesse 3. La vitesse intensefonctionne pendant 10 minutes. Suite à cela, la hotte revientà la dernière vitesse paramétrée.Pour annuler la vitesse intense, appuyez sur la toucheAllumage. La hotte s’éteindra alors. Appuyez sur la toucheVitesse turbine pour revenir à la vitesse préalablement définie.Vitesse cyclique de la hotte.Touche Éclairage (C) = Trois niveaux de lumière sont prévus: haut, moyen, bas.Depuis la position Éteint, appuyez une fois pour le niveau haut,deux fois pour le niveau moyen, trois fois pour le niveau baset quatre fois pour éteindre les lumières.Le réglage de l’éclairage est cyclique : haut, moyen, bas,éteint.Touche Minuterie (D)= quelle que soit la vitesse (à l’exceptionde la vitesse intense), si vous appuyez sur la touche, laminuterie sera activée pendant 15 minutes. Passé ce délai, lahotte s’éteint (turbine et lampes).Témoin Lumières (E) = le voyant lumières s’allume quand leslumières sont allumées à n’importe quel niveau.Témoin filtres (F) = après 30 h de fonctionnement, le témoinde filtres s’allume (sans clignoter). Il indique qu’il est tempsde nettoyer les filtres anti-graisse. La fonction peut être
éinitialisée (lorsque la hotte est éteinte) en appuyant sur latouche Vitesse turbine pendant 5 secondes. Une fois cetteopération effectuée, le témoin de détection des filtres s’éteintet le réglage des 30 heures est réinitialisé.Après 120 h, le témoin clignote en <strong>per</strong>manence. Cela signifiequ’il est temps de remplacer les filtres au charbon (le caséchéant). La fonction peut être réinitialisée (lorsque la hotteest éteinte) en appuyant sur le touche Vitesse turbine pendant5 secondes. Une fois cette opération effectuée, le témoins’éteint et le réglage est réinitialisé.Témoin air propre (8)Lorsque la hotte est à l’arrêt, si vous appuyez pendant 5secondes sur la touche Allumage (1), la fonction Air propreest activée. Cette fonction active la turbine à la vitesse 1pendant 10 minutes toutes les heures. Le témoin s’allume etreste fixe tandis que le témoin de la vitesse 1 s’allume. Pendantles 50 minutes restantes, le témoin clignote. La fonction estdésactivée lorsque vous appuyez sur n’importe quelle toucheà l’exception de celles pour l’éclairage.NOUS DECLINOS TOUTE RESPONSABILI TE POUR LESEVENTUELS DÉGATS PROVOQUÉS PAR L’INOBSERVATIONDES SUSDITES INSTRUCTIO- 23 -
ENGLISHGBGENERALCarefully read the following important information regardinginstallation safety and maintenance. Keep this informationbooklet accessible for further consultations. The appliancehas been designed for use in the ducting version (air exhaustto the outside – Fig.1B), filtering version (air circulation on theinside – Fig.1A) or with external motor (Fig.1C).SAFETY PRECAUTIONthe user is helping to prevent potential damage to theenvironment or to public health.The symbol on the product or on the accompanyingpa<strong>per</strong>work indicates that the appliance should not be treatedas domestic waste, but should be delivered to a suitableelectric and electronic appliance recycling collection point.Follow local guidelines when disposing of waste. For moreinformation on the treatment, re-use and recycling of thisproduct, please contact your local authority, domestic wastecollection service or the shop where the appliance waspurchased.1. Take care when the cooker hood is o<strong>per</strong>ating simultaneouslywith an open fireplace or burner that depend on the air in theenvironment and are supplied by other than electrical energy,as the cooker hood removes the air from the environmentwhich a burner or fireplace need for combustion. The negativepressure in the environment must not exceed 4Pa (4x10⁻⁵ bar).Provide adequate ventilation in the environment for a safeo<strong>per</strong>ation of the cooker hood. Follow the local laws applicablefor external air evacuation.Before connecting the model to the electricity network:- Control the data plate (positioned inside the appliance)to ascertain that the voltage and power correspond to thenetwork and the socket is suitable. If in doubt ask a qualifiedelectrician.- If the power supply cable is damaged, it must be replacedwith another cable or a special assembly, which may beobtained direct from the manufacturer or from the TechnicalAssistance Centre.- This device must be connected to the supply networkthrough either a plug fused 3A or hardwired to a 2 fase spurprotected by 3A fuse.2. Warning !In certain circumstances electrical appliances may be adanger hazard.A) Do not check the status of the filters while the cookerhood is o<strong>per</strong>atingB) Do not touch bulbs or adjacent areas, during or straightafter prolonged use of the lighting installation.C) Flambè cooking is prohibited underneath the cookerhoodD) Avoid free flame, as it is damaging for the filters anda fire hazardE) Constantly check food frying to avoid that theoverheated oil may become a fire hazardF) Disconnec t the elec trical plug prior to anymaintenance.G) This appliance is not intended for use by young childrenor infirm <strong>per</strong>sons without su<strong>per</strong>visionH) Young children should be su<strong>per</strong>vised to ensure they donot play with the applianceI) There shall be adequate ventilation of the room whenthe rangehood is used at the same time as appliancesburning gas or other fuelsL) There is a risk of fire if cleaning is not carried out inaccordance with the instructionsThis appliance conforms to the European Directive EC/2002/96,Waste Electrical and Electronic Equipment (WEEE). By makingsure that this appliance is disposed of in a suitable manner,- 24 -INSTALLATION INSTRUCTIONSAssembly and electrical connections must be carried outby specialised <strong>per</strong>sonnel.• Electric ConnectionNote: Verify the data label placed inside the appliance:- If the symbol ( ) appears on the plate, it means thatno earth connection must be made on the appliance,therefore follow the instructions concerning insulationclass II.- If the symbol ( ) DOES NOT appear on the plate, followthe instructions concerning insulation class I.Insulation class IIThe appliance has been manufactured as a class II, thereforeno earth cable is necessary.The plug must be easily accessible after the installation ofthe appliance.If the appliance is equipped with power cord without plug, asuitably dimensioned omnipolar switch with 3 mm minimumopening between contacts must be fitted between theappliance and the electricity supply in compliance with theload and current regulations.The connection to the mains is carried out as follows:BROWN = L lineBLUE = N neutralInsulation class IWarning:This is a class I, appliance and must therefore be connectedto an effiecient earthing system.The appliance must be connected to the electricity supplyas follows:BROWN = L live wireBLUE = N neutralYELLOW / GREEN = earthThe neutral wire must be connected to the terminal with the Nsymbol while the YELLOW / GREEN, wire must be connectedto the terminal by the earth symbol .Warning:When connecting the appliance to the electricity supply, makesure that the mains socket has an earth connection.After fitting the ducted cooker hood, make sure that theelectrical plug is in a position where it can be accessedeasily.If the appliance is connected directly to the electricity supply,
an omnipolar switch with a minimum contact opening of3 mm must be placed in between the two; its size mustbe suitable for the load required and it must comply withcurrent legislation.• If the hob is electric, gas, or induction, the minimum distancebetween the same and the lower part of the hood must beat least 65 cm.If a connection tube composed of two parts is used, theup<strong>per</strong> part must be placed outside the lower part. Do notconnect the cooker hood exhaust to the same conductorused to circulate hot air or for evacuating fumes from otherappliances generated by other than an electrical source.Beforeproceeding with the assembly o<strong>per</strong>ations, remove the antigreasefilter(s) (Fig.7) so that the unit is easier to handle.In the case of assembly of the appliance in the suction versionprepare the hole for evacuation of the air.• We recommend the use of an air exhaust tube which hasthe same diameter as the air exhaust outlet hole. If a pipewith a smaller diameter is used, the efficiency of the productmay be reduced and its o<strong>per</strong>ation may become noisier.• The appliance features an opening at the front, for improvedair extraction.This feature may be implemented manually (by pulling thecover panel outwards, Fig. 2A) or electronically (only by usingthe controls indicated in Fig. 18), depending on the modelyou have purchased. Press and hold button “D” (Fig. 18) forapproximately 4 seconds to activate electronic opening.• Wall fixing- Mark the position of the lower side of the hood on the wallFig. 4A (taking into account the minimum distance requiredfrom the hob).- Position the fixing template on the wall, making sure thatthe line coincides with the line previously made on the wall,as described in the preceding section.- Mark and drill fixing holes (Fig. 4B).- Secure the 4 screws C and the screw anchors (Fig. 4B),without tightening them completely.- Position the appliance on the wall and secure it in place usingthe 4 screws C and the central screw D (Fig. 5).- When carrying out the fixing o<strong>per</strong>ations, use only screwsand screw anchors suited to the type of wall (e.g. reinforcedconcrete, plasterboard etc.).- If the screws and screw anchors are supplied with theappliance, make sure that they are suited to the type of wallto which the hood must be fixed.• Installation of models without decorative ducts- Extractor hood- Unclip the canopy M and remove the grille E (Fig. 6A).- Pass the power supply cable through the slot in the canopyM, as indicated in Fig. 6B.- Taking the grommet H, position it between the power cableand the slot.- Warning: the cooker hood may be installed with the airexhaust outlet at the rear, by removing bracket X with themotor and rotating it, as illustrated in Fig. 7.The wall mounting bracket Y should also be removed andfixed as illustrated in Fig. 7, using the same screws.- Connect the flexible hose L (not supplied) to the hood, sothat it is aligned with the air exhaust outlet.If the air exhaust is on top, use Fig. 8A as a guide; otherwise,if it is at the rear, use Fig. 8B as a guide.- Secure the fairing M, taking care to ensure that it is correctlyhooked on the securing pins.- Filter hood- Unclip the canopy M and remove the grille E (Fig. 6A).- Pass the power supply cable through the slot in the canopyM, as indicated in Fig. 6B.- Taking the grommet H, position it between the power cableand the slot.- Fit the carbon filters inside the cooker hood (Fig. 3).- Secure the fairing M, taking care to ensure that it is correctlyhooked on the securing pins. (Fig.9).• Installation of models with decorative ducts- Extractor hood- The fairing M should be removed before installing decorativeducts. (Fig. 6A)- Make sure the electrical power supply is within themeasurements of the decorative connector.- If your appliance is to be installed in the ducting version orin the version with external motor, prepare the air exhaustopening.- Adjust the width of the support bracket of the top connector(Fig. 11).- Then fix it to the ceiling so that it is on the same axis as thehood using screws A (Fig.11) and observing the distance fromthe ceiling shown in (Fig. 10).- Connect flange F to the air exhaust hole using flexible hoseL (Fig.12).- Slide the top connector inside the lower duct and place thison the body (Fig. 12).- Pull out the top duct as far as the bracket and secure it usingscrews B (Fig. 13).• Filter hoodPlease note:In order to transform the hood from EXTRACTOR HOODinto FILTER HOOD the carbon filters must be ordered at yourdistributor as accessory.- The filters must be applied to the suction unit positionedinside the hood. They must be centred by turning them 90degrees until the stop catch is tripped (Fig.14).- If you find a bracket such as the one indicated inFig.15included in the product packaging, this should befixed to the hood using the supplied screws.The re-usable filter should be positioned inside the bracket(which should already have been fitted to the cooker hood)and fixed in place using the two smaller brackets (Fig. 15).• Optional features- The appliance may be supplied with a “courtesy light”on request. If the model you have purchased is equippedwith this feature, press the button as indicated in Fig. 2Bto activate it.WARNING: If your appliance has the control strip illustratedin Fig. 18 and does not offer the electronic opening feature,press and hold button “D” (Fig. 18) for 4 seconds to activatethe “courtesy light” function. To deactivate the light function,press and hold the same button for 4 seconds.- The manual opening model depicted in Fig. 2B may be fittedwith a <strong>per</strong>imeter suction kit (supplied on request).- 25 -
USE AND MAINTENANCE• We recommend that the cooker hood is switched on beforeany food is cooked.We also recommend that the appliance is left running for15 minutes after the food is cooked, in order to thoroughlyeliminate all contaminated air.The effective <strong>per</strong>formance of the cooker hood depends onconstant maintenance; the anti-grease filter and the activecarbon filter both require special attention.• The anti-grease filter is used to trap any grease particlessuspended in the air, therefore is subject to saturation (thetime it takes for the filter to become saturated depends onthe way in which the appliance is used).- To prevent potential fire hazards, the anti-grease filters shouldbe washed a minimum of every 2 months (it is possible to usethe dishwasher for this task).- After a few washes, the colour of the filters may change. Thisdoes not mean they have to be replaced.If the replacement and washing instructions are not followed,the anti-grease filters may present a fire hazard.• The active carbon filters are used to purify the air which isreleased back into the room.The filters are not washable or re-usable and must be replacedat least once every four months.The active carbon filter saturation level depends on thefrequency with which the appliance is used, the type ofcooking <strong>per</strong>formed and the regularity with which the antigreasefilters are cleaned.• Clean the cooker hood frequently, both inside and outside,using a cloth which has been dampened with denaturedalcohol or neutral, non-abrasive liquid detergents.• The light on the cooker hood is designed for use duringcooking and not for general room illumination.Extended use of the light reduces the average duration ofthe bulb.• Replacing halogen light bulbs (Fig. 16).In order to replace the dichroic lamps, carefully removethe lamp from the lamp holder with the help of a small flatscrewdriver or a similar tool. PLEASE NOTE! In doing thiso<strong>per</strong>ation, please take care not to scratch the hood.Replace the bulbs with new ones of the same type.• Commands: (Fig.17)Push-button A = on/off lights switchPush-button B = on/off cooker hood switch. The applianceswitches on at speed level 1, If the cooker hood is on depressthe push-button for 2 sec. to switch off the cooker hood. Ifthe cooker hood is at speed level 1 it will not be necessaryto depress the push-button to switch the cooker hood off.Decreases the motor speed.Display C = indicates the motor speed level selected andactivates the timer.Push-button D = switches on the cooker hood. Increases themotor speed. Touching the key at 3rd speed, the intensivefunction runs for 10’, then the appliance go back to work at theoriginal speed. During this function the display blinks.Key E = The Timer times the functions on activation for15 minutes, after which they are switched off. The Timer isdeactivated by re-pressing Key E. When the Timer is activatedthe decimal point must flash on the display. The Timer cannotbe activated if the intensive speed is functioning.The “clean air” function is activated by pressing key E for 2seconds when the appliance is switched off. This switchesthe motor on for 10 minutes every hour at the first speed.During functioning a rotary movement of the <strong>per</strong>ipheralsegments must be visualised on the display. When this timehas passed the motor switches off and the fixed letter “C”must be visualised on the display until the motor re-startsafter 50 minutes for another 10 minutes and so on. Press anykey apart from the light keys to return to normal functioning.Press key E to deactivate the function.• Active carbon/grease filter saturation- When display item C flashes, at a speed where it alternateswith the letter F (e.g. 1 and F), the grease filters must bewashed.- When display item C flashes, at a speed where it alternateswith the letter A (e.g. 1 and A), the carbon filters must bereplaced.After the clean filter has been positioned correctly, theelectronic memory must be reset by pressing button A forapproximately 5 seconds, until the indication F or A shownon the display C stops flashing.• Commands: (Fig.18A-18B)NOTE: With this control it is possible to manage the appliancealso with a remote control to be requested as accessory.Power Button (A) = the on / off button switches on and offthe whole hood (motor and lights).By pressing the button the motor starts at 1st speed.Fan Speed button (B) = From the OFF position, press oncefor the 1st speed, twice for the 2nd speed and three timesfor the 3rd speed. In order to activate the intensive speed,press the button for 5 seconds regardless of the status of thehood. For each speed only the led indicating the set speedwill turn on. The intensive speed is indicated by the flashingof the led indicating speed 3. The duration of the intensivespeed is 10 minutes; after this time the hood goes back tothe last set speed.In order to remove the intensive speed press the power buttonand the hood will switch off, or press the Fan speed buttonand the speed goes back to the previously set one. Speed ofthe hood with cyclic trend.Light button (C)= There are three light levels: High, medium,low.From the off position press once for the high level, twice forthe medium level, three times for the low level and four timesto turn the lights off.The level of the lights has a cyclic trend: High, medium,low, off.Timer button (D) = With any type of speed (excluding theintensive speed), by pressing the button, the timer functionis activated for 15 minutes. After this time has elapsed thehood will turn off (motor and any light on).Lights indicator (E) = The lights indicator will switch on whenthe lights are on at any level.Filters indicator (F) = After 30 minutes of o<strong>per</strong>ation, the ledof the filters indicator will switch on, not flashing indicatingthat the anti-grease filters have to be washed. To reset thefunction (with the hood off), press the Fan speed button for5 seconds. After this o<strong>per</strong>ation, the led of the filters indicatorturns off and the setting of the 30 hours starts again fromthe beginning.After 120 hours the led will flash continuously. This meansthat the carbon filters have to be replaced (if present). To resetthe function (with hood off) press the Fan speed button for 5seconds. After this o<strong>per</strong>ation, the led of the indicator turns offand the setting starts again from the beginningClean air indicator (8).With the hood off, press the Power button (1) for 5 seconds to- 26 -
activate the clean air function. This will switch on the motorat speed 1 for 10 minutes every hour. The light indicator willswitch on without flashing and the led of the 1st speed willswitch on. In the remaining 50 minutes the light indicator willflash. The function can be deactivated by pressing any buttonexcept for the lights one.THE MANUFACTURER DECLINES ALL RESPONSIBILITYFOR EVENTUAL DAMAGES CAUSED BY BREACHING THEABOVE WARNINGS.- 27 -
NEDERLANDSNLALGEMEENDe inhoud van dit boekje grondig doorlezen, daar hetbelangrijke informatie bevat voor veilige installatie, gebruiken onderhoud.Het boekje bewaren voor verdere raadpleging.Het apparaat is ontworpen als afzuigkap (Iuchtafvoer naarbuiten, waarbij gezorgd moet worden voor voldoendeluchttoevoer naar de keuken) of als filter (Iuchtrecirculatiebinnen). Het apparaat is ontworpen om gebruikt te wordenin de afzuigversie (externe afvoer van de lucht - Afb.1B), inde filterversie (interne hercirculatie van de lucht - Afb.1A) ofmet externe motor (Afb.1C).VEILIGHEIDSVOORSCHRIFTEN1.Opletten indien tegelijkertijd een afzuigkap en eenbrander of haard functioneren die afhankelijk zijn vande omgevingslucht en gevoed worden door een andereenergiebron dan de elektrische energie. De afzuigkapkan de lucht die de brander of haard nodig heeft voor deverbranding aan de omgeving onttrekken. De negatievedruk in de omgeving mag niet boven de 4 Pa (4x10⁻⁵ bar)liggen. Voor een veilige werking dient u te zorgen voor eengoede ventilatie van de ruimte. Voor de afvoer naar buitenmoet u zich houden aan de geldende voorschriften die vantoepassing zijn in uw land.Voordat u het model op het elektriciteitsnet aansluit:- Controleer op het gegevensplaatje (aan de binnenkant vanhet apparaat) of de spanning en het vermogen overeenkomenmet die van het net, en of de stekker geschikt is voor deaansluiting. Neem in geval van twijfel contact op met eengekwalificeerde elektricien.- Als de voedingskabel beschadigd is dient deze teworden vervangen door een andere kabel of een specialekabelcombinatie, beschikbaar bij de fabrikant of de technischeservicedienst.- Verbind het mechanisme aan de voeding m.b.v. en stekkermet zekering 3A of aan de twee draden van de tweefasebeschermd met een 3A zekering.2. Attentie!In bepaalde omstandigheden kunnen huishoudelijkeapparaten gevaarlijk zijn.A) Probeer niet om de filters te controleren terwijl deafzuigkap werktB) Raak de lampen en de zones vlakbij niet aan als deverlichting lang aan is of kort daarna.C) Het is verboden om eten met open vlam te bereidenonder de kapD) Voorkom open vlammen, deze zijn schadelijk voor defilters en brandgevaarlijkE) Controleer voortdurend gebakken waren om tevoorkomen dat hete olie vlam vatF) Voor elke willekeurige onderhoudsbeurt moet men deelektrische energie afschakelen.G) Dit apparaat is niet bestemd voor gebruik door kinderenof andere <strong>per</strong>sonen die toezicht nodig hebben.H) Controleer dat kinderen niet met het apparaatspelen.I) Als de afzuigkap tegelijk met andere apparaten wordtgebruikt die gas of andere brandstoffen verbranden, moet- 28 -het vertrek goed worden geventileerd.L) Als de reinigingswerkzaamheden niet wordenuitgevoerd zoals aangegeven in de handleiding loopt uhet risico dat er brand uitbreekt.Dit apparaat is voorzien van het keurmerk Waste Electricaland Electronic Equipment (WEEE), zoals vastgesteld doorde Europese Norm 2002/96/EC. Door te zorgen dat deafvalverwijdering van dit product correct wordt uitgevoerd,werkt de gebruiker mee aan het voorkomen van potentiëlenegatieve consequenties voor omgeving en gezondheid.Het symbool op het product of op het bijgeleverdedocumentatiemateriaal geeft aan dat het niet moet wordenbehandeld als normaal huisvuil, maar dat het moet wordeningeleverd bij een speciaal verzamelpunt voor het recyclen vanelektrische en elektronische apparatuur. De afvalverwijderingmoet plaatsvinden in het respect van de gemeentelijkenormen. Voor meer informatie over het onderhoud en hetrecyclen van dit product kunt u contact opnemen met uwgemeente, de locale reinigingsdienst, of de winkel waar u hetproduct heeft aangeschaft.INSTALLATIE INSTRUCTIESDe werkzaamheden m.b.t de montage en de elektrischeaansluiting dienen verricht te worden door gespecialiseerd<strong>per</strong>soneel.• Elektrische aansluitingOpgelet! Controleer het gegevensplaatje binnen in hetapparaat: - Als op het plaatje het symbool ( ) staat,betekent het dat het apparaat niet geaard hoeft te worden,volg in dit geval de aanwijzingen voor isolatieclasse II.- Als het symbool ( ) niet op het plaatje staat, voer dande aanwijzingen voor isolatieclasse I uit.Isolatieclasse IIHet apparaat is gemaakt in klasse II (dubbel geïsoleerd),het snoer hoeft derhalve niet op een geaard stopcontactaangesloten te worden.De stekker moet na de installatie van het apparaat gemakkelijktoegankelijk zijn.In het geval dat het apparaat een kabel zonder stekkerheeft, moet men deze op het electrische net aansluitenmet een schakelaar tussen apparaat en net, waarvan allepolen onderbroken worden; de minimale opening tussende contacten moet 3 mm zijn en de schakelaar moetgedimensioneerd zijn voor de belasting en voldoen aan devan kracht zijnde normen.De aansluiting op het elektriciteitsnet moet als volgtuitgevoerd worden:BRUIN = L faseBLAUW = N nulleidingIsolatieclasse IWaarschuwing:Dit apparaat is gebouwd in klasse I, en moet daarom aan eenaardgeleiding worden verbonden.De aansluiting op het elektrische net moet op de volgendewijze worden uitgevoerd:BRUIN = L lijnBLAUW = N neutraal
GEEL / GROEN = aardeDe neutrale kabel moet worden aangesloten op deaansluitklem met het symbool N. De GEEL/GROENE kabelmoet worden aangesloten op de aansluitklem vlakbij hetaardsymbool .Waarschuwing:Bij het aansluiten op het elektrische net moet u zich ervanverzekeren dat het stopcontact een aardverbinding heeft.Nadat u de afzuigkap heeft gemonteerd dient u ervoor tezorgen dat het stopcontact makkelijk te bereiken is.In het geval van een directe aansluiting op het elektrischenet is het noodzakelijk tussen het apparaat en het net eenmeerpolige schakelaar aan te brengen met een minimumafstand van 3 mm tussen de contacten. Deze moet aangepastzijn aan het elektrische vermogen en voldoen aan de geldendenormen.• Indien het gebruikte fornuis electrisch, op gas of metinductie werkt, dan moet de minimale afstand hiertussen enhet laagste deel van de kap tenminste 65 cm bedragen.Sluit de afvoer van de afzuigkap niet aan op een leidingwaardoor warme lucht circuleert of die gebruikt wordtvoor de afvoer van rook van apparaten die door een andereenergiebron dan elektrische energie gevoed worden.Voordat u verder gaat met de montage dient u, om hetapparaat makkelijker te kunnen verplaatsen, de antivetfilter(s)te verwijderen (Afb.2).Bij montage van het apparaat in de afzuigversie dient u vooreen gat voor de luchtafvoer te zorgen.• We raden u aan een luchtafvoerbuis te gebruiken meteenzelfde diameter als die van de luchtafvoeropening. Hetgebruik van een reduceerelement zou de prestaties vanhet product kunnen be<strong>per</strong>ken en het lawaai kunnen doentoenemen.• Voor een betere afzuigkracht is het apparaat uitgerust meteen opening aan de voorkant.Deze kan, op basis van het model at u bezit, op eenmechanische manier in werking worden gesteld (door hetdeurtje naar buiten toe te openen Fig. 2A), of op elektronischewijze (alleen beschikbaar met het in Fig. 18 aangegevenbedieningspaneel) De elektronische opening vindt plaatsdoor ongeveer 4 seconden op toets “D” (Fig. 18) te drukken.• Wandbevestiging- Trek een lijn op de muur langs de onderzijde van de kapAfb. 4B (houdt rekening met de minimum afstand tot dekookplaat).- Plaats de bevestigingsmal aan de wand. Zorg ervoor dat delijn overeenkomt met de lijn beschreven in de voorgaandeparagraaf.- Teken en maak de bevestigingsgaten (Afb. 4B).- Bevestig de 4 schroeven C zonder ze volledig vast te draaienen doe de pluggen op hun plaats (Afb.4B).- Zet het apparaat tegen de muur en maak hem definitiefvast door de 4 schroeven C en de middenschroef D (Afb.5)aan te draaien.- Gebruik bij het monteren schroeven en pluggen die geschiktzijn voor het type wand (bv. gewapend beton, gipsplaat,enz.).- Indien de schroeven en de pluggen bij het product zijngeleverd moet u zich ervan verzekeren dat ze geschikt zijn voorhet type wand waaraan de kap wordt bevestigd.• Installatie van modellen zonder decoratieveschoorsteen- Afzuigversie- Kapje M losmaken en het rooster verwijderen (Fig. 6A).- De voedingskabel door de gleuf van kapje M halen, zoalsaangegeven in Fig.6B.- Neem de kabeldoorvoer H en doe deze tussen het snoeren de gleuf.- Let op: de kap kan worden geïnstalleerd met de luchtuitgangaan de achterkant worden door bevestigingsbeugel X met demotor te verwijderen en deze te draaien, zoals aangegevenin Fig. 7.Verwijder ook de muurbevestigingsbeugel Y en plaats deze metgebruik van dezelfde schroeven zoals in Fig. 7 aangegeven.- De flexibele slang L (niet bijgeleverd) op de kap aansluitenop basis van de keuze van de positie van de opening van deluchtuitgang.Voor de bovenste luchtuitgang wordt verwezen naar Fig. 8A,en voor de luchtuitgang aan de achterkant naar Fig. 8B.- Maak de koepel M vast, let op dat deze <strong>per</strong>fect op debevestigingspennen hake.- Filterversie- Kapje M losmaken en het rooster verwijderen (Fig. 6A).- De voedingskabel door de gleuf van kapje M halen, zoalsaangegeven in Fig.6B.- Neem de kabeldoorvoer H en doe deze tussen het snoeren de gleuf.- Plaats de koolstoffilters in de kap. (Fig.3)- Maak de koepel M vast, let op dat deze <strong>per</strong>fect op debevestigingspennen hake. (Fig.9).• Installatie van modellen met decoratieve schoorsteen- Afzuigversie- Voordat men de estetische schachten installeert, moet mende koepel M verwijderen. (Fig. 6A)- Monteer de elektrische voeding binnen de decoratieveschacht.- Indien de afzuigversie of de versie met externe motorgeïnstalleerd moet worden, dan maakt u een gat voor deluchtafvoer.- Regel de breedte van de ophangsteun van het bovensteverbindingsstuk (Afb. 11).- Bevestig hem vervolgens aan het plafond op dusdanige wijzedat hij in een rechte lijn staat met uw kap, door middel van deschroeven A (Afb.11). Respecteer de afstand vanaf het plafond,aangegeven in (Afb. 10).- Verbind, door middel van een flexibele buis L, de flens F aande luchtafvoeropening (Afb. 12).- Steek het bovenste verbindingsstuk in de onderste schachten laat hem op de behuizing staan (Afb.12).- Haal de bovenste schacht omhoog tot aan de steun enbevestig hem met behulp van de schroeven B (Afb. 13).- FilterversieAttentie!Om de kap te veranderen van de AFZUIG- naar de FILTERversie,moet men de koolfilters bij de eigen dealer alstoebehoren bestellen.- De filters moeten op de afzuiggroep aangebracht worden,aan de binnenkant van de kap, en daarop gecentreerd wordendoor ze 90 graden te draaien tot ze vastklikken (Fig.14).- Indien men in de verpakking een beugel vindt zoalsaangegeven in Fig.15 moet men deze met de bijgeleverdeschroeven aan de kap vastmaken.- 29 -
Het herbruikbare filter moet in de binnenkant van de vooraf opde kap geïnstalleerde bevestigingsbeugel worden geplaatst,en met de twee beugeltjes worden bevestigd. (Fig.15)• Optional- Het apparaat kan met de functie “extra verlichting” wordengeleverd. Als het model in uw bezit over deze functie beschikt,kunt u deze inschakelen door op de in Fig. 2B aangegeventoets te drukken.LET OP: Als uw model het in Fig. 18 aangegevenbedieningspaneel bezit en niet e elektronische opening, kuntu de functie “extra verlichting” inschakelen door 4 secondenop toets “D” (Fig.18) te drukken. Om de verlichting uit teschakelen, weer 4 seconden op dezelfde knop drukken.- Voor het in Fig. 2B afgebeelde model met mechanischeopening kan de Kit voor afzuiging via de buitenmuurbijgeleverd worden.GEBRUIK EN ONDERHOUD• We raden aan het apparaat aan te zetten voordat u met debereiding begint van elke willekeurige maaltijd. We radenu aan het apparaat 15 minuten aan te laten nadat het etenbereid is, voor een optimale luchtverversing.De goede werking van de afzuigkap hangt af van eenregelmatig en correct onderhoud; in het bijzonder moetmen aandacht besteden aan het vetfilter en aan het filtermet actieve koolstof.• Het vetfilter dient voor het tegenhouden van de vetdeeltjesdie in de lucht circuleren, en raakt daarom oververzadigd naonvoorzienbare <strong>per</strong>ioden, afhankelijk van het gebruik vanhet apparaat.- Om eventueel brandgevaar te voorkomen dient u maximaalom de 2 maanden het vetfilter te wassen. Dit kan ook in deafwasautomaat.- Nadat u het filter enige malen heeft gewassen kan het lichtverkleuren. Dit geeft echter geen recht op vervanging vanhet filter.Voert men de aanwijzingen betreft de vervanging of hetwassen niet op, dan kan er brandgevaar optreden in devetfilters.• De koolstoffilters zuiveren de lucht die weer in de ruimteteruggevoerd wordt. De filters kunnen niet gereinigd ofgeregenereerd worden en moeten minimaal eens in de viermaanden vervangen worden. De koolstofverzadiging hangtaf van een al dan niet intensief gebruik van de afzuigkap, vanhet type keuken en van de regelmaat waarmee de vetfiltersgereinigd worden.• Reinig de afzuigkap regelmatig van binnen en van buiten metbehulp van een doek gedrenkt in spiritus of in een neutraal,niet schurend afwasmiddel.• De verlichtingsinstallatie is ontworpen om gebruikt teworden tijdens het koken en niet voor langdurige verlichtingvan de omgeving. Het langdurige gebruik van de verlichtingvermindert de levensduur van de lampen aanzienlijk.• Vervanging van de halogeenlampen (Afb.16).Om de lampen te vervangen, moet men deze voorzichtig meteen kleine platte schroevendraaier of iets soortgelijks uit dehouder lichten. OPGELET! Let er op dat men hierbij geenkrassen maakt op de kap.Vervang de lamp met een nieuw van het zelfde type• Kontroller: (Afb.17)Knop A = voor het aan- en uitschakelen van de lichtenKnop B = voor het aan- en uitschakelen van de wasemkap.Het apparaat wordt aangeschakeld op de 1ste snelheid. Alsde kap aan is druk 2 sec. lang op de knop om deze uit teschakelen. Als de kap op de 1ste snelheid aangeschakeld is,is het niet nodig de knop ingedrukt te houden om de kap uitte schakelen. Vermindert de snelheid van de motor.Display C = geeft de geselecteerde motorsnelheid en deinschakeling van de timer aan.Knop D = Voor het inschakelen van de afzuigkap. Met dezeknop kan een hogere stand gekozen worden. Wanneerdeze knop bediend wordt terwijl de afzuigkap in stand 3staat, wordt de intensiefstand ingesteld. Dit houdt in dat deafzuigkap gedurende 10 minuten op vol vermogen zal werken,waarna hij automatisch terugkeert naar stand 3. Tijdens dezefunctie knip<strong>per</strong>t het display C.Toets E = Door de Timer in te schakelen worden de gekozenfuncties 15 minuten lang geactiveerd, waarna ze wordenuitgeschakeld. Door weer op de toets E te drukken wordtde Timer uitgeschakeld. Als de Timer functie actief is zal ophet display het decimale punt knip<strong>per</strong>en. De Timer kan nietworden ingeschakeld als de functie intensieve snelheid isgeactiveerd.Als, wanneer het apparaat uit is, de toets E 2 seconden langwordt ingedrukt, wordt de functie “clean air” geactiveerd.Deze functie schakelt de motor elk uur 10 minuten lang opde eerste snelheid in. Als deze functie is geactiveerd zullen dezijgedeeltes op het display een draaiende beweging maken.Zodra deze tijd is verstreken gaat de motor uit en verschijnt ophet display de letter “C” totdat, na weer 50 minuten, de motoropnieuw voor 10 minuten gaat draaien, enzovoort.• Vetfilters/koolstoffilters verzadigd- Als het display C knip<strong>per</strong>t en de ventilatiesnelheid wordtafgewisseld met de letter F (bv. 1 en F) dienen de vetfilterste worden gereinigd.- Als het display C knip<strong>per</strong>t en de ventilatiesnelheidwordt afgewisseld met de letter A (bv. 1 en A) dienen dekoolstoffilters te worden vervangen.Als het schone filter weer op zijn plaats zit dient u een resetuit te voeren van het elektronische geheugen door circa 5seconden op de toets A te drukken, totdat de tekens F of Aop het display C stoppen met knip<strong>per</strong>en.• Kontroller: (Afb.18A-18B)OPMERKING: Met deze functie kan men het apparaat ookbesturen met een afstandsbediening, die als een toebehoormoeten worden aangevraagd.Toets Power (A)= de toets voor het in-/uitschakelen zal dehele kap aan- of uitzetten ( motor en verlichting).Drukt men op de toets dan zal de motor in de 1° snelheidstartenToets Fan speed (B)= in de stand OFF moet men een keerdrukken voor de 1° snelheid, twee keer voor de 2° snelheid,drie keer voor de 3° snelheid. Om de extra hoge snelheidin te schakelen moet men de toets voor 5 sec indrukken, inwelke toestand de kap zich ook bevindt. Bij elke snelheid zaluitsluitend de led aangaan, die overeenkomt met de ingesteldesnelheid. De extra hoge snelheid wordt aangegeven door deled van de 3° snelheid, deze zal dan knip<strong>per</strong>en. De tijdsduurvan de extra hoge snelheid is 10 min, daarna keert de kapterug naar de laatst ingestelde snelheid.Om de extra hoge snelheid te verwijderen kan men depowertoets indrukken waardoor de kap uit zal gaan, of opde toets Fan speed, hierdoor keert de snelheid terug naarde van te voren ingestelde waarde. Afwisselende snelheidvan de kap.- 30 -
Toets light (C)= er zijn drie verlichtingsniveau’s: hoog,middelmatig, laag.Als de lampen uit zijn, drukt men één maal voor het hogeniveau, twee maal voor het middelste niveau, drie maalvoor het lage niveau en vier maal om de verlichting weeruit te zetten.Het niveau van de verlichting heeft een cyclisch verloop: hoog,middelmatig, laag, uit.Toets timer (D)= bij elke snelheid ( behalve de extra hoge )zal men met deze toets de timer voor 15 min. activeren Aanhet eind van deze tijd zal de kap uitgaan (motor en eventueleverlichting).Controlelamp lichten (E)= de controlelamp gaat aan als deverlichting aan is (willekeurig niveau)Controlelamp filters (F)= Na 30 uur bedrijf zal de controleledvan de filters aangaan, zonder te knip<strong>per</strong>en, men moetnu de anti-vetfilters wassen. Men kan de functie resetten (bijuitgeschakelde kap) door 5 sec lang op de toets Fan speed tedrukken. Hierna zal de led voor de filterssignalering uitgaan ende teller voor de 30 uren zal weer vanaf 0 beginnen.Na 120 uur zal de led voortdurend knip<strong>per</strong>en. Dit wil zeggendat men de koolfilters moet vervangen (indien gemonteerd).Men kan de functie resetten (bij uitgeschakelde kap) door 5sec lang op de toets Fan speed te drukken. Hierna zal de ledvoor de filterssignalering uitgaan en de teller zal weer vanaf0 beginnen.Controlelamp schone lucht (8)Met uitgeschakelde kap kan men 5 sec op de Power toets(1) drukken, om de functie Clean air in te schakelen. Dezezal de motor elk uur voor 10 min op de eerste snelheid latendraaien. De controlelamp gaat continu branden en de led voorde eerste snelheid gaat aan. Tijdens de overige 50 min zal hetlampje knip<strong>per</strong>en. De functie zal gedisactiveerd worden doorelke willekeurige knop, behalve voor de verlichting.DE FABRIKANT IS NIET AANSPRAKELIJK VOOR SCHADEDIE VOORTVLOEIT UIT HET NIET IN ACHT NEMEN VAN DEBOVENSTAANDE VOORSCHRIFTEN.- 31 -
PORTUGUÊSPGENERALIDADESLer cuidadosamente o conteúdo do presente manual já queeste fornece indicações importantes referentes à segurançade instalação, de uso e de manutenção. Conservar o manualpara qualquer ulterior consulta. O aparelho foi projectadopara utilização em versão aspirante (evacuação de ar para oexterior - Fig.1B), filtrante (circulação de ar no interior - Fig.1A)ou com motor exterior (Fig.1C).ADVERTÊNCIAS PARA A SEGURANÇAas consequências potenciais negativas para o meio ambientee a saúde.O símbolo no aparelho ou na documentação deacompanhamento indica que o mesmo não deve ser tratadocomo resíduo doméstico, mas deve ser levado a um pontode colecta idóneo para reciclar equipamento eléctrico eelectrónico. Para eliminá-lo obedecer os regulamentos locaissobre a eliminação de resíduos. Para maiores informaçõessobre o tratamento, a recu<strong>per</strong>ação e a reciclagem desteaparelho, contactar o serviço local encarregado pelacolecta de resíduos domésticos ou a loja onde o mesmo foicomprado.1. Prestar atenção se estão funcionando contemporaneamenteuma coifa aspirante e um queimador ou um fogão dependentesdo ar ambiente e alimentados por uma energia que não aelétrica, já que a coifa, aspirando, tira do ambiente o ar que oqueimador ou o fogão necesitam para a combustão. A pressãonegativa no local não deve ser su<strong>per</strong>ior a 4 Pa (4x10⁻⁵ bar).Para um funcionamento seguro, providenciar uma oportunaventilação do local. Para a evacuação externa, ater-se àsdisposições vigentes no seu País.Antes de ligar o modelo à rede eléctrica:- Controle a placa dos dados (posta no interior do aparelho)para verificar que a tensão e a potência correspondam às darede e que a tomada seja apropriada. Em caso de dúvidasinterpele um electricista qualificado.- Se o cabo de alimentação estiver danificado, deverá sersubstituído por um cabo ou um conjunto especiais fornecidospelo fabricante ou pelo seu serviço de assistência técnica.- Ligar o dispositivo à rede de alimentação através de umaficha com fusível 3A ou aos dois fios da bifásica protegidospor um fusível 3A.2. Atenção!Em determinadas circunstâncias, os electrodomésticospodem ser <strong>per</strong>igosos.A) Não procure controlar os filtros com o exaustor emfuncionamento.B) Não toque as lâmpadas e as áreas adjacentes, durante elogo pós o uso prolongado da instalação de iluminação.C) É proibido cozinhar alimentos flambé sob o exaustor.D) Evite a chama livre, porque é danosa para os filtros e<strong>per</strong>igosa para os incêndios.E) Controle constantemente os alimentos fritos para evitarque o óleo aquecido pegue fogo.F) Antes de efectuar qualquer manutenção, desligue oexaustor da rede eléctrica.G) Este aparelho não é destinado ao uso por parte decrianças ou pessoas que precisem de su<strong>per</strong>visão.H) Não <strong>per</strong>mita que as crianças brinquem com oaparelho.I) Quando o exaustor for utilizado contemporaneamentea aparelhos que queimam gás ou outros combustíveis, olocal deverá ser adequadamente ventilado.L) Se as o<strong>per</strong>ações de limpeza não forem efectuadas norespeito das instruções, existe o risco de incêndio.Este aparelho está marcado em conformidade com aDirectiva Europeia 2002/96/EC, Waste Electrical and ElectronicEquipment (WEEE). Assegurar-se que este aparelho sejaeliminado de maneira certa, o utilizador contribui a prevenir- 32 -ISTRUÇÕES PARA A INSTALAÇÃOAs o<strong>per</strong>ações de montagem e ligação eléctrica devem serefectuadas por pessoal especializado.• Conexão elétrica:Observação! Controle a placa dos dados colocada dentrodo aparelho:- Se na placa aparece o símbolo ( ) significa que oaparelho não deve ser ligado à terra, efectue portanto sinstruções que referem-se à classe de isolamento II.- Se na placa NÃO aparece o símbolo ( ) efectue asinstruções que referem-se à classe de isolamento I.Classe de isolamento IIO aparelho é construído em classe II, portanto nenhum cabodeve ser ligado à tomada de terra.A ficha deve ser facilmente acessível após a instalação doaparelho.No caso em que o aparelho não disponha de cabo sem ficha,para ligá-lo à rede eléctrica será necessário interpor uminterruptor omnipolar com abertura mínima de 3 cm entreos contactos, dimensionado para a carga e que atenda aosregulamentos em vigor.A ligação à rede elétrica deve ser feito como segue:MARROM = L faseAZUL = N neutroClasse de isolamento IAtenção:Este aparelho é feito para a classe I, portanto deverá ser ligadoà tomada de ligação à terra.A ligação à rede eléctrica deverá ser realizada da seguintemaneira:CASTANHO = L linhaAZUL = N neutroGIALLO / VERDE = terraO cabo neutro deverá ser ligado ao borne com o símbolo N,enquanto que o cabo AMARELO/VERDE, deverá ser ligadoao borne <strong>per</strong>to do símbolo de terra .Atenção:Na realização da ligação eléctrica assegurar-se que a tomadaeléctrica seja dotada de uma ligação à terra.Depois de ter montado o exaustor, tomar cuidado para aposição da ficha eléctrica ser de fácil acesso.No caso de ligação directa à rede eléctrica, é necessário, entreo aparelho e a rede, interpor um interruptor omnipolar comabertura mínima de 3 cm. entre os contactos, dimensionado
para a carga e que atenda aos regulamentos em vigor.• Se o plano de cozedura utilizado for eléctrico, a gás ou porindução, a distância mínima entre o mesmo e a parte maisbaixa do exaustor deverá ser de no mínimo 65 cm.Tendo que ser usado um tubo de conexão composto de duasou mais partes, a parte su<strong>per</strong>ior deve ficar externamenteàquela inferior.Não conectar a descarga da coifa a um duto pelo qual circulear quente ou utilizado para evacuar fumos de aparelhosalimentados por uma energia que não a elétrica. Antes deproceder às o<strong>per</strong>ações de montagem, para um manejo maisfácil do aparelho retirar os filtros anti-gordura (Fig.2).No caso de montagem do aparelho em versão aspirantepredisponha o furo de evacuação do ar.• Aconselha-se o uso de um tubo de evacuação do ar como mesmo diâmetro da boca de saída do ar. O uso de umaredução poderia diminuir o desempenho do produto eaumentar o ruído.• Para uma melhor capacidade de aspiração, o aparelho dispõede uma abertura frontal.Esta abertura pode ser realizada de forma mecânica(puxando a porta para o exterior Fig.2A) ou electrónica(disponível somente com os comandos indicados na Fig. 18)conforme a versão de produto. A abertura electrónica ocorrepressionando a tecla “D“ (Fig. 18) por aproximadamente 4segundos.• Como prender numa parede- Trace o lado inferior do exaustor no muro, Fig.4A(considerando a distância mínima do plano de cozedura).- Posicione o molde de fixação na parede, preste atenção paraa linha coincidir com a linha traçada no parágrafo anterior.- Marque e realize os furos para prender (Fig. 4B).- Fixe os 4 parafusos C sem parafusá-los completamente e asbuchas de expansão (Fig. 4B).- Posicione o aparelho na parede e fixe-o definitivamentea<strong>per</strong>tando os 4 parafusos C e o parafuso central D (Fig. 5).- Para as várias montagens utilize parafusos e buchas deexpansão idóneas para o tipo de parede (por ex.: betão,cartão gesso etc.).- Se os parafusos e as buchas forem fornecidas juntamentecom o aparelho, certificar-se que sejam idóneas para o tipode parede na qual o exaustor será preso.• Instalação para modelos sem chaminé estética- Versão aspirante- Desengate a cúpula M e remova a grelh E (Fig. 6A).- Faça passar o cabo de alimentação pelo ilhó da cúpula Mindicada na Fig.6B- Prenda o passa-fios H e posicione-o entre o cabo dealimentação e a fenda.- Atenção: é possível instalar o exaustor com a saídado ar posterior, removendo o suporte X com o motor erodando-o como indicado na Fig. 7.Remova também o suporte de fixação ao muro Y eposicione-o como indicado na Fig. 7, utilizando os mesmosparafusos.- Una o tubo flexível L (não fornecido) ao exaustor, conformea escolha da posição do furo de saída.Para a saída do ar su<strong>per</strong>ior, veja a Fig. 8A, enquanto para asaída do ar posterior, veja a Fig. 8B.- Fixe a cúpula M prestando atenção para que se engate<strong>per</strong>feitamente nos pinos de fixação• Versão filtrante- Desengate a cúpula M e remova a grelh E (Fig. 6A).- Faça passar o cabo de alimentação pelo ilhó da cúpula Mindicada na Fig.6B- Prenda o passa-fios H e posicione-o entre o cabo dealimentação e a fenda.- Coloque os filtros de carvão dentro do exaustor.(Fig.3)- Fixe a cúpula M prestando atenção para que se engate<strong>per</strong>feitamente nos pinos de fixação. (Fig.9).• Instalação para modelos com chaminé estética- Versão aspirante- Antes de instalar as chaminés estéticas é necessário removera cúpula M. (Fig. 6A)- Predispor a alimentação eléctrica dentro das medidas dajunta decorativa.- Se o aparelho se destinar a instalação em versão aspirante ouem versão com motor exterior, preparar o furo de evacuaçãode ar.- Regular a largura do suporte da junta su<strong>per</strong>ior (Fig. 11).- Em seguida, fixar ao tecto de forma que esteja alinhada como exaustor através dos parafusos A (Fig.11) e respeitando adistância do tecto, indicada na Fig. 10.- Ligar, com um tubo flexível L o flange F ao furo deescoamento do ar (Fig. 12).- Instalar a conexão su<strong>per</strong>ior no interior da chaminé inferiore apoiar em cima a caixa (Fig. 12).- Desfiar a chaminé su<strong>per</strong>ior até o suporte e fixá-la através dosparafusos B (Fig. 13).- Versão filtranteAtenção!Para transformar o exaustor de versão <strong>ASPIRANTE</strong> paraversão FILTRANTE, encomende ao seu revendedor os filtrosde carvão activo.- Os filtros devem ser aplicados ao grupo aspirante situado nointerior do exaustor centrando-os e girando-os em 90 grausaté que se ouça o sinal de tranca (Fig.14).- Se na embalagem houver um estribo como aquele indicadona Fig.15, deverá ser fixado ao exaustor através dos parafusosfornecidos com o produto.O filtro regenerável dever ser colocado dentro do suporteinstalado precedentemente ao exaustor, e fixado com as duasbarras de fixação. (Fig.15)• Opcional- É possível encomendar o aparelho com a função “luzes decortesia”. Se a versão do seu aparelho possuir esta função, paraactivá-la é necessário pressionar a tecla indicada na Fig. 2B.ATENÇÃO: Se o seu modelo tiver o comando indicado na Fig.18 e não a abertura electrónica, é possível actuar a função“luzes de cortesia” pressionando a tecla “D“ (Fig.18) por 4segundos. Para desactivar as luzes, pressionar novamente amesma tecla por 4 segundos.- Para o modelo com a abertura mecânica representado na Fig.2B é possível seleccionar o Kit de aspiração <strong>per</strong>imetral.USO E MANUTENÇÃO• É recomendável colocar o aparelho a funcionar antes deproceder com a cozedura de qualquer alimento.É recomendável deixar o aparelho 15 minutos a funcionar,depois de ter terminado a cozedura dos alimentos, para- 33 -
descarregar inteiramente o ar impuro.O bom funcionamento do exaustor depende de umacorrecta e constante manutenção; uma atenção especialdeve ser dedicada ao filtro anti-gordura e ao filtro de carvãoactivado.• O filtro anti-gordura tem a função de reter as partículasgordurosas suspensas no ar, portanto está sujeito à obstruir-seapós algum tempo, conforme o uso que se faz do aparelho.- Para prevenir o <strong>per</strong>igo de eventuais incêndios, no máximo acada 2 meses é necessário lavar os filtros anti-gordura, para osquais é possível utilizar também a máquina de lavar louça.- Após algumas lavagens, podem verificar-se alterações dacor.Este fato não dá direito a reclamações para a eventualsubstituição dos mesmos.No caso de não cumprimento das instruções de substituiçãoe lavagem, pode-se verificar o <strong>per</strong>igo de incêndio dos filtrosanti-gordura.• Os filtros de carvão activado servem para depurar o ar queserá reintroduzido no ambiente.Os filtros de carvão activado não são laváveis ou regeneráveise deverão ser substituídos no máximo a cada quatro meses.A saturação do carvão activado depende do uso mais oumenos prolongado do aparelho, do tipo de cozinha e daregularidade com a que é efectuada a limpeza do filtroanti-gordura.• Limpar frequentemente o exaustor, tanto internamentequanto externamente, usando um pano humedecido comálcool desnaturado ou detergentes líquidos neutros e nãoabrasivos.• O sistema de iluminação foi projectado para o uso durantea cozedura e não para um uso prolongado de iluminaçãogeral do ambiente.O uso prolongado da iluminação diminui sensivelmente aduração média das lâmpadas.• Substituição das lâmpadas de halogéneo (Fig.16).Para substituir as lâmpadas dicróicas, desligue a lâmpadadesatarraxando-a cuidadosamente do porta-lâmpadas,com a ajuda de uma pequena chave de fendas ou comuma ferramenta equivalente. ATENÇÃO! Ao efectuar estao<strong>per</strong>ação, tome cuidado para não arranhar a su<strong>per</strong>fíciedo exaustor.Substitua com lâmpadas do mesmo tipo.• Comandos: (Fig.17)Tecla A = acende/apaga as luzesTecla B = liga/desliga a coifa. O aparelho liga na 1° velocidade.Se a coifa está ligada pressionar a tecla por 2 s. para desligála.Se a coifa se encontra na 1° velocidade não é necessáriomanter a tecla pressionada para desligar. Diminui a velocidadedo motor.Display C = indica a velocidade seleccionada do motor e aactivação do timer.Tecla D = liga a coifa. Aumenta a velocidade do motor.Pressionando a tecla da 3° velocidade insere-se a funçãointensiva por 10’, depois o aparelho volta a funcionar navelocidade de exercício do momento da activação. Duranteesta função o display lampeja.Tecla E = O timer determina os tempos de funcionamento, nomomento da activação, para 15 minutos depois de desligar.Para desactivar o timer carregue outra vez na tecla E. Quandoa função timer estiver activa, no display deverá piscar o pontodecimal. Se estiver a funcionar na velocidade intensa, não serápossível activar o timer.Se carregar 2 segundos na tecla E, quando o aparelho fordesligado, activa-se a função “clean air”. Esta função liga omotor 10 minutos por hora na primeira velocidade. Duranteo funcionamento, o display deverá visualizar um movimentorotativo dos segmentos <strong>per</strong>iféricos. Depois deste tempo terpassado, o motor desliga-se e o display deverá visualizar aletra “C” fixa até, depois de 50 minutos, o motor reiniciar afuncionar mais 10 minutos e assim por diante.• Saturação dos filtros anti-gordura carvão activo- Quando o display C piscar alternando a velocidade defuncionamento com a letra F (ex. 1 e F), os filtros anti-gorudadeverão ser lavados.- Quando o display C piscar alternando a velocidade defuncionamento com a letra A (ex. 1 e A), os filtros carvãodeverão ser substituídos.Uma vez colocado o filtro limpo deve-se restabelecer a memóriaelectrónica, carregando na tecla A por aproximadamente 5segundos, até o indicador luminoso F ou A do display Cterminar de piscar.• Comandos: (Fig.18A-18B)Observação: Com este comando é possível controlaro aparelho mesmo com um telecomando, que deve serencomendado como acessórioTecla Power (A) = A tecla de ligação/desligação liga e desligatodo o exaustor (motor e luzes).Accionando a tecla, o motor inicia na 1ª velocidade.Tecla Fan speed (B)= Da posição OFF, carregue uma vezpara a 1ª velocidade, duas vezes para a 2ª velocidade e trêsvezes para a 3ª velocidade. Para inserir a velocidade intensiva,carregue na tecla por 5 segundos, qualquer que seja acondição de funcionamento do exaustor. A cada velocidade,acende-se só e exclusivamente o led que indica a velocidadeconfigurada. A velocidade intensiva é indicada pelo led da3ª velocidade que pisca. Duração da velocidade intensiva10 minutos, depois disto o exaustor voltará para a últimavelocidade configurada.Para anular a velocidade intensiva, pressione a tecla Powere o exaustor irá desligar-se, ou então, pressione a tecla FanSpeed e a velocidade voltará a ser aquela precedentementeconfigurada. Velocidade do exaustor com andamentocíclico.Tecla light (C)= Os níveis das luzes são três: alto, médio,baixo.Da posição de desligado, pressione uma vez para o nível alto,duas vezes para o nível médio, três vezes para o nível baixo,quatro vezes para desligar as luzes.O nível das luzes possui um andamento cíclico: alto, médio,baixo, desligado.Tecla timer (D)= Com qualquer velocidade inserida (exceptoa velocidade Intensiva), ao carregar nesta tecla activa-se afunção Timer por 15 minutos. No fim da contagem, o exaustordesliga-se (motor e eventuais luzes acesas).Indicador luminoso luzes (E) = O indicador acende-sequando as luzes estão acesas, com qualquer intensidadeIndicador luminoso filtros (F)= Depois de 30 horas defuncionamento, o led do indicador luminoso dos filtrosacende-se sem piscar para indicar que os filtros anti-gorduradevem ser lavados. O restabelecimento da função ocorre (como exaustor apagado) carregando-se na tecla Fan Speed por5 segundos. Depois de ter efectuado esta o<strong>per</strong>ação, os ledsda sinalização dos filtros desligam-se e a configuração das 30horas recomeça do zero.Depois de 120 horas, o led pisca continuamente. Significa queos filtros de carvão (se montados) devem ser substituídos. Orestabelecimento da função ocorre (com o exaustor apagado)- 34 -
carredando-se na tecla Fan Speed por 5 segundos. Depois deter realizado esta o<strong>per</strong>ação, o led da sinalização desliga-se ea configuração recomeça do zero.Indicador luminoso ar limpo (8)Com o exaustor apagado, carregando por 5 segundos na teclaPower (1), activa-se a função “Clean air”. Esta função liga omotor na 1ª velocidade por 10 minutos por hora. O indicadorluminoso acende-se e fica fixo e o led da 1ª velocidadeacende-se. Nos restantes 50 minutos, o indicador luminosopisca. Para desactivar a função, pressione uma tecla qualquer,excepto a das luzes.DECLINA-SE DE QUALQUER RESPONSABILIDADE POREVENTUAIS DANOS PROVOCADOS PELA INOBSERVÂNCIA DASADVERTÊNCIAS ACIMA.- 35 -
3LIK0620