You also want an ePaper? Increase the reach of your titles
YUMPU automatically turns print PDFs into web optimized ePapers that Google loves.
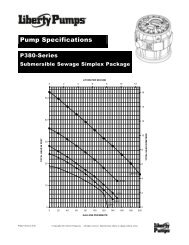
"V" BELT DRIVE TENSIONING METHODBefore attempting to tension any drive it is important thatthe sheaves be properly installed and aligned. The V-beltsshould be placed over the sheaves and in the grooveswithout forcing them over the sides of the grooves.Step 1: With all belts in their proper groove adjust thecenters to take up all slack and until the beltsare fairly tight.Step 2: Start the drive and continue to adjust until thebelts have only a slight bow on the slack sideof the drive while operating under load. Seedrawing below.Step 3: After a few days operation the belts will seatthemselves in the sheave grooves and it maybecome necessary to readjust so that the driveagain shows a slight "bow" in the slack side.Slight BowToo TightToo LooseThe drive is now properly tensioned and should operatesatisfactorily with only an occasional readjustment tocompensate for belt and groove wear.IMPELLER RUNNING CLEARANCEThe impeller running clearance, the distance between theimpeller vanes and wear plate, is adjusted at the factoryprior to shipment to .020" – .030". To adjust this clearancein the field, shut down the pump, disconnect power supplyto the pump and use the following instructions.1. Drain pump casing (1) completely by removing drainplugs (2) from both suction and discharge chamber.2. Remove clean-out cover (83) by unscrewing the twohand knobs (81).3. Reach inside the pump casing through the clean-outhole with a feeler gage and measure the gap betweenthe impeller vanes and wear plate (89). Measure thisgap at each impeller vane. If this gap is not withinthe allowable limits of .020" – .030", adjust thisclearance as follows:(a) Unscrew the three jack-screws (112) and jam nuts(111). Partially loosen the bearing carrier capscrews(45).(b) Adjust the jack-screws (112) and capscrews (45)until the front clearance between the impellervanes and wear plate falls within the allowablerange of .020" – .030". Tightening the jack-screws(112) will increase the front clearance and tighteningthe capscrews (45) will decrease the frontclearance.Tighten one set of screws and loosen the otherto go in the direction required. Tighten locknut(111).Note: maximum allowable bearing carrier (110) pull backmovement is 1 /8", (i.e. from the condition when impeller is"just" touching the wear plate you can push back thebearing carrier assembly by 1 /8").SHAFT AND BEARING REPLACEMENTIf shaft or bearing replacement is necessary, follow theseinstructions. (Shut down the pump and disconnect powersupply to the pump before working on pump.)1. Install the front (impeller end) bearing (36) on theshaft (38).2. Slide the carrier retaining ring (106) onto the shaft(38).3. Install the rear (coupling end) bearing (117) on theshaft (38).4. Install the retaining ring (108) onto the shaft (38).Add shims (107) between the retaining ring (108)and the bearing (117) if required to lock the bearing(117) on to the shaft axially.5. Install o-ring (109) into the bearing carrier groove.6. Slide the bearing carrier (110) with o-ring over therear bearing such that rear bearing slides into thebearing carrier (110). Install the retaining ring (106)in place.7. Insert shaft assembly with bearings and carrier intothe housing (31).CLEANING OR REPLACING CHECK VALVEShut down the pump and disconnect power supply to thepump before working on pump.Drain pump casing (1) completely by removing drainplugs (2). Access to suction check valve can be made byremoving the check valve cover plate (76) from the top ofthe suction chamber of pump casing.Reaching through the check valve cover plate hole,remove the two shoulder screws (118) and check valvekeeper plate (53). Now slide off check valve (51). Pull thecheck valve assembly out of the pump casing through thecover plate hole. Inspect the sealing surface of the checkvalve and make sure it is in good condition and free ofdebris.CLEANING IMPELLERDrain pump casing completely by removing drain plugs(2). Remove hand knobs (81), remove clean-out cover(83) and using coat hanger remove debris from the impellereye area and if necessary wash it off with garden hose.Check o-ring (84) on the clean-out cover, replace it ifnecessary.HYDROTESTNOTE: If hydrostatic test is required in the field, it mustbe performed with suction check valve removed or withpartially open suction check valve.1. The maximum allowable hydrotest pressure for thesepumps is:3DTH EL and EB4DTH EL and EB 130 psi6ETH EL and EB8GTH EL and EB85 psi10GTH EL and EB7