EcoSense DO200A Dissolved Oxygen Meter Operations ... - YSI.com
EcoSense DO200A Dissolved Oxygen Meter Operations ... - YSI.com
EcoSense DO200A Dissolved Oxygen Meter Operations ... - YSI.com
- No tags were found...

You also want an ePaper? Increase the reach of your titles
YUMPU automatically turns print PDFs into web optimized ePapers that Google loves.
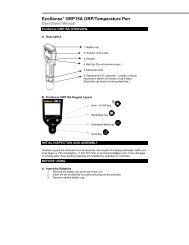
7. ºC: Temperature display.OPERATIONAL PROCEDURESPress to turn the unit on or off. The instrument will perform a self-diagnostic test, duringwhich an “ovEr” message may appear on the display. This is normal. After the warm up is<strong>com</strong>plete the message will disappear. After the self-diagnostic test <strong>com</strong>pletes, thetemperature displays in the lower right of the display, and the unit is ready for operation.Immerse the probe into the sample solution. If possible, do not allow probe to touch any solidobject in the solution. Avoid air bubbles bursting on the membrane surface. When the unit isnot in use, turn it off to save battery life. The instrument has a 30 minute auto shut off featurewhen not in use.NOTE: During an oxygen measurement, the probe must be moved approximately 1/2 ft persecond to over<strong>com</strong>e the consumption of oxygen by the sensor. When using the 200-BOD labprobe, however, simply use the probe’s self-stirring feature.MEASUREMENT MODESThis unit provides three distinct measurements:1. Temperature - Current solution temperature continually displays.2. <strong>Dissolved</strong> <strong>Oxygen</strong> % - Measurement of oxygen in percent saturation.3. <strong>Dissolved</strong> <strong>Oxygen</strong> ppm - Measurement of oxygen in ppm (mg/L).Carefully observe the units displayed at the far side of the LCD to determine the desiredmode.SAVING, VIEWING AND DELETING DATAThe <strong>DO200A</strong> can save 50 data records. When in measurement mode, press to save arecord. The instrument will confirm the saved data by displaying SAVE and the recordnumber for one second. “Full” is displayed when trying to save data and the memory is full.To view saved data, press mode until RECALL is displayed and then press . Use the Up orDown arrow keys to review different saved records. Press Mode to escape back tomeasurement mode.To delete data records, press Mode while in measurement mode until DELETE is displayed.Press . “All” will be displayed and blinking. Press the Up or Down arrow key to switchbetween delete ‘All’ or ‘Each’ options. Select either ‘All’ or ‘Each’ by pressing while thatoption is displayed.If ‘All’ is selected, all records will be deleted from memory and ‘None’ will be displayed. PressMode twice to return to the measurement mode.If ‘Each’ is selected, the Up and Down arrow keys will allow you to scroll through the saveddata records. Press to delete the selected record. All records after the deleted record willshift up to keep the records in sequential order. For example, if record 3 is deleted, record 4will be<strong>com</strong>e record 3 and record 5 will be<strong>com</strong>e record 4. Press Mode twice to return to themeasurement mode.CALIBRATION SET-UPRequirements1. The approximate pressure (in millibars [mBar]) of the location at the time of calibration.2. The approximate salinity of the water to be analyzed. Fresh water has an approximatesalinity of zero parts per thousand (ppt). Seawater has an approximate salinity of 35 ppt.Procedure1. For the field probe, place 5-6 drops of clean water (tap, distilled, or deionized) into thesponge inside the calibration bottle. Turn the bottle over and allow any excess water todrain out of the bottle. The wet sponge creates a 100% water-saturated air environment5