Altivar 11
Altivar 11
Altivar 11

You also want an ePaper? Increase the reach of your titles
YUMPU automatically turns print PDFs into web optimized ePapers that Google loves.
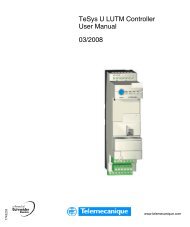
Wiring diagram for factory settings• Supply terminals at the top, motor terminals at the bottom• Connect the power terminals before the control terminalsR/L1S/L2T/L3RA(1)RCLI1LI2LI3LI4+15 V(2)U1V1W1ENGLISHU/T1V/T2W/T3PA / +PC/-+5VAI10VDO-ATV<strong>11</strong>ppppF1pSingle-phase supply 100...120 VR/L1NSingle-phase supply 200...230 VAvoid switching on the drive several times in closesuccession, for example when using a linecontactor. With cycles of less than 5 minutes thedrive is likely to be damaged.ATV<strong>11</strong>ppppM2pR/L1S/L2/NATV<strong>11</strong>ppppM3p3-phase supply 200...240 VM3 =+PAPBReferencepotentiometer(3)3-phase motor200...230 VBraking moduleand resistor,optional(1) Fault relay contacts, for remote indication of the drive status.(2) Internal + 15 V. If an external source is used (+ 24 V max.), connect the 0 V of the source to the 0 V terminal, and do not usethe + 15 V terminal on the drive.(3) Galvanometer or low level relay.Note: Fit interference suppressors to all inductive circuits near the drive or coupled to the same circuit (relays, contactors, solenoidvalves, etc).Choice of associated components:See the <strong>Altivar</strong> <strong>11</strong> catalog.Use of a braking resistor:A VW3A<strong>11</strong>701 braking module must be connected between the drive and the braking resistor.Replacing an ATV08 with an ATV<strong>11</strong>Caution, when replacing an ATV08with an ATV<strong>11</strong>:The control terminals are arrangedand marked differently:ATV08R1AR1C+5VAI1AOATV<strong>11</strong>RCRAnot used0VAI1+5VDOCOMLI1LI2LI3LI4+15VLI1LI2LI3LI4+15V21