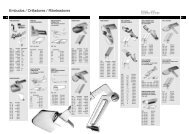
2200AS - Universal Sewing Supply
2200AS - Universal Sewing Supply
2200AS - Universal Sewing Supply
- No tags were found...

Create successful ePaper yourself
Turn your PDF publications into a flip-book with our unique Google optimized e-Paper software.
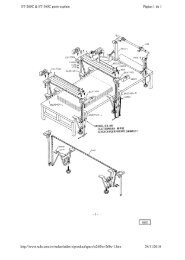
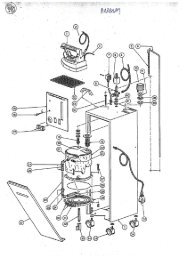
OPERATING INSTRUCTIONSPUTTING INTO SERVICEBefore leaving our factory each machine is carefully inspected,adjusted and given a sewing test. However, upen receipt themachine should be inspected and any damage or complaintshould be reported to Union Special or their distributor withoutdelay.Unpack the machine. Make sure that no pieces of packing aretrapped in the mechanism.Check by turning the motor handwheel in operating direction(see Fig. 2) if the machine works. A slight restistance will befelt as the feed dog rises.Loosen screw (A, Fig. 3) and set thread rod (B) so that itslower end is flush with the underside of thread cone support(C). Retighten screw (A).Check the threading of the machine. Observe the threadingdiagram Fig. 4 and paragraph "THREADING".Lubricate the machine again as per oiling diagram Fig. 5.Depending upon the operating conditions, oiling should be doneat least once a day.Check if the voltage of the sewing motor corresponds with thevoltage of the wall socket. Wall sockets for machines withground wire must be porperly grounded. Insert the plug of thepower cable into the wall socket.Start stitching on a piece of the bag material (jute, paper,polypropylene etc) by pressing the thumb switch. Continuestitching as the bag leaves the machine. This will produce athread chain, which when guided into the V-cut out of the throatplate is automatically cut by the thread chain cutting knives.Release the switch, the machine stops.NOTE: The knives only function when the machine is operating.Otherwise the thread chain will break when pulled and couldcause damage to the needle and looper.OPERATINGFor a neat, presentable closure the filled bag has to be preparedas follows:Paper, heavy gauge plastic, coated polypropylene bags:INSTRUCCIONES DE OPERACIONPUESTA EN MARCHAAntes de salir de nuestra fábrica cada máquina es cuidadosamenteinspeccionada y sometida a pruebas de costura. Sin embargo, tan prontocomo se reciba debe ser inspeccionada y cualquier daño o queja debe sernotificado inmediatamente a Union Special o al distribuidor que realizó laventa.Desempaque la máquina y verifique que no quedaron piezas del material deempaque dentro del mecanismo.Verifique que la máquina funciona girando el volante en sentido de operación(Fig. 2). Un ligera resistencia se sentirá a medida que el diente alimentadorse levanta.Suelte el tornillo (A, Fig. 3) y ajuste la varilla del hilo (B) de manera queligeramente roce la parte inferior del soporte del porta conos (C). Ajuste denuevo el tornillo (A).Verifique el enhebrado de la máquina. Revise el diagrama de enhebrado Fig.4 y el parágrafo "ENHEBRADO".Lubrique la máquina de acuerdo con el diagrama de Lubricación Fig. 5.Dependiendo de las condiciones de operación, la máquina debe ser lubricadapor lo menos una vez al día.Verifique que el voltaje del motor corresponda con el voltaje del enchufedonde se conectará la máquina. Enchufes con conexión a tierre deben seradecuadamente conectados. Finalmente, enchufe la máquina.Comienze a coser sobre un pedazo de material (Yute, Papel, Polypropileno,etc.) presionando el boton de arranque. Continue cosiendo hasta que el sacosalga de la máquina. Se producirá una cadeneta, la cual al ser guiada através del cortador en forma de V al final de la plancha de aguja se contará alpasarla por las cuchillas cortadoras. Suelte el botn de arranque y la máquinadejará de funcionar.NOTA: Las cuchillas solo cortan cuando la máquina está encendida. Tengacuidado de no halar la cadeneta con la máquina apagada, ya que puededañar la aguja y el looper.OPERACIONPara una costura limpia y presentable, el saco debe ser preparado como seseñala a continuación:Papel, plástico pesado y sacos de polypropileno:Inserte ambas manos en la boca del saco lleno y abralo. A continuación,sujete los extremos del saco y con un movimiento firme, acueste el saco ysaque el aire sobrante.Insert both hands into the opening of the filled bag and spreadit apart.Then grip both outer edges of the bag and fold with a sharpmovement the bag top forward and over to expel the air.9