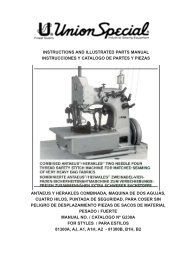
2200AS - Universal Sewing Supply
2200AS - Universal Sewing Supply
2200AS - Universal Sewing Supply
- No tags were found...

You also want an ePaper? Increase the reach of your titles
YUMPU automatically turns print PDFs into web optimized ePapers that Google loves.
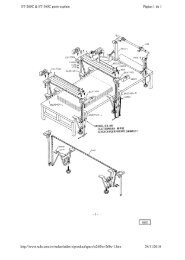
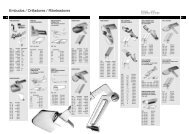
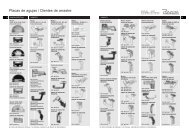
SETTING OF THE KNIVES1. Fixed knife:Set the fixed knife (A, Fig. 11) so that its tip sits close to theunderside of the throat plate (B). For adjustment loosen screw(C) and move knife up or down in its holder as required.Retighten screw.2. Moving knife:Set the moving knife (D, Fig. 11) so that is just clears belowthe throat plate underside on its entire arc of travel. In the mostopen position of the knives the pilot (E) should overlap thefixed knife by 3 mm (1/8"). In cutting position of the knives thecutting edge of the moving knife should overlap the cuttingedge of the fixed knife at least 1 mm (3/64"). For adjustingmoving knife loosen screw (F) and set knife as required.Retighten screw.STITCH LENGTHTo change the stitch length, remove the cover plate located belowthe serial number of the machine. Loosen lock nut (A, Fig. 12)and turn stitch length adjusting screw (B) clockwise to shortenstitch or counterclockwise to lengthen it.After adjustment, retighten lock nut (A) and replace the cover plate.NOTE: Any change in the stitch length necessitates correspondingchange in the needle guard setting.THREAD GUIDESSet the needle thread take-up (A, Fig. 13) so that the needle threadcontacts the hook (A) just when the needle thread loop leaves thelooper point.The needle thread eyelet (B) is set correctily when the eyelet dipsabout 30° to the left.The looper thread eyelet (C) controlls the looper thread. It is setcorrectly when it takes up slack of the looper thread when thelooper moves to the right.THROAT PLATE NEEDLE HOLE SECTION FOR THINFABRICSFor closing of thin and soft fabric an auxiliary needle hole sectionon the needle hole of the throat plate is required:1 - part No. 2130 Needle hole section1 - part No. 77K ScrewFor extremely thin fabric ist is recommended to use in connectionwith these parts needle sizes 125/049 or 170/067 and sewingthread size Ne 34/4 (also refer to paragraph "NEEDLES").AJUSTE DE LAS CUCHILLAS1. Cuchilla fija:Fijar la cuchilla fija (A, Fig. 11) de tal manera que su punta esté al rascon el borde inferior de la plancha de aguja (B). Para ajustarla, soltar eltornillo (C) y mover la cuchilla hacia arriba o abajo. Apretar el tornillootra vez.2. Cuchilla móvil:Fijar la cuchilla móvil (D, Fig. 11) de tal manera que se pueda moverlibremente debajo de la plancha de la aguja. En la posición mas abiertala guía del cuchillo (E) debe sobrepasar la cuchilla fija todavía a 3 mm yen la posición del corte las cuchillas deberán sobrepasarse por lo menos1 mm. Para lograr esto hay que soltar el tornillo (F) y ajustar la posiciónde la cuchilla móvil.LÄRGO DE LA PUNTADAPara variar el largo de la puntada hay que remover la tapa debajo del serialde la maquina. Soltar la tuerca (A, Fig. 12) y girar tornillo (B) hacia la derechapara acortar la puntada y hacia la izquierda para agrandar la puntada.Después hay que apretar la tuerca (A) otra vez y cerrar la tapa.NOTA: Con cada cambio en la puntada hay que ajustar el guarda aguja.GUIA HILOSAjuste el alimentador (A, Fig. 13) del hilo de tal manera que el hilo toque elgancho (A) cuando el lazo del hilo salga de la punta del looper.El guía hilo (B) deberá estar inclinado aprox. 30 grados hacia la izquierda.El guía hilo del looper (C) está en buena posición si el hilo suelto es agarradocuando el looper se mueve hacia la derecha.ADITAMENTO PARA LA PLANCHA DE AGUJA PARA COSERMATERIALES FINOSPara materiales más finos y suaves existe un aditamento para la planchade aguja:1 - Parte No. 2130 Aditamento para el hueco de la plancha de aguja1 - Parte No. 77K TornilloEn este caso se recomienda bajar el grosor de la aguja a 125/049 ó 170/067 y utilizar hilo tamaño Ne 34/4. (Ver tambien el parrafo "AGUJAS").15