2200AS - Universal Sewing Supply
2200AS - Universal Sewing Supply
2200AS - Universal Sewing Supply
- No tags were found...

Create successful ePaper yourself
Turn your PDF publications into a flip-book with our unique Google optimized e-Paper software.
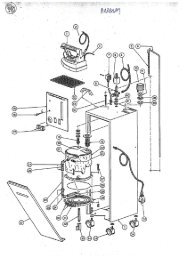
Bring the bag top to the upright position so that it is flat andvertical.Bring the machine to the right hand side of the bag, approx.25 to 40 mm (1- 1 1/2") from the top.Enter the leading edge of the bag between presser foot andthroat plate.Keep a security distance of approx. 100 mm(4") between main and sewing needle!Press the thumb switch. The machine sews across the bag,requiring the operator only to keep pace by moving the handin conjunction with the sewing speed of the machine.As the machine comes off the bag guide the thread chain witha slight twist of the rist into the knives, simultaneously releasethe switch.The machine stops.This results in a short, neat thread chain at the beginning andend of the bag.Hessian, jute, woven polypropylene, cotton and net bags:These bag materials ar not stiff enough, therefore the rightleading edge of the bag has to be entered with the left handinto the machine.Keep a security distance of approx. 100 mm(4") between main and sewing needle!While sewing the operator should move the left hand to theleft side of the bag, maintaining a slight tension across the topof the bag.Enderece el saco de manera que quede en posición vertical y plano.Acerque la máquina a la parte derecha del saco, aproximadamente 25 a 40mm del tope del saco.Introduzca la esquina superior del saco entre el pie prensatelas y la planchade aguja.Mantenga una distancia de aproximdamente 100 mmentre su mano y la aguja de la máquina.!Presione el boton de arranque. La máquina coserá a través del saco,requiriendo del operador solamente mantener la velocidad moviendo la manoen conjunto con la máquina hasta el final de la costura.Cuando el saco salga de la máquina, saldrá un pedazo de cadeneta, que secorta haciendo un ligero movimiento de la muñeca hacia las cuchicllas decorte y soltando simultaneamente el boton de arranque.La maquina se para.El resultado final es una costura limpia y presentable del principio al final delsaco.Sacos de arpilla, fibra natural, Yute, Polipropileno, Algodón y Mallas Tejidas:El material de estos sacos no es lo suficientemente rigido, asi que la puntasuperior derecha del saco debe ser introducida en la maquina con ayuda dela mano izquierda.Mantenga una distancia de aproximdamente 100 mmentre su mano y la aguja de la máquina.!Mientras realiza la operación de costura, el operador debe mantener la manoizquierda a la izquierda del saco, para mantener una ligera tensión en elsaco y lograr una costura pareja.THREADINGPull out mains plug before threading!Loosen thumb screw(s) (D, Fig. 3) in the thread cone support,pull out the spool pin(s) (E) and remove the empty threadcone(s).Insert the new thread cone(s) with spool pin(s) (E) andretighten thumb screw(s) (D).Thread the machine as shown in Fig. 4.For threading the needle, turn motor handwheel in operatingdirection until the needle is in its upmost position above thethroat plate.For threading the looper (double locked stitch machines only)open the hinged cover (A, Fig. 4) and turn motor handwheel inoperating direction until the needle is in its lowest positionbelow the throat plate. Reclose hinged cover (A) afterthreading.THREAD TENSIONThe tension (L, Figs. 4 and 13) controls the looper thread andthe tension (N) controls the needle thread.Only a slight tensionshould be applied on the looper thread. The tension appliedon the needle thread depends upon the size of the thread andthe thickness of the fabric to be sewn and has to be regulatedtill the machine sews and chains off perfectly.PRESSER FOOT PRESSUREThe pressure on the presser foot should be just so strongthat the machine feeds uniformly on the fabric to be sewn.When leaving the fabric to be sewn, an uniform thread chainmust be formed.The presser foot pressure is regulated with the knurledregulating screw (B, Fig. 4).For adjustment loosen nut (C) and turn the regulating screw(B) clockwise to increase the pressure or counterclockwise todecrease the pressure.ENHEBRADODesenchufe la máquina antes de enhebrarla!Afloje los tornillos (D, Fig. 3) del soporte del porta conos, saque los pasadores(E) y retire el cono de hilo vacio.Inserte un nuevo cono de hilo, inserte los pasadores (E) y apriete de nuevolos tornillos (D).Enhebre la máquina tal como se muestra en el diagrama de la Fig. 4.Para enhebrar la aguja, mueva el volante del motor en dirección de operación,hasta que la aguja alcance su punto mas alto de recorrido sobre la planchade aguja.Para enhebrar el looper (en máquinas de costura de cadeneta doblesolamente) abra la tapa del motor (A, Fig. 4) y mueva el volante del motor endirección de operación hasta que la aguja esté en su posición más bajadebajo de la plancha de aguja . Cierre la tapa del motor nuevamente.TENSION DEL HILOEl tensor (L, Fig. 4 y 13) regula el hilo del looper y el tensor (N) regula el hilode la aguja. Solamente una ligera tensión debe ser aplicada al hilo del looper.La tensión aplicada al hilo de la aguja depende del hilo a utilizar y del grosordel material a coser, y debe ser regulada manualmente hasta que la máquinacosa perfectamente.PRESION DEL PIE PRENSATELASAl pie prensatelas se debe aplicar suficiente presión para que el dientetransportador arrastre uniformemente el material y para que salga la cadeneta.La presión del pie se regula con el tornillo estriado (B, Fig. 4).Para ajustar el pie prensatelas, suelte la tuerca (C) y gire el tornillo regulador(B) en sentido del reloj para incrementar la presión y en sentido contrariopara disminuirla.Apriete de nuevo la tuerca (C).Retighten nut (C).10