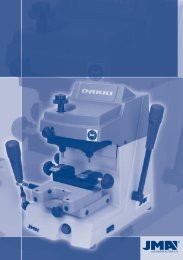
1Pr<strong>es</strong>entationand general points2MachinecharacteristicsEnglish1.1General pointsThe E.U. safety regulations currently in force have beentaken into account in the d<strong>es</strong>ign of the <strong>TITAN</strong> duplicatingmachine.The safety of personnel involved in the handling of thistype of machine is only achieved via a well d<strong>es</strong>ignedpersonal safety program, such as the implementationof a maintenance program, and by following therecommendations made in addition to adhering to th<strong>es</strong>afety regulations dealt with in this manual.The <strong>TITAN</strong> machine is a semi-automatic, highly robust andprecise machine for cutting flat cylinder lock keys, vehiclekeys, cruciform keys and special keys.2.1Family of keysThe <strong>TITAN</strong> machine duplicat<strong>es</strong> the following typ<strong>es</strong> of keys:Flat keys.Vehicle keys.Cruciform keys.Although this machine is easy to install, it is advisablenot to attempt to install, adjust or operate it withoutreading this manual first.The machine leav<strong>es</strong> our factory ready for use, and onlyrequir<strong>es</strong> the calibration operations for the tools whichare going to be used.1.21.3Transport and packagingThe <strong>TITAN</strong> machine com<strong>es</strong> in a robust cardboard boxpadded with foam packaging. The dimensions of thebox are:Width = 570 mm, length = 520 mm, height = 410mmWeight of the machine plus packaging = 26.5 KgWhen unpacking the machine, inspect it carefully tocheck that it has not been damaged during transport.If any irregulariti<strong>es</strong> are discovered, inform the carrierimmediately and do nothing with the machine until arepr<strong>es</strong>entative from the carrier has inspected it.Identification labelThe <strong>TITAN</strong> duplicating machine is supplied with an identificationlabel specifying the machine serial number orregistration number, name and addr<strong>es</strong>s of the manufacturer,EC mark and year of manufacture.See figure 12.2 Key nomenclature1 Head2 Neck3 Top shoulder4 Bottom shoulder5 Teeth6 Blade7 Back8 Tip2.3 Main parts of the machine1 Milling cutter2 Brush3 Motor4 Wheel guard5 Double sided clamp6 Clamp handle7 Carriage8 Carriage handle9 Carriage feed lever10 Fold-away stop11 Tracer12 Tracer support13 Start button14 Brush operation switch15 Tracer depth adjustment control16 Tracer sideways adjustment controlSee figure 2See figure 32.4Technical dataThe main technical data is pr<strong>es</strong>ented below:Motor : Single phase 220V, 50Hz, 0.18Kw,1350 rpm, 1.7 Amp.or Single phase 110V, 60Hz,0.18Kw, 1700 rpm 3.14 Amp.Milling cutter: High speed steel Ø80 x 16 x5 mm.Milling cutter turning speed: 640 rpm.Clamps: 2 sided steel.Displacement: On self-lubricating bearings.Effective travel: X axis= 54 mm.Dimensions: Width = 410 mm, Depth = 350 mm, Height = 240 mm.Weight: 23 Kg.8
3Operationand performance2.5Components and functional parts3.1Machine adjustment2.5.1 Acc<strong>es</strong>ori<strong>es</strong> See figure 41 Non-adjustable size 18 spanner.2 Keys for sideways and depth adjustment of themachine.3 Wedg<strong>es</strong> to adjust the tip of the key.4 Rec<strong>es</strong>sed wedg<strong>es</strong> for duplicating cruciform keys.5 Set of allen keys (2, 2.5, 3, 4, 5, 6).6 Rod with Ø1,207 Rod with Ø1,708 Rod for changing the milling cutter (Ø7x70).2.5.2 Electrical circuit See figure 5The main components of the electrical and electronic circuitsare as follows:12345Current collectorStart button with red light.MicroswitchBlack button for brushMotor2.5.3 2 Sided clamp See figure 6The clamp has been d<strong>es</strong>igned to hold a family of differentkeys on each side. In the diagram, the duplicationpossibiliti<strong>es</strong> on each side of the clamp are shown.12Duplication of the key supported on the reverse side:- Keys with normal blade- Keys with narrow blade, with the help of rods- Cruciform keysDuplication by means of the clamping the keyto the guide (outline).Sideways or depth adjustment of the machine is performedin the following way:TAKE CARE! : Before touching anything when adjustingthe machine, switch off the main on-off switch so thatthe milling cutter cannot begin operating.3.1.1 Sideways control and adjustment See figure 7Position the adjustment keys (1) in the clamps, sothat the head of the adjustment keys go<strong>es</strong> in as faras possible and is touching the inner stop of side 1or 2 of the clamp.Next, tighten the clamp.Move the clamps with the adjustment keys (1) towardsthe tracer point (I) and the milling cutter (F), so thatthe adjustment keys are in the correct position withr<strong>es</strong>pect to the tracer point and the milling cutter.This is achieved by pr<strong>es</strong>sing the button (P) and gentlymoving the carriage nearer to the tracer point (I) andthe milling cutter (F). See figure no. 2.In the event that the groov<strong>es</strong> of the adjustmentkeys do not coincide properly with the tracer pointand the milling cutter, proceed as follows:Loosen the support screw (T), and turn the micrometer screw (K) so that the tracer point supportmov<strong>es</strong> to the left or right so that it corr<strong>es</strong>ponds withthe groove of the corr<strong>es</strong>ponding adjustment key.The distance is now perfectly adjusted, with the tracerpoint and milling cutter coinciding with the r<strong>es</strong>pectivegroov<strong>es</strong> of the adjustment keys. Next, tighten th<strong>es</strong>upport screw (T), thus locking them in position.3.1.2 Control and adjustment of cutting depth See figure 8Position the adjustment keys (1) in the clamps, sothat the head of the adjustment key go<strong>es</strong> in as far aspossible and is touching the inner stop of side 1 or 2of the clamp.Move the clamps with adjustment keys (1) towardsthe tracer point (I) and the milling cutter (F) sothat the adjustment keys are r<strong>es</strong>ting on the tracerpoint and the milling cutter. The machine carriageis unlocked by pr<strong>es</strong>sing the button (P).Turn the milling cutter by hand. If the milling cuttergently scrap<strong>es</strong> against the adjustment keys then themachine has been properly adjusted.If the milling cutter turns freely, i.e. do<strong>es</strong> not scrapeagainst the adjustment keys, this shows that themilling cutter is too far back in relation to the tracerand cutting is not sufficient. On the other hand, ifthe milling cutter is blocked by the adjustment keys,this shows that the milling cutter is too far forwardin relation to the tracer and cutting too deep.If either of the two situations above occur, proceedas follows:- Loosen the setscrew (L) which secur<strong>es</strong> the tracerpoint (I) and turn the micrometer screw (H). Seefigure no. 3.- Move the tracer point forwards or backwards untilthat milling cutter turns and gently scrap<strong>es</strong> againstthe adjustment key. Next, tighten the tracer pointscrew (L). The machine is now in perfect workingorder.9English