RAMPAS DE FILTRACIÃN FILTER HOLDER MANIFOLDS - Auxilab
RAMPAS DE FILTRACIÃN FILTER HOLDER MANIFOLDS - Auxilab
RAMPAS DE FILTRACIÃN FILTER HOLDER MANIFOLDS - Auxilab

You also want an ePaper? Increase the reach of your titles
YUMPU automatically turns print PDFs into web optimized ePapers that Google loves.
<strong>RAMPAS</strong> <strong>DE</strong> FILTRACIÓN<strong>FILTER</strong> HOL<strong>DE</strong>R <strong>MANIFOLDS</strong>Este manual es parte inseparable del aparato por lo que debe estardisponible a todos los usuarios del equipo. Le recomendamos leeratentamente el presente manual y seguir rigurosamente los procedimientosde uso para obtener las máximas prestaciones y unamayor duración del mismo.This manual should be available for all users of these equipments. To getthe best results and a higher duration of this equipment it is advisable toread carefully this manual and follow the processes of use.Revisión 1 Diciembre-05 Manual de instrucciones 59050XXX Pág. 1
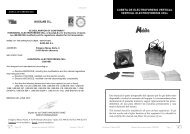
POWER-25-20-30-15-0.4-0.2-0.6-0.8-1 0B A R1 0x kPaIn Hg500VA C U U M /PR E S S U R E PU M P-100400-5300200200500400300500400300200OUTINVACUUM/PRESSURE PUMPPOWER-25-20-30-15-0.4-0.2-0.6-0.8-1 0B A R1 0x kPaIn HgVA C U U M /PR E S S U R E PU M P-100-5400300200500ENGLISH• Please put the filter holder manifold on top of a horizontal, plane and stable tablemaking a free space at least at 30 cm per side. Do not put the filter holder manifold nearany warm supply (burners, blowlamps…), nor expose it directly to the sun, etc.• Avoid inflammable or toxic substances in the working area.Note: In order to use the filter holder manifold you will need some extra accessoriessuch as the glass filter holder, a vacuum pump, rubber items or filtering flasks. Check thepoint "accessories" on Technical specifications section for more information.INDICE <strong>DE</strong> CONTENIDOS1. APLICACIONES <strong>DE</strong>L INSTRUMENTO2. <strong>DE</strong>SCRIPCIÓN3. ESPECIFICACIONES TÉCNICAS4. INSTALACIÓN / PUESTA EN MARCHA5. MANTENIMIENTO Y LIMPIEZACASTELLANO33346Setting up the complete seta) Make sure you fasten properly the body with fritted disk together with the siliconestopper on the filter holder support.Note: Nahita filter holder manifold is provided Awith a teflonated support in order to enable workingwith corrosive solutions.b) Place the membrane filter.1 21. APLICACIONES <strong>DE</strong>L INSTRUMENTOLas rampas de filtración Nahita están especialmente indicadas para su uso en filtracionessimultáneas de vacío de 1,3 ó 6 muestras; ideales para el control de calidad de laindustria química, farmacéutica, etc.Bc) Place the filtration funnel just on top of it and fasten theset with the aluminium clamp.d) Connect the filter holdermanifold to the filtering flask with a hose.C1 22. <strong>DE</strong>SCRIPCIÓN5211.1. Soporte para filtros1.2. Válvula de control1.3. Tubo1.4. Asa1.5. Adaptador vacíoD1 2e) Link up the filtering flask to thevacuum pump.433. ESPECIFICACIONES TÉCNICASf) Pour the sample in the filtrationfunnel and make sure all control valvesyou are working with are open.FE1 2Referencia Posiciones Cuerpo Válvula control Adaptador vacío Tamaño (mm) Autoclavable59050101 1 Acero inox. 90º Acero inox. 230x120x145 Si59050103 3 Acero inox. 90º Acero inox. 535x155x198 Si59050106 6 Acero inox. 90º Acero inox. 840x120x140 Si59050201 1 Aluminio 90º Acero inox. 230x120x145 Si59050203 3 Aluminio 90º Acero inox. 535x155x198 Sig) Switch on the vacuum pump.Page 10 Instruction manual 59050XXX Version 1 December-05Revisión 1 Diciembre-05 Manual de instrucciones 59050XXX Pág. 3
AccesoriosDescripciónReferenciaPortafiltros* 15002900Pinza aluminio anodizado 65002300Cuerpo con placa porosa 18003311Tapón silicona 47195000Embudo 18002301Bomba de membrana 10 L 59001010Bomba de membrana 25 L 59001025Matraz kitasatos 250 mL 12418220Matraz kitasatos 500 mL 12418250Matraz kitasatos 1000 mL 12418310Tapón goma blanca Nº7 47186070Tapón goma blanca Nº10 47186100CASTELLANOAccessoriesDescriptionCodeGlass filter holder* 15002900Anodized aluminium clamp 65002300Body with fritted disk 18003311Silicone stopper 47195000Filtration funnel 18002301Vacum pump 10 L 59001010Vacum pump 25 L 59001025Filtering flask 250 mL 12418220Filtering flask 500 mL 12418250Filtering flask 1000 mL 12418310Rubber stopper No.7 47186070Rubber stopper No.10 47186100ENGLISH* Compuesto por: pinza aluminio anodizado, cuerpo con placa porosa, tapón silicona, embudo.* Composed of: anodized aluminium clamp , body with fritted disk, filtration funnel, silicone stopper.Diámetro Poro ReferenciaFiltro de membrana 47 mm 0.22 micras 81000042Filtro de membrana 47 mm 0.45 micras 81000044Filtro de membrana 47 mm 0.80 micras 81000048Diameter Pore CodeMembrane filter 47 mm 0.22 microns 81000042Membrane filter 47 mm 0.45 microns 81000044Membrane filter 47 mm 0.80 microns 810000484. INSTALACIÓN / PUESTA EN MARCHAInspección preliminar• Desembale la rampa de filtración, retire el plástico que la envuelve y quite la protecciónde poliespán en que viene encajada. Asegúrese de que no presenta ningún daño debido altransporte. De ser así, comuníquelo inmediatamente a su transportista o suministradorpara que pueda hacer las debidas reclamaciones en el plazo establecido.• Guarde el embalaje, ya que siempre se deben realizar las devoluciones en su embalajeoriginal con todos los accesorios suministrados.• Compruebe los accesorios que usted debe recibir junto al equipo:- Rampa de filtración- Garantía- Manual de instruccionesNo aceptaremos ningún equipo en periodo de devolución sin que vaya en su embalajeoriginal.Instalación• Antes de comenzar a utilizar el instrumento, es conveniente familiarizarse con sus componentesy fundamentos básicos.LEA <strong>DE</strong>TALLADAMENTE ESTE MANUAL <strong>DE</strong> INSTRUCCIONES ANTES <strong>DE</strong>OPERAR CON ESTE EQUIPO CON EL FIN <strong>DE</strong> OBTENER LAS MÁXIMAS PRES-TACIONES Y UNA MAYOR DURACIÓN <strong>DE</strong>L MISMO.4. INSTALLATION / SETTING UPPreliminary inspection• Unwrap the filter holder manifold , take off the involving plastic and take off the polispanprotection in which it comes fitted. Make sure that it does not present any damagebecause of the shipment. If so, tell it immediately to your transport agent or dealer so thatthey can make the claims in the correct time limit.• Please keep the original wrapping; you will always need it for returns enclosed with allthe accessories supplied.• Please check that all the accessories are enclosed with the equipment:- Filter holder manifold.- Warrantycertificate.- User manual.We will not accept any equipment in return period unless it comes in its original wrapping.Installation• Before using this instrument, it is convenient for you to familiarize with its componentsand basic essentials.PLEASE READ THOROUGHLY THE INSTRUCTIONS BEFORE CONNECTINGAND OPERATING WITH THIS EQUIPMENT.Pág. 4Manual de instrucciones 59050XXX Revisión 1 Diciembre-05Version 1 December-05 Instruction manual 59050XXX Page 9
POWER-25-20-30-15-0.4-0.2-0.6-0.8-1 0B A R1 0x kPaIn Hg500VA C U U M /PR E S S U R E PU M P-100400-5300200200500400300500400300200OUTINVACUUM/PRESSURE PUMPPOWER-25-20-30-15-0.4-0.2-0.6-0.8-1 0B A R1 0x kPaIn HgVA C U U M /PR E S S U R E PU M P-100-5400300200500IN<strong>DE</strong>X OF CONTENTS1. USES OF THE INSTRUMENT2. <strong>DE</strong>SCRIPTION3. TECHNICAL SPECIFICATIONS4. INSTALLATION / SETTING UP5. MAINTENANCE AND CLEANINGENGLISH888911CASTELLANO• Coloque la rampa filtración sobre una mesa horizontal, plana y estable, creando unespacio libre al menos de 30 cm por cada lado. Asegúrese que esté bien apoyada. No coloqueel equipo en zonas próximas a fuentes de calor (mecheros, sopletes...), ni lo expongadirectamente a la luz del sol, etc.• Evite en el lugar de trabajo productos inflamables o tóxicos.Nota: Para hacer uso de la rampa de filtración necesitará el juego de vidrio (portafiltros),además de una bomba de membrana, matraz kitasatos, goma, etc. Consulte el apartado"accesorios" dentro del punto Especificaciones técnicas para obtener una información másdetallada.1. USES OF THE INSTRUMENTNahita filter holder manifolds are suitable for using them in simultaneous vacuum filtrationsfo 1, 3 or 6 different samples. They are perfect instruments for chemical or pharmaceuticalindustry quality control.2. <strong>DE</strong>SCRIPTION543211.1. Filter holder support1.2. Control valve1.3. Manifold pipe1.4. Handle1.5. Vacuum hose adapterPuesta en funcionamiento con equipamiento completoa) Asegure bien el cuerpo de placa porosa con Ael tapón en el soporte de la rampa de filtración.Nota: la rampa de filtración dispone de unsoporte de teflón para trabajar con disolucionescorrosivas.b) Ponga el filtro de membrana.1 2Bc) Coloque encima el embudo de filtración y sujete todoel sistema con la pinza.C1 2d) Conecte a través de una manguera la rampa de filtracióncon el matraz kitasatos.D1 23. TECHNICAL SPECIFICATIONSe) Conecte el matraz kitasatos a labomba de vacío.Code Positions Body Control valve Hose adapters Size (mm) Autoclavable59050101 1 Stainless steel 90º Stainless steel 230x120x145 Yes59050103 3 Stainless steel 90º Stainless steel 535x155x198 Yes59050106 6 Stainless steel 90º Stainless steel 840x120x140 Yes59050201 1 Aluminium 90º Stainless steel 230x120x145 Yes59050203 3 Aluminium 90º Stainless steel 535x155x198 Yesf) Vierta la muestra a filtrar en elembudo de filtración y asegúrese deque todas las válvulas de control conlas que va a trabajar estén abiertas.FE1 2g) Encienda la bomba de vacío.Page 8 Instruction manual 59050XXX Version 1 December-05Revisión 1 Diciembre-05 Manual de instrucciones 59050XXX Pág. 5
CASTELLANONota: Nahita dispone de dos bombas de vacío. Consulte el apartado "accesorios" dentrodel punto Especificaciones técnicas para obtener una información más detallada o bien a travésde la página www.auxilab.com. Elija modelo según sus necesidades de filtración.h) Apague la bomba de vacío una vez acabada la muestra a filtrar. Desconecte las manguerasy quite los embudos de filtración.i) Una vez haya finalizado lea el punto Mantenimiento y limpieza.Seguridad• La rampa de filtración debe ser utilizada por personal cualificado previamente, queconozca el equipo y su manejo mediante el manual de uso.• Coloque la rampa de filtración sobre una mesa horizontal, plana y estable, creando unespacio libre al menos de 30 cm por cada lado.• No coloque la rampa de filtración en zonas próximas a fuentes de calor (mecheros,sopletes...), ni exponga el equipo directamente a la luz del sol. Evite las vibraciones, elpolvo y ambientes muy secos.• Durante su funcionamiento el material peligroso como líquidos inflamables o materialpatológico, deben estar fuera de esta área.• No intente repararla usted mismo; además de perder la garantía puede causar daños enel funcionamiento general del equipo, así como lesiones a la persona (quemaduras, heridas...)y daños a la instalación eléctrica.• Fabricado según las directivas europeas de y seguridad en máquinas.5. MANTENIMIENTO Y LIMPIEZAPara un adecuado funcionamiento de la rampa de filtración es necesario seguir algunasrecomendaciones.Nota: Todas las normas de utilización citadas anteriormente carecerán de valor si no se realizauna continua labor de mantenimiento.• Siga las instrucciones y advertencias relativas a este manual.• Tenga este manual siempre a mano para que cualquier persona pueda consultarlo.• Utilice siempre componentes y repuestos originales. Puede ser que otros dispositivos seanparecidos, pero su empleo puede dañar el equipo.• No intente repararla usted mismo; además de perder la garantía puede causar daños en elfuncionamiento general de la rampa de filtración.• En caso de avería diríjase a su proveedor para la reparación a través del Servicio Técnicode Nahita.Limpieza• Para la limpieza de las partes de acero inoxidable o aluminio utilice una esponja empleandoagua jabonosa caliente y productos que no contengan elementos alcalinos ni abrasivos.• Nunca utilice estropajos o productos que puedan rayar, ya que deterioran la rampa de filtración,limitando la vida útil del equipo.¡ATENCIÓN!NO SE ADMITIRA NINGUN APARATO PARA REPARAR QUE NOESTE <strong>DE</strong>BIDAMENTE LIMPIO Y <strong>DE</strong>SINFECTADO.ENGLISHThank you for choosing this equipment. We sincerely wish that you enjoy your Nahitafilter holder manifold. We highly recommend looking after this equipment according towhat is stated in this manual.Nahita develops its products according to the CE marking regulations as well asemphasizing the ergonomics and security for its user.The correct using of the equipment and its good quality will permit you to enjoy thisequipment for years.TO GET THE BEST RESULTS AND A HIGHER DURATION OF THE EQUIP-MENT IT IS ADVISABLE TO READ THOROUGHLY THIS MANUAL BEFOREOPERATING WITH THE EQUIPMENT.Please bear in mind the following:• This manual is inseparable from the Nahita filter holder manifold , so it should be availablefor all the users of this equipment.• You should carefully handle the Nahita filter holder manifold avoiding sudden movements,knocks, free fall of heavy / sharp objects on it.• Never dismantle the different pieces of the Nahita filter holder manifold to repair ityourself, since it could produce a defective use of the whole equipment and a loss of theproduct warranty, as well as injuries on people that handle the equipment.• To prevent fire or electric discharges avoid dry or dusty environments. In case it mayhappen unplug the equipment immediately.• If you have any doubt about setting up, installation or functioning do not hesitate incontacting your wholesaler. You can also tell us any doubts or suggestions you have bycontacting Nahita Technical Assistance Department by email to asistencia@auxilab.es orby telephone: +34 807 117 040 (0,30 Euros/min).• This equipment is protected under the Warranties and consumer goods regulation(10/2003).• Overhaul is not covered by the Nahita warranty.• Operations made by non-qualified staff will automatically produce a loss of the equipment'swarranty.• Please make sure you keep the invoice, either for having the right to claim or asking forwarranty coverage. In case you have to send the equipment to Nahita Technical AssistanceDepartment you should enclose the original invoice or a copy as guarantee.• Please do not forget filling the warranty certificate and send it before 15 days after thedate of purchase.• Manufacturer reserves the right to modify or improve the manual or equipment.ATTENTION!IF EQUIPMENTS ARE NOT PROPERLY CLEAN AND DISINFECTED THEYWOULD NOT BE ALLOWED TO REPAIR BY OUR TECHNICAL SERVICE.IN<strong>DE</strong>X OF LANGUAGESSpanishEnglish2-67-11Pág. 6Manual de instrucciones 59050XXX Revisión 1 Diciembre-05Version 1 December-05 Instruction manual 59050XXX Page 7