read and save these instructions lea y conserve estas ... - Datatail
read and save these instructions lea y conserve estas ... - Datatail
read and save these instructions lea y conserve estas ... - Datatail

Create successful ePaper yourself
Turn your PDF publications into a flip-book with our unique Google optimized e-Paper software.
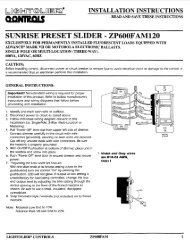
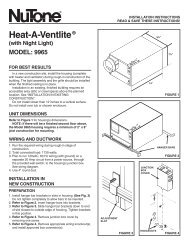
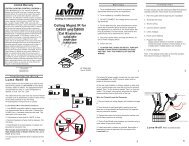
CAUTION !1. For general ventilating use only. Do not use toexhaust hazardous or explosive materials <strong>and</strong>vapors.2. To avoid motor bearing damage <strong>and</strong> noisy <strong>and</strong>/orunbalanced impellers, keep drywall spray,construction dust, etc. off power unit.3. This product is equipped with a thermostat whichmay start fan automatically. To reduce the risk ofinjury, switch power off at service panel <strong>and</strong> lockservice panel to prevent power from being switchedon automatically.4. Your hood motor has a thermal overload which willautomatically shut off the motor if it becomesoverheated. The motor will restart when it coolsdown. If the motor continues to shut off <strong>and</strong> restart,have the hood serviced.5. For best capture of cooking impurities, your rangehood should be mounted 18-24" above the cookingsurface.6. P<strong>lea</strong>se <strong>read</strong> specification label on product for furtherinformation <strong>and</strong> requirements.TOOLS ANDMATERIALS REQUIREDTOOLS Drill, electric or ratchet drive 1-1/4” Spade bit Common head <strong>and</strong> phillips head screwdriver Pliers Tape measure or ruler <strong>and</strong> pencilFor Ducted Installations Only: Saber Saw or drywall saw Metal snipsMATERIALS Electrical wiring <strong>and</strong> supplies of type to complywith local codesFor Ducted Installations Only: Roof or wall cap Roof cement or caulk Duct <strong>and</strong> duct tapeFor Ductfree Installations Only: One two-pack 97007662 Microtek ® System IVFilter KitFor Installation On Kitchen Cabinets With RecessedBottoms Only: Two 1” x 2” x 12” (approximate length) wood strips(purchase locally) Four 1-1/4” long flat head wood screws (purchaselocally) to fasten strips to cabinet bottomPLAN DUCTWORKINSTALLATIONFor Ducted Installations Only:Begin planning ductwork by deciding where ductwill run between hood <strong>and</strong> outside. For best performance,use shortest possible duct run <strong>and</strong> aminimum number of elbows. In more complex situations,3-1/4” x 10” duct can be converted to roundduct by means of a transition. FIGS 1A - 1E showseveral choices.FIG. 1A: Ducting directly through outside wall. Ifwall cap is used directly off back of hood, check tomake sure that damper flap in damper/duct connectoron hood does not interfere with damper flapin wall cap. If it does, remove flap on hood damper/duct connector.FIG. 1B: At times it will be easier to run duct vertically<strong>and</strong> use an elbow.FIG. 1C: Ducting straight up through roof using 3-1/4” x 10” duct. For single story installations.FIG. 1D: Straight up through roof using round duct.FIG. 1E: Ducting between ceiling joists for multistoryinstallations or through soffits above cabinetswhere soffit connects to outside walls.FIG. 1AFIG. 1BMODEL 429 ELBOWCODO MODELO 429MODEL 4013-1/4" X 10" DUCTMODELO 401CONDUCTO8,26 CM X25,40 CM(3-1/4 X 10 PULG.)FIG. 1CMODEL 634 OR 644ROOF CAPTAPA PARA TECHOMODELO 634 O 644MODEL 4013-1/4" X 10" DUCTMODELO 401CONDUCTO 8,26 CM X 25,40 CM(3-1/4 X 10 PULG.)FIG. 1DMODEL 634 OR 644 ROOF CAPTAPA PARA TECHO MODELO 634 O 644MODEL 406 6" ROUND DUCTMODELO 406 CONDUCTO REDONDODE 15,24 CM (6 PULG.)MODEL 411 3–1/4" X 10" TO 6"ROUND DUCT TRANSITIONMODELO 411TRANSICIÓN A CONDUCTO REDONDODE 8,26 CM X 25,40 CM A 15,24 CM(3-1/4 X 10 PULG. A 6 PULG.)FIG. 1EMODEL 419ADJUSTABLE ELBOWMODELO 419CODO AJUSTABLEMODEL 4113–1/4" X 10" TO 6"ROUND DUCT TRANSITIONMODELO 411TRANSICION ACONDUCTOREDONDO DE8,26 CM X 25,40 CM A 15,24CM (3-1/4 X 10 PULG. A 6PULG.)MODEL 639 OR 649 WALL CAPTAPA PARA PARED MODELO 639 O 649MODEL 639 OR649 WALL CAPTAPA PARAPARED MODELO639 O 649MODEL 641 WALL CAPTAPA PARA PAREDMODELO 641MODEL 4066" ROUND DUCTMODELO 406CONDUCTOREDONDO15,24 CM (6 PULG.)C. se está llam<strong>and</strong>o los bomberos.D. usted puede tratar de apagar el fuego teniendo unasalida detrás suyo.* Basado en "Kitchen Fire Safety Tips" publicado por laAsociación Nacional de Protección Contra Incendios(NFPA).CUIDADO !1. Para uso de ventilación general solamente. No lo usepara extraer materiales o vapores explosivos opeligrosos.2. Para evitar daño a los cojinetes del motor e impulsoresruidosos y/o desequilibrados, mantenga la unidad depotencia lejos de rocíos de yeso, polvo de construcción, etc.3. Este producto está equipado con un termostato quepuede activar el ventilador automáticamente. Parareducir el riesgo de lesión, desconecte la potencia en elpanel de servicio y trábelo para evitar que ésta se prendaautomáticamente.4. El motor de su capucha tiene una sobrecarga térmicaque apaga el motor automáticamente si éste sesobrecalienta. El motor arranca de nuevo cu<strong>and</strong>o seenfría. Si el motor continúa apagándose y arranc<strong>and</strong>o,hay que hacerle servicio a la capucha.5. Para atrapar impurezas de cocinado de la mejor manera,la capucha de su estufa se debe montar de 45,72 cm a60,96 cm (18 - 24 pulg.) arriba de la superficie decocinado.6. Por favor <strong>lea</strong> la etiqueta con especificaciones delproducto para más información y requisitos.HERRAMIENTAS YMATERIALES NECESARIOSHERRAMIENTAS Taladro, eléctrico o de trinquete Gusanillo de taladro de hoja ancha de 3,18 cm(1-1/4 pulg.) Destornilladores tipo phillips y tipo hoja Alicates Cinta para medir o regla y lápizSolamente para instalaciones con conductos: Sierra de hoja o sierra para yeso Tijeras para metalMATERIALES Cab<strong>lea</strong>do eléctrico y artículos del tipo necesario paracumplir con códigos localesSolamente para instalaciones con conductos: Tapa para pared o techo Cemento para techo o masilla de calafateo Conductos y cinta de conductosSolamente para instalaciones sin conductos: Un juego de dos paquetes de filtro 97007662 Microtek® Sistema IVSolamente para instalación en gabinetes de cocina confondo que no está a nivel con el marco: Dos tiras de madera de 2,54 cm X 5,08 cm X 30,48cm (1 X 2 X 12 pulg. de tamaño aproximado que sepueden conseguir localmente) Cuatro tornillos de cabeza plana de 3,18 cm (1-1/4pulg.) para madera para fijar las tiras al fondo delgabinete2