3B SCIENTIFIC® PHYSICS
3B SCIENTIFIC® PHYSICS
3B SCIENTIFIC® PHYSICS

You also want an ePaper? Increase the reach of your titles
YUMPU automatically turns print PDFs into web optimized ePapers that Google loves.
<strong>3B</strong> <strong>SCIENTIFIC®</strong> <strong>PHYSICS</strong><br />
Bedienungsanleitung<br />
06/10 ALF<br />
1. Sicherheitshinweise<br />
Spektralröhren-Netzgerät U418001<br />
Das Spektralröhren-Netzgerät entspricht den Sicherheitsbestimmungen<br />
für elektrische Mess-,<br />
Steuer-, Regel- und Laborgeräte nach DIN EN 61010<br />
Teil 1 und ist nach Schutzklasse I aufgebaut. Es ist<br />
für den Betrieb in trockenen Räumen vorgesehen,<br />
die für elektrische Betriebsmittel geeignet sind.<br />
Bei bestimmungsgemäßem Gebrauch ist der sichere<br />
Betrieb des Gerätes gewährleistet. Die Sicherheit<br />
ist jedoch nicht garantiert, wenn das Gerät unsachgemäß<br />
bedient oder unachtsam behandelt wird.<br />
Wenn anzunehmen ist, dass ein gefahrloser Betrieb<br />
nicht mehr möglich ist (z.B. bei sichtbaren Schäden),<br />
ist das Gerät unverzüglich außer Betrieb zu setzen.<br />
1<br />
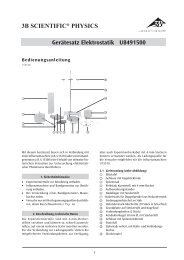
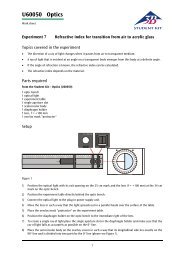
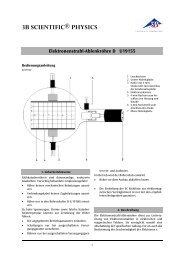
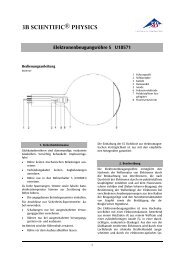
1 Netzkabel<br />
2 Obere Fassung mit Federkontakthalterung<br />
3 Ein/Ausschalter<br />
4 Sicherungshalter<br />
5 Schutzgitter<br />
6 Untere Fassung<br />
In Schulen und Ausbildungseinrichtungen ist der<br />
Betrieb des Gerätes durch geschultes Personal verantwortlich<br />
zu überwachen.<br />
• Vor Erstinbetriebnahme überprüfen, ob der auf<br />
dem Gehäuse aufgedruckte Wert für die Netzanschlussspannung<br />
den örtlichen Anforderungen<br />
entspricht.<br />
• Vor Inbetriebnahme das Gehäuse und die Netzleitung<br />
auf Beschädigungen untersuchen und<br />
bei Funktionsstörungen oder sichtbaren Schäden<br />
das Gerät außer Betrieb setzen und gegen<br />
unbeabsichtigten Betrieb sichern.<br />
• Gerät nur durch eine Elektrofachkraft öffnen<br />
lassen.<br />
• Spektralröhren nur bei ausgeschaltetem Spektralröhren-Netzgerät<br />
einsetzen und entnehmen.
2. Beschreibung<br />
Das Spektralröhren-Netzgerät dient zum Betrieb<br />
der Spektralröhren U41810 bis U41825.<br />
Es ermöglicht eine ruhige und konstante Beleuchtung<br />
und verlängert die Lebensdauer der Spektralröhren.<br />
Eine Federkontakthalterung erlaubt die<br />
sichere Aufnahme und Kontaktierung der Spektralröhren.<br />
Vollständig isolierte Fassungen und ein<br />
Schutzgitter gewährleisten einen sicheren Betrieb.<br />
Das Spektralröhren-Netzgerät mit der Artikelnummer<br />
U418001-115 ist für eine Netzspannung von<br />
115 V (±10 %) ausgelegt, das Gerät mit der Nummer<br />
U418001-230 für 230 V (±10 %).<br />
3. Zubehör<br />
Liste der verfügbaren Spektralröhren<br />
Spektralröhre Kat.-Nr.<br />
Luft U41810<br />
Argon U41811<br />
Brom U41812<br />
Kohlendioxyd U41813<br />
Chlor U41814<br />
Deuterium U41815<br />
Helium U41816<br />
Wasserstoff U41817<br />
Jod U41818<br />
Krypton U41819<br />
Quecksilber U41820<br />
Neon U41821<br />
Stickstoff U41822<br />
Sauerstoff U41823<br />
Wasserdampf U41824<br />
Xenon U41825<br />
4. Technische Daten<br />
Ausgangsspannung: 5000 V<br />
Netzspannung: siehe Gehäuserückseite<br />
230 / 115 V AC, 50/60 Hz<br />
Sicherung: T 1,0 A<br />
Abmessungen: 370 x 120 x 110 mm 3<br />
Masse: ca. 2,9 kg<br />
5. Bedienung<br />
5.1 Allgemeine Hinweise<br />
• Spektralröhren mit einem Lappen oder Handschuhen<br />
anfassen, um Fettablagerungen zu<br />
vermeiden.<br />
• Spektralröhren nur bei ausgeschaltetem Gerät<br />
einsetzen und entnehmen.<br />
• Schutzgitter durch Ziehen am rechten oberen<br />
oder unteren Rand öffnen.<br />
• Zum Einsetzen der Spektralröhre in das Spektralröhren-Netzgerät<br />
Röhre in die untere Fassung<br />
mit Federkontakthalterung einsetzen.<br />
• Röhre mit leichtem Druck nach unten schieben<br />
und in der oberen Fassung arretieren.<br />
• Schutzgitter schließen.<br />
• Spektralröhren-Netzgerät einschalten.<br />
• Mit einem Spektroskop / Spektrometer die<br />
Spektrallinien beobachten.<br />
• Zur Entnahme der Spektralröhre Spektralröhren-Netzgerät<br />
ausschalten und die Röhre abkühlen<br />
lassen.<br />
• Schutzgitter öffnen.<br />
• Röhre mit leichtem Druck nach unten schieben<br />
und aus der oberen Fassung entnehmen.<br />
5.2 Sicherungswechsel<br />
• Stromversorgung ausschalten und unbedingt<br />
Netzstecker ziehen.<br />
• Sicherungshalter mit einem flachen Gegenstand<br />
(z.B. Schraubendreher) herausschrauben.<br />
• Defekte Sicherung nur mit einer dem Original<br />
entsprechenden ersetzen und Halter wieder<br />
einschrauben.<br />
<strong>3B</strong> Scientific GmbH Rudorffweg 8 21031 Hamburg Deutschland www.3bscientific.com<br />
Technische Änderungen vorbehalten<br />
© Copyright 2010 <strong>3B</strong> Scientific GmbH
<strong>3B</strong> <strong>SCIENTIFIC®</strong> <strong>PHYSICS</strong><br />
Instruction sheet<br />
06/10 ALF<br />
Spectrum Tube Power Supply U418001<br />
1. Safety instructions<br />
The spectrum tube power supply unit conforms to<br />
all safety regulations for electrical measuring, control,<br />
monitoring and laboratory equipment, as<br />
specified under DIN EN 61010, Section 1, and the<br />
equipment has been designed to meet protection<br />
class I. It is intended for operation in a dry environment,<br />
suitable for the operation of electrical<br />
equipment and systems.<br />
Safe operation of the equipment is guaranteed,<br />
provided it is used correctly. However, there is no<br />
guarantee of safety if the equipment is used in an<br />
improper or careless manner.<br />
If it may be assumed for any reason that nonhazardous<br />
operation will not be possible (e.g. visible<br />
damage), the equipment should be switched off immediately<br />
and secured against any unintended use.<br />
1<br />
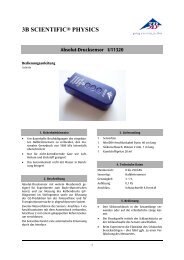
1 Mains lead<br />
2 Lower clamp with spring<br />
clip<br />
3 On/off switch<br />
4 Fuse holder<br />
5 Protective window<br />
6 Upper clamp<br />
In schools and other educational institutions, the<br />
operation of the AC/DC power supply unit must be<br />
supervised by qualified personnel.<br />
• Before using the DC power supply unit for the<br />
first time, confirm that the specifications<br />
printed on the rear side of the housing are<br />
compatible with the local mains voltage.<br />
• Before using the DC power supply unit for the<br />
first time, check the housing and the mains<br />
lead for any damage. In the event of any malfunction/operational<br />
defect or visible damage,<br />
switch off the unit immediately and secure it<br />
against unintended use.<br />
• The equipment may only be opened/repaired<br />
by qualified and trained personnel.<br />
• Do not insert or remove spectrum tubes unless<br />
the spectrum tube control unit is switched off.
2. Description<br />
The spectrum tube power supply unit is intended<br />
for the operation of spectrum tubes U41810 to<br />
U41825. It provides for undisturbed and constant<br />
illumination and increases the lifespan of the tubes<br />
themselves. A clamp with a spring clip ensures that<br />
spectrum tubes can be safely mounted and make<br />
good contact. Full insulation of the clamps and a<br />
protective window ensure safe operation.<br />
The spectrum tube power supply unit with order<br />
number U418001-115 is designed for a mains voltage<br />
of 115 V (±10%) while the version with order<br />
number U418001-230 is for 230 V (±10%).<br />
3. Accessories<br />
List of available spectrum tubes<br />
Spectrum tubes Cat. No.<br />
Air U41810<br />
Argon U41811<br />
Bromine U41812<br />
Carbon dioxide U41813<br />
Chlorine U14814<br />
Deuterium U41815<br />
Helium U41816<br />
Hydrogen U41817<br />
Iodine U41818<br />
Krypton U41819<br />
Mercury U41820<br />
Neon U41821<br />
Nitrogen U41822<br />
Oxygen U41823<br />
Water vapor U41824<br />
Xenon U41825<br />
4. Technical data<br />
Output voltage: 5000 V<br />
Mains voltage: See rear of housing<br />
230 / 115 V AC, 50/60 Hz<br />
Fuse: T 1.0 A<br />
Dimensions: 370 x 120 x 110 mm 3<br />
Weight: 2.9 kg approx.<br />
5. Operation<br />
5.1 General information<br />
• It is recommended that spectrum tubes be<br />
handled with a cloth or gloves in order to<br />
avoid greasy fingerprints.<br />
• Do not insert or remove spectrum tubes unless<br />
the spectrum tube control unit is switched off.<br />
• Open the protective window by pulling on the<br />
right upper or lower edge.<br />
• To insert the spectrum tube into the power<br />
supply, snap it into the lower tube clamp with<br />
the spring clip.<br />
• Push the tube gently downwards and fasten it<br />
in place with the upper clamp.<br />
• Close the protective window.<br />
• Turn on the spectrum tube power supply.<br />
• Use a spectroscope/spectrometer to observe<br />
the spectral lines.<br />
• Before removing the spectrum tube, turn off<br />
the tube power supply and allow the tube to<br />
cool.<br />
• Open the protective window.<br />
• Push the tube gently downwards and slip it out<br />
of the upper clamp.<br />
5.2 Changing the fuse<br />
• Turn off the power switch and unplug the<br />
mains plug.<br />
• Unscrew the fuse holder on the back of the<br />
stand base with a screwdriver.<br />
• Replace the blown fuse with a fuse matching<br />
the original and reinsert the holder in its<br />
socket.<br />
<strong>3B</strong> Scientific GmbH • Rudorffweg 8 21031 Hamburg Germany www.3bscientific.com<br />
Subject to technical amendments<br />
© Copyright 2010 <strong>3B</strong> Scientific GmbH
<strong>3B</strong> <strong>SCIENTIFIC®</strong> <strong>PHYSICS</strong><br />
Instructions d’utilisation<br />
06/10 ALF<br />
Alimentation pour tubes spectraux U418001<br />
1. Consignes de sécurité<br />
L'alimentation pour tubes spectraux correspond<br />
aux dispositions de sécurité pour les appareils<br />
électriques de mesure, de commande, de réglage et<br />
de laboratoire de la norme DIN EN 61010, 1ère<br />
partie, et à la classe de protection 1. Il est prévu<br />
pour être exploité dans des pièces sèches convenant<br />
à des équipements ou dispositifs électriques.<br />
En cas d'utilisation conforme, l'exploitation sûre de<br />
l'appareil est garantie. En revanche, la sécurité<br />
n'est pas garantie si l'appareil n'est pas utilisé dans<br />
les règles ou manipulé négligemment. S'il s'avère<br />
qu'une exploitation peu sûre n'est plus possible,<br />
mettez l'appareil immédiatement hors service (par<br />
ex. en présence de dommages apparents) et protégez-le<br />
contre toute remise en service.<br />
1<br />
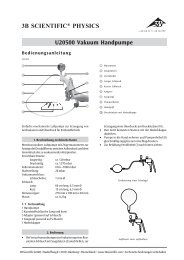
1 Cordon secteur<br />
2 Douille inferieure avec<br />
ressort de fixation<br />
3 Interrupteur<br />
4 Porte-fusible<br />
5 Grille de protection<br />
6 Douille superieure<br />
• Avant la première mise en service, s’assurerque<br />
la valeur imprimée sur le dos du boîtier<br />
pour la tension secteur correspond avec la valeur<br />
en vigueur sur place.<br />
• Avant la mise en service, vérifier si le boîtier<br />
présente des endommagements et, en cas de<br />
dysfonctionnement ou de dommages apparents,<br />
mettre l'appareil hors service et le protéger-<br />
contre toute remise en service.<br />
• Seul un électricien est autorisé à ouvrir l'appareil.<br />
• Ne positionner ou ne retirer les tubes spectraux<br />
qu’après avoir mis l’appareil hors tension.
2. Description<br />
Cette alimentation est prévue pour alimenter les<br />
différents tubes spectraux de U41810 à U41826<br />
grâce à un système de fixation muni d’un ressort<br />
Elle permet un éclairage stable et constant et augmente<br />
la longévité des tubes spectraux. Des douilles<br />
entièrement isolées garantissent un fonctionnement<br />
en toute sécurité, d’autre part une grille<br />
métallique avec fenêtre assure une protection du<br />
tube.<br />
L'alimentation pour tubes spectraux dont la référence<br />
est U418001-115, est conçue pour une tension<br />
du secteur de 115 V (±10 %), celle dont la référence est<br />
U418001-230 sera proposée pour une tension du secteur<br />
de 230 V (±10 %)<br />
3. Accessoires<br />
Liste des tubes spectraux disponibles<br />
Tubes spectraux N° de réf.<br />
Air U41810<br />
Argon U41811<br />
Brome U41812<br />
Dioxyde de carbone U41813<br />
Chlore U41814<br />
Deutérium U41815<br />
Hélium U41816<br />
Hydrogène U41817<br />
Iode U41818<br />
Krypton U41819<br />
Mercure U41820<br />
Néon U41821<br />
Azote U41822<br />
Oxygène U41823<br />
Vapeur d'eau U41824<br />
Xénon U41825<br />
Sodium U41826<br />
4. Caractéristiques techniques<br />
Tension de sortie : 5000 V<br />
Alimentation : voir dos du boîtier<br />
230/115 V CA, 50/60 Hz<br />
Fusible : T 1,0 A<br />
Dimensions : 370 x 120 x 110 mm 3<br />
Masse : env. 2,9 kg<br />
5. Manipulation<br />
5.1 Remarques générales<br />
• Ne toucher le tube spectral qu’avec un chiffon<br />
ou des gants pour éviter de laisser des empreintes,<br />
graisses et de la salir.<br />
• Ne positionner ou ne retirer les tubes spectraux<br />
qu’après avoir mis l’appareil hors tension.<br />
• Pour ouvrir la fenêtre et grille de protectio, il<br />
suffit de tirer sur cette grille, soit par le haut,<br />
soit par le bas.<br />
• Pour insérer un tube spectral, placer le tube<br />
dans la douille inférieure avec ressort de contact.<br />
• Pousser légèrement le tube vers le bas pour<br />
ajuster le positionnement dans la douille supérieure.<br />
• Fermer la fenêtre de protection.<br />
• Mettre l’alimentation sous tension.<br />
• Observer les raies spectrales à l’aide d’un spectroscope<br />
ou d’un spectrogoniomètre.<br />
• Avant de retirer un tube, veillez à d’abord<br />
mettre l’alimentation hors tension, et laisser<br />
refroidir le tube.<br />
• Ouvrir la fenêtre de protection.<br />
• Appuyer sur le tube légèrement vers le bas et<br />
le sortir d’abord de sa douille supérieure, avant<br />
de le retirer complètement.<br />
5.2 Remplacement de fusible<br />
• Couper l’alimentation électrique et retirer<br />
impérativement la fiche secteur.<br />
• Dévisser le porte-fusible avec un objet plat (par<br />
ex. tournevis).<br />
• Remplacer le fusible défectueux uniquement<br />
par un fusible correspondant d’origine et visser<br />
de nouveau le porte-fusible.<br />
<strong>3B</strong> Scientific GmbH Rudorffweg 8 21031 Hamburg Allemagne www.3bscientific.com<br />
Sous réserve de modifications techniques<br />
© Copyright 2010 <strong>3B</strong> Scientific GmbH
<strong>3B</strong> <strong>SCIENTIFIC®</strong> <strong>PHYSICS</strong><br />
Istruzioni per l'uso<br />
06/10 ALF<br />
Alimentatore tubi spettrali U418001<br />
1. Norme di sicurezza<br />
L'alimentatore tubi spettrali risponde alle disposizioni<br />
di sicurezza per apparecchi elettrici di misura,<br />
di comando, di regolazione e da laboratorio della<br />
norma DIN EN 61010 parte 1 ed è realizzato in base<br />
alla classe di protezione I. L'apparecchio è pensato<br />
per l’utilizzo in ambienti asciutti, adatti per strumenti<br />
elettrici.<br />
Un utilizzo conforme garantisce il funzionamento<br />
sicuro dell'apparecchio. La sicurezza non è tuttavia<br />
garantita se l'apparecchio non viene utilizzato in<br />
modo appropriato o non viene trattato con cura.<br />
Se si ritiene che non sia più possibile un funzionamento<br />
privo di pericoli, l'apparecchio deve essere<br />
messo immediatamente fuori servizio (ad es. in<br />
caso di danni visibili).<br />
1<br />
1 Cavo alimentazione<br />
2 Portalampada con supporto<br />
con contatto a molla<br />
3 Interruttore ON/OFF<br />
4 Portafusibili<br />
5 Griglia protettiva<br />
6 Portalampada<br />
Nelle scuole e negli istituti di formazione, il personale<br />
istruito è responsabile del controllo dell'uso<br />
dell'apparecchio.<br />
• Prima di utilizzare l'apparecchio per la prima<br />
volta, verificare che il valore riportato sul retro<br />
dell'alloggiamento indicante la tensione di alimentazione<br />
corrisponda ai requisiti locali.<br />
• Prima della messa in funzione controllare che<br />
l'alloggiamento e il cavo di alimentazione non<br />
presentino danni; in caso di disturbi nel funzionamento<br />
o danni visibili mettere<br />
•<br />
l’apparecchio fuori servizio e al sicuro da ogni<br />
funzionamento involontario.<br />
Fare aprire l'apparecchio solo da un elettricista<br />
specializzato.<br />
• Inserire e rimuovere i tubi spettrali solo con<br />
alimentatore per tubi spettrali disattivato.
2. Descrizione<br />
L'alimentatore per tubi spettrali viene utilizzato<br />
per il funzionamento dei tubi U41810 - U41825.<br />
L'alimentatore consente un'illuminazione continua<br />
e costante e prolunga la durata dei tubi spettrali.<br />
Un supporto con contatto a molla permette il<br />
posizionamento e il collegamento sicuri dei tubi<br />
spettrali. Portalampade completamente isolati ed<br />
una griglia protettiva garantiscono un funzionamento<br />
sicuro.<br />
L'alimentatore per tubi spettrali con numero articolo<br />
U418001-115 è predisposto per una tensione<br />
di rete di 115 V (±10 %), mentre quello con numero<br />
articolo U418001-230 è predisposto per una tensione<br />
di 230 V (±10 %).<br />
3. Accessorio<br />
Elenco dei tubi spettrali disponibili<br />
Tubi spettrali Cat. n°<br />
Aria U41810<br />
Argon U41811<br />
Bromo U41812<br />
Anidride carbonica U41813<br />
Cloro U41814<br />
Deuterio U41815<br />
Elio U41816<br />
Idrogeno U41817<br />
Iodio U41818<br />
Cripto U41819<br />
Mercurio U41820<br />
Neon U41821<br />
Azoto U41822<br />
Ossigeno U41823<br />
Vapore acqueo U41824<br />
Xeno U41825<br />
4. Dati tecnici<br />
Tensione di uscita: 5000 V<br />
Tensione di<br />
alimentazione: ved. retro dell'alloggiamento<br />
230/115 V CA, 50/60 Hz<br />
Fusibile: T 1,0 A<br />
Dimensioni: 370 x 120 x 110 mm 3<br />
Peso: ca. 2,9 kg<br />
5. Comandi<br />
5.1 Indicazioni generali<br />
• Si consiglia di afferrare i tubi spettrali con un<br />
panno o con guanti per evitare depositi di<br />
grasso.<br />
• Inserire e rimuovere i tubi spettrali solo con<br />
alimentatore per tubi spettrali disattivato.<br />
• Aprire la griglia protettiva tirando il suo angolo<br />
in alto o in basso.<br />
• Introdurre il tubo spettrale nell'alimentatore<br />
inserendolo nel portalampada inferiore con<br />
supporto con contatto a molla.<br />
• Spingere il tubo verso il basso con una leggera<br />
pressione e fissarlo nel portalampada superiore.<br />
• Chiudere la griglia protettiva.<br />
• Attivare l'alimentatore per tubi spettrali.<br />
• Osservare le linee spettrali con uno spettroscopio/spettrometro.<br />
• Per estrarre il tubo spettrale, disattivare l'alimentatore<br />
per tubi spettrali e lasciare raffreddare<br />
il tubo.<br />
• Aprire la griglia protettiva.<br />
• Spingere il tubo verso il basso con una leggera<br />
pressione ed estrarlo dal portalampada superiore.<br />
5.2 Sostituzione del fusibile<br />
• Disconnettere l’alimentazione elettrica ed<br />
•<br />
estrarre assolutamente la spina.<br />
Svitare il portafusibili con un oggetto piatto (ad<br />
es. un cacciavite).<br />
• Sostituire il fusibile difettoso esclusivamente<br />
con uno corrispondente all’originale e riavvitare<br />
il supporto.<br />
<strong>3B</strong> Scientific GmbH Rudorffweg 8 21031 Amburgo Germania www.3bscientific.com<br />
Con riserva di modifiche tecniche<br />
© Copyright 2010 <strong>3B</strong> Scientific GmbH
<strong>3B</strong> <strong>SCIENTIFIC®</strong> <strong>PHYSICS</strong><br />
Instrucciones de uso<br />
06/10 ALF<br />
Aparato de red para tubos espectrales U418001<br />
1. Aviso de seguridad<br />
El aparato de red para tubos espectrales corresponde<br />
a las regulaciones de seguridad para dispositivos<br />
eléctricos de medición, de mando, de control<br />
y de laboratorio, estipuladas por la norma DIN<br />
EN 61010, parte 1, y ha sido montada según la<br />
clase de protección I. Está prevista para funcionamiento<br />
en recintos secos, convenientes para<br />
los medios de servicio eléctricos.<br />
Su uso correcto, acorde con las prescripciones,<br />
garantiza el servicio seguro del equipo. Sin<br />
embargo, la seguridad no queda garantizada si el<br />
dispositivo se usa incorrectamente o se lo<br />
manipula sin el cuidado necesario.<br />
Si es de suponer que ya no es posible un<br />
funcionamiento libre de peligro (por ejemplo, por<br />
daños visibles), se debe poner el equipo fuera de<br />
servicio inmediatamente.<br />
1<br />
1 Cable de red<br />
2 Casquillo de soporto con<br />
contacto por muelle<br />
3 Interruptor (ON/OFF)<br />
4 Portafusible<br />
5 Reja de seguridad<br />
6 Casquillo<br />
En escuelas e instalaciones educativas, el<br />
funcionamiento del equipo debe ser supervisado<br />
responsablemente por personal instruido al respecto.<br />
• Antes de la primera puesta en marcha, se debe<br />
comprobar si el valor impreso en el lado<br />
posterior de la caja corresponde a las<br />
exigencias locales de tensión.<br />
• Antes de poner en marcha el aparato se debe<br />
examinar si existen daños en la caja o en la<br />
conexión a la red y, en caso de fallos en el<br />
funcionamiento o daños visibles, se debe<br />
poner el equipo fuera de servicio asegurándolo<br />
contra una puesta en marcha involuntaria.<br />
• Sólo un electrotécnico está autorizado a abrir el<br />
aparato.<br />
• Los tubos espectrales se insertan o retiran sólo<br />
con el aparato de red para lámparas espectrales<br />
desconectado.
2. Descripción<br />
El aparato de red para tubos espectrales sirve para<br />
el funcionamiento de los tubos espectrales de la<br />
serie de U41810 a U41825.<br />
Este aparato hace posible una iluminación reposada,<br />
constante y además alarga la vida medida<br />
de los tubo espectrales. Un soporte de contacto por<br />
muelle permite el alojamiento fijo y el contacto<br />
seguro de los tubos espectrales. Los casquillos<br />
completamente aislados y la reja de seguridad<br />
garantizan un funcionamiento seguro.<br />
El aparato de red para tubos espectrales con el<br />
número de artículo U418001-115 está diseñado<br />
para una tensión de red de 115 V (±10 %), el<br />
aparato con el número U418001-230 para 230 V<br />
(±10 %).<br />
3. Accesorios<br />
Lista de los tubos espectrales disponibles<br />
Tubos espectrales No. de Cat.<br />
Aire U41810<br />
Argón U41811<br />
Bromo U41812<br />
Dióxido de carbono U41813<br />
Cloro U41814<br />
Deuterio U41815<br />
Helio U41816<br />
Hidrógeno U41817<br />
Yodo U41818<br />
Criptón U41819<br />
Mercurio U41820<br />
Neón U41821<br />
Nitrógeno U41822<br />
Oxígeno U41823<br />
Vapor de agua U41824<br />
Xenón U41825<br />
4. Datos técnicos<br />
Tensión de salida: 5000 V<br />
Tensión de conexión<br />
a la red: ver lado posterior de la<br />
caja<br />
230/115 V AC, 50/60 Hz<br />
Fusible: T 1,0 A<br />
Dimensiones: 370 x 120 x 110 mm 3<br />
Masa: aprox. 2,9 kg<br />
5. Servicio<br />
5.1 Notas generales<br />
• Se recomienda tocar los tubos espectrales con<br />
un trapo o con guantes para evitar una contaminación<br />
con grasa de la superficie.<br />
• Los tubos espectrales se insertan o retiran sólo<br />
con el aparato de red para lámparas espectrales<br />
desconectado.<br />
• Tirando en la parte derecha (ariba y abajo) se<br />
abre la reja de seguridad.<br />
• Para insertar el tubo espectral en el aparato de<br />
red para tubos espectrales se inserta el tubo en<br />
soporte inferior con el contacto de muelle.<br />
• Se desliza el tubo hacia abajo con una presión<br />
leve y luego se enclava en el casquillo superior.<br />
• Cerrar reja de seguridad.<br />
• Se conecta luego el aparato de red para tubos<br />
espectrales.<br />
• Se observan las líneas espectrales con un espectroscopio<br />
/ espectrómetro.<br />
• Para retirar el tubo espectral se desconecta el<br />
aparato de red para tubos espectrales y se deja<br />
que el tubo se enfríe.<br />
• Abrir reja de seguridad.<br />
• Se desliza el tubo hacia abajo con una presión<br />
leve y se retira del casquillo superior.<br />
5.2 Reemplazo de fusible<br />
• Desconecte la alimentación de corriente. Es<br />
imprescindible que también desconecte el enchufe<br />
de la red.<br />
• Desatornille el portafusible con un objeto<br />
plano (p. ej. un destornillador).<br />
• Reemplace el fusible por uno que corresponda<br />
al original y vuelva a atornillar el portafusibles.<br />
<strong>3B</strong> Scientific GmbH Rudorffweg 8 21031 Hamburgo Alemania www.3bscientific.com<br />
Nos reservamos el derecho a modificaciones técnicas<br />
© Copyright 2010 <strong>3B</strong> Scientific GmbH
<strong>3B</strong> <strong>SCIENTIFIC®</strong> <strong>PHYSICS</strong><br />
Fonte de alimentação para tubos espectrais U418001<br />
Instruções para o uso<br />
06/10 ALF<br />
1. Indicações de segurança<br />
A fonte de alimentação para tubos espectrais<br />
conforma com as regulamentações de segurança<br />
segundo DIN EN 61010 Parte 1 e é construída<br />
conforme a classe de segurança I. Está prevista para<br />
ser operada em ambiente seco e é apropriada para<br />
meios elétricos de operação.<br />
Caso seja utilizada conforme as indicações<br />
operacionais de segurança, está garantida a<br />
operação segura do aparelho. Esta segurança não<br />
estará garantida caso o aparelho seja operado de<br />
modo incorreto ou sem os necessários cuidados.<br />
Caso seja determinado que um funcionamento sem<br />
perigo não é mais possível (por exemplo, em caso<br />
de danificação do aparelho), deve-se<br />
imediatamente deixar de utilizar o mesmo.<br />
Em escolas ou centros de formação a operação do<br />
aparelho deve ocorrer sob a responsabilidade de<br />
1<br />
1 Cabo de rede<br />
2 Rosca com suporte de<br />
contato de mola<br />
3 Botão liga/desliga<br />
4 Suporte do fusível<br />
5 Grade de proteção<br />
6 Rosca<br />
pessoas preparadas para a operação do aparelho.<br />
• Antes da primeira utilização deve-se verificar<br />
se a tensão de rede impressa na parte posterior<br />
do aparelho coincide com a tensão de rede e<br />
condições de fornecimento locais.<br />
• Antes de conectar o aparelho à rede elétrica,<br />
controlar se este e a conexão à rede estão livres<br />
de danos ou defeitos funcionais, e caso sejam<br />
observados disfunções ou danos visíveis, desligar<br />
imediatamente o aparelho e garantir que<br />
não seja operado por acidente.<br />
• Só permitir a abertura do aparelho por pessoal<br />
especializado em eletricidade.<br />
• Só inserir ou retirar os tubos espectrais com a<br />
fonte de alimentação de tubos espectrais<br />
desligada.
2. Descrição<br />
A fonte de alimentação para tubos espectrais serve<br />
para a operação dos tubos espectrais U41810 até<br />
U41825.<br />
Ela permite uma iluminação suave e constante e<br />
aumenta a vida útil dos tubos espectrais. Um<br />
suporte de conector de mola permite a remoção e<br />
conexão seguras dos tubos espectrais. Roscas<br />
totalmente isoladas e uma grade de proteção<br />
garantem uma utilização segura.<br />
A fonte de alimentação para tubos espectrais com<br />
o número de item U418001-115 é guarnecida para<br />
uma tensão de rede de 115 V (±10 %), o aparelho<br />
com o número U418001-230 é para 230 V (±10 %).<br />
3. Acessórios<br />
Lista dos tubos espectrais disponíveis<br />
Tubos espectrais Nº de cat.<br />
Ar U41810<br />
Argônio U41811<br />
Bromo U41812<br />
Dióxido de carbono U41813<br />
Cloro U41814<br />
Deutério U41815<br />
Hélio U41816<br />
Hidrogênio U41817<br />
Iodo U41818<br />
Criptônio U41819<br />
Mercúrio U41820<br />
Néon U41821<br />
Nitrogênio U41822<br />
Oxigênio U41823<br />
Vapor de água U41824<br />
Xenônio U41825<br />
4. Dados técnicos<br />
Tensão de saída: 5000 V<br />
Tensão de conexão<br />
à rede: veja a parte posterior<br />
do aparelho<br />
230/115 V AC, 50/60 Hz<br />
Fusível: T 1,0 A<br />
Dimensões: 370 x 120 x 110 mm 3<br />
Massa: aprox. 2,9 kg<br />
5. Utilização<br />
5.1 Indicações gerais<br />
• É recomendado manusear os tubos espectrais<br />
com um pano ou com luvas de modo a evitar<br />
depósitos de gordura.<br />
• Só inserir ou retirar os tubos espectrais com a<br />
fonte de alimentação de tubos espectrais<br />
desligada.<br />
• Abrir a grade de proteção puxando a borda<br />
direita superior e inferior.<br />
• Para instalar o tubo espectral no aparelho de<br />
alimentação elétrica, colocá-lo na rosca com<br />
contato de mola.<br />
• Empurrar o tubo com leve pressão e encaixá-lo<br />
na rosca.<br />
• Fechar a grade de proteção.<br />
• Ligar o aparelho de alimentação elétrica do<br />
tubo espectral.<br />
• Observar as linhas espectrais com um espectroscópio<br />
ou espectrômetro.<br />
• Para retirar o tubo espectral, desligar o<br />
aparelho de alimentação elétrica do tubo espectral<br />
e deixa-lo esfriar.<br />
• Abrir a grade de proteção.<br />
• Puxar o tubo para baixo com leve pressão e<br />
retirar da rosca superior.<br />
5.2 Troca de fusível<br />
• Desligue a alimentação elétrica e retire em<br />
todo caso o fio da tomada.<br />
• Desenrosque o suporte do fusível com um<br />
objeto plano (uma chave de fenda, por exemplo).<br />
• Substituir o fusível defeituoso somente com<br />
um correspondente ao original e volte a instalar<br />
o suporte.<br />
<strong>3B</strong> Scientific GmbH Rudorffweg 8 21031 Hamburgo Alemanha www.3bscientific.com<br />
Sob reserva de alterações técnicas<br />
© Copyright 2010 <strong>3B</strong> Scientific GmbH