INSTALLATION MANUAL - Daikin AC
INSTALLATION MANUAL - Daikin AC
INSTALLATION MANUAL - Daikin AC

You also want an ePaper? Increase the reach of your titles
YUMPU automatically turns print PDFs into web optimized ePapers that Google loves.
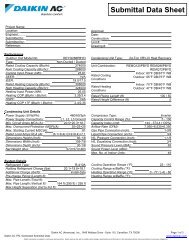
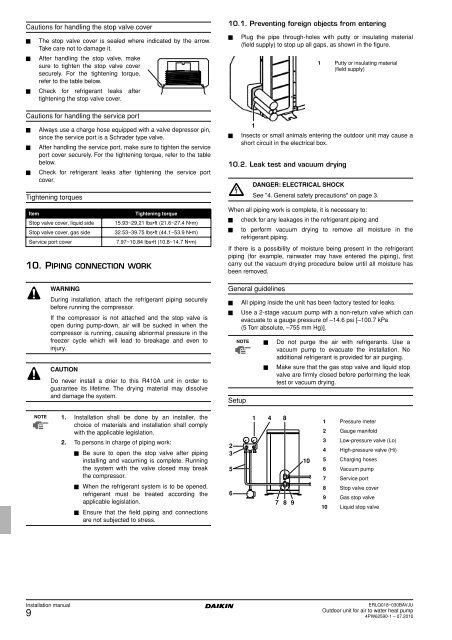
Cautions for handling the stop valve cover■■■The stop valve cover is sealed where indicated by the arrow.Take care not to damage it.After handling the stop valve, makesure to tighten the stop valve coversecurely. For the tightening torque,refer to the table below.Check for refrigerant leaks aftertightening the stop valve cover.Cautions for handling the service port■■■Always use a charge hose equipped with a valve depressor pin,since the service port is a Schrader type valve.After handling the service port, make sure to tighten the serviceport cover securely. For the tightening torque, refer to the tablebelow.Check for refrigerant leaks after tightening the service portcover.Tightening torquesItemStop valve cover, liquid sideStop valve cover, gas sideService port cover10. PIPING CONNECTION WORKTightening torque15.93~29.21 lbs•ft (21.6~27.4 N•m)32.53~39.75 lbs•ft (44.1~53.9 N•m)7.97~10.84 lbs•ft (10.8~14.7 N•m)WARNINGDuring installation, attach the refrigerant piping securelybefore running the compressor.If the compressor is not attached and the stop valve isopen during pump-down, air will be sucked in when thecompressor is running, causing abnormal pressure in thefreezer cycle which will lead to breakage and even toinjury.CAUTIONDo never install a drier to this R410A unit in order toguarantee its lifetime. The drying material may dissolveand damage the system.10.1. Preventing foreign objects from entering■■Plug the pipe through-holes with putty or insulating material(field supply) to stop up all gaps, as shown in the figure.Insects or small animals entering the outdoor unit may cause ashort circuit in the electrical box.10.2. Leak test and vacuum dryingWhen all piping work is complete, it is necessary to:■ check for any leakages in the refrigerant piping and■ to perform vacuum drying to remove all moisture in therefrigerant piping.If there is a possibility of moisture being present in the refrigerantpiping (for example, rainwater may have entered the piping), firstcarry out the vacuum drying procedure below until all moisture hasbeen removed.General guidelines■■Setup1DANGER: ELECTRICAL SHOCKSee "4. General safety precautions" on page 3.All piping inside the unit has been factory tested for leaks.Use a 2-stage vacuum pump with a non-return valve which canevacuate to a gauge pressure of –14.6 psi [–100.7 kPa(5 Torr absolute, –755 mm Hg)].NOTE ■ Do not purge the air with refrigerants. Use avacuum pump to evacuate the installation. Noadditional refrigerant is provided for air purging.■1 Putty or insulating material(field supply)Make sure that the gas stop valve and liquid stopvalve are firmly closed before performing the leaktest or vacuum drying.NOTE 1. Installation shall be done by an installer, thechoice of materials and installation shall complywith the applicable legislation.2. To persons in charge of piping work:■ Be sure to open the stop valve after pipinginstalling and vacuming is complete. Runningthe system with the valve closed may breakthe compressor.■ When the refrigerant system is to be opened,refrigerant must be treated according theapplicable legislation.■ Ensure that the field piping and connectionsare not subjected to stress.235614 87 8 9101 Pressure meter2 Gauge manifold3 Low-pressure valve (Lo)4 High-pressure valve (Hi)5 Charging hoses6 Vacuum pump7 Service port8 Stop valve cover9 Gas stop valve10 Liquid stop valveInstallation manual9ERLQ018~030BAVJUOutdoor unit for air to water heat pump4PW62590-1 – 07.2010