Instrucciones de uso - Telefunken
Instrucciones de uso - Telefunken
Instrucciones de uso - Telefunken

You also want an ePaper? Increase the reach of your titles
YUMPU automatically turns print PDFs into web optimized ePapers that Google loves.
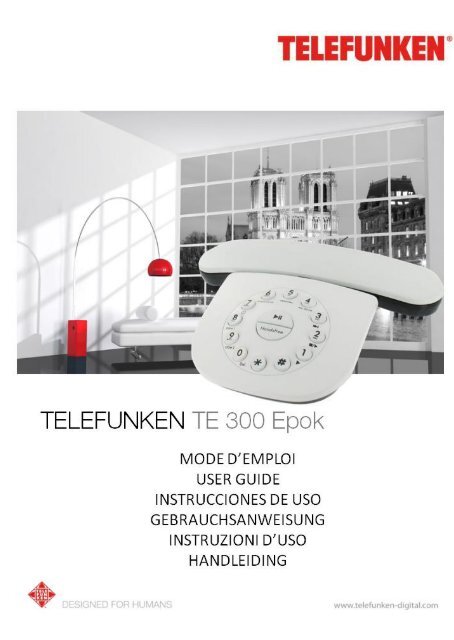
TELEFUNKEN TE 300 Epok<br />
Téléphone numérique sans fil<br />
FRANÇAIS<br />
2
Activation<br />
Information importante<br />
Ce document est qu'un gui<strong>de</strong> <strong>de</strong> démarrage rapi<strong>de</strong>. Le mo<strong>de</strong> d’emploi complet<br />
disponible sur le site internet www.telefunken-digital.com.<br />
Contenu du coffret<br />
• 1 combiné sans fil<br />
• 1 base<br />
• 1 transformateur<br />
• 1 cordon téléphonique<br />
• 2 piles rechargeables AAA NiMh mAh<br />
• 1 gui<strong>de</strong> <strong>de</strong> démarrage rapi<strong>de</strong><br />
Langue<br />
Par défaut, la langue utilisée par le TE 301 et le TE 352 est le français. Pour changer <strong>de</strong><br />
langue :<br />
• Appuyez sur ‘MENU/OK’, et faites défiler à l'ai<strong>de</strong> <strong>de</strong> ▲ ou ▼ jusqu'à la ligne<br />
REGLAGES COMBINE<br />
• Appuyez sur ‘MENU/OK’, et faites défiler à l'ai<strong>de</strong> <strong>de</strong> ▲ ou ▼ jusqu'à la rubrique<br />
LANGUE<br />
• Appuyez sur ‘MENU/OK’, et faites défiler à l'ai<strong>de</strong> <strong>de</strong> ▲ ou ▼ pour choisir la langue qui<br />
vous convient, et appuyez sur ‘MENU/OK’ pour vali<strong>de</strong>r votre choix.<br />
Localisation <strong>de</strong> la base<br />
Elle sera définie en prenant en compte les points suivants :<br />
• Surface stable et plate.<br />
• Distance maximale <strong>de</strong> 1,5 mètre <strong>de</strong>s prises téléphone et secteur.<br />
• Distance minimale d’un mètre <strong>de</strong> tout appareil électronique afin d’éviter les<br />
interférences.<br />
• À l’abri <strong>de</strong> la lumière directe du soleil et à distance suffisante <strong>de</strong> toute source <strong>de</strong><br />
chaleur.<br />
• En <strong>de</strong>hors <strong>de</strong> toute zone humi<strong>de</strong> telle une salle <strong>de</strong> bains.<br />
Votre téléphone TELEFUNKEN offre une portée <strong>de</strong> 300 m en champ libre. Tout obstacle<br />
situé entre la base et le combiné réduira la portée <strong>de</strong> votre téléphone.<br />
La portée maximale du téléphone est réduite à 50 mètres lorsque vous installez la base<br />
à l'intérieur. Les murs épais peuvent affecter la portée d’utilisation.<br />
3
Mise en service<br />
Raccor<strong>de</strong>ments<br />
Base<br />
Raccor<strong>de</strong>z le connecteur transparent <strong>de</strong> l’adaptateur <strong>de</strong> courant à l’endroit indiqué sous<br />
la base, raccor<strong>de</strong>z ensuite l’autre extrémité <strong>de</strong> l’adaptateur à une prise <strong>de</strong> courant.<br />
Combiné<br />
1. Installez <strong>de</strong>ux piles AAA NiMH fournies dans le combiné. Replacez le couvercle du<br />
compartiment à piles.<br />
2. Posez le combiné sur la base puis laissez celui-ci se charger pendant au moins 24<br />
heures. Assurez-vous que le combiné soit correctement inséré. L’indicateur du niveau<br />
<strong>de</strong> charge <strong>de</strong> la batterie s’affiche une fois le combiné chargé.<br />
3. Au bout <strong>de</strong> 24 heures d’utilisation, raccor<strong>de</strong>z l’adaptateur <strong>de</strong> prise téléphonique à la<br />
base et à une prise murale.<br />
Configuration du jour et <strong>de</strong> l'heure<br />
Si vous vous abonnez au service affichage du numéro proposé par votre opérateur<br />
téléphonique, le jour et l'heure seront automatiquement configurés sur tous les<br />
combinés à chaque réception d'un appel.<br />
Au cas où vous ne seriez pas abonné à ce service, vous avez la possibilité <strong>de</strong> configurer<br />
manuellement la date et l'heure.<br />
1. Appuyez sur ‘MENU/OK’, puis sur ▼ pour afficher ‘HORL. /REVEIL’.<br />
2. Appuyez sur ‘MENU/OK’ : ‘DATE & HEURE’ s'affiche sur l'écran.<br />
3. Entrez la date sous le format JJ/MM. Ex.: 04-08 pour le 4 Août.<br />
4. Appuyez sur ‘MENU/OK’, et entrez l'heure sous le format 24-heures, HH: MM format.<br />
Ex. : Par exemple, 14-45 pour 14 h 45<br />
5. Appuyez sur ‘MENU/OK’ pour confirmer ou appuyez sur pour repasser en<br />
mo<strong>de</strong> veille.<br />
Panne <strong>de</strong> courant<br />
En cas <strong>de</strong> coupure d'électricité, votre base ne vous sert qu'à passer <strong>de</strong>s appels ou en<br />
recevoir. Le téléphone sonne en cas d'appel entrant, mais l'écran ne s'éclaire pas, et<br />
l'i<strong>de</strong>ntité <strong>de</strong> votre correspondant n'est pas sauvegardée dans la liste <strong>de</strong>s appels. Vous<br />
n'aurez pas la possibilité <strong>de</strong> vous servir <strong>de</strong>s autres caractéristiques <strong>de</strong> la base ou du<br />
combiné avant rétablissement du courant.<br />
4
Illustration<br />
1. ÉCOUTEUR<br />
2. TOUCHE HAUT<br />
Permet l'accès au répertoire, le défilement vers le haut au sein <strong>de</strong> la liste <strong>de</strong>s<br />
options et d'augmenter le volume sonore <strong>de</strong> l'écouteur.<br />
3. DECROCHER<br />
En mo<strong>de</strong> VEILLE/COMPOSITION D’UN NUMERO : permet <strong>de</strong> passer un appel.<br />
Liste <strong>de</strong> rappel / journal <strong>de</strong>s appels / répertoire téléphonique : permet d’appeler le<br />
contact sélectionné.<br />
Lorsque le téléphone sonne : permet <strong>de</strong> répondre à un appel.<br />
4. TOUCHE FIN D'APPEL<br />
Pendant un appel : Termine l'appel et repasse en mo<strong>de</strong> veille. Permet l'allumage<br />
ou l'extinction du combiné.<br />
5
Illustration<br />
5. TOUCHE BAS<br />
Permet d'accé<strong>de</strong>r à la liste <strong>de</strong>s appels reçus, permet le défilement vers le bas au<br />
sein <strong>de</strong> la liste <strong>de</strong>s options, permet <strong>de</strong> réduire le volume sonore <strong>de</strong> l'écouteur.<br />
6. OK/MENU<br />
Permet d'accé<strong>de</strong>r au menu et à ses diverses options.<br />
Permet <strong>de</strong> confirmer une sélection.<br />
7. TOUCHE C<br />
Permet <strong>de</strong> renouveler un appel. Permet le retour au menu précé<strong>de</strong>nt. Permet<br />
d'effacer une erreur lorsqu'on tape un numéro ou un nom.<br />
8. INT<br />
Touche Intercom : Permet <strong>de</strong> passer un appel interne vers un autre combiné.<br />
9. Clavier Numérique<br />
10. TOUCHE * Permet <strong>de</strong> verrouiller le clavier (en appuyant longuement)<br />
11. TOUCHE # Permet <strong>de</strong> désactiver la sonnerie (en appuyant longuement)<br />
12. MICROPHONE<br />
13. EMPLACEMENT BATTERIE<br />
A. TOUCHE RAPPEL<br />
B. INTERCOM ou APPUI PROLONGÉ POUR ENREGISTRER<br />
C. TOUCHE MODE SILENCE<br />
D. PERMET D'AUGMENTER LE VOLUME<br />
E. PERMET DE RÉDUIRE LE VOLUME<br />
F. TOUCHE RECOMPOSITION DU NUMERO sur le modèle TE 301 ou<br />
LIRE/METTRE EN PAUSE sur le modèle TE 352<br />
G. MAINS LIBRES<br />
6
Téléphoner<br />
Comment appeler<br />
Appuyez sur et composez le numéro.<br />
Vous pouvez aussi vous servir du mo<strong>de</strong> ‘numérotation’ pour entrer un numéro et le<br />
vérifier avant <strong>de</strong> passer votre appel.<br />
Entrez le numéro <strong>de</strong> téléphone, et appuyez sur ou situés sur la base pour<br />
composer le numéro. Si vous appuyez sur , un appel 'Mains-libres' est lancé.<br />
Appuyez sur 'C' pour effacer si vous faites une erreur.<br />
Comment répondre à un appel<br />
Lorsque le combiné sonne, appuyer sur<br />
pour répondre à l'appel.<br />
Réglage du volume<br />
sur le combiné ou appuyez sur la touche<br />
Pendant une communication, appuyez sur ▲ ou ▼ sur le combiné ou sur la base pour<br />
régler le volume <strong>de</strong> l'écouteur ou du haut-parleur.<br />
Le niveau <strong>de</strong> volume sonore est indiqué sur l'écran.<br />
Terminer une communication<br />
Appuyez sur .<br />
Répertoire<br />
Le TELEFUNKEN TE 300 peut conserver en mémoire un maximum <strong>de</strong> 80 noms et<br />
numéros.<br />
Les numéros peuvent être composés <strong>de</strong> 20 chiffres maximum, et les noms d'un<br />
maximum <strong>de</strong> 12 lettres. Les entrées se font dans l'ordre alphabétique.<br />
Ajout d'un contact<br />
1. Appuyez sur ‘MENU/OK’(puis sur ▼ sur le TE 352). ‘REPERTOIRE’ apparaît.<br />
2. Appuyez sur ‘MENU/OK’. ‘ENTRER NOM’ apparaît.<br />
3. Entrez le nom, puis appuyez sur ‘MENU/OK’.<br />
4. Appuyez sur ‘MENU/OK’. ‘ENTRER NUM.’ apparaît.<br />
5. Entrez le numéro. Appuyez sur ‘MENU/OK’ pour confirmer.<br />
6. Appuyez sur pour repasser en mo<strong>de</strong> veille.<br />
7
Répertoire<br />
Vous pouvez annuler toute nouvelle entrée en cours d'insertion en appuyant à n'importe<br />
quel moment sur la touche .<br />
Suppression d'un contact<br />
1. Appuyez sur ▲.<br />
2. Appuyez sur ▲ ou sur ▼ pour sélectionner le nom à supprimer, et appuyez sur<br />
‘MENU/OK’.<br />
3. Appuyez sur ▲ ou sur ▼ pour sélectionner ‘EFFACER, et appuyez sur ‘MENU/OK’.<br />
4. Appuyez sur pour repasser en mo<strong>de</strong> veille.<br />
Suppression <strong>de</strong> tous les contacts<br />
1. Appuyez trois fois sur ‘MENU/OK’.<br />
2. Appuyez sur ▼ pour sélectionner ‘EFFACER TOUT, puis appuyez sur ‘MENU/OK’.<br />
3. Sur l'écran on vous <strong>de</strong>man<strong>de</strong> ‘CONFIRMER?’. Appuyez sur ‘MENU/OK’.<br />
4. Appuyez sur pour repasser en mo<strong>de</strong> veille<br />
Rétablir les réglages initiaux <strong>de</strong> votre téléphone<br />
Le fait <strong>de</strong> remettre à zéro vous fait revenir aux réglages par défaut du téléphone.<br />
1. Appuyez sur ‘MENU/OK’ et ▼ pour afficher ‘MENU BASE’, puis appuyez <strong>de</strong> nouveau<br />
sur ‘MENU/OK’.<br />
2. Appuyez sur ▼ pour sélectionner ‘REG. AVANCES. Appuyez sur ‘MENU/OK’.<br />
3. Entrez votre co<strong>de</strong> PIN (Le co<strong>de</strong> par défaut est 0000) et appuyez sur ‘MENU/OK’<br />
4. Appuyez sur ▼ pour sélectionner ‘DEFAUT’. Appuyez sur‘MENU/OK’.<br />
3. ‘CONFIRMER?’ s’affiche à l’écran. Appuyez sur ‘MENU/OK’.<br />
8
Répon<strong>de</strong>ur<br />
Le répon<strong>de</strong>ur <strong>de</strong> votre TE 352 enregistre les appels que vous avez manqués lorsqu'il est<br />
activé. Il peut enregistrer un maximum <strong>de</strong> 99 messages avec une durée totale<br />
d'enregistrement <strong>de</strong> 15 minutes. La durée maximale pour un message est <strong>de</strong> 9 minutes.<br />
Votre message d'accueil, quant à lui, peut durer 1 minute.<br />
Fonctionnement du répon<strong>de</strong>ur à partir <strong>de</strong> la base<br />
PLAY/PAUSE (Lecture/Pause) : met en route ou arrête la lecture du ou <strong>de</strong>s<br />
message(s).<br />
Mo<strong>de</strong> réponse<br />
Il y a <strong>de</strong>ux messages préenregistrés, et vous pouvez également enregistrer votre propre<br />
message d'accueil.<br />
Répondre & enregistrer<br />
Le correspondant peut laisser un message. Le message préenregistré est : "Hello, I<br />
cannot answer you right now; please leave a message after the beep"<br />
Annonce seule<br />
Le correspondant entend votre message d'accueil, mais est dans l'impossibilité <strong>de</strong><br />
laisser un message. Le message préenregistré est : "Hello, I cannot answer you right<br />
now and you cannot leave a message, please call again later"<br />
Enregistrer, écouter ou supprimer votre message d'accueil<br />
1. Appuyez <strong>de</strong>ux fois sur ‘MENU/OK’ pour sélectionner REPONDEUR et appuyez à<br />
nouveau après l'affichage du nombre <strong>de</strong> messages.<br />
2. Faites défiler les lignes avec▲ ou ▼ jusqu'à MARCHE/ARRET et appuyez sur<br />
MENU/OK pour activer ou désactiver le répon<strong>de</strong>ur.<br />
3. Faites défiler les lignes avec▲ ou ▼ jusqu'à EFFACER TOUT et appuyez sur<br />
MENU/OK pour supprimer tous les messages vocaux.<br />
4. Faites défiler les lignes avec▲ ou ▼ pour sélectionner REP. SIMPLE et appuyez sur<br />
MENU/OK si vous voulez que le correspondant enten<strong>de</strong> un message préenregistré,<br />
mais soit dans l'impossibilité <strong>de</strong> laisser un message.<br />
5. Faites défiler les lignes avec▲ ou ▼pour sélectionner ANNONCE 1 ou ANNONCE 2<br />
et appuyez sur MENU/OK pour sélectionner/écouter/effacer/enregistrer un message<br />
préenregistré 1 ou 2.<br />
6. Faites défiler les lignes avec▲ ou ▼pour sélectionner NB. SONNERIE et appuyez<br />
sur MENU/OK pour choisir le nombre <strong>de</strong> sonneries qui doivent retentir avant que le<br />
correspondant enten<strong>de</strong> le message préenregistré.<br />
7. Faites défiler les lignes avec▲ ou ▼pour sélectionner LANGUE et appuyez sur<br />
MENU/OK pour choisir la langue dans laquelle le message est préenregistré.<br />
8. Faites défiler les lignes avec▲ ou ▼pour sélectionner MOT DE PASSE et appuyez<br />
sur MENU/OK pour implanter un mot <strong>de</strong> passe sur votre répon<strong>de</strong>ur.<br />
9
Intercom<br />
Pour établir un appel entre <strong>de</strong>ux combinés : appuyez sur la touche Intercom du combiné,<br />
suivi du numéro du combiné que vous souhaitez appeler. (Par exemple, un appui sur<br />
Intercom 1 permet <strong>de</strong> joindre le combiné 1, un appui sur Intercom * permet <strong>de</strong> joindre<br />
tous les combinés), tous les combinés préalablement enregistré sur cette base<br />
sonneront, et un appui sur la touche situé sur le combiné déclenche l'appel.<br />
Garantie<br />
Ce téléphone est garanti 24 mois, à compter <strong>de</strong> la date d'achat <strong>de</strong> l'appareil.<br />
Pour plus <strong>de</strong> renseignements sur l'application <strong>de</strong> cette garantie, veuillez consulter le<br />
mo<strong>de</strong> d'emploi complet disponible sur notre site internet www.telefunken-digital.com.<br />
Contact service après-vente<br />
Au cas où vous rencontreriez un problème technique, n'hésitez pas à contacter notre<br />
service après-vente à l'adresse : assistance@sopeg.fr ou en téléphonant au :<br />
0892 70 50 44<br />
Service AUDIOTEL® 0,337 € TTC la minute<br />
10
TELEFUNKEN TE 300 Epok<br />
Teléfono digital inalámbrico<br />
ESPAÑOL<br />
11
Activación<br />
Información importante<br />
Este documento es solamente una guía <strong>de</strong> inicio rápido. Las instrucciones completas<br />
<strong>de</strong> funcionamiento están disponibles en el sitio Web www.telefunken-digital.com.<br />
Contenido <strong>de</strong> la caja<br />
• 1 teléfono inalámbrico<br />
• 1 base<br />
• 1 adaptador eléctrico<br />
• 1 cable telefónico<br />
• 2 pilas recargables NiMh mAh tamaño AAA<br />
• 1 guía <strong>de</strong> inicio rápido<br />
Idioma<br />
El idioma por <strong>de</strong>fecto <strong>de</strong>l TE 301 y <strong>de</strong>l TE 352 es el francés. Para cambiar el idioma:<br />
• Pulse ‘MENU/OK’, y <strong>de</strong>splácese usando ▲ o ▼ hasta REGLAGES COMBINE<br />
• Pulse ‘MENU/OK’, y <strong>de</strong>splácese usando ▲ o ▼ hasta LANGUE<br />
• Pulse ‘MENU/OK’, y <strong>de</strong>splácese usando ▲ o ▼ para elegir el idioma apropiado y<br />
pulse ‘MENU/OK’ para aceptar.<br />
Colocación <strong>de</strong> la base<br />
Debería elegir una ubicación con las características siguientes:<br />
• Una superficie horizontal y estable<br />
• Alejado no más <strong>de</strong> 1,5m <strong>de</strong> una toma <strong>de</strong> corriente y <strong>de</strong> un conector <strong>de</strong> teléfono<br />
• Alejado al menos 1 metro <strong>de</strong> cualquier otro electrodoméstico para evitar<br />
interferencias.<br />
• Fuera <strong>de</strong> los rayos directos <strong>de</strong>l sol y a una distancia suficiente <strong>de</strong> cualquier fuente<br />
<strong>de</strong> calor<br />
• Fuera <strong>de</strong> áreas mojadas o húmedas, como los cuartos <strong>de</strong> baño<br />
Su teléfono TELEFUNKEN tiene un alcance <strong>de</strong> 300m en exteriores cuando hay una<br />
línea <strong>de</strong> visión clara entre la base y el teléfono.<br />
Cualquier obstáculo entre la base y el teléfono reduce en gran medida el alcance.<br />
Si la base está en interiores y el teléfono está en interiores o exteriores, el alcance no<br />
supera los 50m. Las pare<strong>de</strong>s muy gruesas pue<strong>de</strong>n afectar al alcance.<br />
12
Activación<br />
Conexión<br />
Base<br />
Conecte el conector transparente <strong>de</strong>l adaptador eléctrico en el lugar marcado <strong>de</strong>bajo<br />
<strong>de</strong> la base, y enchufe el otro extremo en una toma <strong>de</strong> corriente.<br />
Teléfono<br />
1. Coloque las 2 pilas NiMH tamaño AAA suministradas en el teléfono. Cierre el<br />
compartimiento <strong>de</strong> las pilas con su tapa.<br />
2. Coloque el teléfono en la base, y déjelo cargando al menos 24 horas. Asegúrese <strong>de</strong><br />
colocarlo en la posición correcta. Cuando el teléfono esté cargado, le aparecerá el<br />
símbolo correspondiente.<br />
3. Después <strong>de</strong> 24 horas, conecte el cable telefónico en la base y en la toma <strong>de</strong><br />
teléfono <strong>de</strong> la pared.<br />
Ajustar la fecha y la hora<br />
Si contrata el servicio <strong>de</strong> i<strong>de</strong>ntificación <strong>de</strong> llamada <strong>de</strong> su operador <strong>de</strong> telefonía, la<br />
fecha y la hora se ajustarán automáticamente en el teléfono con cada llamada<br />
recibida.<br />
Si no contrata este servicio, pue<strong>de</strong> ajustar la fecha y la hora manualmente.<br />
1. Pulse ‘MENU/OK’, luego ▼ para ver en pantalla ‘RELOJ/ALARMA”.<br />
2. Pulse ‘MENU/OK’: En la pantalla aparece ‘CONFIGURAR HORA”.<br />
3. Introduzca la fecha en el formato DD/MM. Ejemplo: 04-08 para el 4 <strong>de</strong> agosto.<br />
4. Pulse ‘MENU/OK’, e introduzca la hora en formato 24-horas, HH: MM. Ejemplo:<br />
14-45 para las 14:45 o las 2:45 pm.<br />
5. Pulse ‘MENU/OK’ para confirmar, o pulse para volver al modo en espera.<br />
Corte <strong>de</strong> suministro eléctrico<br />
En el caso <strong>de</strong> un apagón, solo podrá usar la base para hacer y recibir llamadas. El<br />
teléfono sonará cuando reciba una llamada, pero no se iluminará la pantalla y la<br />
i<strong>de</strong>ntificación <strong>de</strong> llamada no se guardará en el registro <strong>de</strong> llamadas. No podrá usar<br />
ninguna otra función <strong>de</strong> la base ni <strong>de</strong>l teléfono inalámbrico hasta que se restablezca<br />
el suministro eléctrico.<br />
13
Ilustración<br />
14. AURICULAR<br />
15. TECLA ‘ARRIBA’<br />
Acce<strong>de</strong> a la guía <strong>de</strong> teléfonos. Se <strong>de</strong>splaza hacia arriba por las opciones. Sube<br />
el volumen <strong>de</strong>l auricular.<br />
16. CONTESTAR<br />
En Espera / modo PREPARATORIO DE MARCACIÓN: para hacer una llamada.<br />
En la Lista <strong>de</strong> re-llamadas / registro <strong>de</strong> llamadas / guía <strong>de</strong> teléfono: hace una<br />
llamada al contacto seleccionado.<br />
Con el teléfono sonando: contesta la llamada.<br />
17. TECLA TERMINAR LLAMADA<br />
Durante una llamada: termina la llamada y regresa a modo en espera. Activa /<br />
<strong>de</strong>sactiva el teléfono inalámbrico.<br />
14
Ilustración<br />
18. TECLA ‘ABAJO’<br />
Acce<strong>de</strong> a la lista <strong>de</strong> llamadas recibidas. Se <strong>de</strong>splaza hacia abajo por las<br />
opciones. Baja el volumen <strong>de</strong>l auricular.<br />
19. ACEPTAR/MENÚ<br />
Acce<strong>de</strong> al menú y a sus diferentes opciones.<br />
Confirma una selección.<br />
20. TECLA C<br />
Tecla ‘Rellamada’. Regresa al menú previo. Borra un error cuando escribe un<br />
número o un nombre.<br />
21. INT<br />
La tecla <strong>de</strong> Intercomunicación hace una llamada interna a otro terminal<br />
telefónico registrado en el mismo sistema.<br />
22. Teclado numérico<br />
23. TECLA * Bloquea el teclado (pulsación larga)<br />
24. TECLA #<br />
Manteniéndola pulsada: <strong>de</strong>sactiva el timbre.<br />
25. MICRÓFONO<br />
26. COMPARTIMIENTO DE LAS PILAS<br />
H. TECLA RELLAMADA<br />
I. INTERCOM / PULSACIÓN LARGA PARA REGISTRAR EL TELÉFONO<br />
J. TECLA DE SILENCIO<br />
K. SUBIR EL VOLUMEN<br />
L. BAJAR EL VOLUMEN<br />
M. TECLA DE RELLAMADA en TE 301 / REPRODUCIR-PAUSA en TE 352<br />
N. MANOS LIBRES<br />
15
Telefonear<br />
Hacer una llamada<br />
Pulse y marque el número.<br />
O pue<strong>de</strong> usar el modo “llamada preparatoria” para introducir un número y<br />
comprobarlo antes <strong>de</strong> hacer la llamada.<br />
Introduzca el número <strong>de</strong> teléfono, y pulse o en la base para marcar el número.<br />
Pulsando , hará una llamada en modo “Manos libres” . Pulse 'C' para borrar un<br />
número si comete un error.<br />
Contestar una llamada.<br />
Cuando suena el teléfono, coja el teléfono <strong>de</strong> la base o pulse<br />
llamada.<br />
Ajustar el volumen<br />
para contestar la<br />
Durante una llamada, pulse ▲ o ▼ en el teléfono o en la base para ajustar el volumen<br />
<strong>de</strong>l auricular.<br />
El nivel <strong>de</strong>l sonido aparece en la pantalla.<br />
Terminar una llamada<br />
Pulse .<br />
Guía <strong>de</strong> teléfonos<br />
El TELEFUNKEN TE 301 pue<strong>de</strong> almacenar hasta 80 nombres y números.<br />
Los números pue<strong>de</strong>n tener hasta 20 dígitos, y los nombres hasta 12 letras. Las<br />
entradas están por or<strong>de</strong>n alfabético.<br />
Añadir un contacto<br />
1. Pulse ‘MENU/OK’: aparece ‘AGENDA’ en pantalla.<br />
2. Pulse ‘MENU/OK’: aparece ‘INTRODUCIR NOMBRE”<br />
3. Escriba el nombre y luego pulse ‘MENU/OK’.<br />
4. Pulse ‘MENU/OK’: aparece ‘”AÑADIR NÚMERO” en pantalla.<br />
5. Introduzca el número. Pulse ‘MENU/OK’ para confirmar.<br />
6. Pulse para regresar al modo en espera.<br />
16
Guía <strong>de</strong> teléfonos<br />
Pue<strong>de</strong> anular una nueva entrada que esté introduciendo pulsando en cualquier<br />
momento.<br />
Eliminar un contacto<br />
1. Pulse ▲.<br />
2. Pulse ▲ o ▼ hasta seleccionar la entrada a eliminar, y pulse ‘MENU/OK’.<br />
3. Pulse ▲ o ▼ hasta seleccionar ‘ELIMINAR NÚMERO”, y pulse ‘MENU/OK’.<br />
4. Pulse para regresar al modo en espera.<br />
Eliminar todos los contactos<br />
1. Pulse ‘MENU/OK’ tres veces:<br />
2. Pulse ▲ o ▼ para seleccionar ‘ELIMINAR TODOS”, y luego pulse ‘MENU/OK’.<br />
3. La pantalla le preguntará “¿CONFIRMAR?”. Pulse ‘MENU/OK’:<br />
4. Pulse para regresar al modo en espera.<br />
Reiniciar su teléfono<br />
La reiniciación le permite recuperar los valores <strong>de</strong> fábrica <strong>de</strong> su teléfono.<br />
1. Pulse ‘MENU/OK’ y ▼ hasta ver en pantalla ‘CONFIGURACIÓN BS”, luego pulse<br />
‘MENU/OK’ otra vez.<br />
2. Pulse ▼ para seleccionar ‘CONFIGURACIÓN AVANZADA”. Pulse ‘MENU/OK’.<br />
3. Introduzca el código PIN (por <strong>de</strong>fecto 0000) y pulse ‘MENU/OK’.<br />
4. Pulse ▼ para seleccionar ‘POR DEFECTO’. Pulse ‘MENU/OK’.<br />
5. La pantalla le preguntará ‘¿CONFIRMAR?”. Pulse ‘MENU/OK’.<br />
17
Contestador automático<br />
El contestador automático <strong>de</strong> su TE 352 graba las llamadas perdidas cuando está<br />
activado. Pue<strong>de</strong> grabar hasta 99 mensajes, el tiempo total <strong>de</strong> grabación es <strong>de</strong> 15<br />
minutos. Cada mensaje pue<strong>de</strong> durar un máximo <strong>de</strong> 9 minutos. Su saludo pue<strong>de</strong> durar 1<br />
minuto.<br />
Uso <strong>de</strong>l contestador automático <strong>de</strong>s<strong>de</strong> la base<br />
REPRODUCIR / PAUSA: Inicia o <strong>de</strong>tiene la reproducción <strong>de</strong> mensajes<br />
Modo Contestador<br />
Hay dos mensajes pre-grabados y usted también pue<strong>de</strong> grabar su propio saludo.<br />
Contestar y Grabar<br />
La persona que llama pue<strong>de</strong> <strong>de</strong>jar un mensaje. El mensaje pre-grabado es "Hello, I<br />
cannot answer you right now; please leave a message after the beep"<br />
Sólo Saludo<br />
La persona que llama oirá su saludo pero no pue<strong>de</strong> <strong>de</strong>jar un mensaje. El mensaje<br />
pre-grabado es "Hello, I cannot answer you right now and you cannot leave a message,<br />
please call again later"<br />
Grabar, oír o eliminar su saludo<br />
1. Pulse ‘MENU/OK’ dos veces para seleccionar CONTESTADOR AUTOMÁTICO y<br />
púlselo otra vez cuando aparezca en pantalla el número <strong>de</strong> mensajes.<br />
2. Desplácese usando ▲ o ▼ hasta CONTESTADOR y pulse MENU/OK para activar o<br />
<strong>de</strong>sactivar el contestador automático.<br />
3. Desplácese usando ▲ o ▼hasta seleccionar ELIMINAR TODOS y pulse MENU/OK<br />
para eliminar todos los mensajes <strong>de</strong> voz.<br />
4. Desplácese usando ▲ o ▼para seleccionar SOLO SALUDO y pulse MENU/OK si<br />
<strong>de</strong>sea que la persona que llame oiga un mensaje pre-grabado pero que no <strong>de</strong>je un<br />
mensaje.<br />
5. Desplácese usando ▲ o ▼hasta seleccionar OGM 1 o OGM 2 y pulse MENU/OK<br />
para seleccionar / oír / borrar / grabar el mensaje pre-grabado 1 o 2.<br />
6. Desplácese usando ▲ o ▼hasta seleccionar NÚMERO DE TONOS y pulse<br />
MENU/OK para elegir el número <strong>de</strong> tonos <strong>de</strong> llamada antes <strong>de</strong> que la persona que llama<br />
oiga el mensaje pre-grabado.<br />
7. Desplácese usando ▲ o ▼hasta seleccionar IDIOMA y pulse MENU/OK para elegir<br />
el idioma <strong>de</strong>l mensaje pre-grabado.<br />
8. Desplácese usando ▲ o ▼hasta seleccionar CONTRASEÑA y pulse MENU/OK<br />
para establecer la contraseña <strong>de</strong> su contestador automático.<br />
18
Intercomunicador<br />
Para establecer una llamada interna con otro terminal: pulse el botón Intercom en el<br />
teléfono seguido <strong>de</strong>l número <strong>de</strong>l terminal <strong>de</strong> teléfono con el que le gustaría hablar (por<br />
ejemplo, pulsando Intercom 1 establecería comunicación con el terminal 1, pulsando<br />
Intercom * establecería comunicación con todos los terminales), cualquier terminal <strong>de</strong><br />
teléfono registrado con la base hará sonar el timbre con la melodía Intercom y pulse<br />
en el terminal <strong>de</strong> teléfono para iniciar la conversación.<br />
Garantía<br />
Este teléfono viene con una garantía <strong>de</strong> 24 meses, <strong>de</strong>s<strong>de</strong> la fecha <strong>de</strong> compra <strong>de</strong>l<br />
teléfono.<br />
Para más información sobre la cobertura <strong>de</strong> esta garantía, por favor lea el manual<br />
completo <strong>de</strong> las instrucciones <strong>de</strong> funcionamiento disponible en la página web<br />
www.telefunken-digital.com.<br />
Contacto <strong>de</strong>l Sevicio <strong>de</strong> Post-Venta<br />
En el caso <strong>de</strong> un problema técnico, tenga la libertad <strong>de</strong> contactar con nuestro servicio<br />
<strong>de</strong> post-venta. postventa@sopeg.fr o llame al 687035185.<br />
19
TELEFUNKEN TE 300 Epok<br />
Telefone Digital Sem Fios<br />
PORTUGUÊS<br />
20
Activação<br />
Informação importante<br />
Este documento é apenas um manual <strong>de</strong> início rápido. Estão disponíveis instruções <strong>de</strong><br />
funcionamento completas na página <strong>de</strong> internet www.telefunken-digital.com.<br />
Conteúdo da caixa<br />
• 1 microtelefone sem fios<br />
• 1 base<br />
• 1 adaptador <strong>de</strong> corrente<br />
• 1 telefone sem fios<br />
• 2 baterias recarregáveis AAA niMh mAh<br />
• 1 manual <strong>de</strong> início rápido<br />
Idioma<br />
O idioma padrão do TE 301 3 do TE 352 é o Francês. Para alterar o idioma:<br />
• Premir ‘MENU/OK’, e <strong>de</strong>slocar usando ▲ ou ▼ para REGLAGES COMBINE<br />
• Premir ‘MENU/OK’, e <strong>de</strong>slocar usando ▲ ou ▼ para LANGUE<br />
• Premir ‘MENU/OK’, e <strong>de</strong>slocar usando ▲ ou ▼ para escolher o idioma a<strong>de</strong>quado e<br />
premir ‘MENU/OK’ para confirmar.<br />
Posicionar a base<br />
Deve ser escolhido um local com as seguintes características:<br />
• Uma superfície plana e estável<br />
• No máximo a 1,5m da tomada <strong>de</strong> corrente eléctrica e da tomada <strong>de</strong> telefone<br />
• A pelo menos 1 m <strong>de</strong> qualquer outro aparelho electrónico para evitar interferências<br />
• Afastado da luz solar directa e a uma distância suficiente <strong>de</strong> qualquer fonte <strong>de</strong> calor<br />
• Afastado <strong>de</strong> qualquer zona húmida ou molhada, como a casa <strong>de</strong> banho<br />
O seu telefone TELEFUNKEN tem um alcance até 300 metros no exterior quando existe<br />
uma linha <strong>de</strong> visibilida<strong>de</strong> nítida entre a base e o microtelefone.<br />
Qualquer obstrução entre a base e o microtelefone reduzirá significativamente o<br />
alcance.<br />
Se a base estiver no interior e o microtelefone estiver ou no interior ou no exterior, o<br />
alcance é até 50m. Pare<strong>de</strong>s grossas po<strong>de</strong>m afectar o alcance.<br />
21
Activação<br />
Ligação<br />
Base<br />
Ligar o conector transparente do adaptador <strong>de</strong> corrente no local marcado por <strong>de</strong>baixo<br />
da base, e ligar o outro terminal na tomada <strong>de</strong> pare<strong>de</strong>.<br />
Microtelefone<br />
1. Introduzir as 2 pilhas AAA NiMH fornecidas no microtelefone. Deslizar a tampa da<br />
bateria <strong>de</strong> novo para a sua posição.<br />
2. Colocar o microtelefone na base, e <strong>de</strong>ixá-lo a carregar durante pelo menos 24 horas.<br />
Certificar que está colocado na posição correcta. Quando o microtelefone estiver<br />
carregado, é visualizado o símbolo.<br />
3. Após 24 horas, ligar o cabo do telefone na base e na tomada <strong>de</strong> pare<strong>de</strong> <strong>de</strong> telefone.<br />
Definir Data e Hora<br />
Se subscrever para o seu telefone o serviço do operador ID do Chamador, a data e a<br />
hora serão automaticamente <strong>de</strong>finidas em todos os microtelefones após cada chamada<br />
recebida.<br />
Se não tiver subscrito este serviço, a data e a hora po<strong>de</strong>m ser <strong>de</strong>finidas manualmente.<br />
6. Premir ‘MENU/OK’, <strong>de</strong>pois ▼ para exibir ‘CLOCK/ALARM’.<br />
7. Premir ‘MENU/OK’: o ecrã exibe ‘SET TIME’.<br />
8. Introduzir a data no formato DD/MM. Ex.: 04-08 para 4 Agosto<br />
9. Premir MENU/OK’, e introduzir a hora em 24-horas, formato HH: MM Ex.: Por<br />
exemplo, 14-45 para 14:45 ou 2:45.<br />
10. Premir ‘MENU/OK’ para confirmar, ou premir para voltar ao modo em<br />
espera.<br />
Falha <strong>de</strong> energia<br />
Se a energia falhar, po<strong>de</strong> apenas usar a base para receber e efectuar chamadas. O<br />
telefone tocará quando há uma chamada a entrar, mas o ecrã não ficará iluminado, e a<br />
ID do Chamador não será guardada na lista <strong>de</strong> chamadas. Não lhe será possível utilizar<br />
as outras funções da base ou o microtelefone até que a energia eléctrica seja reposta.<br />
22
Imagem<br />
27. AUSCULTADOR<br />
28. TECLA PARA CIMA<br />
Acesso aos números telefónicos. Deslocar para cima através das opções.<br />
Aumenta o volume no auscultador.<br />
29. RESPONDER<br />
Modo Em ESPERA / MARCAÇÃO PREPARATÓRIA: efectua uma chamada.<br />
Lista <strong>de</strong> remarcação / registo chamada / lista telefónica: efectua uma cahamada<br />
para um contacto seleccionado.<br />
Quando o telefone está a tocar: respon<strong>de</strong> a uma chamada,<br />
30. TECLA DE FIM DE CHAMADA<br />
Durante uma chamada: termina a chamada e volta ao modo em espera. Ligar e<br />
<strong>de</strong>sligar o microtelefone.<br />
23
Imagem<br />
31. TECLA PARA BAIXO<br />
Ace<strong>de</strong> à lista <strong>de</strong> chamadas recebidas. Deslocar para baixo através das opções.<br />
Reduz o volume no auscultador.<br />
32. OK/MENU<br />
Ace<strong>de</strong> ao menu e às suas várias opções.<br />
Confirma a selecção.<br />
33. TECLA C<br />
Rechamar. Voltar ao menu anterior. Apaga um erro quando da digitação <strong>de</strong> um<br />
número ou nome.<br />
34. INT<br />
Tecla <strong>de</strong> intercomunicador: Efectua uma chamada interna para outro<br />
microtelefone.<br />
35. Teclado Numérico<br />
36. TECLA * Bloqueia o teclado (premir <strong>de</strong>moradamente)<br />
37. TECLA #<br />
Premir e manter premido: <strong>de</strong>sactiva a campainha do telefone.<br />
38. MICROFONE<br />
39. COMPARTIMENTO DAS BATERIAS<br />
O. TECLA DE RECHAMADA<br />
P. INTERCOMUNICADROR / PREMIR DEMORADAMENTE PARA REGISTO<br />
Q. TECLA SEM SOM<br />
R. AUMENTAR O VOLUME<br />
S. DIMINUIR O VOLUME<br />
T. TECLA DE REMARCAÇÃO no TE 301 / LIGAR-PAUSA no TE 352<br />
U. MÃOS LIVRES<br />
24
Telefonar<br />
Efectuar uma chamada<br />
Premir e marcar o número.<br />
Ou po<strong>de</strong> usar o modo 'preparatory dialling' para introduzir um número e confirmá-lo<br />
antes <strong>de</strong> efectuar a chamada.<br />
Introduzir o número <strong>de</strong> telefone, e premir ou na base para marcar o número. Ao<br />
premir , é efectuada uma chamada 'HANDSFREE' . Premir 'C' para apagar se fizer<br />
um erro.<br />
Respon<strong>de</strong>r a uma chamada<br />
Quando o microtelefone toca, levantar o auscultador ou premir<br />
chamada.<br />
Ajustamento do Volume<br />
para respon<strong>de</strong>r à<br />
Durante uma chamada, premir ▲ ou ▼ no microtelefone ou na base para ajustar o<br />
volume do auscultador ou do microfone.<br />
O nível do som é exibido no ecrã.<br />
Terminar uma chamada<br />
Premir .<br />
Lista Telefónica<br />
O TELEFUNKEN TE 301 po<strong>de</strong> memorizar até 80 nomes e números.<br />
Os números po<strong>de</strong>m ter até 20 dígitos, e os nomes até 12 letras. As entradas são por<br />
or<strong>de</strong>m alfabética.<br />
Adicionar um contacto<br />
1. Premir ‘MENU/OK’. aparecerá ‘PHONEBOOK’.<br />
2. Premir ‘MENU/OK’. aparecerá ‘ENTER NAME’.<br />
3. Introduzir o nome, <strong>de</strong>pois premir ‘MENU/OK’.<br />
4. Premir ‘MENU/OK’. aparecerá ‘ADD NUM.’.<br />
5. Introduzir o número. Premir ‘MENU/OK’ para confirmar.<br />
6. Premir para voltar ao modo em espera.<br />
25
Lista Telefónica<br />
Po<strong>de</strong> anular uma nova entrada que estiver a introduzir premindo em qualquer momento<br />
.<br />
Adicionar um contacto<br />
1. Premir ▲.<br />
2. Premir ▲ ou ▼ para seleccionar a entrada a apagar, e premir ‘MENU/OK’.<br />
3. Premir ▲ ou ▼ para seleccionar ‘DEL. NUM’, e premir ‘MENU/OK’.<br />
4. Premir para voltar ao modo em espera.<br />
Apagar todos os contactos<br />
1. Premir ‘MENU/OK’ três vezes.<br />
2. Premir ▼ para seleccionar ‘DEL. ALL’, <strong>de</strong>pois premir ‘MENU/OK’.<br />
3. O ecrã pergunta ‘CONFIRM?’. Premir ‘MENU/OK’.<br />
4. Premir para voltar ao modo em espera.<br />
Reiniciar o seu Telefone<br />
Reiniciar permite-lhe voltar às <strong>de</strong>finições padrão do telefone.<br />
1. Premir ‘MENU/OK’ e ▼ para exibir ‘BS SETUP, <strong>de</strong>pois premir <strong>de</strong> novo ‘MENU/OK’ .<br />
2. Premir ▼ para seleccionar ‘ADVANCE SET: Premir ‘MENU/OK’.<br />
3. Introduzir o seu código PIN (padrão é 0000) e premir ‘MENU/OK’<br />
4. Premir ▼ para seleccionar ‘DEFAUT Premir ‘MENU/OK’.<br />
5. O ecrã pergunta ‘CONFIRM?’. Premir ‘MENU/OK’.<br />
26
Aten<strong>de</strong>dor <strong>de</strong> Chamadas<br />
O aten<strong>de</strong>dor <strong>de</strong> chamadas do seu TE 352 regista chamadas não atendidas quando está<br />
activado. Po<strong>de</strong> registar até 99 mensagens para um tempo <strong>de</strong> gravação total <strong>de</strong> 15<br />
minutos. Cada mensagem po<strong>de</strong> durar 9 minutos. A sua saudação po<strong>de</strong> durar 1 minuto.<br />
Cada mensagem po<strong>de</strong> durar 1 minuto.<br />
Colocar o aten<strong>de</strong>dor <strong>de</strong> chamadas em funcionamento a partir da base<br />
REPRODUZIR/PAUSA: Inicia ou pára a reprodução da mensagem.<br />
Modo <strong>de</strong> resposta<br />
Existem duas mensagens pré-gravadas e po<strong>de</strong> também gravar a sua própria saudação.<br />
Respon<strong>de</strong>r e Gravar<br />
O chamador po<strong>de</strong> <strong>de</strong>ixar uma mensagem. A mensagem pré-gravada é "Hello, I cannot<br />
answer you right now; please leave a message after the beep"<br />
Só anunciar<br />
O chamador ouve a sua saudação mas não po<strong>de</strong> <strong>de</strong>ixar uma mensagem. A mensagem<br />
pré-gravada é "Hello, I cannot answer you right now and you cannot leave a message,<br />
please call again later"<br />
Gravar, ouvir ou apagar o seu anúncio<br />
1. Premir ‘MENU/OK’ duas vezes para seleccionar ANS MACHINE e premi-lo <strong>de</strong> novo<br />
<strong>de</strong>pois <strong>de</strong> o número <strong>de</strong> mensagens ser exibido.<br />
2. Deslocar usando ▲ ou ▼ para ANSWER e premir MENU/OK para activar ou<br />
<strong>de</strong>sactivar o aten<strong>de</strong>dor <strong>de</strong> chamadas.<br />
3. Deslocar usando ▲ ou ▼para seleccionar DELETE ALL e premir MENU/OK para<br />
apagar todas as mensagens <strong>de</strong> voz.<br />
4. Deslocar usando ▲ ou ▼para seleccionar ANNOUNCE ONLY e premir MENU/OK<br />
se preten<strong>de</strong>r que o chamador oiça uma mensagem pré-gravada mas não <strong>de</strong>sejar <strong>de</strong>ixar<br />
uma mensagem.<br />
5. Deslocar usando ▲ ou ▼para seleccionar OGM 1 ou OGM 2 e premir MENU/OK<br />
para seleccionar / ouvir / apagar / gravar mensagem pré-gravada 1 ou 2.<br />
6. Deslocar usando ▲ ou ▼para seleccionar RING DELAY e premir MENU/OK para<br />
escolher o número <strong>de</strong> toques antes do chamador ouvir a mensagem pré-gravada.<br />
7. Deslocar usando ▲ ou ▼para seleccionar LANGUAGE e premir MENU/OK para<br />
escolher o idioma da mensagem pré-gravada.<br />
8. Deslocar usando ▲ ou ▼para seleccionar PASSWORD e premir MENU/OK para<br />
<strong>de</strong>finir a palavra-passe do seu aten<strong>de</strong>dor <strong>de</strong> chamadas.<br />
27
Intercomunicador<br />
Para estabelecer uma chamada com outro microtelefone: premir o botão<br />
Intercomunicador no microtelefone seguido pelo número do microtelefone que preten<strong>de</strong><br />
chamar (por ex. Premir Intercom 1 fará a comunicação com o microtelefone 1, premir o<br />
Intercom * comunicaria com todos HS), qualquer microtelefone registado nessa base<br />
tocará com a melodia do Intercomunicador e premir no Microtelefone iniciará a<br />
chamada.<br />
Garantia<br />
Este telefone tem uma garantia <strong>de</strong> 24 meses, a começar da data em que o telefone foi<br />
adquirido.<br />
Para mais informação sobre a aplicabilida<strong>de</strong> <strong>de</strong>sta garantia, <strong>de</strong>ve consultar as<br />
instruções completas disponíveis na página internet www.telefunken-digital.com.<br />
Contacto Após-Venda<br />
No caso <strong>de</strong> um problema técnico, po<strong>de</strong> contactar o nosso serviço após-venda.<br />
assistance@sopeg.fr ou +34 687035185.<br />
28
TELEFUNKEN TE 300 Epok<br />
Digital cordless phone<br />
ENGLISH<br />
29
Activation<br />
Important information<br />
This document is only a quick-start gui<strong>de</strong>. Full operating instructions are available on the<br />
website www.telefunken-digital.com.<br />
Box contents<br />
• 1 cordless handset<br />
• 1 base<br />
• 1 power adapter<br />
• 1 telephone cord<br />
• 2 AAA NiMh mAh rechargeable batteries<br />
• 1 quick start gui<strong>de</strong><br />
Language<br />
The <strong>de</strong>fault language of the TE 301 and the TE 352 is French. To change the language:<br />
• Press ‘MENU/OK’, and scroll using ▲ or ▼ to REGLAGES COMBINE<br />
• Press ‘MENU/OK’, and scroll using ▲ or ▼ to LANGUE<br />
• Press ‘MENU/OK’, and scroll using ▲ or ▼ to choose the appropriate language and<br />
press ‘MENU/OK’ to validate.<br />
Locating the Base<br />
A site should be chosen with the following characteristics:<br />
• A flat and stable surface<br />
• At most 1.5 meters from a power outlet and a telephone jack<br />
• At least 1 meter from any other electronic appliance to avoid interference<br />
• Out of direct sunlight and a sufficient distance from any heat source<br />
• Away from any wet or damp area, such as a bathroom<br />
Your TELEFUNKEN telephone has a range of 300m outdoors when there is a clear line<br />
of sight between the base and the handset.<br />
Any obstacle between the base and the handset seriously reduces the range.<br />
If the base is indoors and the handset is either indoors or outdoors, the range is up to<br />
50m. Very thick walls can affect the range.<br />
30
Activation<br />
Connection<br />
Base<br />
Plug the transparent connector of the power adapter into the place marked un<strong>de</strong>rneath<br />
the base, and plug the other end into a wall outlet.<br />
Handset<br />
1. Insert the 2 AAA NiMH batteries supplied into the handset. Sli<strong>de</strong> the battery<br />
compartment cover back into place.<br />
2. Place the handset in the base, and leave it to charge for at least 24 hours. Make sure<br />
it is inserted in the right direction. When the handset is charged, the symbol is<br />
displayed.<br />
3. After 24 hours, plug the telephone cord into the base and into the telephone wall jack.<br />
Set Date and Time<br />
If you subscribe to your telephone operator’s Caller ID service, the date and time will be<br />
automatically set on all the handsets upon each call received.<br />
If you do not subscribe to this service, you can set the date and time manually.<br />
11. Press ‘MENU/OK’, then ▼ to display ‘CLOCK/ALARM’.<br />
12. Press ‘MENU/OK’: the screen displays ‘SET TIME’.<br />
13. Enter the date in DD/MM format. Ex.: 04-08 for 4 August.<br />
14. Press ‘MENU/OK’, and enter the time in 24-hour, HH: MM format. Ex.: For<br />
example, 14-45 for 14:45 or 2:45pm.<br />
15. Press ‘MENU/OK’ to confirm, or press to return to standby mo<strong>de</strong>.<br />
Power outage<br />
If the power goes out, you can only use the base to receive and make calls. The<br />
telephone will ring when a call comes in, but the screen will not illuminate, and caller ID<br />
will not be saved to the calls list. You will not be able to use the other features of the base<br />
or the handset until power is restored.<br />
31
Illustration<br />
40. EARPIECE<br />
41. UP KEY<br />
Accesses the repertory. Scrolls upward through options. Raises the volume in the<br />
earpiece.<br />
42. ANSWER<br />
In STANDBY / PREPARATORY DIALLING mo<strong>de</strong>: makes a call.<br />
Redial list / call log / phonebook: makes a call to the selected contact.<br />
When the telephone is ringing: answers a call.<br />
43. END CALL KEY<br />
During a call: ends the call and returns to standby mo<strong>de</strong>. Turns the handset on/off.<br />
32
Illustration<br />
44. DOWN KEY<br />
Accesses the list of calls received. Scrolls downward through options. Lowers the<br />
volume in the earpiece.<br />
45. OK/MENU<br />
Accesses the menu and its various options.<br />
Confirms a selection.<br />
46. C KEY<br />
Recall. Returns to the previous menu. Deletes a mistake when typing a number or<br />
a name.<br />
47. INT<br />
Intercom key Makes an internal call to another handset.<br />
48. Numerical Keypad<br />
49. * KEY Locking the keypad (long press)<br />
50. # KEY<br />
Press and hold: <strong>de</strong>activates the ringer.<br />
51. MICROPHONE<br />
52. BATTERIES CASE<br />
V. RECALL KEY<br />
W. INTERCOM / LONG PRESS TO REGISTRATION<br />
X. MUTE KEY<br />
Y. INCREASE THE VOLUME<br />
Z. DECREASE THE VOLUME<br />
AA. REDIAL KEY on TE 301 / PLAY-PAUSE on TE 352<br />
BB. HANDFREE<br />
33
Telephoning<br />
Making a Call<br />
Press and dial the number.<br />
Or you can use 'preparatory dialling' mo<strong>de</strong> to enter a number and check it before making<br />
the call.<br />
Enter the telephone number, and press or on the base to dial the number. By<br />
pressing , a 'HANDSFREE' call is ma<strong>de</strong>. Press 'C' to <strong>de</strong>lete if you make a mistake.<br />
Answering a Call<br />
When the handset rings, pick up the handset or press<br />
Adjusting the Volume<br />
to answer the call.<br />
During a call, press ▲ or ▼ on the handset or on the base to adjust the earpiece or<br />
speaker volume.<br />
The sound level is shown on the screen.<br />
Ending a Call<br />
Press .<br />
Phonebook<br />
The TELEFUNKEN TE 301 can store up to 80 names and numbers.<br />
The numbers can have up to 20 digits, and names can have up to 12 letters. Entries are<br />
in alphabetical or<strong>de</strong>r.<br />
Adding a contact<br />
1. Press ‘MENU/OK’. ‘PHONEBOOK’ will appear.<br />
2. Press ‘MENU/OK’. ‘ENTER NAME’ appears.<br />
3. Enter the name, then press ‘MENU/OK’.<br />
4. Press ‘MENU/OK’. ‘ADD NUM.’ appears.<br />
5. Enter the number. Press ‘MENU/OK’ to confirm.<br />
6. Press to return to standby mo<strong>de</strong>.<br />
34
Phonebook<br />
You can cancel a new entry you are inputting by pressing at any time.<br />
Deleting a contact<br />
1. Press ▲.<br />
2. Press ▲ or ▼ to select the entry to <strong>de</strong>lete, and press ‘MENU/OK’.<br />
3. Press ▲ or ▼ to select ‘DEL. NUM’, and press ‘MENU/OK’.<br />
4. Press to return to standby mo<strong>de</strong>.<br />
Deleting all contacts<br />
1. Press ‘MENU/OK’ three times.<br />
2. Press ▼ to select ‘DEL. ALL’, then press ‘MENU/OK’.<br />
3. The screen asks ‘CONFIRM ?’. Press ‘MENU/OK’.<br />
4. Press to return to standby mo<strong>de</strong>.<br />
Resetting Your Telephone<br />
Resetting lets you return to the telephone’s <strong>de</strong>fault settings.<br />
1. Press ‘MENU/OK’ and ▼ to display ‘BS SETUP, then press ‘MENU/OK’ again.<br />
2. Press ▼ to select ‘ADVANCE SET’. Press ‘MENU/OK’.<br />
3. Enter your PIN co<strong>de</strong> (<strong>de</strong>fault is 0000) and press ‘MENU/OK’<br />
4. Press ▼ to select ‘DEFAULT’. Press ‘MENU/OK’.<br />
3. The screen asks ‘CONFIRM ?’. Press ‘MENU/OK’.<br />
35
Answering Machine<br />
The answering machine of your TE 352 records missed calls when it is enabled. It can<br />
record up to 99 messages for a total recording time of 15 minutes. Each message can<br />
last 9 minutes. Your greeting can last 1 minute.<br />
Operating the answering machine from the base<br />
PLAY/PAUSE : Start or stop message playback<br />
Answer mo<strong>de</strong><br />
There are two pre-recor<strong>de</strong>d messages and you can also record your own greeting.<br />
Answer & record<br />
The caller can leave a message. The pre-recor<strong>de</strong>d message is "Hello, I cannot answer<br />
you right now; please leave a message after the beep"<br />
Announce only<br />
The caller hears your greeting but cannot leave a message. The pre-recor<strong>de</strong>d message<br />
is "Hello, I cannot answer you right now and you cannot leave a message, please call<br />
again later"<br />
Record, listen to or <strong>de</strong>lete your announce<br />
1. Press ‘MENU/OK’ two times to select ANS MACHINE and press it again after the<br />
number of messages is displayed.<br />
2. Scroll using ▲ or ▼ to ANSWER and press MENU/OK to activate or <strong>de</strong>sactivate the<br />
answering machine.<br />
3. Scroll using ▲ or ▼to select DELETE ALL and press MENU/OK to <strong>de</strong>lete all the<br />
voice mails.<br />
4. Scroll using ▲ or ▼to select ANNOUNCE ONLY and press MENU/OK if you want the<br />
caller to hear a pre-recor<strong>de</strong>d message but not to leave a message.<br />
5. Scroll using ▲ or ▼to select OGM 1 or OGM 2 and press MENU/OK to select / listen<br />
/ erase / record pre-recor<strong>de</strong>d message 1 or 2.<br />
6. Scroll using ▲ or ▼to select RING DELAY and press MENU/OK to choose the<br />
number of ring before the caller can hear the pre-recor<strong>de</strong>d message.<br />
7. Scroll using ▲ or ▼to select LANGUAGE and press MENU/OK to choose the<br />
language of the pre-recor<strong>de</strong>d message.<br />
8. Scroll using ▲ or ▼to select PASSWORD and press MENU/OK to set a password to<br />
your answering machine.<br />
36
Intercom<br />
To establish a call with another handset: press the Intercom button on the headset<br />
followed by the number of the headset you would like to call (for eg. Press Intercom 1<br />
would intercom headset 1, press Intercom * would intercom all HS), any handset<br />
registered to that base will ring with Intercom melody and press on Handset would<br />
initiate the call.<br />
Warranty<br />
This telephone comes with a 24-month warranty, starting from the date the phone was<br />
purchased.<br />
For more information on the applicability of this warranty, please refer to the full<br />
operating instructions available on the website www.telefunken-digital.com<br />
After-Sales Service Contact<br />
In the event of a technical problem, feel free to contact our after-sales service.<br />
assistance@sopeg.fr or +33 (0) 545 608 251 (International number)<br />
37