You also want an ePaper? Increase the reach of your titles
YUMPU automatically turns print PDFs into web optimized ePapers that Google loves.
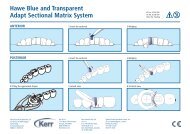
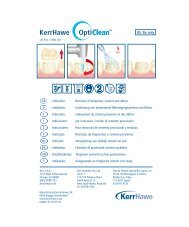
All Indirect Restorations (excluding Veneers)<br />
1. Remove provisional restoration.<br />
2. Use OptiClean rotary instrument, or your<br />
choice of cleaning method, to remove<br />
temporary cement and residue from<br />
preparation area. Rinse thoroughly.<br />
3. Air dry preparation (do not desiccate).<br />
4. Try in restoration to ensure proper fit.<br />
5. Select desired shade of cement.<br />
6. Bleed cartridge before initial use. Place<br />
appropriate mixer on dual syringe cartridge.<br />
Mixer with wide opening is only for use with<br />
curved tips.<br />
Dispensing of the material can be done as<br />
follows:<br />
Inlay/Onlay – Dispense the cement directly into<br />
cavity preparation covering all surfaces. Seat<br />
restoration gently onto tooth prep, allowing the<br />
cement to flow from all sides.<br />
Crown – Dispense the cement directly into<br />
restoration or tooth prep, covering all surfaces.<br />
Seat restoration gently onto tooth prep, allowing<br />
the cement to flow from all margins.<br />
Post – Prepare post space. Size and fit post.<br />
Dispense the cement onto post or directly into<br />
canal space. Seat post and vibrate slightly to<br />
avoid trapped air. Allow the cement to slowly<br />
flow from canal space.<br />
7. When restoration is properly seated, remove<br />
excess cement. Excess cement is best<br />
removed in its gel state with a scaler or<br />
explorer. Gel state can be achieved by tackcuring<br />
excess with a light for approximately<br />
2 seconds, or by allowing the cement to<br />
self-cure for approximately 2-3 minutes<br />
after application.<br />
8. After removal of excess cement, light cure<br />
all surfaces including margins using Demi<br />
curing light for 10 seconds. See footnote for<br />
recommended curing times for other curing<br />
light models. [1]<br />
9. Use finishing strips for proximal<br />
areas. Polish margins with Gloss Plus discs,<br />
cups, or points. Use HiLusterPlus polishers<br />
for a final high luster shine.<br />
10. Check occlusion.