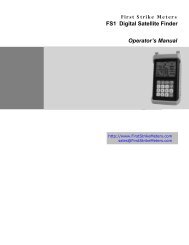
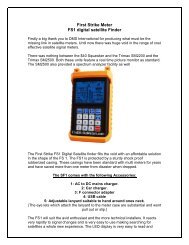
First Strike Meters FS1 Digital Satellite Finder Operator's Manual
First Strike Meters FS1 Digital Satellite Finder Operator's Manual
First Strike Meters FS1 Digital Satellite Finder Operator's Manual

Create successful ePaper yourself
Turn your PDF publications into a flip-book with our unique Google optimized e-Paper software.
Model: <strong>FS1</strong><br />
Fir s t S trike Met er s<br />
<strong>FS1</strong> <strong>Digital</strong> <strong>Satellite</strong> <strong>Finder</strong><br />
Operator’s <strong>Manual</strong><br />
http://www.<strong>First</strong><strong>Strike</strong><strong>Meters</strong>.com<br />
sales@<strong>First</strong><strong>Strike</strong><strong>Meters</strong>.com
<strong>FS1</strong> http://www.<strong>First</strong><strong>Strike</strong><strong>Meters</strong>.com<br />
Object 1<br />
To ensure safe operation and maximum benefit from the features of this device, please read this<br />
manual carefully prior to initial use. Para garantizar la operación segura y el máximo beneficio de<br />
las características de este dispositivo, por favor, lea atentamente este manual antes de su uso<br />
inicial.<br />
The technical specifications and operating methods included in this manual are subject to changes<br />
without notice. Las especificaciones técnicas y los métodos de explotación incluida en este manual<br />
están sujetos a cambios sin previo aviso. In case of any inquires after a period of usage, please<br />
consult the manufacturer. En caso de cualquier pregunta después de un período de uso, consulte<br />
con el fabricante.<br />
WARNNING WARNNING<br />
Make certain that the battery is<br />
fully charged before the first using<br />
of the meter.<br />
Warning: The meter is powered<br />
with high-performance Li-ion<br />
battery. Use only the charger<br />
provided by the manufacturer.<br />
Using any other battery charger<br />
may overheat or distort the meter,<br />
or cause fire, injury or harm to the<br />
environment and will void the<br />
warranty.<br />
Inspect the instrument, box and packing material prior to use to verify that damage has not occurred in transit to<br />
your location. Inspeccione el instrumento, la caja y material de embalaje antes de su uso para verificar que el<br />
daño no se ha producido en el tránsito hasta su ubicación. Verify that all listed accessories are included with<br />
your unit, and that the unit is functioning properly. In the event of improper operation, or that items are missing or<br />
damaged, please contact your distributor immediately. Compruebe que todos los accesorios se han incluido con<br />
la unidad, y que la unidad está funcionando correctamente. En caso de funcionamiento incorrecto, o que<br />
artículos faltan o están dañados, por favor, contacte con su distribuidor inmediatamente.<br />
Battery Notice: Aviso de la batería:<br />
CAUTION<br />
RISK OF ELECTRIC SHOCK<br />
DO NOT OPEN<br />
Do not expose to, dispose of the battery in fire. No exponer a, a disponer de la batería en el fuego.<br />
Avoid shorting the battery. Evite el cortocircuito de la batería.<br />
Avoid excessive physical shock or vibration. Evitar un choque físico excesivo o vibraciones.<br />
!<br />
Page 1 of 14<br />
This extended warranty program<br />
will not cover physical and nonphysical<br />
damages, which include<br />
accident, use of supplies or parts<br />
not meeting the product's<br />
specifications, misuse other<br />
software application, damage due<br />
to shipment, neglect, fire, water,<br />
lightning, or other acts of nature,<br />
unauthorized product modification,<br />
removal, installation and set-up<br />
service charges by any third party,<br />
and failure to follow instructions<br />
supplied with the product.
<strong>FS1</strong> http://www.<strong>First</strong><strong>Strike</strong><strong>Meters</strong>.com<br />
Do not disassemble or deform the battery. No desmonte ni deformar la batería.<br />
Do not leave battery in charger over 12 hours. No deje la batería en el cargador de más de 12 horas.<br />
Store the battery in a cool, dry and well-ventilated area. Almacene la batería en un área ventilada fresco, seco y<br />
bien.<br />
Keep battery packs away from children. Mantenga baterías lejos de los niños.<br />
Promptly and properly dispose of used battery packs according to local regulations for the disposal of batteries.<br />
Rápidamente y como deshacerse de los paquetes de pilas usadas de acuerdo a las normativas locales para la<br />
eliminación de las pilas.<br />
Damaged or leaking battery packs should be handled with extreme care. Dañados o con fugas paquetes de<br />
baterías se deben manejar con extremo cuidado.<br />
Charge unused battery packs at least once every six months. Cargue la batería sin utilizar paquetes de al<br />
menos una vez cada seis meses.<br />
Charger Notice: Cargador de Comunicación:<br />
Charge the battery packs only with the specified charger. Carga de la batería paquetes sólo con el cargador<br />
especificado.<br />
Never use a modified or damaged charger. Nunca utilice un cargador modificado o dañado.<br />
We recommend that Li-Ion batteries should be charged in an unoccupied area. Recomendamos que las baterías<br />
Li-Ion se debe cargar en una zona no ocupada.<br />
Do not charge battery packs near combustible or conductive materials. No cargue paquetes de baterías cerca<br />
de materiales combustibles o conductores.<br />
Charge the battery packs in a well-ventilated room that does not exceed room temperatures of 40ºC/104ºF.<br />
Carga de la batería paquetes en un lugar bien ventilado que no exceda de la temperatura ambiente de 40 º<br />
C/104 º F.<br />
Accessories Accesorios<br />
AC Adaptor Adaptador de CA<br />
Car charger Cargador de coche<br />
RF connector Conector RF<br />
USB cable Cable USB<br />
User manual <strong>Manual</strong> de usuario<br />
Li-ion battery Li-Ion<br />
INDEX ÍNDICE<br />
Accessories...................................<br />
2<br />
Page 2 of 14
<strong>FS1</strong> http://www.<strong>First</strong><strong>Strike</strong><strong>Meters</strong>.com<br />
INDEX..............................................................3<br />
Overview: ......................................................... 4<br />
Screen instructions: ............................................ 4<br />
Panel introduction: ............................................. 7<br />
Start using your meter. ....................................... 9<br />
4-1. Power on/off: .............................................. 9<br />
4-2. Enter the coordinates of your location. ............ 9<br />
4-3. <strong>Manual</strong>ly Searching <strong>Satellite</strong> ....................... 10<br />
4.4 Using default channel plan. ........................... 13<br />
4.5 Using user channel plan. .............................. 13<br />
4.6 Copy a channel from default channel plan to the user channel plan... 14<br />
4.7 Modify channels in both default & user channel plan. 14<br />
4.8 Delete channel in the user channel plan. ......... 14<br />
4.9 Restore factory settings. .............................. 15<br />
4.10 Upgrades: ................................................ 15<br />
4.11 Charging by satellite receiver: ..................... 15<br />
Technical parameters ....................................... 16<br />
Overview: Información general:<br />
<strong>FS1</strong> <strong>Satellite</strong> <strong>Finder</strong> is an ideal instrument for satellite installation. <strong>FS1</strong> <strong>Satellite</strong> <strong>Finder</strong> es un instrumento ideal<br />
para la instalación de satélite. It reacts fast, works reliably, the easy-to-use features can really make satellite<br />
searching a easy job. Reacciona rápido, funciona de manera confiable, el fácil de utilizar características<br />
realmente puede hacer vía satélite buscar un trabajo fácil.<br />
The meter calculates the elevation and polarization automatically and show in the display, according to your<br />
location and satellite's longitude. El contador calcula la elevación y la polarización de forma automática y<br />
mostrar en la pantalla, de acuerdo a su ubicación y la longitud del satélite.<br />
The meter comes with the global data of satellite channel plan, you can also download channel plan data via PC<br />
or edit the user-defined channel plan which can save up to 100 satellite parameters. El medidor viene con los<br />
datos globales del plan de canal satélite, se puede también descargar los datos del plan de canales a través de<br />
PC o editar el definido por el usuario del canal plan que se pueden guardar hasta 100 parámetros de satélite.<br />
Screen instructions: Instrucciones de la pantalla:<br />
Screen instructions: Fig.1 Instrucciones de la pantalla: Figura 1<br />
Fig.1 Fig.1<br />
Page 3 of 14
<strong>FS1</strong> http://www.<strong>First</strong><strong>Strike</strong><strong>Meters</strong>.com<br />
(1) Positioning guide zone: (1) Posicionamiento de la zona de guía:<br />
A:Indicates the azimuth direction. A: Indica la dirección del azimut.<br />
E:Indicates the degree of elevation E: Indica el grado de elevación<br />
P: Indicates the LNB polarization angle P: Indica el ángulo de polarización de LNB<br />
(2) <strong>Satellite</strong> settings zone: (2) ajustes de satélite de zona:<br />
L: <strong>Satellite</strong> longitude L: longitud satélite<br />
F: Transponder frequency F: frecuencia del transpondedor<br />
SR: Symbol rate SR: Velocidad de símbolo<br />
LO: Local oscillator frequency LO: frecuencia del oscilador local<br />
LNB: 13V(vertical) or 18V (horizontal) polarization switch LNB: 13V (vertical) o 18V (horizontal) cambiar la<br />
polarización<br />
22KHz Control: “ON” indicates on, blank indicates off. 22KHz de control: "ON", indica el, en blanco indica<br />
apagado.<br />
(3) Channel number zone: (3) Número de zona del canal:<br />
User channel plan can save 100 user-defined satellite parameters, you can also save frequently-used<br />
parameters here. Plan de canales El usuario puede ahorrar 100 parámetros definidos por satélite, también<br />
puede guardar los parámetros se utilizan con frecuencia aquí.<br />
Using and key select the channel. Uso de clave y seleccione el canal. The meter has preset the data of<br />
most satellite channel plans in the world, and reserves 300 empty channel plans. El medidor ha predefinido los<br />
datos de los planes de la mayoría de los canales por satélite en el mundo, y las reservas de 300 planes de<br />
canal vacíos.<br />
Inputting the longitude and latitude of your location, the meter will automatically select and display a channel that<br />
you can receive. Introducir la longitud y latitud de su ubicación, el medidor automáticamente seleccionar y<br />
mostrar un canal que puede recibir.<br />
(4) Latitude and longitude settings & functions zone: (4) Latitud y longitud y configuración de las funciones de<br />
zona:<br />
Page 4 of 14
<strong>FS1</strong> http://www.<strong>First</strong><strong>Strike</strong><strong>Meters</strong>.com<br />
LONG: Longitude LONG: Longitud<br />
LAT: Latitude LAT: Latitud<br />
: It blinks when pressing to indicate saved successfully. : Parpadea cuando se pulsa para indicar que<br />
se han guardado correctamente.<br />
:Indicates the mode of local channel plan. : Indica el modo de plan de canales locales.<br />
:Hold for 3 seconds until the symbol shows, indicating the speaker is off; Press and hold for 3 seconds<br />
again to turn on the speaker. : Mantenga la posición durante 3 segundos hasta que aparezca el símbolo, que<br />
indica el altavoz está apagado; Mantenga pulsado durante 3 segundos para encender el altavoz.<br />
:Linked with PC : Vinculada con el PC<br />
:Shows current battery status, blinks when the battery is low. : Muestra el estado actual de la batería,<br />
parpadea cuando la batería está baja.<br />
(5) Measurement zone: After setting satellite parameters, you should move cursor to channel number zone and<br />
press any numeric key from 0 to 9 to activate the measurement. (5) zona de medición: Después de ajustar los<br />
parámetros de satélite, debe mover el cursor a la zona del canal número y presione cualquier tecla numérica 0 a<br />
9 para activar la medida.<br />
S, Q column S, la columna Q<br />
S, Q column displays the signal strength and signal quality in percentage. S, Q columna muestra la intensidad<br />
de la señal y la calidad de la señal en porcentaje.<br />
S, S/N and B S, S / N y B,<br />
S:Actual value of signal strength S: valor real de la señal de la fuerza<br />
S/N: Carrier noise ratio S / N: ruido Carrier<br />
B: Bit error rate B: tasa de error de bit<br />
Indicates the signal has been locked. Indica que la señal ha sido bloqueada.<br />
Page 5 of 14
<strong>FS1</strong> http://www.<strong>First</strong><strong>Strike</strong><strong>Meters</strong>.com<br />
Panel introduction: Introducción de Control:<br />
Fig. Fig. 2 2<br />
1. Input port: The port to connect with LNB Puerto de entrada: El puerto para conectarse con LNB<br />
2. Output port: When the battery is low, connect this port with input port of satellite receiver, then turn on<br />
the receiver to supply power for meter and get signal input. El puerto de salida: Cuando la batería está<br />
baja, conecte este puerto con el puerto de entrada del receptor de satélite, a continuación, encienda el<br />
receptor a la fuente de alimentación para el metro y recibe la señal de entrada.<br />
(3) LCD: LCD display with backlight. (3) LCD: Pantalla LCD con luz de fondo.<br />
(4) Option Key & shift key between default and user-defined channel plans: (4) la tecla de opción y cambio de<br />
clave entre predeterminado y definido por el usuario planes de canales:<br />
Single-press, the cursor will move downwards circularly. Pulsar una sola vez, el cursor se moverá hacia abajo<br />
circularmente.<br />
Hold for 3 seconds, screen will shift between default and user-defined channel plans. Mantenga la posición<br />
durante 3 segundos, la pantalla cambiará entre predeterminado y definido por el usuario planes de canal.<br />
(5) Number digit key & backlight key: (5) Número de clave de dos dígitos y tecla de iluminación:<br />
Single-press: cursor moves left Single-prensa: mueve el cursor a la izquierda<br />
Hold for 3 seconds to turn on or turn off backlight. Mantenga la posición durante 3 segundos para activar o<br />
Page 6 of 14
<strong>FS1</strong> http://www.<strong>First</strong><strong>Strike</strong><strong>Meters</strong>.com<br />
desactivar la luz de fondo.<br />
(6) Number digit key & mute key: (6) Número de clave y clave silenciar dígitos:<br />
Single-press: cursor moves right Single-prensa: cursor se desplaza a la derecha<br />
Hold for 3 seconds to turn on (off) the speaker. Mantenga la posición durante 3 segundos para encender (OFF)<br />
el altavoz.<br />
(7) Save & delete key: (7) Guardar y eliminar clave:<br />
Press to save modified items. Pulse para guardar los elementos modificados.<br />
Hold for 3 seconds to delete the selected item. Mantenga la posición durante 3 segundos para eliminar el<br />
elemento seleccionado.<br />
(8) Load and unit key (8) y la clave de la unidad de carga<br />
Single-press: load parameters in local channel plan to user-defined channel plan. De prensa de un solo: los<br />
parámetros de carga en el plan de canales locales para el usuario plan de canales definidos.<br />
Hold for 3 seconds to shift among the measurement units dBuV, dBmV, dBm. Mantenga la posición durante 3<br />
segundos para cambiar entre las unidades de medida dBuV, dBmV, dBm.<br />
(9) Numeric Keys: Enter numbers from 0 to 9. (9) Teclas numéricas: Escriba los números del 0 al 9. When<br />
cursor is in channel number zone, press any nummeric key to start or stop the signal measurment. Cuando el<br />
cursor está en la zona del canal número, presione cualquier tecla nummeric para iniciar o detener la<br />
measurment señal.<br />
Hold “0” key for 3 seconds to enter local longitude & latitude modifying mode. Hold "0" durante 3 segundos para<br />
entrar en locales de longitud y latitud modificar el modo.<br />
(10) POWER: power on & power off key. (10) POWER: Encendido y apagado clave.<br />
(11) Data port to connect with PC (11) Puerto de datos para conectar con el PC<br />
(12) Charging port (12) Puerto de carga<br />
(13) Speaker (13) Speaker<br />
Start using your meter. Comience a usar su medidor.<br />
• 4-1. 4-1. Power on/off: Encendido / apagado:<br />
Hold the power key until the meter “beeps” and enters the main menu. Mantenga presionada la tecla de<br />
encendido hasta que el contador de "bips" y entra en el menú principal. Press the power key again to<br />
power off. Pulse la tecla de encendido de nuevo para que se apague.<br />
• 4-2. 4-2. Enter the coordinates of your location. Introduzca las coordenadas de su ubicación.<br />
Enter the latitude and longitude of your location. Introduzca la latitud y longitud de su ubicación.<br />
<strong>First</strong>, using key move cursor to channel number zone. En primer lugar, mover el cursor<br />
Page 7 of 14
<strong>FS1</strong> http://www.<strong>First</strong><strong>Strike</strong><strong>Meters</strong>.com<br />
utilizando clave para canalizar la zona de número. Make sure the measurement zone is blank,<br />
otherwise press any numeric key to quit the measurement mode. Asegúrese de que la zona de<br />
medición está en blanco, de lo contrario, pulse cualquier tecla numérica para salir del modo de<br />
medición. Then hold “0” key for 3 seconds, the cursor will move to the longitude and latitude<br />
setting zone. A continuación, ponga "0" durante 3 segundos, el cursor se moverá a la longitud y<br />
latitud configuración de la zona. As shown in Fig. Como se muestra en la figura. 3 3<br />
• Fig. Fig. 3 3<br />
For example: Enter longitude 117E , latitude 39N. Por ejemplo: Introduzca 117E longitud,<br />
latitud 39N.<br />
Using key move cursor to “LONG”,using or key select the number digit, and enter<br />
the number “117” when the cursor blinks. Uso de mover el cursor clave en "Largo", utilizando o<br />
tecla de selección del número de dos dígitos, e introduzca el número "117" cuando el cursor<br />
parpadea. Continuing to press or key until “E” or “W” blinks, press any key from 0 to 9<br />
to shift between “E” and “W”. Mantiene pulsada la tecla o la tecla hasta "E" o "W" parpadea,<br />
presione cualquier tecla 0 a 9 para cambiar entre "E" y "W".<br />
Using key move cursor to “LAT”, enter “39”. Uso de clave para mover el cursor "LAT",<br />
escribe "39". Continuing to press or key until “N” or “S” blinks, press any key from 0 to 9<br />
to shift between “N” and “S”. Mantiene pulsada la tecla o la tecla hasta que "N" o "S" parpadea,<br />
presione cualquier tecla 0 a 9 para cambiar entre "N" y "S".<br />
Hold “0” for 3 seconds to save and exit Hold "0" durante 3 segundos para guardar y salir<br />
• 4-3. 4-3. <strong>Manual</strong>ly Searching <strong>Satellite</strong> Búsqueda manual de satélite<br />
4-3-1. 4-3-1. Enter parameters: Introduzca los parámetros:<br />
In user channel plan, move cursor to channel number zone, press or to select an<br />
empty channel plan, pressing key to move cursor to L, F, SR, LO, LNB, 22KHz and enter the<br />
correct parameters one by one. En el plan de usuario del canal, mueva el cursor a la zona<br />
número de canales, pulse o para seleccionar un plan de canales vacíos, apretar la tecla para<br />
Page 8 of 14
<strong>FS1</strong> http://www.<strong>First</strong><strong>Strike</strong><strong>Meters</strong>.com<br />
mover el cursor a la L, M, SR, LO, LNB, 22KHz y entrar en los parámetros correctos, uno por<br />
uno.<br />
For example: Por ejemplo:<br />
Moving cursor to “L” and enter 146E: Moviendo el cursor a "L" y entrar 146E:<br />
Enter number when the digit blinks, using or key move the cursor. Introduzca el número<br />
cuando el dígito parpadea, utilizando la tecla o mover el cursor. When the cursor is at “hundred”<br />
it won't blink, directly enter “1”. Continuing to use or key move the cursor to “E” or<br />
“W”,when “E” or “W” blinks, press any numeric key from 0 to 9 to shift between “E” or “W”.<br />
Cuando el cursor se encuentra en "cien" que no parpadea, entrar directamente "1". Continuando<br />
con el uso o mover el cursor a la tecla "E" o "W", cuando "E" o "W" parpadea, pulse cualquier<br />
numérico clave de 0 a 9 para cambiar entre "E" o "W".<br />
When the cursor is at “LNB” or “22KHz”, use any numeric key to shift between the options.<br />
Cuando el cursor se encuentra en "LNB" o "22KHz", utilice cualquier tecla numérica para<br />
cambiar entre las opciones.<br />
After entering all parameters, press key to save. Después de introducir todos los<br />
parámetros, presione la tecla para guardar. The cursor moves to channel number area<br />
automatically and all parameters are saved into current channel successfully. El cursor se<br />
desplaza a la zona del número de canales de forma automática y todos los parámetros se<br />
guardan en el canal actual con éxito.<br />
Note: As “L” is entered, the meter will calculate elevation and polarization and display on the<br />
positioning guide zone, according to local longitude & latitude you have entered, provided the<br />
satellite program is available locally. Nota: Como en "L" se introduce, el medidor se calculará la<br />
altitud y la polarización y la presentación en la zona de guía de posicionamiento, de acuerdo con<br />
la latitud y longitud local que ha introducido, siempre que el programa de satélites está<br />
disponible localmente.<br />
4-3-2. 4-3-2. Signal measurement: La medición de la señal:<br />
Make sure the cursor is in the channel number zone, press any numeric key to launch signal test<br />
mode. Asegúrese de que el cursor se encuentra en la zona de número de canal, presione<br />
cualquier tecla numérica para iniciar el modo de prueba de señal. When the input port is<br />
connected with LNB, the meter will detect LNB noise and display the signal level, indicating the<br />
LNB is OK and connected well with the meter. Cuando el puerto de entrada está conectada con<br />
un LNB, el medidor detecta el ruido de LNB y mostrar el nivel de la señal, lo que indica el LNB<br />
está bien y bien conectados con el metro. As Fig.4 Como Fig.4<br />
Page 9 of 14
<strong>FS1</strong> http://www.<strong>First</strong><strong>Strike</strong><strong>Meters</strong>.com<br />
Fig. Fig. 4 4<br />
4-3-3. 4-3-3. Signal searching: Señal de la búsqueda:<br />
Turn the antenna in the direction the meter indicates, the tone will become louder and sharper.<br />
When the antenna is close to the satellite, the meter shows a increasing value of S/N and BER.<br />
Gire la antena en la dirección que el contador indica, el tono se vuelve más fuerte y nítida.<br />
Cuando la antena está cerca del satélite, el medidor muestra un incremento del valor de S / N y<br />
BER. As Fig. Como la figura. 5 5<br />
Fig. Fig. 5 5<br />
Continue to turn the antenna slowly in the direction that makes the S/N increase. Siga girando<br />
la antena lentamente en la dirección que hace que la S / N aumento. When the value is<br />
sufficient, the meter sounds a steady tone and show Cuando el valor es suficiente, el<br />
medidor emite un sonido constante y mostrar icon on the display. icono en la pantalla. As Fig.<br />
Como la figura. 6 6<br />
Fig. Fig. 6 6<br />
Continue to tune the antenna until the meter shows the maximum S/N value, now the antenna is<br />
in the best position. As Fig. Continuar con la melodía de la antena hasta que el medidor muestra<br />
Page 10 of 14
<strong>FS1</strong> http://www.<strong>First</strong><strong>Strike</strong><strong>Meters</strong>.com<br />
el máximo de S / valor N, ahora la antena está en la mejor posición. Como la figura. 7 7<br />
Fig. Fig. 7 7<br />
Note: In measurement mode, you can press or key to change the parameter of “F” item<br />
by 1MHz step. Nota: En el modo de medición, puede pulsar la tecla o para cambiar el<br />
parámetro de "F" por el tema 1MHz paso. Press key to save. Pulse la tecla para guardar.<br />
icon will blink when the battery is low, please charge the battery or connect to the STB as<br />
power supply, otherwise although the meter can still work it may not be able to supply power for<br />
the LNB. icono parpadea cuando la batería está baja, por favor cargue la batería o conectar con<br />
el STB como fuente de alimentación, de lo contrario, aunque el contador puede trabajar puede<br />
que no sea capaz de suministrar energía para la LNB.<br />
• 4.4 Using default channel plan. 4.4 Uso de plan de canales predeterminado.<br />
Hold key until shows at the lower right corner of screen, press or to change the<br />
channel number. Mantener pulsada la tecla hasta que se muestre en la esquina inferior derecha<br />
de la pantalla, pulse o para cambiar el número del canal. Press any numeric key to start testing.<br />
Pulse cualquier tecla numérica para iniciar la prueba.<br />
• 4.5 Using user channel plan. 4.5 Uso de plan de canales de usuario.<br />
In default channel plan, hold key until disappears. En el plan predeterminado de canales,<br />
mantenga pulsado la tecla hasta que desaparezca. The meter enters user channel plan mode.<br />
El medidor entra en modo de usuario del canal del plan. Press or to change channel<br />
number and press any numeric key to start testing. Pulse o para cambiar el número de canal y<br />
presione cualquier tecla numérica para iniciar la prueba.<br />
• 4.6 Copy a channel from default channel plan to the user channel plan. 4.6 Copia de un canal de<br />
plan por defecto del canal al plan de canal de usuario.<br />
In default channel plan mode, using and keys select the favorite channel and press<br />
key. En el modo por defecto del plan de canal, utilizando las teclas y seleccione el canal favorito<br />
y pulse la tecla. The meter displays in the lower right and the channel is copied to the<br />
user channel plan successfully. El medidor muestra en la parte inferior derecha y el canal se<br />
copia en el plan de canales de usuario con éxito.<br />
Page 11 of 14
<strong>FS1</strong> http://www.<strong>First</strong><strong>Strike</strong><strong>Meters</strong>.com<br />
• 4.7 Modify channels in both default & user channel plan. 4.7 Modificar los canales tanto en<br />
default & plan de canales de usuario.<br />
In the default or user channel plan mode, using key move the cursor to the item and modify<br />
it. En el defecto o el canal de modo de usuario plan, utilizando jugada clave del cursor hasta el<br />
elemento y modificarlo. Press key to save. Pulse la tecla para guardar. The meter displays<br />
in the lower right and the channel modification is saved successfully. El medidor muestra<br />
en la parte inferior derecha y la modificación de canales se guarda correctamente.<br />
In the default channel plan mode, the “L” item can't be modified. En el modo predeterminado de<br />
plan de canales, la "L", el tema no puede ser modificado.<br />
Above function can't be done in the test mode, press any numeric to switch out of test mode.<br />
Por encima de la función no se puede hacer en el modo de prueba, presione cualquier numérico<br />
para cambiar de modo de prueba.<br />
• 4.8 Delete channel in the user channel plan. 4.8 Borrar canal en el plan de canal de usuario.<br />
In the user channel plan mode, using and keys select the channel to be deleted and<br />
hold for 3 seconds to delete the channel. En el plan de canales en modo de usuario,<br />
utilizando las teclas y seleccione el canal que desea borrar y mantener durante 3 segundos para<br />
borrar el canal.<br />
• 4.9 Restore factory settings. 4.9 Restaurar configuraciones de fábrica.<br />
Type in 9876 immediately after power on, about 5 seconds later, the meter will restart and<br />
recover to factory settings. Tipo en 9876 inmediatamente después de encender, a unos 5<br />
segundos más tarde, el contador se reinicia y recuperar la configuración de fábrica. All saved<br />
and modified contents will loss. Todos están a salvo y los contenidos modificados pérdida.<br />
Please use this function carefully. Por favor, use esta función con cuidado.<br />
• 4.10 Upgrades: 4,10 Actualizaciones:<br />
Install the software provided in the product disk or downloaded from www.<strong>First</strong><strong>Strike</strong><strong>Meters</strong>.com,<br />
connect with PC with the communication cable. Instale el software proporcionado en el disco del<br />
producto o descargado de www.<strong>First</strong><strong>Strike</strong><strong>Meters</strong>.com, conecta con el PC con el cable de<br />
comunicación.<br />
• 4.11 Charging by satellite receiver: 4,11 de carga por el receptor de satélite:<br />
The input port of a satellite receiver can supply power for the meter. El puerto de entrada de un<br />
receptor de satélite puede suministrar energía para el metro. Connect the input port of satellite<br />
receiver with the output port of the meter. Conecte el puerto de entrada del receptor de satélite<br />
con el puerto de salida del medidor.<br />
AS Fig. Como indica la figura. 8 8<br />
Page 12 of 14
<strong>FS1</strong> http://www.<strong>First</strong><strong>Strike</strong><strong>Meters</strong>.com<br />
Fig. Fig. 8 8<br />
Above configuration is used only when the battery is low. Por encima de la configuración se<br />
utiliza sólo cuando la batería está baja.<br />
Technical parameters Parámetros técnicos<br />
Input frequency range: 950~2150MHz Rango de frecuencia de entrada: 950 ~ 2150 MHz<br />
Signal level range: 30dBuV-105dBuV Rango de nivel de señal: 30dBuV-105dBuV<br />
Measurement unit: dBmV; dBµV; dBm Unidad de medida: dBmV, dBμV, dBm<br />
Measurement accuracy: ±1.5dB Precisión de medida: ± 1.5dB<br />
Input resistance: 75Ω Resistencia de entrada: 75Ω<br />
Symbol rate: 2Msps-45Msps Velocidad de símbolo: 2MSPS-45Msps<br />
Connector: F type Conector: tipo F<br />
Measurement item: signal strength; bit error rate; S/N Punto de medición: intensidad de la señal,<br />
tasa de error de bit, S / N<br />
QPSK switch: Auto Interruptor QPSK: Auto<br />
22K control: supported 22K de control: el apoyo<br />
Audio output: speaker Salida de audio: Altavoz<br />
Display: Code segment wide-temperature LCD Presentación: Segmento de código de gran<br />
pantalla LCD de temperatura<br />
Memory content: 300 reserved locations for global satellite channels, 100 user-defined channels<br />
Contenido de la memoria: 300 lugares reservados para los canales mundiales de satélites, 100<br />
canales definidos por el usuario<br />
LNB Power Supply: 13V, 18V, ≤400mA LNB Power Supply: 13V, 18V, ≤ 400 mA<br />
Page 13 of 14
<strong>FS1</strong> http://www.<strong>First</strong><strong>Strike</strong><strong>Meters</strong>.com<br />
Interface mode: USB El modo de Interfaz: USB<br />
Adapter power supply:AC100V-240V Adaptador de alimentación: AC100V-240V<br />
DC input: 13.5V/2A Entrada de CC: 13.5V/2A<br />
Output port voltage: DC12-23V Voltaje del puerto de salida: DC12-23V<br />
Battery working time: about 2.5 hours continuously after full charged, varying from LNB with<br />
different power consumption. Duración de la Batería de trabajo: alrededor de 2,5 horas<br />
continuas después de plena carga, que varían de LNB con el consumo de energía diferentes.<br />
Charging time: 4 to 6 hours Tiempo de carga: 4 a 6 horas<br />
Working Temperature:0 ℃ ~40℃<br />
Temperatura de trabajo: 0 ℃ ~ 40 ℃<br />
Storage Temperature:-10 ℃ ~50℃<br />
Temperatura de almacenamiento: -10 ℃ ~ 50 ℃<br />
Dimensions: 142*82*35(mm) Dimensiones: 142 * 82 * 35 (mm)<br />
Weight: 0.42Kg Peso: 0,42 kg<br />
Gross weight:0.9 Kg Peso bruto: 0,9 Kg<br />
<strong>First</strong> <strong>Strike</strong> <strong>Meters</strong> sales@<strong>First</strong><strong>Strike</strong><strong>Meters</strong>.com www.<strong>First</strong><strong>Strike</strong><strong>Meters</strong>.com<br />
Page 14 of 14