MA223 (es_en) Instrucciones de montaje MA223 ... - Multi-Contact
MA223 (es_en) Instrucciones de montaje MA223 ... - Multi-Contact
MA223 (es_en) Instrucciones de montaje MA223 ... - Multi-Contact

You also want an ePaper? Increase the reach of your titles
YUMPU automatically turns print PDFs into web optimized ePapers that Google loves.
Advanced <strong>Contact</strong> Technology<br />
Tab. 1<br />
Tipo<br />
Type<br />
2,5mm 2<br />
L<br />
Longitud L (mm)<br />
L<strong>en</strong>gth L (mm)<br />
PV-BP3/4 6 – 7,5<br />
PV-SP3/4 6 – 7,5<br />
PV-BP3/6 8,5 – 9,5<br />
PV-SP3/6 8,5 – 9,5<br />
Q<br />
4mm 2<br />
6mm 2<br />
6<br />
7<br />
8<br />
9<br />
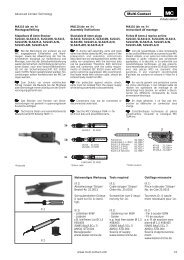
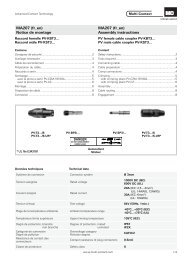
Preparación <strong>de</strong>l cable Cable preparation<br />
(ill. 6 / Tab. 1)<br />
Pelar el cable.<br />
Longitud <strong>de</strong> acuerdo con la Tab. 1<br />
At<strong>en</strong>ción:<br />
T<strong>en</strong>ga cuidado <strong>de</strong> no cortar ningún<br />
hilo.<br />
Nota:<br />
para obt<strong>en</strong>er instruccion<strong>es</strong> sobre<br />
cómo utilizar los alicat<strong>es</strong> pela cabl<strong>es</strong><br />
PV-AZM... y cómo cambiar las hojas<br />
<strong>de</strong> corte, consulte MA267<br />
www.multi-contact.com<br />
4 / 8 www.multi-contact.com<br />
(ill. 6 / Tab. 1)<br />
Strip cable insulation.<br />
L<strong>en</strong>gth according Tab. 1<br />
Att<strong>en</strong>tion:<br />
Take care not to cut individual<br />
strands.<br />
Note:<br />
for directions on the operation of<br />
stripping pliers PV-AZM... and changing<br />
bla<strong>de</strong> sets, see operating instruction<br />
MA267 at www.multi-contact.com<br />
Conexion<strong>es</strong> para <strong>en</strong>garzar Crimp connections<br />
Para conectar los conductor<strong>es</strong> a los<br />
casquillos <strong>de</strong> <strong>en</strong>garce <strong>de</strong> los conectors<br />
PV, recom<strong>en</strong>damos utilizar las<br />
herrami<strong>en</strong>tas <strong>de</strong> <strong>en</strong>garce indicadas <strong>en</strong><br />
<strong>es</strong>ta hoja <strong>de</strong> instruccion<strong>es</strong>.<br />
Engarce Crimping<br />
con alicat<strong>es</strong> <strong>de</strong> <strong>en</strong>garce<br />
PV-CZM-16100A<br />
For the connection of the conductors<br />
to the crimping sleev<strong>es</strong> of the PV plug<br />
connectors, we recomm<strong>en</strong>d using the<br />
stated crimping tools.<br />
with crimping pliers<br />
PV-CZM-16100A<br />
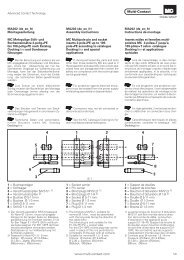
Quitar el localizador. Remove the locator.<br />
(ill. 7)<br />
Coloque la parte metálica <strong>de</strong>l pin<br />
macho o hembra <strong>en</strong> la guía para la<br />
sección <strong>de</strong> cable corr<strong>es</strong>pondi<strong>en</strong>te.<br />
Inserte el cable <strong>de</strong> la izquierda.<br />
(ill. 8)<br />
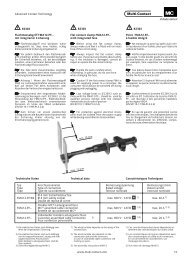
At<strong>en</strong>ción:<br />
Todos los conductor<strong>es</strong> <strong>de</strong>b<strong>en</strong> ser<br />
introducidos <strong>de</strong>b<strong>en</strong> ser introducidos<br />
<strong>en</strong> el orifi cio Q <strong>de</strong>jando<br />
una distancia máxima visible <strong>de</strong><br />
1mm.<br />
Cierre completam<strong>en</strong>te la herrami<strong>en</strong>ta<br />
<strong>de</strong> <strong>en</strong>garce.<br />
Nota:<br />
para el cambio <strong>de</strong>l posicionador y<br />
las corr<strong>es</strong>pondi<strong>en</strong>t<strong>es</strong> matric<strong>es</strong>, por<br />
favor, diríjase al manual MA251,<br />
www.multi-contact.com<br />
(ill. 9)<br />
Verifi que la crimpadora <strong>en</strong> forma<br />
visual.<br />
(ill. 7)<br />
Place the metal part of the female<br />
or male coupler in the gui<strong>de</strong> for the<br />
appropriate cross section. Insert the<br />
cable from the left.<br />
(ill. 8)<br />
Att<strong>en</strong>tion:<br />
All strands of the wir<strong>es</strong> must be<br />
correctly inserted into the bore<br />
hole and visible in sight hole Q.<br />
The max. distance of 1mm must<br />
not be excee<strong>de</strong>d.<br />
Completely close the crimping tool.<br />
Note:<br />
for the replacem<strong>en</strong>t of the locator<br />
and the corr<strong>es</strong>ponding crimping<br />
inserts, please see MA251 at<br />
www.multi-contact.com<br />
(ill. 9)<br />
Visually check the crimp.