MA223 (es_en) Instrucciones de montaje MA223 ... - Multi-Contact
MA223 (es_en) Instrucciones de montaje MA223 ... - Multi-Contact
MA223 (es_en) Instrucciones de montaje MA223 ... - Multi-Contact

Create successful ePaper yourself
Turn your PDF publications into a flip-book with our unique Google optimized e-Paper software.
Advanced <strong>Contact</strong> Technology<br />
<strong>MA223</strong> (<strong>es</strong>_<strong>en</strong>)<br />
Instruccion<strong>es</strong> <strong>de</strong> <strong>montaje</strong><br />
Conector hembra empotrable <strong>en</strong> panel o caja<br />
PV-ADBP3/.../GWD<br />
Conector macho empotrable <strong>en</strong> panel o caja PV-<br />
ADSP3/.../GWD<br />
Conector hembra empotrable <strong>en</strong> panel o caja<br />
con el cable MC-K.../PV-ADBP3/.../GWD<br />
Conector macho empotrable <strong>en</strong> panel o caja con<br />
el cable MC-K.../PV-ADSP3/.../GWD<br />
Índice<br />
Instruccion<strong>es</strong> <strong>de</strong> seguridad ........................................................2<br />
Herrami<strong>en</strong>tas nec<strong>es</strong>arias ...........................................................3<br />
Cabl<strong>es</strong> <strong>de</strong> conexión ...................................................................3<br />
Preparación <strong>de</strong>l cable ...............................................................4<br />
Conexion<strong>es</strong> por <strong>en</strong>garce ............................................................4<br />
Engarce ....................................................................................4<br />
— con alicat<strong>es</strong> <strong>de</strong> <strong>en</strong>garce PV-CZM-16100A .............................4<br />
Montaje <strong>de</strong> los conector<strong>es</strong> empotrabl<strong>es</strong> ...................................5<br />
Disposición <strong>de</strong>l cable .................................................................6<br />
Conexión ...................................................................................6<br />
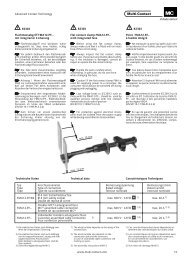
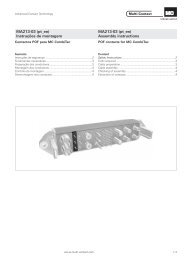
Conector hembra empotrable <strong>en</strong> panel o caja<br />
Female panel receptacle<br />
<strong>MA223</strong> (<strong>es</strong>_<strong>en</strong>)<br />
Assembly instructions<br />
PV-Female panel receptacle PV-ADBP3/.../GWD<br />
PV-Male panel receptacle PV-ADSP3/.../GWD<br />
PV-Female panel receptacle with cable<br />
MC-K.../PV-ADBP3/.../GWD<br />
PV-Male panel receptacle with cable<br />
MC-K.../PV-ADSP3/.../GWD<br />
Cont<strong>en</strong>t<br />
Safety Instructions ......................................................................2<br />
Tools required ............................................................................3<br />
Connecting lead ........................................................................3<br />
Cable preparation ......................................................................4<br />
Crimp connections ....................................................................4<br />
Crimping ....................................................................................4<br />
— with crimping pliers PV-CZM-16100A ....................................4<br />
Assembly of panel receptacl<strong>es</strong> ..................................................5<br />
Cable routing .............................................................................6<br />
Engagem<strong>en</strong>t ..............................................................................6<br />
Conector macho empotrable <strong>en</strong> panel o caja<br />
Male panel receptacle<br />
PV-ADBP3/.../GWD PV-ADBP3/.../GWD<br />
con el cable / with cable con el cable / with cable<br />
MC-K.../PV-ADBP3/.../GWD MC-K.../PV-ADSP3/.../GWD<br />
Etiqueta adh<strong>es</strong>iva<br />
Sticker<br />
Datos técnicos Technical data<br />
Sistema <strong>de</strong> conector<strong>es</strong> Connector system Ø 3mm<br />
T<strong>en</strong>sión nominal Rated voltage 1000V DC (IEC)<br />
Corri<strong>en</strong>te nominal Rated curr<strong>en</strong>t<br />
20A (2,5mm2 , 4mm²)<br />
30A (6mm²)<br />
T<strong>en</strong>sión <strong>de</strong> control T<strong>es</strong>t voltage 6kV (50Hz, 1min.)<br />
Rango <strong>de</strong> temperatura ambi<strong>en</strong>te Ambi<strong>en</strong>t temperature range -40°C...+85°C (IEC)<br />
Temperatura límite superior Upper limiting temperature 105°C (IEC)<br />
Tipo <strong>de</strong> protección, <strong>en</strong>chufado<br />
d<strong>es</strong><strong>en</strong>chufado<br />
Degree of protection, mated<br />
unmated<br />
IP65<br />
IP2X<br />
Categoría <strong>de</strong> sobret<strong>en</strong>sión / Grado <strong>de</strong> suciedad Overvoltage category / Pollution <strong>de</strong>gree CATIII / 2<br />
R<strong>es</strong>ist<strong>en</strong>cia <strong>de</strong> contacto <strong>de</strong> los conector<strong>es</strong> <strong>Contact</strong> r<strong>es</strong>istance of plug connectors 0,5mΩ<br />
Clase <strong>de</strong> protección Safety class II<br />
www.multi-contact.com 1 / 8
Advanced <strong>Contact</strong> Technology<br />
Instruccion<strong>es</strong> <strong>de</strong> seguridad Safety Instructions<br />
Sólo personal a<strong>de</strong>cuadam<strong>en</strong>te cualifi cado y <strong>es</strong>pecialistas formados<br />
podran realizar el <strong>montaje</strong> y la instalación <strong>de</strong> los productos<br />
t<strong>en</strong>i<strong>en</strong>do <strong>en</strong> cu<strong>en</strong>ta todas las regulacion<strong>es</strong> <strong>de</strong> seguridad<br />
aplicabl<strong>es</strong>.<br />
<strong>Multi</strong>-<strong>Contact</strong> (MC) no se r<strong>es</strong>ponsabiliza ante el incumplimi<strong>en</strong>to<br />
<strong>de</strong> <strong>es</strong>tas advert<strong>en</strong>cias.<br />
Utilice sólo los compon<strong>en</strong>t<strong>es</strong> y herrmi<strong>en</strong>tas indicadas por MC.<br />
No se d<strong>es</strong>víe <strong>de</strong> los procedimi<strong>en</strong>tos <strong>de</strong> preparación y <strong>montaje</strong><br />
aquí d<strong>es</strong>critos, <strong>en</strong> caso <strong>de</strong> una manipulación ina<strong>de</strong>cuada no<br />
se podrá garantizar la seguridad ni la conformidad con los datos<br />
técnicos. No modifi que el prodcuto <strong>en</strong> ningún caso.<br />
Los conector<strong>es</strong> no fabricados por MC que se pued<strong>en</strong> conectar<br />
con elem<strong>en</strong>tos MC, a vec<strong>es</strong> d<strong>en</strong>ominados por los fabricant<strong>es</strong><br />
como „compatibl<strong>es</strong> con MC“ no cumpl<strong>en</strong> con los requisitos<br />
para una conexión eléctrica segura y <strong>es</strong>table a largo plazo.<br />
No pued<strong>en</strong> conectarse con elem<strong>en</strong>tos MC por motivos <strong>de</strong> seguridad.<br />
Por tanto, MC no se r<strong>es</strong>ponsabilizará <strong>de</strong> los daños<br />
surgidos por la conexión <strong>de</strong> conector<strong>es</strong> no autorizados por<br />
MC con elem<strong>en</strong>tos MC.<br />
Los trabajos aquí d<strong>es</strong>critos no pued<strong>en</strong> ejecutarse<br />
<strong>en</strong> piezas conectadas a la red y con t<strong>en</strong>sión.<br />
El producto fi nal <strong>de</strong>be proporcionar protección al<br />
usuario fr<strong>en</strong>te a una d<strong>es</strong>carga eléctrica.<br />
Los conector<strong>es</strong> no pued<strong>en</strong> separarse <strong>es</strong>tando cargados.<br />
Se permite la conexión y d<strong>es</strong>conexión con<br />
t<strong>en</strong>sión.<br />
Los conector<strong>es</strong> son impermeabl<strong>es</strong> según el tipo <strong>de</strong><br />
protección IP. Pero no <strong>es</strong>tán indicados para un largo<br />
uso bajo agua. No coloque los conector<strong>es</strong> directam<strong>en</strong>te<br />
sobre una cubierta.<br />
Se <strong>de</strong>b<strong>en</strong> proteger ante la humedad y suciedad los<br />
conector<strong>es</strong> no conectados con una tapa <strong>de</strong> cierre<br />
(MC3 nº <strong>de</strong> artículo 32.0720 para born<strong>es</strong> y 32.0721<br />
para <strong>en</strong>chuf<strong>es</strong>). No se pued<strong>en</strong> conectar conector<strong>es</strong><br />
sucios.<br />
El conector no <strong>de</strong>be someterse nunca a una tracción<br />
mecánica dura<strong>de</strong>ra. El cable <strong>de</strong>be fi jarse con bridas.<br />
Por razon<strong>es</strong> <strong>de</strong> seguridad MC prohíbe el uso <strong>de</strong> cabl<strong>es</strong><br />
<strong>de</strong> PVC o no <strong>es</strong>tañados <strong>de</strong>l tipo H07RN-F.<br />
Encontrará más <strong>de</strong>tall<strong>es</strong> técnicos <strong>en</strong> el catálogo <strong>de</strong>l<br />
producto.<br />
2 / 8 www.multi-contact.com<br />
The products may be assembled and installed exclusively by<br />
suitably qualifi ed and trained specialists duly observing all applicable<br />
safety regulations.<br />
<strong>Multi</strong>-<strong>Contact</strong> (MC) do<strong>es</strong> not accept any liability in the ev<strong>en</strong>t of<br />
failure to observe th<strong>es</strong>e warnings.<br />
Use only the compon<strong>en</strong>ts and tools specifi ed by MC. In case<br />
of self-assembly, do not <strong>de</strong>viate from the preparation and assembly<br />
instructions as stated herein, otherwise MC cannot<br />
give any guarantee as to safety or conformity with the technical<br />
data. Do not modify the product in any way.<br />
Connectors not originally manufactured by MC which can<br />
be mated with MC elem<strong>en</strong>ts and in some cas<strong>es</strong> are ev<strong>en</strong><br />
d<strong>es</strong>cribed as ”MC-compatible” by certain manufacturers do<br />
not conform to the requirem<strong>en</strong>ts for safe electrical connection<br />
with long-term stability, and for safety reasons must not<br />
be plugged together with MC elem<strong>en</strong>ts. MC therefore do<strong>es</strong><br />
not accept any liability for any damag<strong>es</strong> r<strong>es</strong>ulting from mating<br />
such connectors (i.e. lacking MC approval) with MC elem<strong>en</strong>ts.<br />
The work d<strong>es</strong>cribed here must not be carried out<br />
on live or load-carrying parts.<br />
Protection from electric shock must be assured by<br />
the <strong>en</strong>d product (i.e. by the correctly assembled<br />
plug connector) and by its user.<br />
The plug connections must not be disconnected<br />
un<strong>de</strong>r load. Plugging and unplugging wh<strong>en</strong> live is<br />
permitted.<br />
The plug connectors are watertight in accordance<br />
with the product specifi c IP protection class. However,<br />
they are not suitable for continuous operation<br />
un<strong>de</strong>r water. Do not place the plug connectors<br />
directly on the roof membrane.<br />
Unmated plug connectors must be protected from<br />
moisture and dirt with a sealing cap (MC3 Article<br />
No. 32.0720 sockets and 32.0721 for plugs). The<br />
male and female parts must not be plugged together<br />
wh<strong>en</strong> soiled.<br />
The plug connection must not be subjected to<br />
continuous mechanical t<strong>en</strong>sion. The cable should be<br />
fi xed with cable bin<strong>de</strong>rs.<br />
For safety reasons MC prohibits the use of either<br />
PVC cabl<strong>es</strong> or untinned cabl<strong>es</strong> of type H07RN-F.<br />
For further technical data please see the product<br />
catalogue.<br />
Explicación <strong>de</strong> los símbolos Explanation of the symbols<br />
Advert<strong>en</strong>cia <strong>de</strong> voltaj<strong>es</strong> peligrosos<br />
Warning of dangerous voltag<strong>es</strong><br />
Advert<strong>en</strong>cia <strong>de</strong> área <strong>de</strong> peligro Warning of a hazard area<br />
Suger<strong>en</strong>cia o consejo útil Useful hint or tip
Advanced <strong>Contact</strong> Technology<br />
PV-CZM-16100A<br />
1<br />
2<br />
3<br />
4<br />
5<br />
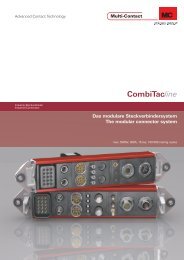
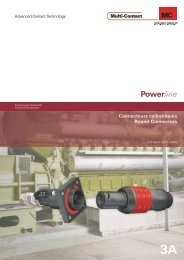
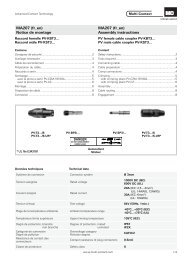
Herrami<strong>en</strong>tas nec<strong>es</strong>arias Tools required<br />
(ill. 1)<br />
Alicate pela-cabl<strong>es</strong> PV-AZM... y<br />
d<strong>es</strong>tornillador hexagonal 2,5mm.<br />
Sección <strong>de</strong>l cable:<br />
1,5 / 2,5 / 4 / 6mm²<br />
Tipo: PV-AZM-1.5/6<br />
No. <strong>de</strong> código 32.6029-156<br />
(ill. 2)<br />
Alicat<strong>es</strong> <strong>de</strong> <strong>en</strong>garce PV-CZM-16100A<br />
para una sección <strong>de</strong> cable <strong>de</strong><br />
2,5mm² – 10mm² / 14 / 12 / 10AWG<br />
No. <strong>de</strong> código: 32.6020-16100A<br />
Nota:<br />
para la operación <strong>de</strong>l alicate <strong>de</strong><br />
<strong>en</strong>garce consulte MA251<br />
(www.multi-contact.com).<br />
(ill. 3)<br />
Llave dinamométrica <strong>de</strong> 17mm<br />
o<br />
(ill. 4)<br />
Adaptador <strong>es</strong>pecial PV-WZ-AD/GWD<br />
con hueco para calb<strong>es</strong> hasta Ø 10mm<br />
para llave dinamométrica.<br />
No. <strong>de</strong> código 32.6006<br />
(ill. 5)<br />
Broca Ø 12,5mm<br />
(ill. 1)<br />
Stripping pliers PV-AZM... incl built-in<br />
wire stripping bla<strong>de</strong> as well as hexagonal<br />
screwdriver A/F 2,5mm.<br />
Cable cross section: 1,5 / 2,5 / 4 / 6mm²<br />
Type: PV-AZM-1.5/6<br />
Or<strong>de</strong>r No. 32.6029-156<br />
(ill. 2)<br />
Crimping pliers PV-CZM-16100A for<br />
cable cross section of<br />
2,5mm² – 10mm² / 14 / 12 / 10AWG<br />
Or<strong>de</strong>r No.: 32.6020-16100A<br />
Not<strong>es</strong>:<br />
to the operation of the crimping<br />
pliers, see MA251<br />
(www.multi-contact.com)<br />
(ill. 3)<br />
Torque spanner op<strong>en</strong>-<strong>en</strong>d with<br />
A/F 17mm<br />
or<br />
(ill. 4)<br />
Special socket wr<strong>en</strong>ch<br />
PV-WZ-AD/GWD with rec<strong>es</strong>s for<br />
cabl<strong>es</strong> up to max. Ø 10mm.<br />
Or<strong>de</strong>r No. 32.6006<br />
(ill. 5)<br />
Drill Ø 12,5mm<br />
Cabl<strong>es</strong> <strong>de</strong> conexión Connecting lead<br />
Pued<strong>en</strong> conectarse cabl<strong>es</strong> <strong>de</strong> clase 5<br />
o 6 (<strong>de</strong> acuerdo con IEC 60228, DIN<br />
VDE 0295) con seccion<strong>es</strong> <strong>de</strong> cable <strong>de</strong><br />
2,5mm2 – 6mm2 .<br />
At<strong>en</strong>ción:<br />
No utilice cabl<strong>es</strong> oxidados o sin<br />
rev<strong>es</strong>timi<strong>en</strong>to. Es aconsejable<br />
utilizar conductor<strong>es</strong> <strong>es</strong>tañados.<br />
Los cabl<strong>es</strong> solar<strong>es</strong> MC cu<strong>en</strong>tan<br />
con conductor<strong>es</strong> <strong>es</strong>tañados <strong>de</strong><br />
alta calidad.<br />
Comprobar el diámetro <strong>de</strong>l hilo <strong>de</strong> cobre.<br />
Pued<strong>en</strong> ser utilizados condutor<strong>es</strong><br />
multifi lar<strong>es</strong> <strong>en</strong> medidas AWG.<br />
Cabl<strong>es</strong> with a strand construction<br />
of class<strong>es</strong> 5 and 6 (according to IEC<br />
60228, DIN VDE 0295) with cable<br />
cross section of 2,5mm2 – 6mm2 can<br />
be connected.<br />
Att<strong>en</strong>tion:<br />
Use no uncoated or already oxidised<br />
conductors. It is advantage<br />
to use tinned conductors. All MC<br />
solar cabl<strong>es</strong> have high-quality,<br />
tinned conductors.<br />
Check strand diameter.<br />
<strong>Multi</strong>-stran<strong>de</strong>d conductors in AWG<br />
gaug<strong>es</strong> can be used.<br />
www.multi-contact.com 3 / 8
Advanced <strong>Contact</strong> Technology<br />
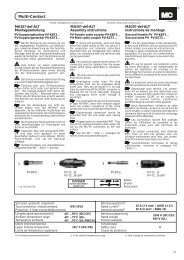
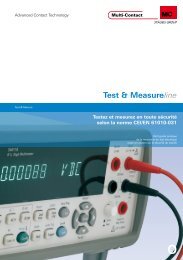
Tab. 1<br />
Tipo<br />
Type<br />
2,5mm 2<br />
L<br />
Longitud L (mm)<br />
L<strong>en</strong>gth L (mm)<br />
PV-BP3/4 6 – 7,5<br />
PV-SP3/4 6 – 7,5<br />
PV-BP3/6 8,5 – 9,5<br />
PV-SP3/6 8,5 – 9,5<br />
Q<br />
4mm 2<br />
6mm 2<br />
6<br />
7<br />
8<br />
9<br />
Preparación <strong>de</strong>l cable Cable preparation<br />
(ill. 6 / Tab. 1)<br />
Pelar el cable.<br />
Longitud <strong>de</strong> acuerdo con la Tab. 1<br />
At<strong>en</strong>ción:<br />
T<strong>en</strong>ga cuidado <strong>de</strong> no cortar ningún<br />
hilo.<br />
Nota:<br />
para obt<strong>en</strong>er instruccion<strong>es</strong> sobre<br />
cómo utilizar los alicat<strong>es</strong> pela cabl<strong>es</strong><br />
PV-AZM... y cómo cambiar las hojas<br />
<strong>de</strong> corte, consulte MA267<br />
www.multi-contact.com<br />
4 / 8 www.multi-contact.com<br />
(ill. 6 / Tab. 1)<br />
Strip cable insulation.<br />
L<strong>en</strong>gth according Tab. 1<br />
Att<strong>en</strong>tion:<br />
Take care not to cut individual<br />
strands.<br />
Note:<br />
for directions on the operation of<br />
stripping pliers PV-AZM... and changing<br />
bla<strong>de</strong> sets, see operating instruction<br />
MA267 at www.multi-contact.com<br />
Conexion<strong>es</strong> para <strong>en</strong>garzar Crimp connections<br />
Para conectar los conductor<strong>es</strong> a los<br />
casquillos <strong>de</strong> <strong>en</strong>garce <strong>de</strong> los conectors<br />
PV, recom<strong>en</strong>damos utilizar las<br />
herrami<strong>en</strong>tas <strong>de</strong> <strong>en</strong>garce indicadas <strong>en</strong><br />
<strong>es</strong>ta hoja <strong>de</strong> instruccion<strong>es</strong>.<br />
Engarce Crimping<br />
con alicat<strong>es</strong> <strong>de</strong> <strong>en</strong>garce<br />
PV-CZM-16100A<br />
For the connection of the conductors<br />
to the crimping sleev<strong>es</strong> of the PV plug<br />
connectors, we recomm<strong>en</strong>d using the<br />
stated crimping tools.<br />
with crimping pliers<br />
PV-CZM-16100A<br />
Quitar el localizador. Remove the locator.<br />
(ill. 7)<br />
Coloque la parte metálica <strong>de</strong>l pin<br />
macho o hembra <strong>en</strong> la guía para la<br />
sección <strong>de</strong> cable corr<strong>es</strong>pondi<strong>en</strong>te.<br />
Inserte el cable <strong>de</strong> la izquierda.<br />
(ill. 8)<br />
At<strong>en</strong>ción:<br />
Todos los conductor<strong>es</strong> <strong>de</strong>b<strong>en</strong> ser<br />
introducidos <strong>de</strong>b<strong>en</strong> ser introducidos<br />
<strong>en</strong> el orifi cio Q <strong>de</strong>jando<br />
una distancia máxima visible <strong>de</strong><br />
1mm.<br />
Cierre completam<strong>en</strong>te la herrami<strong>en</strong>ta<br />
<strong>de</strong> <strong>en</strong>garce.<br />
Nota:<br />
para el cambio <strong>de</strong>l posicionador y<br />
las corr<strong>es</strong>pondi<strong>en</strong>t<strong>es</strong> matric<strong>es</strong>, por<br />
favor, diríjase al manual MA251,<br />
www.multi-contact.com<br />
(ill. 9)<br />
Verifi que la crimpadora <strong>en</strong> forma<br />
visual.<br />
(ill. 7)<br />
Place the metal part of the female<br />
or male coupler in the gui<strong>de</strong> for the<br />
appropriate cross section. Insert the<br />
cable from the left.<br />
(ill. 8)<br />
Att<strong>en</strong>tion:<br />
All strands of the wir<strong>es</strong> must be<br />
correctly inserted into the bore<br />
hole and visible in sight hole Q.<br />
The max. distance of 1mm must<br />
not be excee<strong>de</strong>d.<br />
Completely close the crimping tool.<br />
Note:<br />
for the replacem<strong>en</strong>t of the locator<br />
and the corr<strong>es</strong>ponding crimping<br />
inserts, please see MA251 at<br />
www.multi-contact.com<br />
(ill. 9)<br />
Visually check the crimp.
Advanced <strong>Contact</strong> Technology<br />
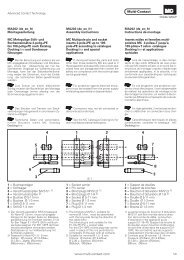
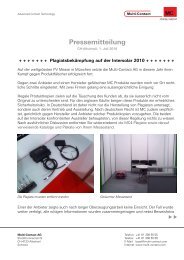
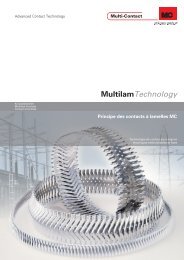
max. 5 mm<br />
+0.2<br />
- 0,4<br />
Ø12,5<br />
10<br />
11<br />
12<br />
13<br />
14<br />
Montaje <strong>de</strong> los conector<strong>es</strong><br />
empotrabl<strong>es</strong><br />
(ill. 10)<br />
Taladrar la pared <strong>de</strong>l panel<br />
(Ø 12,5mm).<br />
(ill. 11)<br />
Introducir los conector<strong>es</strong> empotrabl<strong>es</strong><br />
junto con el cable <strong>en</strong>garzado <strong>en</strong> el<br />
taladro practicado.<br />
(ill. 12)<br />
Colocar a mano la tuerca hexagonal.<br />
At<strong>en</strong>ción:<br />
Es muy importante fi jar los conector<strong>es</strong><br />
empotrabl<strong>es</strong> con ayuda<br />
<strong>de</strong> las tuercas <strong>de</strong> plástico que<br />
acompañan al suministro (las dos<br />
piezas se complem<strong>en</strong>tan una con<br />
otra).<br />
(ill. 13)<br />
Apretar la tuerca con la lave dinamométrica.<br />
Par <strong>de</strong> apriete 2Nm.<br />
(ill. 14)<br />
Enganche el adh<strong>es</strong>ivo „DANGER – DO<br />
NOT DISCONNECT UNDER LOAD“<br />
<strong>en</strong> la carcasa <strong>de</strong> la aplicación lo más<br />
cerca posible <strong>de</strong> los panel<strong>es</strong> fotovoltaicos.<br />
Assembly of panel receptacl<strong>es</strong><br />
(ill. 10)<br />
Drill a hole (Ø 12,5mm) in the wall of<br />
the housing (max. 5mm wall thickn<strong>es</strong>s).<br />
(ill. 11)<br />
Feed crimped cable with panel receptacl<strong>es</strong><br />
through the drill hole.<br />
(ill. 12)<br />
Screw on the hex. nut by hand.<br />
Att<strong>en</strong>tion:<br />
It is important that the panel<br />
receptacl<strong>es</strong> are fi xed with the <strong>de</strong>livered<br />
plastic nuts. (Parts match<br />
each other).<br />
(ill. 13)<br />
Tight<strong>en</strong> nut with the torque spanner<br />
(tight<strong>en</strong>ing torque 2Nm).<br />
(ill. 14)<br />
Attach <strong>en</strong>closed sticker „DANGER<br />
- DO NOT DISCONNECT UNDER<br />
LOAD“ to the applicance housing as<br />
near as possible to the PV panel male<br />
receptacle.<br />
www.multi-contact.com 5 / 8
Advanced <strong>Contact</strong> Technology<br />
Disposición <strong>de</strong>l cable Cable routing<br />
Referir a la <strong>es</strong>pecifi cación <strong>de</strong>l fabricante<br />
<strong>de</strong>l cable para el radio <strong>de</strong> curvatura.<br />
Conexión Engagem<strong>en</strong>t<br />
Verifi que que las piezas <strong>de</strong> conexión<br />
se <strong>en</strong>cu<strong>en</strong>tr<strong>en</strong> totalm<strong>en</strong>te aseguradas.<br />
6 / 8 www.multi-contact.com<br />
Refer to calbe manufactur<strong>es</strong> specifi cation<br />
for minimum b<strong>en</strong>ding radius.<br />
Check that the coupler parts are fully<br />
<strong>en</strong>gaged.
Advanced <strong>Contact</strong> Technology<br />
Notas / Not<strong>es</strong>:<br />
www.multi-contact.com 7 / 8
Advanced <strong>Contact</strong> Technology<br />
Notas / Not<strong>es</strong>:<br />
alterations<br />
to Subject / cacion<strong>es</strong> modifi a Sujeto – Communications Global i, In<strong>de</strong>x 02.2012, – <strong>MA223</strong> –<br />
Fabricante/Producer:<br />
Switzerland<br />
<strong>Multi</strong>-<strong>Contact</strong> AG<br />
AG,<br />
Stockbrunn<strong>en</strong>rain 8<br />
CH – 4123 Allschwil<br />
Tel. +41/61/306 55 55<br />
Fax +41/61/306 55 56<br />
<strong>Multi</strong>-<strong>Contact</strong><br />
mail basel@multi-contact.com<br />
by<br />
www.multi-contact.com ©