Escaleras - FIBERPOOL
Escaleras - FIBERPOOL
Escaleras - FIBERPOOL

You also want an ePaper? Increase the reach of your titles
YUMPU automatically turns print PDFs into web optimized ePapers that Google loves.
AÑOS DE GARANTIA<br />
YEARS OF GUARANTEE<br />
2ANNÉES DE GARANTIE<br />
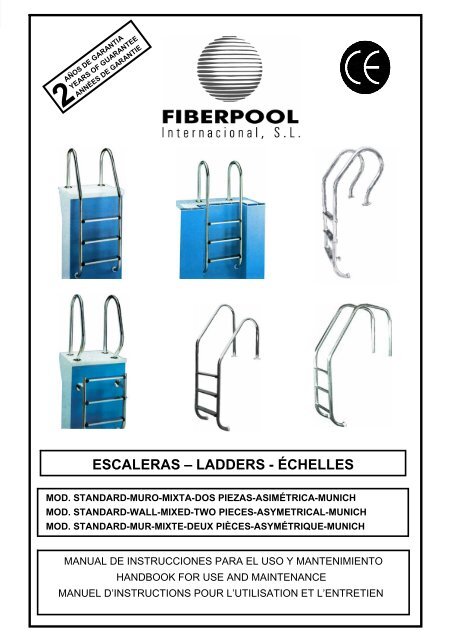
ESCALERAS – LADDERS - ÉCHELLES<br />
MOD. STANDARD-MURO-MIXTA-DOS PIEZAS-ASIMÉTRICA-MUNICH<br />
MOD. STANDARD-WALL-MIXED-TWO PIECES-ASYMETRICAL-MUNICH<br />
MOD. STANDARD-MUR-MIXTE-DEUX PIÈCES-ASYMÉTRIQUE-MUNICH<br />
MANUAL DE INSTRUCCIONES PARA EL USO Y MANTENIMIENTO<br />
HANDBOOK FOR USE AND MAINTENANCE<br />
MANUEL D’INSTRUCTIONS POUR L’UTILISATION ET L’ENTRETIEN
MANUAL ESCALERAS<br />
COMPONENTES<br />
Cada modelo de escalera contiene los siguientes componentes (excepto modelo Dos Piezas) :<br />
-Barra acero inoxidable 18/8 Ø43 pulido brillante. (2 unidades).<br />
-Nº 1 - 1.1 Peldaño de inoxidable o polipropileno, según modelo.<br />
(2,3,4,5 unidades).<br />
-Nº 2 Conjunto de Tornillo (8x73), tuerca y arandela. (2 unidades x nº<br />
de peldaños)<br />
-Nº 3 Taco. (2 unidades).<br />
-Nº 4 Anclaje (2 unidades).<br />
-Nº 5 Embellecedor inoxidable (2 unidades).<br />
La escalera Modelo Dos Piezas contiene:<br />
-Nº 1 Pasamanos de acero inoxidable 18/8 Ø43<br />
pulido. (2 unidades).<br />
-Nº 2 Soporte peldaños. (2 unidades).<br />
-Nº 3 Conjunto de tornillo (8x73), tuerca y arandela (2<br />
unidades x peldaño).<br />
-Nº 4 Peldaño inoxidable. (2,3,4,5 unidades).<br />
-Nº 5 Taco. (2 unidades).<br />
-Nº 6 Tornillo. (12 unidades).<br />
-Nº 7 Taco tornillo (12 unidades).<br />
-Nº 8 Arandela plástico (6 unidades)<br />
2
MANUAL ESCALERAS<br />
MONTAJE<br />
MONTAJE DE LA ESCALERA (todos los<br />
modelos excepto modelo Dos Piezas)<br />
-Empotrar los anclajes (nº4) según la cota A (ver<br />
figura 1) en el suelo. Los anclajes deberán estar a<br />
500mm el uno del otro (tal como se observa en la<br />
figura 1).<br />
-Montar los peldaños (nº1 de inoxidable o nº1.1<br />
de polipropileno, según modelo) en las barras<br />
de acero inoxidable. Cada peldaño debe de tener<br />
2 tornillos, 2 arandelas y 2 tuercas (conjunto nº2).<br />
-Colocar los dos tacos de goma (nº3) en los<br />
extremos inferiores de las respectivas barras de<br />
inoxidable.<br />
-Empotrar las dos barras de inoxidable en sus<br />
respectivos anclajes (nº4).<br />
-Uno de los anclajes posee una toma de tierra.<br />
Conectar con un cable de tierra (según normativa)<br />
la parte metálica del anclaje a la varilla de tierra de<br />
la piscina.<br />
-Finalmente atornillar el anclaje para la fijación de<br />
las barras de inoxidable y cubrir el anclaje<br />
mediante los embellecedores (nº5).<br />
FIGURA 1<br />
MONTAJE DE LA ESCALERA (MODELO<br />
DOS PIEZAS)<br />
-Atornillar cada extremo del pasamanos de<br />
acero inoxidable (nº1) a la cota indicada en el<br />
dibujo (260mm). Entre el suelo y el pasamanos<br />
deberá fijarse la arandela de plástico (nº8).<br />
Cada pasamanos deberá estar a 500mm el uno<br />
del otro (ver dibujo).<br />
-Montar los peldaños (nº 4) en el soporte<br />
peldaños (nº2). Cada peldaño debe de tener 2<br />
tornillos, 2 arandelas y 2 tuercas (conjunto<br />
nº3).<br />
-Colocar los dos tacos de goma (nº5) en los<br />
extremos inferiores del soporte peldaños<br />
(nº2).<br />
-Fijar el soporte peldaños (nº2) a la pared de<br />
la piscina con los tornillos teniendo en cuenta<br />
que entre la pared y el soporte debe de ir la<br />
arandela de plástico (nº8).<br />
3
MANUAL ESCALERAS<br />
CARACTERÍSTICAS TÉCNICAS Y MANTENIMIENTO<br />
<strong>Escaleras</strong> para piscinas, fabricadas en acero<br />
inoxidable pulido brillante AISI 304 Ø43.<br />
Peldaños antideslizantes de inoxidable o polipropileno.<br />
Estas escaleras no podrán ser instaladas cuando<br />
se utilicen cloradores salinos o cualquier aparato<br />
que produzca una electrólisis en el agua.<br />
El agua de la piscina deberá mantenerse a un PH<br />
entre 6.8 y 8.<br />
Para limpiar la escalera solo se utilizará agua y<br />
productos no abrasivos (disolventes, lejías, sal<br />
fumante, etc,..).<br />
Cuando se añada un aminorador o un aumentador de<br />
PH, o cloro, nunca deberán estar en contacto directo<br />
con la escalera.<br />
Antes de colocar la escalera, verificar si el tipo de<br />
inoxidable es el que necesitamos<br />
Notas:<br />
...................................................................................................................................<br />
...................................................................................................................................<br />
...................................................................................................................................<br />
...................................................................................................................................<br />
...................................................................................................................................<br />
...................................................................................................................................<br />
...................................................................................................................................<br />
...................................................................................................................................<br />
...................................................................................................................................<br />
...................................................................................................................................<br />
...................................................................................................................................<br />
...................................................................................................................................<br />
...................................................................................................................................<br />
...................................................................................................................................<br />
...................................................................................................................................<br />
...................................................................................................................................<br />
...................................................................................................................................<br />
...................................................................................................................................<br />
...................................................................................................................................<br />
...................................................................................................................................<br />
...................................................................................................................................<br />
...................................................................................................................................<br />
...................................................................................................................................<br />
...................................................................................................................................<br />
...................................................................................................................................<br />
...................................................................................................................................<br />
4
LADDERS MANUAL<br />
PARTS<br />
Each ladder model includes the following spares (except the Two Pieces model):<br />
18/8 Stainless-steel handrail d-43 polished shiny<br />
(2 units)<br />
Nº1 – 1.1 Stainless-steel or polypropylene step,<br />
according model (2,3,4 or 5 units)<br />
Nº2 Kit composed by screws (8x73), nuts and<br />
washers (2 units for each steps)<br />
Nº3 Rubber stopper (2 units)<br />
Nº4 Anchor (2 units)<br />
Nº5 Stainless-steel trimming part (2 units)<br />
The Two Pieces ladder model includes:<br />
Nº1 18/8 Stainless-steel handrail d-43 polished shiny<br />
(2 units)<br />
Nº2 Steps support (2 units)<br />
Nº3 Kit composed by: screws (8x73), nuts and<br />
washers (2 units for each step)<br />
Nº4 Stainless-steel step (2,3,4 or 5 units)<br />
Nº5 Rubber stopper (2 units)<br />
Nº6 Screw (12 units)<br />
Nº7 Screw plug (12 units)<br />
Nº8 Plastic washer (6 units)<br />
5
LADDERS MANUAL<br />
ASSEMBLY<br />
-LADDER ASSEMBLY (all models except Two-<br />
Pieces model)<br />
Fit the anchorages (nº4) into the floor as per<br />
measurement A (see drawing 1). The distance<br />
between both anchorages must be at 500mm one<br />
from the other (as shown in drawing 1)<br />
-Assembly the steps (nº1 stainless steel or nº1<br />
polypropylene according to the model) into the<br />
stainless steel handrail. Each step must have 2<br />
screws, 2 washers and 2 nuts (kit nº2).<br />
-Place the rubber stoppers (nº3) to each lower<br />
part of the handrail.<br />
-Fit the two stainless-steel handrails into their<br />
corresponding anchorages (nº4).<br />
-One of those anchorages has an earth wire.<br />
Connect the metallic part of the anchor with an<br />
earth cable (in accordance to the standards) to the<br />
swimming pool earth connection.<br />
-Finally screw the anchor that will support the<br />
handrail and cover the anchor with the stainlesssteel<br />
trimming part.<br />
DRAWING 1<br />
LADDER ASSEMBLY (Two Pieces model)<br />
-Screw the end of the stainless-steel handrail<br />
(nº1) as per the measurement indicated in the<br />
drawing (260mm). A plastic washer (nº8) must<br />
be placed between the floor and the handrails.<br />
The distance between both handrails must be<br />
500mm one from the other (see drawing).<br />
-Place the steps (nº4) to the step support<br />
(nº2). Each step must have 2 screws, 2<br />
washers and 2 nuts (kit nº3)<br />
-Place the rubber stoppers (nº5) to each lower<br />
part of the step support (nº2).<br />
-Screw the step support (nº2) to the swimming<br />
pool wall. Be careful to place a plastic washer<br />
(nº8) between the wall and the step support.<br />
6
LADDERS MANUAL<br />
TECHNICAL CHARACTERISTICS AND<br />
MAINTENANCE<br />
Swimming pool ladders are made of bright polished<br />
stainless steel AISI 304 d-43.<br />
Stainless steel or polypropylene non-slip steps.<br />
Those ladders could not be installed when using<br />
salt chlorinators or any other equipment that<br />
produces water electrolysis.<br />
Swimming pool water must have a pH between 6,8<br />
and 8.<br />
Only use water or non-abrasive products for cleaning<br />
the ladders. Never use solvents, bleach, hydrochloric<br />
acid, etc…)<br />
When using a pH reducer, pH augmenter or chlorine<br />
please be sure they will never be in contact with the<br />
ladder.<br />
Before installing the ladder, check the steel type<br />
needed.<br />
Notes:<br />
...................................................................................................................................<br />
...................................................................................................................................<br />
...................................................................................................................................<br />
...................................................................................................................................<br />
...................................................................................................................................<br />
...................................................................................................................................<br />
...................................................................................................................................<br />
...................................................................................................................................<br />
...................................................................................................................................<br />
...................................................................................................................................<br />
...................................................................................................................................<br />
...................................................................................................................................<br />
...................................................................................................................................<br />
...................................................................................................................................<br />
...................................................................................................................................<br />
...................................................................................................................................<br />
...................................................................................................................................<br />
...................................................................................................................................<br />
...................................................................................................................................<br />
...................................................................................................................................<br />
...................................................................................................................................<br />
...................................................................................................................................<br />
...................................................................................................................................<br />
...................................................................................................................................<br />
...................................................................................................................................<br />
...................................................................................................................................<br />
7
MANUEL ÉCHELLES<br />
COMPOSANTS<br />
Chaque modèle d'échelle est livré avec les composants suivants (sauf le modèle Deux-Pièces) :<br />
-Supports acier inoxydable 18/8 d-43 polit brillant (2 pièces)<br />
-Nº1 – 1.1 Marches en inoxydable ou polypropylène, selon modèle<br />
(2,3,4 ou 5 pièces)<br />
-Nº2 Ensemble de vis (8x73), écrou et rondelle (2 pièces par marche)<br />
-Nº3 Sabot (2 pièces)<br />
-Nº4 Ancrage (2 pièces)<br />
-Nº5 Enjoliveur inoxydable (2 pièces)<br />
L'échelle modèle Deux-Pièces est livré<br />
avec les composants suivants :<br />
-Nº1 Main-courante en acier inoxydable 18/8 d-43<br />
polit (2 pièces)<br />
-Nº2 Support de marches (2 pièces)<br />
-Nº3 Ensemble de vis (8x73), écrou et rondelle (2<br />
pièces par marche)<br />
-Nº4 Marche inoxydable (2,3,4 ou 5 pièces)<br />
-Nº5 Sabot (2 pièces)<br />
-Nº6 Vis (12 pièces)<br />
-Nº7 Cheville pour vis (12 pièces)<br />
-Nº8 Rondelle plastique (6 pièces)<br />
8
MANUEL ÉCHELLES<br />
MONTAGE<br />
MONTAGE DE L'ÉCHELLE (tous les modèles<br />
sauf le modèle Deux-Pièces)<br />
-Sceller les ancrages (nº4) au sol, selon la cote A<br />
(voir fig. 1). Les ancrages devront être à 500mm<br />
l'un de l'autre (comme indiqué sur la fig.1).<br />
-Fixer les marches (nº1 inoxydable ou nº1<br />
polypropylène, selon le modèle) aux supports en<br />
acier inoxydable. Chaque marche doit avoir 2 vis,<br />
2 rondelles et 2 écrous (ensemble Nº 2).<br />
-Placer les deux sabots en caoutchouc (nº3) aux<br />
extrémités inférieures de chaque support<br />
inoxydable.<br />
-Sceller les deux supports inoxydables dans leurs<br />
ancrages correspondants (nº4).<br />
-Un des ancrages possède une prise de terre.<br />
Connecter la partie métallique de l'ancrage avec<br />
un câble de terre (conforme aux normes) à la tige<br />
de terre de la piscine.<br />
-Finalement visser l'ancrage pour la fixation du<br />
support inoxydable et couvrir l'ancrage avec<br />
l'enjoliveur (nº5).<br />
FIG. 1<br />
MONTAGE DE L'ÉCHELLE (MODÈLE DEUX-<br />
PIÈCES)<br />
-Visser chaque extrémité de la main—<br />
courante acier inoxydable (nº1) à la cote<br />
indiquée sur le dessin (260mm). Une rondelle<br />
en plastique (nº8) devra être placée entre le<br />
mur et la main-courante. Chaque main-courante<br />
devra être à 500mm l'une de l'autre (voir dessin)<br />
-Monter les marches (nº4) au support des<br />
marches (nº2). Chaque marche devra avoir 2<br />
vis, 2 rondelles et 2 écrous (ensemble nº3).<br />
-Placer les deux sabots en caoutchouc (nº5)<br />
aux extrémités inférieures du support de<br />
marches.<br />
-Fixer le support de marches (nº2) à la paroi<br />
de la piscine à l'aide des vis tout en faisant<br />
attention qu'entre le mur et le support doit y aller<br />
la rondelle en plastique (nº8).<br />
9
MANUEL ÉCHELLES<br />
CARACTÉRISTIQUES TECHNIQUES ET ENTRETIEN<br />
Echelles pour piscines, fabriquées en acier inoxydable<br />
polit brillant AISI 304 d-43.<br />
Marches antiglisse en inoxydable ou polypropylène.<br />
Ces échelles ne peuvent pas être installées dans<br />
une piscine où l'on utilise un chlorinateur au sel<br />
ou n'importe quel autre appareil qui produise une<br />
électrolyse dans l'eau.<br />
L'eau de la piscine devra avoir un PH entre 6,8 et 8.<br />
Pour nettoyer l'échelle on devra utiliser de l'eau ou<br />
des produits non-abrasifs. Ne pas utiliser de<br />
dissolvants, eau de javel, acide chlorhydrique, etc…)<br />
Eviter de mettre en contact direct avec l'échelle un<br />
réducteur ou augmentateur de PH ou bien du chlore.<br />
Avant de sceller l'échelle, vérifier le type d'acier<br />
inoxydable du matériel que nous voulons installer.<br />
Notes:<br />
...................................................................................................................................<br />
...................................................................................................................................<br />
...................................................................................................................................<br />
...................................................................................................................................<br />
...................................................................................................................................<br />
...................................................................................................................................<br />
...................................................................................................................................<br />
...................................................................................................................................<br />
...................................................................................................................................<br />
...................................................................................................................................<br />
...................................................................................................................................<br />
...................................................................................................................................<br />
...................................................................................................................................<br />
...................................................................................................................................<br />
...................................................................................................................................<br />
...................................................................................................................................<br />
...................................................................................................................................<br />
...................................................................................................................................<br />
...................................................................................................................................<br />
...................................................................................................................................<br />
...................................................................................................................................<br />
...................................................................................................................................<br />
...................................................................................................................................<br />
...................................................................................................................................<br />
...................................................................................................................................<br />
...................................................................................................................................<br />
10
Declaración de conformidad:<br />
<strong>FIBERPOOL</strong> INTERNACIONAL, S.L., declara bajo su responsabilidad que<br />
sus productos <strong>Escaleras</strong> inoxidable AISI 304 Ø43 cumplen con la<br />
Directiva CE<br />
Declaration of conformity:<br />
We, <strong>FIBERPOOL</strong> INTERNACIONAL, S.L., declare under our own<br />
responsability that our products <strong>Escaleras</strong> inoxidable AISI 304 Ø43<br />
comply with the CE Directive<br />
Déclaration de conformité:<br />
<strong>FIBERPOOL</strong> INTERNACIONAL, S.L., déclare sous sa responsabilité que<br />
les produits <strong>Escaleras</strong> inoxidable AISI 304 Ø43 sont conformes à la<br />
Directive CE.<br />
Dichiarazione di conformità:<br />
Noi, <strong>FIBERPOOL</strong> INTERNACIONAL, S.L., dichiaramo sotto la Ns. sola<br />
responsabilità che nostri prodotti <strong>Escaleras</strong> inoxidable AISI 304 Ø43 sono<br />
in comformità alla direttiva CE.<br />
Konformitätserklärung:<br />
Die Firma <strong>FIBERPOOL</strong> INTERNACIONAL, S.L., erklärt unter ihrer vollen<br />
Verantwortlichkeit, daß die Produkte <strong>Escaleras</strong> inoxidable AISI 304 Ø43<br />
den CE Richtlinien entsprechen.<br />
Declaração de conformidade<br />
<strong>FIBERPOOL</strong> INTERNACIONAL, S.L., declara sob a sua responsabilidade<br />
que os seus produtos <strong>Escaleras</strong> inoxidable AISI 304 Ø43 estão em<br />
conformidade com as directivas CE.<br />
Ponent 3-5-7 / P.I. Sant Pere Molanta<br />
08799 Olèrdola (BARCELONA)<br />
Tel:+34 938 180 016 / Fax:+34 938 180 718<br />
www.fiberpool.com<br />
Apoderado: Víctor Balaguer<br />
Olèrdola, 25 de Octubre<br />
2004