Télécharger la notice au format pdf (36ko) - Babymoov
Télécharger la notice au format pdf (36ko) - Babymoov
Télécharger la notice au format pdf (36ko) - Babymoov

Create successful ePaper yourself
Turn your PDF publications into a flip-book with our unique Google optimized e-Paper software.
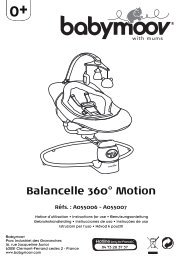
0+<br />
Ba<strong>la</strong>ncelle Bubble<br />
New Generation<br />
Réfs. : A055004 - A055005<br />
Notice d’utilisation • Instructions for use • Benutzungsanleitung<br />
Gebruikshandleiding • Instrucciones de uso • Instruções de uso<br />
Istruzioni per l’uso • Návod k použití<br />
<strong>Babymoov</strong><br />
Parc Industriel des Gravanches<br />
16, rue Jacqueline Auriol<br />
63051 Clermont-Ferrand cedex 2 - France<br />
www.babymoov.com
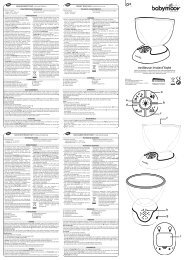
COMPOSITION - ZUSAMMENSETZUNG - SAMENSTELLING - COMPOSICIÓN -<br />
COMPOSIÇÃO - COMPOSIZIONE - SLOŽENÍ VÝROBKU<br />
a<br />
b c d<br />
e<br />
f<br />
g et h<br />
i j k<br />
2
l m n<br />
o<br />
p<br />
r<br />
q<br />
s<br />
3
A1<br />
1 2<br />
A2<br />
3 4<br />
5 6<br />
4
A3<br />
7 8<br />
9 10<br />
11 12<br />
13<br />
14<br />
15<br />
5
A4<br />
16 17<br />
18<br />
19<br />
20<br />
A5<br />
21 22<br />
6
A6<br />
23<br />
A7<br />
24 25<br />
A8<br />
26<br />
B1<br />
27<br />
29 30 31<br />
28<br />
7
B2<br />
32 33<br />
8<br />
34 35<br />
36<br />
B3<br />
37<br />
38<br />
39 40<br />
41<br />
42<br />
8
C<br />
t<br />
v<br />
u<br />
w<br />
9
FR<br />
Merci d’avoir choisi <strong>la</strong> Ba<strong>la</strong>ncelle BABYMOOV. Pour <strong>la</strong> sécurité de votre bébé, veuillez lire attentivement<br />
ce manuel d’instruction et le conserver soigneusement pour vous y référer ultérieurement.<br />
Conforme <strong>au</strong>x exigences de sécurité. Conforme <strong>au</strong>x exigences de <strong>la</strong> norme PR EN 16232 : 2011<br />
LIRE ATTENTIVEMENT LES INSTRUCTIONS<br />
AVANT TOUTE UTILISATION ET LES CONSERVER<br />
POUR TOUTE REFERENCE ULTERIEURE<br />
Les équipements électriques font l’objet d’une collecte sélective. Ne pas se débarrasser des déchets<br />
d’équipements électriques et électroniques avec les déchets municip<strong>au</strong>x non triés, mais procéder<br />
à leur collecte sélective. Ce symbole indique à travers l’Union Européenne que ce produit ne doit pas être<br />
jeté à <strong>la</strong> poubelle ou mé<strong>la</strong>ngé <strong>au</strong>x ordures ménagères, mais faire l’objet d’une collecte sélective.<br />
• Ne jamais <strong>la</strong>isser l’enfant sans surveil<strong>la</strong>nce.<br />
• Il est dangereux d’utiliser ce produit sur une surface en h<strong>au</strong>teur (par<br />
exemple, une table).<br />
• Ce produit n’est pas prévu pour de longues périodes de sommeil.<br />
• Toujours utiliser le système de retenue.<br />
• Ne pas dép<strong>la</strong>cer et ne pas soulever ce produit quand le bébé est à<br />
l’intérieur.<br />
AVERTISSEMENTS<br />
• Ne pas utiliser ce produit si votre enfant tient assis tout seul ou s’il pèse<br />
plus de 9kg.<br />
• Pour éviter les blessures, s’assurer que les enfants ne sont pas à<br />
proximité lors du pliage et du dépliage du produit.<br />
• Ne pas <strong>la</strong>isser les enfants jouer avec ce produit.<br />
• Ne jamais utiliser l’arce<strong>au</strong> de jeu pour soulever ou dép<strong>la</strong>cer ce produit.<br />
• Le montage doit être réalisé par un adulte.<br />
• Ne pas utiliser <strong>la</strong> ba<strong>la</strong>ncelle si elle est endommagée ou cassée.<br />
• Tenir les petites pièces hors de portée des enfants.<br />
• Ce produit ne remp<strong>la</strong>ce pas un couffin ou un lit pour bébé. Si votre<br />
enfant a besoin de dormir, il convient de le p<strong>la</strong>cer dans un couffin ou<br />
un lit adapté.<br />
• Ne pas utiliser le produit si un ou plusieurs éléments sont cassés ou<br />
manquants.<br />
• Ne pas utiliser d’accessoires ou de pièces de rechange <strong>au</strong>tres que ceux<br />
approuvés par le fabricant.<br />
• Avant l’utilisation, vérifier que les mécanismes de verrouil<strong>la</strong>ge soient<br />
bien enclenchés et correctement ajustés.<br />
• Vérifier régulièrement le système de suspension de <strong>la</strong> ba<strong>la</strong>ncelle.<br />
• Utiliser toujours un harnais 5 points de sécurité.<br />
• Ne pas utiliser <strong>la</strong> ba<strong>la</strong>ncelle sans sa housse de protection.<br />
• Ne jamais utiliser <strong>la</strong> ba<strong>la</strong>ncelle sur une surface molle (lit, canapé,<br />
coussin) ; le siège pourrait basculer et provoquer un danger pour<br />
votre enfant.<br />
CONSIGNES DE SECURITÉ À RESPECTER<br />
ATTENTION<br />
• Eloigner <strong>la</strong> ba<strong>la</strong>ncelle de toute f<strong>la</strong>mme, des sources de chaleur intenses,<br />
des prises électriques, rallonges, cuisinières etc. ou objets pouvant être<br />
à <strong>la</strong> portée de l’enfant.<br />
• Pour éviter tout risque d’étouffement, conserver les sacs p<strong>la</strong>stiques de<br />
l’embal<strong>la</strong>ge hors de portée des bébés et des jeunes enfants.<br />
• Ne jamais ajouter d’oreiller, de couverture ou de rembourrage ; utiliser<br />
seulement le cale-tête fourni avec votre ba<strong>la</strong>ncelle.<br />
• Ne pas p<strong>la</strong>cer d’objets, avec des ficelles, <strong>au</strong>tour du cou de l’enfant ;<br />
ne pas suspendre des ficelles à <strong>la</strong> ba<strong>la</strong>ncelle et ne pas accrocher de<br />
ficelles <strong>au</strong>x jouets. Ces pratiques pourraient c<strong>au</strong>ser l’étranglement du<br />
bébé.<br />
• Ne pas p<strong>la</strong>cer <strong>la</strong> ba<strong>la</strong>ncelle près d’une fenêtre où les cordons d’un store<br />
ou de ride<strong>au</strong>x pourraient étrangler l’enfant.<br />
• Ne pas attacher d’<strong>au</strong>tres jouets que ceux fournis par <strong>Babymoov</strong>.<br />
Type de piles recommandes : 4 piles AA (non fournies).<br />
• Les piles non rechargeables ne doivent pas être rechargées. Dans le cas contraire celles-ci pourraient exploser ou fuir.<br />
• Il ne f<strong>au</strong>t pas mé<strong>la</strong>nger différentes sortes de piles, ni mé<strong>la</strong>nger des piles neuves et usagées.<br />
• Les piles doivent être insérées avec <strong>la</strong> po<strong>la</strong>rité correcte.<br />
• Les piles déchargées doivent être retirées de <strong>la</strong> ba<strong>la</strong>ncelle.<br />
• Conserver les piles hors de portée des enfants.<br />
• Changer les piles lorsque <strong>la</strong> ba<strong>la</strong>ncelle cesse de fonctionner de manière satisfaisante.<br />
• Enlever les piles avant de ranger votre ba<strong>la</strong>ncelle pour une longue période.<br />
• Jeter les piles dans le conteneur prévu à cet effet.<br />
• Remp<strong>la</strong>cer et recharger toutes les piles en même temps.<br />
• Les piles rechargeables doivent être chargées sous <strong>la</strong> surveil<strong>la</strong>nce d’un adulte.<br />
• Ne pas recharger une pile rechargeable dans un chargeur différent.<br />
• Les bornes d’alimentation ne doivent pas être court-circuitées.<br />
• Ne pas jeter les piles <strong>au</strong> feu car elles pourraient éc<strong>la</strong>ter ou dégager des substances novices.<br />
BALANCELLE BUBBLE • Notice d’utilisation 11
AVERTISSEMENT : avant l’assemb<strong>la</strong>ge, retirer tous les éléments de <strong>la</strong> boîte et les identifier.<br />
a. Pied avant g<strong>au</strong>che<br />
b. Pied avant droit<br />
c. Pied arrière g<strong>au</strong>che<br />
d. Pied arrière droit<br />
e. Pied <strong>la</strong>téral g<strong>au</strong>che<br />
f. Pied <strong>la</strong>téral droit<br />
g. Pied g<strong>au</strong>che de ba<strong>la</strong>ncement<br />
h. Pied droit de ba<strong>la</strong>ncement<br />
i. Arche d’éveil<br />
j. Caches de protection<br />
ATTENTION<br />
Adaptateur externe :<br />
• La ba<strong>la</strong>ncelle ne doit être utilisée qu’avec l’adaptateur recommandé.<br />
• Les adaptateurs doivent être régulièrement examinés afin de déceler d’éventuels dommages sur le cordon, <strong>la</strong> prise, le boîtier et les <strong>au</strong>tres<br />
parties. En cas de dommage(s) constaté(s), ne pas utiliser l’appareil.<br />
COMPOSITION DE LA BALANCELLE<br />
UTILISATION ET CARACTÉRISTIQUES DE LA BALANCELLE<br />
A. INSTRUCTIONS POUR L’ASSEMBLAGE DES ÉLÉMENTS<br />
A1. Assemb<strong>la</strong>ge des pieds de <strong>la</strong> ba<strong>la</strong>ncelle<br />
Insérer le pied arrière g<strong>au</strong>che (c) dans le pied arrière droit (d). S’assurer que le bouton de pression du pied arrière droit (d) est bien enclenché dans<br />
l’orifice du pied arrière g<strong>au</strong>che (c). Les lettres D+D doivent être jointes. Figure 1 De même, insérer le pied avant g<strong>au</strong>che (a) dans le pied avant droit<br />
(b). S’assurer que le bouton de pression du pied avant g<strong>au</strong>che (a) est bien enclenché dans l’orifice du pied avant droit (b). Les lettres C+C doivent<br />
être jointes. Figure 2 Pour que l’opération soit correctement réalisée, l’utilisateur doit entendre un « clic » et voir apparaitre un bouton de pression<br />
gris sur le côté du pied opposé.<br />
A2. Assemb<strong>la</strong>ge des bras de ba<strong>la</strong>ncement<br />
Insérer le pied <strong>la</strong>téral g<strong>au</strong>che (e) dans le pied avant g<strong>au</strong>che (a) et arrière g<strong>au</strong>che (c) de sorte que les lettres A+A soient jointes ainsi que les lettres<br />
B+B. Figures 3 et 4 Insérer le pied <strong>la</strong>téral droit (f) dans le pied avant droit (b) et arrière droit (d) puis clipper les pieds avant. Figure 5 Pour déplier<br />
les pieds, appuyer sur les boutons de pliage (n) situés sur les côtés des pieds <strong>la</strong>tér<strong>au</strong>x (e) et (f). Pour que l’opération soit correctement réalisée,<br />
l’utilisateur doit entendre un « clic » et voir apparaitre un bouton de pression gris sur le côté du pied opposé. Figure 6<br />
A3. Assemb<strong>la</strong>ge du siège de <strong>la</strong> ba<strong>la</strong>ncelle<br />
Pour installer le siège (k), insérer le pied droit de ba<strong>la</strong>ncement (h) du côté du boitier électronique (m), et le pied g<strong>au</strong>che de ba<strong>la</strong>ncement (g) du côté<br />
opposé. Figures 7, 8, 9, 10 et 11 Fixer les bras de ba<strong>la</strong>ncement avec les caches de protection (j) dans les orifices prévus à cet effet. Figures 12, 13,<br />
14 et 15<br />
A4. Instal<strong>la</strong>tion de <strong>la</strong> housse de protection<br />
AVERTISSEMENT : ne pas utiliser <strong>la</strong> ba<strong>la</strong>ncelle sans sa housse de protection.<br />
Faire pivoter les arce<strong>au</strong>x du siège (k) vers le h<strong>au</strong>t, jusqu’à ce qu’ils se joignent. Figure 16 Recouvrir les arce<strong>au</strong>x du siège (k) par <strong>la</strong> housse de protection<br />
(q). Pour ne pas se tromper dans le sens de <strong>la</strong> pose de <strong>la</strong> housse de protection (q) veiller à ce que le logo <strong>Babymoov</strong> soit orienté vers le bas. Figure<br />
17<br />
Ecarter les deux arce<strong>au</strong>x du siège (k) tout en faisant glisser <strong>la</strong> housse de protection (q) le long des deux arce<strong>au</strong>x. Figures 18, 19 et 20<br />
A5. Instal<strong>la</strong>tion de l’arche d’éveil (i)<br />
AVERTISSEMENT : ne pas soulever <strong>la</strong> ba<strong>la</strong>ncelle par l’arche d’éveil.<br />
Insérer l’arche d’éveil (i) dans les fentes situées à cet effet. Figures 21 et 22<br />
k. Siège<br />
l. Cale-tête<br />
m. Boîte électronique<br />
n. Boutons de pliage<br />
o. Bouton pression<br />
p. Adaptateur secteur<br />
q. Housse de protection<br />
r. Boutons d’inclinaison de l’assise<br />
s. Bouton de verrouil<strong>la</strong>ge de l’assise<br />
A6. Instal<strong>la</strong>tion du cale-tête (l)<br />
AVERTISSEMENT : ne jamais ajouter d’oreiller, de couverture ou de rembourrage, utiliser seulement le cale-tête fourni avec votre ba<strong>la</strong>ncelle. Le caletête<br />
(l) est un élément optionnel qui offrira un appui supplémentaire à <strong>la</strong> tête du bébé pour un confort optimal. Cet élément peut se détacher de<br />
<strong>la</strong> ba<strong>la</strong>ncelle.<br />
Pour attacher ou détacher le cale-tête (l) il suffit d’utiliser l’attache Velcro qui se trouve sur l’arrière de ce dernier, il f<strong>au</strong>t l’enfiler à <strong>la</strong> housse de protection<br />
(q). Figure 23<br />
A7. Instal<strong>la</strong>tion des piles<br />
La boîte électronique (m) de <strong>la</strong> ba<strong>la</strong>ncelle doit être alimentée par 4 piles AA de 1,5V (non fournies). Pour une meilleure performance, utiliser des<br />
piles alcalines.<br />
Servez-vous d’un tournevis cruciforme (non fourni) pour ouvrir le boitier électronique (m) qui se situe sur le pied droit de ba<strong>la</strong>ncement (h). Figure<br />
24 Insérer les 4 piles AA de 1,5V (non fournies) en observant les marquages de po<strong>la</strong>rité indiqués sur le visuel. Figure 25<br />
Revisser le boitier électronique (m) à l’aide d’un tournevis. Ne pas trop serrer.<br />
12<br />
BALANCELLE BUBBLE • Notice d’utilisation
A8. Branchement sur secteur (adaptateur fourni) (p)<br />
IMPORTANT : avant toutes opérations veillez à ce que votre ba<strong>la</strong>ncelle soit éteinte.<br />
La ba<strong>la</strong>ncelle peut fonctionner sur une prise secteur à l’aide de l’adaptateur fourni.<br />
Input : 230V / 50Hz<br />
Output : 6V / 500Ma<br />
Les adaptateurs doivent être régulièrement examinés afin de déceler d’éventuels dommages sur le cordon, <strong>la</strong> prise, le boitier et les <strong>au</strong>tres parties.<br />
En cas de dommage(s) constaté(s), ne pas utiliser l’appareil.<br />
La ba<strong>la</strong>ncelle ne doit être utilisée qu’avec l’adaptateur recommandé.<br />
Brancher l’embout de l’adaptateur dans l’orifice prévu à cet effet et l’<strong>au</strong>tre partie dans <strong>la</strong> prise secteur. Figure 26<br />
B. INSTRUCTIONS D’UTILISATION DE LA BALANCELLE<br />
AVERTISSEMENT :<br />
• Ne pas utiliser <strong>la</strong> ba<strong>la</strong>ncelle si l’un des éléments est cassé ou manquant.<br />
• Avant l’utilisation, vérifier que les mécanismes de verrouil<strong>la</strong>ge soient bien enclenchés et correctement ajustés.<br />
• Ne pas soulever ou transporter <strong>la</strong> ba<strong>la</strong>ncelle lorsque l’enfant y est assis.<br />
B1. Instal<strong>la</strong>tion du bébé dans <strong>la</strong> ba<strong>la</strong>ncelle<br />
AVERTISSEMENT : toujours utiliser le harnais de sécurité 5 points fourni.<br />
IMPORTANT : veiller à ce que les bretelles du harnais ne soient pas vrillées.<br />
P<strong>la</strong>cer le bébé dans <strong>la</strong> ba<strong>la</strong>ncelle en position assise ou couchée. Fermer le harnais 5 points. Figures 27, 28, 29, 30 et 31 Ajuster le harnais 5 points<br />
<strong>au</strong> nive<strong>au</strong> des ép<strong>au</strong>les ou de <strong>la</strong> taille si nécessaire.<br />
B2. Inclinaison du siège (k)<br />
AVERTISSEMENT : ne jamais changer l’inclinaison du siège lorsque le bébé est présent dans <strong>la</strong> ba<strong>la</strong>ncelle. Retirer l’enfant avant chaque manipu<strong>la</strong>tion.<br />
A l’aide de vos deux mains, saisir <strong>la</strong> partie supérieure et inférieure du siège (k) et ajustez en fonction de <strong>la</strong> position souhaitée. Figures 33, 34 et<br />
35 Vous pouvez incliner l’assise en position siège ou semi-allongée à l’aide des boutons d’inclinaison de l’assise (r). Figure 32 Vous pouvez<br />
également bloquer cette position à l’aide des boutons de verrouil<strong>la</strong>ge de l’assise (s). Figure 36<br />
B3. Pliage de <strong>la</strong> ba<strong>la</strong>ncelle et transport<br />
Retirer l’arche d’éveil (i) de <strong>la</strong> ba<strong>la</strong>ncelle. Figure 37 Replier le siège (k) : presser les deux boutons de pliage (n) positionnés de chaque côté de <strong>la</strong><br />
ba<strong>la</strong>ncelle en resserrant simultanément les pieds de <strong>la</strong> ba<strong>la</strong>ncelle. Figures 38, 39, 40 et 41 Fermer le bouton de pression pour bloquer l’assise.<br />
Figure 42<br />
t. Bouton de rég<strong>la</strong>ge du ba<strong>la</strong>ncement<br />
u. Bouton musique et nive<strong>au</strong> sonore<br />
v. Bouton minuterie<br />
w. LEDs indiquant le temps de ba<strong>la</strong>ncement de <strong>la</strong> ba<strong>la</strong>ncelle<br />
C. MISE EN MARCHE DE LA BALANCELLE<br />
C1. Sélection du nive<strong>au</strong> de ba<strong>la</strong>ncement<br />
ATTENTION : ne pas ba<strong>la</strong>ncer manuellement <strong>la</strong> ba<strong>la</strong>ncelle, <strong>la</strong> vitesse voulue s’enclenchera entre 20 et 45 secondes après <strong>la</strong> sélection du nive<strong>au</strong><br />
de ba<strong>la</strong>ncement.<br />
Tourner le bouton de rég<strong>la</strong>ge du ba<strong>la</strong>ncement (t) pour accélérer le nive<strong>au</strong> de ba<strong>la</strong>ncement. Le 1e cran (le plus à g<strong>au</strong>che) étant le ba<strong>la</strong>ncement le<br />
plus faible, le 6e état (le plus à droite) le plus élevé. Pour éteindre le ba<strong>la</strong>ncement, tourner le bouton sur <strong>la</strong> g<strong>au</strong>che.<br />
C2. Bouton pour le choix de <strong>la</strong> musique et de nive<strong>au</strong> sonore (u)<br />
Pour enclencher <strong>la</strong> musique appuyez une fois sur le bouton (u), puis une 2e, 3e et 4e fois pour <strong>au</strong>gmenter le nive<strong>au</strong> sonore. Pour éteindre appuyez<br />
une 5e fois sur le bouton (u). Pour changer de musique, appuyez une 6e fois sur le bouton musique et nive<strong>au</strong> sonore (u).<br />
C3. Bouton de minuterie (v)<br />
Utiliser <strong>la</strong> minuterie pour définir une période de ba<strong>la</strong>ncement.<br />
Presser le bouton (v) pour choisir une période de ba<strong>la</strong>ncement comprise entre 8, 15 ou 30 minutes. Les trois LEDs (w), localisées à côté du bouton<br />
minuterie (v) indiquent <strong>la</strong> période de temps choisie.<br />
SOINS ET ENTRETIEN<br />
Composition<br />
• Aluminium et PVC<br />
• Assise : 100 % polyester (suédine et toile)<br />
Soins et entretien<br />
• Vérifier souvent <strong>la</strong> ba<strong>la</strong>ncelle pour s’assurer qu’il n’y ait pas de vis desserrées, de pièces usées, de tissus déchirés, ou de points décousus.<br />
• Faire remp<strong>la</strong>cer ou réparer les pièces si nécessaire. N’utiliser que des pièces détachées conseillées par <strong>Babymoov</strong>.<br />
• Nettoyer régulièrement <strong>la</strong> ba<strong>la</strong>ncelle.<br />
• Le cale-tête et <strong>la</strong> housse de <strong>la</strong> ba<strong>la</strong>ncelle sont <strong>la</strong>vables en surface. Pour ce<strong>la</strong>, utilisez un chiffon humide ainsi que du savon.<br />
• Pour nettoyer le cadre de <strong>la</strong> ba<strong>la</strong>ncelle, utiliser exclusivement du savon domestique ou un détergent et de l’e<strong>au</strong> tiède. Ne pas utiliser d’e<strong>au</strong><br />
de javel.<br />
• Une exposition excessive <strong>au</strong> soleil ou à <strong>la</strong> chaleur peut provoquer <strong>la</strong> décoloration ou le voi<strong>la</strong>ge des pièces.<br />
BALANCELLE BUBBLE • Notice d’utilisation 13
EN<br />
Thank you for choosing the BABYMOOV Baby Swing. For your baby’s safety please read these<br />
instructions carefully and make sure you keep it in a safe p<strong>la</strong>ce for future reference.<br />
Meets safety requirements. Meets the requirements of the PR EN 16232: 2011 standard<br />
IMPORTANT-ALWAYS READ THE<br />
INSTRUCTIONS CAREFULLY BEFORE USE AND<br />
KEEP THEM FOR FUTURE REFERENCE<br />
Electric appliances are subject to selective collection. Do not throw away electric and electronic<br />
equipment with the unsorted municipal refuse, but follow the selective collection. Throughout the<br />
European Union this symbol indicates this product must not be thrown in the bin or mixed with domestic<br />
waste but be sorted for recycling.<br />
• Never leave the child unsupervised.<br />
• It is dangerous to use this product on a high surface (a table for<br />
instance).<br />
• This product is not designed for long periods of sleep.<br />
• Always use the safety harness.<br />
• Never move or raise this product when the baby is inside.<br />
WARNINGS<br />
• Do not use this product if your child can sit up by himself or if he<br />
weighs more than 9kg.<br />
• To avoid injuries make sure the children are not nearby when folding<br />
or unfolding the product.<br />
• Do not allow children to p<strong>la</strong>y with this product.<br />
• Never use the p<strong>la</strong>y arch to lift or move this product.<br />
• To be assembled by an adult only.<br />
• Do not use the baby swing if it is damaged or broken.<br />
• Keep the small parts out of children’s reach.<br />
• This product does not rep<strong>la</strong>ce a cradle or cot. If your baby needs to sleep<br />
he should be p<strong>la</strong>ced in a cradle or suitable cot.<br />
• Never use the product if one or more items are broken or missing.<br />
• Do not use accessories or spare parts other than those approved by<br />
the manufacturer.<br />
• Check before using the locking mechanisms are well engaged and<br />
correctly adjusted.<br />
• Check the baby swing suspension system regu<strong>la</strong>rly.<br />
• Always use a 5 point safety harness.<br />
• Never use the baby swing without its protective cover.<br />
• Do not use the baby swing on a soft surface (bed, couch, cushion); the<br />
seat may tip over and be a danger for your child.<br />
SAFETY INSTRUCTIONS TO FOLLOW<br />
WARNING<br />
Type of batteries recommended: 4 AA batteries (not supplied).<br />
• The non-rechargeable batteries must not be recharged; otherwise they could explode or leak.<br />
• Different sorts of batteries must not be mixed, nor new and used batteries.<br />
• The batteries must be inserted with the correct po<strong>la</strong>rity.<br />
• The exh<strong>au</strong>sted batteries must be removed from the baby swing.<br />
• Keep the batteries out of children’s reach.<br />
• Change the batteries when the baby swing stops working satisfactorily.<br />
• Remove the batteries before storing your baby swing for a long time.<br />
• Throw the batteries away in the container provided for the purpose.<br />
• Rep<strong>la</strong>ce and recharge all the batteries at the same time.<br />
• The rechargeable batteries must be charged with an adult’s supervision.<br />
• Do not recharge a rechargeable battery in a different charger.<br />
• The power supply terminals must not be short-circuited.<br />
• Do not throw batteries in the fire as they could burst or give off noxious substances.<br />
• Keep the baby swing away from any f<strong>la</strong>me, intense heat sources,<br />
electric plugs, leads, cookers etc., or objects that may be within the<br />
child’s reach.<br />
• To avoid any risk of suffocation keep p<strong>la</strong>stic packing bags out of babies’<br />
and young children’s reach.<br />
• Never add a pillow, b<strong>la</strong>nket, or padding; only use the headrest supplied<br />
with your baby swing.<br />
• Never put objects with strings around your child’s neck; do not hang<br />
strings from the baby swing and do not tie strings to the toys. Doing<br />
so could strangle your baby.<br />
• Never p<strong>la</strong>ce the baby swing by a window with blind or curtain cords:<br />
they could strangle your child.<br />
• Do not attach toys other than those supplied by <strong>Babymoov</strong>.<br />
External adapter:<br />
• Only use the baby swing with the recommended adapter.<br />
• The adapters must be examined regu<strong>la</strong>rly so as to detect eventual damage to the lead, plug, case and other parts. Do not use the appliance if<br />
you detect any damage.<br />
14<br />
NEW GENERATION BUBBLE BABY SWING • Instruction Manual
WARNING : before assembly take all the items out of the box and identify them.<br />
a. Left front leg<br />
b. Right front leg<br />
c. Left back leg<br />
d. Right back leg<br />
e. Left side leg<br />
f. Right side leg<br />
g. Left swing leg<br />
h. Right swing leg<br />
i. Early learning arch<br />
j. Protective masks<br />
COMPOSITION OF THE BABY SWING<br />
k. Seat<br />
l. Headrest<br />
m. Electronic panel<br />
n. Folding buttons<br />
o. Press stud<br />
p. Mains adapter<br />
q. Protective cover<br />
r. Seat angle controls<br />
s. Seat lock<br />
BABY SWING USE AND FEATURES<br />
A. INSTRUCTIONS FOR ASSEMBLING THE PARTS<br />
A1. Assembling the baby swing legs<br />
Insert the left back leg (c) in the right back leg (d). Make sure the right back leg press stud (d) fits well into the orifice of the left back leg (c). The letters<br />
D+D have to be joined together. Figure 1 In the same way insert the left front leg (a) into the right front leg (b). Make sure the left front leg press<br />
stud (a) fits well into the orifice of the right front leg (b). The letters C+C have to be joined together. Figure 2 For the operation to be completed correctly<br />
the user has to hear a “click” and see a grey press stud appear on the side of the opposite leg.<br />
A2. Assembling the swing arms<br />
Insert the left side leg (e) in the left front (a) and left back leg (c) so that the letters A+A are joined together as well as the letters B+B. Figures 3 and<br />
4 Insert right side leg (f) in the front right (b) and right back leg (d) and then click on the front legs. Figure 5 To unfold the legs press the folding buttons<br />
(n) on the sides of the side legs (e) and (f). For the operation to be completed correctly the user has to hear a “click” and see a grey press stud appear<br />
on the side of the opposite leg. Figure 6<br />
A3. Assembling the baby swing seat<br />
To install the seat (k), insert the right swing leg (h) on the side of the electronic panel (m), and the left swing leg (g) on the opposite side. Figures 7,<br />
8, 9, 10 and 11 Fix the swing arms with the protective masks (j) in the orifices provided for the purpose. Figures 12, 13, 14 and 15<br />
A4. Installing the protective cover<br />
WARNING: never use the baby swing without its protective cover.<br />
Pivot the seat arches (k) upwards until they join. Figure 16 Cover the seat arches (k) with the protective cover (q). In order not to put the protective<br />
cover on the wrong way (q) make sure the <strong>Babymoov</strong> logo is facing downwards. Figure 17<br />
Push the two seat arches apart (k) while sliding the protective cover (q) along the two arches. Figures 18, 19 and 20<br />
A5. Installing the early learning arch (i)<br />
WARNING: never use the early learning arch to lift the baby swing.<br />
Insert the early learning arch (i) in the slots p<strong>la</strong>ced for the purpose. Figures 21 and 22<br />
A6. Installing the headrest (l)<br />
WARNING: never add a pillow, b<strong>la</strong>nket, or padding; only use the headrest supplied with your baby swing. The headrest (l) is an optional item that<br />
gives the baby’s head extra support for optimum comfort. This item can be detached from the baby swing.<br />
To attach or detach the headrest (l) it is enough to use the Velcro strip behind the headrest; it has to be slipped on the protective cover (q). Figure<br />
23<br />
A7. Installing the batteries<br />
The electronic panel (m) of the baby swing has to be powered by 4 1.5V AA batteries (not supplied). For better performance use alkaline batteries.<br />
Use a cross-head screwdriver (not supplied) to open the electronic panel (m) on the right swing leg (h). Figure 24 Insert the 4 1.5V AA batteries (not<br />
supplied) while respecting the marks of po<strong>la</strong>rity as shown on the disp<strong>la</strong>y. Figure 25<br />
Screw the electronic panel (m) back on with a screwdriver. Do not over-tighten.<br />
A8. Connecting to the mains (adapter supplied) (p)<br />
IMPORTANT: before any operation make sure your baby swing is switched off.<br />
The baby swing can function connected to a mains socket with the aid of the adapter supplied.<br />
Input: 230V / 50Hz<br />
Output: 6V / 500Ma<br />
The adapters must be examined to detect any eventual damage to the lead, plug, panel and other parts. If any damage is detected do not use<br />
the appliance.<br />
The baby swing must be used only with the adapter recommended.<br />
Connect the adapter to the dedicated orifice and the other end in the mains socket. Figure 26<br />
NEW GENERATION BUBBLE BABY SWING • Instruction Manual 15
B. INSTRUCTIONS FOR USING THE BABY SWING<br />
WARNING:<br />
• Do not use the baby swing if one of the parts is broken or missing.<br />
• Before using, check the locking mechanisms are well engaged and correctly adjusted.<br />
• Do not lift or transport the baby swing when the baby is sitting in it.<br />
B1. Installing the baby in the baby swing<br />
WARNING: always use the 5 point safety harness supplied.<br />
IMPORTANT: make sure the straps of the harness do not become twisted.<br />
P<strong>la</strong>ce the baby in the baby swing in a sitting position or lying down. Fasten the 5 point harness. Figures 27, 28, 29, 30 and 31 Adjust the 5 point<br />
harness at the level of the shoulders or waist if necessary.<br />
B2. The angle of the seat (k)<br />
WARNING: never change the angle of the seat when the baby is in the baby swing. Take the baby out before each manipu<strong>la</strong>tion.<br />
Using both your hands grip the upper and lower parts of the seat (k) and adjust it depending on the position desired. Figures 33, 34 and 35 You<br />
can incline the base in seat or semi-recumbent position with the aid of the seat inclination controls (r). Figure 32 You can also block this position y<br />
using the seat locking buttons (s). Figure 36<br />
B3. Folding the baby swing and transport<br />
Remove the early learning arch (i) from the baby swing. Figure 37 Fold up the seat (k): press the two folding buttons (n) on either side of the baby<br />
swing while at the same time tightening the legs of the baby swing together. Figures 38, 39, 40 and 41 Close the press stud to block the seat.<br />
Figure 42<br />
t. Switch to adjust the swinging<br />
u. Music and sound level button<br />
v. Timer button<br />
w. LEDs indicating swinging time of the baby swing<br />
C. STARTING THE BABY SWING<br />
C1. Selection of swinging rate<br />
WARNING: do not swing the baby swing by hand: the chosen speed will set in between 20 and 45 seconds after selecting the swinging rate.<br />
Turn the switch to set the swinging (t) to accelerate the swinging rate. The 1st setting - the farthest to the left – is the weakest swing, the 6th – the<br />
farthest to the right – the strongest. To switch the swinging off turn the switch on the left.<br />
C2. Button for choosing the music and sound level (u)<br />
To switch the music on press the button (u), once, then a 2nd, 3rd, and 4th time to raise the sound level. To switch off press the button (u). a 5th<br />
time. To change the music press the music and sound level button a 6th time.(u).<br />
C3. Timer button (v)<br />
Use the timer to set a period of swinging.<br />
Press the button (v) to choose a period of swinging of between 8, 15, or 30 minutes. The three LEDs (w), beside the timer button (v) indicate the period<br />
of time selected.<br />
CARE AND MAINTENANCE<br />
Composition<br />
• Aluminium and PVC<br />
• Seat: 100% polyester (suede cloth and canvass)<br />
Care and maintenance<br />
• Check the baby swing frequently to make sure there are no loose screws, worn out parts, torn fabric, or unstitching.<br />
• Have the parts rep<strong>la</strong>ced or repaired if necessary. Only use spare parts recommended by <strong>Babymoov</strong>.<br />
• Clean the baby swing regu<strong>la</strong>rly.<br />
• The baby swing headrest and cover are surface washable. This means they can be washed with a damp cloth and soap.<br />
• To clean the frame of the baby swing, use household soap or detergent and warm water exclusively. Do not use bleach.<br />
• Heat or excessive exposure to the sun can c<strong>au</strong>se the parts to fade or warp.<br />
16<br />
NEW GENERATION BUBBLE BABY SWING • Instruction Manual
DE<br />
Wir danken Ihnen, dass Sie sich für die BABYMOOV-Sch<strong>au</strong>kel entschieden haben. Für die Sicherheit Ihres<br />
Kindes empfehlen wir, diese Anleitung <strong>au</strong>fmerksam zu lesen und sie für späteres Nachsch<strong>la</strong>gen<br />
sorgfältig <strong>au</strong>fzubewahren.<br />
Entspricht den Sicherheitsanforderungen. Entspricht den Anforderungen der Norm PR EN 16232: 2011<br />
WICHTIG – DIE ANWEISUNGEN<br />
AUFMERKSAM VOR DEM EINSATZ DER<br />
SCHAUKEL LESEN UND FÜR SPÄTERES<br />
NACHLESEN AUFBEWAHREN<br />
Elektro<strong>au</strong>sstattung wird getrennt vom häuslichen Abfall gesammelt. Entsorgen Sie keine Abfälle von<br />
Elektrogeräten und elektronischen Geräten mit dem unsortierten H<strong>au</strong>smüll, sondern entsorgen Sie sie<br />
ordnungsgemäß. EU-weit zeigt dieses Symbol an, dass dieses Produkt nicht in den H<strong>au</strong>smüll gehört,<br />
sondern getrennt zu entsorgen ist.<br />
• Lassen Sie Ihr Kind nie unbe<strong>au</strong>fsichtigt.<br />
• Es ist gefährlich, dieses Produkt <strong>au</strong>f einer höher gelegenen Fläche (z.<br />
B. einem Tisch) <strong>au</strong>fzustellen.<br />
• Dieses Produkt ist nicht für längere Sch<strong>la</strong>fperioden gedacht.<br />
• Immer den Gurt anlegen.<br />
• Das Produkt weder versetzen, noch anheben, wenn das Kind in der<br />
Sch<strong>au</strong>kel liegt.<br />
• Dieses Produkt ist nicht für Kinder geeignet, die selbständig sitzen<br />
WARNHINWEISE<br />
können oder deren Körpergewicht 9 kg überschreitet.<br />
• Um Verletzungen zu vermeiden sicherstellen, dass die Kinder sich<br />
beim Zusammen- und Auseinanderfalten des Produktes nicht in<br />
unmittelbarer Nähe <strong>au</strong>fhalten.<br />
• Kinder nicht mit diesem Produkt spielen <strong>la</strong>ssen.<br />
• Das Produkt nie an dem Haltebügel für Spielzeug anheben oder<br />
verschieben.<br />
• Die Montage ist von Erwachsenen vorzunehmen.<br />
• Sch<strong>au</strong>kel nicht verwenden, wenn sie beschädigt oder kaputt ist.<br />
• Kleinteile für Kinder unerreichbar <strong>au</strong>fbewahren.<br />
• Dieses Produkt ersetzt weder eine Babytrage, noch ein Babybett.<br />
Wenn Ihr Kind sch<strong>la</strong>fen soll, sollte es in eine geeignete Babytrage<br />
oder ein Bett gelegt werden.<br />
• Produkt nicht verwenden, wenn ein oder mehrere Elemente kaputt<br />
sind oder fehlen.<br />
• Nur von dem Hersteller anerkanntes Zubehör oder Ersatzteile<br />
verwenden.<br />
• Vor dem Einsatz prüfen, dass die Verriegelungsmechanismen korrekt<br />
eingerastet und eingestellt sind.<br />
• Regelmäßig die Aufhängung der Sch<strong>au</strong>kel prüfen.<br />
• Immer einen 5-Punkt Sicherheitsgurt verwenden.<br />
• Nie die Sch<strong>au</strong>kel ohne den Schutzbezug verwenden.<br />
• Sch<strong>au</strong>kel nie <strong>au</strong>f einer weichen Unter<strong>la</strong>ge (Bett, Sofa, Kissen) <strong>au</strong>fstellen;<br />
der Sitz könnte kippen und Ihr Kind gefährden.<br />
ZU BERÜCKSICHTIGENDE SICHERHEITSHINWEISE<br />
ACHTUNG<br />
• Sch<strong>au</strong>kel von offenem Feuer, Hitzequellen, Steckdosen, Stromkabeln,<br />
Küchenherd usw. oder Gegenständen fern halten, die das Kind<br />
erreichen könnte.<br />
• Zur Vermeidung von Erstickungsgefahr die P<strong>la</strong>stiktüten der Verpackung<br />
für Babys und Kleinkinder unerreichbar <strong>au</strong>fbewahren.<br />
• Nie Kissen, Decke oder Polstermaterial in die Sch<strong>au</strong>kel legen; nur das<br />
mit der Sch<strong>au</strong>kel gelieferte Kopfstützenkissen verwenden.<br />
• Um den Hals des Kindes keine an einem Band befestigten<br />
Gegenstände anbringen; keine Bänder an die Sch<strong>au</strong>kel hängen und<br />
das Spielzeug nicht mit Bändern befestigen. Das Baby könnte dadurch<br />
erdrosselt werden.<br />
• Sch<strong>au</strong>kel nicht in der Nähe eines Fensters <strong>au</strong>fstellen, wo Bänder von<br />
Jalousien oder Gardinen das Kind erdrosseln könnten.<br />
• Nur das von <strong>Babymoov</strong> gelieferte Spielzeug verwenden.<br />
Empfohlener Batterietyp: 4 AA-Batterien (nicht im Lieferumfang enthalten).<br />
• Keine normalen Batterien wieder <strong>au</strong>f<strong>la</strong>den. Ein Auf<strong>la</strong>deversuch normaler Batterien kann zu Explosion oder Leckage der Batterien führen.<br />
• Verschiedene Batterietypen oder alte und neue Batterien dürfen nicht gleichzeitig verwendet werden.<br />
• Beim Einlegen der Batterien <strong>au</strong>f die richtige Ausrichtung (Po<strong>la</strong>rität) achten.<br />
• Leere Batterien sind <strong>au</strong>s der Sch<strong>au</strong>kel zu entfernen.<br />
• Batterien für Kinder unzugänglich <strong>au</strong>fbewahren.<br />
• Batterien <strong>au</strong>st<strong>au</strong>schen, sobald die Sch<strong>au</strong>kel unzureichend mit Strom versorgt wird.<br />
• Bitte nehmen Sie die Batterien <strong>au</strong>s dem Batteriefach, bevor Sie die Sch<strong>au</strong>kel für längere Zeit <strong>au</strong>ßer Betrieb nehmen.<br />
• Bitte entsorgen Sie die Batterien in entsprechenden Sammelvorrichtungen.<br />
• Alle Batterien müssen gleichzeitig <strong>au</strong>sget<strong>au</strong>scht oder <strong>au</strong>fge<strong>la</strong>den werden.<br />
• Akkus sind unter Aufsicht eines Erwachsenen <strong>au</strong>fzu<strong>la</strong>den.<br />
• Kein anderes Auf<strong>la</strong>degerät zum Auf<strong>la</strong>den eines Akkus verwenden.<br />
• Keinen Kurzschluss an den Zuleitungsklemmen herstellen.<br />
• Batterien nicht ins Feuer werfen, sie könnten p<strong>la</strong>tzen oder Schadstoffe freisetzen.<br />
SCHAUKEL BUBBLE NEW GENERATION • Benutzungsanleitung 17
ACHTUNG<br />
Externer Adapter:<br />
• Die Sch<strong>au</strong>kel darf nur mit dem empfohlenen Adapter verwendet werden.<br />
• Die Adapter sind regelmäßig <strong>au</strong>f eventuelle Schäden am Kabel, Stecker, Gehäuse und den anderen Teilen zu prüfen. Keine beschädigten Geräte<br />
verwenden.<br />
WARNUNG: Vor der Montage alle Bestandteile <strong>au</strong>s der Verpackung nehmen und identifizieren.<br />
a. Fuß vorne links<br />
b. Fuß vorne rechts<br />
c. Fuß hinten links<br />
d. Fuß hinten rechts<br />
e. Linker seitlicher Fuß<br />
f. Rechter seitlicher Fuß<br />
g. Linker Sch<strong>au</strong>kelfuß<br />
h. Rechter Sch<strong>au</strong>kelfuß<br />
i. Stimulierender Spielbogen<br />
j. Schutzkappen<br />
ZUSAMMENSETZUNG DER SCHAUKEL<br />
k. Sitz<br />
l. Kopfstützenkissen<br />
m. Elektronikmodul<br />
n. Knöpfe zum Zusammenlegen<br />
o. Druckknopf<br />
p. Stromadapter<br />
q. Schutzbezug<br />
r. Knöpfe zum Verstellen des Sitz-Neigungswinkels<br />
s. Verriegelungsknopf für den Sitz<br />
EINSATZ UND MERKMALE DER SCHAUKEL<br />
A. ANWEISUNGEN FÜR DEN ZUSAMMENBAU<br />
A1. Montage der Sch<strong>au</strong>kelfüße<br />
Den Fuß hinten links (c) in den Fuß hinten rechts (d) einführen. Sicherstellen, dass der Druckknopf des Fußes hinten rechts (d) richtig in die Öffnung<br />
des Fußes hinten links (c) einrastet.Die Buchstaben D+D müssen <strong>au</strong>feinander treffen.Abb. 1 Ebenso den Fuß vorne links (a) in den Fuß vorne rechts<br />
(b) einführen. Sicherstellen, dass der Druckknopf des Fußes vorne links (a) richtig in die Öffnung des Fußes vorne rechts (b) einrastet. Die Buchstaben<br />
C+C müssen <strong>au</strong>feinander treffen.Abb. 2 Die Montage ist korrekt, wenn man beim Einrasten ein „Klicken" hört und ein gr<strong>au</strong>er Druckknopf an der<br />
Seite des gegenüberliegenden Fußes erscheint.<br />
A2. Montage der Sch<strong>au</strong>ke<strong>la</strong>rme<br />
Den linken seitlichen Fuß (e) in den vorderen linken Fuß (a) und den hinteren linken Fuß (c) so einführen, dass die Buchstaben A+A und B+B<br />
<strong>au</strong>feinander treffen. Abb. 3 und 4 Den rechten seitlichen Fuß (f) in den rechten vorderen Fuß (b) und den rechten hinteren Fuß (d) einführen und<br />
die Vorderfüße verklipsen. Abb. 5 Zum Aufstellen der Füße <strong>au</strong>f die entsprechenden Knöpfe (n) an den Seiten der Seitenfüße (e) und (f). drücken.<br />
Die Montage ist korrekt, wenn man beim Einrasten ein „Klicken" hört und ein gr<strong>au</strong>er Druckknopf an der Seite des gegenüberliegenden Fußes erscheint.<br />
Abb. 6<br />
A3. Montage des Sch<strong>au</strong>kelsitzes<br />
Für die Montage des Sitzes (k), den rechten Sch<strong>au</strong>kelfuß (h) am Elektronikmodul (m) und den linken Sch<strong>au</strong>kelfuß (g) an der gegenüberliegenden<br />
Seite einführen. Abb. 7, 8, 9, 10 und 11 Sch<strong>au</strong>ke<strong>la</strong>rme mit den Schutzabdeckungen (j) in den dazu vorgesehenen Öffnungen befestigen. Abb. 12,<br />
13, 14 und 15<br />
A4. Anbringung des Schutzbezuges<br />
WARNUNG: Nie die Sch<strong>au</strong>kel ohne den Schutzbezug verwenden.<br />
Die Bögen des Sitzes (k) nach oben schwenken, bis sie zusammentreffen. Abb. 16 Schutzbezug (q) <strong>au</strong>f die Bögen des Sitzes (k) spannen. Der Schutzbezug<br />
(q) ist richtig angebracht, wenn das <strong>Babymoov</strong>-Logo nach unten zeigt. Abb. 17<br />
Die beiden Sitzbögen (k) wegbiegen und den Schutzbezug (q) über die Bögen führen.Abb. 18, 19 und 20<br />
A5. Montage des Spielbogens (i)<br />
WARNUNG: Sch<strong>au</strong>kel nicht am Spielbogen anheben.<br />
Spielbogen (i) in die entsprechenden Schlitze einführen. Abb. 21 und 22<br />
A6. Anbringung des Kopfstützenkissens (l)<br />
WARNUNG: Nie Kissen, Decke oder Polstermaterial in die Sch<strong>au</strong>kel legen; nur das mit der Sch<strong>au</strong>kel gelieferte Kopfstützenkissen verwenden. Das<br />
Kopfstützenkissen (l) ist eine Option und bietet dem Kopf des Kindes zusätzlichen Halt. Es kann von der Sch<strong>au</strong>kel entfernt werden.<br />
Das Kopfstützenkissen (l) mit dem Klettverschluss an der Kissenrückseite befestigen, der <strong>au</strong>f den Schutzbezug (q) zu stecken ist. Abb. 23<br />
A7. Einlegen der Batterien<br />
Das Elektronikmodul (m) der Sch<strong>au</strong>kel benötigt 4 1,5 V AA-Batterien (nicht im Lieferumfang enthalten). Alkali-Batterien haben eine längere<br />
Betriebsd<strong>au</strong>er.<br />
Öffnen Sie das Elektronikmodul (m) am rechten Sch<strong>au</strong>kelfuß (h). Abb. 24 mit einem Kreuzschr<strong>au</strong>benzieher (nicht im Lieferumfang enthalten). Legen<br />
Sie die 4 1,5 V AA-Batterien (nicht im Lieferumfang enthalten) entsprechend der in der Abbildung gezeigten Markierung der Pole ein. Abb.25<br />
Verschließen Sie das Elektronikmodul (m) wieder mit dem Schr<strong>au</strong>benzieher. Schr<strong>au</strong>ben nicht zu stark anziehen.<br />
18<br />
SCHAUKEL BUBBLE NEW GENERATION • Benutzungsanleitung
A8. Anschluss an die Stromversorgung (Adapter im Lieferumfang enthalten) (p)<br />
WICHTIG: Prüfen Sie zunächst, dass die Sch<strong>au</strong>kel <strong>au</strong>sgeschaltet ist.<br />
Die Sch<strong>au</strong>kel kann mit dem Adapter an eine Steckdose angeschlossen werden.<br />
Input : 230V / 50Hz<br />
Output : 6V / 500Ma<br />
Adapter sind regelmäßig <strong>au</strong>f eventuelle Schäden am Kabel, Stecker, Gehäuse und den anderen Teilen zu prüfen. Bei Schäden die Sch<strong>au</strong>kel nicht<br />
verwenden. Die Sch<strong>au</strong>kel darf nur mit dem empfohlenen Adapter verwendet werden.<br />
Adapter-Ansatzstück in die entsprechende Öffnung einführen und den Netzstecker einführen. Abb. 26<br />
B. ANWEISUNGEN ZUR NUTZUNG DER SCHAUKEL<br />
WARNUNG:<br />
• Sch<strong>au</strong>kel nicht benutzen, wenn ein Bestandteil kaputt ist oder fehlt.<br />
• Vor dem Einsatz prüfen, dass die Verriegelungsmechanismen korrekt eingerastet und eingestellt sind.<br />
• Sch<strong>au</strong>kel nicht anheben oder bewegen, wenn das Kind darin sitzt.<br />
B1. Baby in die Sch<strong>au</strong>kel setzen<br />
WARNUNG: Dem Kind immer den mitgelieferten 5-Punkt-Gurt anlegen.<br />
WICHTIG: Dar<strong>au</strong>f achten, dass die Gurtträger nicht verdreht sind.<br />
Baby in die Sch<strong>au</strong>kel setzen oder legen. 5-Punkte-Gurt schließen. Abb. 27, 28, 29, 30 et 31 5-Punkte-Gurt bei Bedarf an den Schultern oder in der<br />
Taille nachjustieren.<br />
B2. Sitzneigung (k)<br />
WARNUNG: Sitzneigung nie verstellen, wenn das Baby sich in der Sch<strong>au</strong>kel befindet. Vor jedem Eingriff das Kind <strong>au</strong>s der Sch<strong>au</strong>kel nehmen.<br />
Mit beiden Händen den oberen und unteren Teil des Sitzes (k) fassen und diesen in die gewünschte Position bringen. Abb. 33, 34 et 35 Der Sitz<br />
kann anhand der Knöpfe zur Einstellung des Neigungswinkels (r). Abb. 32 in Sitzposition oder halbliegende Position gebracht werden. Anhand der<br />
Verriegelungsknöpfe für den Sitz (s) können Sie diese Position <strong>au</strong>ch arretieren. Abb. 36<br />
B3. Sch<strong>au</strong>kel zusammenlegen und transportieren<br />
Spielbogen (i) entfernen. Abb. 37 Sitz (k) zusammenlegen: Die beiden entsprechenden Knöpfe (n) beidseitig der Sch<strong>au</strong>kel drücken und gleichzeitig<br />
die Sch<strong>au</strong>kelfüße zusammendrücken. Abb. 38, 39, 40 et 41 Druckknopf schließen, um den Sitz zu arretieren. Abb. 42<br />
t. Einstellknopf für die Sch<strong>au</strong>kelbewegung<br />
u. Musik-Taste und L<strong>au</strong>tstärke<br />
v. Knopf Kurzzeitwecker<br />
w. LED-Anzeige der Sch<strong>au</strong>kelzeit<br />
C. SCHAUKEL EINSCHALTEN<br />
C1. Auswahl der Sch<strong>au</strong>kelgeschwindigkeit<br />
ACHTUNG: Die Sch<strong>au</strong>kel nicht von Hand bewegen, die gewählte Geschwindigkeit schaltet sich innerhalb von 20 bis 45 Sekunden nach Auswahl<br />
ein.<br />
Die Sch<strong>au</strong>kelgeschwindigkeit lässt sich durch Drehen des Einstellknopfes der Sch<strong>au</strong>kelintensität (t) verändern. Auf Stufe 1 (ganz links) ist die<br />
Sch<strong>au</strong>kelbewegung am sanftesten, <strong>au</strong>f Stufe 6 (ganz rechts) am stärksten. Die Sch<strong>au</strong>kelbewegung lässt sich durch Drehen des Knopfes ganz nach<br />
links <strong>au</strong>sschalten.<br />
C2. Knopf zur Auswahl von Musik und L<strong>au</strong>tstärke (u)<br />
Durch einfachen Druck <strong>au</strong>f die Taste (u) wird die Musik eingeschaltet, durch einen 2., 3., und 4. Druck wird die L<strong>au</strong>tstärke eingestellt. Ein 5. Druck<br />
<strong>au</strong>f die Taste (u) schaltet die Musik <strong>au</strong>s. Wenn Sie eine andere Musik <strong>au</strong>swählen wollen, drücken Sie ein 6. Mal <strong>au</strong>f die Taste Musik und L<strong>au</strong>tstärke<br />
(u).<br />
C3. Kurzzeitwecker (v)<br />
Mit dem Kurzzeitwecker können Sie eine Sch<strong>au</strong>kelzeit einstellen.<br />
Drücken Sie die Taste (v) um 8, 15 oder 30 Minuten Sch<strong>au</strong>kelzeit <strong>au</strong>szuwählen. Die drei LED (w) neben der Taste des Kurzzeitweckers (v) zeigen die<br />
gewählte Zeit an.<br />
PFLEGE UND WARTUNG<br />
Zusammensetzung<br />
• Aluminium und PVC<br />
• Sitz: 100 % Polyester (Wildlederimitat und Stoff)<br />
Pflege und Wartung<br />
• Sch<strong>au</strong>kel häufig <strong>au</strong>f lockere Schr<strong>au</strong>ben, verschlissene Teile, zerrissenen Stoff oder gep<strong>la</strong>tzte Nähte überprüfen.<br />
• Teile bei Bedarf <strong>au</strong>st<strong>au</strong>schen oder reparieren <strong>la</strong>ssen. Nur von <strong>Babymoov</strong> empfohlene Ersatzteile verwenden.<br />
• Sch<strong>au</strong>kel regelmäßig reinigen.<br />
• Die Oberfläche von Kopfstützenkissen und Sch<strong>au</strong>kelbezug ist abwaschbar. Mit feuchtem Tuch und Seife reinigen.<br />
• Den Rahmen der Sch<strong>au</strong>kel nur mit H<strong>au</strong>shaltsseife oder Reinigungsmittel und <strong>la</strong>uwarmem Wasser reinigen. Kein Chlorwasser verwenden.<br />
• Starke Sonnen- oder Hitzeeinwirkung können zu Verfärbungen oder Schleierbildung <strong>au</strong>f den Teilen führen.<br />
SCHAUKEL BUBBLE NEW GENERATION • Benutzungsanleitung 19
NL<br />
Bedankt dat u voor het BABYMOOV schommelstoeltje heeft gekozen. Voor de veiligheid van uw baby<br />
wordt u verzocht deze gebruiksaanwijzing aandachtig te lezen, en te bewaren voor <strong>la</strong>tere nas<strong>la</strong>g.<br />
In overeenstemming met de veiligheidseisen. In overeenstemming met de norm PR EN 16232: 2011<br />
BELANGRIJK- VÒÒR GEBRUIK EERST DE<br />
GEBRUIKSAANWIJZING LEZEN, EN DEZE<br />
BEWAREN VOOR LATERE NASLAG.<br />
Elektrisch afval, waaronder elektrische apparaten moeten gescheiden ingezameld worden. Dit symbool<br />
geldt voor de hele Europese Gemeenschap, en geeft aan dat dit product niet in de vuilnisbak of bij<br />
huisvuil gegooid mag worden, maar gescheiden ingezameld moet worden.<br />
• Een kind nooit zonder toezicht <strong>la</strong>ten.<br />
• Het is gevaarlijk om dit product ergens op te zetten (een tafel,<br />
bijvoorbeeld).<br />
• Dit product is niet geschikt om <strong>la</strong>ng in te s<strong>la</strong>pen.<br />
• Altijd het bevestigingssysteem gebruiken.<br />
• Dit product niet met de baby erin verp<strong>la</strong>atsen of optillen.<br />
WAARSCHUWINGEN<br />
• Dit product niet gebruiken als uw baby kan zitten, of meer dan 9kg<br />
weegt.<br />
• Om verwondingen te voorkomen moet dit product uit de buurt van<br />
kinderen ingek<strong>la</strong>pt en uitgek<strong>la</strong>pt worden.<br />
• Kinderen niet met dit product <strong>la</strong>ten spelen.<br />
• Dit product nooit bij de speelboog optillen of verp<strong>la</strong>atsen.<br />
• Dit product niet gebruiken wanneer één of meerdere onderdelen<br />
ontbreken, of beschadigd zijn.<br />
• Geen andere accessoires of reserve-onderdelen gebruiken dan<br />
aangeraden door de fabrikant.<br />
• Voor gebruik controleren of het vergrendelingssysteem goed<br />
vergrendeld en afgesteld is.<br />
• Regelmatig het veringsysteem van het schommelstoeltje controleren.<br />
• Altijd een 5 punts veiligheidsgordel gebruiken.<br />
• Het schommelstoeltje niet zonder zijn beschermingshoes gebruiken.<br />
• Het schommelstoeltje nooit op een zachte ondergrond p<strong>la</strong>atsen (bed,<br />
zitbank, kussen); het zou kunnen kantelen en uw baby in gevaar<br />
brengen.<br />
• Het schommelstoeltje uit de buurt houden van v<strong>la</strong>mmen, hittebronnen,<br />
stekkers, verlengsnoeren, kookfornuis enz. houden, of van voorwerpen<br />
TE RESPECTEREN VEILIGHEIDSINSTRUCTIES<br />
PAS OP<br />
dat het baby zou kunnen pakken.<br />
• Om verstikking te voorkomen moeten de p<strong>la</strong>stic zakken van de<br />
verpakking buiten bereik van baby’s en jonge kinderen gehouden<br />
worden.<br />
• Alleen het hoofdsteuntje geleverd met uw schommelstoeltje gebruiken;<br />
geen kussen, dekens of opvulling toevoegen.<br />
• Geen voorwerpen met touwtjes om de nek van uw baby p<strong>la</strong>atsen; geen<br />
touwtjes aan het schommelstoeltje hangen, en geen touwtjes aan<br />
speelgoed bevestigen. Dit kan verstikkingsgevaar voor uw baby<br />
betekenen.<br />
• Het schommelstoeltje niet bij een raam zetten waar de koorden van<br />
een rolgordijn of gordijnen verstikkingsgevaar voor uw baby zouden<br />
kunnen betekenen.<br />
• Alleen de door <strong>Babymoov</strong> bijgeleverde speelgoed bevestigen.<br />
Het aanbevolen type batterijen: 4 AA batterijen (niet bijgeleverd).<br />
• Niet op<strong>la</strong>adbaar batterijen mogen niet opge<strong>la</strong>den worden. De batterijen kunnen dan ontploffen, of gaan lekken.<br />
• Gebruik geen verschillende type batterijen, of nieuwe en oude batterijen door elkaar.<br />
• Bij het p<strong>la</strong>atsen van de batterijen de po<strong>la</strong>riteit respecteren.<br />
• Lege batterijen moeten uit het schommelstoeltje verwijderd worden.<br />
• Batterijen buiten bereik van kinderen bewaren.<br />
• De batterijen vervangen wanneer het schommelstoeltje niet goed meer werkt.<br />
• De batterijen uit het schommelstoeltje verwijderen wanneer deze voor <strong>la</strong>ngere tijd niet gebruikt wordt.<br />
• Lege batterijen inleveren als KCA.<br />
• Alle batterijen tegelijk op<strong>la</strong>den of vervangen.<br />
• De op<strong>la</strong>adbare batterijen moeten onder toezicht van een volwassene opge<strong>la</strong>den worden.<br />
• Op<strong>la</strong>adbare batterijen niet in verschillende op<strong>la</strong>ders op<strong>la</strong>den.<br />
• Zorg ervoor dat er geen kortsluiting bij de batterijpolen ontstaat.<br />
• Batterijen niet in het vuur gooien; de batterijen kunnen dan ontploffen, of gaan lekken.<br />
Externe adapter:<br />
• Het schommelstoeltje mag alleen met de aanbevolen adapter gebruikt worden.<br />
• De adapters moeten regelmatig gecontroleerd worden op beschadigingen van het koord, de stekker, de behuizing en andere onderdelen. In<br />
geval van schade het apparaat niet meer gebruiken.<br />
20<br />
BUBBLE NEW GENERATION SCHOMMELSTOELTJE • Gebruikshandleiding
WAARSCHUWING: voor montage alle onderdelen uit de doos halen voor controle.<br />
a. Linker voorpoot<br />
b. Rechter voorpoot<br />
c. Linker achterpoot<br />
d. Rechter achterpoot<br />
e. Linker zijpoot<br />
f. Rechter zijpoot<br />
g. Linker schommelpoot<br />
h. Rechter schommelpoot<br />
i. Speelboog<br />
j. Beschermingsdoppen<br />
SAMENSTELLING VAN HET SCHOMMELSTOELTJE<br />
GEBRUIK EN KENMERKEN VAN HET SCHOMMELSTOELTJE<br />
A. INSTRUCTIES VOOR MONTAGE VAN DE ONDERDELEN<br />
A1. Montage van de schommelstoelpoten<br />
De linker achterpoot (c) in de rechter achterpoot schuiven (d). Controleren dat de drukknop van de rechter achterpoot (d)) goed in de opening van<br />
de linker achterpoot (c) bevestigd is. De letters D+D moeten samen komen. Afbeelding 1 Op dezelfde manier de linker voorpoot (a) in de rechter<br />
voorpoot schuiven (b). Controleren dat de drukknop van de linker voorpoot (a) goed in de opening van de rechter voorpoot (b). bevestigd is. De<br />
letters C+C moeten samen komen. Afbeelding 2 Om er zeker van te zijn dat alles goed gemonteerd is, moet de persoon een «klik» horen, en er<br />
een grijze drukknop op de zijkant van de tegenovergestelde poot te zien zijn.<br />
A2. Montage van de schommelpoten<br />
De linker zijpoot (e) in de linker voor- (a) en linker achterpoot schuiven (c) zodat de letters A+A en B+B samen komen. Afbeeldingen 3, 4 De rechter<br />
zijpoot (f) in de rechter voor- (b) en de rechter achterpoot voegen (d) vervolgens de voorpoten vastklikken. Afbeelding 5 Om de poten uit te k<strong>la</strong>ppen,<br />
op de uitk<strong>la</strong>pknoppen (n) van de linker- (e) en rechter (f) zijpoten drukken. Om er zeker van te zijn dat alles goed gemonteerd is, moet de persoon<br />
een «klik» horen, en er een grijze drukknop op de zijkant van de tegenovergestelde poot te zien zijn. Afbeelding 6<br />
A3. Montage van de zitting van het schommelstoeltje<br />
Voor de bevestiging van de zitting (k), moet de rechter schommelpoot (h) in de elektronische behuizing (m) gevoegd worden; hetzelfde voor de linker<br />
schommelpoot (g) aan de andere kant. Afbeeldingen 7, 8, 9, 10, 11 De schommelpoten met de beschermingsdoppen (j) in de hiervoor beschermde<br />
openingen bevestigen. Afbeeldingen 12, 13, 14, 15<br />
A4. Bevestiging van de beschermingshoes<br />
WAARSCHUWING: het schommelstoeltje niet zonder beschermingshoes gebruiken.<br />
De bogen van de zittin (k) naar boven draaien, tot ze elkaar raken. Afbeelding 16 De beschermingshoes (q) om de bogen van de zitting (k)<br />
schuiven. Let erop dat de beschermingshoes (q) met het <strong>Babymoov</strong> logo aan de onderkant naar beneden geschoven wordt. Afbeelding 17<br />
De twee bogen van de zitting (k) uit elkaar duwen, en daarbij de beschermingshoes (q) over de twee bogen <strong>la</strong>ten glijden. Afbeeldingen 18, 19,<br />
20<br />
A5. Bevestiging van de speelboog (i)<br />
WAARSCHUWING: Het schommelstoeltje nooit bij de boog optillen of verp<strong>la</strong>atsen.<br />
De speelboog (i) vastzetten in de hiervoor bestemde gleuven. Afbeeldingen 21, 22<br />
k. Zitting<br />
l. Hoofdsteun<br />
m. Electronische behuizing<br />
n. In- uitk<strong>la</strong>pknoppen<br />
o. Drukknop<br />
p. Adapter elektriciteitsnet<br />
q. Beschermingshoes<br />
r. Verstelknop zitting<br />
s. Vergrendelknop zitting<br />
A6. Bevestiging van de hoofdsteun (l)<br />
WAARSCHUWING: geen kussen, dekens of opvulling gebruiken, alleen de hoofdsteun geleverd bij uw schommelstoeltje. De hoofdsteun (l) is een<br />
optioneel onderdeel dat het babyhoofdje extra steun biedt voor een optimaal comfort. Kan van het schommelstoeltje verwijderd worden.<br />
De hoofdsteun (l) is aan de achterzijde voorzien van klittenband. Hierdoor kan de hoofdsteun, voorzien van de beschermingshoes (q), eenvoudig<br />
bevestigd of verwijderd kan worden. Afbeelding 23<br />
A7. Batterijen p<strong>la</strong>atsen<br />
De elektronische behuizing (m) van het schommelstoeltje werkt op 4 AA batterijen van 1,5V (niet geleverd). Voor een <strong>la</strong>ngere levensduur raden wij<br />
u aan alkaline batterijen te gebruiken.<br />
Gebruik een kruiskopschroevendraaier (niet geleverd) om de electronische behuizin (m) te openen op de rechter schommelpoot (h). Afbeelding<br />
24 De 4 AA batterijen van 1,5V (niet geleverd) p<strong>la</strong>atsen. Bij het p<strong>la</strong>atsen van de batterijen op de po<strong>la</strong>riteit letten, zoals aangegeven op de tekening.<br />
Afbeelding 25<br />
De elektronische behuizing (m) weer dicht draaien met de schroevendraaier. Niet te stevig aandraaien.<br />
A8. Aansluiting op het stopcontact (bijgeleverde adapter) (p)<br />
BELANGRIJK: bij iedere handeling op het schommelstoeltje moet deze uitgeschakeld zijn.<br />
Dankzij de bijgeleverde adapter kan het schommelstoeltje gewoon op het stopcontact aangesloten worden.<br />
Input: 230V / 50Hz<br />
Output: 6V / 500Ma<br />
BUBBLE NEW GENERATION SCHOMMELSTOELTJE • Gebruikshandleiding 21
De adapters moeten regelmatig gecontroleerd worden op beschadigingen van het koord, de stekker, de behuizing en andere onderdelen. In geval<br />
van schade het apparaat niet meer gebruiken.<br />
Het schommelstoeltje mag alleen met de aanbevolen adapter gebruikt worden.<br />
De stekker van de adapter op het stopcontact aansluiten. Afbeelding 26<br />
B. GEBRUIKSINSTRUCTIES VAN HET SCHOMMELSTOELTJE<br />
WAARSCHUWING:<br />
• Het Schommelstoeltje niet gebruiken wanneer één of meerdere onderdelen ontbreken of beschadigd zijn.<br />
• Voor gebruik controleren of de vergrendeling goed bevestigd en ingesteld is.<br />
• Het schommelstoeltje nooit optillen of vervoeren als uw baby er inzit.<br />
B1. De baby in het schommelstoeltje zetten<br />
WAARSCHUWING: altijd de bijgeleverde 5 punts veiligheidsgordel gebruiken.<br />
BELANGRIJK: controleren of de banden van de gordel niet gedraaid zijn.<br />
De baby liggend of zittend in het schommelstoeltje zetten. De 5 punts veiligheidsgordel vastmaken. Figures 27, 28, 29, 30, 31 De 5 punts<br />
veiligheidsgordel indien nodig bij de schouders of middel bijstellen.<br />
B2. De zitting (k) verstellen<br />
WAARSCHUWING: de zitting nooit verstellen als uw baby in het schommelstoeltje zit. Voor iedere instelling eerst uw baby er uit halen.<br />
Pak met beide handen de bovenkant en onderkant van de zitting (k) en op de gewenste stand instellen. Afbeeldingen 33, 34, 35 U kunt met de<br />
verstelknoppen (r) de zitting in de zitstand, of in de half liggende stand instellen. Afbeelding 32 U kunt deze stand ook met de vergrendelingsknoppen<br />
(s) van de zitting vergrendelen. Afbeelding 36<br />
B3. Het schommelstoeltje ink<strong>la</strong>ppen en vervoeren<br />
De speelboog (i) van het schommelstoeltje verwijderen. Afbeelding 37 De zitting (k) ink<strong>la</strong>ppen door op de twee ink<strong>la</strong>pknoppen (n) te drukken aan<br />
de zijkanten van het schommelstoeltje, en tegelijkertijd de twee poten van het schommelstoeltje samen te knijpen. Afbeeldingen 38, 39, 40, 41<br />
De drukknop sluiten om de zitting te blokkeren. Afbeelding 42<br />
t. Schommel instellingknop<br />
u. Muziek- en geluidsknop<br />
v. Tijdschake<strong>la</strong>ar<br />
w. LEDs geven de schommeltijd van het schommelstoeltje aan<br />
C. HET SCHOMMELSTOELTJE AANZETTEN<br />
C1. Instelling van de schommelstand<br />
PAS OP: Het schommelstoeltje niet handmatig <strong>la</strong>ten schommelen, de ingestelde snelheid start tussen 20 en 45 seconden na selectie van de<br />
schommelstand. De schommel instellingsknop (t) een s<strong>la</strong>g draaien voor een snellere schommelstand. Het 1ste tandje (helemaal links) is de <strong>la</strong>agste<br />
schommelstand, het 6de tandje (helemaal rechts), de hoogste. Om de schommelfunctie uit te schakelen moet de knop aan de linkerkant uitgedraaid<br />
worden.<br />
C2. Knop voor muziek- en geluidsinstelling (u)<br />
Om de muziek aan te zetten, één keer op de knop voor muziek en geluidsinstelling (u) drukken, en vervolgens een 2de, 3de en 4de keer om het<br />
geluid harder te zetten. Om uit te schakelen, een 5de keer op de knop (u) drukken. Om van muziek te veranderen, een 6de keer op de knop (u)<br />
drukken.<br />
C3. Tijdschake<strong>la</strong>ar (v)<br />
Met de tijdschake<strong>la</strong>ar kunt u de schommeltijd inschakelen.<br />
Druk op de knop (v) voor een schommeltijdinstelling tussen 8, 15 of 30 minuten. De drie LEDs (w), aan de zijkant van de tijdschake<strong>la</strong>ar (v) geven de<br />
ingestelde tijd aan.<br />
REINIGING EN ONDERHOUD<br />
Samenstelling<br />
• Aluminium en PVC<br />
• Zitting: 100% polyester (imitatie-suèdeleder en doek)<br />
Reiniging en onderhoud<br />
• Regelmatig het schommelstoeltje controleren of er geen schroeven los zitten, op versleten onderdelen, gescheurde of losse bekleding.<br />
• Indien nodig onderdelen <strong>la</strong>ten vervangen of repareren. Alleen de door <strong>Babymoov</strong> aanbevolen reserve-onderdelen gebruiken.<br />
• Het schommelstoeltje regelmatig reinigen.<br />
• Het opperv<strong>la</strong>k van de hoofdsteun en de hoes van het schommelstoeltje kan gereinigd worden. Gebruik hiervoor een vochtig doekje en wat zeep.<br />
• Voor de reiniging van het frame van het schommelstoeltje mag alléén huishoud- zeep of reinigingsmiddel, en <strong>la</strong>uw water gebruikt worden. Geen<br />
bleekmiddel gebruiken.<br />
• Een te intensieve blootstelling aan zon en warmte kan verkleuring of kleurverlies van de onderdelen veroorzaken.<br />
22<br />
BUBBLE NEW GENERATION SCHOMMELSTOELTJE • Gebruikshandleiding
ES<br />
Gracias por haber elegido el Ba<strong>la</strong>ncín BABYMOOV. Para <strong>la</strong> seguridad de su bebé, sírvase leer<br />
atentamente este manual de instrucción y conservarlo cuidadosamente para consultarlo ulteriormente.<br />
Conforme a <strong>la</strong>s exigencias de seguridad. Conforme a <strong>la</strong>s exigencias de <strong>la</strong> norma PR EN 16232: 2011<br />
IMPORTANDO LEER ATENTAMENTE LAS<br />
INSTRUCCIONES ANTES DE CUALQUIER<br />
UTILIZACIÓN Y CONSERVARLAS PARA<br />
CUALQUIER REFERENCIA ULTERIOR<br />
Los equipamientos eléctricos deberán recic<strong>la</strong>rse en un centro de recogida selectiva. No deshacerse de<br />
los residuos de equipamientos eléctricos y electrónicos con los residuos municipales no c<strong>la</strong>sificados, sino<br />
que se procederá a una recogida selectiva. Este símbolo indica en toda <strong>la</strong> Unión Europea que este<br />
producto no debe echarse al cubo de basura o mezc<strong>la</strong>rse con <strong>la</strong>s basuras domésticas, sino que deberá<br />
recic<strong>la</strong>rse en un centro de recogida selectiva.<br />
• No dejar nunca al niño sin vigi<strong>la</strong>ncia.<br />
• Es peligroso utilizar este producto en una superficie en altura (por<br />
ejemplo, una mesa).<br />
• Este producto no está previsto para <strong>la</strong>rgos períodos de sueño.<br />
• Utilizar siempre el sistema de retención.<br />
• No desp<strong>la</strong>zar ni levantar este producto cuando el bebé está dentro.<br />
• No utilizar este producto si su niño se mantiene sentado solo o si<br />
pesa más de 9kg.<br />
ADVERTENCIAS<br />
• Para evitar <strong>la</strong>s heridas, asegurarse que los niños no estén cerca<br />
cuando se pliega y despliega el producto.<br />
• No dejar que los niños jueguen con este producto.<br />
• No utilizar nunca el aro de juego para levantar o desp<strong>la</strong>zar este<br />
producto.<br />
CONSIGNAS DE SEGURIDAD QUE DEBEN RESPETARSE<br />
• El montaje debe realizarlo un adulto.<br />
• No utilizar el ba<strong>la</strong>ncín si está estropeado o roto.<br />
• Mantener <strong>la</strong>s pequeñas piezas fuera del alcance de los niños.<br />
• Este producto no remp<strong>la</strong>za una cuna o una cama para bebé. Si su niño<br />
necesita dormir, conviene colocarlo en una cuna o una cama adaptada.<br />
• No utilizar el producto si uno o varios elementos estuviesen rotos o<br />
faltasen.<br />
• No utilizar accesorios ni piezas de repuesto otros que aquéllos<br />
aprobados por el fabricante.<br />
• Antes de <strong>la</strong> utilización, comprobar que los mecanismos de bloqueo<br />
estén bien enganchados y correctamente estado ajustados.<br />
• Comprobar regu<strong>la</strong>rmente el sistema de suspensión del ba<strong>la</strong>ncín.<br />
• Utilizar siempre un arnés con 5 puntos de seguridad.<br />
• No utilizar el ba<strong>la</strong>ncín sin su funda de protección.<br />
• No utilizar el ba<strong>la</strong>ncín sobre una superficie b<strong>la</strong>nda (cama, sofá, cojín);<br />
el asiento podría volcarse y representar un peligro para su niño.<br />
ATENCIÓN<br />
Tipo de pi<strong>la</strong>s recomendado: 4 pi<strong>la</strong>s AA (no proporcionadas).<br />
• Las pi<strong>la</strong>s no recargables no deben recargarse. En caso contrario podrían estal<strong>la</strong>r o huir.<br />
• No deben mezc<strong>la</strong>rse distintas c<strong>la</strong>ses de pi<strong>la</strong>s, ni mezc<strong>la</strong>r pi<strong>la</strong>s nuevas con pi<strong>la</strong>s usadas.<br />
• Las pi<strong>la</strong>s deben colocarse respetando <strong>la</strong> po<strong>la</strong>ridad.<br />
• Las pi<strong>la</strong>s descargadas deben retirarse del ba<strong>la</strong>ncín.<br />
• Conservar <strong>la</strong>s pi<strong>la</strong>s fuera del alcance de los niños.<br />
• Cambiar <strong>la</strong>s pi<strong>la</strong>s cuando el ba<strong>la</strong>ncín deja de funcionar satisfactoriamente.<br />
• Retirar <strong>la</strong>s pi<strong>la</strong>s antes de guardar el ba<strong>la</strong>ncín durante un <strong>la</strong>rgo período.<br />
• Desechar <strong>la</strong>s pi<strong>la</strong>s en el contenedor previsto a tal efecto.<br />
• Cambiar y recargar todas <strong>la</strong>s pi<strong>la</strong>s al mismo tiempo.<br />
• Las pi<strong>la</strong>s recargables deben cargarse bajo <strong>la</strong> vigi<strong>la</strong>ncia de un adulto.<br />
• No recargar una pi<strong>la</strong> recargable en un cargador diferente.<br />
• Las terminales de alimentación no deben ponerse en cortocircuito.<br />
• No desechar <strong>la</strong>s pi<strong>la</strong>s al fuego ya que podrían estal<strong>la</strong>r o desprender sustancias nocivas.<br />
• Alejar el ba<strong>la</strong>ncín de cualquier l<strong>la</strong>ma, fuentes de calor intensas,<br />
enchufes, a<strong>la</strong>rgaderas, cocinas etc. u objetos que puedan estar al<br />
alcance del niño.<br />
• Para evitar todo riesgo de asfixia, conservar <strong>la</strong>s bolsas de plástico<br />
del emba<strong>la</strong>je fuera del alcance de los bebés y niños pequeños.<br />
• No añadir nunca una almohada, manta o material de relleno; utilizar<br />
so<strong>la</strong>mente el accesorio para ca<strong>la</strong>r <strong>la</strong> cabeza, que se entrega con el<br />
ba<strong>la</strong>ncín.<br />
• No colocar objetos, con cuerdas, alrededor del cuello del niño; no<br />
colgar cuerdas del ba<strong>la</strong>ncín ni enganchar cuerdas a los juguetes.<br />
Estas prácticas podrían ocasionar el estrangu<strong>la</strong>miento del bebé.<br />
• No colocar el ba<strong>la</strong>ncín cerca de una ventana donde los cordones de<br />
una persiana o de cortinas pudiesen estrangu<strong>la</strong>r al niño.<br />
• No sujetar otros juguetes que aquéllos proporcionados por <strong>Babymoov</strong>.<br />
BALANCÍN BUBBLE NEW GENERATION • Instrucciones de uso 23
ADVERTENCIA: antes del montaje, retirar todos los elementos de <strong>la</strong> caja e identificarlos.<br />
a. Pie de<strong>la</strong>ntero izquierdo<br />
b. Pie de<strong>la</strong>ntero derecho<br />
c. Pie posterior izquierdo<br />
d. Pie posterior derecho<br />
e. Pie <strong>la</strong>teral izquierdo<br />
f. Pie <strong>la</strong>teral derecho<br />
g. Pie izquierdo de ba<strong>la</strong>nceo<br />
h. Pie derecho de ba<strong>la</strong>nceo<br />
i. Aro de estimu<strong>la</strong>ción<br />
j. Tapas de protección<br />
ATENCIÓN<br />
Adaptador externo:<br />
• El ba<strong>la</strong>ncín sólo debe utilizarse con el adaptador recomendado.<br />
• Los adaptadores deben examinarse regu<strong>la</strong>rmente con el fin de detectar eventuales daños en el cordón, el enchufe, <strong>la</strong> caja y <strong>la</strong>s demás partes.<br />
En caso de daño (s) constatado (s), no utilizar el aparato.<br />
COMPOSICIÓN DEL BALANCÍN<br />
UTILIZACIÓN Y CARACTERÍSTICAS DEL BALANCÍN<br />
A. INSTRUCCIONES PARA MONTAR LOS ELEMENTOS<br />
A1. Montaje de los pies del ba<strong>la</strong>ncín<br />
Introducir el pie posterior izquierdo (c) en el pie posterior derecho (d). Asegurarse que el botón de presión del pie posterior derecho (d) se engancha<br />
bien en el orificio del pie posterior izquierdo (c). Las letras D+D deben quedar juntas. Figura 1 Del mismo modo, introducir el pie de<strong>la</strong>ntero izquierdo<br />
(a) en el pie de<strong>la</strong>ntero derecho (b). Asegurarse que el botón de presión del pie de<strong>la</strong>ntero izquierdo (a) se engancha bien en el orificio del pie de<strong>la</strong>ntero<br />
derecho (b). Las letras C+C deben quedar juntas. Figura 2 Para que <strong>la</strong> operación se realice correctamente, el usuario debe oír un “clic” y ver aparecer<br />
un botón de presión gris en el <strong>la</strong>teral del pie opuesto.<br />
A2. Montaje de los brazos de ba<strong>la</strong>nceo<br />
Introducir el pie <strong>la</strong>teral izquierdo (e) en el pie de<strong>la</strong>ntero izquierdo (a) y posterior izquierdo (c) de modo que <strong>la</strong>s letras A+A queden juntas, así como<br />
<strong>la</strong>s letras B+B. Figuras 3 y 4 Introducir el pie <strong>la</strong>teral derecho (f) en el pie de<strong>la</strong>ntero derecho (b) y posterior derecho (d) luego fijar con los clips los<br />
pies de<strong>la</strong>nteros. Figura 5 Para desplegar los pies, pulsar los botones de plegado (n) situados en los <strong>la</strong>terales de los pies <strong>la</strong>terales (e) y (f). Para<br />
realizar <strong>la</strong> operación correctamente, el usuario debe oír un “clic” y ver aparecer un botón de presión gris en el <strong>la</strong>teral del pie opuesto.Figura 6<br />
A3. Montaje del asiento del ba<strong>la</strong>ncín<br />
Para insta<strong>la</strong>r el asiento (k), introducir el pie derecho de ba<strong>la</strong>nceo (h) del <strong>la</strong>do de <strong>la</strong> caja electrónica (m), y el pie izquierdo de ba<strong>la</strong>nceo (g) del <strong>la</strong>do<br />
opuesto. Figuras 7, 8, 9, 10 y 11 Fijar los brazos de ba<strong>la</strong>nceo con <strong>la</strong>s tapas de protección (j) en los orificios previstos a tal efecto. Figuras 12, 13, 14<br />
y 15<br />
A4. Insta<strong>la</strong>ción de <strong>la</strong> funda de protección<br />
ADVERTENCIA: no utilizar el ba<strong>la</strong>ncín sin su funda de protección.<br />
Girar los aros del asiento (k) hacia arriba, hasta que se junten. Figura 16 Cubrir los aros del asiento (k) con <strong>la</strong> funda de protección (q). Para no equivocarse<br />
en el sentido de <strong>la</strong> insta<strong>la</strong>ción de <strong>la</strong> funda de protección (q) ve<strong>la</strong>r por que el logotipo <strong>Babymoov</strong> esté orientado hacia abajo. Figura 17<br />
Separar los dos aros del asiento (k) deslizando al mismo tiempo <strong>la</strong> funda de protección (q) a lo <strong>la</strong>rgo de los dos aros. Figuras 18, 19 y 20<br />
A5. Insta<strong>la</strong>ción del aro de estimu<strong>la</strong>ción (i)<br />
ADVERTENCIA: no levantar el ba<strong>la</strong>ncín cogiéndolo del aro de estimu<strong>la</strong>ción.<br />
Introducir el aro de estimu<strong>la</strong>ción (i) en <strong>la</strong>s ranuras situadas a tal efecto. Figuras 21 y 22<br />
k. Asiento<br />
l. Accesorio para ca<strong>la</strong>r <strong>la</strong> cabeza<br />
m. Caja electrónica<br />
n. Botones de plegado<br />
o. Botón presión<br />
p. Adaptador sector<br />
q. Funda de protección<br />
r. Botones de inclinación del asiento<br />
s. Botón de bloqueo del asiento<br />
A6. Insta<strong>la</strong>ción del accesorio para ca<strong>la</strong>r <strong>la</strong> cabeza (l)<br />
ADVERTENCIA: no añadir una almohada, manta o material de relleno, utilizar so<strong>la</strong>mente el accesorio para ca<strong>la</strong>r <strong>la</strong> cabeza, que se entrega con<br />
el ba<strong>la</strong>ncín. El accesorio para ca<strong>la</strong>r <strong>la</strong> cabeza (l) es un elemento opcional que ofrecerá un apoyo suplementario a <strong>la</strong> cabeza del bebé para un confort<br />
óptimo. Este elemento puede separarse del ba<strong>la</strong>ncín.<br />
Para sujetar o soltar el accesorio para ca<strong>la</strong>r <strong>la</strong> cabeza (l) basta con utilizar <strong>la</strong> sujeción de Velcro que se encuentra en su parte posterior, hay que<br />
pasar<strong>la</strong> por <strong>la</strong> funda de protección (q). Figura 23<br />
A7. Insta<strong>la</strong>ción de <strong>la</strong>s pi<strong>la</strong>s<br />
La caja electrónica (m) del ba<strong>la</strong>ncín debe estar alimentada con 4 pi<strong>la</strong>s AA de 1,5V (no proporcionadas). Para un mejor resultado, utilizar pi<strong>la</strong>s alcalinas.<br />
Utilice un destornil<strong>la</strong>dor de estrel<strong>la</strong> (no proporcionado) para abrir <strong>la</strong> caja electrónica (m) que está situada en el pie derecho de ba<strong>la</strong>nceo (h). Figura<br />
24 Introducir <strong>la</strong>s 4 pi<strong>la</strong>s AA de 1,5V (no proporcionadas) respetando los marcados de po<strong>la</strong>ridad indicados en el visual. Figura 25<br />
Volver a atornil<strong>la</strong>r <strong>la</strong> caja electrónica (m) con un destornil<strong>la</strong>dor. No apretar demasiado.<br />
24<br />
BALANCÍN BUBBLE NEW GENERATION • Instrucciones de uso
A8. Conexión al sector (adaptador proporcionado) (p)<br />
IMPORTANTE: antes de efectuar cualquier operación, asegúrese de que el ba<strong>la</strong>ncín esté apagado.<br />
El ba<strong>la</strong>ncín puede funcionar en una toma sector empleando el adaptador proporcionado.<br />
Entrada: 230V/50Hz<br />
Salida: 6V/500Ma<br />
Los adaptadores deben examinarse regu<strong>la</strong>rmente con el fin de detectar eventuales daños en el cordón, <strong>la</strong> toma, <strong>la</strong> caja y <strong>la</strong>s demás piezas. En<br />
caso de daño (s) constatado (s), no utilizar el aparato.<br />
El ba<strong>la</strong>ncín sólo debe utilizarse con el adaptador recomendado.<br />
Conectar <strong>la</strong> contera del adaptador en el orificio previsto a tal efecto y <strong>la</strong> otra parte en <strong>la</strong> toma sector. Figura 26<br />
B. INSTRUCCIONES DE UTILIZACIÓN DEL BALANCÍN<br />
ADVERTENCIA:<br />
• No utilizar el ba<strong>la</strong>ncín si uno de los elementos estuviese roto o faltase.<br />
• Antes de <strong>la</strong> utilización, comprobar que los mecanismos de bloqueo estén bien enganchados y correctamente ajustados.<br />
• No levantar ni transportar el ba<strong>la</strong>ncín cuando el niño está sentado.<br />
B1. Insta<strong>la</strong>ción del bebé en el ba<strong>la</strong>ncín<br />
ADVERTENCIA: utilizar siempre el arnés de seguridad 5 puntos proporcionado.<br />
IMPORTANTE: ve<strong>la</strong>r por que los tirantes del arnés no estén retorcidos.<br />
Colocar el bebé en el ba<strong>la</strong>ncín en posición sentada o acostada. Cerrar el arnés 5 puntos. Figuras 27, 28, 29, 30 y 31 Ajustar el arnés 5 puntos a<br />
nivel de los hombros o del talle si fuera necesario.<br />
B2. Inclinación del asiento (k)<br />
ADVERTENCIA: no cambiar nunca <strong>la</strong> inclinación del asiento cuando el bebé se encuentra en el ba<strong>la</strong>ncín. Retirar el niño antes de cada manipu<strong>la</strong>ción.<br />
Con ayuda de sus dos manos, coger <strong>la</strong> parte superior e inferior del asient (k) y ajustar<strong>la</strong> en función de <strong>la</strong> posición deseada. Figuras 33, 34 y 35<br />
Puede inclinar <strong>la</strong> base en posición asiento o semi acostado utilizando los botones de inclinación de <strong>la</strong> base (r). Figura 32 También puede bloquear<br />
esta posición con los botones de bloqueo de <strong>la</strong> base (s). Figura 36<br />
B3. Plegado del ba<strong>la</strong>ncín y transporte<br />
Retirar el aro de estimu<strong>la</strong>ción (i) del ba<strong>la</strong>ncín.Figura 37 Plegar el asiento (k) : presionar los dos botones de plegado (n) colocados por cada <strong>la</strong>do<br />
del ba<strong>la</strong>ncín apretando simultáneamente los pies del ba<strong>la</strong>ncín. Figuras 38, 39, 40 y 41 Cerrar el botón de presión para bloquear <strong>la</strong> base. Figura<br />
42<br />
t. Botón de ajuste del ba<strong>la</strong>nceo<br />
u. Botón música y nivel sonoro<br />
v. Botón minutero<br />
w. LEDs que indica el tiempo de ba<strong>la</strong>nceo del ba<strong>la</strong>ncín<br />
C. PUESTA EN MARCHA DEL BALANCÍN<br />
C1. Selección del nivel de ba<strong>la</strong>nceo<br />
ATENCIÓN: no ba<strong>la</strong>ncear manualmente el ba<strong>la</strong>ncín, <strong>la</strong> velocidad deseada se activará entre 20 y 45 segundos después de haber seleccionado el<br />
nivel de ba<strong>la</strong>nceo.<br />
Gire el botón de ajuste del ba<strong>la</strong>nceo (t) para acelerar el nivel de ba<strong>la</strong>nceo. La 1e muesca (<strong>la</strong> que está más a <strong>la</strong> izquierda) es el ba<strong>la</strong>nceo más lento,<br />
<strong>la</strong> 6e (<strong>la</strong> que está más a <strong>la</strong> derecha) es el más rápido. Para apagar el ba<strong>la</strong>nceo, girar el botón a <strong>la</strong> izquierda.<br />
C2. Botón para <strong>la</strong> elección de <strong>la</strong> música y nivel sonoro (u)<br />
Para activar <strong>la</strong> música pulsar una vez el botón (u), luego una 2e ,3e y 4e vez para <strong>au</strong>mentar el nivel sonoro. Para apagar, pulsar una 5e vez el<br />
botón (u). Para cambiar de música, pulsar una 6e vez el botón música y nivel sonoro (u).<br />
C3. Botón de minutero (v)<br />
Utilizar el minutero para definir un período de ba<strong>la</strong>nceo.<br />
Presionar el botón (v) para elegir un período de ba<strong>la</strong>nceo incluido entre 8,15 ó 30 minutos. Los tres LEDs (w), localizados junto al botón minutero<br />
(v) indican el período de tiempo elegido.<br />
CUIDADO Y MANTENIMIENTO<br />
Composición<br />
• Aluminio y PVC<br />
• Base: 100% poliéster (imitación gamuza y tejido)<br />
Cuidados y mantenimiento<br />
• Inspeccionar a menudo el ba<strong>la</strong>ncín para asegurarse de que no haya tornillos flojos, piezas usadas, tejidos rasgados, o puntos descosidos.<br />
• Mandar remp<strong>la</strong>zar o reparar <strong>la</strong>s piezas si fuera necesario. Utilizar so<strong>la</strong>mente piezas de repuesto aconsejadas por <strong>Babymoov</strong>.<br />
• Limpiar regu<strong>la</strong>rmente el ba<strong>la</strong>ncín.<br />
• El accesorio para ca<strong>la</strong>r <strong>la</strong> cabeza y <strong>la</strong> funda del ba<strong>la</strong>ncín pueden <strong>la</strong>varse en superficie. Para ello, utilice un paño húmedo así como jabón.<br />
• Para limpiar el marco del ba<strong>la</strong>ncín, utilizar exclusivamente jabón doméstico o un detergente y agua temp<strong>la</strong>da. No utilizar lejía.<br />
• Una exposición excesiva al sol o al calor puede c<strong>au</strong>sar <strong>la</strong> decoloración o el a<strong>la</strong>beo de <strong>la</strong>s partes.<br />
BALANCÍN BUBBLE NEW GENERATION • Instrucciones de uso 25
PT<br />
Gratos pe<strong>la</strong> escolha da nossa Cadeira de Ba<strong>la</strong>nço BABYMOOV. Para a segurança de seu bebê. Leia com<br />
atenção as presentes instruções e guarde para consulta posterior.<br />
Conforme às exigências de segurança. Conforme às exigências da norma PR EN 16232 : 2011<br />
IMPORTANTE- LEIA COM ATENÇÃO AS<br />
PRESENTES INSTRUÇÕES ANTES DE<br />
QUALQUER UTILIZAÇÃO E GUARDE PARA<br />
POSTERIOR CONSULTA.<br />
Os equipamentos elétricos são objeto de recolha seletiva. Não elimine equipamentos elétricos e<br />
eletrônicos com resíduos domésticos não selecionados mas sim proceda à uma recolha seletiva. Este<br />
símbolo indica na União Européia que o produto não deve ser eliminado no lixo ou junto de resíduos<br />
domésticos mas sim ser eliminado num circuito de recolha específico.<br />
• Nunca deixe uma criança sem vigilância.<br />
• É perigoso utilizar este produto numa superfície alta (por exemplo, em<br />
cima de uma mesa).<br />
• Este produto não está previsto para períodos de sono prolongado.<br />
• Utilizar sempre o sistema de travagem.<br />
• Não deslocar ou levantar este produto quando o bebê estiver insta<strong>la</strong>do.<br />
• Não utilizar este produto se a criança se mantiver sentada sozinha ou<br />
ADVERTÊNCIAS<br />
se tiver peso superior a 9kg.<br />
• Para evitar lesões, verificar que as crianças não estejam por perto<br />
durante o fecho ou a abertura do produto.<br />
• Não deixe crianças brincar com este produto.<br />
• Nunca utilizar o arco de atividades de estimu<strong>la</strong>ção para levantar ou<br />
deslocar o produto.<br />
• A montagem deve ser realizada por pessoa adulta..<br />
• Não utilizar a cadeira de ba<strong>la</strong>nço se estiver danificada ou partida<br />
• Manter afastadas das crianças as peças de tamanho reduzido.<br />
• Este produto não substitui o berço ou a cama para bebê. Se a criança<br />
precisar de dormir, é conveniente ser insta<strong>la</strong>da em berço ou cama<br />
adaptada. .<br />
• Não utilizar o produto se um ou mais elementos estiverem partidos<br />
ou faltarem.<br />
• Não utilizar acessórios ou peças de substituição que não tenham<br />
sido aprovadas pelo fabricante.<br />
• Antes de qualquer utilização verificar sempre que os mecanismos de<br />
travagem estejam armados e corretamente ajustados.<br />
• Verificar com regu<strong>la</strong>ridade o sistema de suspensão da cadeira de<br />
ba<strong>la</strong>nço.<br />
• Utilizar sempre um cinto de segurança com 5 pontos.<br />
• Não utilizar a cadeira de ba<strong>la</strong>nço sem o forro de proteção.<br />
• Nunca utilizar a cadeira de ba<strong>la</strong>nço em superfície mole (cama, sofá,<br />
INSTRUÇÕES DE SEGURANÇA<br />
ATENÇÃO<br />
almofada); o assento pode verter e ser perigoso para a criança.<br />
• Afastar a cadeira de ba<strong>la</strong>nço de qualquer chama, fontes de calor<br />
intenso, tomadas elétricas, extensões elétricas, fogão etc... ou objetos<br />
que possam ficar ao alcance da criança.<br />
• Para evitar qualquer risco de asfixia, mantenha os sacos plásticos<br />
da emba<strong>la</strong>gem fora do alcance dos bebês e de crianças com pouca<br />
idade.<br />
• Não acrescentar nenhuma almofada, cobertor ou enchimento; utilizar<br />
apenas o descanso de cabeça fornecido com a cadeira de ba<strong>la</strong>nço.<br />
• Não pôr objetos com cordões no pescoço da criança; não suspender<br />
cordões na cadeira de ba<strong>la</strong>nço nem nos brinquedos. Estas práticas<br />
podem estrangu<strong>la</strong>r o bebê.<br />
• Não colocar a cadeira de ba<strong>la</strong>nço junto de uma jane<strong>la</strong> onde os<br />
cordões dos estores ou das cortinas possam estrangu<strong>la</strong>r a criança.<br />
• Não amarrar outros brinquedos que os fornecidos por <strong>Babymoov</strong>.<br />
Tipo de pilhas recomendadas : 4 pilhas AA (não disponibilizadas).<br />
• Não carregar pilhas não recarregáveis. Recarregar pilha não recarregável pode levar à sua explosão ou extravasamento<br />
• Não devem ser misturadas vários tipos de pilhas ou pilhas novas e usadas.<br />
• Inserir as pilhas respeitando a po<strong>la</strong>ridade indicada.<br />
• As pilhas descarregadas devem ser removidas da cadeira de ba<strong>la</strong>nço.<br />
• Conservar as pilhas fora do alcance das crianças.<br />
• Mudar as pilhas sempre que a cadeira de ba<strong>la</strong>nço deixe de funcionar corretamente.<br />
• Remover as pilhas sempre que a cadeira de ba<strong>la</strong>nço não for usada por tempo prolongado.<br />
• Eliminar as pilhas no contentor previsto para o efeito<br />
• Substituir e carregar a totalidade das pilhas ao mesmo tempo.<br />
• O carregamento de pilhas recarregáveis deve ser supervisionado por um adulto responsável.<br />
• Não carregar uma pilha recarregável em carregador diferente<br />
• Não colocar os terminais das pilhas em curto-<br />
• Não eliminar as pilhas no fogo, estas podem explodir ou emitir substâncias nocivas.<br />
26<br />
CADEIRA DE BALANÇO BUBBLE NEW GENERATION • Instruções de uso
ADVERTÊNCIA: antes de efetuar a montagem, tirar todos os elementos da emba<strong>la</strong>gem para identificação.<br />
a. Pé dianteiro esquerdo<br />
b. Pé dianteiro direito<br />
c. Pé traseiro esquerdo<br />
d. Pé traseiro direito<br />
e. Pé <strong>la</strong>teral esquerdo<br />
f. Pé <strong>la</strong>teral direito<br />
g. Pé esquerdo de ba<strong>la</strong>nço<br />
h. Pé direito de ba<strong>la</strong>nço<br />
i. Arco de atividades de estimu<strong>la</strong>ção<br />
j. Tampas de proteção<br />
ATENÇÃO<br />
Adaptador externo :<br />
• A cadeira de ba<strong>la</strong>nço só deve utilizada com o adaptador recomendado.<br />
• Os adaptadores devem ser examinados com regu<strong>la</strong>ridade com o fim de verificar a existências de danos no cordão, na tomada, no compartimento<br />
ou nas outras partes. No caso de danos verificados, não utilizai o aparelho.<br />
COMPOSIÇÃO DA CADEIRA DE BALANÇO<br />
k. Assento<br />
l. Descanso de cabeça<br />
m. Compartimento eletrônico<br />
n. Botões de dobragem<br />
o. Botão pressão<br />
p. Adaptador setor<br />
q. Forro de proteção<br />
r. Botões de inclinação do assento<br />
s. Botão de travagem do assento<br />
UTILIZAÇÃO E CARACTERÍSTICAS DA CADEIRA DE BALANÇO<br />
A. INSTRUÇÕES PARA MONTAGEM DOS ELEMENTOS<br />
A1. Montagem dos pés da cadeira de ba<strong>la</strong>nço<br />
Inserir o pé traseiro esquerdo (c) no pé traseiro direito (d). Verificar que o botão pressão do pé traseiro direito (d) esteja corretamente enfiado no<br />
orifício do pé traseiro esquerdo (c). As letras D+D tem de estar juntas. Figura 1 Depois, inserir o pé dianteiro esquerdo (a) no pé dianteiro direito<br />
(b). Verificar que o botão pressão do pé dianteiro esquerdo (a) esteja corretamente enfiado no orifício do pé dianteiro direito (b). As letras C+C tem<br />
de estar juntas. Figura 2 Para realizar corretamente a operação, o utilizador tem de ouvir um « clic » e aparecer um botão pressão de cor cinzenta<br />
no <strong>la</strong>do do pé oposto.<br />
A2. Montagem dos braços de ba<strong>la</strong>nço<br />
Inserir o pé <strong>la</strong>teral esquerdo (e) no pé dianteiro esquerdo (a) e traseiro esquerdo (c) de maneira às letras A+A ficarem juntas assim como as letras<br />
B+B. Figuras 3 et 4 Inserir o pé <strong>la</strong>teral direito (f) no pé dianteiro direito (b) e traseiro direito (d) e clipe os pés dianteiros.Figura 5 Para desdobramento<br />
dos pés, carregar nos botões de dobragem (n) situados na parte <strong>la</strong>teral do pés <strong>la</strong>terais (e) e (f). Para realizar corretamente a operação, o utilizador<br />
tem de ouvir um « clic » e aparecer um botão pressão de cor cinzenta no <strong>la</strong>do do pé oposto. Figura 6<br />
A3. Montagem do assento da cadeira de ba<strong>la</strong>nço<br />
Para insta<strong>la</strong>r o assento (k), inserir o pé direito de ba<strong>la</strong>nço (h) do <strong>la</strong>do do compartimento eletrônico (m), e o pé esquerdo de ba<strong>la</strong>nço (g) no <strong>la</strong>do<br />
oposto. Figuras 7, 8, 9, 10 e 11 Fixar os braços de ba<strong>la</strong>nço com as tampas de proteção (j) nos orifícios previstos para o efeito. Figuras 12, 13, 14<br />
e 15<br />
A4. Insta<strong>la</strong>ção do forro de proteção<br />
ADVERTÊNCIA: não utilizar a cadeira de ba<strong>la</strong>nço sem o forro de proteção.<br />
Mover os arcos da assento (k) para cima até ficarem juntos. Figura 16 Cobrir os arcos do assento (k) com o forro de proteção (q). Para não haver<br />
engano no sentido da insta<strong>la</strong>ção do forro de proteção (q) verifique que o logo <strong>Babymoov</strong> esteja orientado para baixo. Figura 17<br />
Abrir os arcos da cadeira (k) fazendo deslizar o forro de proteção (q) em todo o comprimento dos dois arcos. Figuras 18, 19 e 20<br />
A5. Insta<strong>la</strong>ção do arco de atividades de estimu<strong>la</strong>ção (i)<br />
ADVERTÊNCIA: não levantar a cadeira de ba<strong>la</strong>nço pelo arco de atividades de estimu<strong>la</strong>ção.<br />
Inserir o arco de atividades de estimu<strong>la</strong>ção (i) nas fendas previstas par o efeito. Figuras 21 e 22<br />
A6. Insta<strong>la</strong>ção do descanso de cabeça (l)<br />
ADVERTÊNCIA: não acrescentar nenhuma almofada, cobertor ou enchimento, utilizar apenas o descanso de cabeça fornecido com a cadeira de<br />
ba<strong>la</strong>nço. O descanso de cabeça (l) é um elemento opcional oferecendo um apoio adicional à cabeça do bebê para um conforto ideal. Este elemento<br />
pode ser removido da cadeira de ba<strong>la</strong>nço.<br />
Para prender ou desprender o descanso de cabeça (l) basta utilizar o Velcro que se encontra na parte detrás, é preciso o enfiar no forro de proteção<br />
(q). Figura 23<br />
A7. Insta<strong>la</strong>ção das pilhas<br />
O compartimento eletrônico (m) da cadeira de ba<strong>la</strong>nço tem de ser alimentado com 4 pilhas AA de 1,5V (não disponibilizadas). Para melhor<br />
eficiência, utilizar pilhas alcalinas.<br />
Utilize um chave de cruz (não disponibilizada) para abrir o compartimento eletrônico (m) situado no é direito de ba<strong>la</strong>nço (h). Figura 24 Inserir as<br />
4 pilhas AA de 1,5V (não disponibilizadas) respeitando a po<strong>la</strong>ridade indicada no visual. Figura 25<br />
Aperte os parafusos do compartimento eletrônico (m) com a chave. Não apertar em demasia.<br />
CADEIRA DE BALANÇO BUBBLE NEW GENERATION • Instruções de uso 27
A8. Ligação ao setor (adaptador disponibilizado) (p)<br />
IMPORTANTE: antes de qualquer manipu<strong>la</strong>ção verificar que a cadeira de ba<strong>la</strong>nço esteja desligada.<br />
A cadeira de ba<strong>la</strong>nço pode funcionar numa tomada de setor com o adaptador fornecido.<br />
Input : 230V / 50Hz<br />
Output : 6V / 500Ma<br />
Os adaptadores devem ser examinados com regu<strong>la</strong>ridade com o fim de verificar a existências de danos no cordão, na tomada, no compartimento<br />
ou nas outras partes. No caso de danos verificados, não utilizai o aparelho.<br />
A cadeira de ba<strong>la</strong>nço apenas deve ser utilizada com o adaptador recomendado.<br />
Ligar a extremidade do adaptador no orifício previsto para o efeito e a outra extremidade na tomada de setor. Figure 26<br />
B. INSTRUÇÕES DE UTILIZAÇÃO DA CADEIRA DE BALANÇO<br />
ADVERTÊNCIA :<br />
• Não utilizar o produto se um ou mais elementos estiverem partidos ou faltarem.<br />
• Antes de qualquer utilização verificar sempre que os mecanismos de travagem estejam armados e corretamente ajustados.<br />
• Não levantar ou transportar a cadeira de ba<strong>la</strong>nço com uma criança insta<strong>la</strong>da.<br />
B1. Insta<strong>la</strong>ção do bebê na cadeira de ba<strong>la</strong>nço<br />
ADVERTÊNCIA: utilizar sempre o cinto de segurança de 5 pontos fornecido.<br />
IMPORTANTE: verificar que os suspensórios do cinto não estejam dobrados.<br />
Colocar o bebê na cadeira de ba<strong>la</strong>nço em posição sentado ou deitado. Aperte o cinto de 5 pontos Figuras 27, 28, 29, 30 e 31 Ajustar o cinto de<br />
5 pontos nos ombros ou na cintura se for necessário.<br />
B2. Inclinação do assento (k)<br />
ADVERTÊNCIA: nunca modificar a inclinação do assento quando o bebê estiver presente na cadeira de ba<strong>la</strong>nço. Tirar a criança antes de qualquer<br />
manipu<strong>la</strong>ção .Com as duas mãos, agarrar a parte superior e inferior do assento (k) e ajuste em função da posição desejada. Figuras 33, 34 e<br />
35 Pode inclinar o assento em posição sentada ou semi-deitada com a ajuda dos botões de inclinação do assento (r). Figura 32 Pode também<br />
bloquear essa posição com a ajuda dos botões de travagem do assento (s). Figura 36<br />
B3. Dobragem da cadeira de ba<strong>la</strong>nço e transporte<br />
Remover o arco de atividades de estimu<strong>la</strong>ção (i) da cadeira de ba<strong>la</strong>nço. Figura 37 Dobrar o assento (k) : pressionar os dois botões de dobragem<br />
(n) posicionados de ambos os <strong>la</strong>dos da cadeira de ba<strong>la</strong>nço apertando em simultâneo os pé da cadeira de ba<strong>la</strong>nço. Figuras 38, 39, 40 e 41 Fechar<br />
o botão de pressão para bloquear o assento. Figura 42<br />
t. Botão de regu<strong>la</strong>ção do ba<strong>la</strong>nço<br />
u. Botão de música e de volume sonoro<br />
v. Botão temporizador<br />
w. LEDs indicadores da duração de ba<strong>la</strong>nço da cadeira<br />
C. ATIVAÇÃO DA CADEIRA DE BALANÇO<br />
C1. Seleção do nível de ba<strong>la</strong>nço<br />
ATENÇÃO: não ba<strong>la</strong>nçar manualmente a cadeira, a velocidade desejada inicia entre 20 e 45 segundos apos seleção do nível de ba<strong>la</strong>nço.<br />
Girar o botão de ba<strong>la</strong>nço (t) para acelerar o nível de ba<strong>la</strong>nço. O nível 1 (o mais à esquerda) sendo o mais fraco, o 6º sendo (o mais à direita) o<br />
mais forte. Para desligar o ba<strong>la</strong>nço, girar o botão para a esquerda.<br />
C2. Botão para escolha de música e de volume sonoro (u)<br />
Para ligar a música carregue uma vez no botão (u), uma 2ª, 3ª e 4` vez para <strong>au</strong>mentar o volume. Para apagar carregue 5ª vez no botão (u). Para<br />
mudar de musica, carregue 6ª vez no botão musica e volume sonoro (u).<br />
C3. Botão temporizador (v)<br />
Utilizar o temporizador para definir uma duração de ba<strong>la</strong>nço.<br />
Carregar no botão (v) para escolher um período de ba<strong>la</strong>nço compreendido entre 8, 15 ou 30 minutos. As três LEDs (w), localizadas ao <strong>la</strong>do do botão<br />
temporizador (v) indicam à duração escolhida.<br />
CUIDADOS E MANUTENÇÃO<br />
Composição<br />
• Alumínio e PVC<br />
• Assento: 100% poliéster (suédine e te<strong>la</strong>)<br />
Cuidados e manutenção<br />
• Verificar com regu<strong>la</strong>ridade a cadeira de ba<strong>la</strong>nço para eliminar a eventualidade de parafusos desapertado, de peças usadas, de tecidos<br />
rasgados s ou de pontos descosidos.<br />
• Substituir ou reparar as peças se for necessário. Apenas utilizar peças de substituição aconselhadas por <strong>Babymoov</strong>.<br />
• Limpar com regu<strong>la</strong>ridade a cadeira de ba<strong>la</strong>nço.<br />
• O descanso de cabeça e o forro da cadeira de ba<strong>la</strong>nço podem ser <strong>la</strong>vados em superfície. Para tal, utilize um pano úmido e sabão.<br />
• Para limpar o quadro da cadeira de ba<strong>la</strong>nço, utilizar exclusivamente sabão doméstico ou detergente com água tépida.. Na utilizar lixívia..<br />
• Uma exposição excessiva ao sol ou ao calor pode provocar a descoloração ou o empenar as peças.<br />
28<br />
CADEIRA DE BALANÇO BUBBLE NEW GENERATION • Instruções de uso
IT<br />
Vi ringraziamo per aver scelto il seggiolino dondolo BABYMOOV. Per <strong>la</strong> sicurezza del vostro bebé, vi<br />
preghiamo di leggere attentamente il foglio illustrativo con le spiegazioni e di conservarlo in modo da<br />
poterlo utilizzare quando ne avrete necessità.<br />
Conforme alle esigenze di sicurezza. Conforme alle esigenze delle norme PR EN 16232 / 2011<br />
IMPORTANTE – LEGGERE ATTENTAMENTE LE<br />
ISTRUZIONI PRIMA DI QUALSIASI<br />
UTILIZZAZIONE E DI CONSERVARLE PER<br />
EVENTUALI ULTERIORI RIFERIMENTI<br />
Le instal<strong>la</strong>zioni elettriche fanno parte del programma di raccolta differenziata. Non dovete buttare i rifiuti<br />
delle instal<strong>la</strong>zioni elettriche ed elettroniche nello stesso contenitore dei rifiuti municipali non selezionati,<br />
ma procedere al<strong>la</strong> raccolta differenziata. Questo simbolo indica in tutta l’Unione Europea che il prodotto<br />
non deve essere buttato nel<strong>la</strong> spazzatura né nei rifiuti casalinghi, ma deve essere posto negli appositi<br />
contenitori del<strong>la</strong> raccolta differenziata.<br />
• Non <strong>la</strong>sciare al<strong>la</strong> portata dei bambini senza sorveglianza<br />
• Attenzione l’uso di questo articolo su delle superfici in altezza è<br />
pericoloso (per esempio un tavolo)<br />
• Questo articolo non è concepito per dei periodi di sonno lunghi<br />
• Utilizzare sempre il sistema di bloccaggio<br />
• Non spostare né sollevare l’articolo se c’è il bebé dentro<br />
• Non utilizzare questo articolo se il bambino è capace di stare seduto<br />
da solo o se pesa più di 9kg<br />
• Il montaggio deve essere fatto da un adulto<br />
• Non utilizzare il Seggiolino Dondolo se è rotto o non funziona bene<br />
• Tenere i pezzi di misura picco<strong>la</strong> fuori dal<strong>la</strong> portata dei bambini<br />
• Questo articolo non sostituisce una cul<strong>la</strong> o un lettino per bebé. Se il/<strong>la</strong><br />
bimbo/a ha bisogno di dormire è importante metterlo/<strong>la</strong> nel<strong>la</strong> cul<strong>la</strong><br />
o in un lettino appropriato<br />
• Non utilizzare l’articolo se uno o più pezzi sono rotti o mancanti<br />
• Non utilizzare accessori o pezzi di ricambio che non siano quelli<br />
approvati dal fabbricante<br />
• Prima dell’uso verificare che i meccanismi di blocco siano ben agganciati<br />
e correttamente posizionati<br />
• Verificare rego<strong>la</strong>rmente il sistema di sospensione del seggiolino<br />
dondolo<br />
• Utilizzare sempre un’imbragatura 5 punti di sicurezza<br />
• Non usare il Seggiolino Dondolo senza <strong>la</strong> sua protezione<br />
• Non usare mai il Seggiolino Dondolo su di una superficie molle (letto,<br />
divano, cuscino) ; il seggiolino potrebbe rovesciarsi o capovolgersi<br />
AVVERTENZE<br />
DISPOSIZIONI DI SICUREZZA DA RISPETTARE<br />
ATTENZIONE<br />
• Per evitare qualsiasi tipo di ferita dovete assicurarvi che non ci siano<br />
bambini vicino al momento del<strong>la</strong> chiusura o apertura del Seggiolino<br />
Dondolo<br />
• Evitare che i bambini giochino con questo articolo<br />
• Non usare mai l’arco stimo<strong>la</strong>tore per sollevare o spostare l’articolo<br />
diventando un pericolo per il bebé<br />
• Tenere il seggiolino lontano da qualsiasi fonte di calore intenso, di<br />
fiamme, da prese elettriche, da prolunghe, cucine a gas o elettriche,<br />
ecc. o da oggetti che potrebbero essere al<strong>la</strong> portata dei bebé<br />
• Per evitare qualsiasi rischio di soffocamento, mettere tutti i sacchetti<br />
di p<strong>la</strong>stica dell’imbal<strong>la</strong>ggio fuori dal<strong>la</strong> portata dei bebé o di bambini<br />
piccoli. Mai aggiungere dei cuscini, delle coperte o imbottitura di<br />
qualsiasi tipo ; utilizzare so<strong>la</strong>mente il poggia testa fornito con il<br />
Seggiolino Dondolo<br />
• Mai mettere degli oggetti con cordine o nastrini intorno al collo dei bebé<br />
; non sospendere corde al Seggiolino Dondolo e non mettere delle<br />
cordicelle ai giocattoli. Queste modalità potrebbero c<strong>au</strong>sare lo<br />
strango<strong>la</strong>mento del bebé<br />
• Non attaccare né aggiungere altri giochi oltre a quelli forniti da<br />
<strong>Babymoov</strong><br />
Vi raccomandiamo di utilizzare le pile : 4 pile AA (non fornite, non incluse)<br />
• Le pile non ricaricabili non devono essere ricaricate. Nel caso contrario queste potrebbero esplodere o avere delle perdite.<br />
• Non bisogna mettere insieme diversi tipi di pile, né pile usate con pile nuove.<br />
• Le pile devono essere inserite con <strong>la</strong> po<strong>la</strong>rità nel verso giusto.<br />
• Le pile scariche devono essere tolte dal Seggiolino Dondolo.<br />
• Conservare le pile fuori dal<strong>la</strong> portata dei bambini.<br />
• Cambiare le pile quando il Seggiolino Dondolo non funziona più normalmente.<br />
• Estrarre le pile prima di mettere il Seggiolino Dondolo a riposo per un lungo periodo.<br />
• Buttare le pile nel contenitore previsto a questo scopo.<br />
• Sostituire e ricaricare tutte le pile nello stesso tempo.<br />
• Le pile ricaricabili devono essere messe in carica sotto sorveglianza di un adulto.<br />
• Non ricaricare una pi<strong>la</strong> ricaricabile in un caricatore diverso.<br />
• I morsetti di alimentazione non devono essere sottoposti a cortocircuito.<br />
• Non buttare le pile nel fuoco in quanto potrebbero scoppiare o esa<strong>la</strong>re sostanze nocive.<br />
SEGGIOLINO DONDOLO BABYMOOV NEW GENERATION • Istruzioni per l’uso 29
AVVERTENZA : prima di assemb<strong>la</strong>re tutti i pezzi, estrarre i pezzi dal<strong>la</strong> scato<strong>la</strong> e identificarli.<br />
a. Appoggio frontale sinistro<br />
b. Appoggio frontale destro<br />
c. Appoggio posteriore sinistro<br />
d. Appoggio posteriore destro<br />
e. Appoggio <strong>la</strong>terale sinistro<br />
f. Appoggio <strong>la</strong>terale destro<br />
g. Appoggio sinistro di dondo<strong>la</strong>mento<br />
h. Appoggio destro di dondo<strong>la</strong>mento<br />
i. Archetto stimo<strong>la</strong>tore<br />
j. Coperchi di protezione<br />
ATTENZIONE<br />
Adattatore esterno :<br />
• Il Seggiolino Dondolo deve essere utilizzato solo con l’adattatore raccomandato.<br />
• Gli adattatori devono essere rego<strong>la</strong>rmente esaminati per poter verificare eventuali danni sul cordone, <strong>la</strong> presa, <strong>la</strong> scato<strong>la</strong> e le altre parti. Qualora<br />
fossero constatati uno o più danni non utilizzare l’apparecchio.<br />
COMPOSIZIONE DEL SEGGIOLINO DONDOLO<br />
USO E CARATTERISTICHE DEL SEGGIOLINO DONDOLO<br />
A. ISTRUZIONI PER L’ASSEMBLAGGIO DEGLI ELEMENTI<br />
A1. Assemb<strong>la</strong>ggio degli appoggi del Seggiolino Dondolo<br />
Inserire l’appoggio posteriore sinistro (c) nell’appoggio posteriore destro (d). Assicurarsi che il pulsante di pressione dell’appoggio posteriore destro<br />
(d) sia ben agganciato nell’orifizio dell’appoggio posteriore sinistro (c). Le lettere D+D devono essere congiunte. Figure 1 Ugualmente, inserire l’appoggio<br />
frontale sinistro (a) nell’appoggio frontale destro (b). Assicurarsi che il pulsante di pressione dell’appoggio frontale sinistro (a) sia ben agganciato<br />
nell’orifizio dell’appoggio frontale destro (b). Le lettere C+C devono essere congiunte. Figure 2 Perché l’operazione sia correttamente realizzata,<br />
l’utilizzatore deve udire un « clic » e vedere apparire un pulsante di pressione grigio sul <strong>la</strong>to dell’appoggio opposto.<br />
A2. Assemb<strong>la</strong>ggio dei bracci del dondolo<br />
Inserire l’appoggio <strong>la</strong>terale sinistro (e) nell’appoggio frontale sinistro (a) e posteriore sinistro (c) ) in modo che le lettere A+A siano unite così come<br />
anche le lettere B+B. Figure 3 e 4 Inserire l’appoggio <strong>la</strong>terale destro (f) nell’appoggio frontale destro (b) e posteriore destro (d) poi agganciare gli<br />
appoggi frontali. Figura 5 Per disfare gli appoggi, schiacciare il pulsante per piegare (n) che si trova sui <strong>la</strong>ti degli appoggi <strong>la</strong>terali (e) e (f). ). Perché<br />
l’operazione sia correttamente realizzata, l’utilizzatore (8) dovrà udire un « clic » e vedere apparire un pulsante di pressione grigio sul <strong>la</strong>to<br />
dell’appoggio opposto. Figura 6<br />
A3. Assemb<strong>la</strong>ggio del seggiolino del dondolo<br />
Per instal<strong>la</strong>re il seggiolino (k), inserire l’appoggio destro del dondolo (h) dal <strong>la</strong>to del<strong>la</strong> scato<strong>la</strong> elettronica (m), e l’appoggio sinistro del dondolo (g)<br />
al <strong>la</strong>to opposto. Figure 7, 8, 9, 10 e 11 Fissare i bracci del dondolo con i coperchi di protezione (j) negli orifizi previsti a questo scopo. Figure 12, 13,<br />
14 e 15<br />
A4. Instal<strong>la</strong>zione del<strong>la</strong> protezione<br />
AVVERTENZA : non utilizzare il Seggiolino Dondolo senza <strong>la</strong> sua protezione.<br />
Fare girare gli archetti del seggiolino (k) verso l’alto, sino a che si siano uniti. Figura 16 Ricoprire gli archetti del seggiolino (k) con <strong>la</strong> protezione apposita<br />
(q). Per non commettere errori con il senso del<strong>la</strong> protezione (q) fare attenzione in modo che <strong>la</strong> marca <strong>Babymoov</strong> sia orientata verso il basso. Figura<br />
17<br />
Al<strong>la</strong>rgare i due archetti del seggiolino (k) facendo scivo<strong>la</strong>re <strong>la</strong> protezione (q) sui due archetti. Figure 18, 19 e 20<br />
A5. Instal<strong>la</strong>zione dell’archetto stimo<strong>la</strong>tore con i giochini<br />
AVVERTENZA : non sollevare il Seggiolino Dondolo tenendolo da questo archetto.<br />
Inserire l’archetto stimo<strong>la</strong>tore (i) nei buchi preposti a questo scopo. Figure 21 e 22<br />
k. Seggiolino<br />
l. Poggia testa<br />
m. Scato<strong>la</strong> elettronica<br />
n. Pulsante per piegare<br />
o. Pulsante di pressione<br />
p. Adattatore presa elettrica<br />
q. Protezione<br />
r. Pulsante d’inclinazione di seduta<br />
s. Pulsante di bloccaggio del<strong>la</strong> seduta<br />
A6. Instal<strong>la</strong>zione del poggia testa (l)<br />
AVVERTENZA : Mai aggiungere dei cuscini, delle coperte o imbottitura di qualsiasi tipo ; utilizzare so<strong>la</strong>mente il poggia testa fornito con il Seggiolino<br />
Dondolo. Il poggia testa (l) è un opzione che offre un appoggio supplementare al<strong>la</strong> testa del bebé per una comodità ottimale. Questo elemento<br />
si può staccare dal Seggiolino Dondolo.<br />
Per attaccare o staccare il poggia testa (l) è sufficiente usare l’attacco VELCRO che si trova nel<strong>la</strong> parte posteriore del poggia testa e di infi<strong>la</strong>rlo nel<strong>la</strong><br />
protezione (q). Figura 23<br />
A7. Instal<strong>la</strong>zione delle pile<br />
La scato<strong>la</strong> elettronica (m) del Seggiolino Dondolo deve essere alimentata con 4 pile AA da 1,5V (non incluse né fornite). Per una prestazione<br />
migliore, utilizzare le pile alcaline.<br />
Adoperare un cacciavite cruciforme (non fornito) per aprire <strong>la</strong> scato<strong>la</strong> elettronica (m) che si trova sull’appoggio destro del Seggiolino Dondolo (h).<br />
Figura 24 Inserire le 4 pile AA di 1,5 V (non fornite) osservando i segni convenuti di po<strong>la</strong>rità sul visuale. Figura 25<br />
Riavvitare <strong>la</strong> scato<strong>la</strong> elettronica (m) adoperando un cacciavite. Non stringere troppo forte.<br />
30<br />
SEGGIOLINO DONDOLO BABYMOOV NEW GENERATION • Istruzioni per l’uso
A8. Collegamento al<strong>la</strong> rete elettrica (adattatore fornito e incluso) (p)<br />
IMPORTANTE : prima di iniziare qualsiasi operazione fare attenzione che l’apparecchio sia spento. Il Seggiolino Dondolo può funzionare su di una<br />
presa elettrica con l’adattatore fornito.<br />
Input : 230V / 50Hz<br />
Output : 6V/ Ma<br />
Gli adattatori devono essere esaminati rego<strong>la</strong>rmente in modo da potere identificare immediatamente eventuali danni sul cordone, <strong>la</strong> presa, <strong>la</strong> scato<strong>la</strong><br />
o altre parti. In caso di danno o guasto constatati non utilizzare l’apparecchio.<br />
L’apparecchio del Seggiolino Dondolo deve essere utilizzato solo con l’addattatore raccomandato.<br />
Collegare <strong>la</strong> punta dell’adattatore nell’orifizio previsto a questo scopo e l’altra parte nel<strong>la</strong> presa elettrica. Figura 26<br />
B. ISTRUZIONI PER L’USO DEL SEGGIOLINO DONDOLO<br />
AVVERTENZE :<br />
• Non usare il Seggiolino Dondolo se un pezzo manca o è guasto.<br />
• Prima dell’uso, verificare che i meccanismi di bloccaggio siano ben chiusi e aggiustati correttamente.<br />
• Non sollevare o trasportare il Seggiolino Dondolo quando c’è un bebé seduto.<br />
B1. Come instal<strong>la</strong>re il bebé nel Seggiolino Dondolo<br />
AVVERTENZA : usare sempre l’imbragatura 5 punti fornita.<br />
IMPORTANTE : fare attenzione che tutte le bretelle dell’imbragatura non siano arroto<strong>la</strong>te.<br />
Mettere il bebé nel seggiolino in posizione seduto o sdraiato. Chiudere l’imbragatura 5 punti Figure 27, 28, 29, 30 e 31 Sistemare l’imbragatura<br />
5 punti a livello delle spalle o del<strong>la</strong> vita se necessario.<br />
B2. Inclinazione del seggiolino (k)<br />
AVVERTENZA : non cambiare mai <strong>la</strong> posizione del seggiolino quando c’è il bambino seduto dentro. Prima di fare qualsiasi manovra assicurarsi<br />
che non ci sia il bebé seduto. Con l’aiuto delle due mani, prendere <strong>la</strong> parte superiore ed inferiore del seggiolino (k) e metterlo nel<strong>la</strong> posizione desiderata.<br />
Figure 33, 34 e 35 Potete inclinare <strong>la</strong> posizione del seggiolino sia come seduto che come semi sdraiato con l’aiuto del pulsante d’inclinazione del<strong>la</strong><br />
seduta (r). Figura 32 Potete anche bloccare questa posizione con il pulsante di bloccaggio del<strong>la</strong> seduta (s). Figura 36<br />
B3. Come si piega il seggiolino e trasporto<br />
Ritirare l’archetto stimo<strong>la</strong>tore (i) dal seggiolino dondolo. Figura 37 Ripiegare il seggiolino (k) : premere i due pulsanti di piegatura (n) che si trovano<br />
su ogni <strong>la</strong>to del seggiolino dondolo stringendo simultaneamente gli appoggi del Seggiolino Dondolo. Figure 38, 39, 40 e 41 Chiudere il pulsante<br />
di pressione per bloccare l’assise. Figura 42<br />
t. Pulsante per rego<strong>la</strong>re il dondo<strong>la</strong>mento<br />
u. Pulsante musica e livello sonoro<br />
v. Pulsante timing<br />
w. LEDs indicante il tempo di dondo<strong>la</strong>mento del Seggiolino Dondolo<br />
C. MESSA IN FUNZIONE DEL SEGGIOLINO DONDOLO<br />
C1. Selezione del livello di dondo<strong>la</strong>mento<br />
ATTENZIONE : non far dondo<strong>la</strong>re mai il seggiolino manualmente, <strong>la</strong> velocità desiderata scatterà 20 >45 secondi dopo <strong>la</strong> selezione del livello di dondolio.<br />
Girare il pulsante di rego<strong>la</strong>zione del dondolio (t) per accelerare il livello di dondolio. Tacca 1 (quel<strong>la</strong> più a sinistra) è il dondolio più leggero, tacca<br />
6 (quel<strong>la</strong> più a destra) è il dondolio più forte. Per spegnere il dondo<strong>la</strong>mento, girare il pulsante verso sinistra.<br />
C2. Pulsante per <strong>la</strong> scelta del<strong>la</strong> musica e del livello sonoro (u)<br />
Per attivare <strong>la</strong> musica premere una volta il pulsante (u), poi una seconda volta, una terza e una quarta volta per <strong>au</strong>mentare di volta in volta il livello<br />
sonoro. Per spegnere premere una quinta volta sul pulsante (u). Per cambiare il motivo musicale, premere ancora una sesta volta il pulsante « musica<br />
» ed il « livello sonoro » (u).<br />
C3. Pulsante Timing (v)<br />
Utilizzare questo pulsante per definire il tempo voluto per il dondo<strong>la</strong>mento.<br />
Premere il pulsante (v) per scegliere un tempo voluto di dondo<strong>la</strong>mento compreso tra 8, 15 o 30 minuti. I tre LEDs (w), situati a <strong>la</strong>to del pulsante timing<br />
(v) indicano il tempo scelto.<br />
MANUTENZIONE<br />
Composizione<br />
• Alluminio e PVC<br />
• Sedile : 100% polyestere (suedina e stoffa)<br />
Manutenzione<br />
• Verificare spesso il dondo<strong>la</strong>mento assicurandosi che non ci siano viti non ben avvitate, pezzi usati, stoffa strappata o dei punti scuciti.<br />
• Fare sostituire o riparare i pezzi se necessario. Usare soltanto pezzi di ricambio consigliati da <strong>Babymoov</strong>.<br />
• Pulire rego<strong>la</strong>rmente il Seggiolino Dondolo.<br />
• Il poggia testa e <strong>la</strong> protezione hanno <strong>la</strong> superficie <strong>la</strong>vabili. Usare un panno umido con un poco di sapone.<br />
• Per pulire il quadro del Seggiolino Dondolo, usare solo sapone domestico o un detergente neutro e acqua tiepida. Non usare candeggina.<br />
• Un’eccessiva esposizione al sole o a fonti di calore possono provocare una decolorazione o ve<strong>la</strong>tura dei pezzi.<br />
SEGGIOLINO DONDOLO BABYMOOV NEW GENERATION • Istruzioni per l’uso 31
CZ<br />
Děkujeme Vám, že jste si vybrali houpačku BABYMOOV. Pro bezpečnost Vašeho dítěte si pozorně<br />
přečtěte tento návod a pečlivě jej uschovejte pro případ budoucího použití.<br />
Odpovídá bezpečnostním požadavkům. Odpovídá požadavkům normy PR EN 16232 : 2011<br />
DŮLEŽITÉ UPOZORNĚNÍ - DŘÍVE, NEŽ<br />
ZAČNETE VÝROBEK POUŽÍVAT, PŘEČTĚTE SI<br />
POZORNĚ NÁVOD K OBSLUZE A<br />
USCHOVEJTE JEJ PRO DALŠÍ POTŘEBU.<br />
Elektrické zařízení musí být shromažďovány odděleně. Vyřazené elektrické a elektronické zařízení se<br />
nesmí vyhazovat do netříděného komunálního odpadu, ale musí být odevzdány do sběrného místa<br />
elektroodpadu. Symbol přeškrtnuté popelničky vyjadřuje v celé Evropské unii, že toto elektrozařízení<br />
nesmí být vyhozeno do komunálního odpadu, ale má být sbíráno odděleně.<br />
• Nikdy nenechávejte dítě v houpačce bez dozoru.<br />
• Je nebezpečné umístit houpačku na vyvýšenou plochu (napřík<strong>la</strong>d na<br />
stůl).<br />
• Houpačka není určena k dlouhodobému spaní.<br />
• Vždy použijte zádržný systém.<br />
• Nikdy nepřenášejte a nezvedejte houpačku spolu s dítětem.<br />
• Montáž houpačky musí provádět dospělá osoba.<br />
• Nepoužívejte houpačku je-li polámaná či jakkoliv poškozená.<br />
• Malé součásti uchovávejte mimo dosah dětí.<br />
• Houpačka nenahrazuje postýlku ani přenosnou korbičku. Pokud Vaše<br />
dítě potřebuje spát, uložte jej do vhodné korbičky nebo dětské postýlky.<br />
• Nikdy nepoužívejte houpačku, pokud některé díly chybí nebo jsou<br />
poškozeny.<br />
• Nepoužívejte jiné příslušenství nebo náhradní díly, než ty, které schválil<br />
výrobce.<br />
• Před použitím zkontrolujte, zda zajišťovací mechanismy jsou správně<br />
uzavřeny a přizpůsobeny.<br />
• Pravidelně kontrolujte systém zavěšení na houpačce.<br />
• Vždy použijte 5ti-bodový bezpečnostní pás.<br />
• Houpačku nikdy nepoužívejte bez správně nataženého potahu.<br />
• Nikdy nepoužívejte houpačku na měkké ploše (lůžko, pohovka, polštář),<br />
UPOZORNĚNÍ<br />
DŮLEŽITÉ BEZPEČNOSTNÍ POKYNY<br />
POZOR<br />
Doporučené typy baterií: 4 tužkové baterie typu AA (nejsou součástí balení).<br />
• Nenabíjecí baterie se nesmí nabíjet. V opačném případě může dojít k výbuchu nebo k úniku elektroklytu.<br />
• Nemíchejte různé typy baterií nebo vybité a nové baterie.<br />
• Baterie musí být vloženy se správnou po<strong>la</strong>ritou.<br />
• Vybité baterie musí být z houpačky odstraněny.<br />
• Baterie uchovávejte mimo dosah dětí.<br />
• Vyměňte baterie, když houpačka přestane fungovat uspokojivě.<br />
• Před dlouhodobým usk<strong>la</strong>dněním vyberte baterie z houpačky .<br />
• Vyhoďte použité baterie do příslušného kontejneru.<br />
• Vyměňte a dobíjejte všechny baterie najednou.<br />
• Akumulátory se mají dobíjet pod dohledem dospělé osoby.<br />
• Nenabíjejte dobíjecí baterie v jiné nabíječce.<br />
• Napájecí svorky se nesmí zkratovat.<br />
• Nevhazujte baterie do ohně, protože mohou explodovat nebo uvolňovat škodlivé látky.<br />
• Houpačka není určena pro samostatně sedící dítě nebo pro dítě s<br />
váhou větší než 9 kg.<br />
• Aby nedošlo ke zranění, skládejte a rozkládejte výrobek mimo dosah<br />
dětí.<br />
• Nedovolte dětem hrát si s houpačkou.<br />
• Nepřenášejte a nezvedejte houpačku za hrazdičku.<br />
sedadlo se může převrhnout a vystavit Vaše dítě nebezpečí.<br />
• Nikdy nestavte houpačku do blízkosti otevřeného ohně, intenzivních<br />
zdrojů tep<strong>la</strong>, elektrických zásuvek, prodlužovacích šňůr, sporáků atd.<br />
nebo předmětů, které mohou být v dosahu dětí.<br />
• Aby se předešlo nebezpečí udušení, uschovejte igelitové pytle z obalu<br />
mimo dosah kojenců a malých dětí.<br />
• Nikdy pod dítě nevkládejte další polštářky či deky, používejte jen<br />
přiložený podh<strong>la</strong>vníček.<br />
• Nedávejte dítěti kolem krku hračky s dlouhými provázky, nezavěšujte<br />
šňúry na hrazdičku ani je neuvazujte na hračky. Šňůry představují pro<br />
děti nebezpečí uškrcení.<br />
• Nedávejte houpačku do blízkosti oken, kde dítěti hrozí nebezpečí<br />
zardoušení šňůrou žaluzie nebo záclony.<br />
• Nezavěšujte na hrazdičku jiné hračky, než ty, které byly dodány firmou<br />
<strong>Babymoov</strong>.<br />
Externí adaptér:<br />
• Houpačka se může používat jenom s doporučeným adaptérem.<br />
• Adaptéry se musí pravidelně kontrolovat, aby se zjistilo případné poškození šňůry, zástrčky, pouzdra a dalších částí. V případě poškození<br />
přístroj nepoužívejte.<br />
32<br />
HOUPAČKA BUBBLE NEW GENERATION • Návod k použití
POPIS HOUPAČKY<br />
VAROVÁNÍ: Před montáží houpačky identifikujte a zkontrolujte všechny části.<br />
a. Přední levá noha<br />
b. Přední pravá noha<br />
c. Zadní levá noha<br />
d. Zadní pravá noha<br />
e. Boční levá noha<br />
f. Boční pravá noha<br />
g. Levé houpací rameno<br />
h. Pravé houpací rameno<br />
i. Didaktická hrazdička<br />
j. Ochranné kryty<br />
k. Sedačka<br />
l. Podh<strong>la</strong>vníček<br />
m. Ovládací box<br />
n. T<strong>la</strong>čítka pro skládání konstrukce<br />
o. Stiskací knoflík<br />
p. Síťový adaptatér<br />
q. Potah<br />
r. T<strong>la</strong>čítka sklonu sedačky<br />
s. T<strong>la</strong>čítko zajištění sedačky<br />
OBSLUHA A POPIS HOUPAČKY<br />
A. NÁVOD NA MONTÁŽ HOUPAČKY<br />
A1. Montáž noh houpačky<br />
Zasuňte zadní levou nohu (c) do pravé zadní nohy (d). Zkontroluje, zda stiskací knoflík zadní pravé nohy (d) je správně zasazen do otvoru na levé<br />
zadní noze (c). Písmena D+D musí být spojena.(Obrázek 1) Podobně, zasuňte levou přední nohu (a) do pravé přední nohy (b). Zkontroluje, zda stiskací<br />
knoflík přední levé nohy (a) je správně zasazen do otvoru na pravé přední noze (b). Písmena C+C musí být spojena.(Obrázek 2) Při správně provedené<br />
operaci, uslyšíte zacvaknutí a objeví se šedý stiskací knoflík na opačné straně nohy.<br />
A2. Montáž houpacích ramen<br />
Zasuňte levou boční nohu (e) do levé přední nohy (a) a do levé zadní nohy (c) tak, aby se písmena A+A a B+B spojily. (Obrázky 3 a 4)Zasuňte pravou<br />
boční nohu (f) do pravé přední nohy (b) a do pravé zadní nohy (d) a nasaďte zacvaknutím přední nohy.(Obrázek 5) Nohy rozložte stisknutím<br />
t<strong>la</strong>čítek pro skládání konstrukce (n) nacházejících se na straně bočních noh (e) a (f). Při správně provedené operaci, uslyšíte zacvaknutí a objeví se<br />
šedý stiskací knoflík na opačné straně nohy.(Obrázek 6)<br />
A3. Montáž sedačky<br />
Sedačku namontujete (k) zasunutím pravého houpacího ramena (h) do jedné strany ovládacího boxu (m), a levého houpacího ramena (g) do<br />
opačné strany.(Obrázky 7, 8, 9, 10 a 11)Připevněte houpací ramena ochrannými kryty (j) do otvorů určených k tomuto účelu.(Obrázky 12, 13, 14<br />
a 15)<br />
A4. Nasazení potahu<br />
VAROVÁNÍ: Houpačku nikdy nepoužívejte bez správně nataženého potahu.<br />
Otočte oblouky sedačky (k) směrem vzhůru a spojte je.(Obrázek 16) Natáhněte na oblouky sedačky (k) potah (q). Pro správné nasazení potahu (q)<br />
dbejte, aby logo <strong>Babymoov</strong> směrovalo dolů.(Obrázek 17)<br />
Odkloňte od sebe oba oblouky sedačky (k) a zároveň navlékněte potah (q) podél obou oblouků.(Obrázky 18, 19 a 20)<br />
A5. Insta<strong>la</strong>ce didaktické hrazdičky (i)<br />
VAROVÁNÍ: Nikdy nezvedejte houpačku za hrazdičku!<br />
Zasuňte hrazdičku (i) do příslušných otvorů.(Obrázky 21 a 22)<br />
A6. Insta<strong>la</strong>ce podh<strong>la</strong>vníčku (l)<br />
VAROVÁNÍ: Nikdy pod dítě nevkládejte další polštářky či deky, používejte jen přiložený podh<strong>la</strong>vníček. Podh<strong>la</strong>vníček (l) je volitelný prvek, který poskytne<br />
dodatečnou podporu pro dětskou h<strong>la</strong>vu pro optimální pohodlí. Tento doplněk lze od houpačky oddělit .<br />
Podh<strong>la</strong>vníček (l) upevněte pomocí suchého zipu na jeho zadní straně, musí se natáhnout na potah (q).(Obrázek 23)<br />
A7. Insta<strong>la</strong>ce baterie<br />
Ovládácí box (m) houpačky je napájen 4 tužkovými bateriemi typu AA, 1,5V (nejsou součástí balení). Pro lepší výkon používejte alkalické baterie.<br />
Pomocí křížového šroubováku (není součástí balení) otevřete ovládací box (m), umístněný na pravém houpacím rameně (h).(Obrázek 24) Vložte 4<br />
tužkové baterie typu AA, 1,5V (nejsou součástí balení) podle označení po<strong>la</strong>rity na obrázku.(Obrázek 25)<br />
Zavřete box (m) pomocí šroubováku. Pozor na nadměrné utažení šroubů.<br />
A8. Zapojení do elektrické sítě (adaptér dodán v balení) (p)<br />
DŮLEŽITÉ: Před jakýmkoliv zásahem ověřte, zda je houpačka vypnutá.<br />
Houpačku je možné pomocí dodaného adaptéru zapojit do elektrické sítě.<br />
Vstup: 230V / 50Hz<br />
Výstup: 6V / 500Ma<br />
Adaptéry se musí pravidelně kontrolovat, aby se zjistilo případné poškození šňůry, zástrčky, pouzdra a dalších částí. V případě poškození přístroj<br />
nepoužívejte.<br />
Houpačka se může používat jenom s doporučeným adaptérem.<br />
Zapojte adaptér do příslušného otvoru a druhou stranu do zásuvky.(Obrázek 26)<br />
HOUPAČKA BUBBLE NEW GENERATION • Návod k použití 33
B. OBSLUHA HOUPAČKY<br />
VAROVÁNÍ:<br />
• Nepoužívejte houpačku, pokud jedna část chybí nebo je poškozená.<br />
• Před použitím zkontrolujte, zda zajišťovací mechanismy jsou správně uzavřeny a přizpůsobeny.<br />
• Nikdy nepřenášejte a nezvedejte houpačku pokud v ní dítě sedí.<br />
B1. Vložení dítěte do houpačky<br />
Vždy používejte 5-ti bodový bezpečnostní pás.<br />
Vždy zkontrolujte zda popruhy nejsou překříženy!<br />
Položte dítě do houpačky vsedě nebo vleže. Zatáhněte 5-ti bodový bezpečnostní pás.(Obrázky 27, 28, 29, 30 a 31)Podle potřeby popruhy na<br />
ramenou nebo v pasu utáhněte či uvolněte.<br />
B2. Nastavení sklonu sedačky (k)<br />
VAROVÁNÍ: Nikdy neměňte sklon sedačky, je-li v houpačce dítě. Před každou manipu<strong>la</strong>cí dítě vyndejte.<br />
Oběma rukama uchopte horní a dolní část sedačky (k) a upravte do žádané polohy. (Obrázky 33, 34 a 35)Sedačku můžete sklopit do polohy sezení<br />
nebo (polo) ležení pomocí t<strong>la</strong>čítka sklonu sedačky. (r). (Obrázek 32) Vybranou polohu můžete taky zablokovat pomocí t<strong>la</strong>čítek zajištění<br />
sedačky(s).(Obrázek 36)<br />
B3. Skládání houpačky a přeprava<br />
Sundejte didaktickou hrazdičku (i) z houpačky. (Obrázek 37) Složte sedačku (k) : stiskněte obě t<strong>la</strong>čítka pro skládání konstrukce (n) umístěné po stranách<br />
houpačky a zároveň přitáhněte nohy houpačky k sobě. (Obrázky 38, 39, 40 a 41) Zablokujte sedačku stiskacím knoflíkem.(Obrázek 42)<br />
t. T<strong>la</strong>čítko nastavení houpání<br />
u. T<strong>la</strong>čítko hudby a h<strong>la</strong>sitosti<br />
v. T<strong>la</strong>čítko časového spínače<br />
w. LED diody znázorňující dobu houpání<br />
C. FUNKCE HOUPÁNÍ<br />
C1. Výběr rychlosti houpání<br />
Nerozhoupávejte ani nezastavujte houpačku rukou, požadovaná rychlost houpání se spustí po cca 20-45 vteřinách po nastavení.<br />
Otočte t<strong>la</strong>čítko nastavení houpání (t), chcete-li zvýšit rychlost houpání. 1. vrub (úplně vlevo) je nejnižší rychlost houpání, 6. vrub (úplně vpravo) je<br />
nejvyšší rychlost houpání. Houpání zastavíte otočením t<strong>la</strong>čítka vlevo.<br />
C2. T<strong>la</strong>čítko pro výběr hudby a h<strong>la</strong>sitosti (u)<br />
Hudba se spustí jedním stisknutím t<strong>la</strong>čítka (u), a 2., 3. a 4. stisknutí pak zvýší h<strong>la</strong>sitost. Hudba se vypne 5. stisknutím t<strong>la</strong>čítka (u). Hudba se změní,<br />
když stiskněte příslušné t<strong>la</strong>čítko po 6 (u).<br />
C3. T<strong>la</strong>čítko časového spínače (v)<br />
T<strong>la</strong>čítkem časového spínače nastavíte dobu houpání.<br />
Stisknutím t<strong>la</strong>čítka (v) nastavíte požadovanou dobu houpání – 10, 15 nebo 30 minut. Tři diody LED (w), umístěné vedle t<strong>la</strong>čítka časového spínače<br />
(v) zobrazují zvolenou dobu houpání.<br />
ÚDRŽBA A ČIŠTĚNÍ<br />
Materiál<br />
• Aluminium a PVC<br />
• Sedačka: 100% polyester (imitace semiše a plátno)<br />
Údržba a čištění<br />
• Houpačku často kontrolujete a ubezpečte se, že žádné šrouby nejsou uvolněné, díly opotřebované, látky potrhané, nebo švy rozpárané.<br />
• V případě potřeby vadné či poškozené části spravte, příp. vyměňte. Používejte pouze díly doporučené značkou <strong>Babymoov</strong>.<br />
• Houpačku pravidelně čistěte.<br />
• Povrch podh<strong>la</strong>vníčku a potahu je umyvatelný. Použijte vlhký hadřík a mýdlo.<br />
• Konstrukci houpačky čistěte výlučně domácím mýdlem nebo jemnými čistícími prostředky a v<strong>la</strong>žnou vodou. Nepoužívejte žádné chlorové bělidlo.<br />
• Nadměrné vystavení slunečnímu záření nebo vysoké teplotě může způsobit odbarvení nebo deformování částí.<br />
34<br />
HOUPAČKA BUBBLE NEW GENERATION • Návod k použití
Bon de garantie à vie<br />
(à renvoyer dans les 15 jours suivant l’achat)<br />
❐ Oui, je souhaite garantir à vie mon produit <strong>Babymoov</strong> et je vous joins une copie de<br />
mon ticket de caisse (OBLIGATOIRE). Sans ce<strong>la</strong>, nous ne pourrons garantir à vie<br />
votre achat.<br />
❐ Oui, je souhaite recevoir <strong>la</strong> Moovletter, lettre d’in<strong>format</strong>ion électronique sur les<br />
nouve<strong>au</strong>tés et <strong>la</strong> société <strong>Babymoov</strong>. Merci de bien remplir votre adresse e-mail.<br />
Nom des parents : . . . . . . . . . . . . . . . . . . . . . . . . . . . . . . . . . . . . . . . . . . . . . . . . . . . . . . . . . . . . . . . . . . . . . . .<br />
Prénoms des parents : . . . . . . . . . . . . . . . . . . . . . . . . . . . . . . . . . . . . . . . . . . . . . . . . . . . . . . . . . . . . . . . . . . . .<br />
Adresse : . . . . . . . . . . . . . . . . . . . . . . . . . . . . . . . . . . . . . . . . . . . . . . . . . . . . . . . . . . . . . . . . . . . . . . . . . . . . . .<br />
. . . . . . . . . . . . . . . . . . . . . . . . . . . . . . . . . . . . . . . . . . . . . . . . . . . . . . . . . . . . . . . . . . . . . . . . . . . . . . . . . . . . . .<br />
Code Postal / Ville : . . . . . . . . . . . . . . . . . . . . . . . . . . . . . . . . . . . . . . . . . . . . . . . . . . . . . . . . . . . . . . . . . . . . . .<br />
N° de téléphone : . . . . . . . . . . . . . . . . . . . . . . . . . . . . . . . . . . . . . . . . . . . . . . . . . . . . . . . . . . . . . . . . . . . . . . . .<br />
E-mail : . . . . . . . . . . . . . . . . . . . . . . . . . . . . . . . . . . . . . . . . . . . . . . . . . . . . . . . . . . . . . . . . . . . . . . . . . . . . . . . .<br />
Prénoms de vos enfants : . . . . . . . . . . . . . . . . . . . . . . . . . . . . . . . . . . . . . . . . . . . . . . . . . . . . . . . . . . . . . . . . .<br />
Dates de naissance : . . . . . . . . . . . . . . . . . . . . . . . . . . . . . . . . . . . . . . . . . . . . . . . . . . . . . . . . . . . . . . . . . . . . .<br />
Nom du produit acheté : . . . . . . . . . . . . . . . . . . . . . . . . . . . . . . . . . . . . . . . . . . . . . . . . . . . . . . . . . . . . . . . . . .<br />
Référence : . . . . . . . . . . . . . . . . . . . . . . . . . . . . . . . . . . . . . . . . . . . . . . . . . . . . . . . . . . . . . . . . . . . . . . . . . . . . .<br />
N° de code barre (obligatoire) : . . . . . . . . . . . . . . . . . . . . . . . . . . . . . . . . . . . . . . . . . . . . . . . . . . . . . . . . . . . . .<br />
Date de l’achat : . . . . . . . . . . . . . . . . . . . . . . . . . . . . . . . . . . . . . . . . . . . . . . . . . . . . . . . . . . . . . . . . . . . . . . . .<br />
Lieu de l’achat : . . . . . . . . . . . . . . . . . . . . . . . . . . . . . . . . . . . . . . . . . . . . . . . . . . . . . . . . . . . . . . . . . . . . . . . . .<br />
Votre opinion sur <strong>la</strong> qualité du produit : M<strong>au</strong>vaise 1 2 3 4 5 très bonne<br />
Combien de produits <strong>Babymoov</strong> avez-vous déjà acheté <br />
1 2 3 4 5 6 7 8 <strong>au</strong>tre : . . . . . . . . . . . . . . . . . . . . . . . . . . . . . . . . . . . . . . . . . . . . . . . . . . . . . . . . . . . . . . . . .<br />
Avez-vous des commentaires sur ce produit <br />
. . . . . . . . . . . . . . . . . . . . . . . . . . . . . . . . . . . . . . . . . . . . . . . . . . . . . . . . . . . .<br />
. . . . . . . . . . . . . . . . . . . . . . . . . . . . . . . . . . . . . . . . . . . . . . . . . . . . . . . . . . . .<br />
Avez-vous une idée d’un produit génial<br />
à créer pour bébé <br />
. . . . . . . . . . . . . . . . . . . . . . . . . . . . . . . . . . . . . . . . . . . . . . . . . . . . .<br />
. . . . . . . . . . . . . . . . . . . . . . . . . . . . . . . . . . . . . . . . . . . . . . . . . . . . .<br />
. . . . . . . . . . . . . . . . . . . . . . . . . . . . . . . . . . . . . . . . . . . . . . . . . . . . .<br />
* Garantie à vie. Cette garantie est soumise à<br />
conditions. Va<strong>la</strong>ble en France. Liste des <strong>au</strong>tres<br />
pays concernés, activation et renseignements<br />
en ligne à l'adresse suivante :<br />
www.service-babymoov.com<br />
Photographies et illustrations non contractuelles A055004-Manual-Artwork-01<br />
* sous réserve d’une utilisation conforme à <strong>la</strong> <strong>notice</strong>. La garantie à vie ne couvre pas les détériorations dues à une utilisation anormale, le textile, les consommables (sucettes,<br />
ampoules…), <strong>la</strong> sérigraphie, l’usure normale de certains éléments comme le p<strong>la</strong>stique, le rou<strong>la</strong>nt...<br />
• Nous vous rappelons que vous disposez d'un droit d'accès, de modification, de rectification et de suppression des données qui vous concernent (art. 34 de <strong>la</strong> loi "In<strong>format</strong>ique<br />
et Libertés" du 6 janvier 1978). Pour exercer ce droit, adressez-vous à <strong>Babymoov</strong> - Parc Industriel des Gravanches - 16, rue Jacqueline Auriol - 63051 Clermont-Ferrand cedex 2.<br />
• Les in<strong>format</strong>ions qui vous concernent sont destinées à <strong>Babymoov</strong>. Nous pouvons être amenés à les transmettre à des tiers (partenaires commerci<strong>au</strong>x, etc).<br />
Le souhaitez-vous Oui ❒ Non ❒