AUXILAB S.L. pH METRO PORTÃTIL PORTABLE pH METER ...
AUXILAB S.L. pH METRO PORTÃTIL PORTABLE pH METER ...
AUXILAB S.L. pH METRO PORTÃTIL PORTABLE pH METER ...

Create successful ePaper yourself
Turn your PDF publications into a flip-book with our unique Google optimized e-Paper software.
ANNEX I: CE CERTIFICATE<br />
ENGLISH<br />
<strong>pH</strong> <strong>METRO</strong> PORTÁTIL<br />
<strong>PORTABLE</strong> <strong>pH</strong> <strong>METER</strong><br />
<strong>AUXILAB</strong> S.L.<br />
DECLARATION OF CONFORMITY<br />
<strong>PORTABLE</strong> <strong>pH</strong> <strong>METER</strong> 902/4 of Auxilab, S.L for the<br />
Directive of Machines (89/392/CEE modified) and the regulations<br />
adopted for their transposition<br />
NAME OF THE MANUFACTURER / IMPORTER:<br />
<strong>AUXILAB</strong>, S.L.<br />
MODELO/MODEL 902/4<br />
ADDRESS: Polígono Morea Norte, 8<br />
31191 Beriáin (Navarra)<br />
WE STATE THAT:<br />
ph metro NAHITA 902/4<br />
Model 50902040<br />
Are designed and manufactured according to:<br />
Directive 89/392/CEE, including the modifications and national regulations that<br />
transpose them.<br />
Directive 89/336/CEE modified over electromagnetic compatibility<br />
.<br />
And that the following harmonized rules have applied (or part of them):<br />
UNE 292-1/-2/-2/A1,UNE-EN 1050, UNE-EN 614-1,UNE-EN 1037, UNE-EN<br />
1088, UNE-EN 547, UNE-EN 953, UNE-EN 294, UNE-EN 418, UNE-EN 894-1, UNE-<br />
EN 894-2, UNE-EN 954-1, UNE-EN 60204-1, UNE 61010-1/A2, UNE-EN61010-2-051..<br />
BERIAIN 16th July 2007<br />
Signed by: ALFONSO AINCIBURU SANZ<br />
DIRECTOR/MANAGER<br />
Polígono Morea Norte, 8 31191 Beriain (Navarra) - Spain. Tel. 948 310 513 Fax 948 312 071<br />
Internet: www.auxilab.es · Email: correo@auxilab.es<br />
Page 16 Instruction manual 50902040 Version 1 June-07<br />
Este manual es parte inseparable del aparato por lo que debe estar<br />
disponible a todos los usuarios del equipo. Le recomendamos leer<br />
atentamente el presente manual y seguir rigurosamente los procedimientos<br />
de uso para obtener las máximas prestaciones y una<br />
mayor duración del mismo.<br />
This manual should be available for all users of these equipments. To get<br />
the best results and a higher duration of this equipment it is advisable to<br />
read carefully this manual and follow the processes of use.<br />
Revisión 1 Junio-2007 Manual de instrucciones 50902040 Pág. 1
CASTELLANO<br />
pGracias por haber adquirido este equipo. Deseamos sinceramente que disfrute del <strong>pH</strong><br />
metro portátil Nahita 902/4. Le recomendamos que cuide el equipo conforme a lo expuesto<br />
en este manual.<br />
Nahita desarrolla sus productos según las directrices del marcado CE y haciendo hincapié<br />
en la ergonomía y seguridad del usuario.<br />
La calidad de los materiales empleados en la fabricación y el correcto proceder le permitirán<br />
disfrutar del equipo por muchos años.<br />
El uso incorrecto o indebido del equipo puede dar lugar a accidentes, descargas eléctricas,<br />
cortocircuitos, fuegos, lesiones, etc. Lea el punto de Mantenimiento, donde se recogen<br />
aspectos de seguridad<br />
LEA DETALLADAMENTE ESTE MANUAL DE INSTRUCCIONES ANTES DE<br />
OPERAR CON ESTE EQUIPO CON EL FIN DE OBTENER LAS MÁXIMAS PRES-<br />
TACIONES Y UNA MAYOR DURACIÓN DEL MISMO.<br />
Tenga especialmente presente lo siguiente:<br />
Este manual es parte inseparable del <strong>pH</strong> metro portátil Nahita 902/4, por lo que debe<br />
estar disponible para todos los usuarios del equipo.<br />
Debe manipularse siempre con cuidado evitando los movimientos bruscos, golpes, caídas<br />
de objetos pesados o punzantes; evite el derrame de líquidos en su interior.<br />
Nunca desmonte el equipo para repararlo usted mismo, además de perder la garantía<br />
podría producir un funcionamiento deficiente de todo el equipo, así como daños a las personas<br />
que lo manipulan.<br />
Para prevenir fuego o descargas eléctricas, evite los ambientes secos y polvorientos. Si<br />
esto ocurre, desenchufe inmediatamente el equipo de la toma de corriente.<br />
Cualquier duda puede ser aclarada por su distribuidor (instalación, puesta en marcha,<br />
funcionamiento). Usted puede también mandarnos sus dudas o sugerencias a la siguiente<br />
dirección de correo del Servicio Técnico Nahita (asistencia@auxilab.es) o bien llamando<br />
al Tel: 807117040 (0.30 Euros/min).<br />
Este equipo está amparado por la Ley de garantías y bienes de consumo (10/2003).<br />
No se consideran en garantía las revisiones del equipo.<br />
La manipulación del equipo por personal no autorizado provocará la pérdida total de<br />
la garantía.<br />
Los accesorios, así como su pérdida, no están cubiertos por dicha garantía. Tampoco<br />
estarán cubiertos por el periodo de garantía las piezas en su desgaste por uso natural.<br />
Asegúrese de guardar la factura de compra para tener derecho de reclamación o prestación<br />
de la garantía. En caso de enviar el equipo al Servicio Técnico adjunte factura o<br />
copia de la misma como documento de garantía.<br />
El fabricante se reserva los derechos a posibles modificaciones y mejoras sobre este<br />
manual y equipo.<br />
¡ATENCIÓN! NO SE ADMITIRÁ NINGÚN APARATO PARA REPARAR<br />
QUE NO ESTÉ DEBIDAMENTE LIMPIO Y DESINFECTADO.<br />
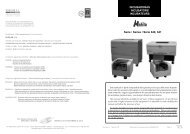
Glass body electrode<br />
ENGLISH<br />
Code Working temp Diaphragm Membrane Electrolyte<br />
90900651 5-60 ºC Ceramic Bulb Liquid, refillable<br />
90900652 5-90 ºC Ceramic Bulb Liquid, refillable<br />
90900953 5-60 ºC Ground glass Bulb Gel, sealed<br />
90900955 5-90 ºC Ground glass Bulb Liquid, refillable<br />
5. MAINTENANCE AND CLEANING<br />
To get the best results and a higher duration of the <strong>pH</strong> meter it is essential to follow the<br />
processes of use.<br />
Note: All the processes of use mentioned below will not have any value unless you keep<br />
a continued and careful maintenance.<br />
Please follow the processes of use of this manual.<br />
This manual should be available for all users of this equipment.<br />
Always use original components and supplies. Other devices can be similar but they<br />
can damage the equipment.<br />
Never try to repair the <strong>pH</strong> meter by yourself, since you will lose the warranty and may<br />
provoke damages to the general operating system, as well as injuries to the people that<br />
usually handle the <strong>pH</strong> meter (burns, hurts…).<br />
Maintenance of the electrode. Rinse the <strong>pH</strong> electrode in clean water after each measurement;<br />
for a thorough cleaning, clean the electrode with a cloth and a solution of HCl 0.1<br />
M. After cleaning the electrode, calibrate the equipment.<br />
Do not use the light more than necessary to extend the life of batteries.<br />
If LOBAT is displayed, change the batteries.<br />
For long periods of no use, remove the batteries.<br />
Do not expose the equipment directly to the sunlight, since the LCD could suffer damages<br />
and produce an early ageing of the equipment.<br />
In the event of breakdown please contact your distributor to overhaul through Nahita<br />
Technical Assistance Department.<br />
Cleaning<br />
Never use scourers or substances that can grate for cleaning the case of the equipment<br />
as they damage the <strong>pH</strong> meter and produce an early ageing of the equipment.<br />
Use a fluff-free cloth dampened with soaped water that does not contain abrasives.<br />
<br />
INSTRUCTIONS ON ENVIRONMENT PROTECTION<br />
At the end of its life cycle, please, do not dispose of this equipment by throwing it in<br />
the usual garbage; hand it over a collection point for the recycling of electrical and electronic<br />
appliances. It does not contain dangerous or toxic products for humans but a non<br />
adequate disposal would damage the environment.<br />
The materials are recyclable as mentioned in its marking. By recycling material or by other forms of<br />
re-utilization of old appliances, you are making an important contribution to protect our environment.<br />
Please inquire at the community administration for the authorized disposal location.<br />
Pág. 2 Manual de instrucciones 50902040 Revisión 1 Junio-07<br />
Version 1 June-07 Instruction manual 50902040 Page 2
When the displayed value is stable press ENTER (3).<br />
Press MODE (2) and STD2 will be displayed at the lower part of the screen. This is the<br />
second calibration point.<br />
Clean the electrode with distilled water and submerge it in the buffer solution.<br />
NOTE: For the second calibration point use the solution with <strong>pH</strong> 4.01 if working in an<br />
acidic <strong>pH</strong> range or the solution with 10.1 if working in a basic <strong>pH</strong> range.<br />
When the displayed value is stable press ENTER (3). The equipment is calibrated.<br />
To go to the H measuring range press MODE (2); MEAS will be displayed. The <strong>pH</strong><br />
meter is ready to operate.<br />
<strong>pH</strong> and mV measurements<br />
NOTE: Make sure the equipment is calibrated before performing any measurement.<br />
Turn the ph meter on by pressing ON/OFF (1).<br />
Select the <strong>pH</strong> or mV measuring mode by pressing MODE (2). MEAS will be displayed<br />
at the lower part of the screen.<br />
Clean the electrode with distilled water and dry it with a filter or cellulose paper.<br />
Submerge the electrode 4 cm into the sample to be analyzed and stir it with the electrode.<br />
Wait until the reading is stable. <strong>pH</strong> or mV value will be displayed at the middle and<br />
below is shown the temperature value previously introduced.<br />
NOTE: If several samples are going to be analyzed successively it is recommended to<br />
clean the <strong>pH</strong> electrode with distilled water to avoid cross contamination.<br />
Security<br />
The <strong>pH</strong> meter must be used by previously qualified staff that knows how the equipment<br />
works thanks to the user manual.<br />
It is essential to have the equipment switched off before cleaning, checking components<br />
or replacing any piece.<br />
Never try to repair the <strong>pH</strong> meter by yourself, since you will lose the warranty and may<br />
provoke damages to the general operating system, as well as injuries to the people that<br />
usually handle the equipment (burns, hurts…).<br />
Try not to spill any liquid on the control panel, though it is properly insulated.<br />
Made under the European regulations for electrical security, electromagnetic compatibility<br />
and security on machines.<br />
Accessories<br />
We are provided with a wide range of combined ph electrodes to adapt to any application<br />
in chemistry pharmaceutics, education, etc. All the electrodes present a BNC connector<br />
and a <strong>pH</strong> range from 0 to 14.<br />
Plastic body electrodes<br />
Code Working temp Diaphragm Membrane Electrolyte<br />
90900218 5-60 ºC Fibre Bulb Gel, sealed<br />
90900219 5-60 ºC Fibre Bulb Liquid, refillable<br />
90900900 5-60 ºC PTFE ring Bulb Gel, sealed<br />
90900901 5-60 ºC PTFE ring Flat Gel, sealed<br />
ÍNDICE DE IDIOMAS<br />
Castellano<br />
Inglés<br />
ÍNDICE DE CONTENIDOS<br />
1. APLICACIONES DEL INSTRUMENTO<br />
2. DESCRIPCIÓN<br />
3. ESPECIFICACIONES TÉCNICAS<br />
4. INSTALACIÓN / PUESTA EN MARCHA<br />
5. MANTENIMIENTO Y LIMPIEZA<br />
ANEXO I: CERTIFICADO CE<br />
1. APLICACIONES DEL INSTRUMENTO<br />
CASTELLANO<br />
2-9<br />
10-16<br />
El <strong>pH</strong>-metro Nahita 902/4 es un instrumento portátil, ligero, compacto y fácil de manejar<br />
ideal para mediciones de <strong>pH</strong> in situ. Presenta una pantalla de cristal líquido de fácil<br />
lectura que puede ser iluminada para facilitar la lectura en lugares con poca luz y un teclado<br />
de membrana resistente a la humedad con 5 teclas desde las que se acceden a todas las<br />
funciones del instrumento.<br />
El equipo, suministrado con un electrodo combinado con cuerpo de vidrio permite<br />
medir el <strong>pH</strong> y el potencial eléctrico de diverso tipo de soluciones. Para adaptarse a las<br />
necesidades de cada aplicación, el equipo puede ser utilizado con otros tipos de electrodos<br />
siempre y cuando dispongan de conector BNC. El <strong>pH</strong>-metro Nahita 902/4 presenta<br />
también un mecanismo de compensación de temperatura mediante la introducción del<br />
valor de temperatura a través del teclado.<br />
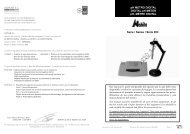
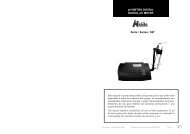
2. DESCRIPCIÓN<br />
1. ON/OFF: encendido/apagado<br />
2. MODE: selección del modo de medida,<br />
calibración y ajuste de temperatura<br />
3. ENTER: confirmación de parámetros<br />
4. : incremento de parámetros<br />
5. : disminución de parámetros<br />
6. Botón de iluminación<br />
7. Conexión electrodo<br />
8. Electrodo <strong>pH</strong><br />
1<br />
<br />
2<br />
6<br />
3<br />
7<br />
MODE<br />
ENTER<br />
ON<br />
OFF<br />
5<br />
4<br />
8<br />
3<br />
3<br />
4<br />
4<br />
7<br />
9<br />
Page 14 Instruction manual 50902040 Version 1 June-07 Revisión 1, Junio-07 Manual de instrucciones 50902040 Pág. 3
3. ESPECIFICACIONES TÉCNICAS<br />
Referencia 50902040<br />
Rango <strong>pH</strong> 0.0 a 14.0<br />
Rango mV<br />
Resolución <strong>pH</strong> 0.01<br />
Resolución mV<br />
0 a ±1400 mV<br />
1 mV<br />
Precisión <strong>pH</strong> ± 0.03<br />
Precisión mV ± 0.2%<br />
Compensación de temperatura<br />
Rango CAT 0-60 ºC<br />
Calibración<br />
Alimentación<br />
4. INSTALACIÓN / PUESTA EN MARCHA<br />
Introduciendo datos por teclado<br />
1 ó 2 puntos<br />
2 baterías 1.5 V, tipo AA<br />
CASTELLANO<br />
Inspección preliminar<br />
Desembale el <strong>pH</strong> metro y sin encender el equipo, asegúrese de que no presenta ningún<br />
daño debido al transporte. De ser así, comuníquelo inmediatamente a su transportista o<br />
suministrador para que pueda hacer las debidas reclamaciones en el plazo establecido.<br />
Guarde el embalaje, ya que siempre se deben realizar las devoluciones en su embalaje<br />
original con todos los accesorios suministrados.<br />
Compruebe los accesorios que usted debe recibir junto al equipo:<br />
- Electrodo <strong>pH</strong><br />
- Soluciones tampón <strong>pH</strong> 4.01, <strong>pH</strong> 7.00, <strong>pH</strong> 10.01<br />
- 2 pilas 1.5 V, tipo AA<br />
- Certificado de garantía<br />
- Manual de isntrucciones<br />
Sólo aceptamos devoluciones de equipos en los 15 días posteriores al envío y siempre<br />
que vengan completos en su embalaje original.<br />
Instalación<br />
Antes de comenzar a utilizar el instrumento, es conveniente familiarizarse con sus componentes<br />
y fundamentos básicos, así como con las funciones de sus controles.<br />
LEA DETALLADAMENTE ESTE MANUAL DE INSTRUCCIONES ANTES DE<br />
OPERAR CON ESTE EQUIPO CON EL FIN DE OBTENER LAS MÁXIMAS PRES-<br />
TACIONES Y UNA MAYOR DURACIÓN DEL MISMO.<br />
Para su funcionamiento el <strong>pH</strong> metro Nahita 902/4 emplea 2 pilas alcalinas tipo AA.<br />
Abra el compartimiento de las pilas situado en la parte posterior del equipo y coloque las<br />
pilas según su polaridad. Vuelva a colocar la tapa del compartimiento.<br />
ENGLISH<br />
The Nahita <strong>pH</strong> meter 902/4 operates with 2 alkaline batteries type AA. Open the batteries<br />
compartment located at the back side of the equipment and put the batteries according<br />
to their polarity. Put again the lid of the compartment.<br />
NOTE: Remove the batteries if you are not using the instrument for a long period of<br />
time.<br />
Connection of the <strong>pH</strong> electrode. Connect the <strong>pH</strong> electrode (8) to the connector (7) situated<br />
at the upper part of the equipment.<br />
Turn the <strong>pH</strong> meter on by pressing ON/OFF (1). After a few seconds the equipment will<br />
be ready to operate.<br />
Working temperature adjustment<br />
Nahita <strong>pH</strong> meter 902/4 is provided with a temperature compensation mechanism by<br />
entering data using the keypad. For this purpose:<br />
In the measuring mode press MODE (2) until the ºC symbol starts blinking.<br />
Introduce the exact value of the temperature of the solution to be analyzed by using<br />
(4) and (5).<br />
Press ENTER (3) to save the temperature value.<br />
Calibration of the <strong>pH</strong> meter<br />
Note: It is recommended to calibrate de <strong>pH</strong> meter before starting using the equipment<br />
and whenever observing variations in measurements, after changing the electrode and<br />
after a prolonged use with solutions of <strong>pH</strong>12, organic solutions or fluorine containing<br />
solutions.<br />
Preparation of the standard buffer solutions:<br />
The <strong>pH</strong> meter is supplied with the following standard buffer solutions: <strong>pH</strong> 4.01 (25 ºC),<br />
<strong>pH</strong> 7.00 (25 ºC), <strong>pH</strong> 10.01 (25 ºC).<br />
Pour the content of one of the packet of buffer solution into a clean beaker and add 100<br />
mL of distilled water.<br />
Dissolve well the powder; if it is necessary add more water.<br />
Once all the content is dissolved, pour the solution into a 250 mL volumetric flask and<br />
add distilled water until it reaches the neck of the flask.<br />
Calibration:<br />
Connect the electrode to the equipment.<br />
Turn the <strong>pH</strong> meter on by pressing ON/OFF (1). The equipment will enter in the mV<br />
measuring mode.<br />
Press MODE (2) to make the temperature adjustment. When the symbol ºC blinks introduce<br />
the temperature of the standard buffer solution by using (4) and (5). Save the<br />
value by pressing ENTER (3).<br />
Press MODE (2) again and STD1 will be displayed at the lower part of the screen. This<br />
is the first calibration point.<br />
NOTE: If the equipment does not need to be calibrated, press MODE (2) two more times<br />
and the equipment will enter the <strong>pH</strong> measuring mode.<br />
Clean the electrode with distilled water and submerge it in the buffer solution.<br />
NOTE: For the first calibration point use the solution with <strong>pH</strong> 7.00 (neutral).<br />
<br />
<br />
Pág. 4 Manual de instrucciones 50902040 Revisión 1 Junio-07<br />
Version 1 June-07 Instruction manual 50902040 Page 13
3. TECHNICAL SPECIFICATIONS<br />
Code 50902040<br />
<strong>pH</strong> range 0.0 a 14.0<br />
mV range<br />
<strong>pH</strong> resolution 0.01<br />
mV resolution<br />
0 a ±1400 mV<br />
1 mV<br />
<strong>pH</strong> accuracy ± 0.03<br />
mV accuracy ± 0.2%<br />
Temperature compensation<br />
ATC range 0-60 ºC<br />
Calibration<br />
Power<br />
4. INSTALLATION / SETTING UP<br />
Entering data using the keypad<br />
1 or 2 points<br />
2 batteries 1.5 V, typo AA<br />
Page 12 Instruction manual 50902040 Version 1 June-07<br />
ENGLISH<br />
Preliminary inspection<br />
Unwrap the <strong>pH</strong> meter and, without turning the equipment on, make sure that it does<br />
not present any damage because of the shipment. In case it presents any damage, tell it<br />
immediately to your transport agent or dealer so that they can make the claims in the<br />
correct time limit.<br />
Please keep the original wrapping; you will always need it for returns enclosed with all<br />
the accessories supplied.<br />
Please check that all the accessories are enclosed with the equipment:<br />
- <strong>pH</strong> electrode<br />
- Standard buffer solutions <strong>pH</strong> 4.01, <strong>pH</strong> 7.00, <strong>pH</strong> 10.01<br />
- 2 batteries 1.5 V, type AA<br />
- Warranty certificate<br />
- User's manual<br />
We will only accept any equipment return within 15 days after delivery and provided<br />
it comes in its original wrapping.<br />
Installation<br />
Before using the ph meter, it is convenient for you to familiarize with its components<br />
and basic essentials, as well as with its control functions.<br />
PLEASE READ THOROUGHLY THE INSTRUCTIONS BEFORE CONNECTING<br />
AND OPERATING WITH THIS EQUIPMENT WITH THE AIM OF ACHIEVING<br />
THE HIGHEST FEATURES AND THE MAXIMUM DURABILITY OF THE INS-<br />
TRUMENT.<br />
CASTELLANO<br />
NOTA: Si no va a emplear el equipo durante un largo periodo tiempo retire las pilas.<br />
Conexión del electrodo. Conecte el electrodo de <strong>pH</strong> (8) en el conector situado en la parte<br />
superior del equipo (7).<br />
Encienda el <strong>pH</strong> metro presionando el botón ON/OFF (1).<br />
<br />
Ajuste de la temperatura de trabajo<br />
El <strong>pH</strong> metro Nahita 902/4 dispone de un mecanismo de compensación de temperatura<br />
mediante la introducción del valor de temperatura a través del teclado. Para ello:<br />
En el modo de medida presione MODE (2) hasta que el símbolo ºC comience a parpadear.<br />
Introduzca el valor exacto de la temperatura de la solución mediante los botones<br />
(4) y (5).<br />
Presione ENTER (3) para confirmar el dato.<br />
<br />
<br />
<br />
<br />
<br />
<br />
<br />
<br />
Calibración del <strong>pH</strong> metro<br />
Nota: Se recomienda realizar la calibración del <strong>pH</strong> metro antes de comenzar a usar el<br />
equipo, cuando observe variaciones importantes en la medida, después de cada cambio de<br />
electrodo, tras largo tiempo de no uso o uso prolongado con tan sólo disoluciones de<br />
<strong>pH</strong>12, con soluciones orgánicas o con soluciones que contienen flúor.<br />
Preparación de los patrones:<br />
El <strong>pH</strong> metro incluye las siguientes soluciones patrón: <strong>pH</strong> 4.01 (25 ºC), <strong>pH</strong> 7.00 (25 ºC),<br />
<strong>pH</strong> 10.01 (25 ºC).<br />
Vierta el contenido de un sobre de solución tampón en un vaso limpio y añada unos 100<br />
mL de agua destilada.<br />
Disuelva bien. Si ve que no se disuelve, añada un poco más de agua.<br />
Una vez disuelto, vierta el contenido a un matraz aforado de 250 mL y enrase con agua<br />
destilada.<br />
Calibración:<br />
Conecte el electrodo con el equipo.<br />
Encienda el <strong>pH</strong> metro pulsando el botón ON/OFF (1). El equipo entrará en el modo de<br />
medida mV.<br />
Presione MODE (2) para realizar el ajuste de la temperatura. Cuando el símbolo ºC parpadee<br />
introduzca la temperatura de la solución patrón mediante los botones (4) y<br />
(5). Confirme el dato pulsando ENTER (3).<br />
Presione MODE (2) de nuevo y verá cómo en la parte inferior de la pantalla aparece<br />
STD1. Éste es el primer punto de calibración.<br />
NOTA: Si no necesita calibrar el equipo, pulse MODE (2) dos veces más y entrará en el<br />
modo de medida <strong>pH</strong>.<br />
Lave el electrodo con agua destilada y sumérjalo en la solución de calibración.<br />
NOTA: Para el primer punto de calibración emplee la solución correspondiente a <strong>pH</strong><br />
neutro 7.00<br />
Cuando el valor mostrado en pantalla sea estable, pulse ENTER (3).<br />
Presione MODE (2) y en la parte inferior de la pantalla observará STD2; es el segundo<br />
Revisión 1, Junio-07 Manual de instrucciones 50902040 Pág. 5
CASTELLANO<br />
punto de calibración.<br />
Lave el electrodo con agua destilada y sumérjalo en la solución de calibración.<br />
NOTA: Para el segundo punto de calibración emplee la solución de <strong>pH</strong> 4.01 si va a trabajar<br />
en un rango de <strong>pH</strong> ácido o bien la solución de <strong>pH</strong> 10.1 si va a trabajar en un rango<br />
de <strong>pH</strong> básico.<br />
Cuando el valor mostrado en pantalla sea estable, pulse ENTER (3). El equipo ya está<br />
calibrado.<br />
Para pasar al modo de medida de <strong>pH</strong> pulse MODE (2); en la parte inferior de la pantalla<br />
visualizará MEAS. El <strong>pH</strong> metro ya está listo para realizar mediciones.<br />
Determinación del <strong>pH</strong> o mV<br />
NOTA: Antes de realizar las mediciones, asegúrese de que el equipo está calibrado.<br />
Encienda el <strong>pH</strong> metro pulsado el botón ON/OFF (1).<br />
Seleccione el modo de medida <strong>pH</strong> o mV mediante el botón MODE (2). En la parte inferior<br />
de la pantalla visualizará MEAS.<br />
Lave con agua destilada el electrodo y séquelo suavemente con papel de filtro o celulosa.<br />
Sumerja el electrodo unos 4 cm en la solución a analizar. Remueva ligeramente la solución<br />
con el electrodo y espere a que la medición se estabilice. La lectura del <strong>pH</strong> o mV<br />
(potencial) se mostrará en el centro de la pantalla, debajo estará el valor de temperatura<br />
que previamente habremos introducido manualmente.<br />
NOTA: Si se analizan muchas muestras diferentes sucesivamente, se recomienda limpiar<br />
el electrodo minuciosamente con agua destilada para evitar la contaminación cruzada.<br />
<br />
Seguridad<br />
El <strong>pH</strong> metro debe ser utilizado por personal cualificado previamente, que conozca el<br />
equipo y su manejo mediante el manual de uso.<br />
Para cualquier manipulación de limpieza, verificación de los componentes o sustitución<br />
de cualquier componente es imprescindible apagar el equipo.<br />
No intente repararlo usted mismo; además de perder la garantía puede causar daños en<br />
el funcionamiento general del equipo, así como lesiones a personas (quemaduras, heridas...).<br />
Procure que no entre agua en el cuadro de controles, aunque éste se encuentre debidamente<br />
aislado.<br />
Fabricado según las directivas europeas de seguridad eléctrica, compatibilidad electromagnética<br />
y seguridad en máquinas.<br />
<br />
Accesorios<br />
Disponemos de una amplia variedad de electrodos combinados de <strong>pH</strong> para adaptarse<br />
a todo tipo de aplicaciones en el ámbito de la industria química, farmacéutica, enseñanza,<br />
etc. Todos los electrodos presentan conector BNC y un rango de medida de <strong>pH</strong> 0-14.<br />
INDEX OF LANGUAGES<br />
Spanish<br />
English<br />
INDEX OF CONTENTS<br />
1. USES OF THE INSTRUMENT<br />
2. DESCRIPTION<br />
3. TECHNICAL SPECIFICATIONS<br />
4. INSTALLATION / SETTING UP<br />
5. MAINTENANCE AND CLEANING<br />
ANNEX I: CE CERTIFICATE<br />
1. USES OF THE INSTRUMENT<br />
ENGLISH<br />
2-9<br />
10-16<br />
The Nahita <strong>pH</strong> meter 902/4 is a light, compact and easy-to-use portable instrument ideal<br />
for in situ <strong>pH</strong> determinations. It presents an easy-to-read liquid crystal display that can be<br />
illuminated to facilitate readings in dark places and a damp-proofed membrane keypad<br />
with 5 functional keys to access to all the instrument possibilities.<br />
The equipment, supplied with a glass body combined electrode, can perform <strong>pH</strong> and<br />
voltage readings of different solutions. To adapt to any application, the equipment can<br />
also be used with other type of electrodes provided they present a BNC connector. The<br />
Nahita <strong>pH</strong> meter 902/4 also presents a temperature compensation mechanism by entering<br />
data using the keypad.<br />
2. DESCRIPTION<br />
1. ON/OFF<br />
2. MODE: selection of the measuring,<br />
calibration and temperature adjustment<br />
modes.<br />
3. ENTER: parameter confirmation<br />
4. : parameter increase<br />
5. : parameter decrease<br />
6. Light button<br />
7. Electrode connector<br />
8. <strong>pH</strong> electrode<br />
1<br />
<br />
2<br />
3<br />
6<br />
7<br />
MODE<br />
ENTER<br />
ON<br />
OFF<br />
5<br />
4<br />
8<br />
11<br />
11<br />
12<br />
12<br />
15<br />
16<br />
Pág. 6 Manual de instrucciones 50902040 Revisión 1 Junio-07<br />
Version 1 June-07 Instruction manual 50902040 Page 11
ENGLISH<br />
Thank you for choosing this equipment. We sincerely wish that you enjoy your Nahita<br />
portable <strong>pH</strong> meter 902/4. We highly recommend looking after this equipment according<br />
to what is stated in this manual.<br />
Nahita develops its products according to the CE marking regulations as well as<br />
emphasizing the ergonomics and security for its user.<br />
The correct using of the equipment and its good quality will permit you to enjoy this<br />
equipment for years.<br />
The improper use of the equipment can cause accidents and electric discharges, circuit<br />
breakers, fires, damages, etc. Please read the point of Maintenance, where we expose the<br />
security notes.<br />
TO GET THE BEST RESULTS AND A HIGHER DURATION OF THE EQUIP-<br />
MENT IT IS ADVISABLE TO READ THOROUGHLY THIS MANUAL BEFORE<br />
OPERATING WITH THE EQUIPMENT.<br />
Please bear in mind the following:<br />
This manual is inseparable from the Nahita portable <strong>pH</strong> meter 902/4, so it should be<br />
available for all the users of this equipment.<br />
You should carefully handle the equipment avoiding sudden movements, knocks, free<br />
fall of heavy / sharp objects on it. Avoid spilling liquids inside the equipment.<br />
Never dismantle the different pieces of the equipment to repair it yourself, since it could<br />
produce a defective use of the whole equipment and a loss of the product warranty, as<br />
well as injuries on people that handle the <strong>pH</strong> meter.<br />
To prevent fire or electric discharges avoid dry or dusty environments. In case it may<br />
happen unplug the equipment immediately.<br />
If you have any doubt about setting up, installation or functioning do not hesitate in<br />
contacting your wholesaler. You can also tell us any doubts or suggestions you have by<br />
contacting Nahita Technical Assistance Department by email to asistencia@auxilab.es or<br />
by telephone: +34 807 117 040 (0.30 Euros/min).<br />
This equipment is protected under the Warranties and consumer goods regulation<br />
(10/2003).<br />
Overhaul is not covered by the equipment warranty.<br />
Operations made by non-qualified staff will automatically produce a loss of the<br />
warranty.<br />
Accessories, including their loss are not covered by the product's warranty. The<br />
warranty neither covers piece's deterioration due to the course of time.<br />
Please make sure you keep the invoice, either for having the right to claim or asking for<br />
warranty coverage. In case you have to send the equipment to Nahita Technical Assistance<br />
Department you should enclose the original invoice or a copy as guarantee.<br />
Manufacturer reserves the right to modify or improve the manual or equipment.<br />
<br />
ATTENTION!! IF EQUIPMENTS ARE NOT PROPERLY CLEAN AND<br />
DISINFECTED THEY WOULD NOT BE ALLOWED TO REPAIR BY OUR<br />
TECHNICAL SERVICE.<br />
Page 10 Instruction manual 50902040 Version 1 June-07<br />
<br />
<br />
<br />
<br />
<br />
<br />
Electrodos con cuerpo de plástico<br />
Revisión 1, Junio-07 Manual de instrucciones 50902040 Pág. 7<br />
CASTELLANO<br />
Referencia Tª trabajo Diafragma Membrana Electrolito<br />
90900218 5-60 ºC Fibra Esférica Gel, no rellenable<br />
90900219 5-60 ºC Fibra Esférica Líquido, rellenable<br />
90900900 5-60 ºC Anillo PTFE Esférica Gel, no rellenable<br />
90900901 5-60 ºC Anillo PTFE Plana Gel, no rellenable<br />
Electrodos con cuerpo de vidrio<br />
Referencia Tª trabajo Diafragma Membrana Electrolito<br />
90900651 5-60 ºC Cerámico Esférica Líquido, rellenable<br />
90900652 5-90 ºC Cerámico Esférica Líquido, rellenable<br />
90900953 5-60 ºC Vidrio esmerilado Esférica Gel, no rellenable<br />
90900955 5-90 ºC Vidrio esmerilado Esférica Líquido, rellenable<br />
5. MANTENIMIENTO Y LIMPIEZA<br />
Para un adecuado funcionamiento del equipo es necesario seguir algunas recomendaciones.<br />
Nota: Todas las normas de utilización citadas anteriormente carecerán de valor si no<br />
se realiza una continua labor de mantenimiento.<br />
Siga las instrucciones y advertencias relativas a este manual.<br />
Tenga este manual siempre a mano para que cualquier persona pueda consultarlo.<br />
Utilice siempre componentes y repuestos originales. Puede ser que otros dispositivos<br />
sean parecidos, pero su empleo puede dañar el equipo.<br />
No intente repararlo usted mismo; además de perder la garantía puede causar daños en<br />
el funcionamiento general del <strong>pH</strong> metro, así como lesiones a personas (quemaduras, heridas...).<br />
Mantenimiento del electrodo. Enjuague el electrodo con agua limpia después de las<br />
mediciones. Si precisa una limpieza mas a fondo, limpie el electrodo con un paño y una<br />
disolución de ácido clorhídrico 0.1 M. Tras limpiar el electrodo, calibre el equipo.<br />
No emplee la luz más que lo necesario; un uso no controlado disminuirá la vida útil de<br />
las pilas.<br />
Si visualiza en pantalla LOBAT, reemplace las pilas.<br />
Si durante un largo tiempo no emplea el equipo retire las pilas.<br />
No exponga el equipo directamente a los rayos solares, la pantalla podría sufrir deficiencias<br />
limitando la vida útil del equipo.<br />
En caso de avería diríjase a su proveedor para la reparación través del Servicio Técnico<br />
de Nahita.<br />
Limpieza<br />
Para la limpieza de las de la carcasa nunca utilice estropajos o productos que puedan
ENGLISH<br />
rayar, ya que deterioran el <strong>pH</strong> metro, limitando su vida útil.<br />
Para la limpieza del equipo recomendamos se utilice un trapo libre de pelusa humedecido<br />
con agua jabonosa que no contenga productos abrasivos.<br />
¡ATENCIÓN! NO SE ADMITIRÁ NINGÚN APARATO PARA REPARAR<br />
QUE NO ESTÉ DEBIDAMENTE LIMPIO Y DESINFECTADO.<br />
INSTRUCCIONES SOBRE PROTECCIÓN DEL MEDIO<br />
AMBIENTE<br />
No se deshaga de este equipo tirándolo a la basura ordinaria cuando<br />
haya terminado su ciclo de vida; llévelo a un punto de recogida para el<br />
reciclaje de aparatos eléctricos y electrónicos. No contiene elementos peligrosos<br />
o tóxicos para el ser humano pero una eliminación no adecuada, perjudicaría al<br />
medio ambiente.<br />
Los materiales son reciclables tal como se indica en la marcación. Al reciclar materiales<br />
o con otras formas de reutilización de aparatos antiguos, esta Ud. haciendo una contribución<br />
importante a la protección del medio ambiente.<br />
Por favor póngase en contacto con la administración de su comunidad para que le asesoren<br />
sobre los puntos de recogida.<br />
ANEXO I: CERTIFICADO CE<br />
<strong>AUXILAB</strong> S.L.<br />
DECLARACIÓN CE DE CONFORMIDAD<br />
<strong>pH</strong> <strong>METRO</strong> PORTÁTIL 902/4 de Auxilab,S.L a la Directiva<br />
de Máquinas (89/392/CEE modificada) y a las reglamentaciones<br />
adoptadas para su transposición<br />
NOMBRE DEL FABRICANTE / IMPORTADOR:<br />
<strong>AUXILAB</strong>, S.L.<br />
DIRECCIÓN: Polígono Morea Norte, 8<br />
31191 Beriáin (Navarra)<br />
DECLARAMOS QUE:<br />
Están diseñados y fabricados de acuerdo a:<br />
CONDUCTÍ<strong>METRO</strong> NAHITA 902/4<br />
REFERENCIA 50902040<br />
ENGLISH<br />
Directiva 89/392/CEE, incluidas las modificaciones de la misma, y las reglamentaciones<br />
nacionales que la transponen.<br />
Directiva 89/336/CEE modificada sobre compatibilidad electromagnética<br />
Y que se han aplicado las siguientes normas armonizadas (o parte de ellas):<br />
UNE 292-1/-2/-2/A1,UNE-EN 1050, UNE-EN 614-1,UNE-EN 1037, UNE-EN<br />
1088, UNE-EN 547, UNE-EN 953, UNE-EN 294, UNE-EN 418, UNE-EN 894-1, UNE-<br />
EN 894-2, UNE-EN 954-1, UNE-EN 60204-1, UNE 61010-1/A2, UNE-EN61010-2-<br />
051.EN 894-2, UNE-EN 954-1, UNE-EN 60204-1, UNE 61010-1/A2, UNE-EN61010-2-<br />
051.<br />
BERIAIN a 16 de JULIO 2007<br />
Fdo: ALFONSO AINCIBURU SANZ<br />
DIRECTOR/GERENTE<br />
Polígono Morea Norte, 8 31191 Beriain (Navarra) - Spain. Tel. 948 310 513 Fax 948 312 071<br />
Internet: www.auxilab.es · Email: correo@auxilab.es<br />
Pág. 8 Manual de instrucciones 50902040 Revisión 1 Junio-07<br />
Revisión 1, Junio-07 Manual de instrucciones 50902040 Pág. 9