Manual de Instalación de la Compuerta Giratoria Serie Eagle-200 ...
Manual de Instalación de la Compuerta Giratoria Serie Eagle-200 ...
Manual de Instalación de la Compuerta Giratoria Serie Eagle-200 ...

Create successful ePaper yourself
Turn your PDF publications into a flip-book with our unique Google optimized e-Paper software.
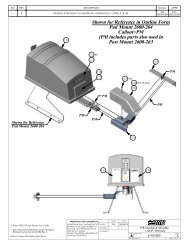
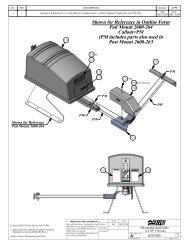
Operadores <strong>de</strong> <strong>Compuerta</strong> / <strong>Serie</strong> <strong>Eagle</strong>-<strong>200</strong> / <strong>Eagle</strong>-100<br />
Conexión <strong>de</strong> <strong>la</strong> Corriente<br />
!CUIDADO!<br />
Asegúrese que el interruptor <strong>de</strong> circuito para <strong>la</strong> potencia <strong>de</strong> entrada <strong>de</strong> línea esté apagado antes <strong>de</strong> conectar<strong>la</strong> potencia <strong>de</strong> entrada a <strong>la</strong> unidad.<br />
Conecte <strong>la</strong> potencia <strong>de</strong> entrada <strong>de</strong> línea 120 VAC,<br />
15A a los cables suministrados en <strong>la</strong> caja <strong>de</strong><br />
conexiones <strong>de</strong>l interruptor <strong>de</strong> corriente localizado<br />
cerca <strong>de</strong> <strong>la</strong> parte inferior <strong>de</strong>l operador.<br />
A un <strong>la</strong>do <strong>de</strong>l operador se ha<br />
proporcionado tomacorriente auxiliar<br />
<strong>de</strong> 120 VAC, 15A,<br />
Advertencia: <strong>Eagle</strong> Access Control Systems, Inc. no<br />
es responsable <strong>de</strong> investigar y cumplir con los<br />
códigos <strong>de</strong> construcción locales. Asegúrese <strong>de</strong><br />
verificar estos códigos antes <strong>de</strong> <strong>la</strong> insta<strong>la</strong>cion.<br />
Todas <strong>la</strong>s unida<strong>de</strong>s <strong>de</strong>ben ponerse a tierra a<strong>de</strong>cuadamente<br />
Los cables están codificados por color <strong>de</strong> <strong>la</strong> manera siguiente:<br />
Negro - 120 VAC / Potencia <strong>de</strong> Entrada <strong>de</strong> Línea<br />
B<strong>la</strong>nco - Entrada Neutral<br />
Ver<strong>de</strong> - Entrada <strong>de</strong> Tierra (<strong>de</strong> un método <strong>de</strong> puesta a tierra aprobado)<br />
!<strong>Eagle</strong> recomienda insta<strong>la</strong>r protección contra sobrevoltaje en todos los operadores!<br />
Insta<strong>la</strong>ción <strong>de</strong>l Circuito Cerrado <strong>de</strong> Retroseso / Salida<br />
El propósito <strong>de</strong> un circuito cerrado <strong>de</strong> retroceso es evitar que <strong>la</strong> compuerta se cierre contra un vehículo qu e está<br />
saliendo o parado en medio <strong>de</strong>l área <strong>de</strong> <strong>la</strong> compuerta. El propósito <strong>de</strong>l circuito cerrado <strong>de</strong> salida es abrir<br />
automáticamente <strong>la</strong> compuerta cuando un vehículo se acerque a <strong>la</strong> salida.<br />
Operación <strong>de</strong>l Circuito Cerrado <strong>de</strong> Salida<br />
CIRCUITO CERRADO EN RETROCESO<br />
CIRCUITO CERRADO DE SALIDA<br />
ENTRADA<br />
SALIDA<br />
CIRCUITO CERRADO DE RETROCESO<br />
CIRCUITO CERRADO FANTASMA<br />
Corte <strong>de</strong>l Ciruito Cerrado<br />
Cables Torcidos<br />
Los cables <strong>de</strong>ben<br />
estar <strong>de</strong>ben estar<br />
envueltos <strong>de</strong>ntro <strong>de</strong><br />
<strong>la</strong> ranura 3 veces.<br />
Una vez que Ud.<br />
haya terminado el<br />
proceso, llene <strong>la</strong>s<br />
ranuras con un sello<br />
a<strong>de</strong>cuado.<br />
DEBEN USARSE UN SELLADOR ADECUADO<br />
EN LOS CORTES DEL CIRCUITO CERRADO<br />
HILERAS DE CABLES EN EL<br />
CORTE DEL CIRCUITO CERRADO