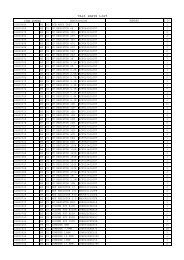
SW65 PARTS LIST - Ibanez
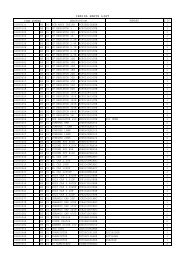
SW65 PARTS LIST - Ibanez
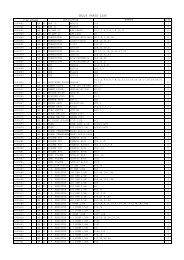
SW65 PARTS LIST - Ibanez

Create successful ePaper yourself
Turn your PDF publications into a flip-book with our unique Google optimized e-Paper software.
Foreword<br />
Thank you for purchasing the IBANEZ <strong>SW65</strong> bass amp. Read this<br />
manual thoroughly prior to using your amplifier in order to get the most<br />
out of the functions available. Then keep the manual in a safe place.<br />
Features<br />
The amp head of the <strong>SW65</strong> features a 65W output, and the speaker<br />
section uses a powerful IBANEZ original 12-inch POWER JAM 1204<br />
speaker together with a PJPT85 piezo horn tweeter, giving you the<br />
ultimate in sound quality and convenience.<br />
The pre-amp EQ is a newly designed 4-band active EQ with ±15 dB of<br />
range, covering a versatile range of performance needs and allowing<br />
wide yet detailed adjustments. The <strong>SW65</strong> also features an internal<br />
limiter, creating punchy low-end with minimal distortion.<br />
Precautions during use<br />
• Do not subject the amplifier to shocks by dropping, etc., or treat it<br />
roughly in any way.<br />
• Place the amplifier carefully in a stable position. The sound from the<br />
amplifier will vary depending on how and where it is set up.<br />
• Do not use or store the amplifier in locations where it is subject to<br />
direct sunlight or in environments that experience extreme temperatures<br />
and humidity levels.<br />
• Reduce the volume to ’0’ or switch off the power supply when connecting<br />
the guitar shielded cable and the effects or other cables required<br />
for external connection. Note that the noise generated when<br />
plugs are inserted and removed may cause severe damage to the<br />
equipment.<br />
• To avoid the danger of fire, do not place containers of liquid on the<br />
amp.<br />
• As long as the <strong>SW65</strong> is connected to an electrical outlet, it is not<br />
completely insulated from the power supply even if the power switch<br />
is turned off. When you are not using it, leave the power turned off. If<br />
you will not be using the <strong>SW65</strong> for an extended period, leave the power<br />
cable disconnected.<br />
Names and functions for each part<br />
1. INPUT jack<br />
This is a 1/4" phone jack input. Use a shielded guitar cable to connect your<br />
electric bass guitar to this jack.<br />
2. 10 dB GAIN switch<br />
When you are using a bass that has a low output, or to intensify the effect of the<br />
limiter, you can turn the 10 dB GAIN switch ON to boost the pre-amp gain by 10<br />
dB.<br />
3. GAIN control<br />
This controls the gain of the preamp. Raising the level will increase the volume,<br />
but after you pass a certain level, a limiter will operate to prevent distortion, and<br />
the level will not increase very much. If you continue raising this control, the<br />
limiter will apply more strongly, producing an effect as though the threshold were<br />
lowered. Adjust this control in conjunction with the EQ and the VOLUME control<br />
to get the sound you want.<br />
4. BASS control<br />
This is a shelving-type equalizer for the low frequencies. It boosts or cuts the<br />
level of the 100 Hz region in a range of ±15 dB.<br />
5. MIDDLE control<br />
This is the mid-frequency equalizer. It boosts or cuts the level of the 600 Hz<br />
region in a range of ±15 dB.<br />
6. TREBLE control<br />
This is a shelving-type equalizer for the high frequencies. It boosts or cuts the<br />
level of the region at 4 kHz and above in a range of ±15 dB.<br />
7. PRESENCE control<br />
This is the ultra-high frequency equalizer. It boosts or cuts the level of the 9.4<br />
kHz region in a range of ±15 dB.<br />
8. VOLUME control<br />
This adjusts the output level of the amp. Raising the level will increase the volume,<br />
but after you pass a certain level, a limiter will operate to prevent distortion,<br />
and the level will not increase very much. If you continue raising this control,<br />
the limiter will apply more strongly, producing an effect as though the threshold<br />
were lowered. Simultaneously, it also controls the output level of the CD INPUT.<br />
9. CD INPUT<br />
These are stereo phono input jacks that can be connected to a portable CD/MD/<br />
cassette player or to the headphone output of your stereo system. Use the VOL-<br />
UME control to adjust the volume. These inputs are not suitable for connection<br />
to LINE OUT jacks.<br />
5<br />
ENGLISH