
You also want an ePaper? Increase the reach of your titles
YUMPU automatically turns print PDFs into web optimized ePapers that Google loves.
CONTROLS AND SETTINGS<br />
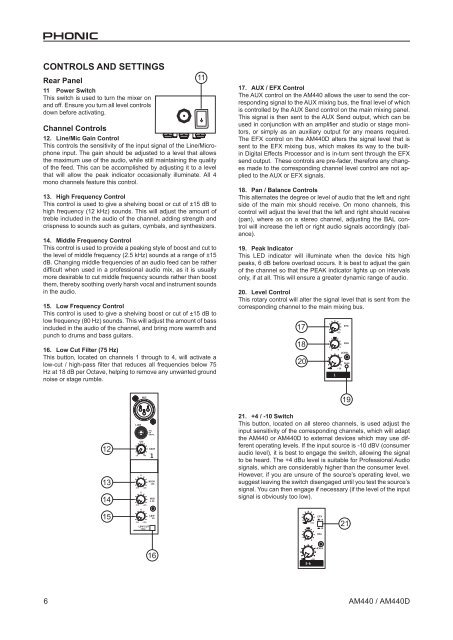
Rear Panel<br />
11 Power Switch<br />
This switch is used to turn the mixer on<br />
and off. Ensure you turn all level controls<br />
down before activating.<br />
Channel Controls<br />
12. Line/Mic Gain Control<br />
This controls the sensitivity of the input signal of the Line/Microphone<br />
input. The gain should be adjusted to a level that allows<br />
the maximum use of the audio, while still maintaining the quality<br />
of the feed. This can be accomplished by adjusting it to a level<br />
that will allow the peak indicator occasionally illuminate. All 4<br />
mono channels feature this control.<br />
13. High Frequency Control<br />
This control is used to give a shelving boost or cut of ±15 dB to<br />
high frequency (12 kHz) sounds. This will adjust the amount of<br />
treble included in the audio of the channel, adding strength and<br />
crispness to sounds such as guitars, cymbals, and synthesizers.<br />
14. Middle Frequency Control<br />
This control is used to provide a peaking style of boost and cut to<br />
the level of middle frequency (2.5 kHz) sounds at a range of ±15<br />
dB. Changing middle frequencies of an audio feed can be rather<br />
difficult when used in a professional audio mix, as it is usually<br />
more desirable to cut middle frequency sounds rather than boost<br />
them, thereby soothing overly harsh vocal and instrument sounds<br />
in the audio.<br />
15. Low Frequency Control<br />
This control is used to give a shelving boost or cut of ±15 dB to<br />
low frequency (80 Hz) sounds. This will adjust the amount of bass<br />
included in the audio of the channel, and bring more warmth and<br />
punch to drums and bass guitars.<br />
16. Low Cut Filter (75 Hz)<br />
This button, located on channels 1 through to 4, will activate a<br />
low-cut / high-pass filter that reduces all frequencies below 75<br />
Hz at 18 dB per Octave, helping to remove any unwanted ground<br />
noise or stage rumble.<br />
17. AUX / EFX Control<br />
The AUX control on the <strong>AM440</strong> allows the user to send the corresponding<br />
signal to the AUX mixing bus, the final level of which<br />
is controlled by the AUX Send control on the main mixing panel.<br />
This signal is then sent to the AUX Send output, which can be<br />
used in conjunction with an amplifier and studio or stage monitors,<br />
or simply as an auxiliary output for any means required.<br />
The EFX control on the <strong>AM440</strong>D alters the signal level that is<br />
sent to the EFX mixing bus, which makes its way to the builtin<br />
Digital Effects Processor and is in-turn sent through the EFX<br />
send output. These controls are pre-fader, therefore any changes<br />
made to the corresponding channel level control are not applied<br />
to the AUX or EFX signals.<br />
18. Pan / Balance Controls<br />
This alternates the degree or level of audio that the left and right<br />
side of the main mix should receive. On mono channels, this<br />
control will adjust the level that the left and right should receive<br />
(pan), where as on a stereo channel, adjusting the BAL control<br />
will increase the left or right audio signals accordingly (balance).<br />
19. Peak Indicator<br />
This LED indicator will illuminate when the device hits high<br />
peaks, 6 dB before overload occurs. It is best to adjust the gain<br />
of the channel so that the PEAK indicator lights up on intervals<br />
only, if at all. This will ensure a greater dynamic range of audio.<br />
20. Level Control<br />
This rotary control will alter the signal level that is sent from the<br />
corresponding channel to the main mixing bus.<br />
17<br />
18<br />
20<br />
21. +4 / -10 Switch<br />
This button, located on all stereo channels, is used adjust the<br />
input sensitivity of the corresponding channels, which will adapt<br />
the <strong>AM440</strong> or <strong>AM440</strong>D to external devices which may use different<br />
operating levels. If the input source is -10 dBV (consumer<br />
audio level), it is best to engage the switch, allowing the signal<br />
to be heard. The +4 dBu level is suitable for Professional Audio<br />
signals, which are considerably higher than the consumer level.<br />
However, if you are unsure of the source’s operating level, we<br />
suggest leaving the switch disengaged until you test the source’s<br />
signal. You can then engage if necessary (if the level of the input<br />
signal is obviously too low).<br />
19<br />
21<br />
<br />
<strong>AM440</strong> / <strong>AM440</strong>D